Get out of the preparation and into the picture fun: In parts 2-3/14 of our Christmas Affinity Photo series, you'll learn how to convert your images to black and white and give them a shiny metallic look. Do you already know these tricks?
Part 2: Black and white conversion in Affinity Photo
In the second part of the Affinity Photo tutorial, trainer Marco Kolditz starts with the conversion of the motif "The Christmas Angel". The first step is to convert the original image to black and white . He uses the Black & White adjustment and then refines it.
You will certainly need the black and white conversion again and again to redesign your own photos and images accordingly. Black and white is still a popular option, for example when you want to create a romantic, classic or dreamy look.
You'll see: Affinity Photo makes "color removal" pretty easy for you. The program also offers you wonderful setting options with which you can individually adjust the black and white. The best thing is that the technique shown works non-destructively, so you can make changes later if necessary.
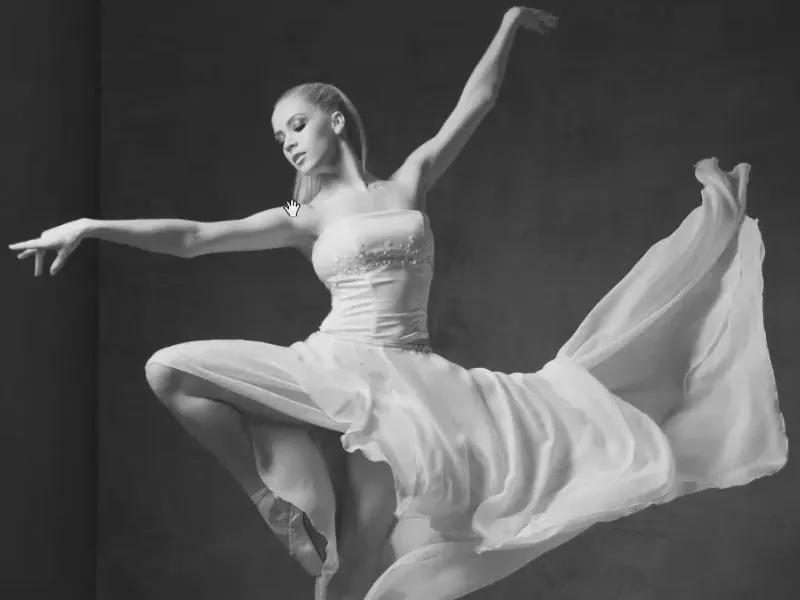
Here's what you'll learn in part 2 of the Affinity Photo tutorial
- Rename layers
- Convert colored images to black and white non-destructively in Affinity Photo
- How to customize a black and white conversion
Importing an image into Affinity Photo
Let's start by building the compositing step by step in Affinity Photo . First, let's take care of the dancer. We want to edit it and then crop it.
We can either search for and open the image of the dancer on the hard disk via File>Open... (1). Or we can drag the image from Windows Explorer into Affinity Photo (2).
In the layer palette on the right-hand side, the image is displayed as a background layer (3). Double-click on the name to rename the layer, for example to "Dancer".
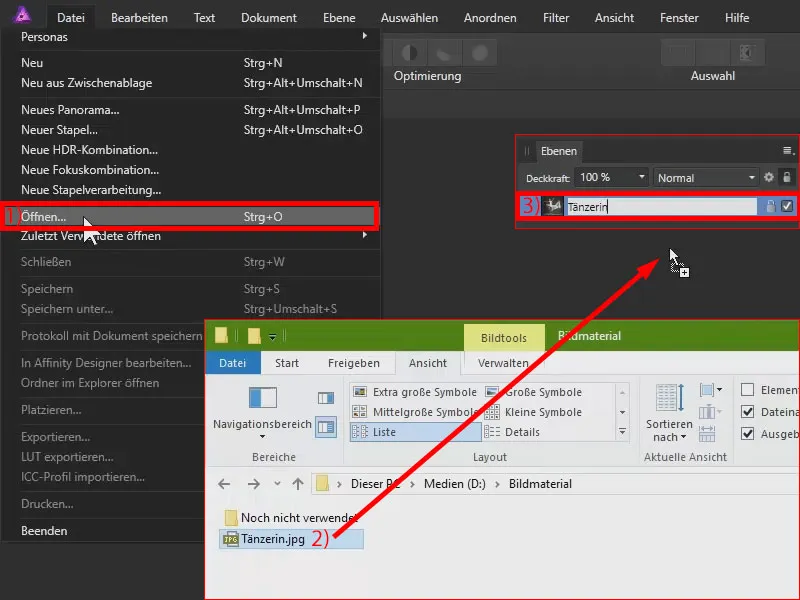
Adjusting black and white
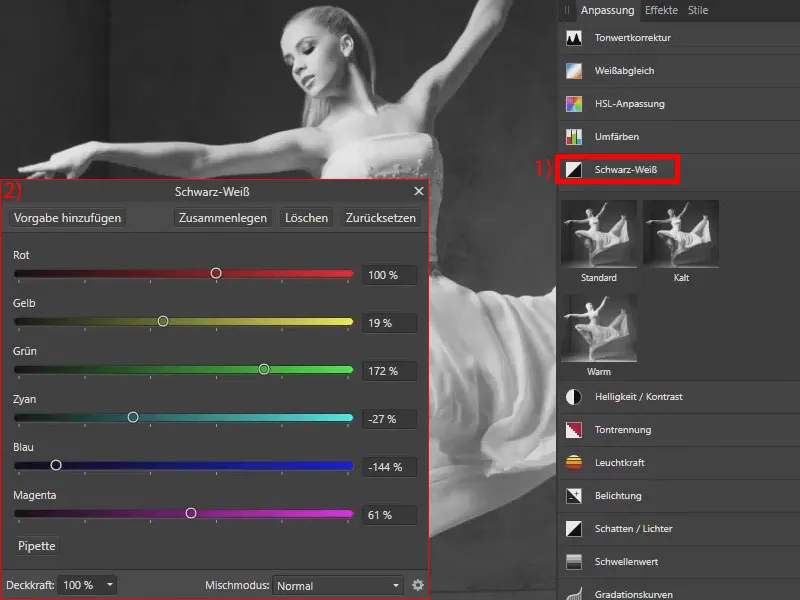
In the first step, I make sure that we get a black and white image. Later on, the skin and the dress should look a little more metallic, as this dancer is to be placed like a kind of statue inside a snow globe. But first to the black and white conversion:
In the Adjustment panel, I select the Black & White item (1). This converts the image directly and opens a dialog box (2). You can use the sliders for red, yellow, green and so on to refine the black and white conversion . I pull yellow, blue and magenta down a little and add a little to the green (settings at 2).
The nice thing is that we always see a live preview of the effect. I like my settings like this, so I can now close the Black & White dialog box.
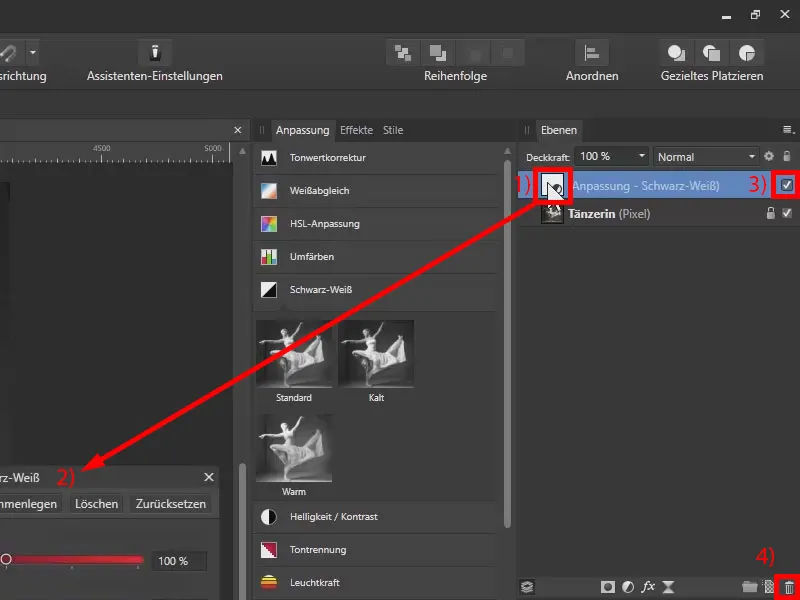
Non-destructive work and deleting layers
The black and white conversion was non-destructive as we worked with a separate adjustment layer. If you double-click on this preview image (1), you can call up the dialog box again at any time and correct the settings of the black and white layer (2).
You can also click on this checkmark (3) to hide and show the changes you have made. Deleting would work like this: With the adjustment layer active, you can press the delete buttonand delete the black and white layer again in this way. Alternatively, click on the layer, hold down the mouse button and drag the layer to the trash can icon (4). However, we will keep the black and white layer for compositing.
Black and white conversion in Affinity Photo - summary part 2
- Rename your layers by double-clicking on the respective layer - this gives you a better overview and helps you especially with more complex composings with many layers.
- Adjustment>Black & White: Convert the selected image layer into a black and white image.
- Use the settings in the black and white conversion dialog box to make further adjustments.
- In general: If possible, work with non-destructive methods so that you can correct changes afterwards.
Part 3: Creating the metal look - tonal range and tonal correction
After the image with the dancer has been converted to black and white, you will now transform the appearance in the third part of the Affinity Photo tutorial : Using the tonal value ranges Intertones, Shadows and Highlights and with the help of tonal value correction, you will create a metallic look . Marco Kolditz explains how to proceed ...
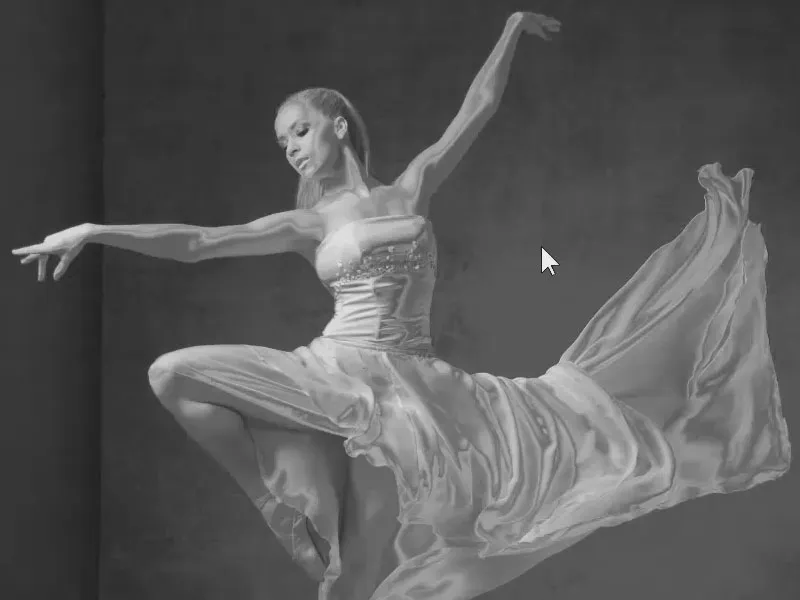
This is what you'll learn in part 3 of the Affinity Photo tutorial
- Helpful shortcuts: Copy to new layer and deselect
- Selecting intermediate tones, highlights and shadows in an image
- Working with tone correction, black level, white level and gamma
- Creating a metallic look in Affinity Photo
Working with the selection functions under tonal range
I want to make the skin and dress look more metallic. Affinity Photo offers a nice feature that allows you to select the intermediate tones, the light or dark areas of an image.
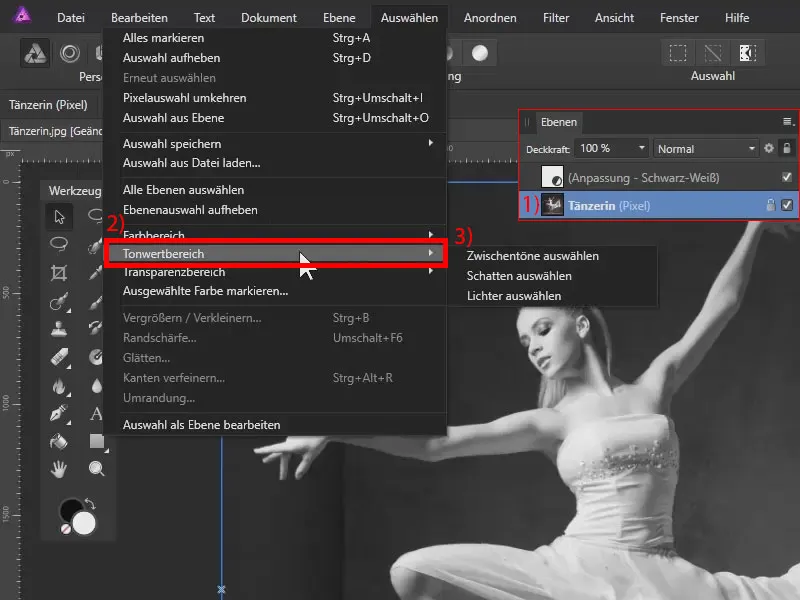
I switch to the layer with the image of the dancer (1). In the Select menu, you will find the Tonal range item (2). There you can select the various tonal ranges of the image separately (3): the intermediate tones, also known as midtones, the shadows and the highlights.
Selecting highlights
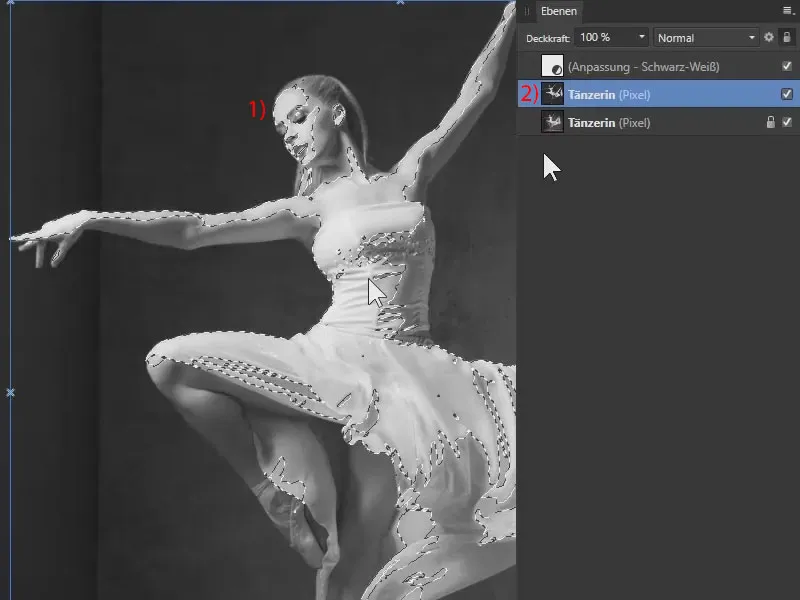
First, I select the highlights (Select>Tone range>Select highlights). You can see from the ant lines that only the bright areas of the image are actually selected (1).
I would like to copy these to a new layer. To do this, I press Ctrl+J with the dancer's layer activated. Result: I now only have the light areas of the image on a separate layer (2).
I cancel the selection again with Ctrl+D. Alternatively, this can also be done via Select>Unselect.
Select shadows
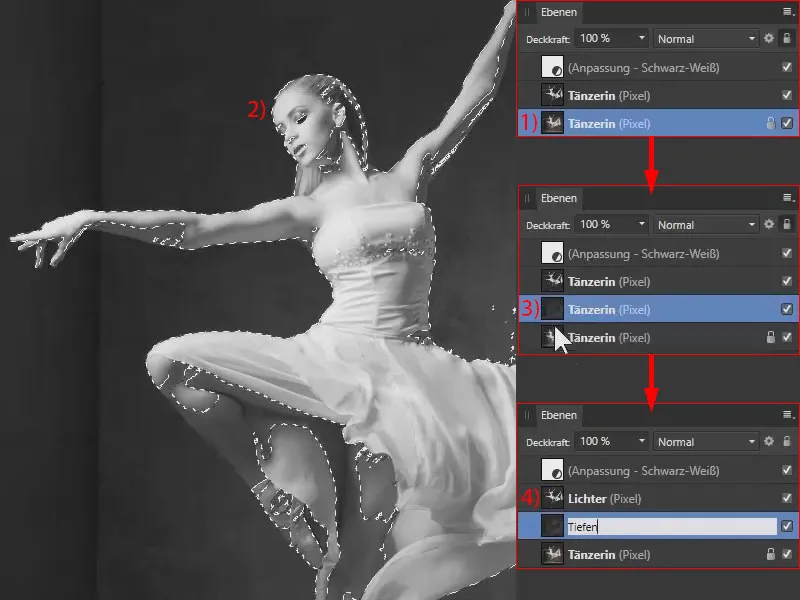
I go back to the original image (1) and this time select the shadows in the Select menu under Tonal range. As you can see, this results in a different selection that only takes into account the dark areas of the image (2). I also copy this to a separate layer using Ctrl+J (3) and deselect it again using Ctrl+D.
Important: Name your layers appropriately so that you can keep track of your layer structure. I call the layer with the highlights "Highlights" and the layer with the shadows "Shadows" (4).
Tone correction: Adjusting the highlights
We now have two separate layers, one with the highlights and one with the shadows of the image. I will now use the tone value correction to adjust these.
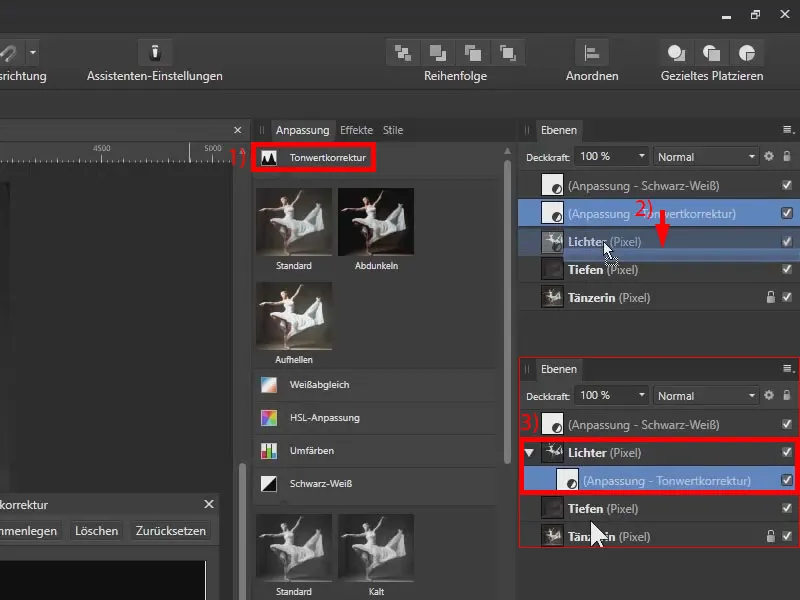
First, I'm on the "Highlights" layer, select the tonal correction (1) and drag it directly into the "Highlights" layer: as you drag, you'll see a blue bar (2) - when it appears, simply let go.
Now click on the arrow symbol next to the layer. You will see that the tone correction adjustment layer is now inside the "Highlights" layer in the form of a kind of clipping mask (3). This means that all changes to the tone value correction only affect the "Highlights" layer.
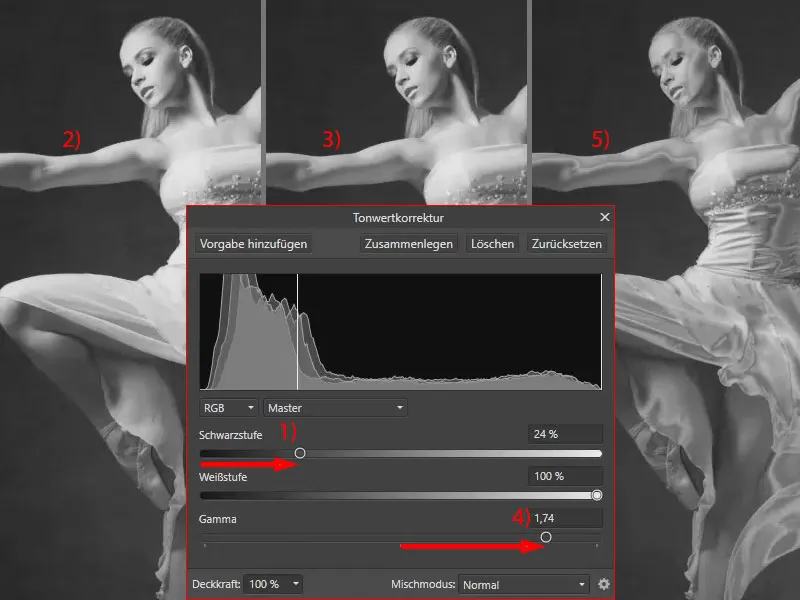
Now we move on to the tone correction control panel : to create the metallic look, I want to darken the dark areas of the "Highlights" layer. So I drag the Black Level slider a little to the right (1).
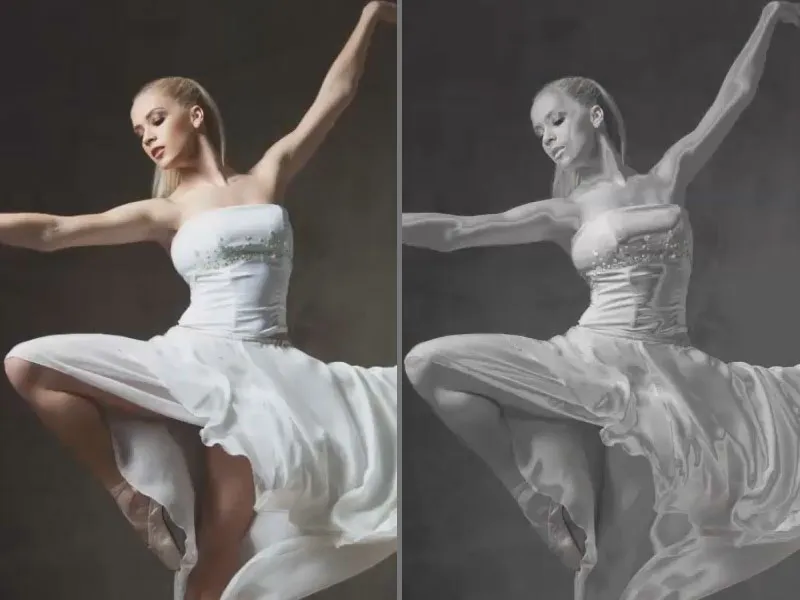
Take a look at the region in the dancer's right arm for comparison: Before the tonal correction, you can see a nice, soft gradient (2). After the tonal correction, the arm has a kind of edge and the whole thing looks a little more metallic (3).
I also pull the gamma valueto the right (4) - this already makes a clear difference (5). Now we can close the tone value correction.
Tone correction: Adjust shadows
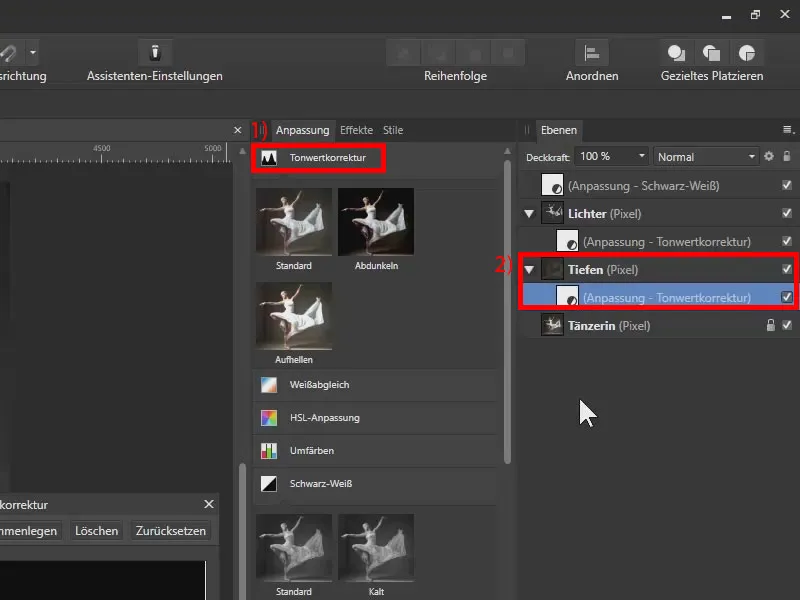
I also apply a tonal correction to the "Shadows" layer (1), which I also drag into the layer (2).
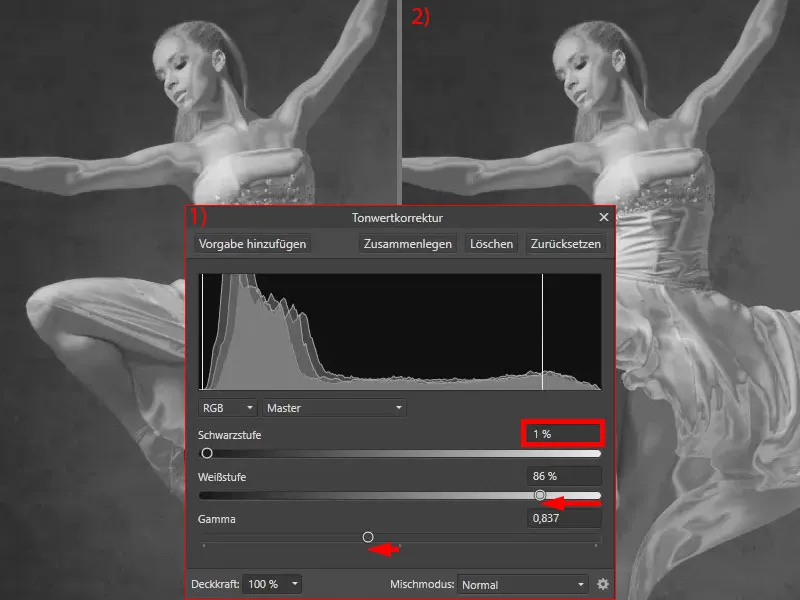
I open the tonal correction window to make the light areas lighter this time. To do this, I drag the slider for the white level and the gamma valuea little to the left. I set the black level to 1 % (settings at 1). In this way, we have created a metallic look (2). This is a little reminiscent of a kind of mercury.
Once again, the original image and the current editing stage of our compositing for comparison: So far, we have converted the image to black and white, copied the highlights and shadows to new layers using the tonal value ranges and adjusted these using the tonal value correction.
Tonal range and tonal correction in Affinity Photo - summary part 3
- Use the shortcut Ctrl+J to copy an image selection to a new layer.
- Use the shortcut Ctrl+D to cancel an image selection.
- Select>Tone range: Select the intermediate tones (or midtones), the light (highlights) or dark (shadows or depths) areas of an image.
- Drag adjustment layers such as the tonal correction into a layer so that the settings of the adjustment layer only affect this layer.
- Adjust the black level, white level and gamma in the tone correction to adjust the effect of your image and produce creative effects.
Important links for you
Missed the beginning? Click through to the first part of the tutorial. Prefer to watch the whole thing in the video? Take a look at the training. Fancy more tutorials and interested in assets for Affinity Photo? Take a look at the corresponding software category. Otherwise, if you are not yet a member of TutKit.com, we would be happy to invite you to a free, no-obligation trial.
> To parts 4 and 5 of the tutorial
The content of this article is based on a tutorial by our trainer Marco Kolditz:
