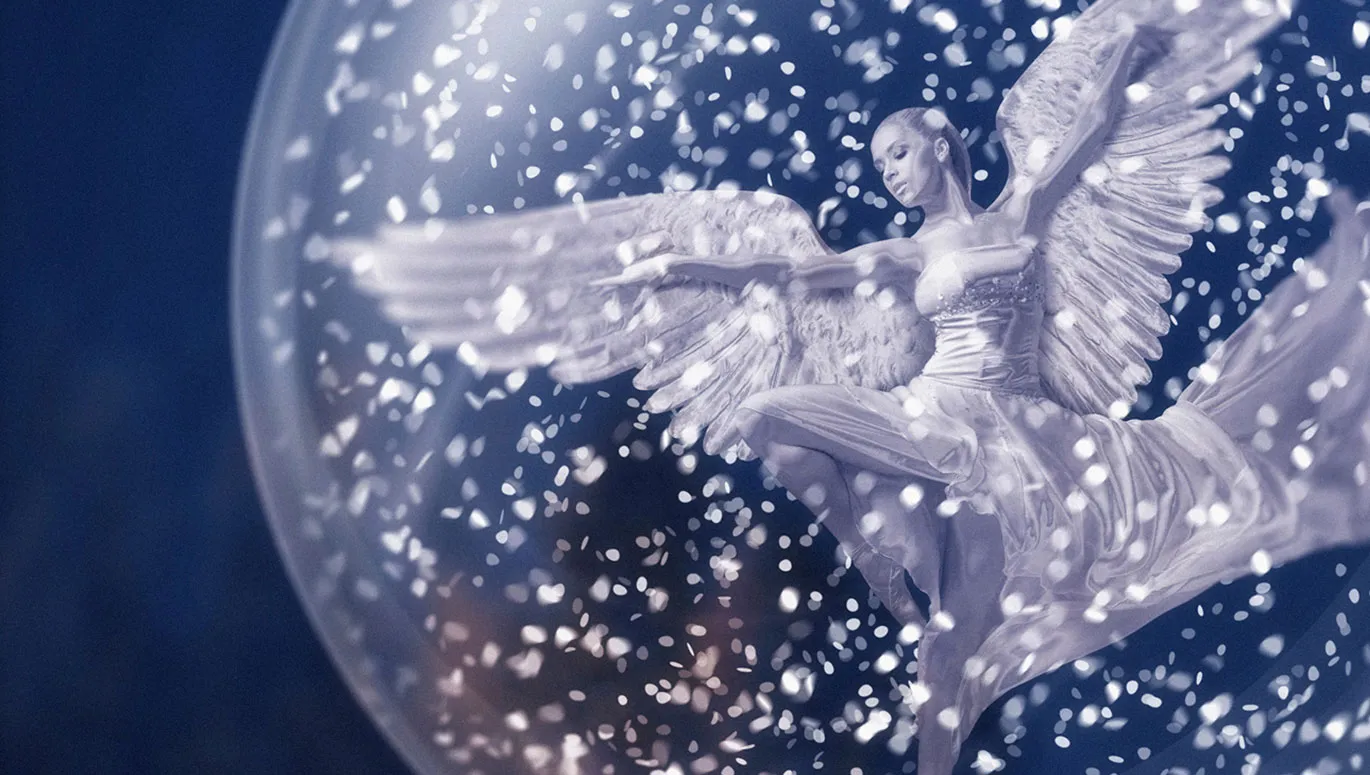
Cut out subjects in Affinity Photo - using the QuickMask and the Paint Brush to do this with the dancer. In parts 6-8/14 of our tutorial series, you will now learn a different method: Pick up your pencil and use paths to give the angel its well-deserved wings.
Part 6: Cut out the wings - create a path with the drawing pencil
Go for the second motif you need for the composing. Before you crop the wings, Marco Kolditz will explain to you how to get started with cropping using the Pen toolin Affinity Photo . After working with the paintbrush and QuickMask, you will learn a second technique for clipping. The final step is a path-based selection , which will be refined in the subsequent tutorial.
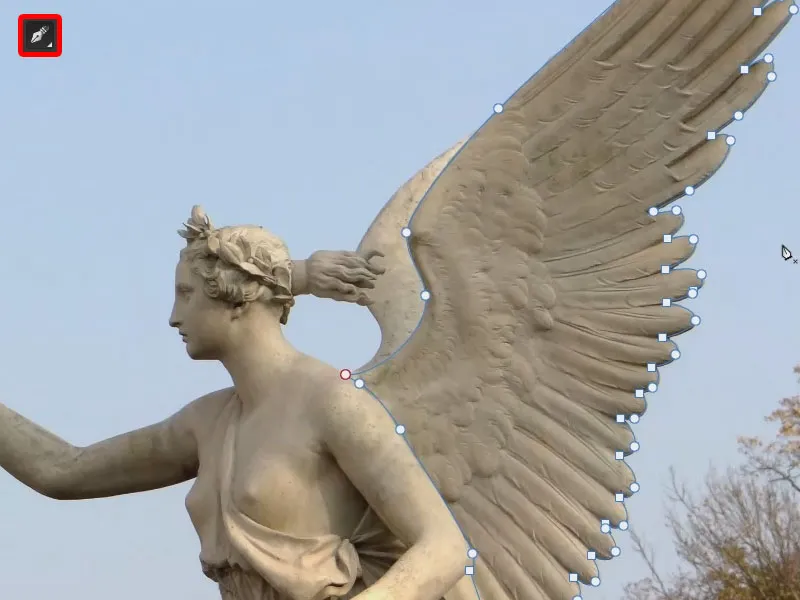
This is what you will learn in part 6 of the Affinity Photo tutorial
- Create a path using the drawing pencil to prepare a crop
- The basics of the pen tooland how to use it in practice
- Swap anchor points to create curves and corners
Clipping with the drawing pen - the basics explained
Let's take care of the wings. I chose this image and loaded it into the background layer in Affinity Photo. We could activate the QuickMask again and select the wing using the paintbrush tool.
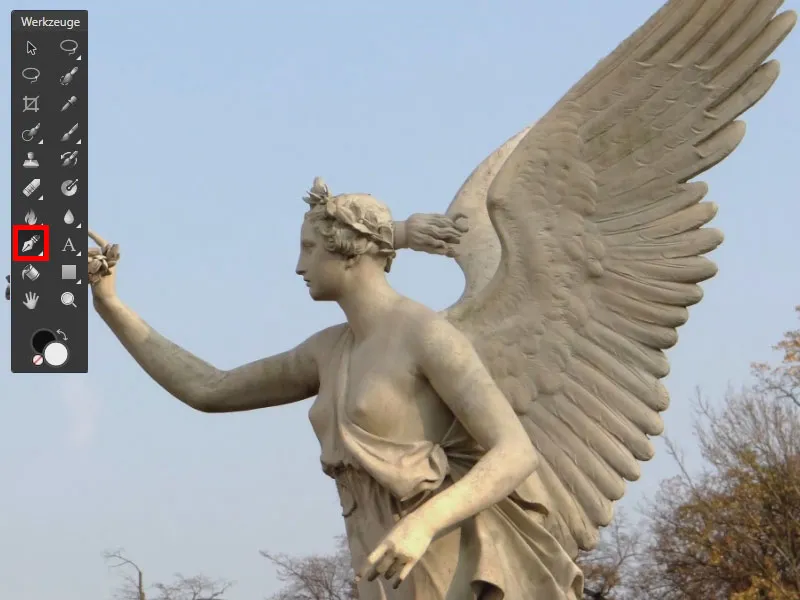
In this case, however, I prefer to use the Pen toolor work with paths , because we have nice curves here that are easy to select with paths. I grab the pen tool. It is hidden behind this icon and can also be activated with P:
I zoom into the image. If I click on a point in the image with the drawing pen, this small rectangle (1) appears. You can't see anything special in the layer palette yet. As soon as I set a second point, I have two anchor points and a line between them (2). There is now a curve layer in the layer pal ette, which is basically a path layer . If I set further anchor points and complete the whole thing, I have created a closed path (3).
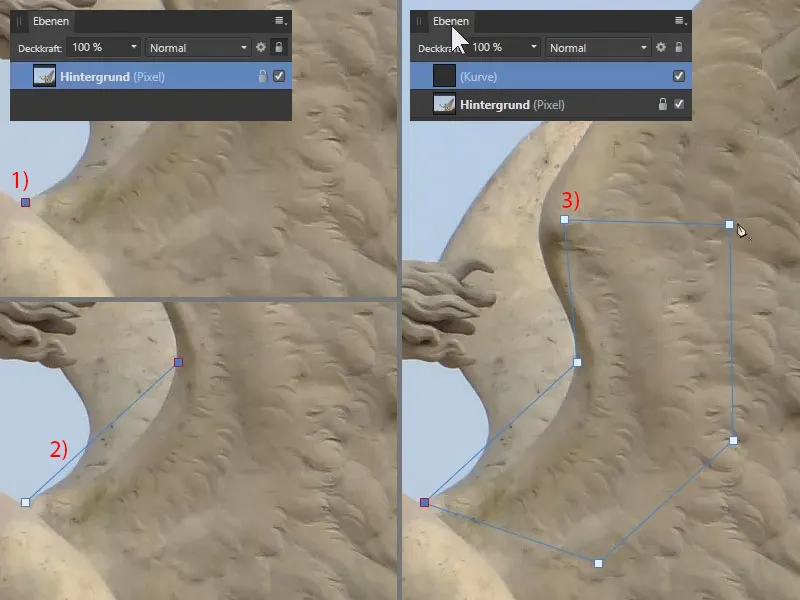
The anchor points are angular. If I want a rounding, i.e. curves, I have to click and drag at the next anchor point (1). This way I can create a curve. Small arms emerge from the anchor point. In addition, the anchor point is no longer square, but circular.
If I click and drag again (2), I can see beautiful curves that merge into the other curves. So you don't see any edges and each of these anchor points has two arms.
If I want to move these individual anchor points, regardless of whether they are round or square , I hold down the Ctrl key. The mouse cursor (3) changes accordingly - I click on an anchor point and drag. This allows me to place the anchor points where I want them.
This also applies to the arms for such curves. If I click and drag an arm while holding down the Ctrl key(4), I can change the curve. Both arms move towards each other so that there is no unsightly edge.
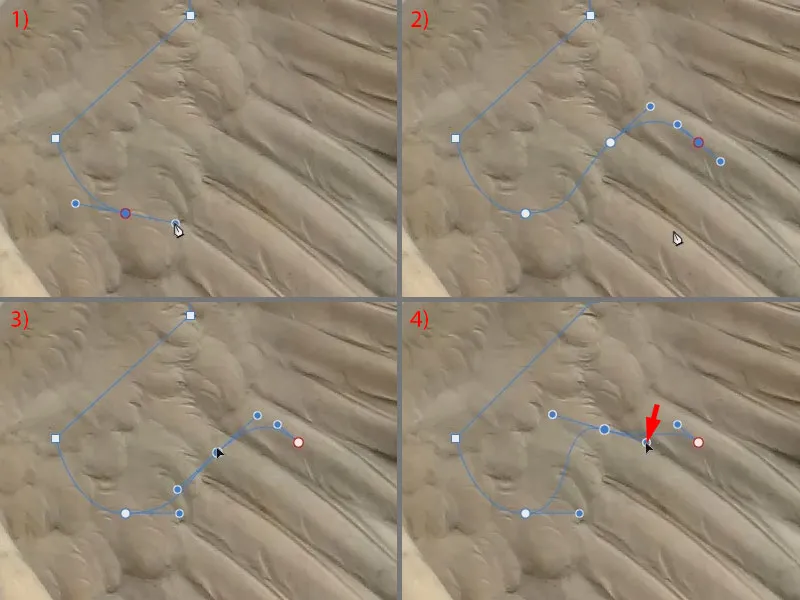
If I want this to be a curve and the whole thing to become an edge, I have to hold down the Alt key, click and drag (1). This is how I created an edge. The arms move independently of each other (2). I can adjust the arms by holding down the Ctrl key. Now we have a curve, an edge and another curve (3) . You can see from the rectangle that there is an edge here.
Creating a path with the drawing pen
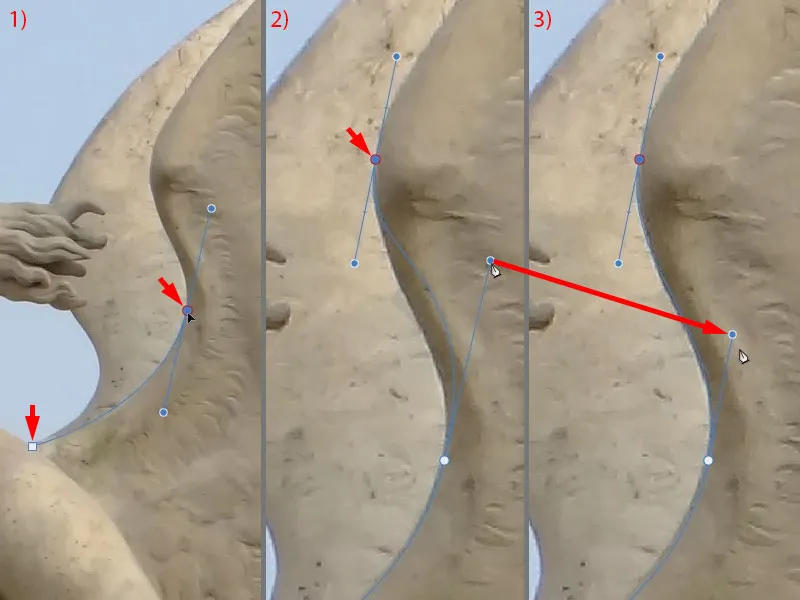
This is an easy way to work with paths . Use the technique to select the wing. I delete the previous path layer. I set the first anchor point here (square point at 1) and the second at this point, dragging directly to create a curve (round point at 1). I make sure that the curve is placed along the wing. If it extends beyond the wing, I hold down the Ctrl key, click on the anchor point and can correct it a little.
Here I set the third anchor point (2). You have to practise a little with the drawing pen - the more you have worked with the tool, the better you know where to click in the picture. So you don't have to set an anchor point millimeter by millimeter, but you can leave more space and work more with these curves.
Here we can see that the little arm is probably too long. So I correct this by holding down the Ctrl key(from 2 to 3). Overall, I work so that the path is slightly inside the wing rather than outside.
Here, too, I make further adjustments until everything fits. This is how you work your way through the picture step by step.
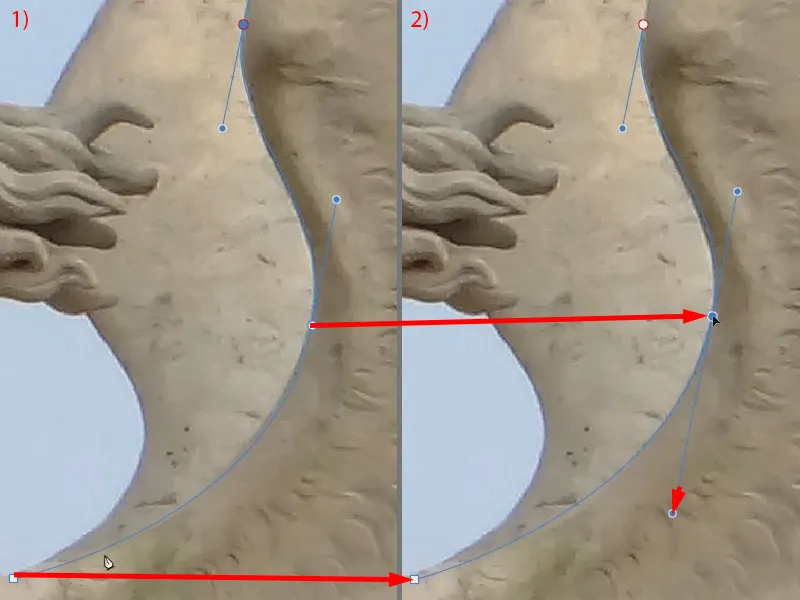
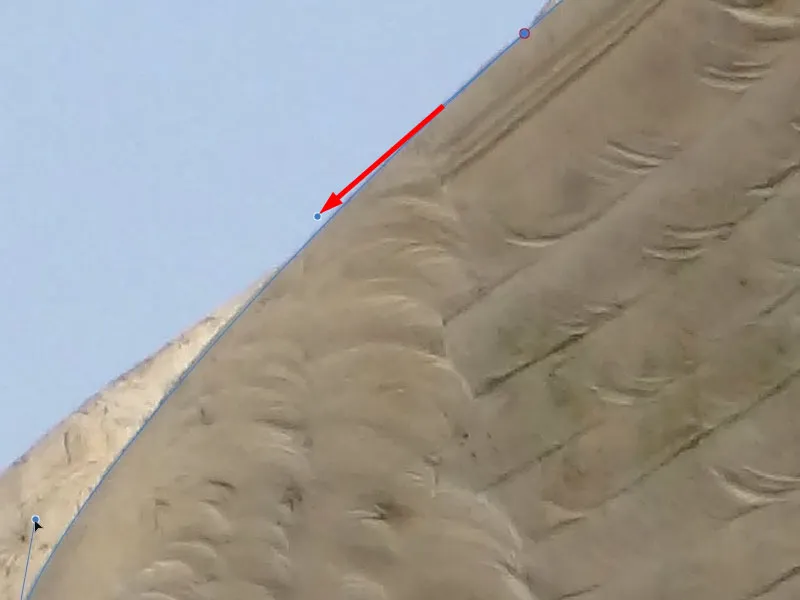
In the next picture, we can see that we have a slightly curved section in front of us. It is therefore probably sufficient to set the next anchor point high up. I click and drag - and we have a curve again, but it doesn't follow the curve of our wing. So I adjust that too by lengthening the arm.
As I said, you have to take your time until you get the hang of it in the truest sense of the word. The pen tool is highly recommended if you need to crop objects such as glasses or technical devices . For objects with curves and straight lines, working with paths is simply more efficient than cropping with the QuickMask, for example.
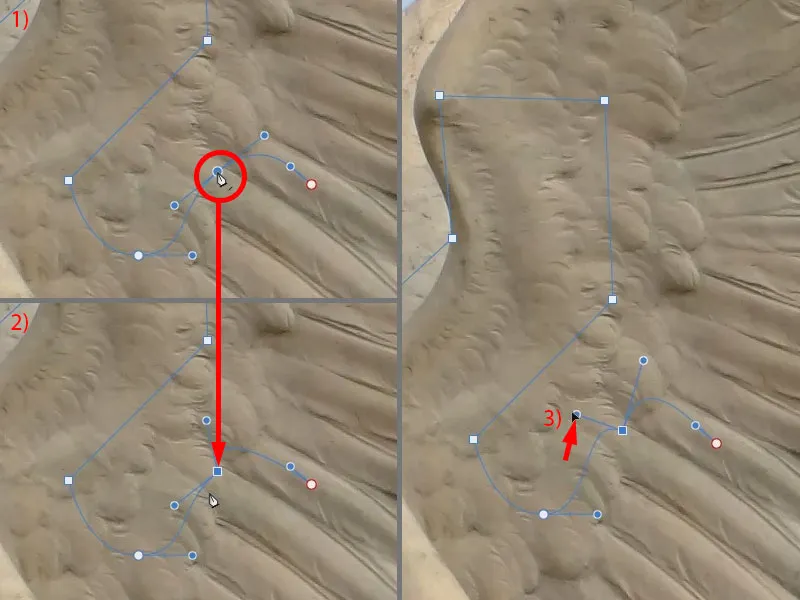
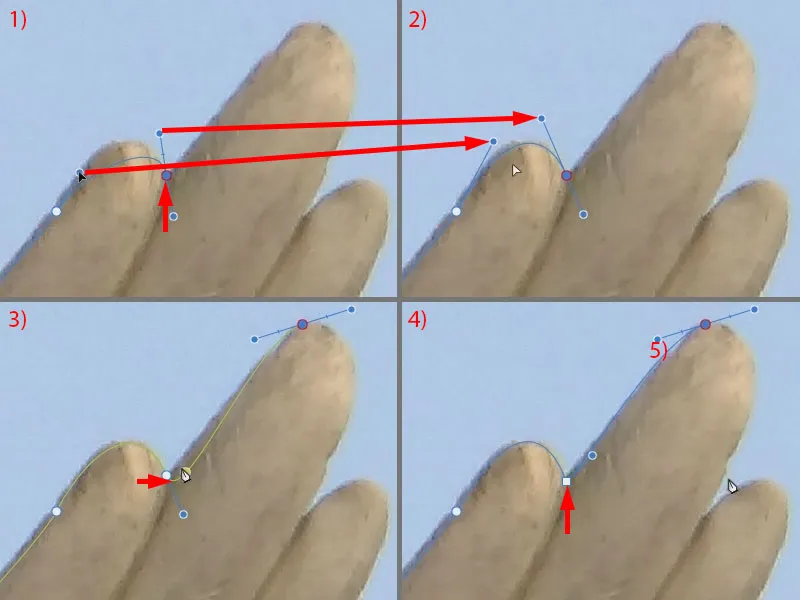
Now we come to a more complicated area. Here we have a curve and then an edge. I set the anchor point and adjust the curve (1 to 2).
If I now set the next anchor point and drag, we have a curve (3), but also at the bottom here (arrow at 3). To get the edge, I hold down the Alt key, click on the anchor point and drag. In this way, I have turned the round anchor point back into a square one (4). Holding down the Ctrlkey, I move the arms away from each other.
At the top we have an area where the wing is not continuous (5). We can correct this later with a mask.
This allows you to work your way through the image. The nice thing is: with a path, we can achieve very fine contours, i.e. not the pixelated or uneven areas that can occur if we were to work with the paintbrush tool, for example.
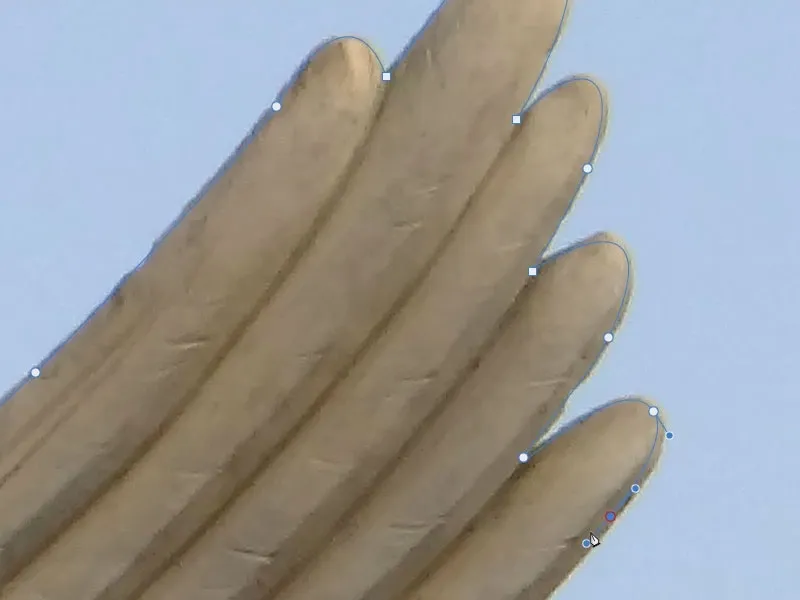
The current results: I have selected the entire wing using the pen tool.
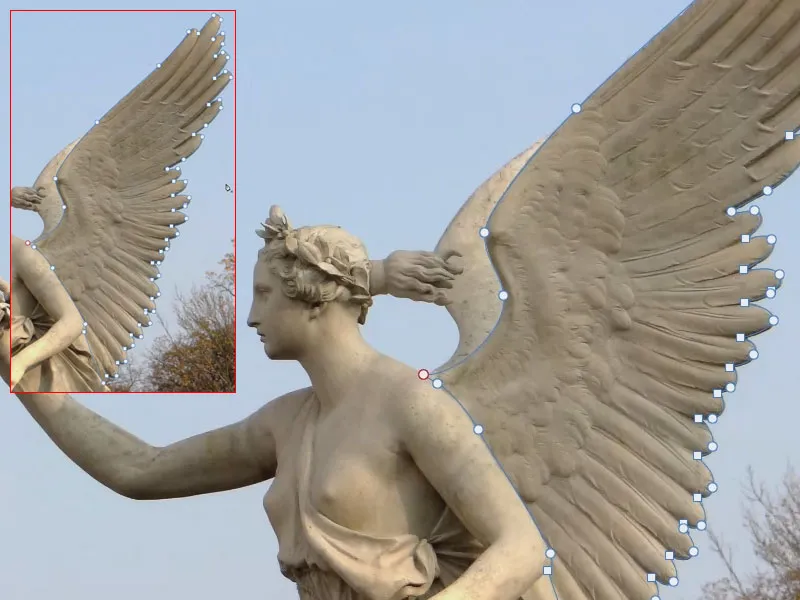
Creating a path with the drawing pen - summary part 6
- Use the drawing pen to create a curve layer based on paths.
- The drawing pen is recommended for objects with straight and curved edges.
- Activate the drawing pen via the icon or with the shortcut P.
- Click to set an angular anchor point for corners.
- Click and drag to create a round anchor point for curves.
- You can move set anchor points (and arms) by holding down the Ctrl key.
- Use the Alt keyto turn a round anchor point into a square anchor point.
- After all, practice makes perfect! Try out different shapes with the drawing pen.
Part 7: Cut out the wings, create a mask and add notches
Now it's time to cut out the wings after the dancer. You can convert the path using either the Mask function or the Selection function. You can find out how to do this in the seventh tutorial in the Christmas series. Along the way, file a few notches into the edges of the wings so that you end up with a completely cropped motif that looks even more realistic because it is partially worn.
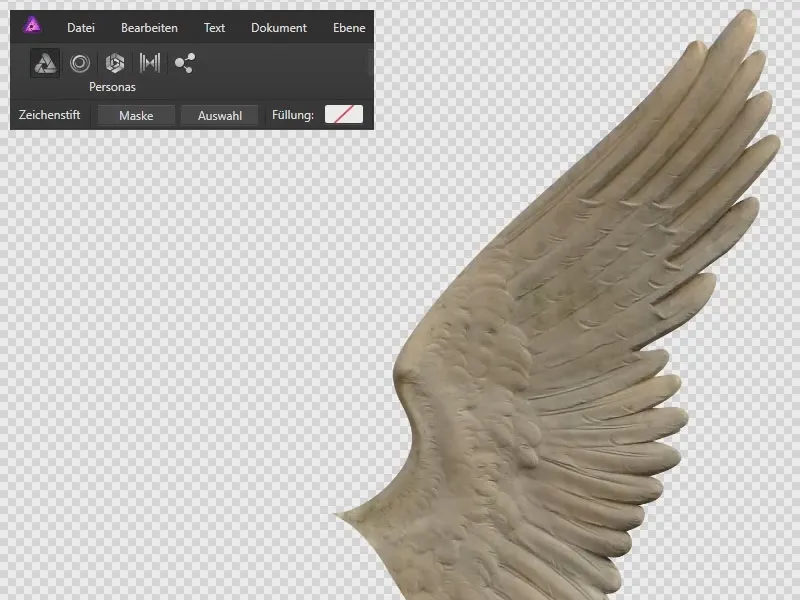
This is what you will learn in part 7 of the Affinity Photo tutorial
- How to create a mask from a path
- Creating path and pixel masks
- Drawing pen - selection and mask functions
- Making further optimizations with the paint brush
- Merging visible layers in Affinity Photo
Creating a mask from a path
After creating the path for the wing in the previous tutorial, we now have the image as the background layer and the curve layer, i.e. our path layer, in the layer palette. How can we create a mask from this? - There are two ways ...
With the pen toolactivated (1) and the curve layer active (2), the path is visible. We also see the Mask and Selection options at the top (3). Let's take a look at the Mask function.
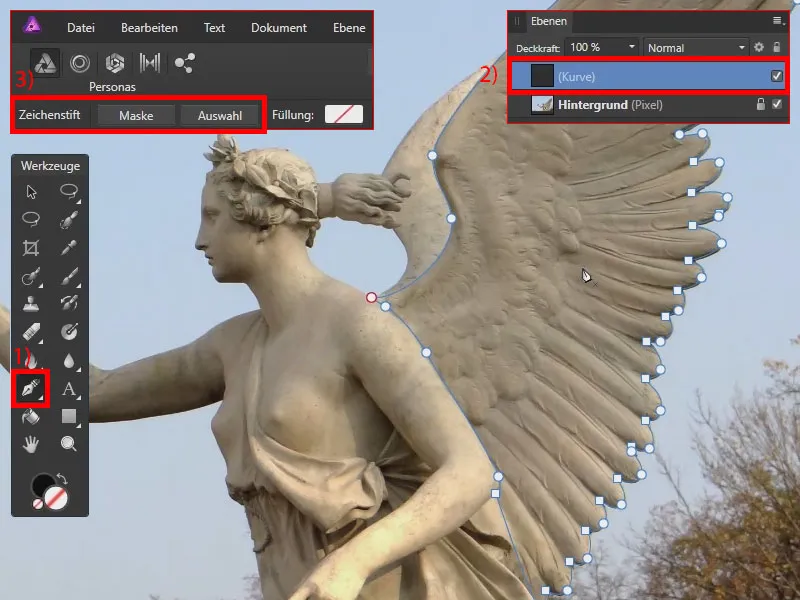
With the curve layer (1) activated and the image below it that I want to mask, I click on Mask (2). I have already masked and selected the wing. The rest is transparent (3). In the layer palette, the image is displayed with a mask (4) - with a path mask that can still be changed.
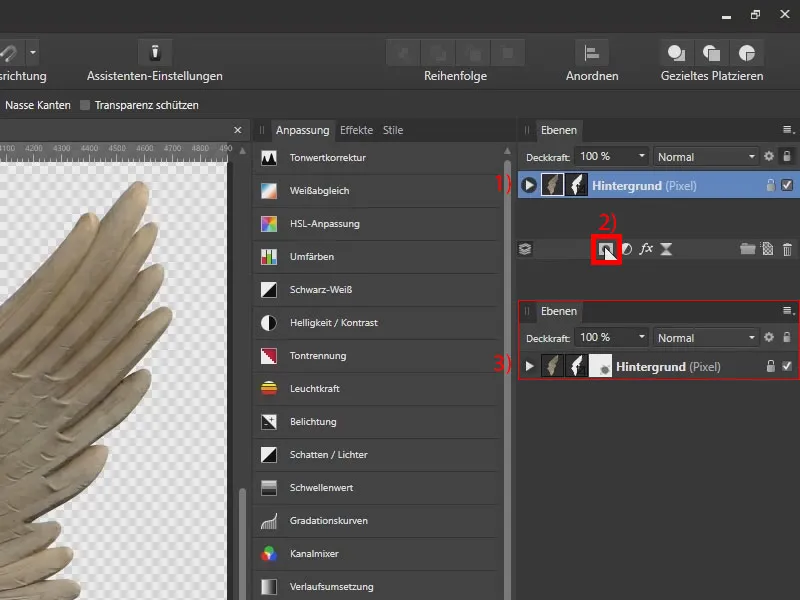
I can't now use the paint brush tooland paint with a black foreground color to make this area transparent - that won't work because we have a path mask. But if I select our background layer (select 4) and click on the mask icon (5), I can create a new mask (6) . I can click on this again and drag it onto the background layer (7). Now I have a pixel mask and a path mask (8).
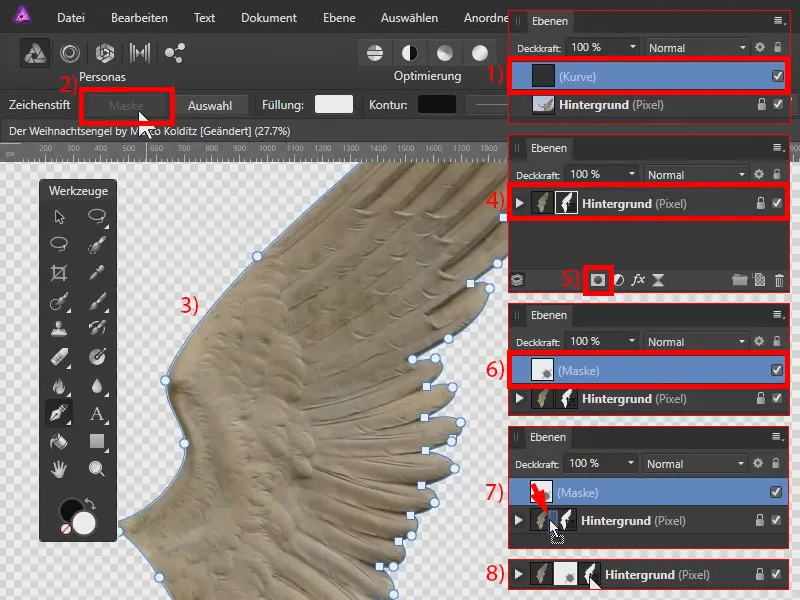
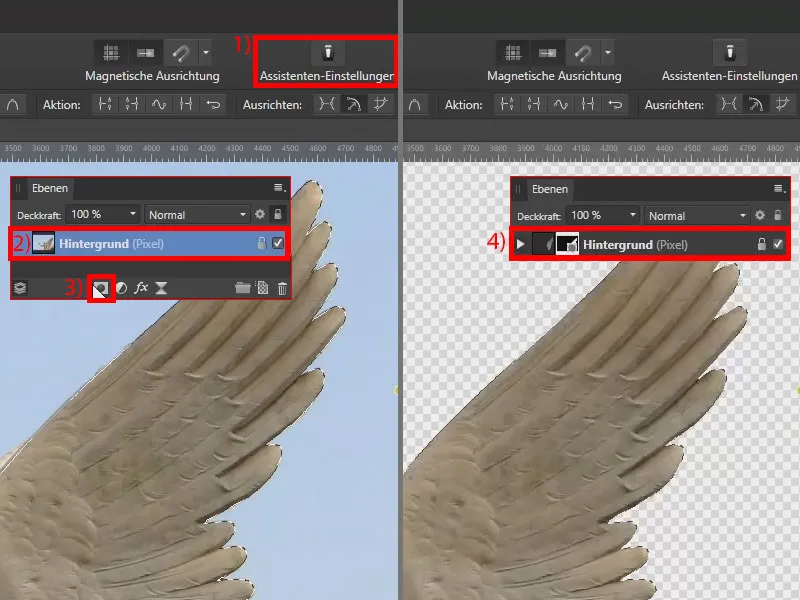
A note: You can use the Wizard settings button to activate that a mask is automatically applied to the selected layer . I usually deactivate the wizard because it has advantages on the one hand, but sometimes also disadvantages on the other.
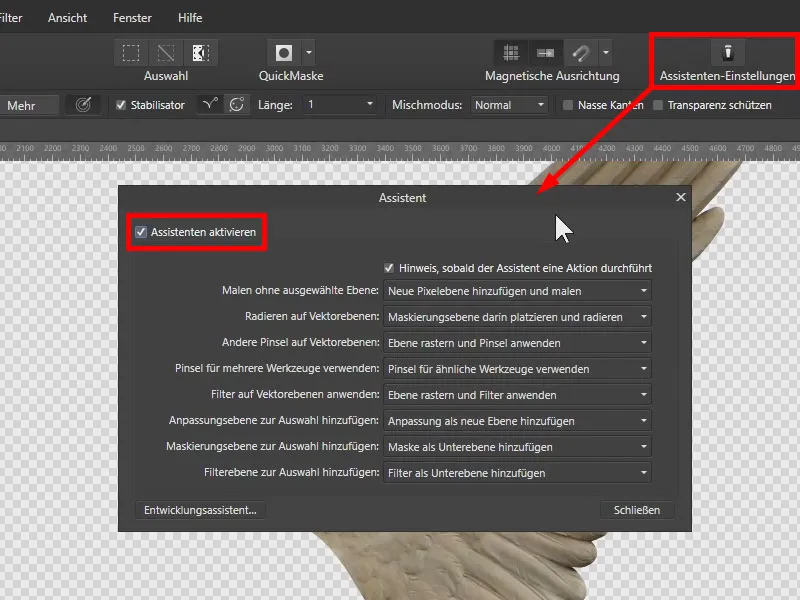
I'll show you what it means when it's activated: I have the background layer active again (1), click on this mask icon (2). In this case, Affinity Photo knows I want to apply a mask to this layer (3). This is where the wizard comes in handy. However, there are sometimes scenes in which the assistant intervenes and does things that were not actually planned. That's why I deactivated it.
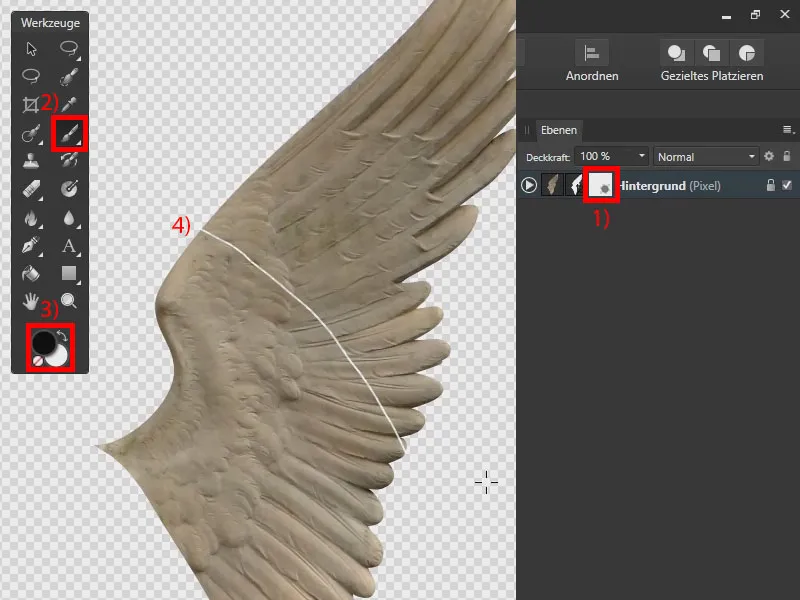
So we have the path mask and the pixel mask. If I have activated the pixel mask (1) and the paint brush tool(2) with a black foreground color (3), I can paint areas transparently (4).
This allows us to work with a combination of path mask and pixel mask. We change the path mask using the pen tool- the pixel mask with the paintbrush.
Create a selection from a path
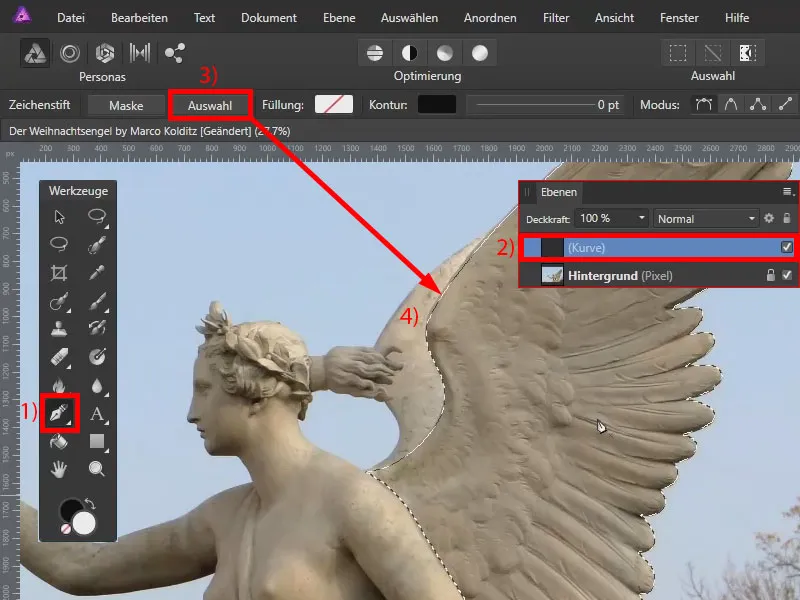
If you only want to work with a p ixel mask, proceed as follows: We have our original background and the curve layer again. The pen toolis active (1). I am on the curve layer (2). This time I select Selection (3). So we have converted the path into a pixel selection (4).
We can use the selection to create a pixel mask. To do this, I activate the background (1), the wizard settings as well (2), and I click on the mask (3) so that a pixel mask is added to the selected layer (4). I cancel the current selection with Ctrl+D.
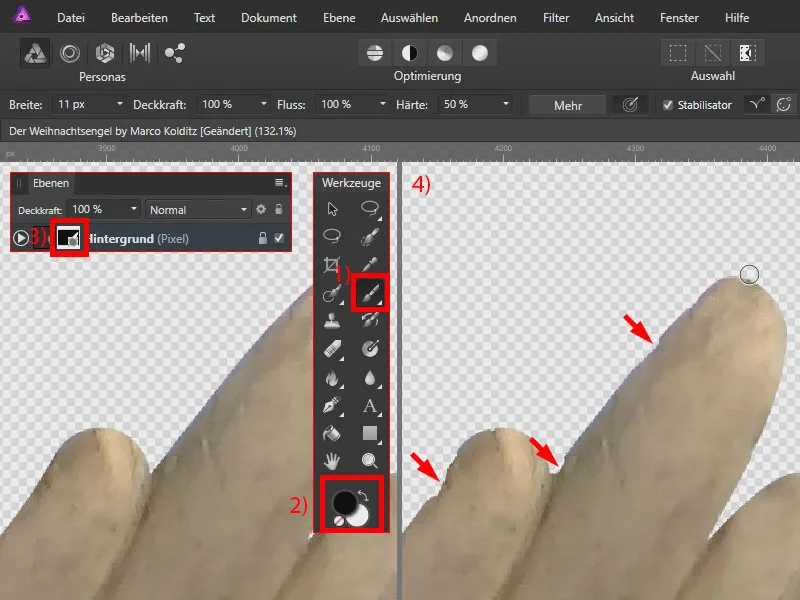
Editing the mask of the wing
We can further edit and optimize the mask. To do this, I zoom into the image. I adjust the border areas. At the moment, everything is still smooth. I take the paintbrush (1) with black foreground paint (2) and paint on the mask (3) to add small notches, which ultimately create a more realistic effect (4).
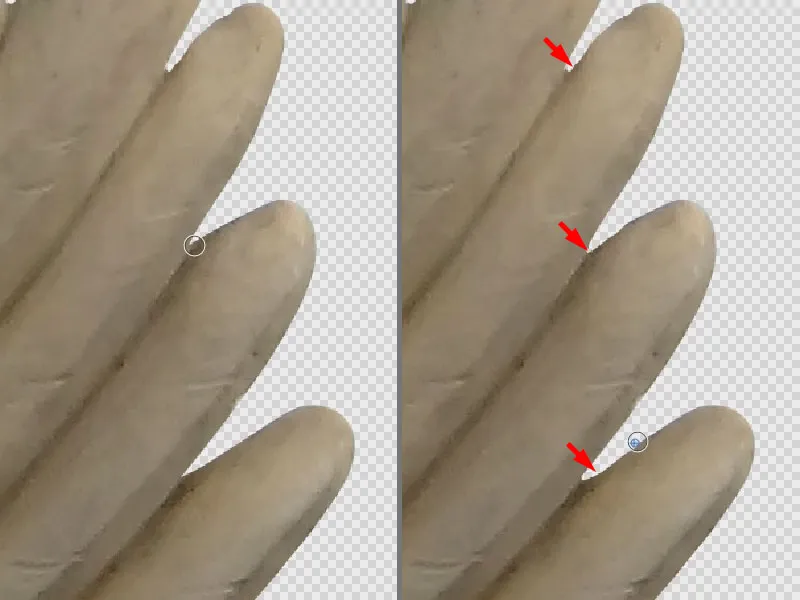
This is how I work my way around the entire selection. As I work with a graphics tablet, I can vary the thickness of the brush with the pen by applying different amounts of pressure.
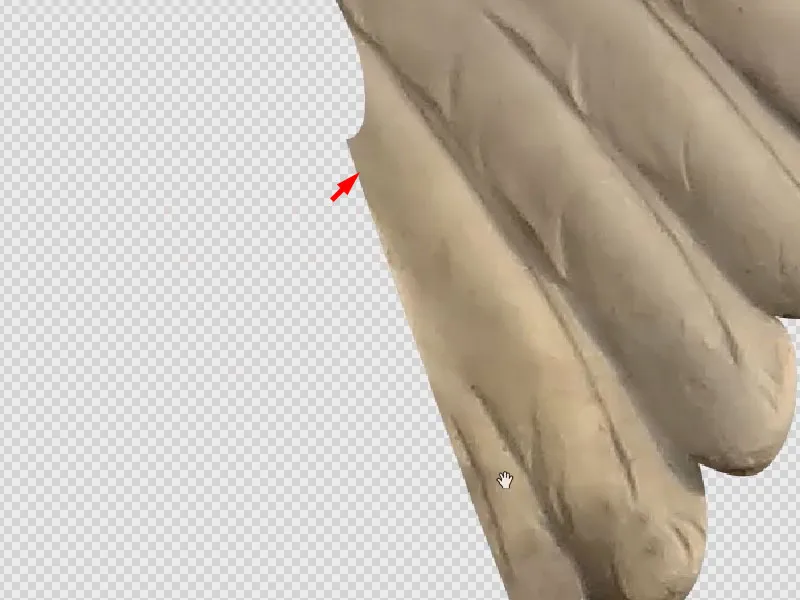
We can completely ignore the areas that will later be behind the model:
Merge visible layers
We could place this layer, the image with the mask, in our compositing. However, I would like to show you how to create a separate layer with just this wing, without the mask. To do this, select the current layer (1) and go to Merge visible under Layer (2). Alternatively, you can do this with Ctrl+Alt+Shift+E. This will merge the underlying layers into one (3) .
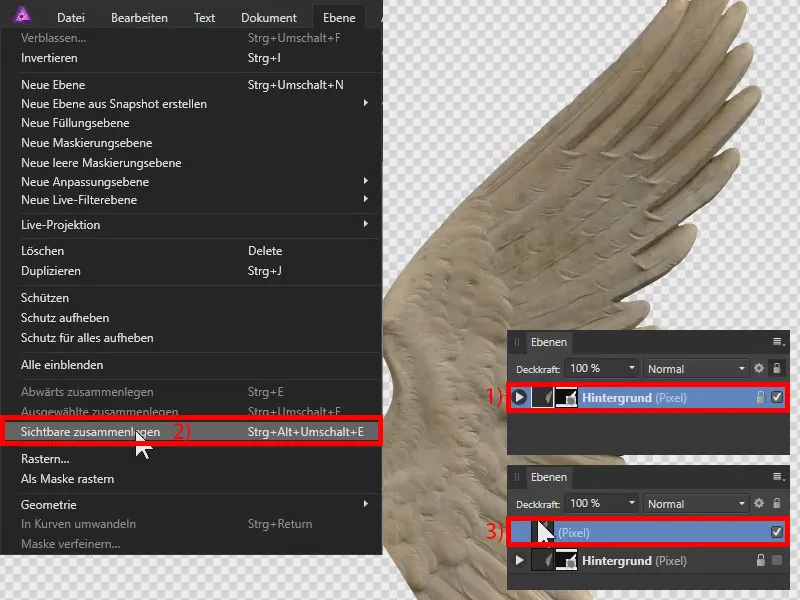
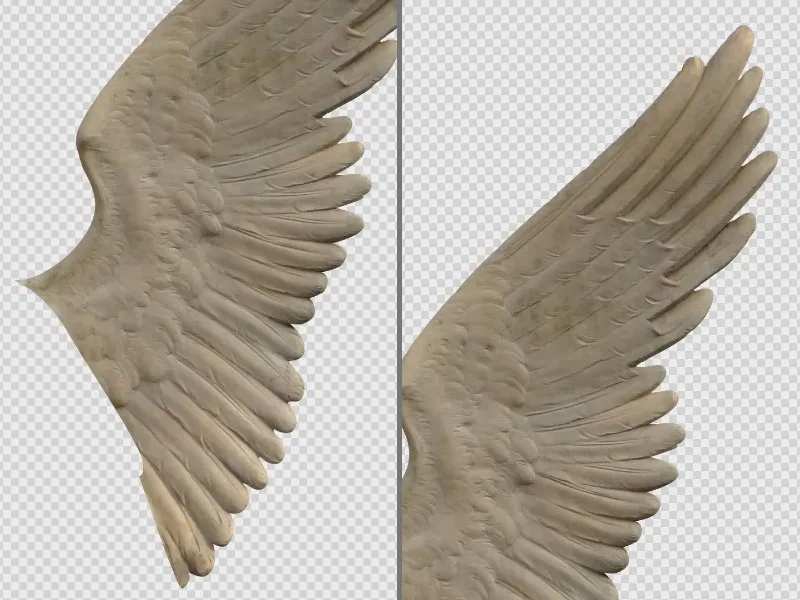
I now have the wing on a separate layer in front of a transparent background, without any mask. And we can now place it in the composing.
Creating masks in Affinity Photo - Summary Part 7
- To create a mask from a path, the Mask and Selection functions are available in the Pen tool.
- You can edit pixel masks later using the paintbrush.
- Use the wizard if necessary.
- You can merge visible layers using Ctrl+Alt+Shift+E.
Part 8: Positioning and transforming the wings
We released the Christmas angel and the corresponding wing in the previous parts of the tutorial. Now it's time to combine the motifs. Find out what you need to pay attention to when inserting one image into another and how you can transform elements . You use rotation, horizontal mirroring and proportional or non-proportional enlargement and reduction to make the angel fly.
Here's what you'll learn in part 8 of the Affinity Photo tutorial
- How to insert images into other images and what you should pay attention to when doing so
- Changing thedocument size and canvas size
- Position and transform motifs: mirror horizontally, move, rotate, (proportionally) enlarge and reduce them
Copying an image from one file and pasting it into another file
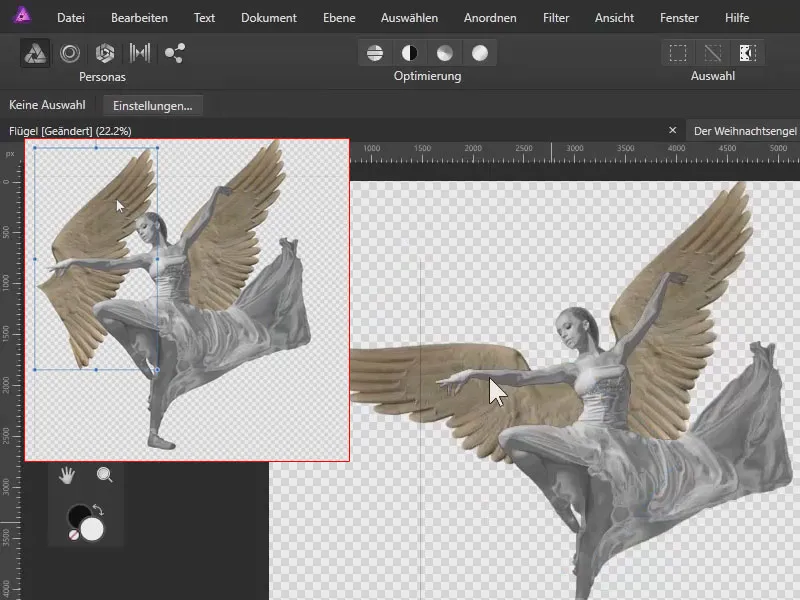
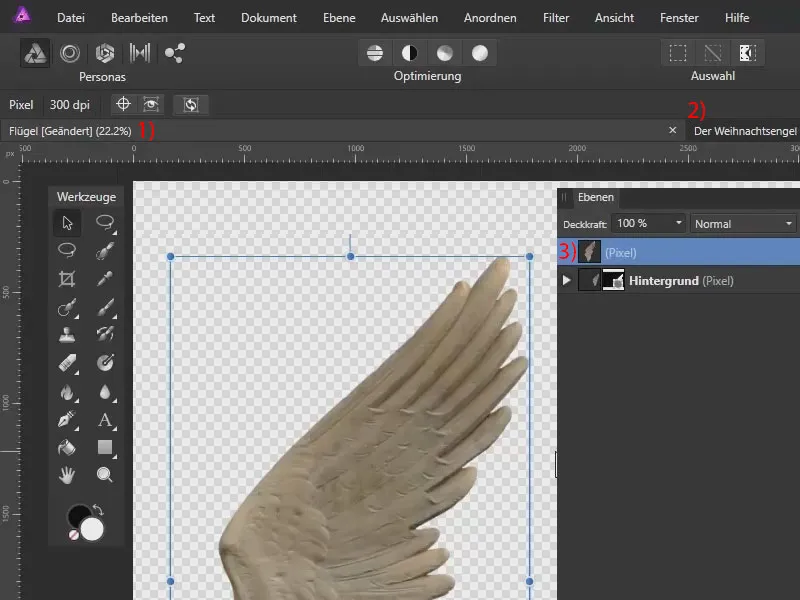
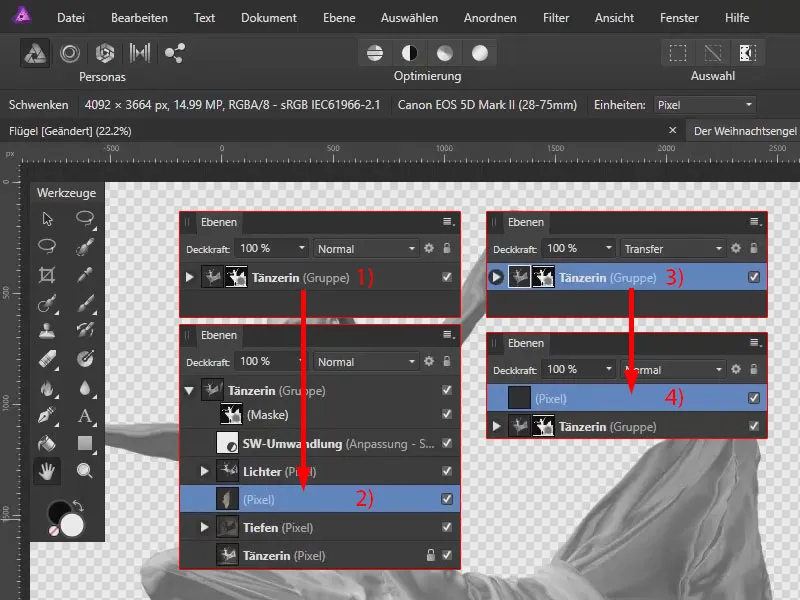
We have cropped the wing and are now placing it behind the Christmas angel. To do this, I have opened the files with the wing (1) and the Christmas angel (2). In the layer palette, we can see the cropped wing, which is located on a pixel layer (3).
I would like to select this and drag it into the other file, but this does not work in Affinity Photo (version 1.6). Nor can I simply click on the wing and drag it into the other file. So we have to go another way, via copy and paste : I select the layer I want to copy and press Ctrl+C for Copy. I switch to the other file.
Now I could press Ctrl+V to paste the sash. But we have to be careful: The group is currently not selected in the layer palette(1). If I now simply press Ctrl+V, nothing happens. Where is the wing? It has been placed somewhere within the group (2).
I delete the layer, close the group and this time make sure that the group is activated first (3). If I now press Ctrl+V, the copied content is placed above the previously selected group or layer (4). This is exactly what we wanted to achieve.
Change document size and canvas size
Now we need to make sure that the wing is behind our Christmas angel. This is usually very easy to do by placing the layer below the "Dancer" layer.
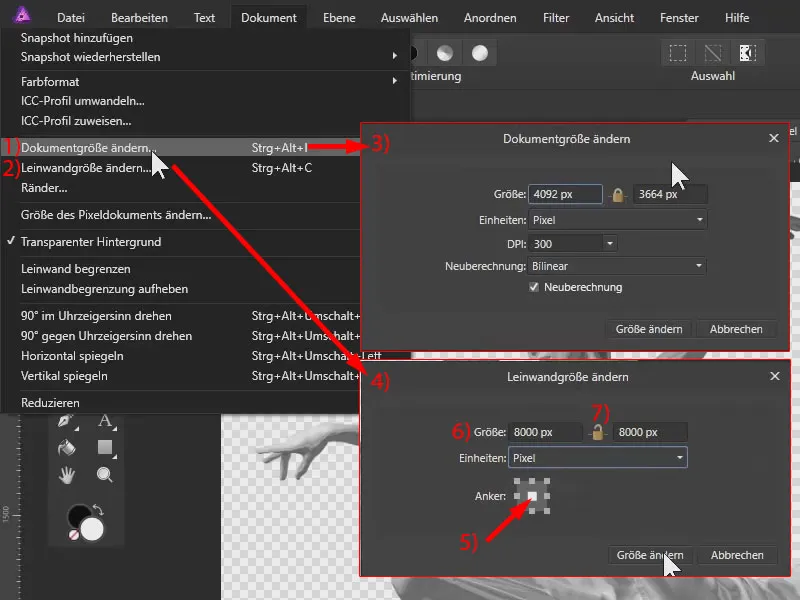
However, we can see in our document that there is not a lot of space available. We have to create this space first. We need to enlarge the document or, as it is called in Affinity, enlarge the canvas. This can be done via Document, where there are two points: Resize document... (1) and Resize canvas ... (2) .
What is the difference? Change document size (3) enlarges or reduces the image, i.e. the pixels in the image are recalculated and the content is thus enlarged or reduced. This is not what we want in this case.
Instead, we select Change canvas size (4) . Now I can define how large the canvas or document should be. I select the center (5) as the anchor so that the image is enlarged from the center outwards. I set the size to 8,000 px (6). The lock symbol adjusts the other value proportionally. I therefore open the lock symbol (7) and also enter 8,000 px for the second value. I confirm this with Change size.
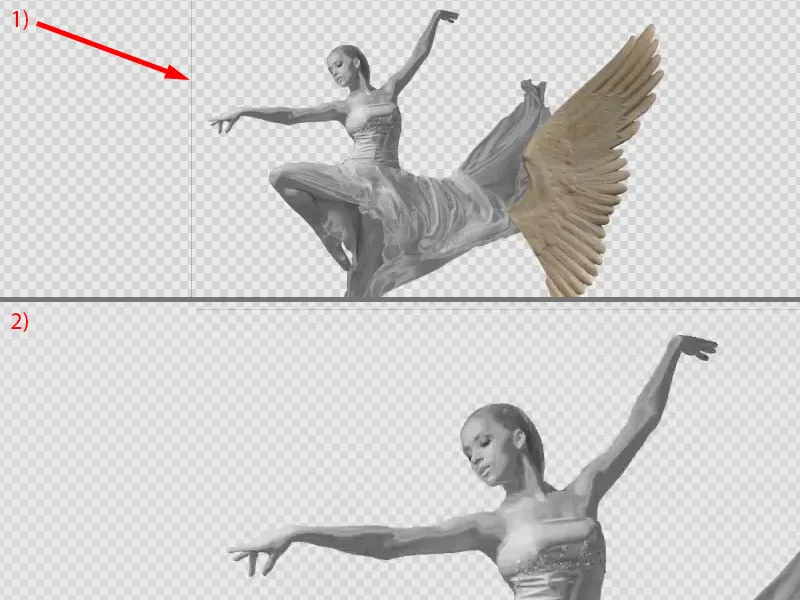
Note: Display error in Affinity Photo
Don't be surprised about this line (1), this is a display error. When I zoom into the image, it disappears (2). Obviously a display problem in Affinity Photo (version 1.6) - when you save the image, the stroke is not saved because it doesn't actually exist.
Placing the wings behind the statue
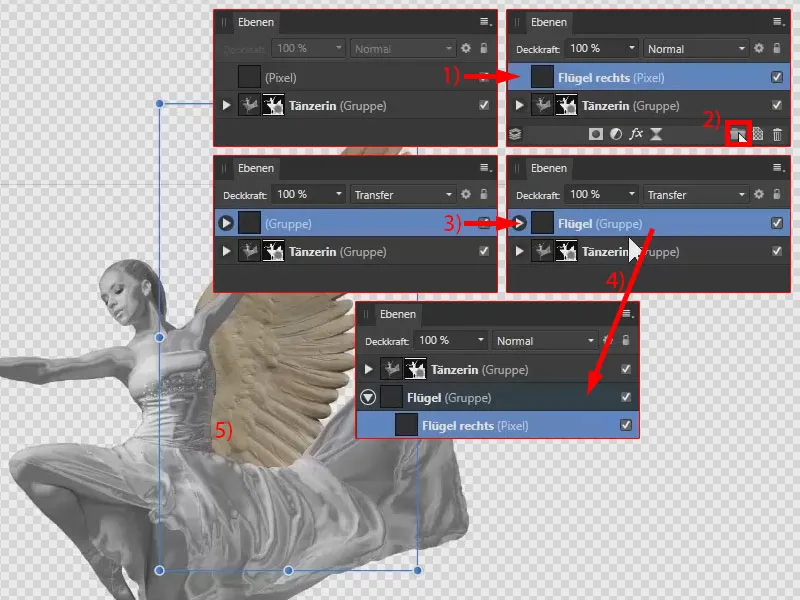
I rename the pixel layer to "Wings right" (1). I also create a new group for this: The layer is activated and I click on the folder icon (2) or press Ctrl+G. I rename the group to "Wings" (3). Now I drag the group all the way down (4) to place the wing behind the statue (5).
Mirror wings horizontally
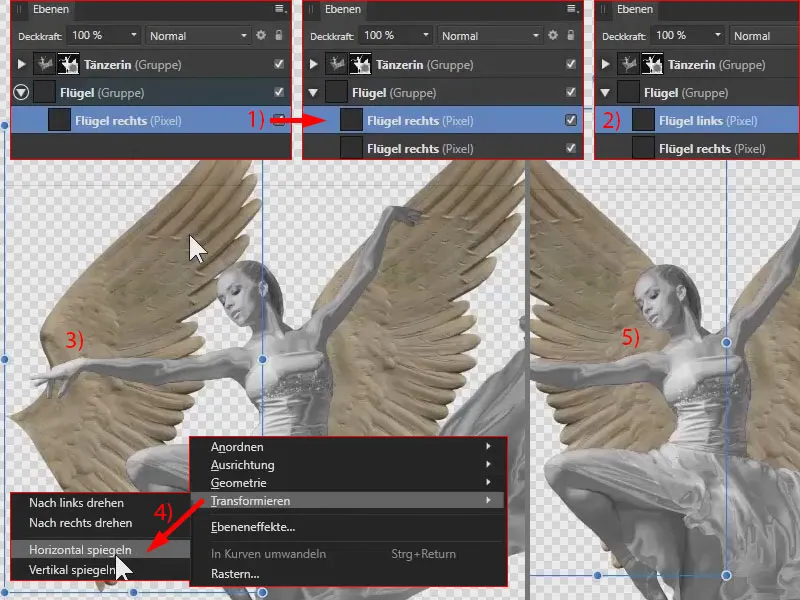
I duplicate the wing. To do this, I select "Wing right" and press Ctrl+J (1). I rename the copy to "Sash left" (2). I drag it to the left (3), then mirror it: right-click on the wing and select Transform>Mirror horizontally (4) . The wing is now mirrored (5).
Moving and rotating motifs
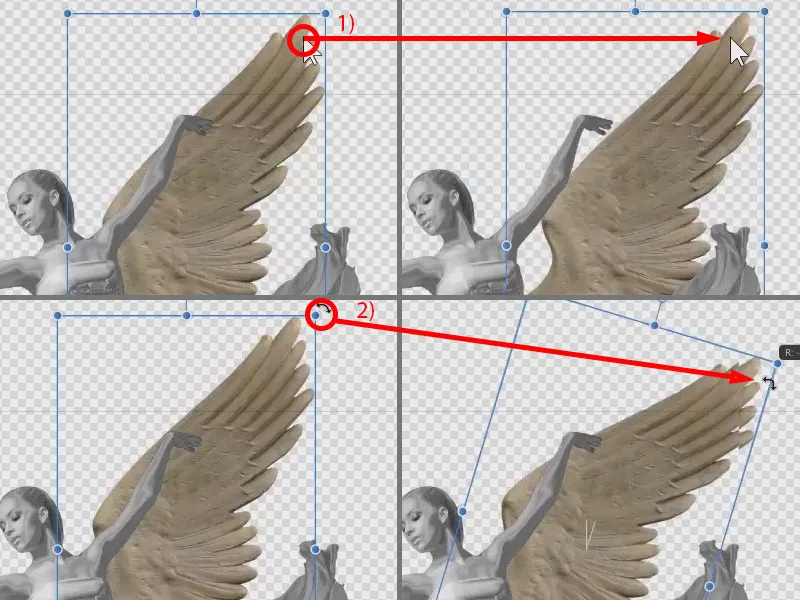
Let's take a look at the right-hand wing first: if I click on it, I can move it (1).
To rotate it, I move the mouse cursor to the top corner (2). Not directly on the anchor point, but a little further out, then the double arrow appears. Click and drag to rotate the wing.
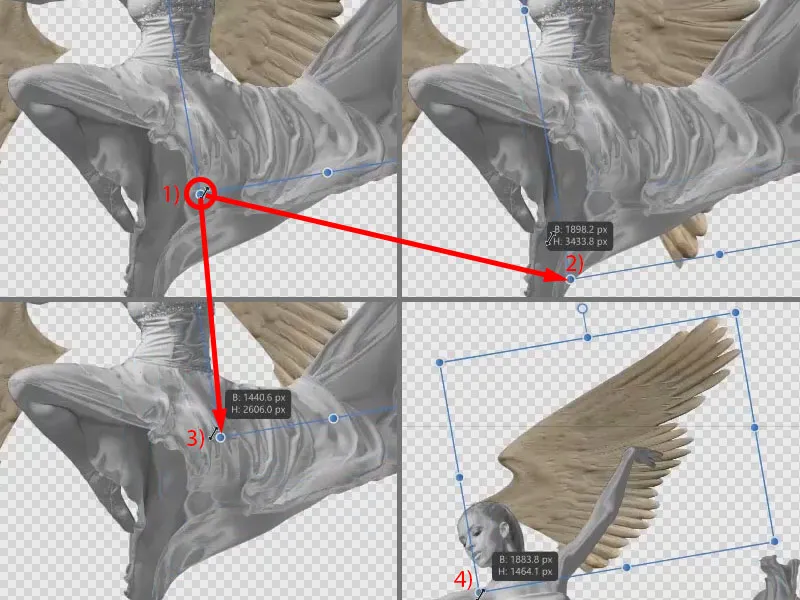
However, if I click on one of the anchor points (1) and drag, the size changes proportionally (2 and 3). If you don't want to increase or decrease the size proportionally (4), hold down the Shift keywhile dragging the anchor point.
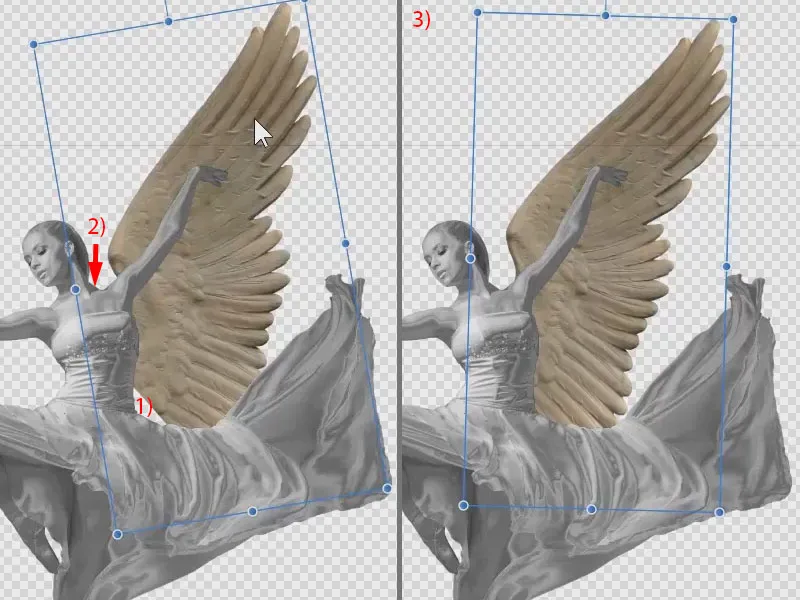
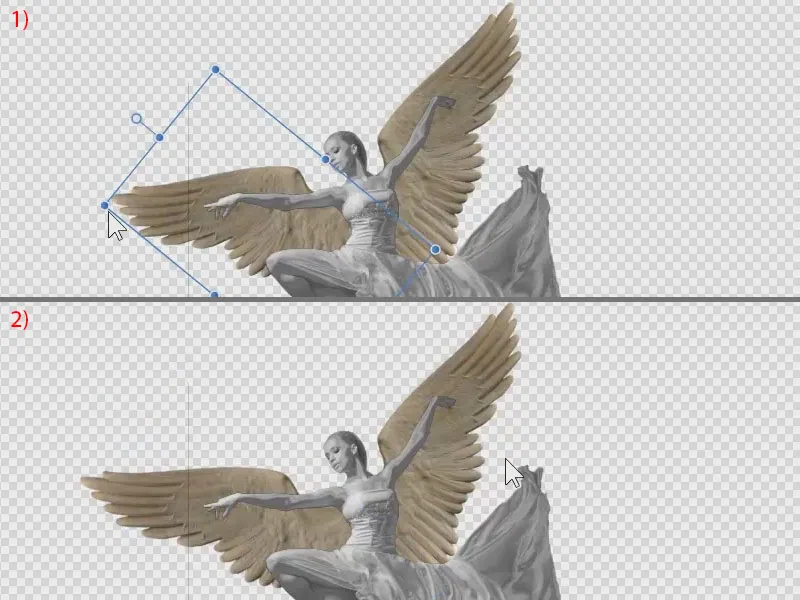
I now position the wing as I want it, also rotating and stretching it a little. At the bottom, I have to make sure that the free area is not visible (1). Also, the wing should not start behind the neck (2). I like it like this (3).
For the left wing: I turn it more so that the two wings follow the arms. Here, too, I adjust the size, sometimes working non-proportionally. The wing should start approximately at the knee (1) and also behind the shoulder (2).
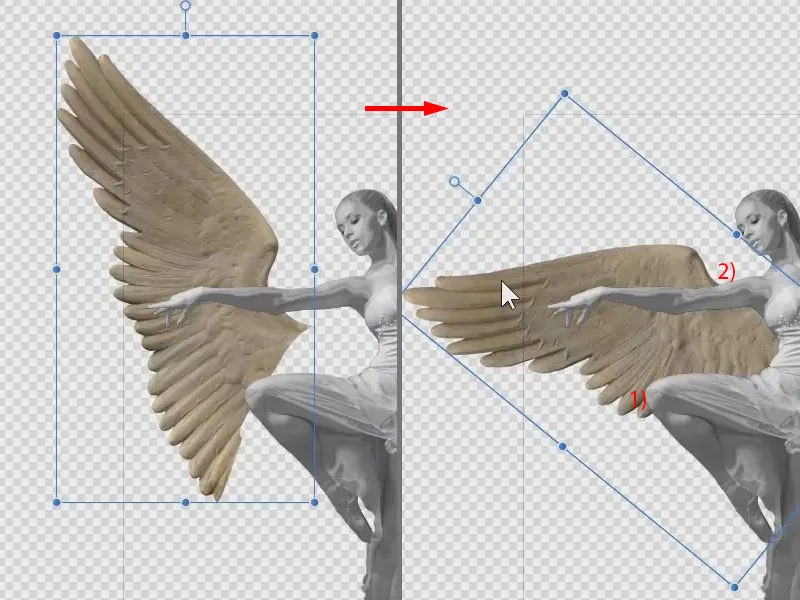
If you zoom in a little, you will notice that the right wing appears slightly larger than the left (1). The right wing should be slightly to the rear and the left wing more to the side. I adjust this again (2).
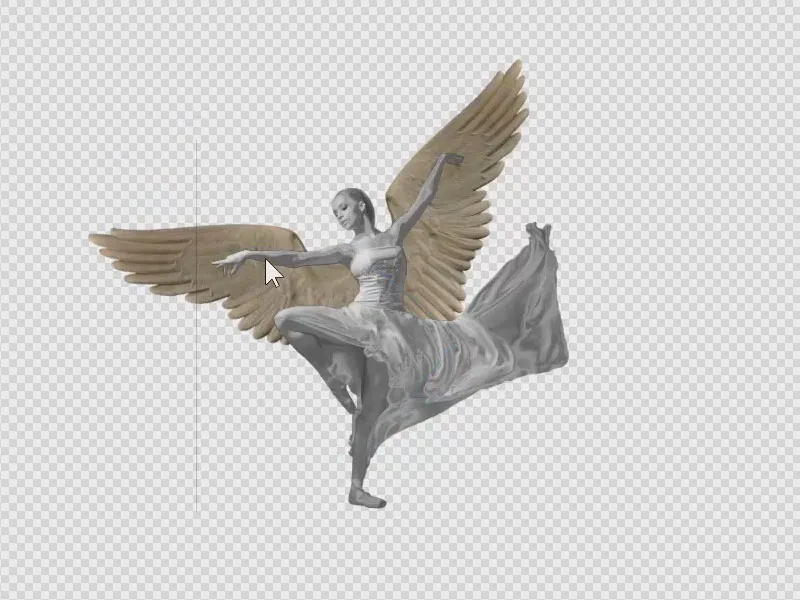
We have now placed both wings behind the statue.
Positioning and transforming motifs in Affinity Photo - Summary Part 8
- Paste images into others by copying and pasting with Ctrl+C and Ctrl+V.
- When pasting, pay attention to which element is selected in the layer palette.
- Use the document size to adjust the size of your image.
- Use the canvas size to adjust the available workspace.
- Right-click on an image under Transform to flip it horizontally or vertically.
- You can move motifs by clicking and dragging them.
- Use transformations such as mirroring, rotation and (proportional) zoom in and out to adjust image elements as desired.
- If you click on the handle of a motif, you can enlarge and reduce it proportionally. If you hold down the Shift keywhile doing this, you can switch to non-proportional resizing.
> To the previous parts 4 and 5

The content of this article is based on a video tutorial by our trainer Marco Kolditz:
