
Fusion - The morphing workflow in Photoshop

- 15 lessons in over 90 minutes of video training from digital artist Gabor Richter
- Get to know professional Photoshop image editing methods and apply them directly
- Including project files to join in and learn hands-on
Put on the Photoshop welding torch and bind what belongs together forever and ever! A morphing workflow for the best of two parts!
15 Videos, 100 minutes
Morphing in Photoshop
Fusion - The morphing workflow in Photoshop - 01 Intro
Extraordinary, creative and intense - this is how two portraits become one face that does not exist in reality. Introductory words on portrait fusion and the workflow in Photoshop!
Fusion - The morphing workflow in Photoshop - 02 Raw development
The first step in this image processing will be to develop the two portraits in Camera Raw. Detail extraction plays an important role here. The raw development settings are also transferred from the first to the second subject with just a few clicks.
Fusion - The morphing workflow in Photoshop - 03 Aligning portraits
In this video, Gabor shows you how to align two different faces. A few small adjustments will help.
Fusion - The morphing workflow in Photoshop - 04 Merging portraits
In this video, Gabor shows you how to merge two different motifs without additional layers. Hair is also inserted, for which no blending modes or brushes/brushes are necessary.
Fusion - The morphing workflow in Photoshop - 05 Lengthening clothes
If the image section is too small, the garments can be extended for a larger section or you can simply take another motif from a series shot to add it on.
Fusion - The morphing workflow in Photoshop - 06 Adjusting the shape
In this video, Gabor shows you how you can adjust the shape of two different people in a few simple steps without alienating them.
Fusion - The morphing workflow in Photoshop - 07 Retouching
Two people fused together also deserve a basic retouch. In this video, you can see which tools Gabor uses and which settings he applies.
Fusion - The morphing workflow in Photoshop - 08 Insert background
Backgrounds don't always have to be flat and boring, especially if it's a gray background. Watch the video to see how you can improve it for a portrait in just a few steps.
Fusion - The morphing workflow in Photoshop - 09 Dodge and Burn (skin)
Painting with light is used here to make the portrait even more intense and three-dimensional. Not only is the shape remodeled, but a few details are also "tickled in" to create more depth.
Fusion - The Morphing Workflow in Photoshop - 10 Dodge and Burn (Clothing)
In this video, Gabor shows you how he uses just one layer and one tool to make clothing more three-dimensional. Non-existent highlights and shiny areas are artificially painted in with Photoshop.
Fusion - The morphing workflow in Photoshop - 11 Coloring eyes
In this video, Gabor kills two birds with one stone - on the one hand, the eyes are brightened even more intensively and, on the other, the irises are colored differently.
Fusion - The morphing workflow in Photoshop - 12 Lighting scenes
To direct the viewer's focus, Gabor uses three simple adjustment layers to reset the brightness in the portrait. This also makes the subject much more exciting and gives it a slightly darker mood.
Fusion - The morphing workflow in Photoshop - 13 color looks
In this video, Gabor will create a color look that suits both people. There is also another look that ensures that the two halves of the face have two different color moods.
Fusion - The morphing workflow in Photoshop - 14 Finale
The final processing of this portrait will take place on a single layer, to which only one filter will be applied. You can see how Gabor adjusts the fine-tuning to suit his taste in this video.
Fusion - The morphing workflow in Photoshop - 15 Last words
Finally, a few final sentences ...
Examples of use
-
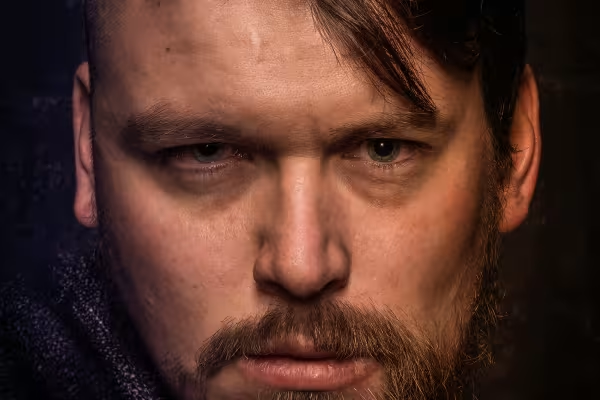 Two in one: Learn how to create a fusion look like this in Photoshop.
 -
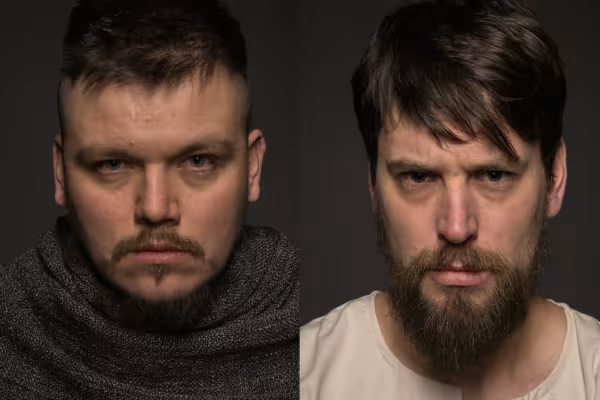 The fusion look is developed based on these two portraits.
You might also like

Photo editing & image composition

Full power, more inspirations, maximum WOW effect!

Save time with artificial intelligence

More style, more power, more templates!
Comment now „Fusion - The morphing workflow in Photoshop“