Sketch
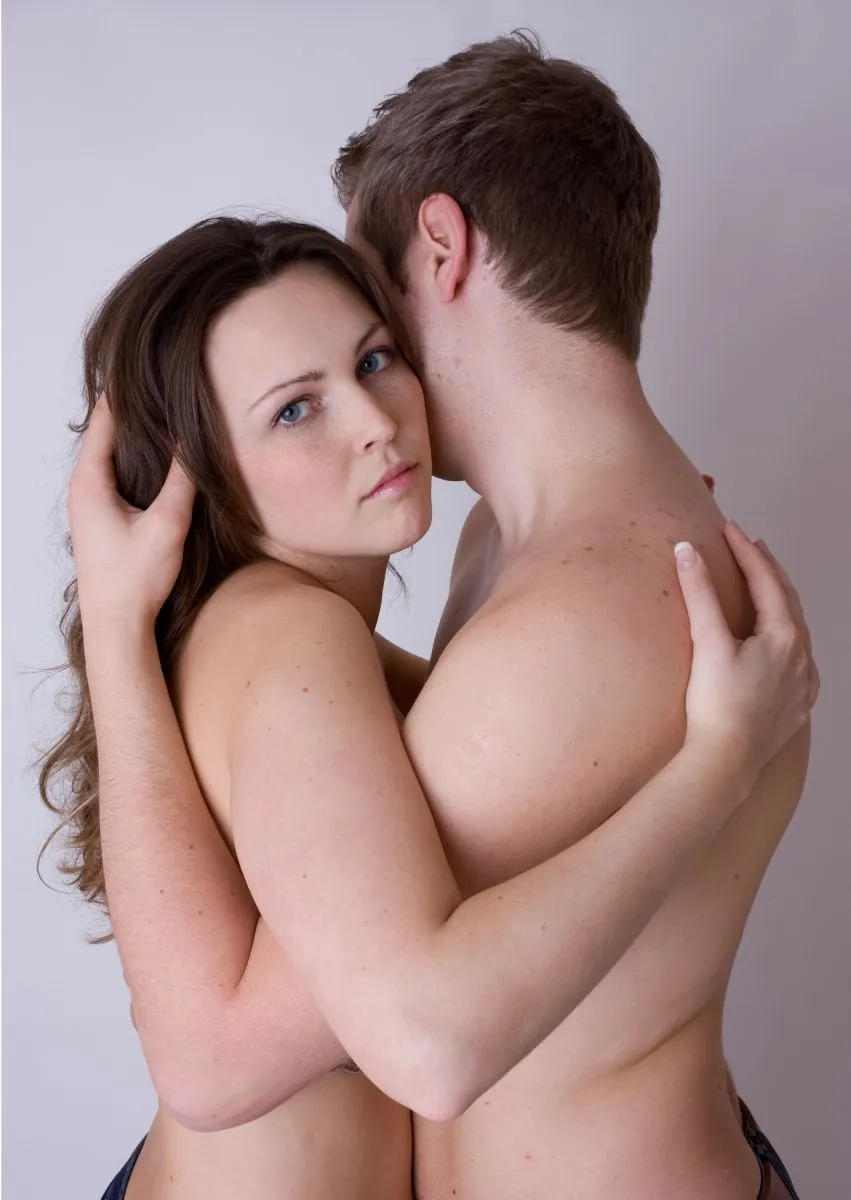
My idea was to photograph a couple embracing, full of emotion and tenderness. The woman's pose and facial expression played the most important role in this scene. In order to give the image a different color mood later in Photoshop, I photographed on a white background. I always prefer to photograph my subjects on a white background because it gives me more scope for experimentation.
I used an Aurora Fusion 300 flash head with an Octabox 170 cm, the power was set to 120 and the light source came slightly from the left. This softly diffused light illuminated the bodies perfectly without any deep shadows. This gives us the opportunity to emphasize the shapes and contours of the body in the image processing and to create a new light space. Photographs were taken with a Canon EOS 450 D camera, ISO: 100, Blender F/10, exposure time 1/125 sec.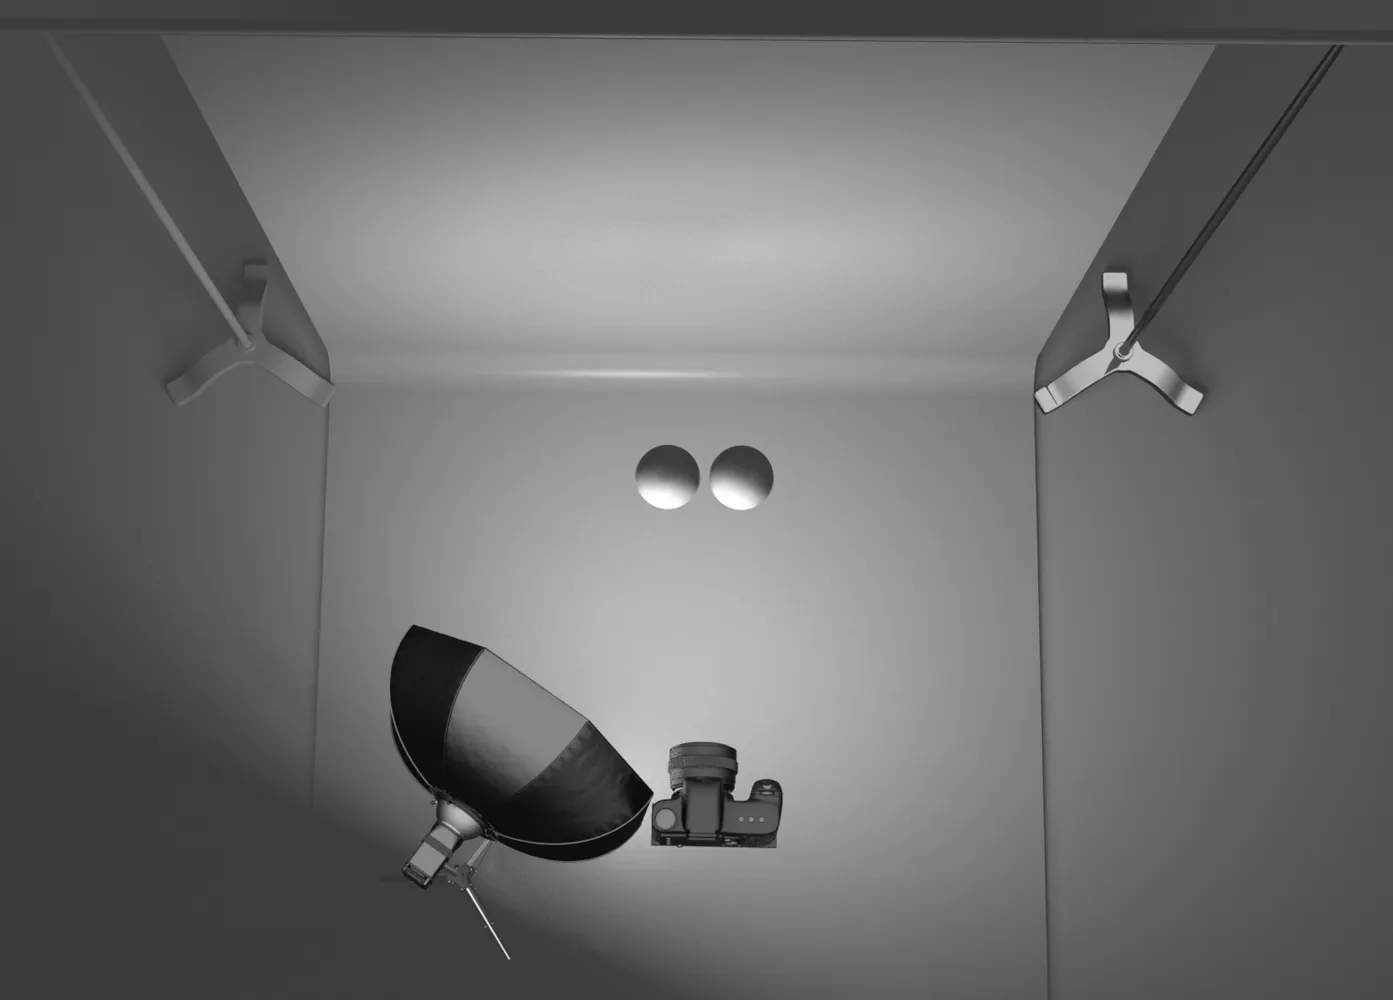
Step 1: Prepare the image
Open the image, duplicate the background layer and name it "Liquefy". Open Filter>Liquify. Switches to the Forward Curl tool(W; Drag tool in newer versions) and selects a brush size of approx. 650px. Paint over the hair, arms and back to shape these elements. Exit the liquefy dialogby clicking on Confirm.
Switch to the Copy Stamp tool and stamp away strands of hair, the finger on the shoulder and the jeans.
Create three copies of the "Liquefy" layer. Reduce the opacity of the bottom two to 41% and desaturate them via Image>Corrections>Reduce Saturation. Now apply the following settings: 1st layer: Soft light blending mode. 2nd layer: Multiply blending mode. 3rd layer: Multiply Negative blend mode, opacity 34%.
Create a white layer mask for each of the layers and blend out areas that are too dark or too light using a soft black brush with 50% opacity and flow.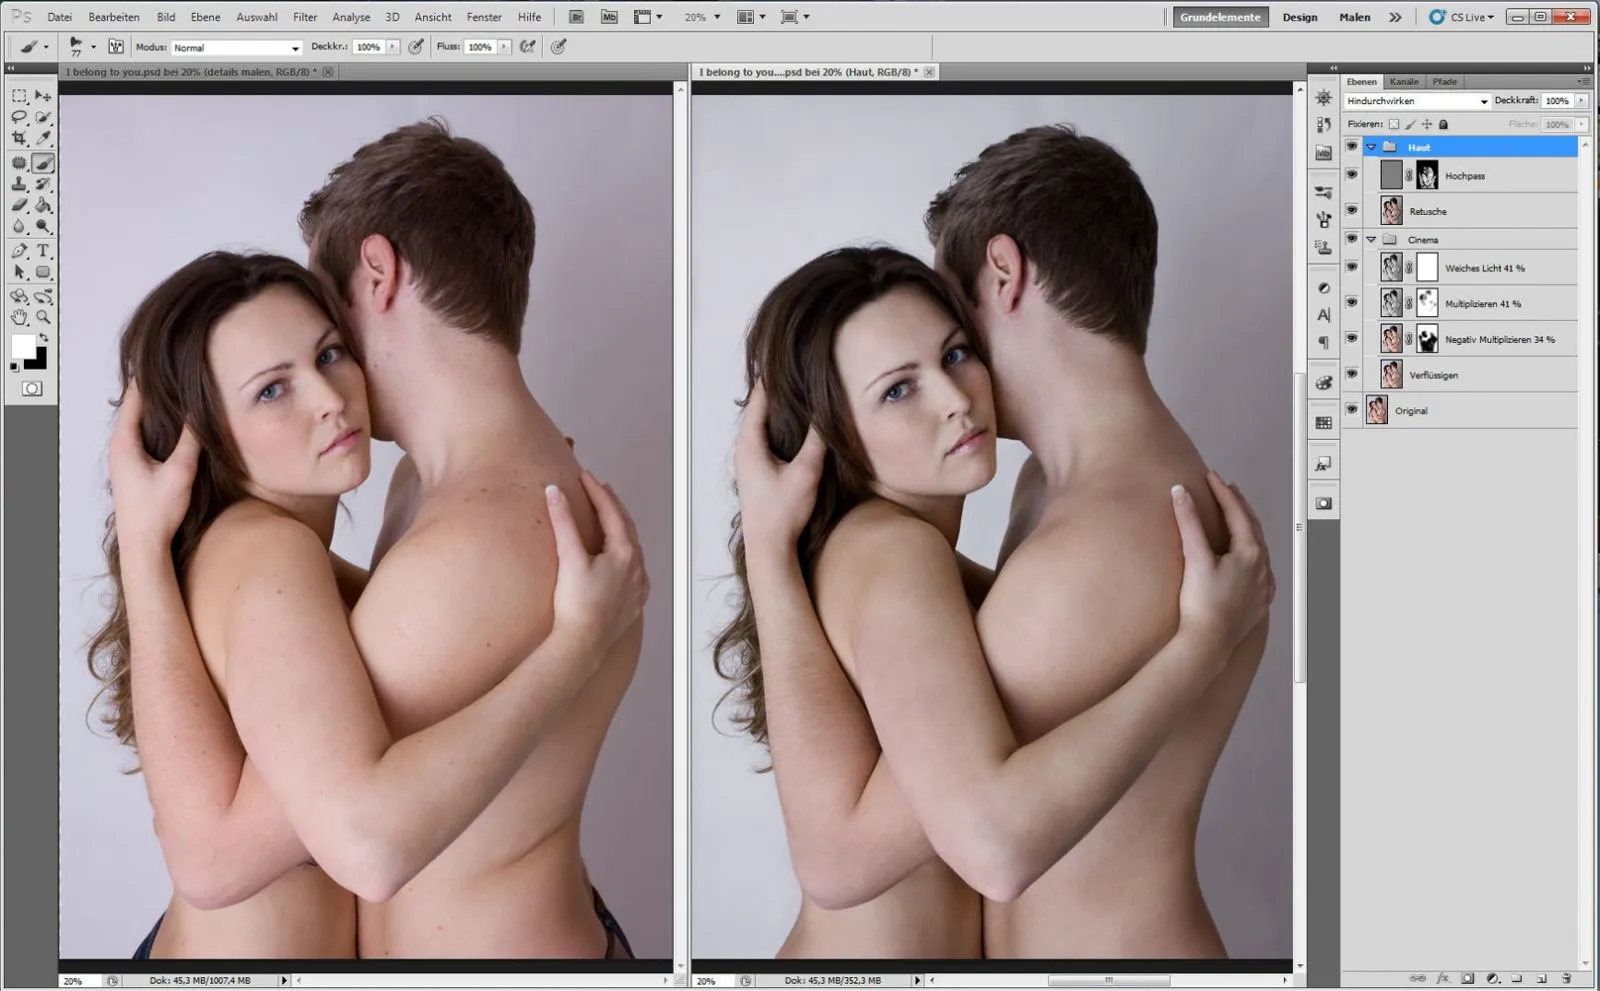
Combine these three layers into a group and name it "Cinema." Use the shortcut Ctrl+Alt+Shift+Del to copy the three layers to a new one. Name this "Retouch."
Remove skin blemishes using the touch-up tool and the repair brush. Duplicate the layer and apply the following filters: 1st: Filter>Other filters>High pass (radius 6 Px). 2: Filter>Blur Filter>GaussianBlur (9 Px). Invert the image via Image>Corrections>Invert and set the blending mode to Linear light.
Create a mask and mask out everything except the skin.
Tip: If you want to retouch away a large wrinkle, do not use the Copy Stamp tool, but select an area that would be suitable in terms of light and structure, mark the area with the Lasso tool, increase the number of pixels for soft edges, duplicate it on a new layer and move it to the area to be retouched.
Step 2: Emphasize the colour mood and details
Create a new layer and fill it with a yellow color, blending mode: Linear light, opacity 14 %. Fill a new layer with a brown-green color, blending mode: Multiply, op acity 100%. Duplicate the layer and assign a white mask to both layers, paint in the middle with a black foreground color and a soft brush tip at maximum size to create a vignette. Change the yellow color palette of the image and add red and blue tones to the image.
Create an adjustment layer via Layer>New adjustment layer>Color balance. And make the following settings: Cyan-Red: +6, Magenta-Green: -6, Yellow-Blue: +27. Put all the layers in a folder and name it "Color Mood". Combine all the layers and insert them again as a new layer. To make the eyes, lips and hair more contrasty, go to Filter>Other filters>High pass (radius 28 pixels), blending mode: Soft light.
Use a black mask to hide everything and use a white foreground color to paint the change into the image in the area of the eyes, eyebrows, nostrils, lips and hair. You call this layer "high pass". Put the two layers in a folder and name it "Emphasize details".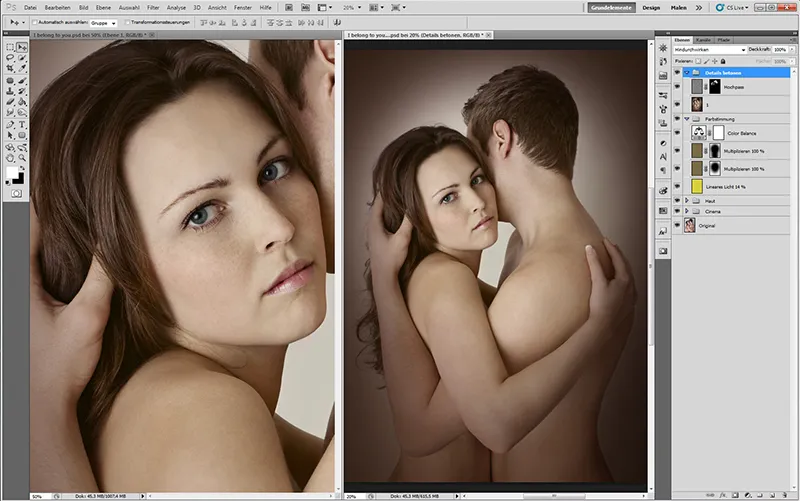
Tip: The higher the radius of the high-pass filter, the more contrast the details will have.
Step 3: Make it shine
To remove the light and dark spots on the skin, create a new layer. Layer>New>Layer. A dialog box will appear, name it "Skin patches", select the Soft light mode and check the 50% grey box. Take a brush with a soft edge and set opacity and flow to 10-20%. Lighten the dark areas with white foreground color and darken the light areas with black color. Use the shortcut Ctrl+Alt+Shift+Del to copy the layers to a new one. Name this "2".
To make the skin glow, we create two gradation curves, in one you lighten the midtones and call it "lighten", in the other you darken the midtones and call it "darken". Then invert the two layer masks: Image>Corrections>Invert. Use a white foreground color and a soft brush with low opacity and flow to make the skin glow. Put the layers in a folder and name it "Light effects".
To change the lip color, create an adjustment layer via Layer>New Adjustment Layer>Color Balance and make the following settings: Cyan-Red: +23, Magenta-Green: +19, Yellow-Blue: +12. Name the layer "Lips" and invert it. Paint the lips on the black mask with white paint. Use the same procedure for the eyes (iris) with the settings: Cyan-red: -12, magenta-green: +0, yellow-blue: +24. To lighten the whites of the eyes, create a gradation curve and lighten the mid tones; name the layer "whites of the eyes", invert it and paint the whites of the eyes on the black mask. Put the layers in a folder and name it "Eyes, lips".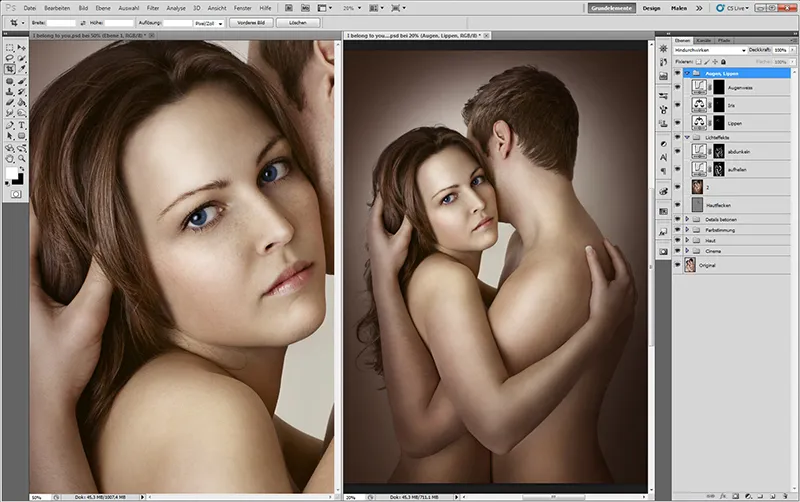
Tip: To be able to retouch the spots on the skin cleanly, you should adjust the size of the brush exactly to the spot and zoom the image to 200-300 %.
Step 4: Create a brush
There are many ways to give your eyelashes more volume, your eyebrows a beautiful shape and your hair more shine and texture. I'll show you how to get quick and photorealistic results with a brush tool. Open the brush presets dialog (F5), go to Load brush, select the brush and click on Load. The brush now appears in the Brush presets dialog.
Take a white work surface and practice setting the brush strokes; this will give you more confidence if you are practiced before you start the actual work. If you are using a graphics tablet, select pen pressure; if you are working with the mouse, set the menu item to Off. Experiment with the opacity and flow. With low opacity and flow, the strokes will be finer, which is suitable for hair, fur and fabric. High opacity and flow for eyelashes, eyebrows and light reflections on hair.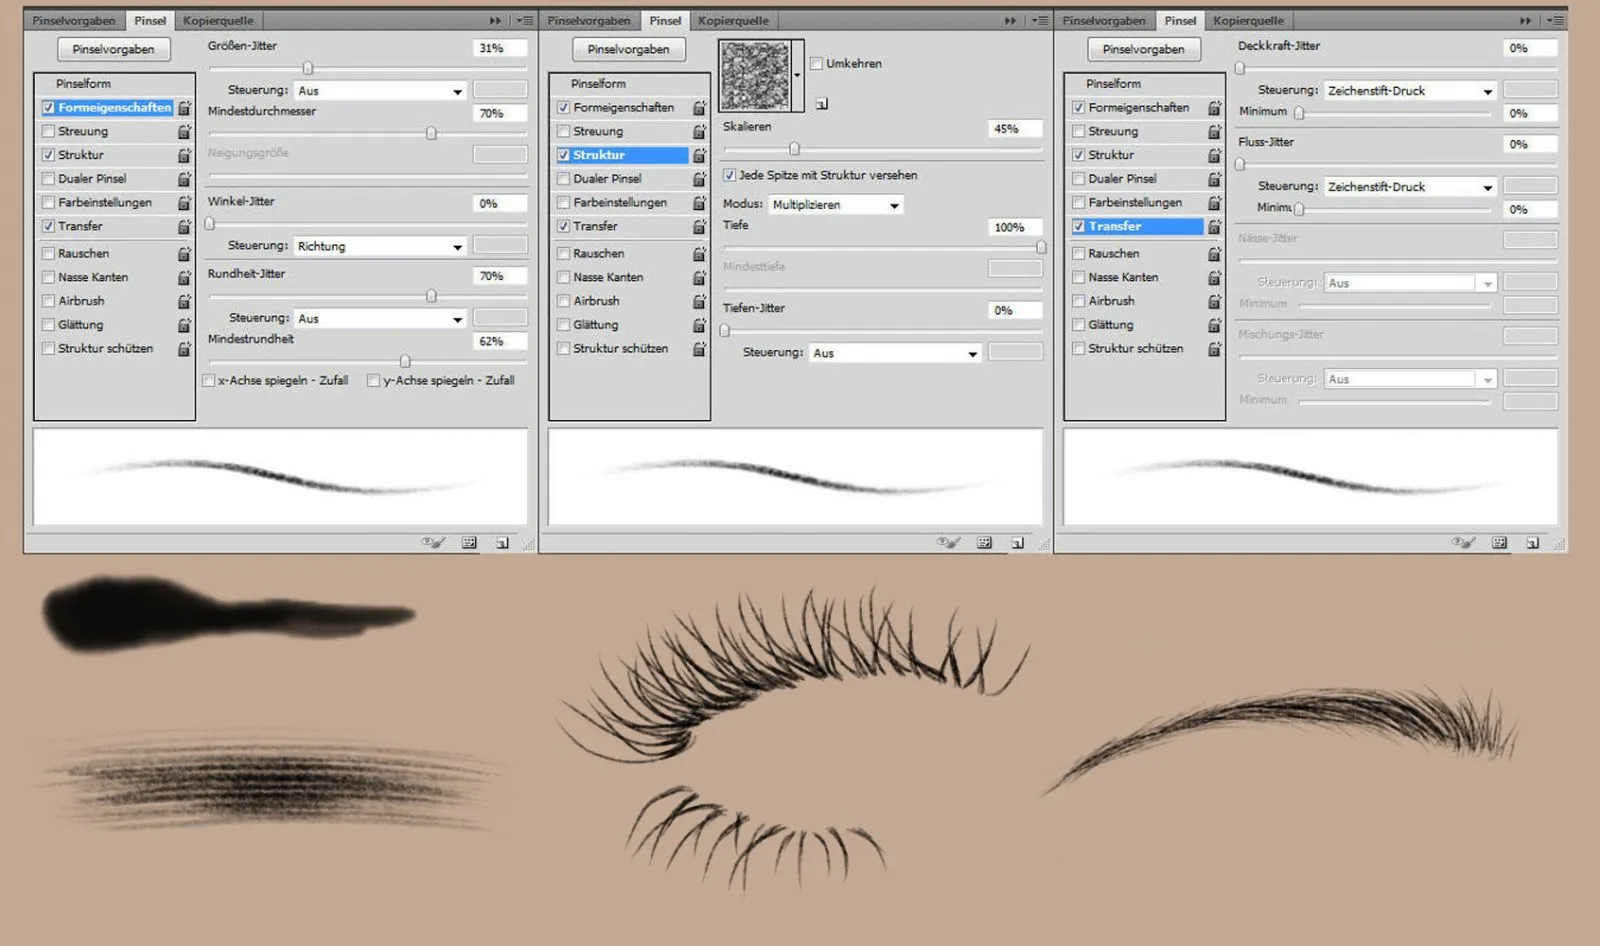
Step 5: Painting
To add volume to the lips, create two new layers. The first layer to lighten - assign the Linear Dodge blend mode to the layer. The second layer for darkening - assign the Multiply blending mode to the layer. Pick up the lip color with the eyedropper tool and switch to the brush tool with soft edge, low opacity and flow. On the "Dodge Linear" layer, lighten the lips in the center and on the side where there is a light reflection.
On the "Multiply" layer, darken the shadow side slightly. Now create an "Eyebrows" layer, pick up the eyebrow color with the eyedropper tool, switch to the brush tool and select the brush you practiced with earlier. Paint small hairs with light movements in the direction of growth and fill in the gaps, experimenting with the opacity and flow. Create a new layer for the eyelashes and proceed in the same way as for the eyebrows.
Paint long and short hairs to achieve more density. To make hair shiny, create a new layer, pick up the lightest hair color with the pipette tool and paint with the brush tool (op acity and flow at 50 %) with light movements in the direction of growth. For the highlights, you can increase the opacity and flow and choose a lighter color. Put the layers in a folder and name it "Painting".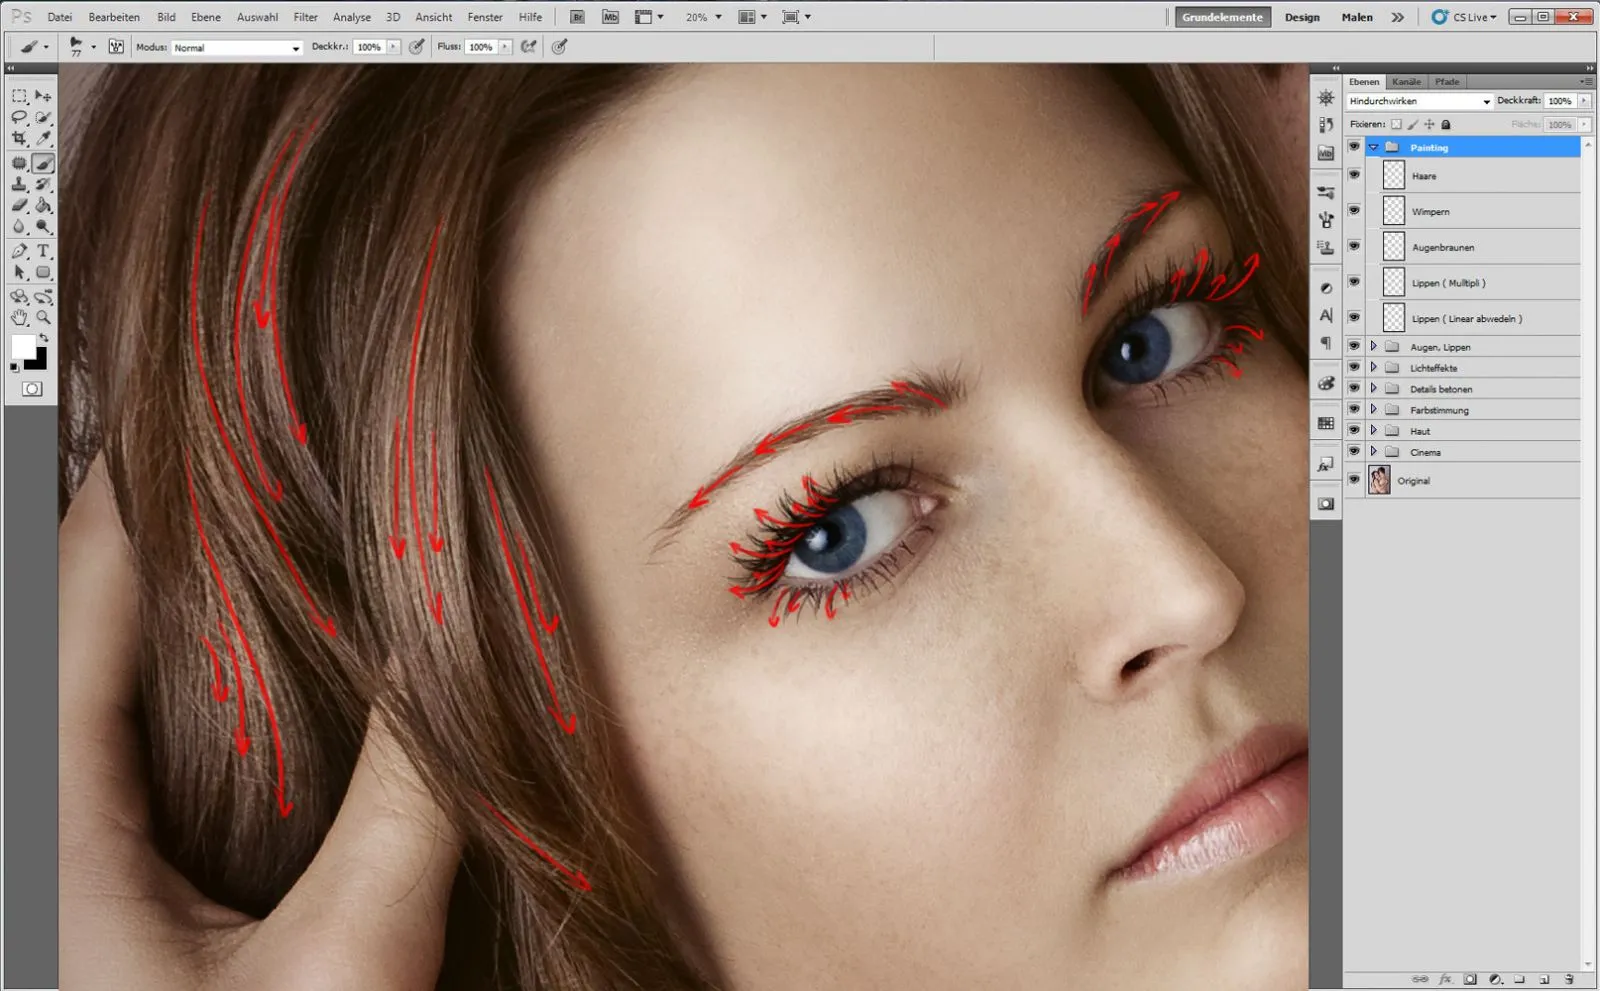
Tip: If you want to paint intensely mascaraed eyelashes, simply duplicate the layer with the eyelashes, reduce the opacity slightly and erase the tips of the eyelashes with the eraser tool.
Step 6: Final
Use the shortcut Ctrl+Alt+Shift+Del to copy the layers to a new one. Name this "3."
Finally, I like to experiment with the photo filter: I would like to give the image a cooler environment. Create an adjustment layer via Layer>New adjustment layer>Photo filter, select a cold filter (80) and a density of 25%. Copy the layers to a new one.
To make the image softer and richer in contrast, go to Filter>Soft focus filter>Gaussian blur, radius 80 pixels, select the Soft light blend mode and reduce the opacity to 63%. Finally, sharpen the image by copying the layers to a new one, assigning it the Soft light blend mode and selecting Filter>Other filters>High pass with a radius of 1 pixel.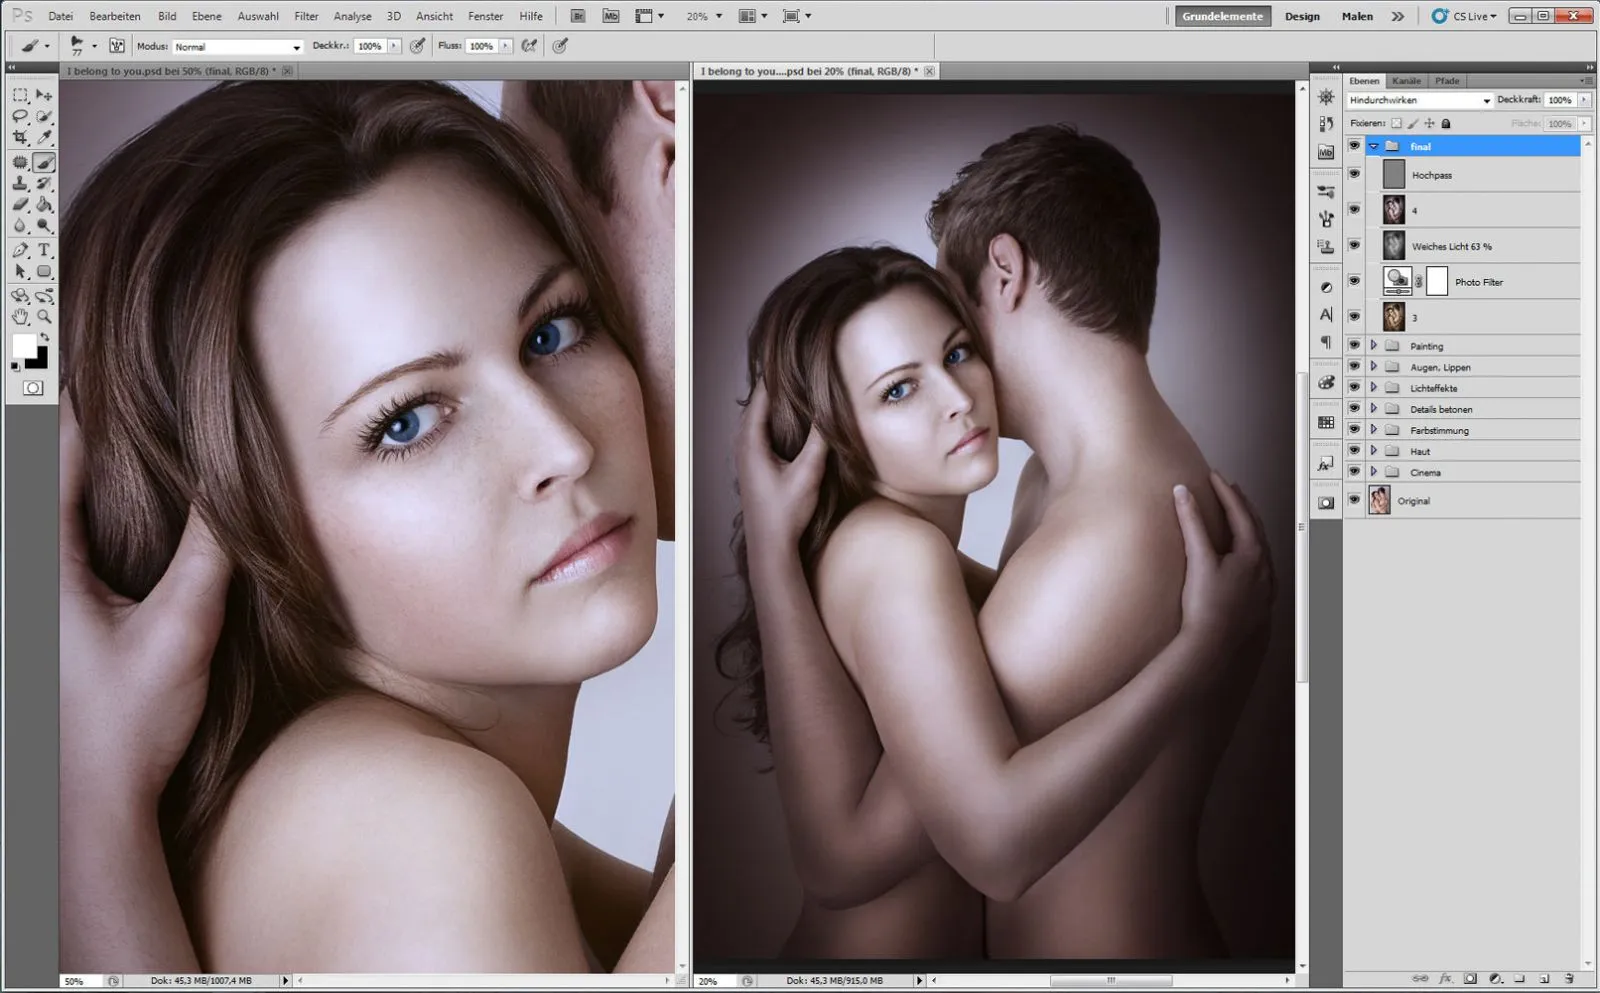
Tip: To give the image a uniform color mood, use a photo filter.
Here is an overview of the layers: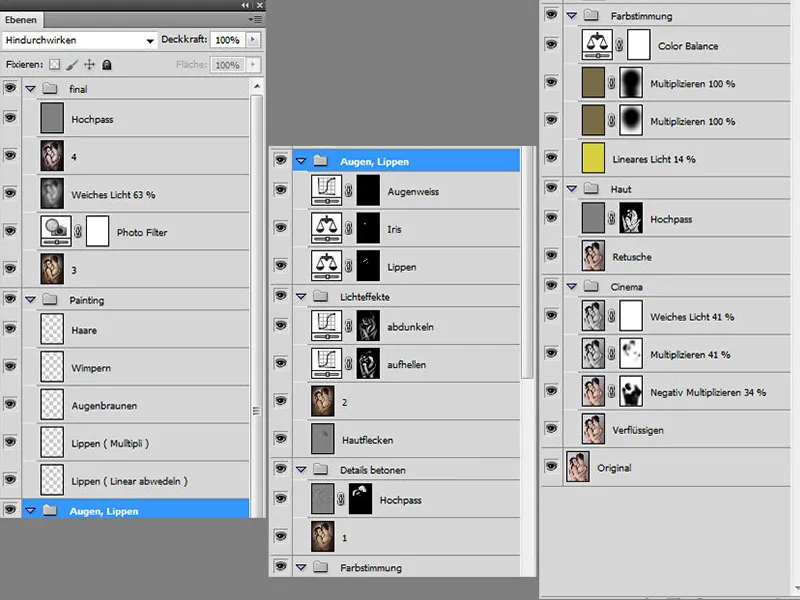
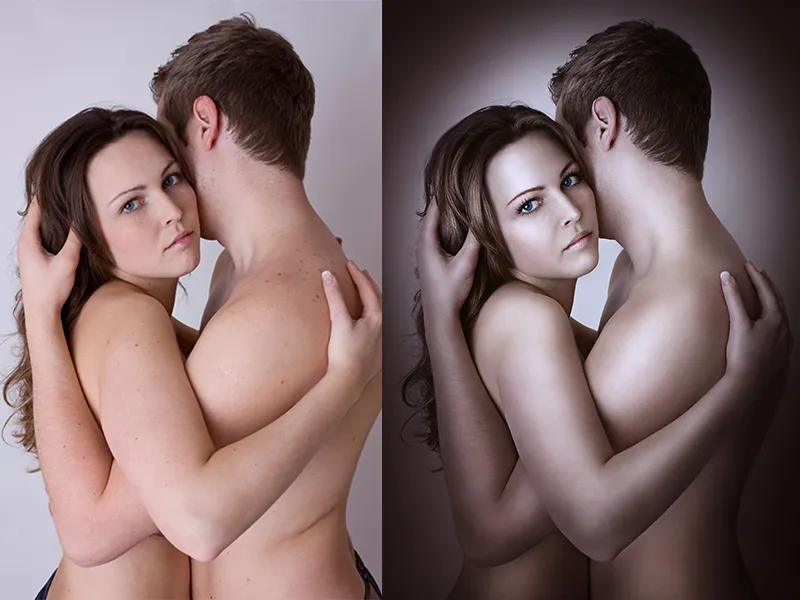
And here is the before and after view: