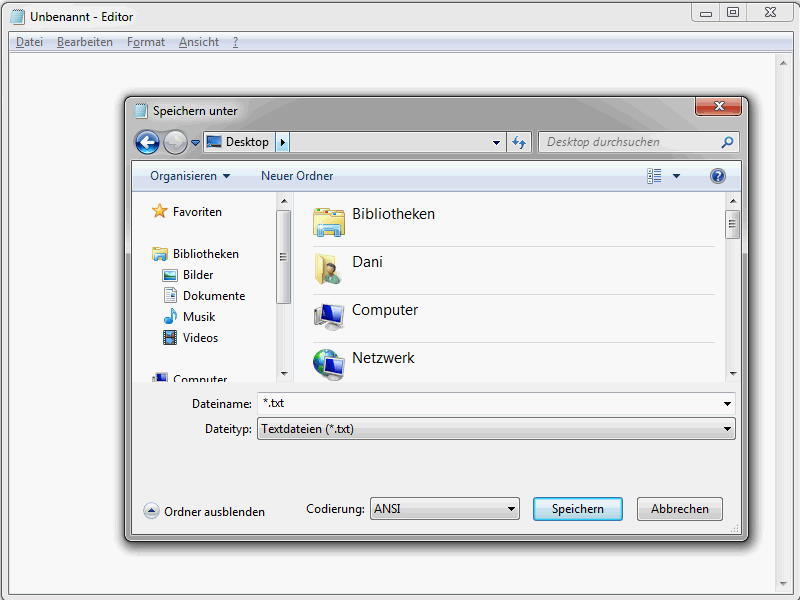
Create a new file for a first test in the editor of your choice. If you use the Windows Editor, open it via Start>AllPrograms>Accessories>Editor.
Then select File>Save as. The file type field is crucial.

All files must be set here. Then enter index.htm in the File name field. You can now save the file in the desired location. This is the file you are now working with, your first HTML file, which is currently still empty. This will change in a moment.
If you are using Dreamweaver, it is best to specify that you want to create an HTML file when you start the program.
The HTML framework
Before we start with the HTML framework, an important note on the semantics used within this series - and also in the HTML world. You will constantly come across the terms tag and element, which unfortunately are often misinterpreted. An example:
<a href="news.htm">To the news</a>
This syntax shows an a element, namely <a href="news.htm">To the news</a>. This element is made up of an opening a tag, i.e. <a> or in full <a href="news.htm">, the element content To the news and the closing a tag </a>. In addition, the element a has the attribute href with the attribute value news .htm.
The previous example shows a hyperlink definition in HTML via the element a. This element a is characterized by the opening < ;a> and the closing </a> tag. As you can see, it is not that difficult to use the terms element and tag correctly.
But now let's get started. Open the previously saved HTML file in your editor. Every HTML document has a certain basic structure.
Here is the framework in its full glory:
<!DOCTYPE html> <html lang="en"> <head> <title>PSD-Tutorials.de</title> <meta charset="UTF-8" /> </head> <body> </body> </html>
What do the individual entries mean? Let's start with the so-called document type declaration.
<!DOCTYPE html>
This document type declaration tells the browser in which your website will later be displayed which HTML standard you are using. In this case, this is HTML5. However, if you were using HTML 4.01, the DOCTYPE specification would look like this:
<!DOCTYPE HTML PUBLIC "-//W3C//DTD HTML 4.01 Transitional//EN" "http://www.w3.org/TR/html4/loose.dtd">
The topic of document type declarations in particular causes confusion for HTML beginners because there are many different variants. It is actually quite simple: Think of a document type declaration as a kind of construction manual that describes which elements may be contained in a document.
I generally advise you to use a short HTML5 declaration.
<!DOCTYPE html>
Modern browsers recognize it and display the pages in which it is used in standard mode. However, you should only define HTML elements that are permitted in HTML5. More on this later.
Let's continue with the html element.
<html lang="en"> ... </html>
This element encloses the document. What stands out is the lang attribute. This specifies the language used in the document. Here are some lang abbreviations for German-speaking countries.
- de - German (standard)
- de-ch - German (Switzerland)
- de-at - German (Austria)
- de-lu - German (Luxembourg)
- de-li - German (Liechtenstein)
By the way, there are even more different long abbreviations for English.
- en-us - English (USA)
- en-gb - English (United Kingdom)
- en-au - English (Australia)
- en-ca - English (Canada)
- en-nz - English (New Zealand)
- en-ie - English (Ireland)
- en-z - English (South Africa)
- en-jm - English (Jamaica)
- en - English (Caribbean Islands)
Whether you use the two-digit abbreviations de, gb etc. or prefer to use the compound abbreviations shown above is ultimately up to you. I favor the two-digit ones.
The document header data is expected within the head element.
<head> ... </head>
Admittedly, header data sounds a bit unwieldy, but it is quickly explained. Among other things, you put things in here that describe the document in more detail. These are, for example, the title and the character set used. Scripts and style sheets can also be integrated here and general metadata can be defined. But more on this later.
The title element is particularly important.
<title>Tutorials for image editing with Photoshop, web design & photography - PSD-Tutorials.de </title>
This is used to define the title, which is required in various places.
- In the title bar of the browser.
- When a bookmark is set in the browser.
- And, of course, the title plays a very important role in search engine optimization.
So you can see how important the title is. Choose a title that is as short and concise as possible.
You can use meta information for a detailed description of the page. Detailed information on this will follow.
Continue with the character set used.
<meta charset="UTF-8" />
This information is important for browsers. This is the only way they know how the characters must be encoded so that they are displayed correctly. Only by specifying the correct character set can umlauts and special characters, for example, be displayed correctly. UTF-8 is normally specified here.
Now we come to the actual content of the website, i.e. what visitors actually see. All of this is defined in the body element.
<body> ... </body>
For demonstration purposes, simply insert the following between the opening and closing <body>tag:
<h1>PSD-Tutorials.com</h1>
The document should then look like this
<!DOCTYPE html> <html lang="en"> <head> <title>Example HTML5 basic framework - www.html-seminar.de</title> <meta charset="UTF-8" /> </head> <body> <h1>PSD-Tutorials.de</h1> </body> </html>
Save the changes and open the file in a browser.
As you can see, PSD-Tutorials .de is now actually displayed. You have created your first own HTML document.


