Step 1: The source material
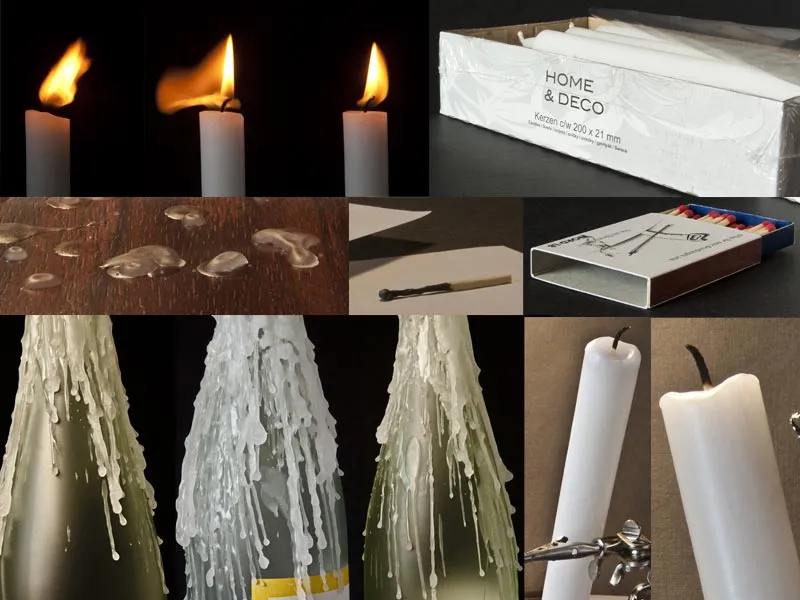
Here you can see some of the photos used for the picture. In total we need: Candles and candle box, flames, wax stains, matches and box, table or wooden top, lots of wax drops/wax noses - created by patiently dripping wax onto various glass and plastic bottles, also Photoshop brushes for smoke effects, e.g. this one: Smoke Brush Set 2.
All image elements were cropped separately in a separate file and later dragged into the working file only for Photoshop compositing. Working with a graphics tablet certainly makes it easier to create the image.
Step 2: Here we go - creating the dance floor
The dance floor is inserted in a new file with approx. 3000px x 2200px and a black background. In this case, it is a tabletop that was photographed frontally, at a slight angle from above. The plate is positioned in the lower third of the image and the layer is edited via Filter>Convert to Smart Filter.
Using the Gaussian Blur filter (approx. 7px) and a layer mask, the rear edge of the table is blurred so that the focus is more in the front area. The conversion to the smart object allows us to return to the menu later if the blurring still needs to be corrected.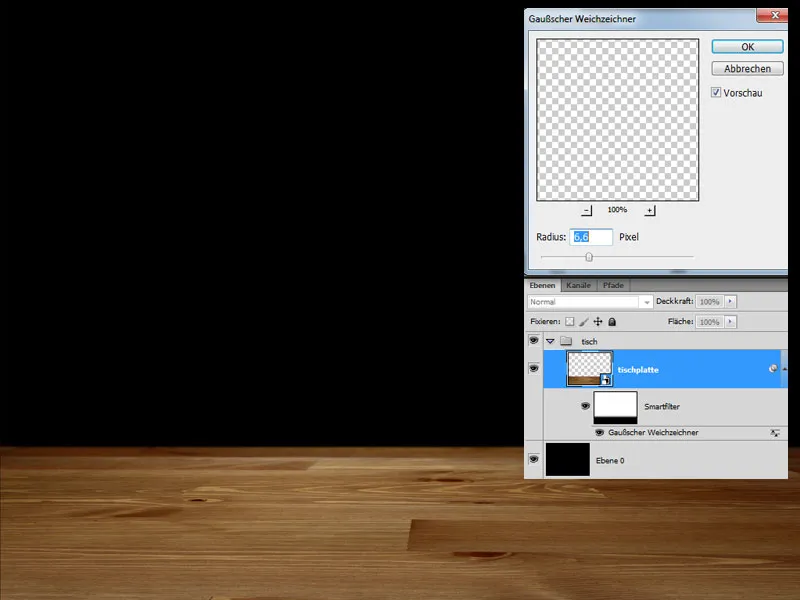
Darkening
(1.) The table should be better integrated into the background, so we darken it down to the middle area using a gradation curves adjustment layer and a mask. This layer is set as a clipping mask for the table top layer, i.e. the following changes only affect the table top and not the entire image. A clipping mask can be created by holding down the Alt key and clicking between the two layers that are to be related to each other.
(2.) The table is not yet dark enough for me, so a second Gradation Curves layer is applied. This time, however, the area in which the candles will later dance is cut out in an elliptical shape using the mask. All subsequent layers are also created as clipping masks.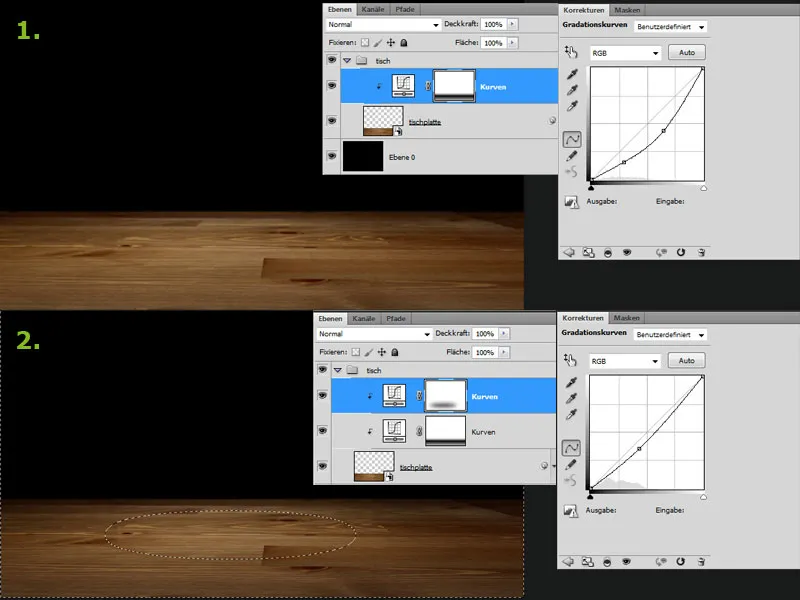
Spotlight
In the next step, a spotlight is added to illuminate the area where the candles will later be positioned. A white, long, oval shape with a very soft edge is drawn for this purpose and placed in the blend mode Copy one into the other. The scene should later be illuminated almost exclusively by the candlelight, so the table can be made a little darker, and the mid tones are darkened a little more using the tone value correction. Now you can dance, the dance floor is ready.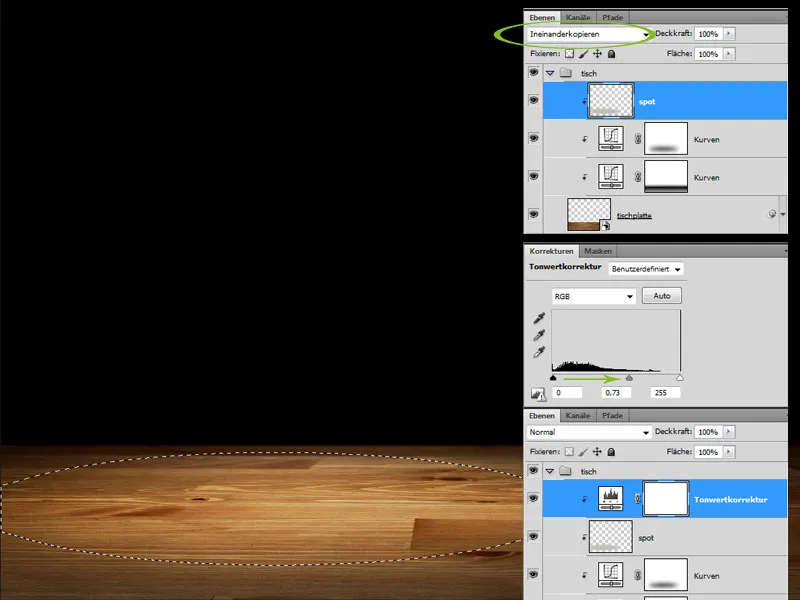
Step 3: Create a dancing couple - define the basic body
Two candles are cut out of the source material using the pencil tool and inserted into the working file. Using the shape grid, they are brought into the desired basic position. For this and the following steps, it is helpful to look at reference photos of dancing couples. This makes it easier to create the right dance posture.
The lighting conditions of the candles are then adjusted slightly using a gradation curves adjustment layer. The highlights were raised slightly and the mid-tones lowered to increase the contrast. The effects of the gradation cur ves can be controlled even more precisely using the layer masks.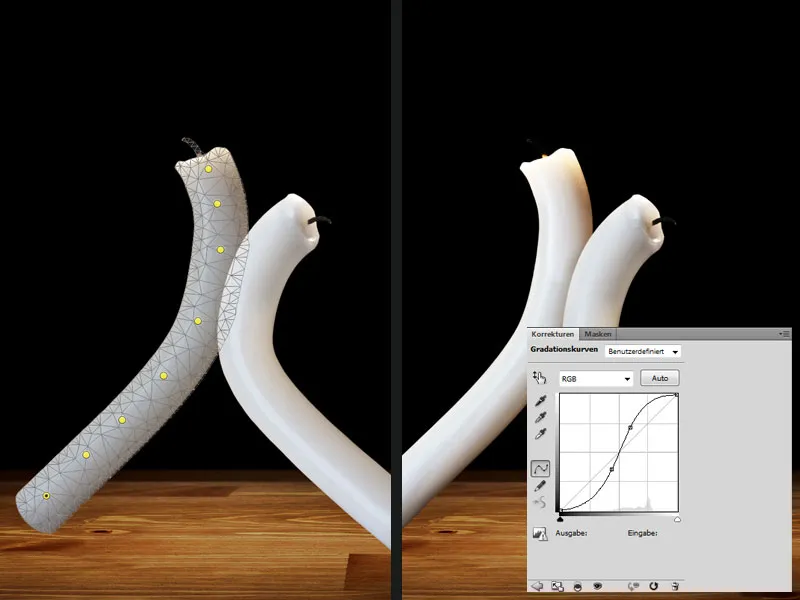
Adding body parts with a lot of patience - shaping arms and legs
Various "wax noses" are cut out of the original images; this can be done with the drawing pencil, sometimes it even works with the magic wand tool if the contrasts are high enough. In any case, these steps require a lot of stamina.
The various wax elements are inserted into the image on separate layers and brought into the right shape and position using the shape grid or Free Transform. The elements are then arranged in front of or behind the basic bodies, depending on which dance position is to be depicted. These work steps also require patience, and not every "wax nose" fits straight away, you have to try.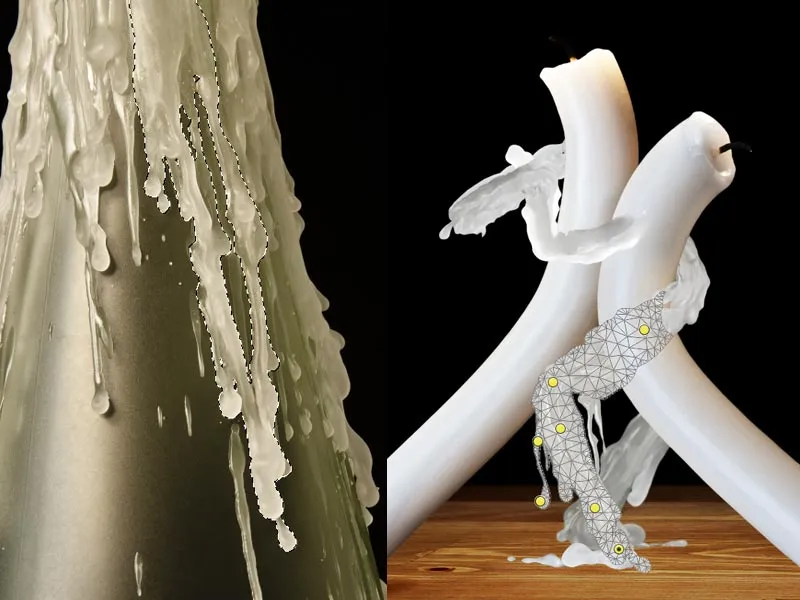
Add more wax - dress etc.
The dancing couple is fitted with further wax elements, e.g. a kind of costume is created. It may be necessary to adjust the lighting conditions of the individual wax elements so that everything fits together harmoniously. This is controlled via the tone value correction. Layer masks are used to blend the individual elements together and create smooth transitions.
During these work steps, many layers quickly come together, which are best organized in groups, e.g. parts of the arm or leg. This will help you to keep an overview and make it easier to find your way around later if changes are necessary.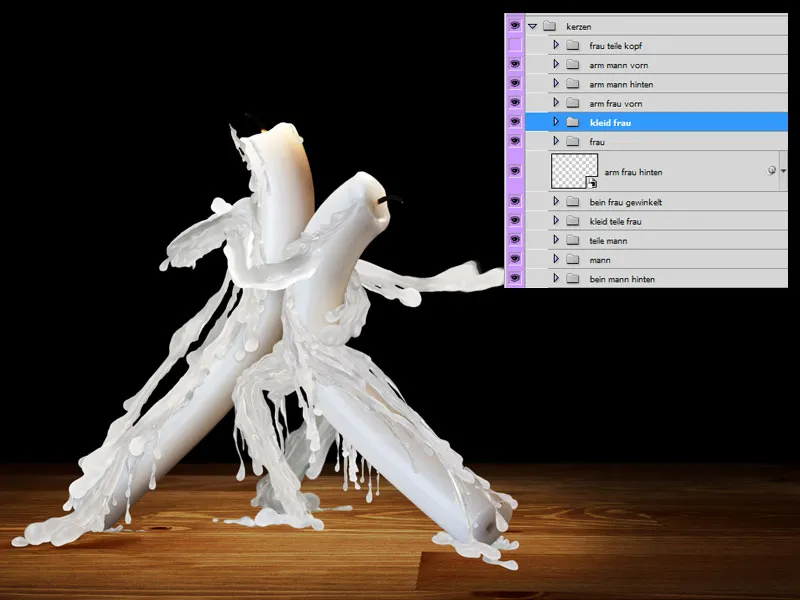
Finishing touches - painting shadows and increasing contrast
Once we are happy with the arrangement of all the elements, we copy the dancing couple to a new layer (Shift+Ctrl+E), which makes it easier to continue working. Don't forget to hide the background layer and the table for this step, otherwise they will also be copied onto the layer.
Paint the shadow:
A new layer is created as a clipping mask for the dancing couple, in the Multiply blend mode. Use black paint, a soft round brush tip and low opacity to paint shadow areas on the candles, e.g. under the arms. The two look much more three-dimensional with shadows.
The contrast could be a little crisper. To do this, we create a gradation curves adjustment layer as a clipping mask in the Multiply blend mode. The mid tones and highlights are raised. If the effect is too strong, the opacity of the layer is reduced; in the image it is approx. 55%.
Another adjustment layer, Tone Correction, refines the whole thing, brightens the highlights a little more and reduces the tonal range of the dark tones slightly. Up to this point, the whole thing looks quite good.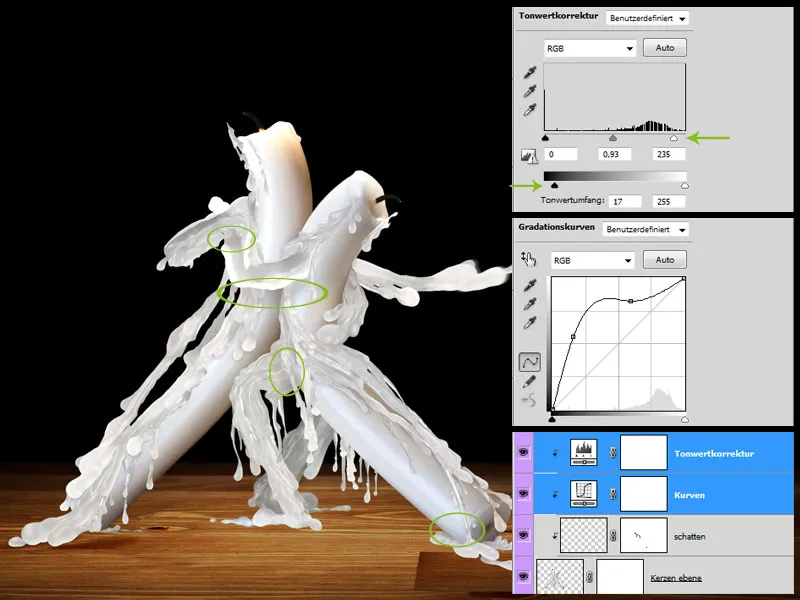
Shadows cast on the floor
For more realism, a shadow needs to be cast on the floor. To do this, paint a shadow under the dancing couple in a new layer with a soft brush tip and black; the layer is set to Multiply. If you apply the Gaussian blur to the layer, you will achieve softer transitions. If the shadows are a little too strong, this can be easily adjusted using the layer opacity.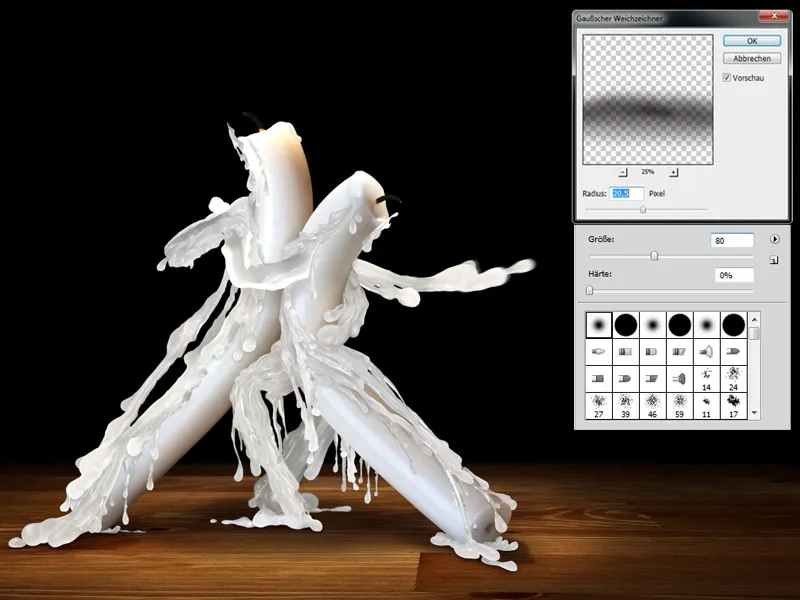
Step 4: Out of the box
Inserting the candle box and adjusting the toning
The candle box was also cut out in a separate file and is added to the bottom right of the image in the document. To make it match the rest of the image in terms of color, a Color Fill layer (#f6bc42) is placed over the layer as a clipping mask using the Soft Light blend mode and an opacity of approx. 48%.
The box is still far too bright, so a Brightness/Contrast adjustment layer is added, the brightness is reduced to -90, the contrast to -13 and the layer opacity to 80%. In the layer mask, the effect is limited to the bottom right-hand part of the box using a gradient from black to white.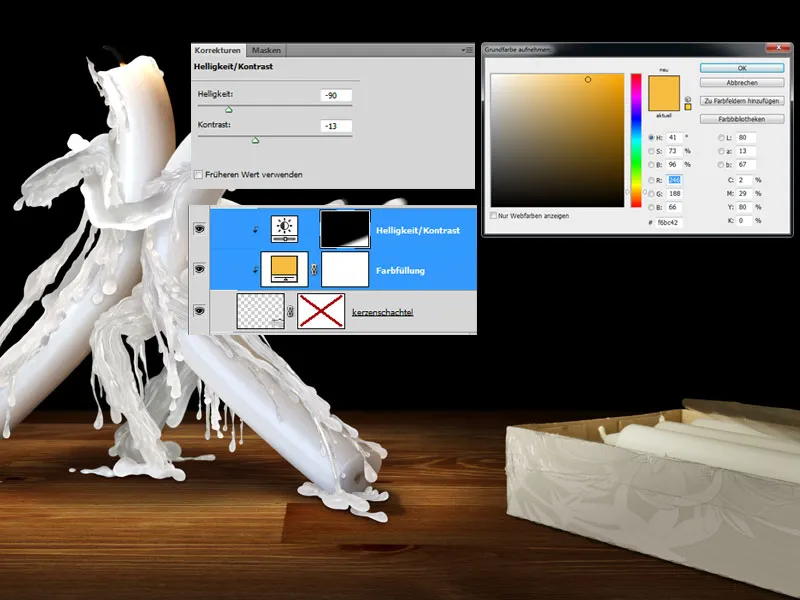
Darken further
The box still does not look properly integrated into the image. For this reason, a gradation curves adjustment layer and a tone value correction are added. As can be seen in the image, the light color tones are further reduced in both palettes. It is important to set the layers to the Luminance blend mode to avoid changing the color saturation of the candle box.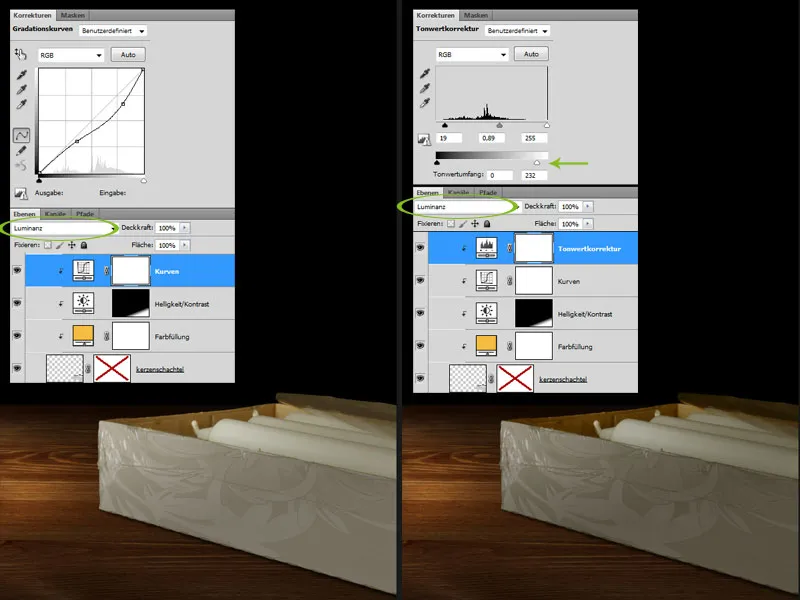
The box is burning
We are already adding a burn mark to the box, although there is no fire in the picture yet. To do this, we create a layer mask for the candle box and mask out a small section at the top of the box. Now we need some soot around the burnt area. This is drawn in with black paint and a soft brush on a new layer in the Multiply blend mode.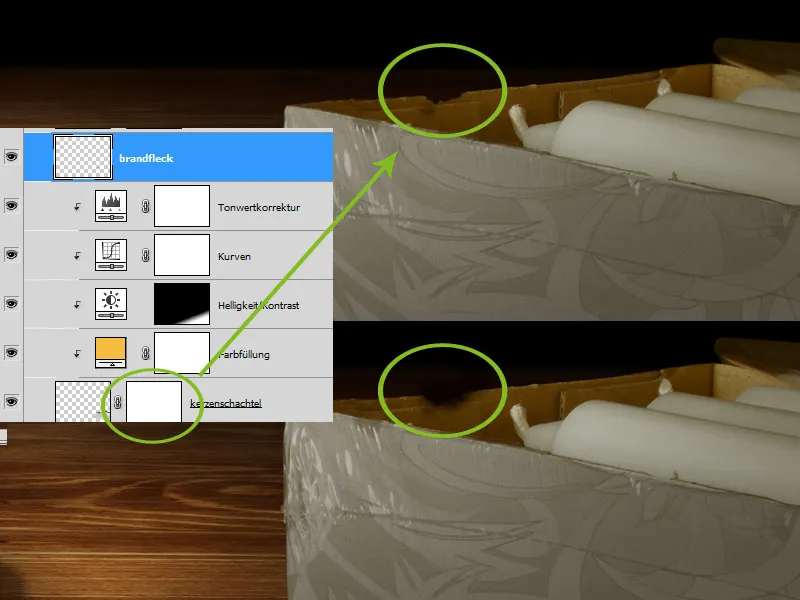
Embers and smoke
Now we need to add some embers. Using a small hard brush and red/yellow paint, draw a small glowing edge and then place the layer in the Linear dodge (Add) blending mode. Duplicate the layer to enhance the effect.
A small column of smoke is added using white paint and a suitable smoke brush, which must first be loaded into Photoshop. A dripping wax nose is also added to the corner of the packet.
Last but not least, all that is missing is a shadow edge under the packaging. To do this, use a soft black brush to paint a shadow on a new layer below all the others. Set the layer to the Multiply blend mode and reduce the layer opacity to approx. 70%. This completes the editing of the candle box.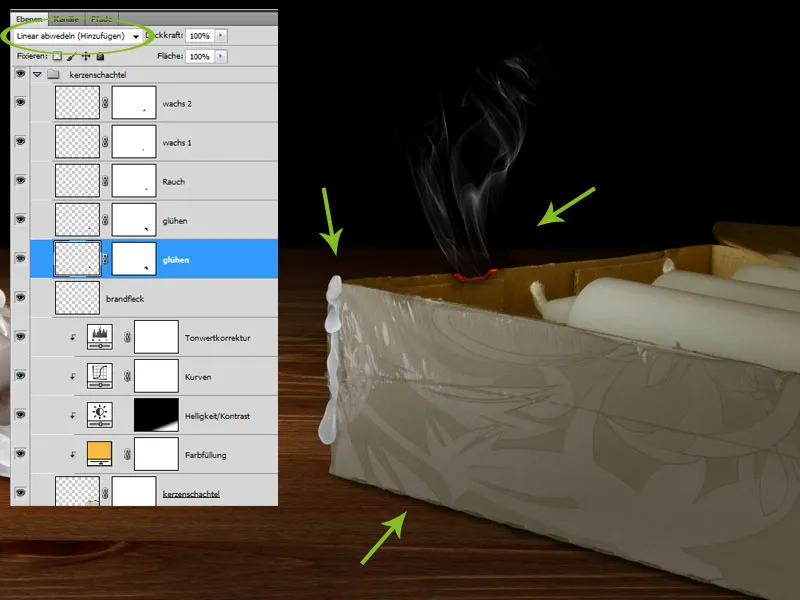
Step 5: The matchbox
The candles are to be lit later, so the appropriate lighting material must be added to the picture: a matchbox and burnt matches. Drag the cropped matchbox into the document and position it in the bottom left-hand corner of the image and adjust the size using Free Transform if necessary.
The blue color of the inner packaging does not quite match the color mood of the image, so the blue tones are desaturated and lightened using a Hue/Saturation adjustment layer , created as a clipping mask.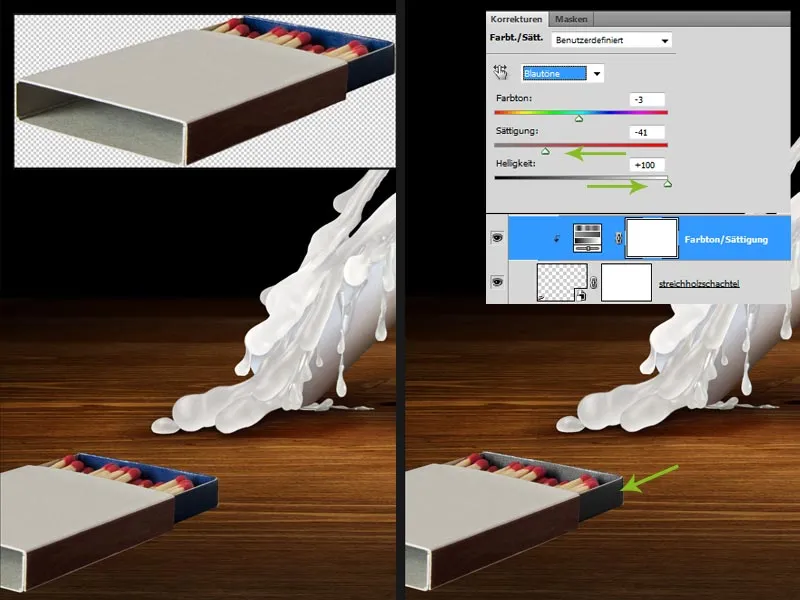
Darken the box
The inner area of the box is far too bright, so simply paint over it with a little black, set the layer to Multiply and reduce the opacity to 60%. That already looks better.
Nevertheless, the box is still too bright overall and doesn't quite fit into the picture. We change this with a Gradation Curves adjustment layer. This is again created as a clipping mask and the light, medium and dark color tones are reduced. The layer then switches to the Multiply blend mode and the opacity is reduced to approx. 40%.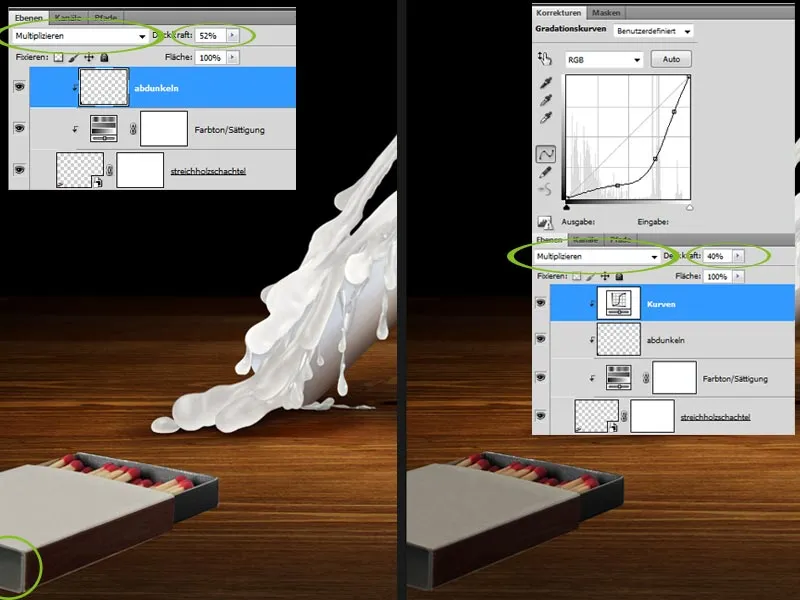
Print and shadow
Now the box still needs a suitable imprint. This was created outside Photoshop using Adobe Illustrator and then copied into the document as a Smart Object. The print is adapted to the perspective of the matchbox using Free Transform. So that the print integrates better and the paper structure of the box shines through a little, the layer is set to the blend mode Overlay.
The box also has a shadow; this is again painted under the box with a soft, black brush in a separate layer, the layer is set to the Multiply blend mode and the opacity is reduced to approx. 80%.
To refine the whole thing a little more, you can apply the Gaussian blur to the shadow layer with a radius of approx. 10 pixels.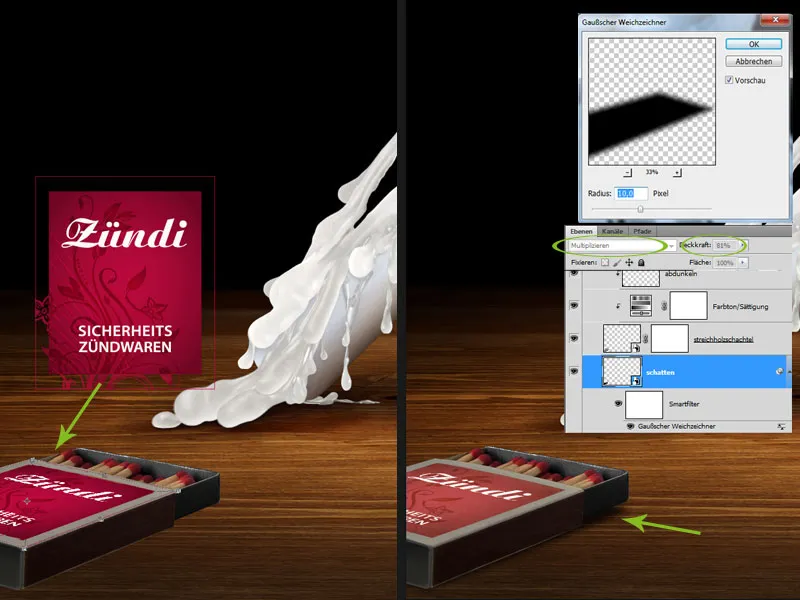
Inserting matches
The box is given the finishing touch by adding two burnt matches, which are placed on the box. A shadow is also added to these two on a separate layer, which is painted in with a small brush tip and black paint. In the final step, this layer is set to the Multiply blend mode again and the opacity is reduced to 90%.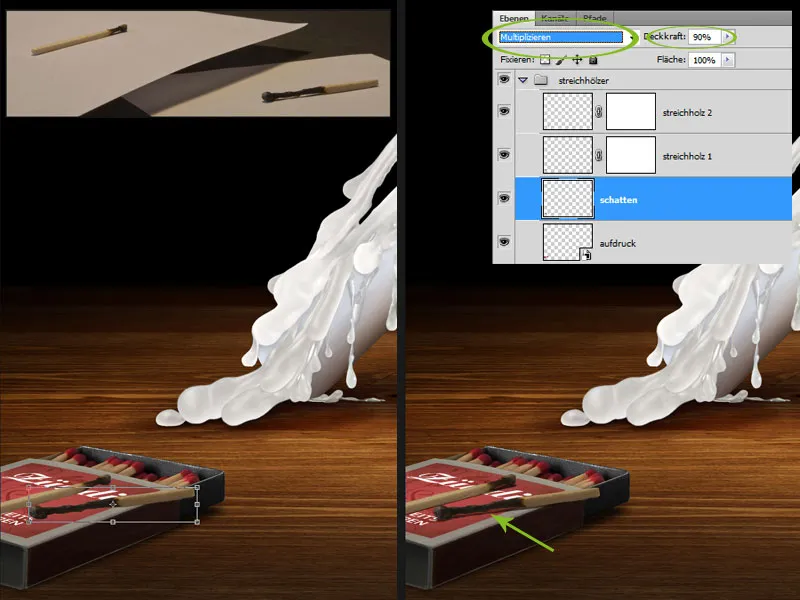
Step 6: Flaming "heads"
Now it's time to bring some fire into play; to do this, we release a suitable flame from the source material and drag it into the document. Use Free Transform to bring the flame to the right size and position it on the wick of the male candle; if necessary, a clean transition can be created using a layer mask. Finally, set the layer to the Multiply negative blend mode to remove any unsightly dark areas that may have remained after clipping.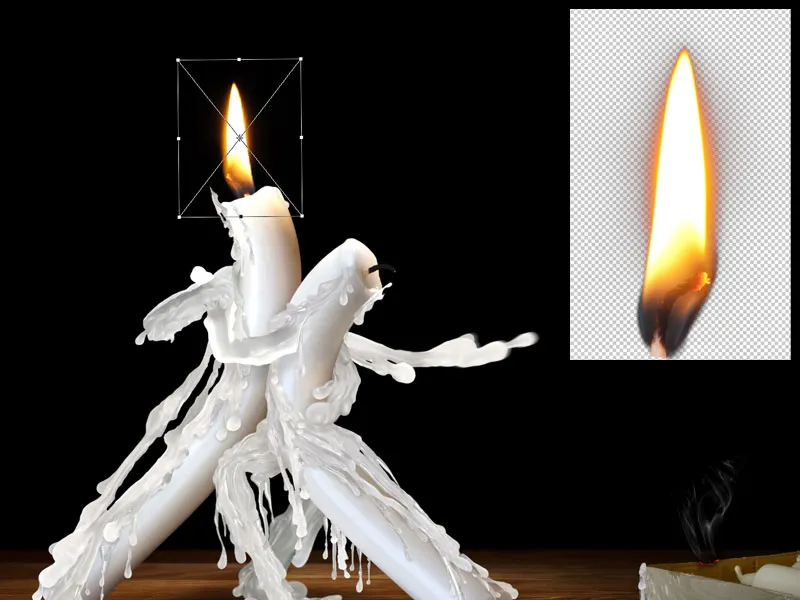
More dynamics
For more dynamism and movement in the image, drag additional flames into the document. Distort and bend them using Free Transform until beautiful curved shapes are created that could reflect the movement of the "head". For these layers too, switch to the Multiply negative fill method and mask out unwanted areas. These work steps again require a little patience until you have achieved a respectable result.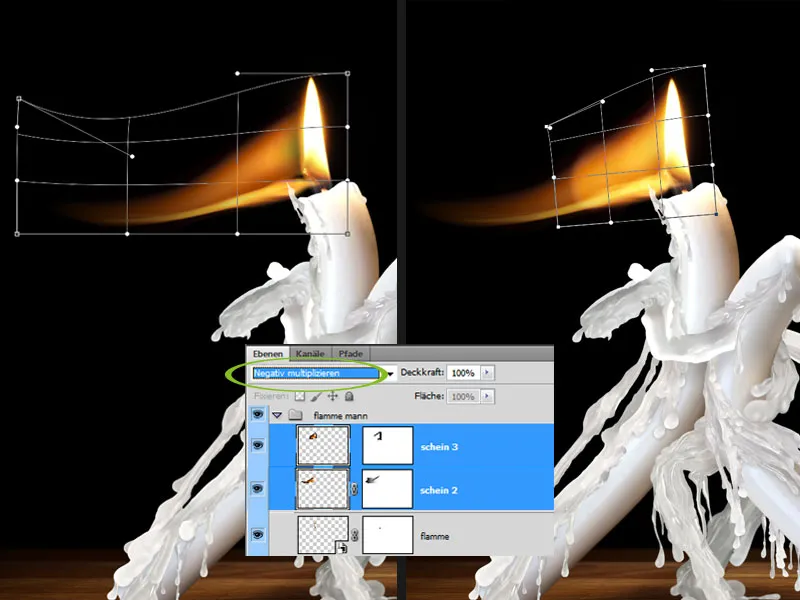
Momentum with traces of light
We need a little more momentum; to achieve this, we integrate light trails, which are also created from the cropped flames. Here, however, we exaggerate the distortion a little more. To achieve beautiful color effects, experiment here with the layer fill methods. Multiply Negative, Radiant Light or Dodge Colored are particularly suitable ; the opacity may need to be adjusted for these layers, otherwise the effects may be too strong.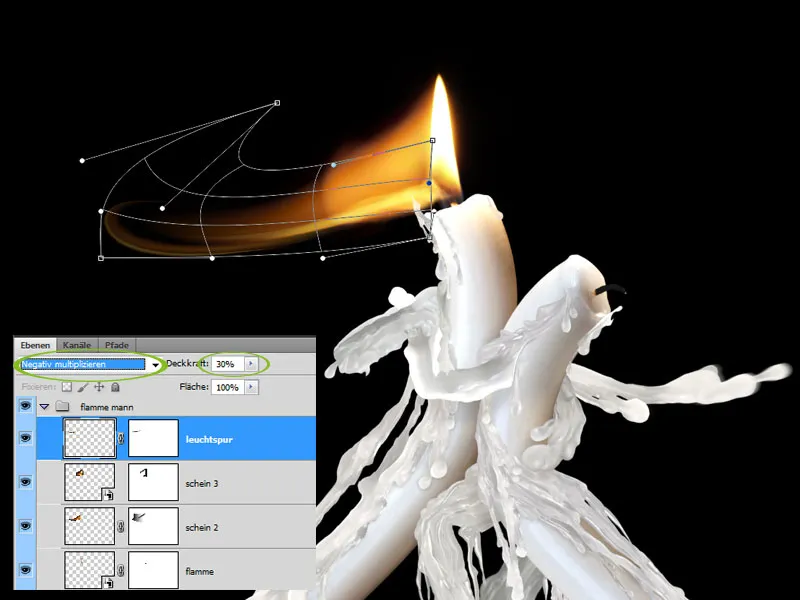
Glow
As fire also produces light, a layer for a glow is created under all flame and tracer layers. Select a yellow-orange color and place a large soft dot over the middle of the candle wick. For a very soft transition to the background, you can also apply the Gaussian blur to the layer with a very high pixel value.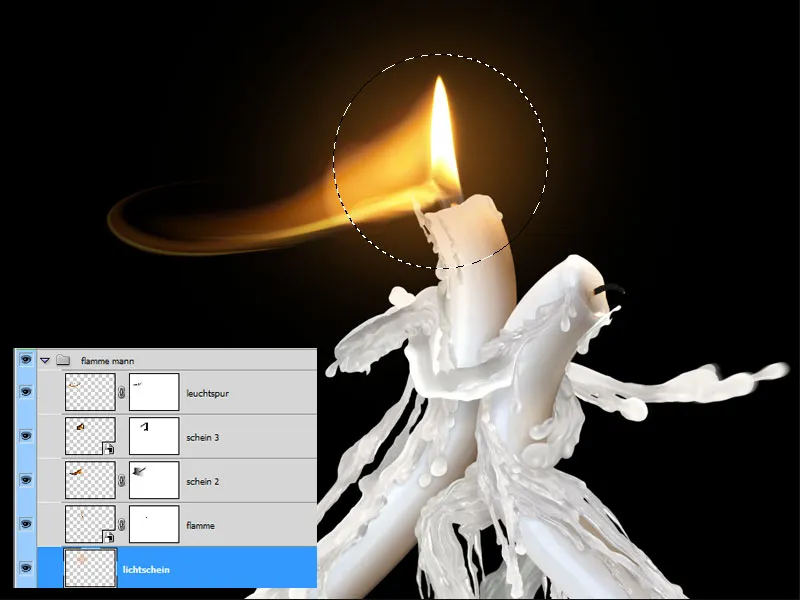
The lady
Exactly the same steps are necessary for the woman's flames. Here, only more flames and traces of light have been integrated to create the appearance of flying hair.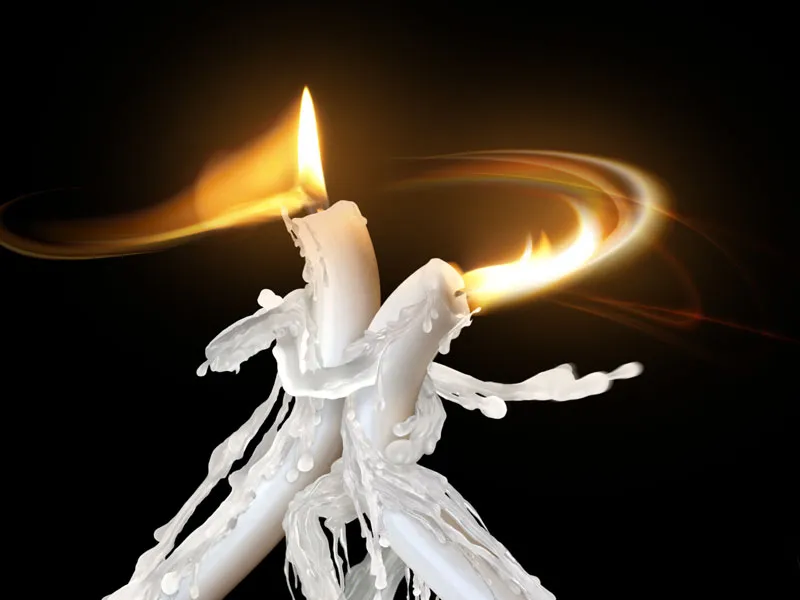
Step 7: Flying wax
The dance of the two is quite fiery and exuberant, so a few more drops of wax flying around should be integrated. To do this, just like when creating the figures themselves, individual drops of wax are cut out of the original images, dragged into the picture and positioned in the appropriate places.
To make it look as if the drops are flying through the air, a motion blur filter is added to each drop. It is helpful to convert the layers into a smart object beforehand so that you can make any necessary changes very easily. The filter is applied at a distance of approx. 40-50 pixels. The angle depends on the direction of flight and must be adjusted separately for each drop.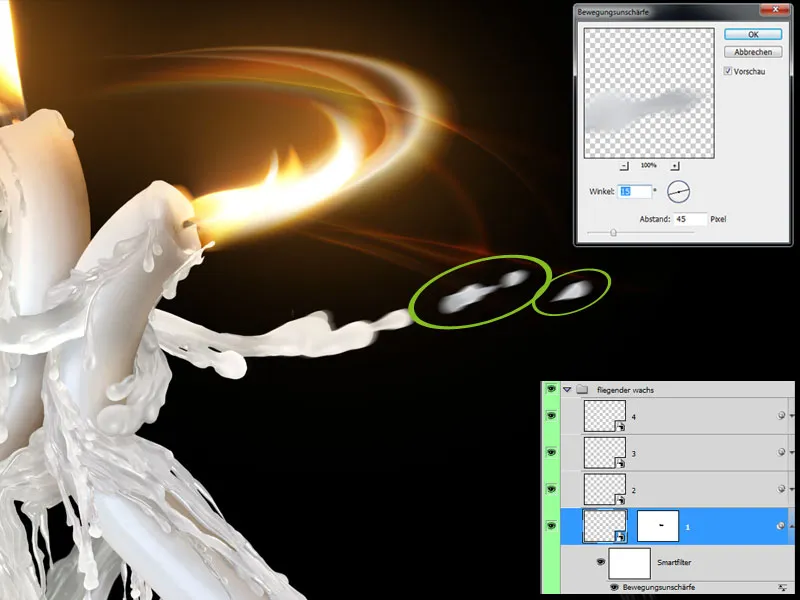
Step 8: Flying sparks
To ensure that the crackling between the two can be seen properly, a good flight of sparks is required. First, the sparks for the gentleman are painted. To do this, a new layer is created behind the candle layers. Before we start painting, the brush properties must be defined. The following values have been set for the picture in the brush palette.
- Star brush (2423) from Photoshop's own brush palette, size 60px, distance 200%
- under Shape properties: Size jitter 100%, Control: Pen pressure, Angle jitter: Control: Pen skew
- under Scattering: 500%
- under Color settings: Select a foreground and background color beforehand: Orange and Red, Foreground/Background Jitter 50%, Control: Pen Pressure
- under Transfer: Flow jitter: Control: Pen pressure, minimum 59%, Flow jitter: Pen pressure control, minimum 60%
- smoothing is activated.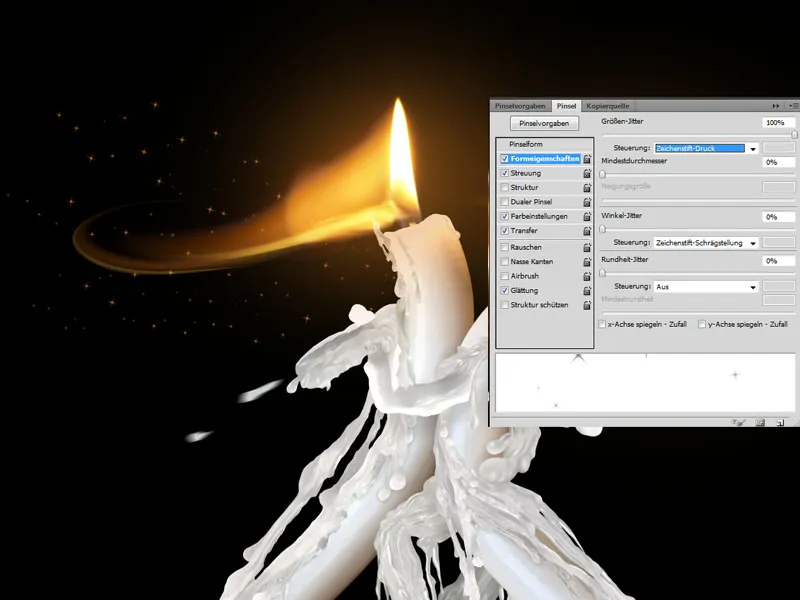
Distort sparks
When painting in the stars, you can experiment with size, scattering etc., there is no universal solution. In the image, the star plane has also been distorted using Free Transform, so the stars do not all appear to lie on the same plane, but have a perspective effect. The sparks for the lady were created in the same way as described above.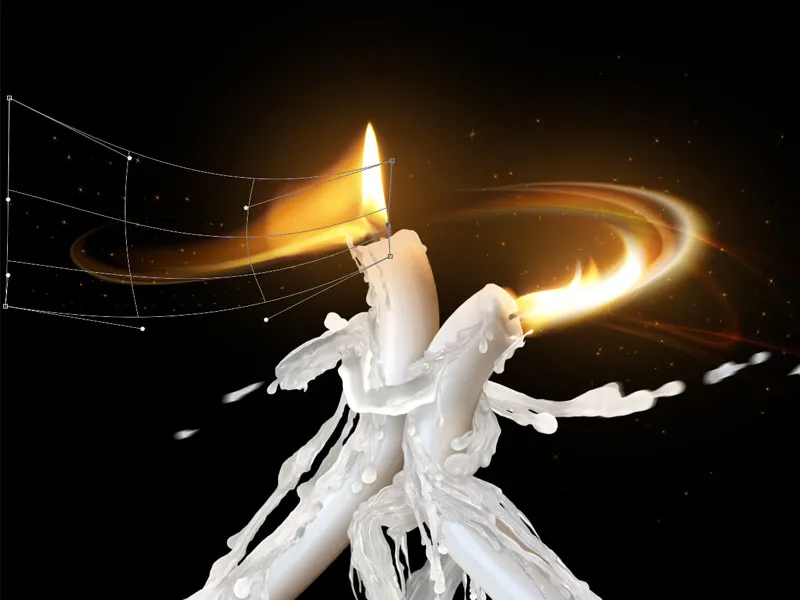
Let big sparks fly
A slightly irregular small drop is painted onto a new layer using yellow-orange tones. Once you are happy with the result, convert the layer into a Smart Object.
Now add some motion blur to the drop using the filter of the same name. A distance of approx. 40 pixels was selected for the image. As with the wax drops, the angle is used to determine the "direction of flight".
A plane copy is created to give the spark more luminosity. For the copy, the value of the motion blur is increased to approx. 140 pixels to create a more attractive light tail.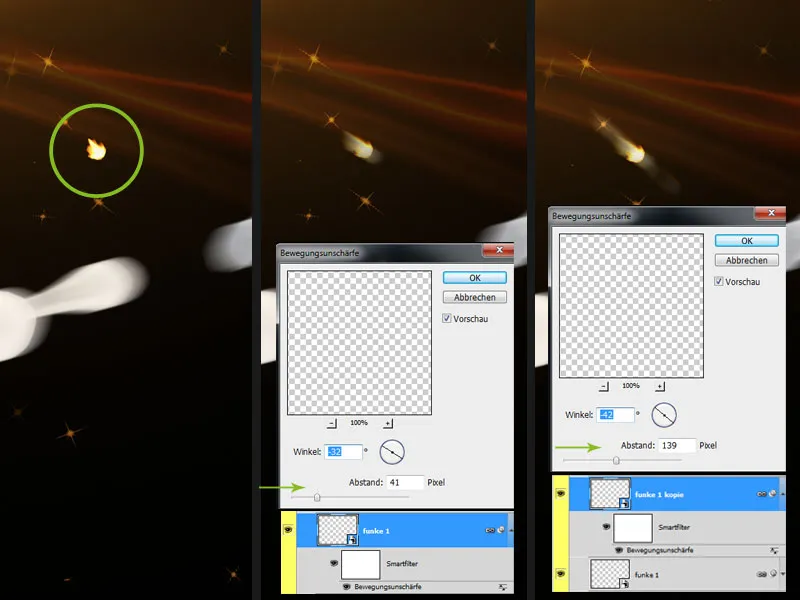
Adding sparks and integrating glow
Additional sparks are integrated into the image in the same way. The two initial planes can be copied again and again, only the flight angle has to be readjusted for each spark. However, this can be done quite quickly by converting to the smart object.
The sparks are given the finishing touch with a small glow. To do this, create a new empty layer under all the spark layers using the Multiply negative blend mode. Using a soft brush, slightly larger than the spark, and an opacity of approx. 20%, add a yellow-orange glow behind each spark.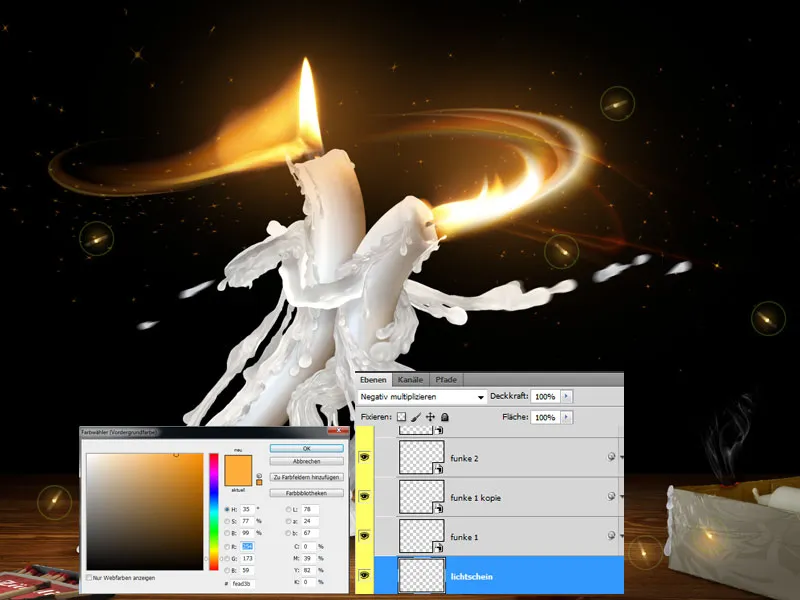
Step 9: Wax stains on the table
As the wax flies criss-cross through the air, wax spots must also be visible on the table. Use the quick selection tool to select a suitable wax spot from the source material and drag it into the working file.
Double-click on the preview image of the layer thumbnail to call up the fill options in the layer styles. In the lower palette section Color range, select Grey and, holding down the Alt key, drag the slider for the dark tones of this layer to approx. 225. The wax stain is now better integrated and allows the surface of the wooden table to shine through. Further wax stains are added to the image in the same way.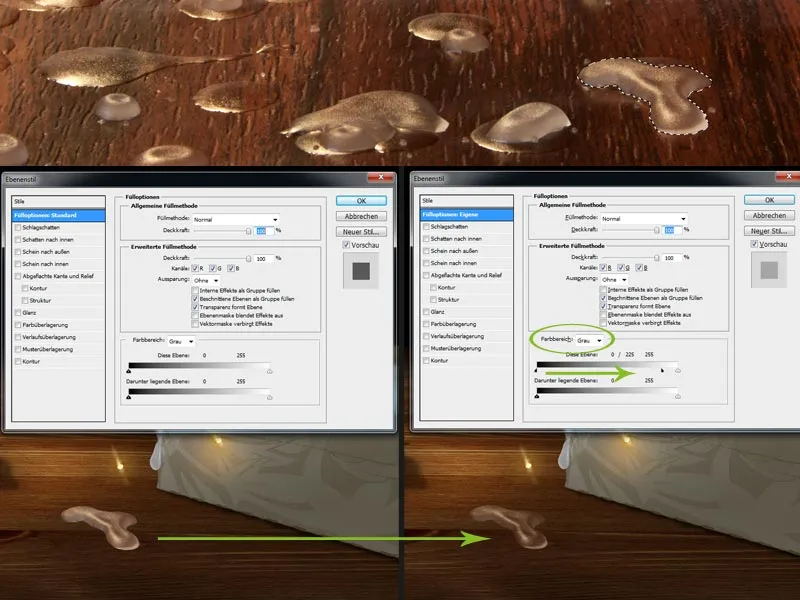
Step 10: Small burn mark on the dance floor
Now we have the salad: one of the sparks has burnt the table. A new layer is created in the Multiply blend mode for a small burn mark on the tabletop. A stain is painted in with a small brush tip and black paint. The outlines can be easily blurred with the smudge finger, making the stain look more natural. You can remove areas in a layer mask if necessary.
Use a previously used smoke brush and a light shade of gray to create a small smoke trail over the stain on a new layer. If the smoke is too thick, reduce the opacity of the layer slightly.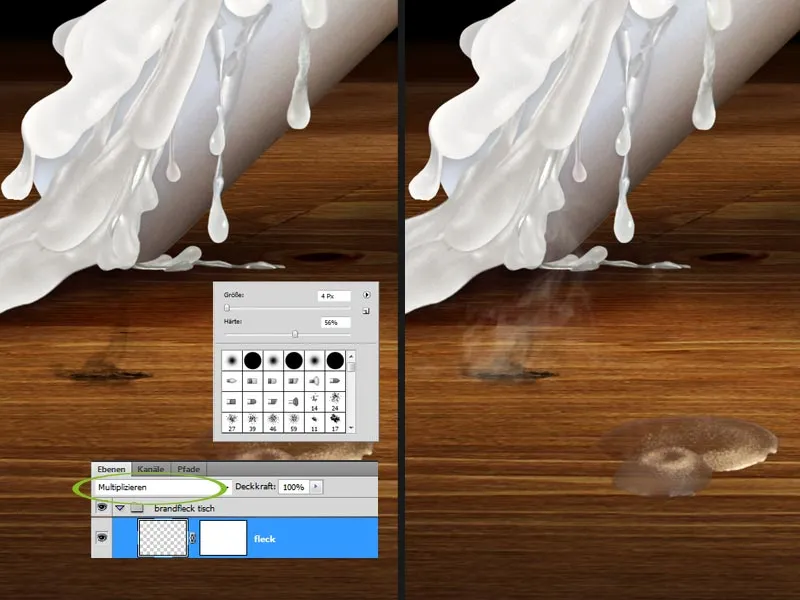
Step 11: Focus more on the dancing couple
Use the selection tool to draw an elliptical selection around the dancing couple, invert the selection and add a gradation curves adjustment layer. By lowering the darker color tones, the image areas around the dancing couple are darkened, bringing them more into the foreground. For a soft transition, set the soft edge in the mask area of the adjustment layer to 250 pixels.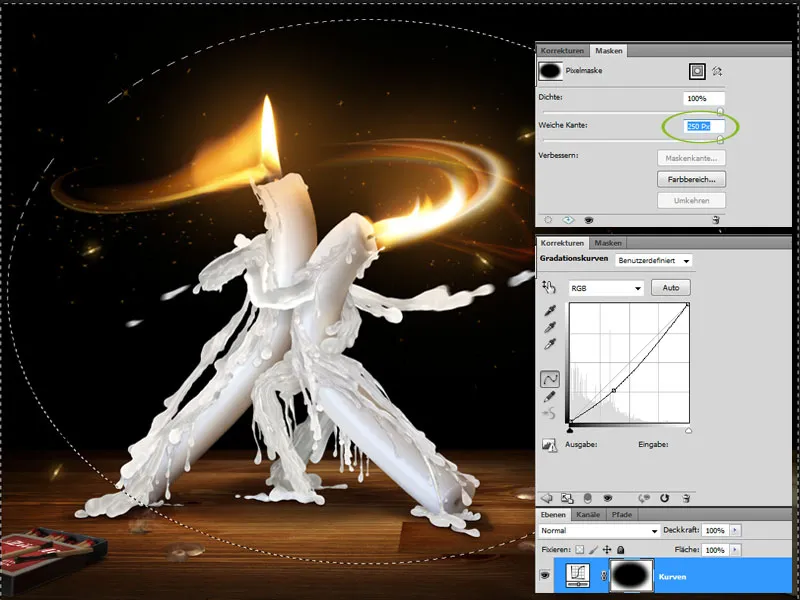
Step 12: A little darker
For my taste, the candle and matchbox could be a little darker in the lower area; the darker color areas are darkened again with a second adjustment layer Gradation Curves. Invert the layer mask of the adjustment layer and use a large soft brush to paint the effect onto the desired areas only.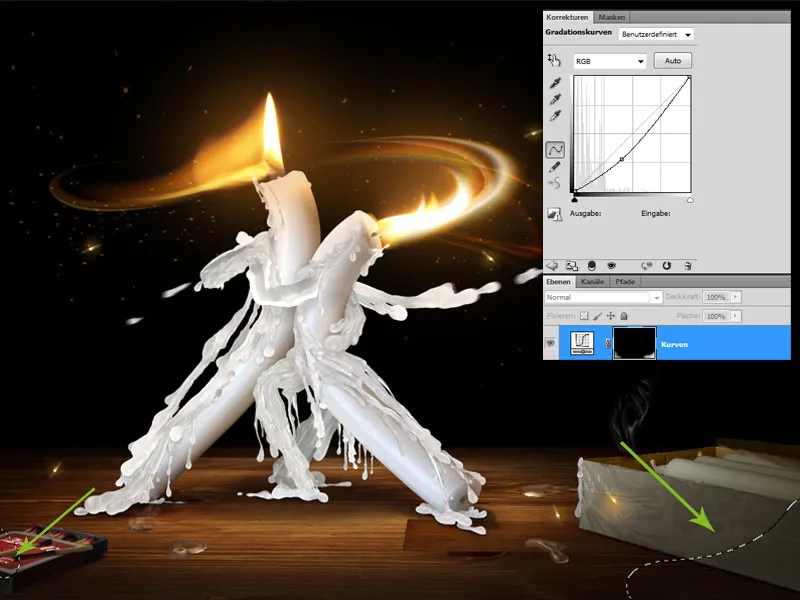
Step 13: Final step - more atmosphere with a golden sheen
The final step is to add a colored area layer in the soft light blend mode. By selecting a yellow-brown color tone, you can achieve a golden hue that supports the mood of the picture very well.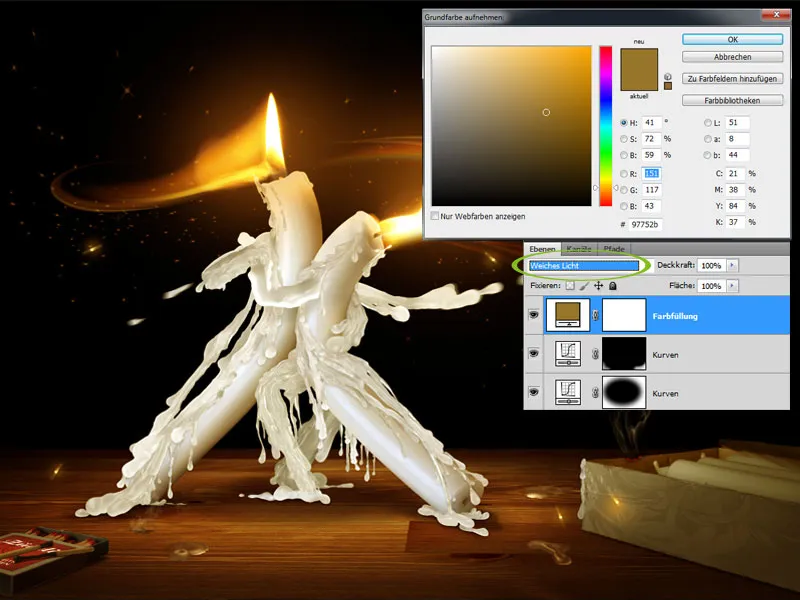
The finished picture
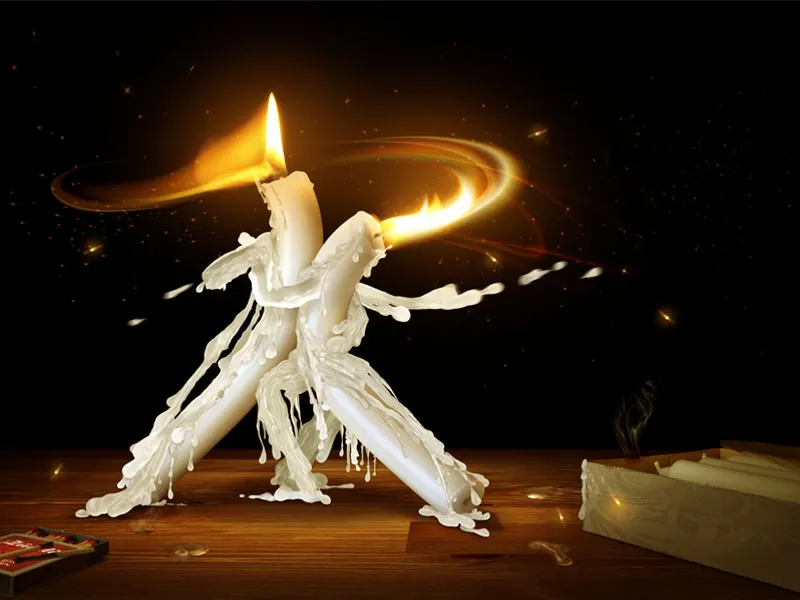
This is what the result looks like: