Before we look at the new, node-based materials, let's first take a look at which materials are now available in Cinema 4D and what role they play.
Via the Create>New Material command in the Material Manageror by double-clicking on an empty space, we get the familiar "old" material with the familiar material channels. The physical material is merely a slimmed-down version of this material, reduced to the reflectivity channel.
If we want to create a node-based material, we have to do this explicitly using the Create>New Node Material command or the Command+Alt+N shortcut. If you are just starting to familiarize yourself with the topic of material nodes, but would like to use the new conveniences, the so-called over-materials are interesting for you. These are prefabricated node materials that can be edited in a very similar way to the usual materials. The included presets in the Node materials submenu show what is functionally possible with the new materials. Here, the materials and the associated parameters are optimally matched to the intended use in some examples.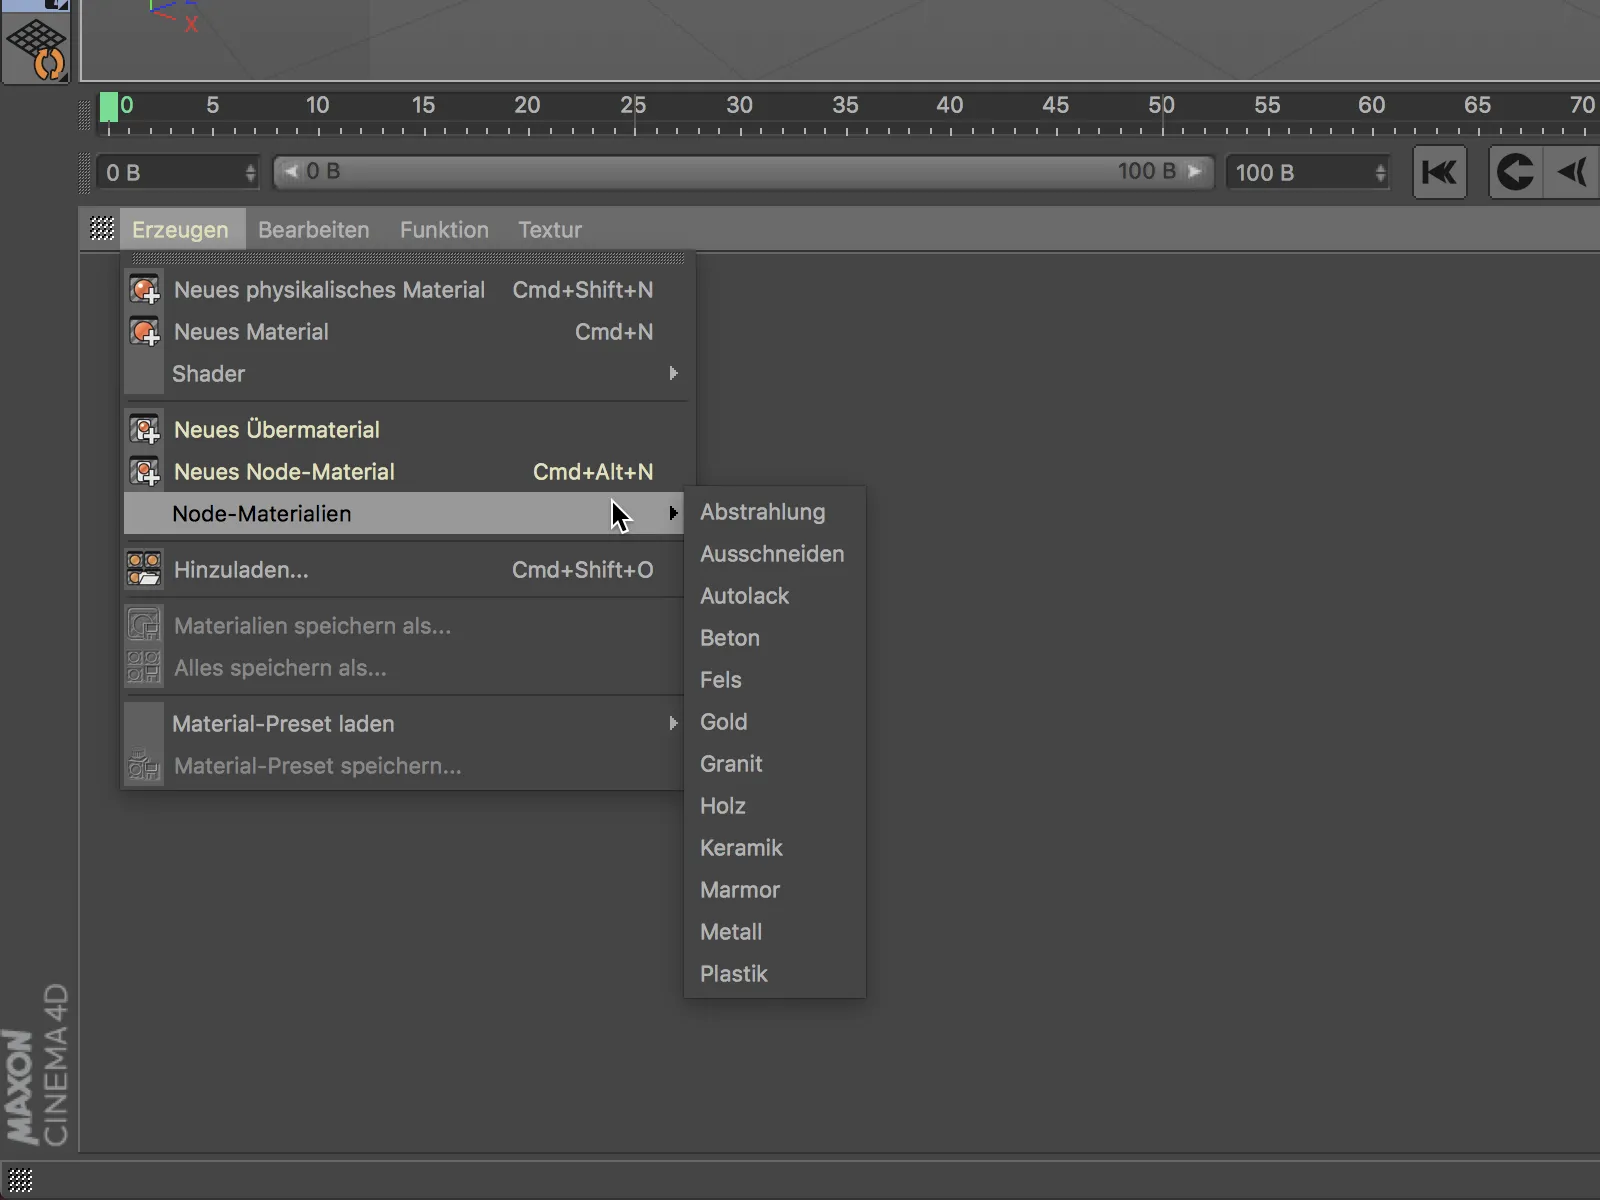
Overlay material
The new overlay material is actually node-based, but knows how to hide this very well because its structure is very similar to the standard material. There is no color channelhere; this property is now handled correctly via the diffuse channel.
On the whole, therefore, there should be little difficulty in getting used to it. To activate a material channel and access its settings, we first have to set the corresponding checkmark on the basic pageof the material.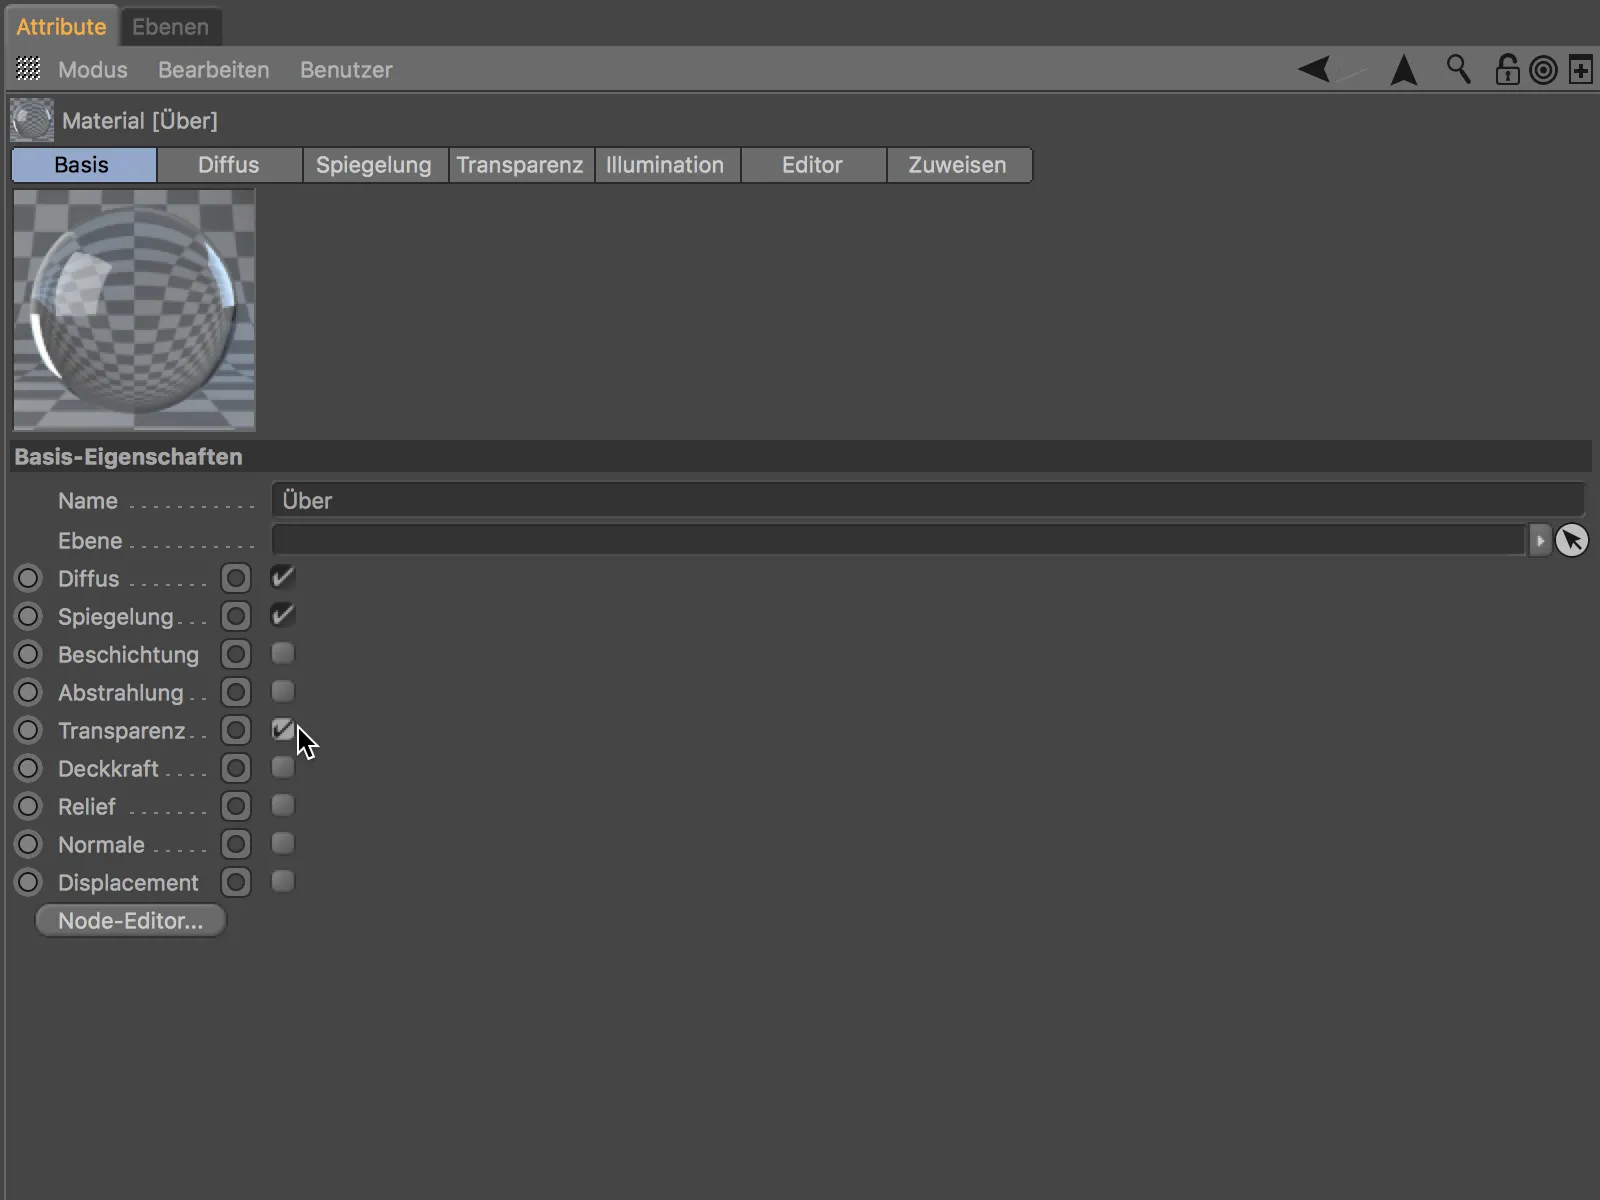
We can find the corresponding settings on the pages for the active channels. As mentioned, we now define the material color in the diffuse channel.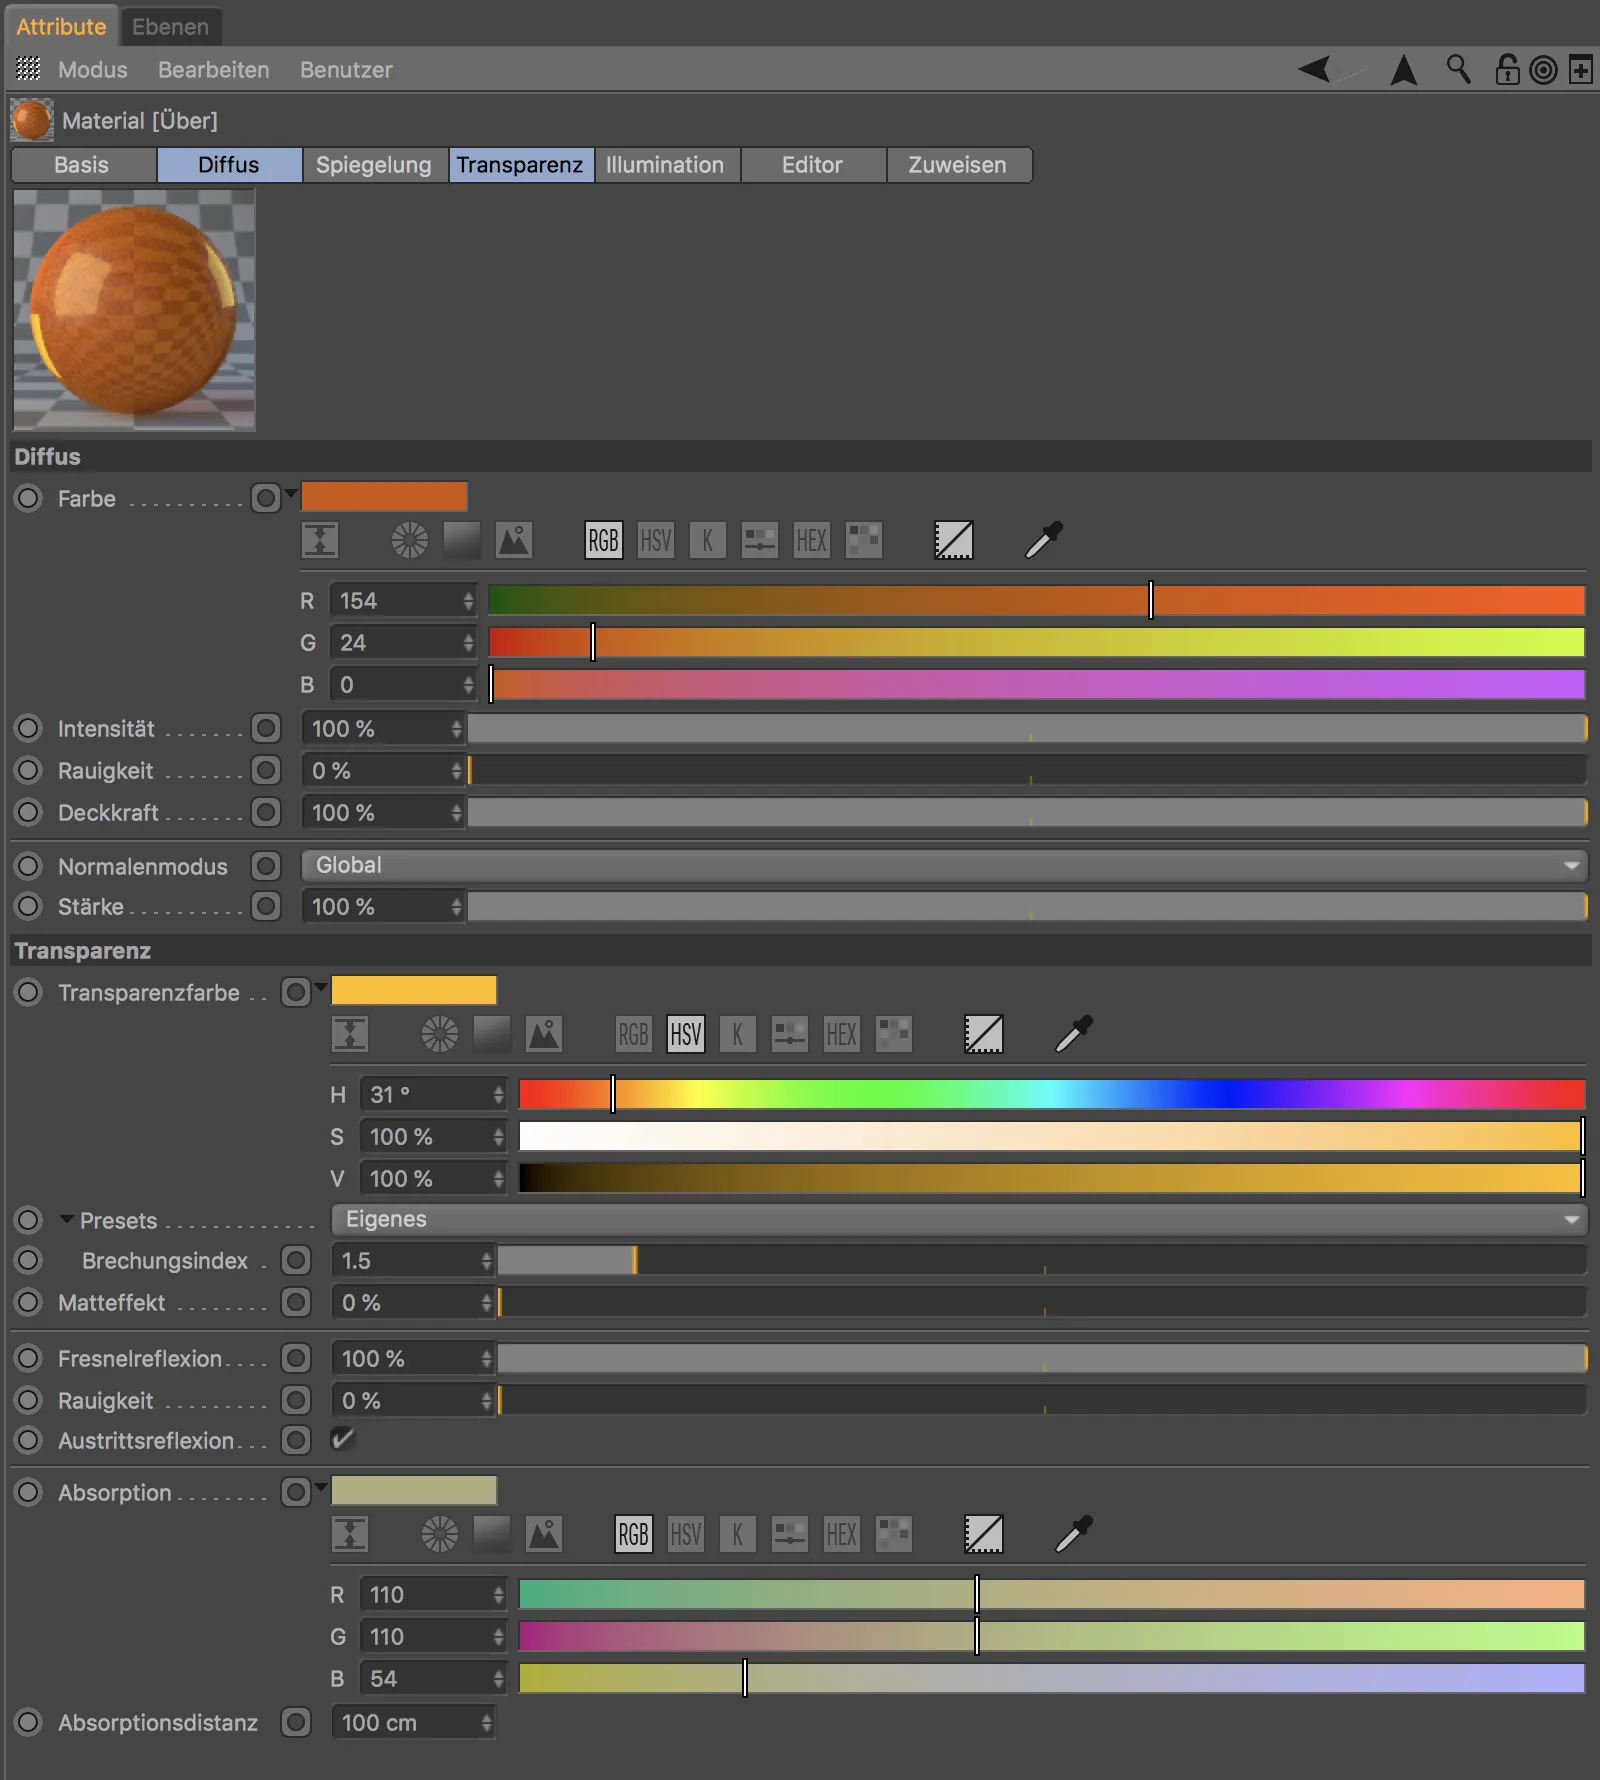
Up to this point, nothing would suggest a node functionality, but a new control element, the so-called connection icon, reveals that we have the option of creating a connection here.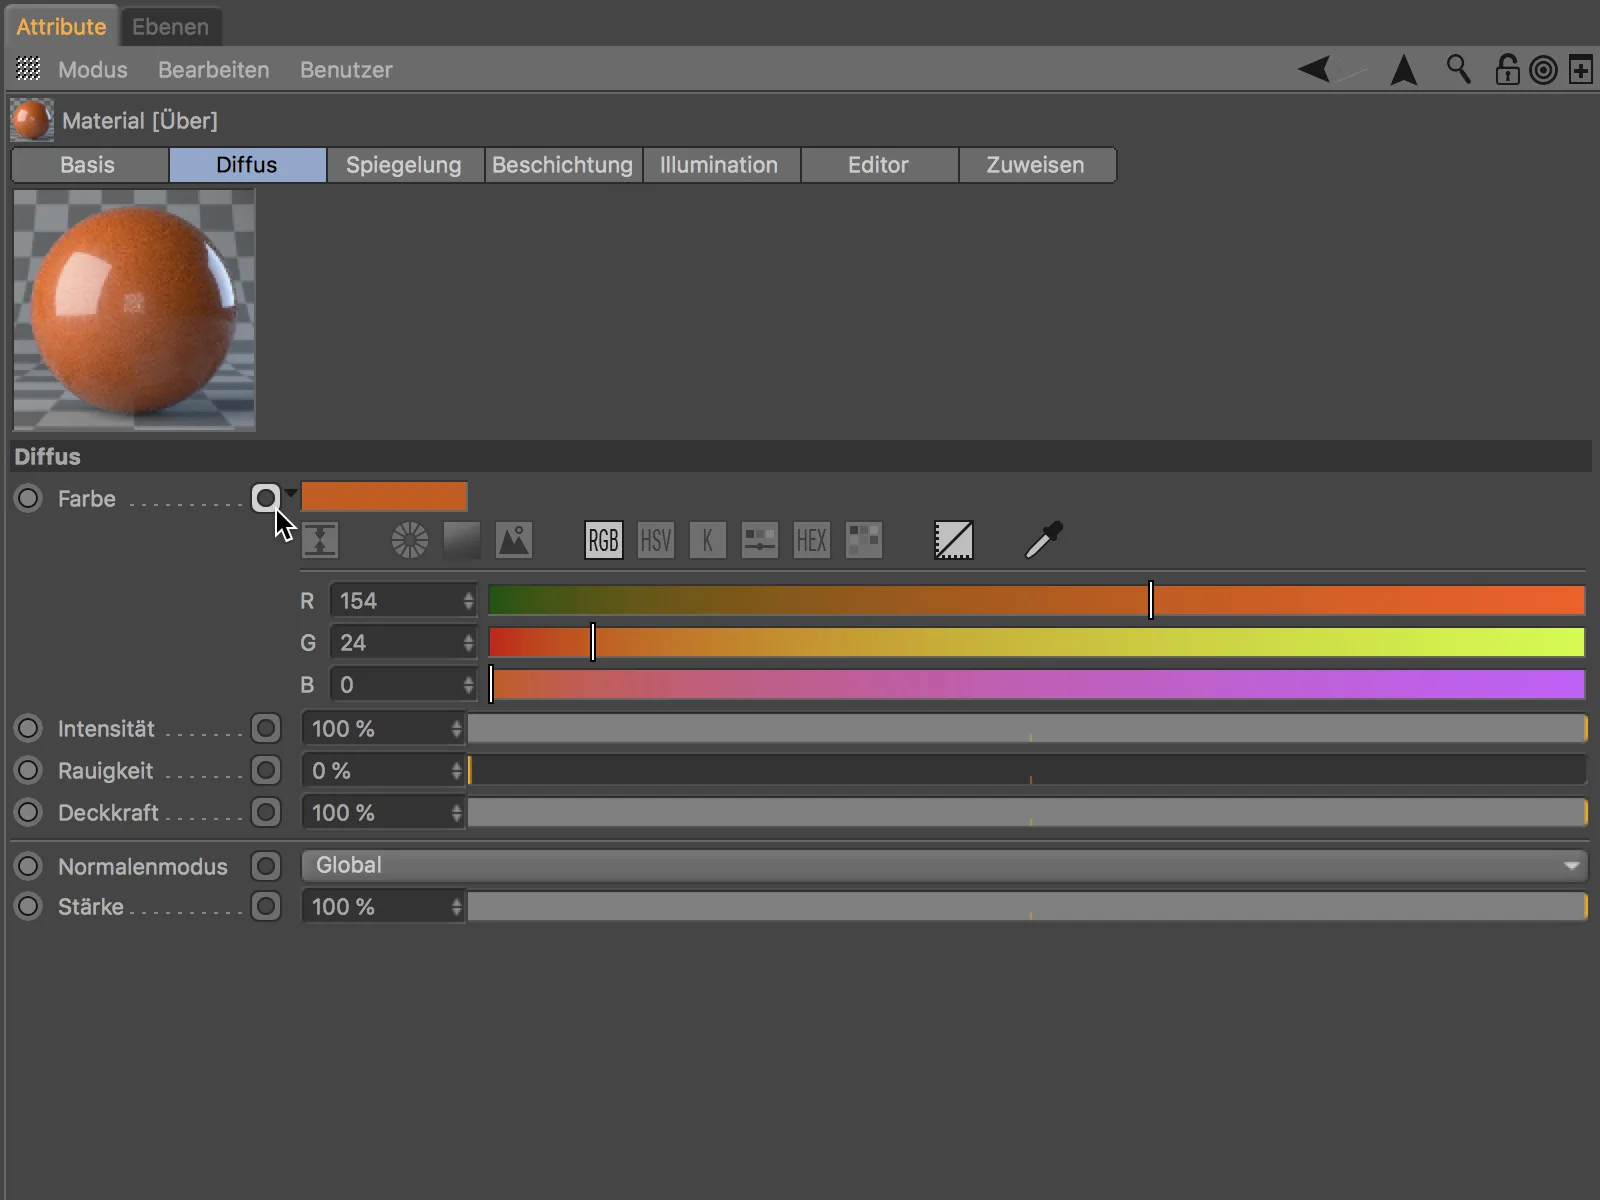
The special thing about this is that we can create connections in this way without having to open the node editor. Clicking on the connection icon for the Color parameter, for example, opens a context-sensitive command menu that we can use to connect and load textures or attach additional node functions and assets via Connect Node.
In the example shown, a node with a checkered patternis connected as a color texture.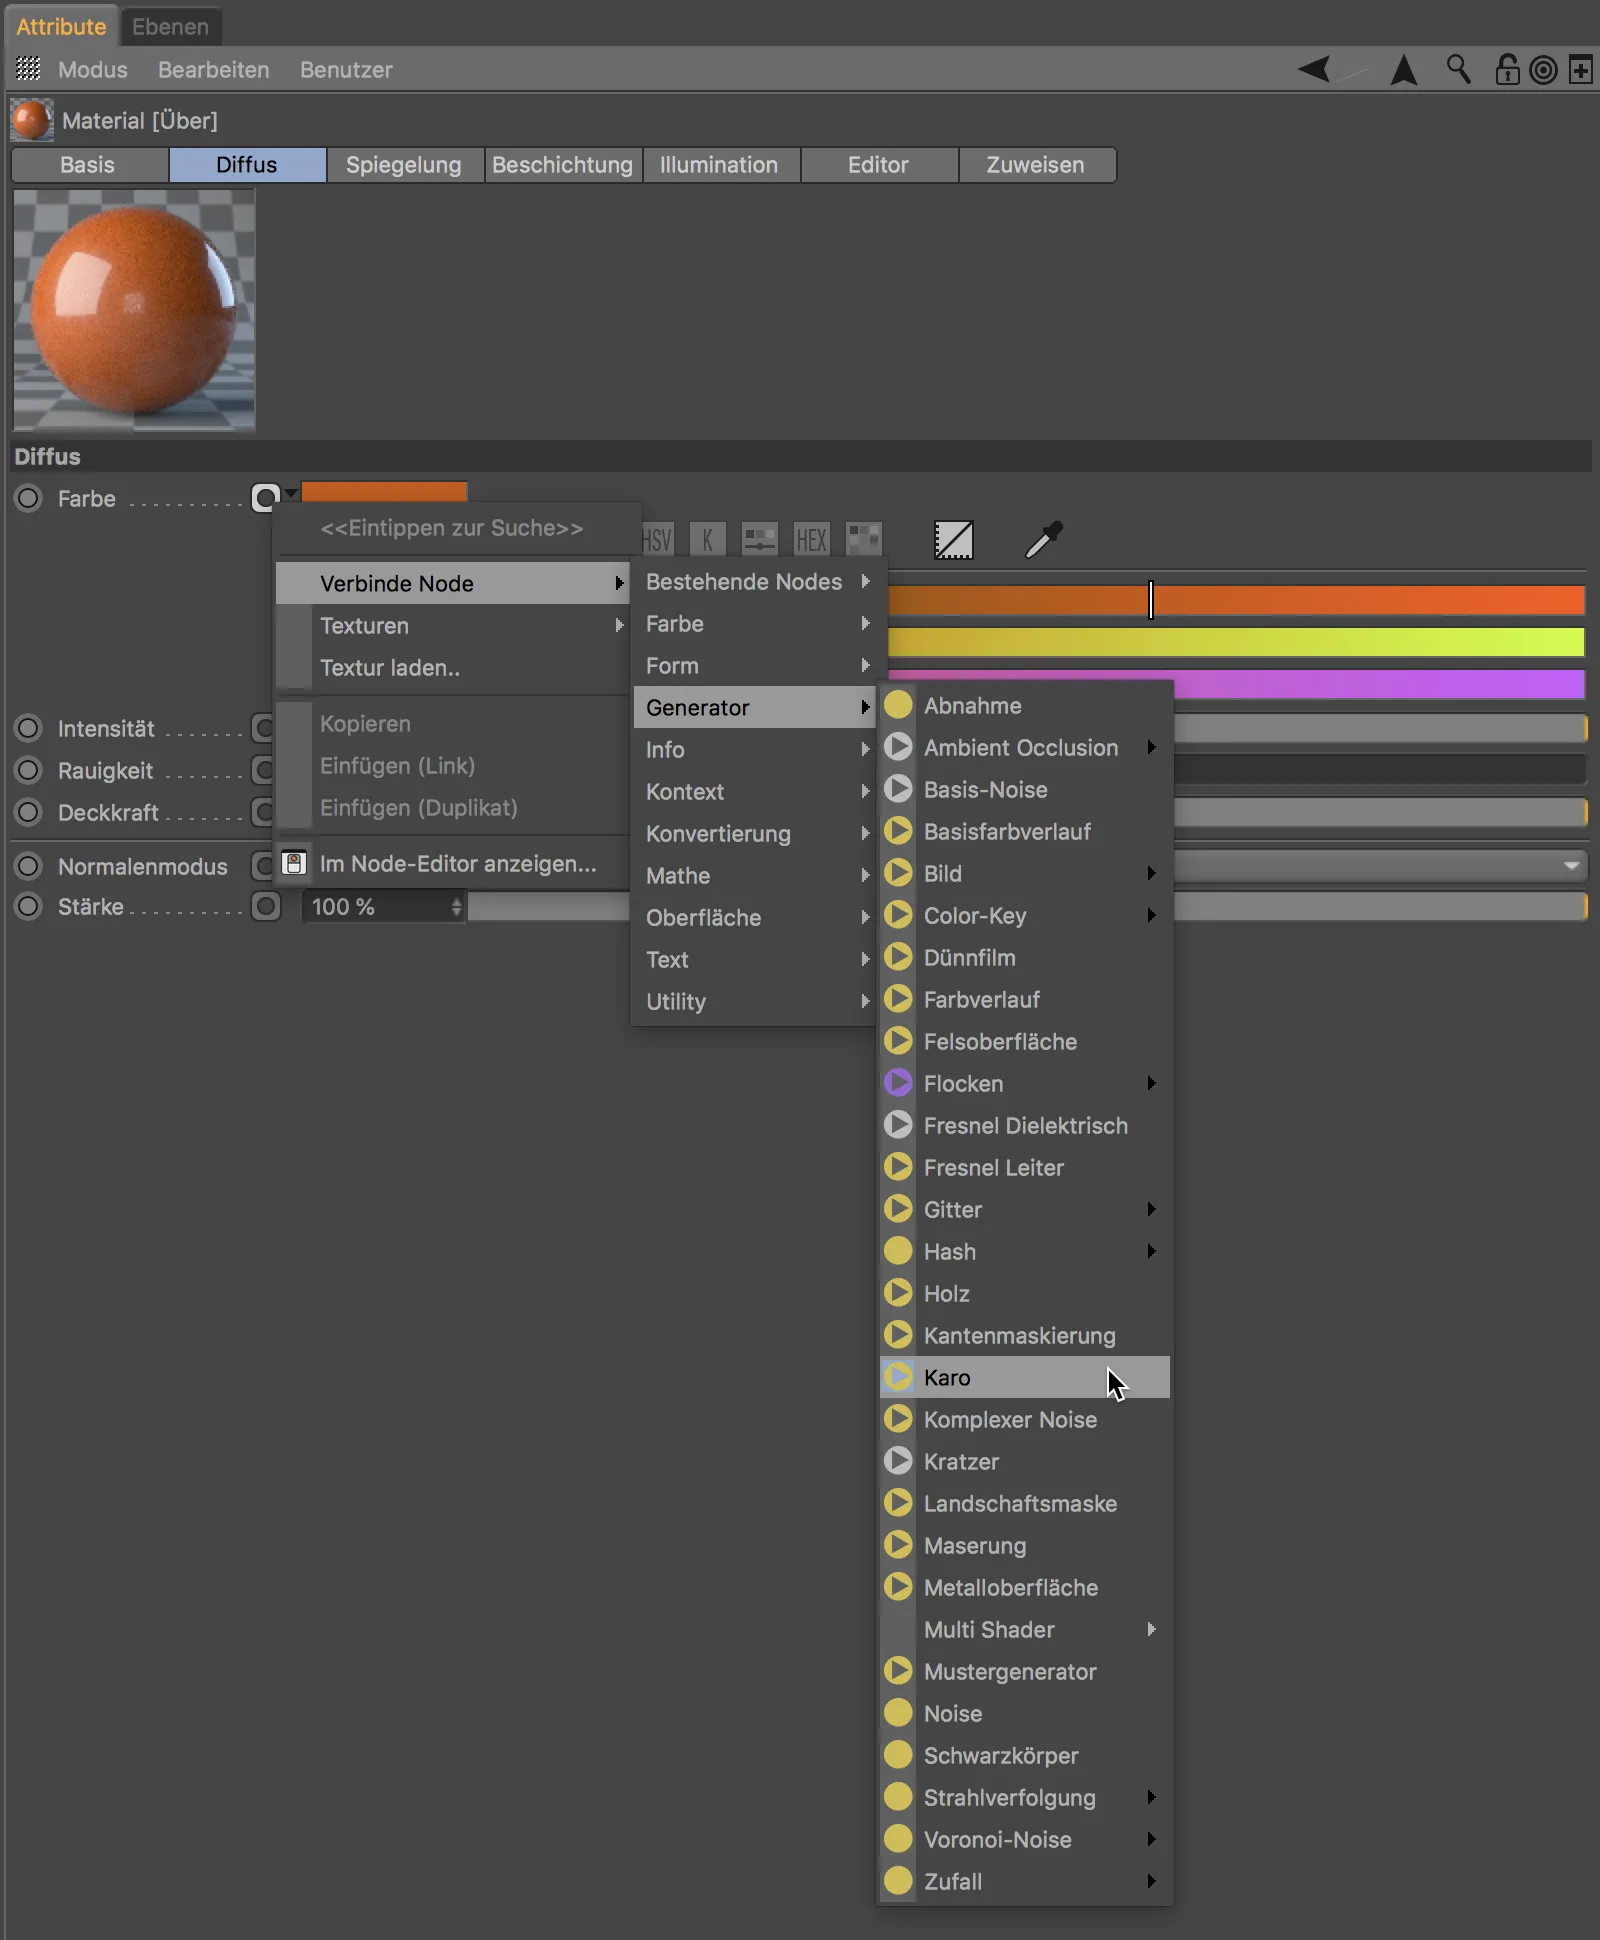
As soon as a connection is created, the connection icon changes accordingly to indicate that this parameter is supplied by a linked node. And of course the attached information, in the case shown here the checkered pattern, can also be controlled in the same way with a connection.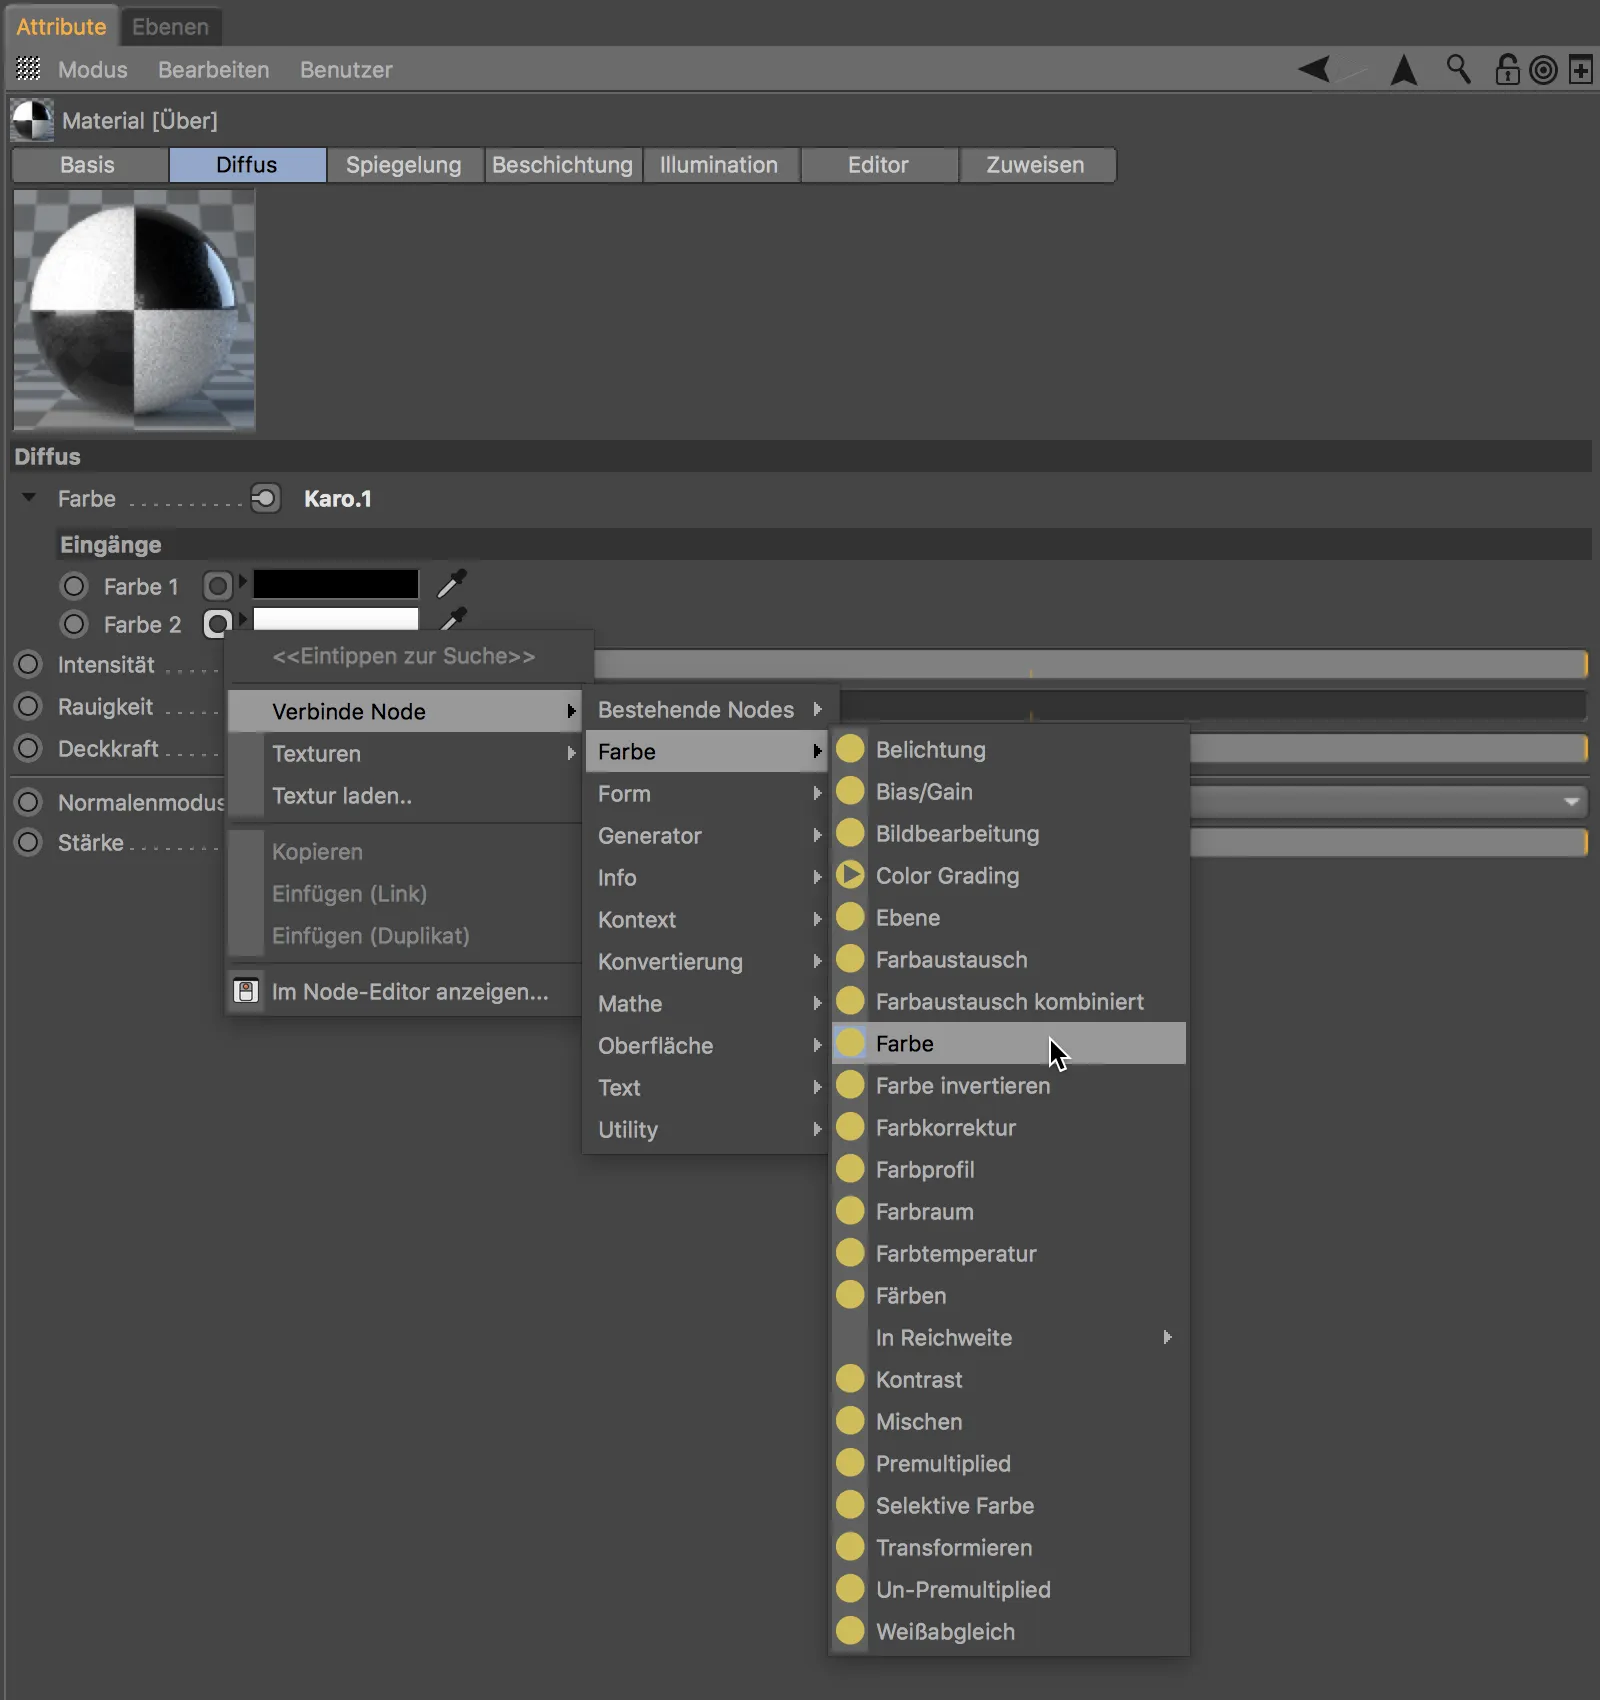
In this way, connections to information - the different nodes - can be easily created directly via the Attribute Manager, using only the settings dialog of the material. A click on the Node Editor button on the base pageof the material shows us the result of our efforts.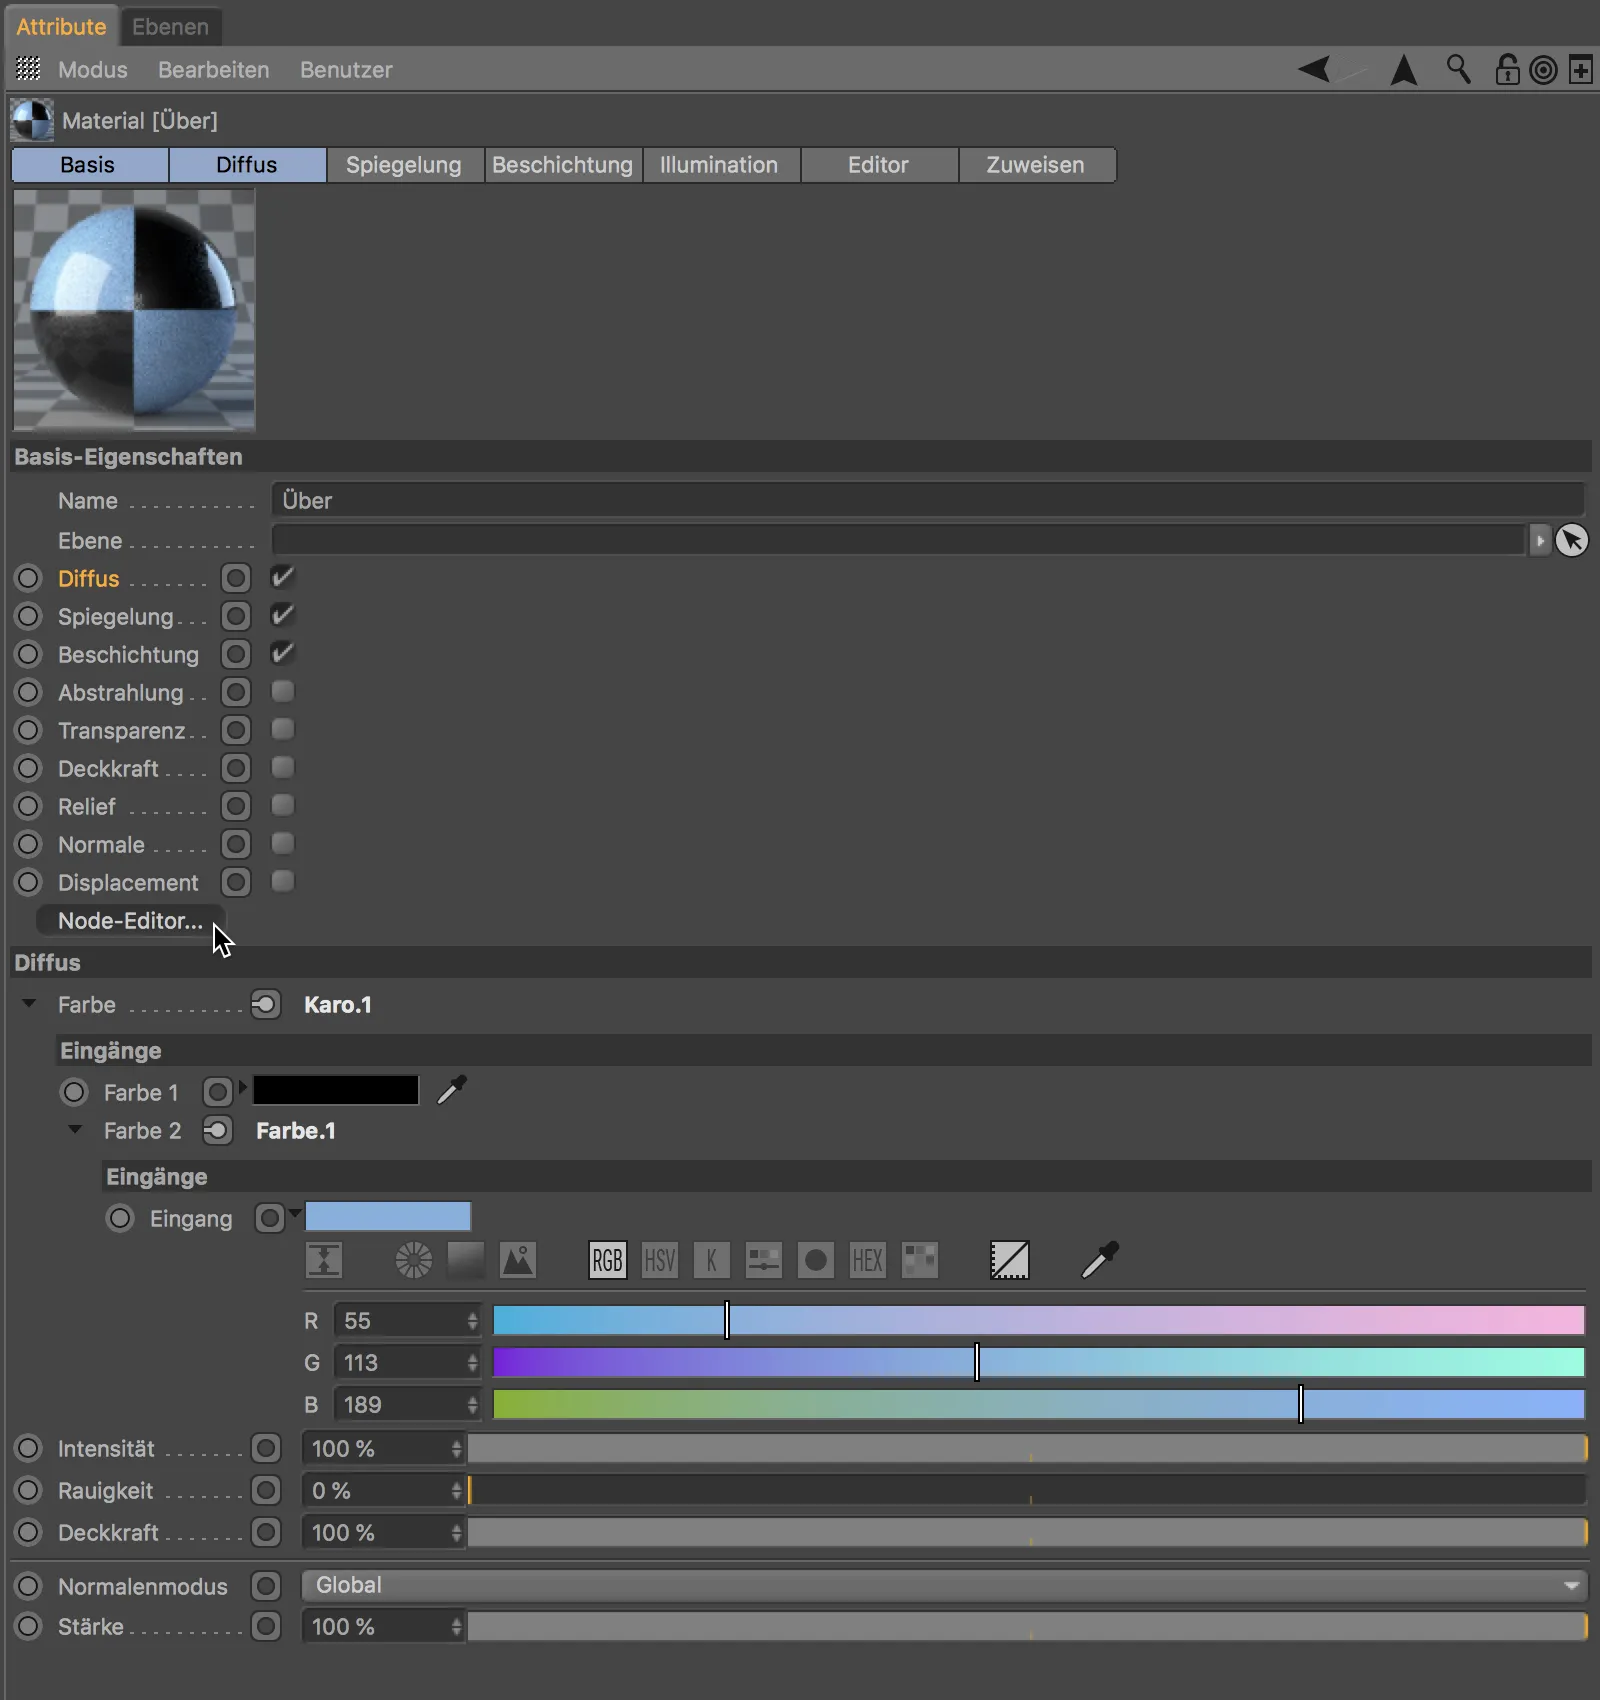
In the middle area of the node editor (more on this shortly), we can recognize the node of the material as such, framed in green. The checkered node, which creates the checkerboard pattern, is attached to it. Its color.2 port is supplied by the last connected color node.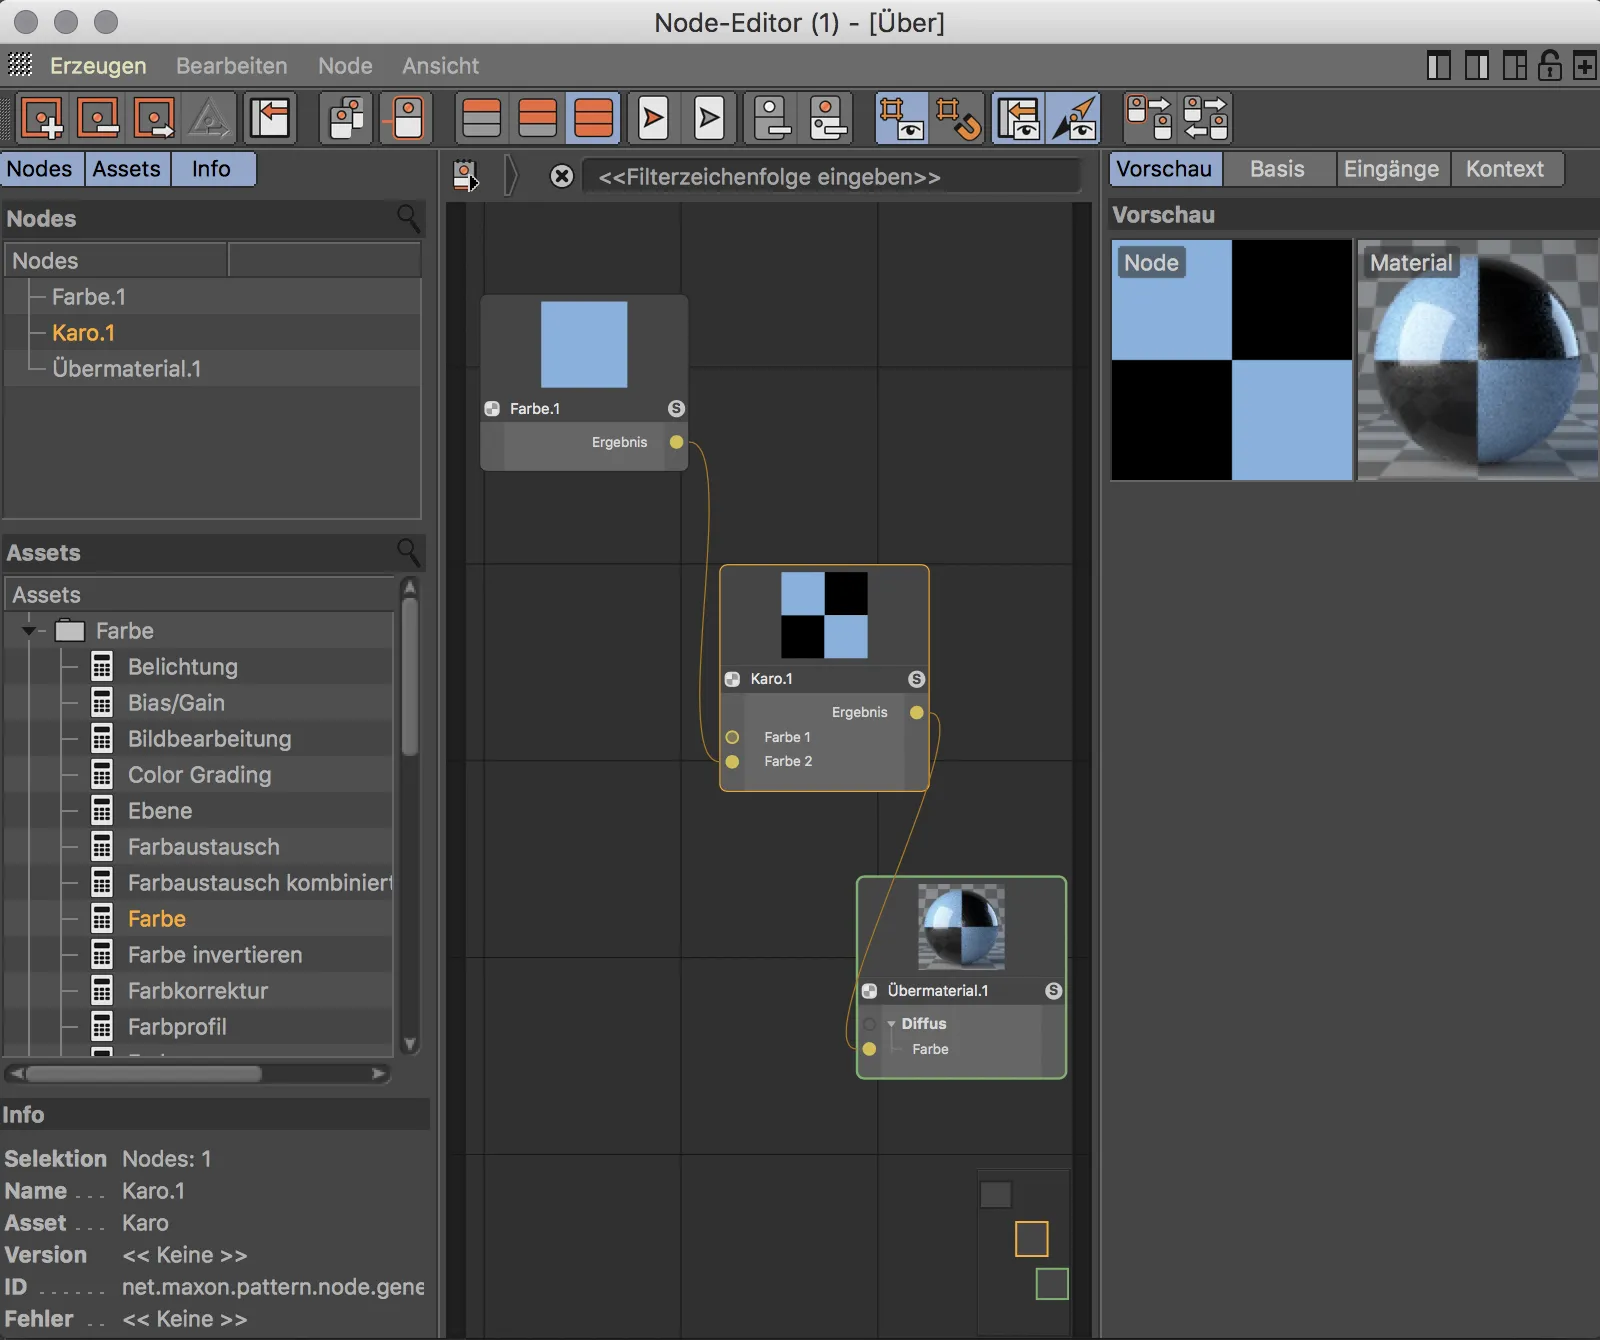
Prefabricated node materials
You can get a first impression of the possibilities offered by the node and overlay materials with the prefabricated node materials. In the submenu of the same name, some frequently used material types such as car paint, rock, wood or metal are available.
To take a look under the hood, let's take a quick look at the structure of the gold preset.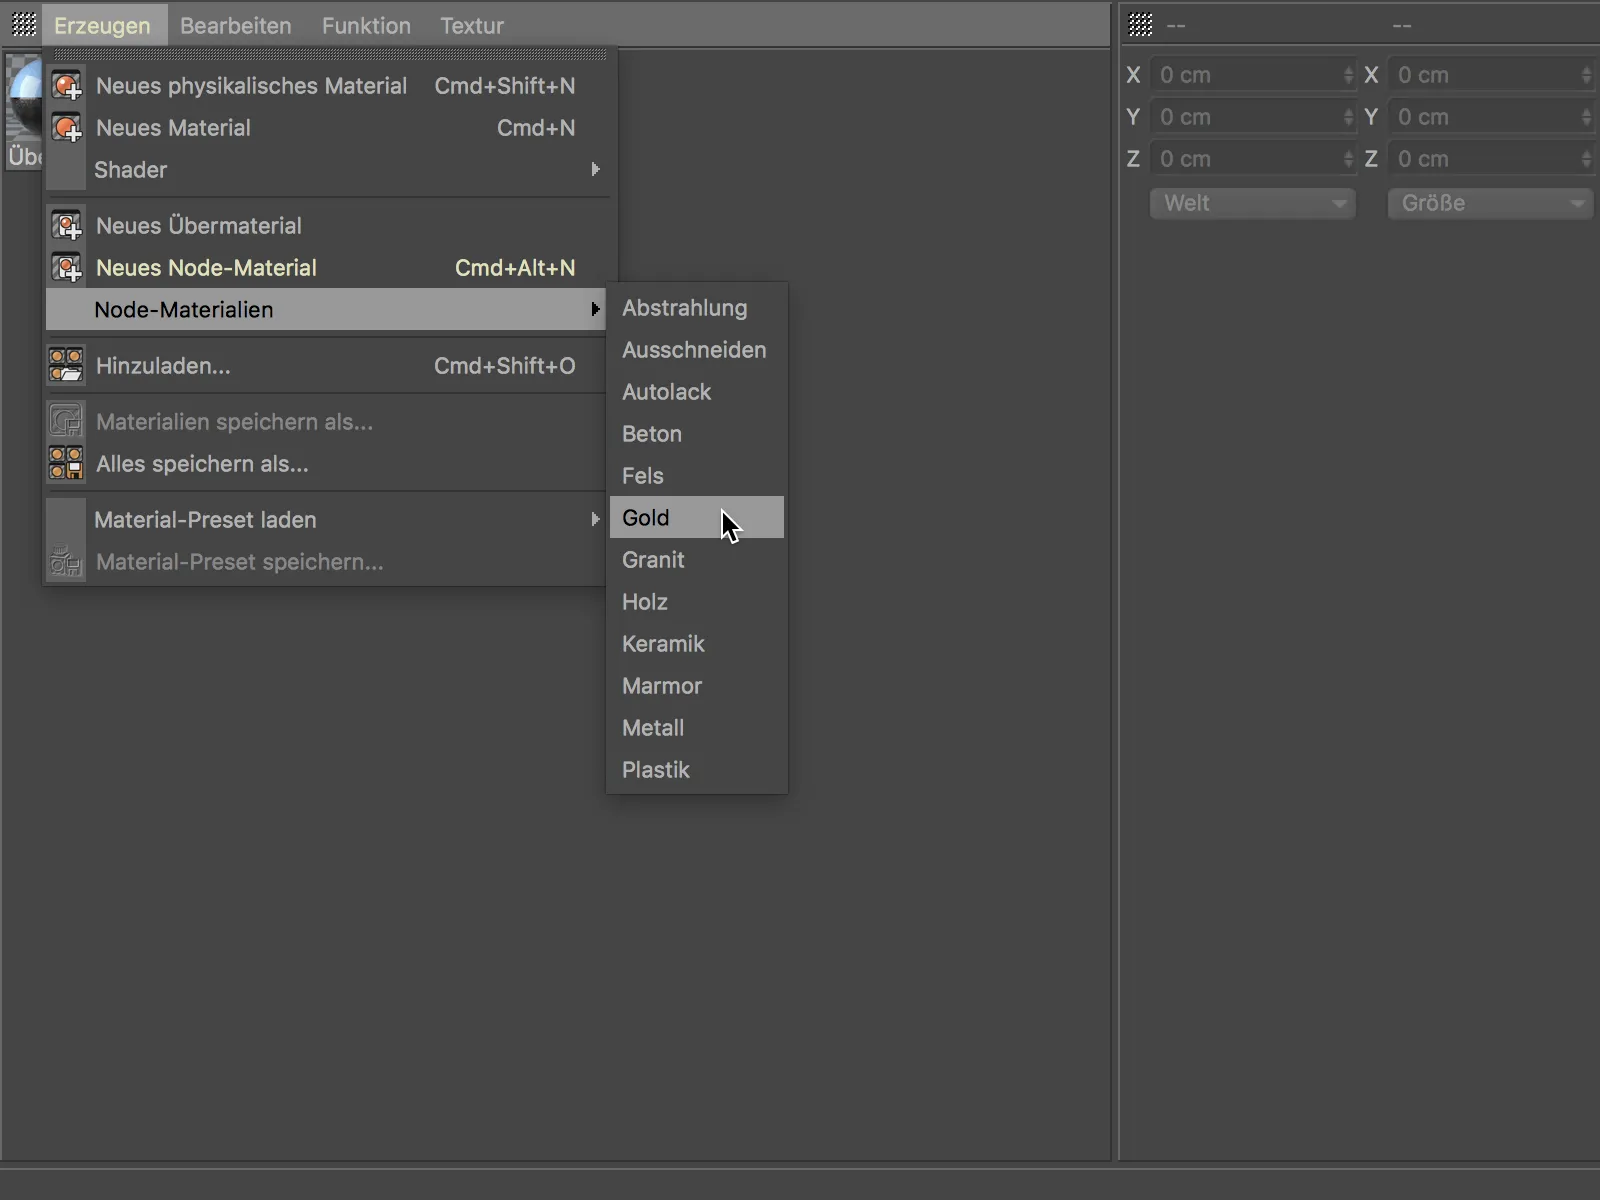
If we create the gold materialvia the Create>Node Materials menu and then open it in the Node Editor, we see an extensively equipped node with many material-specific parameters such as grain, damage or patina. It is therefore a super material specially designed for this purpose.
In the context menu, which we can access with the right mouse button, we can find numerous practical functions for working with nodes and the node editor as well as the Edit asset command. In Cinema 4D, referenceable material-node compilations are referred to as assets.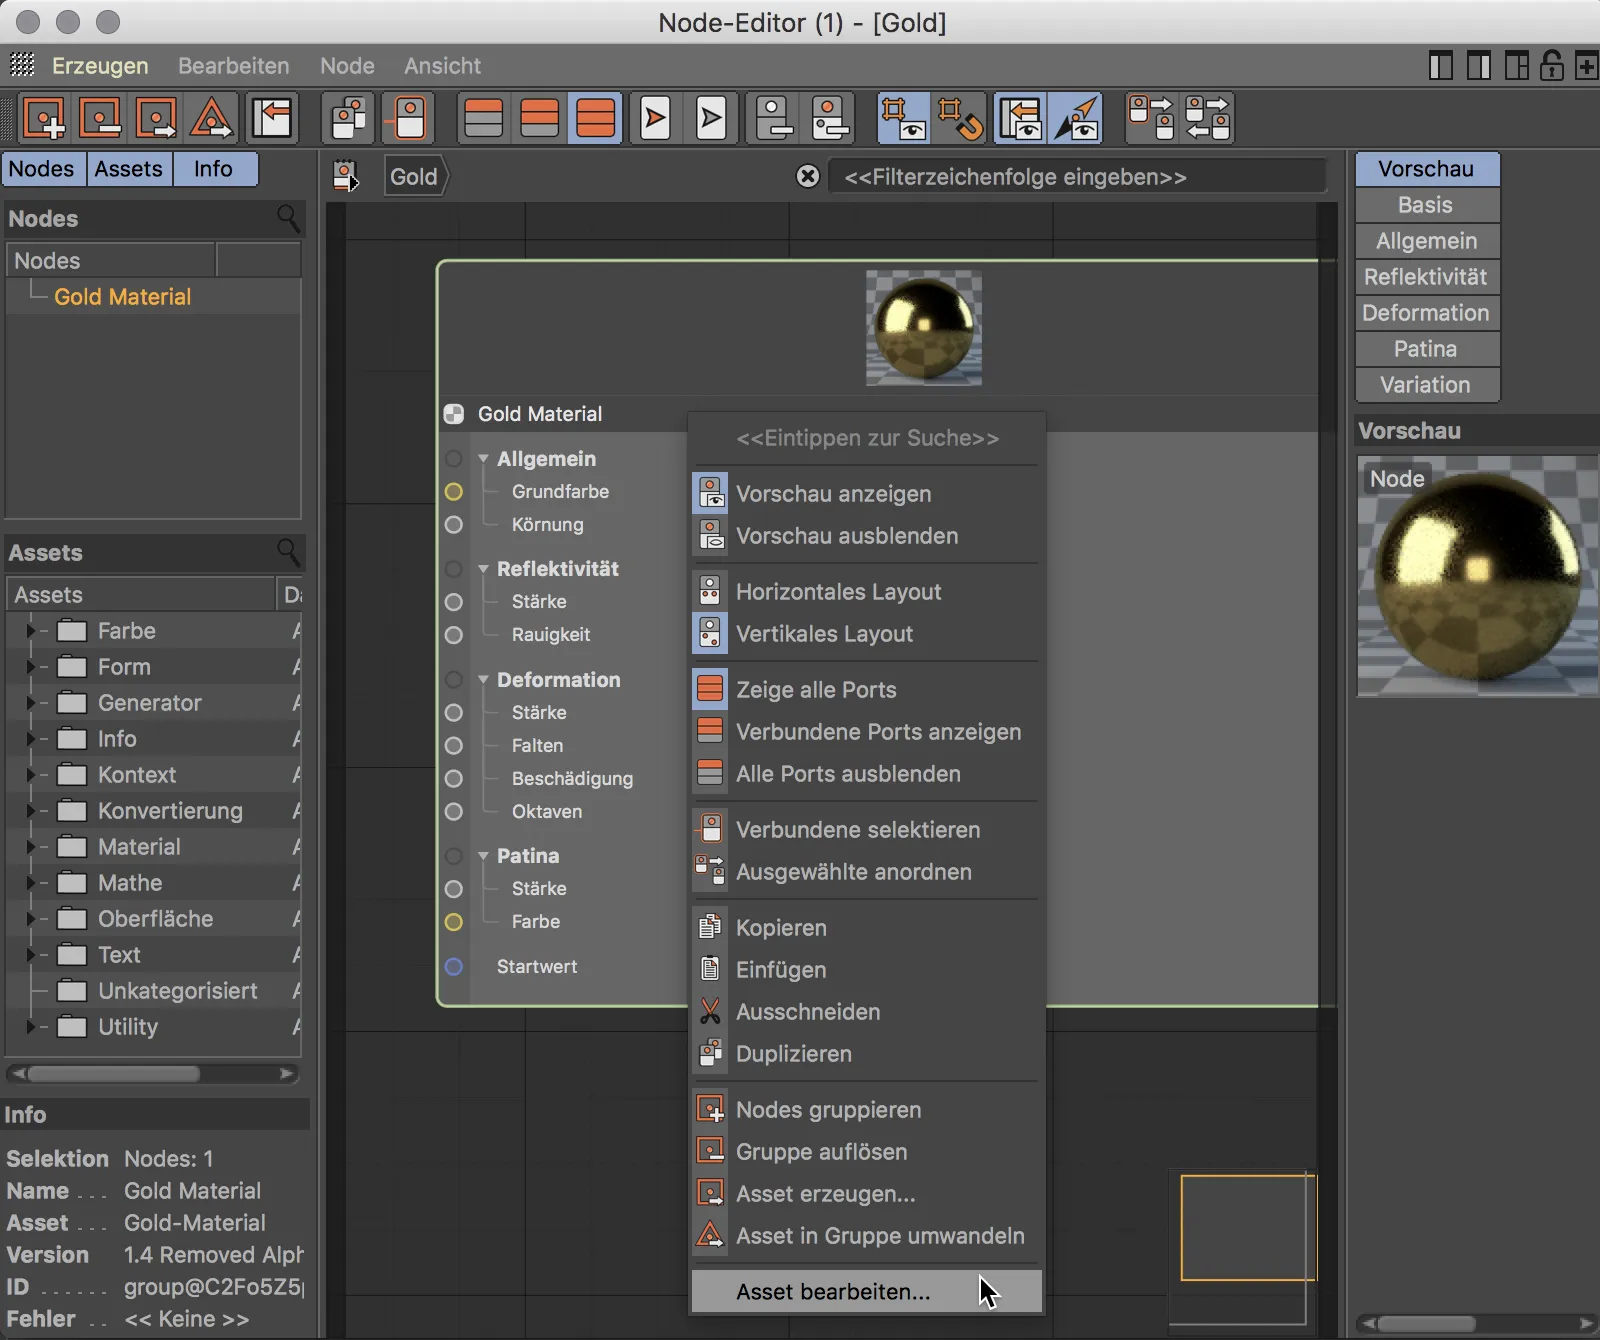
If we open the node group now displayed using the arrow symbol to the right of its name ...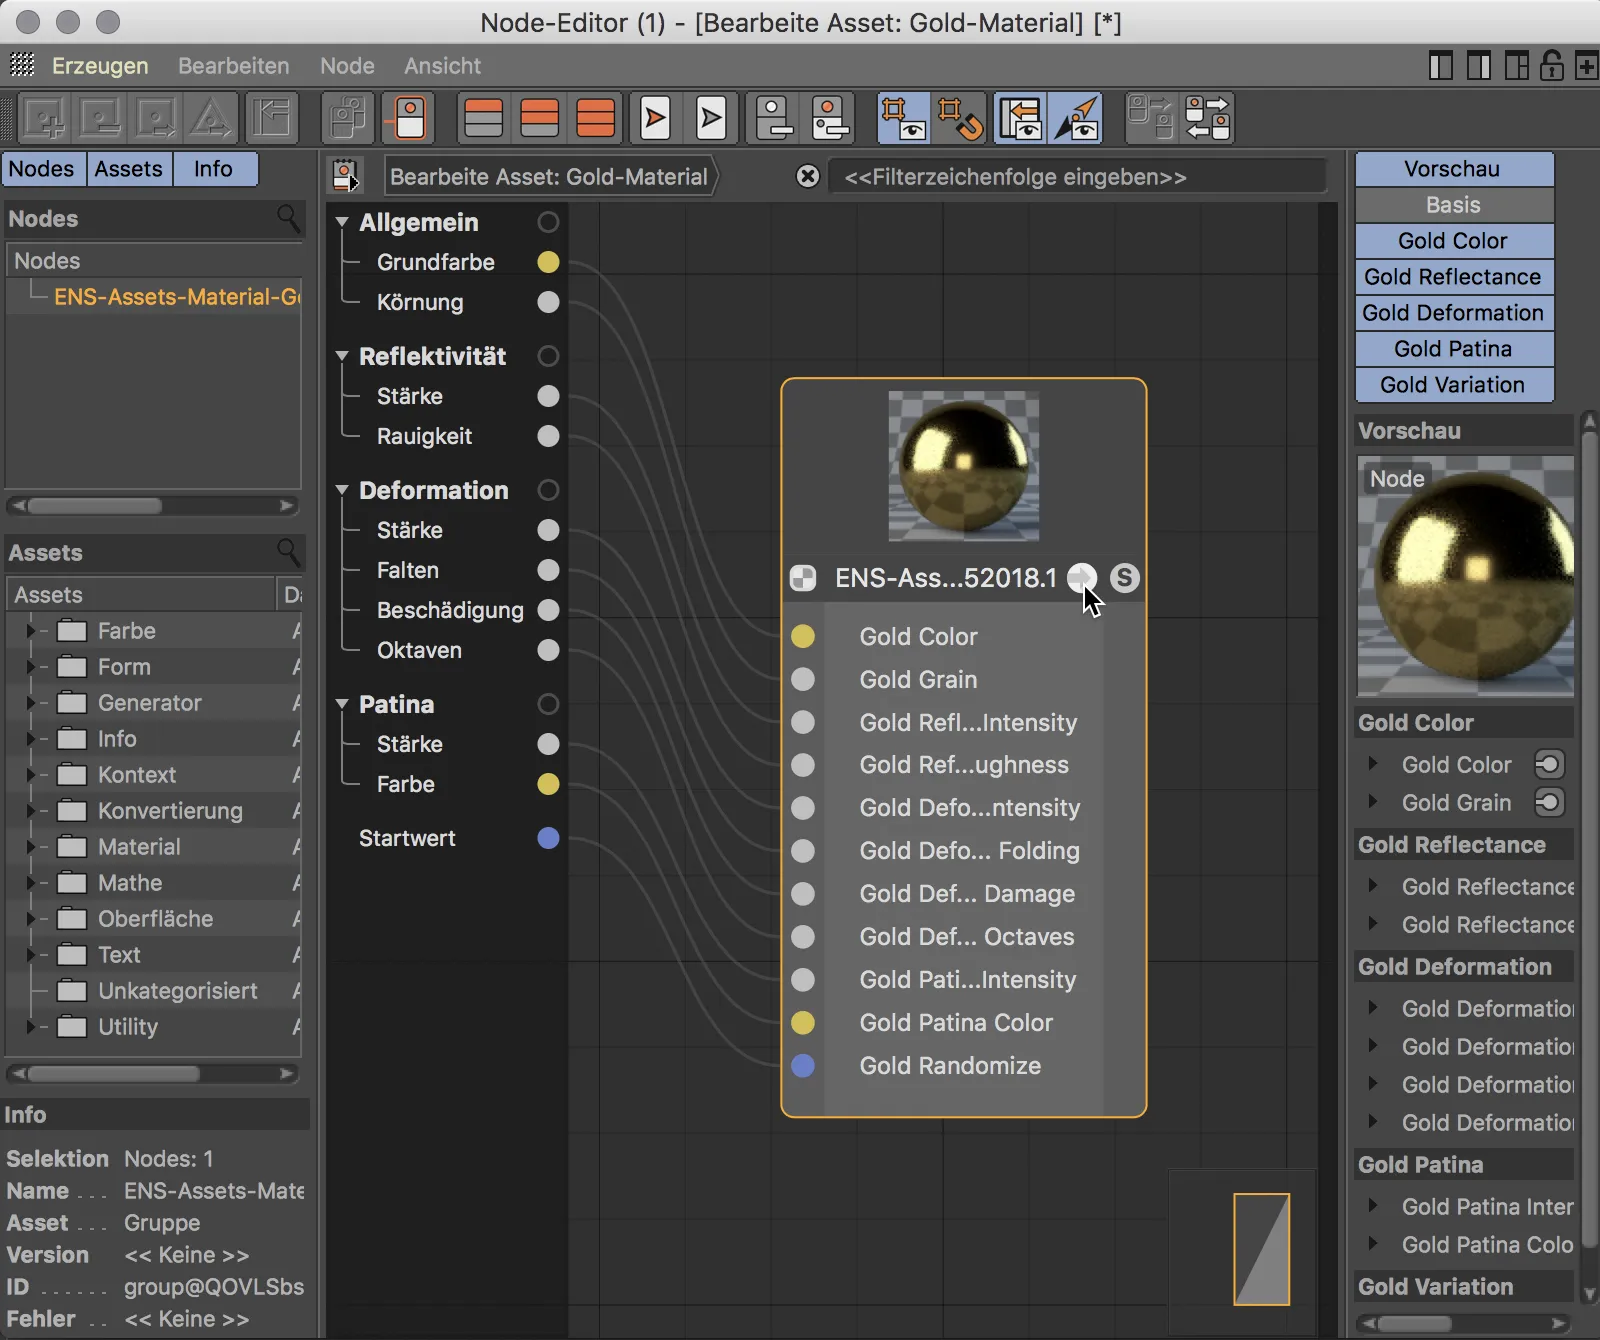
... we get an impression of the complexity of the underlying node structure, from which we are actually spared thanks to excess material. If you enjoy working with nodes and the associated flexibility and practically unlimited possibilities, you can generate your own generators and create your own assets.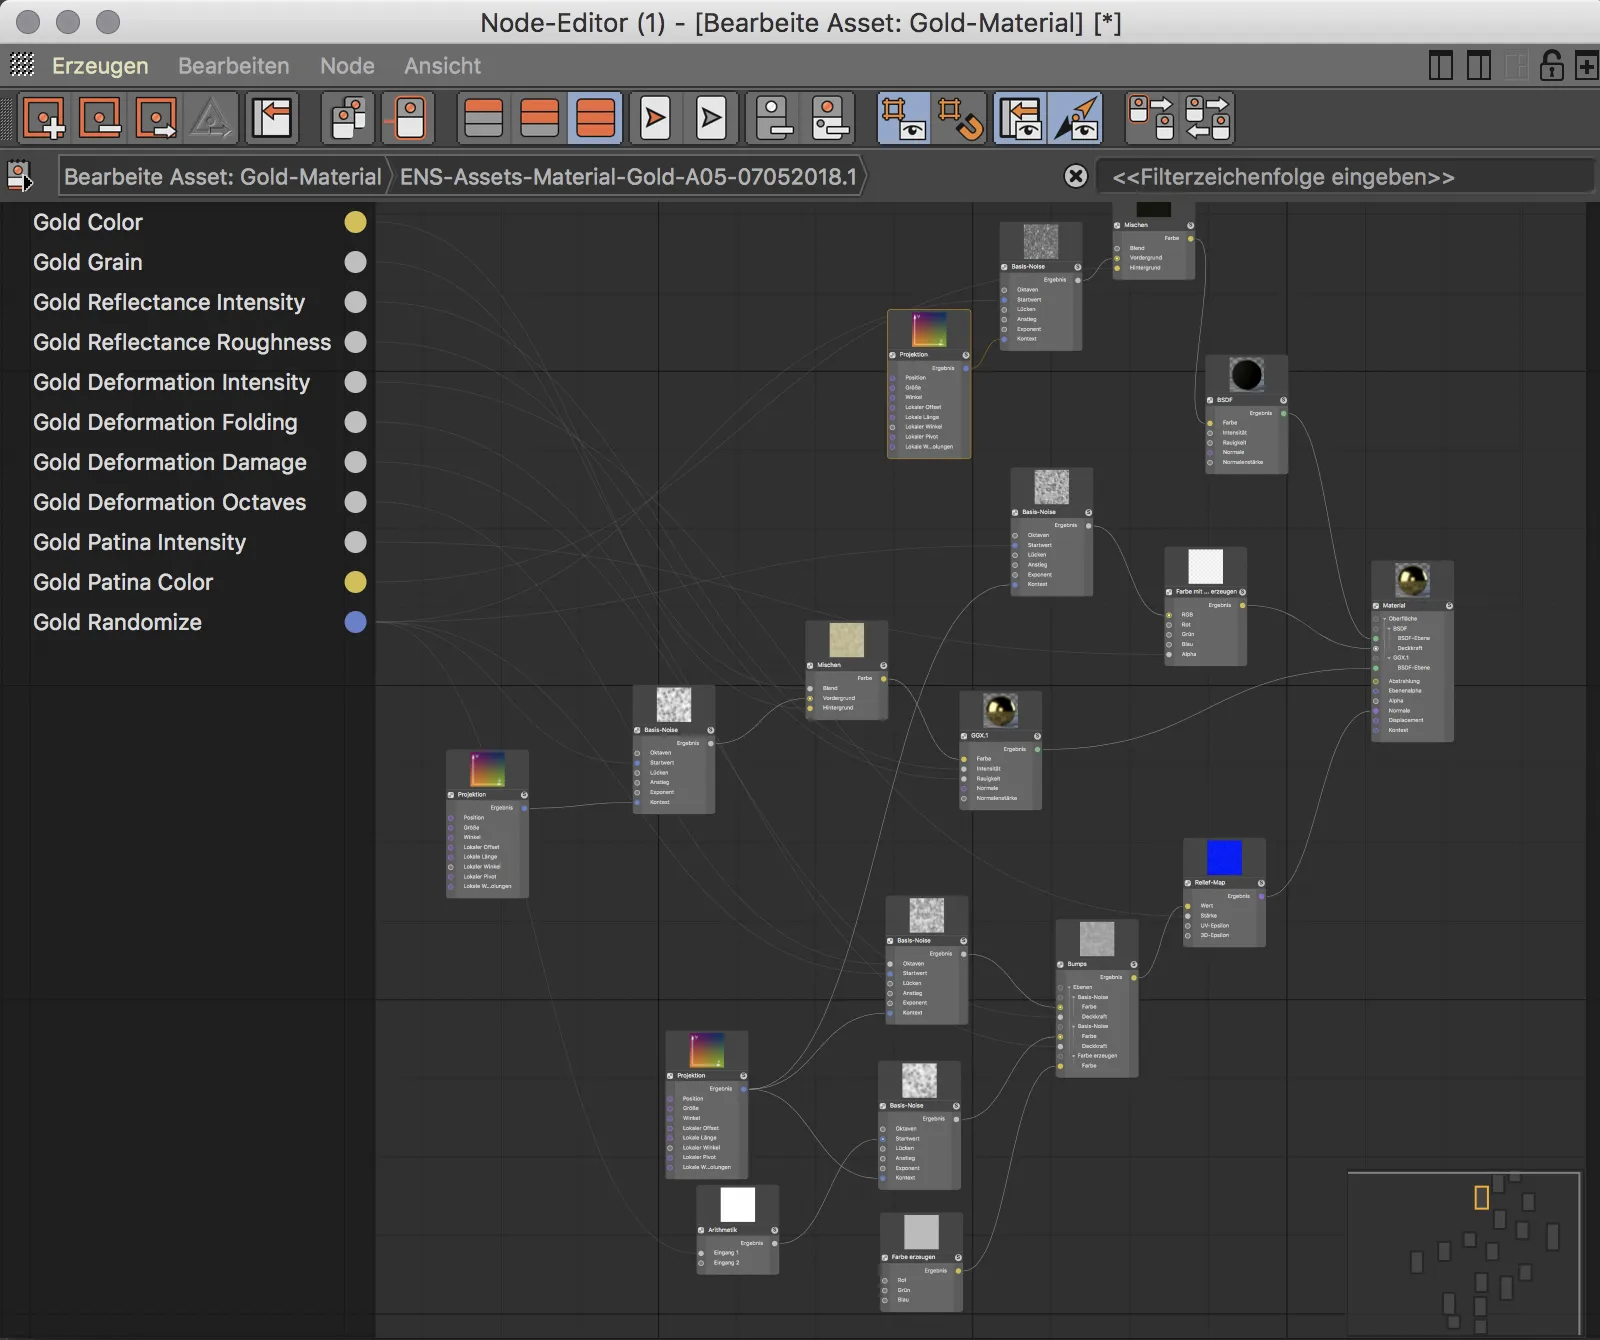
Node materials
This tutorial is not about complex node structures, but about a simple introduction to working with materials and nodes. So let's take a look at how we can create our own new node material and integrate our first nodes.
We create a new node material using the Create>New Node Material command or the Command+Alt+N shortcut in the Material Manager.
If we double-click this node material in the Material Manager, the Node Editor opens. In the middle, we find the main workspace, which already contains the material node for the result and a connected diffuse node by default. The left-hand column shows us the nodes used , a library of all available assets and general information about the selected node. The right-hand column is reminiscent of the Attribute Manager, where all settings for the selected node or asset are made.
The node editor itself offers a wealth of functions for working with nodes and in the editor - here I would recommend simply switching on the tooltips or taking a look at the documentation.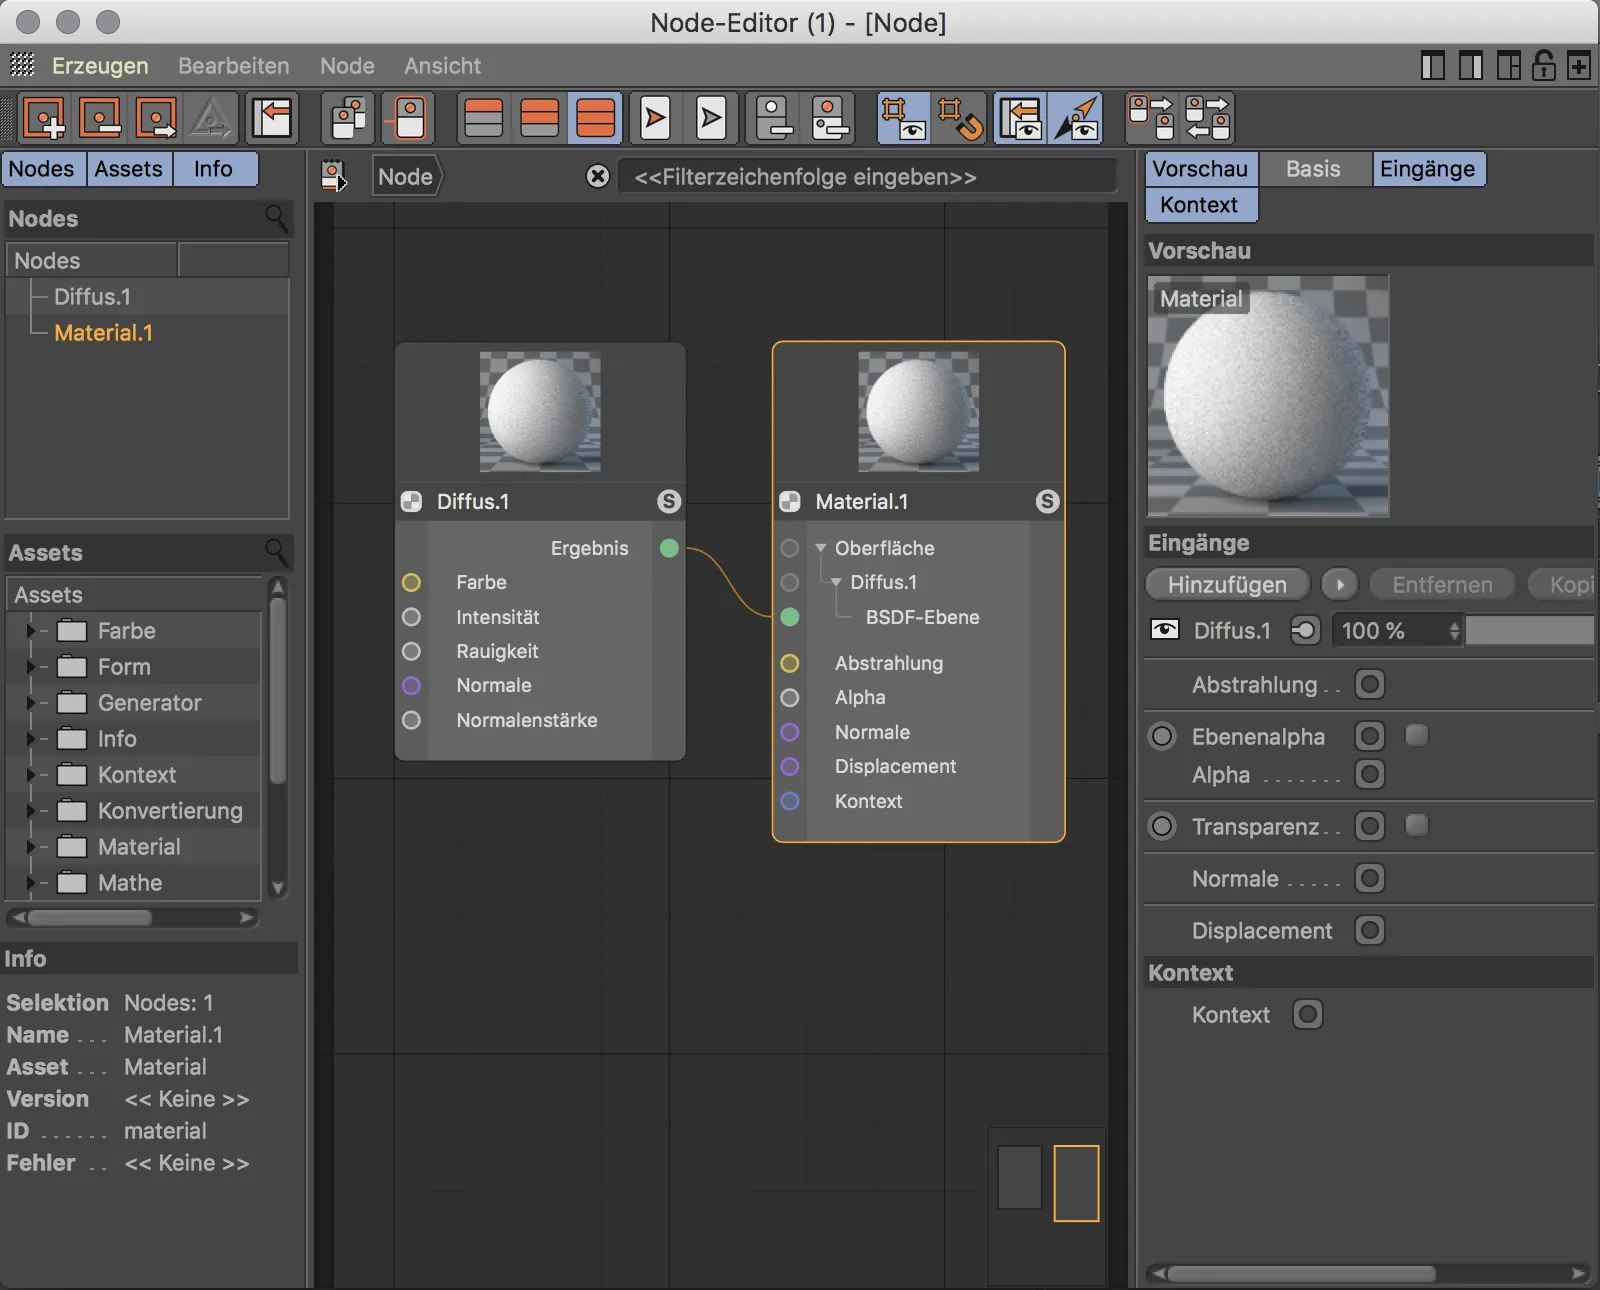
At the moment, our node material only has a diffuse layer for the surface. The material node also provides the radiation, alpha, normal, displacement and context ports.
In order to teach the material reflectivity, we need an additional surface layer, which we create as an input port using the Add button. These layers work with the physical BSDF (Bidirectional Scattering Distribution Function) shading. Blender users have been familiar with the abbreviation "BSDF" since the introduction of the Cycles renderer.
After this step, the material node has a second BSDF layer with its own input port in addition to the existing diffuse layer, which we can control.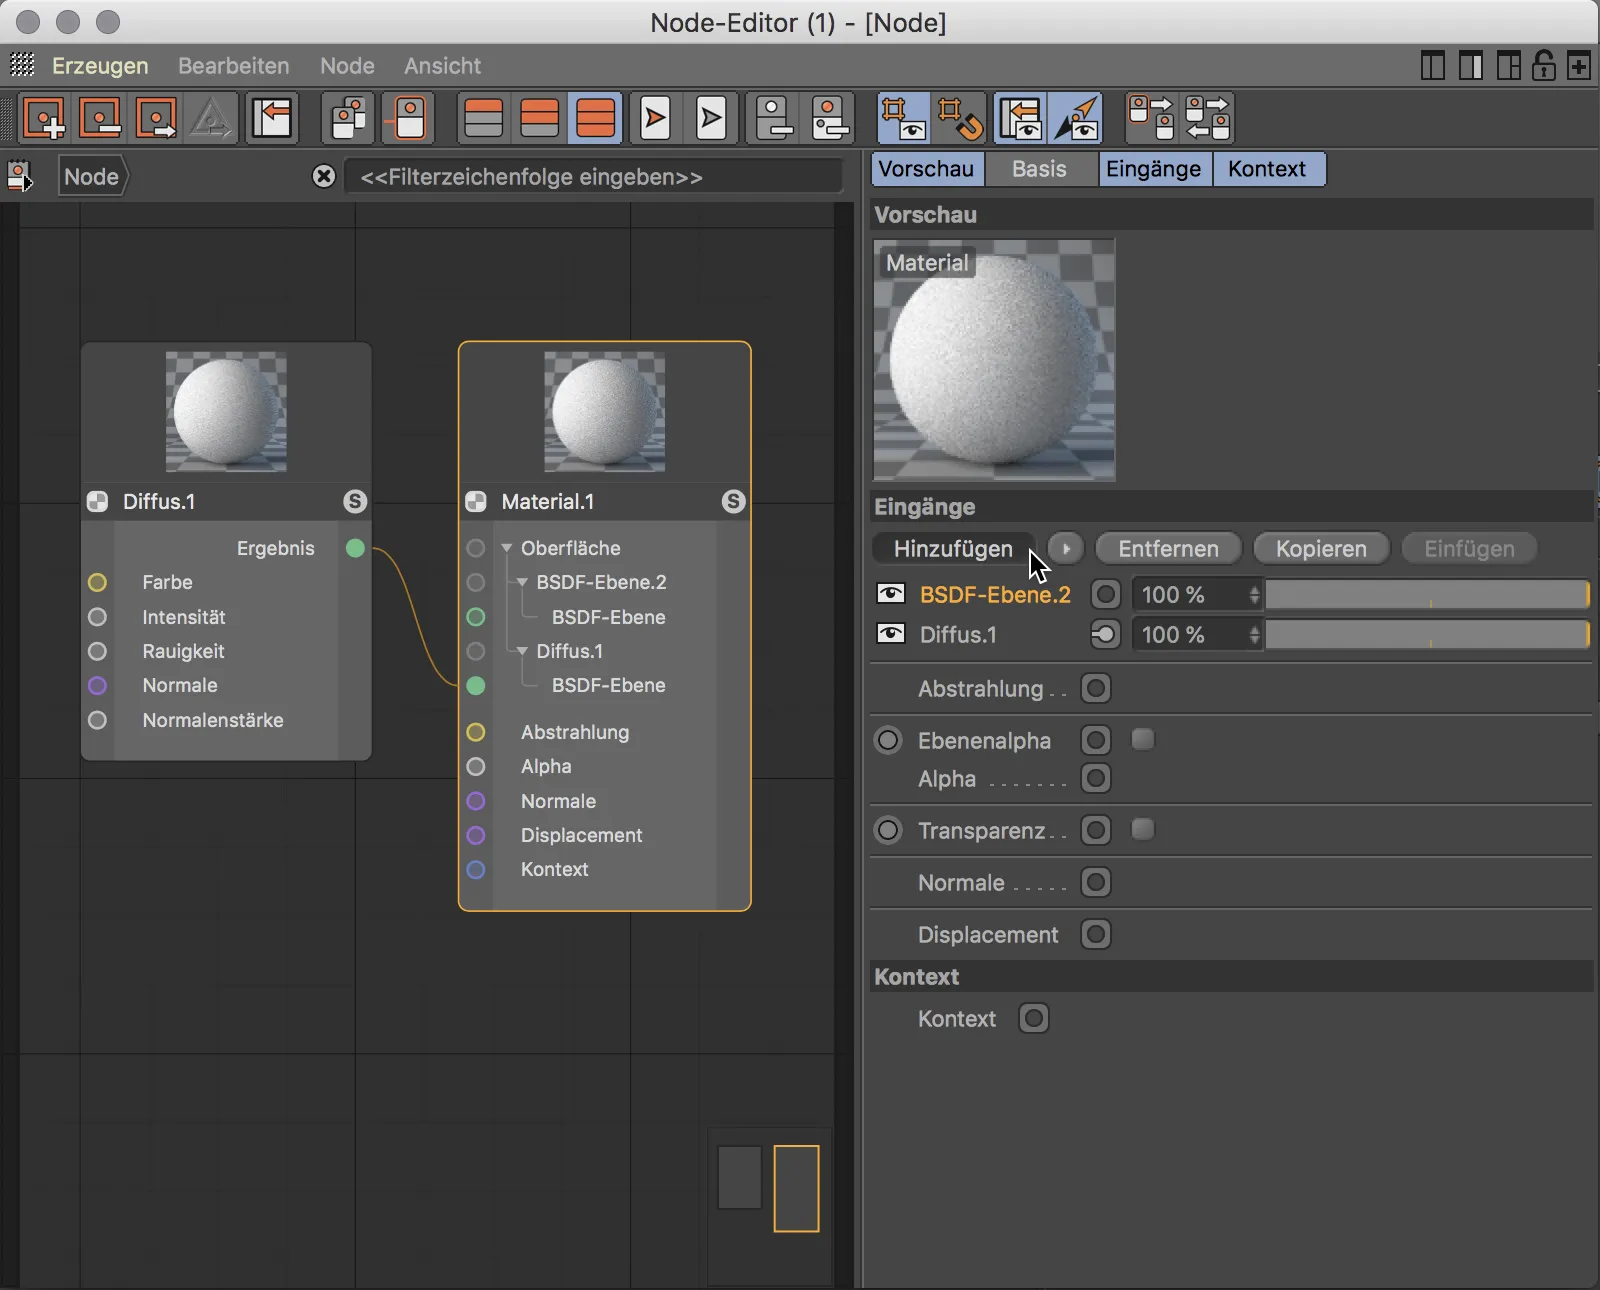
The material receives the reflectivity via a different BSDF type. We have already provided the input port for this in the material node, so we need a second BSDF node analogous to the diffuse plane. We can get this node from the asset library or simply create it by copying and pasting the diffuse node. In the settings of the second BSDF node, we select a BSDF type such as GGX or Beckmann and set the Fresnel to Dielectric. To use this BSDF node for the material, we connect its green result port to the green input port of the second BSDF level. The preview of the material node immediately shows us the calculated result.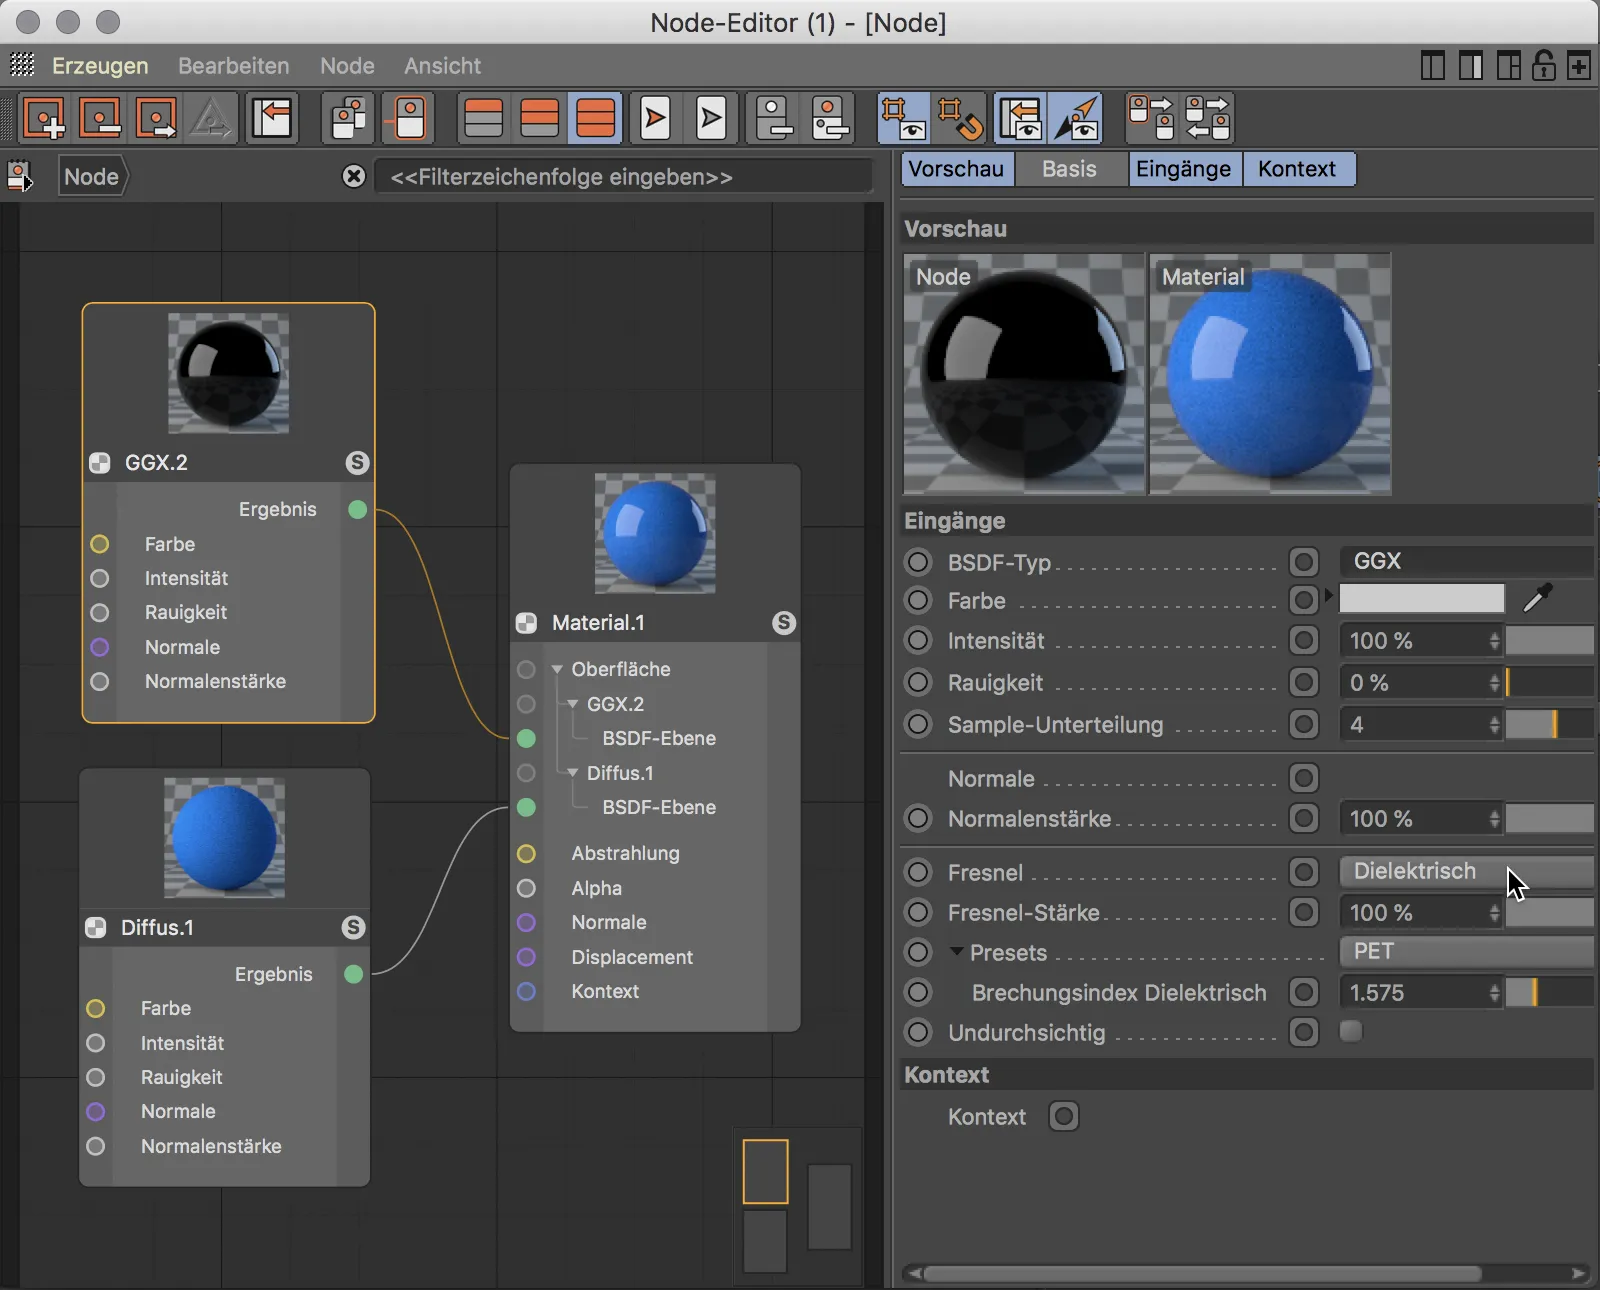
Integrating a texture into a node material is very simple. We simply drag the desired texture from Windows Explorer or the Mac Finder into the Node Editor.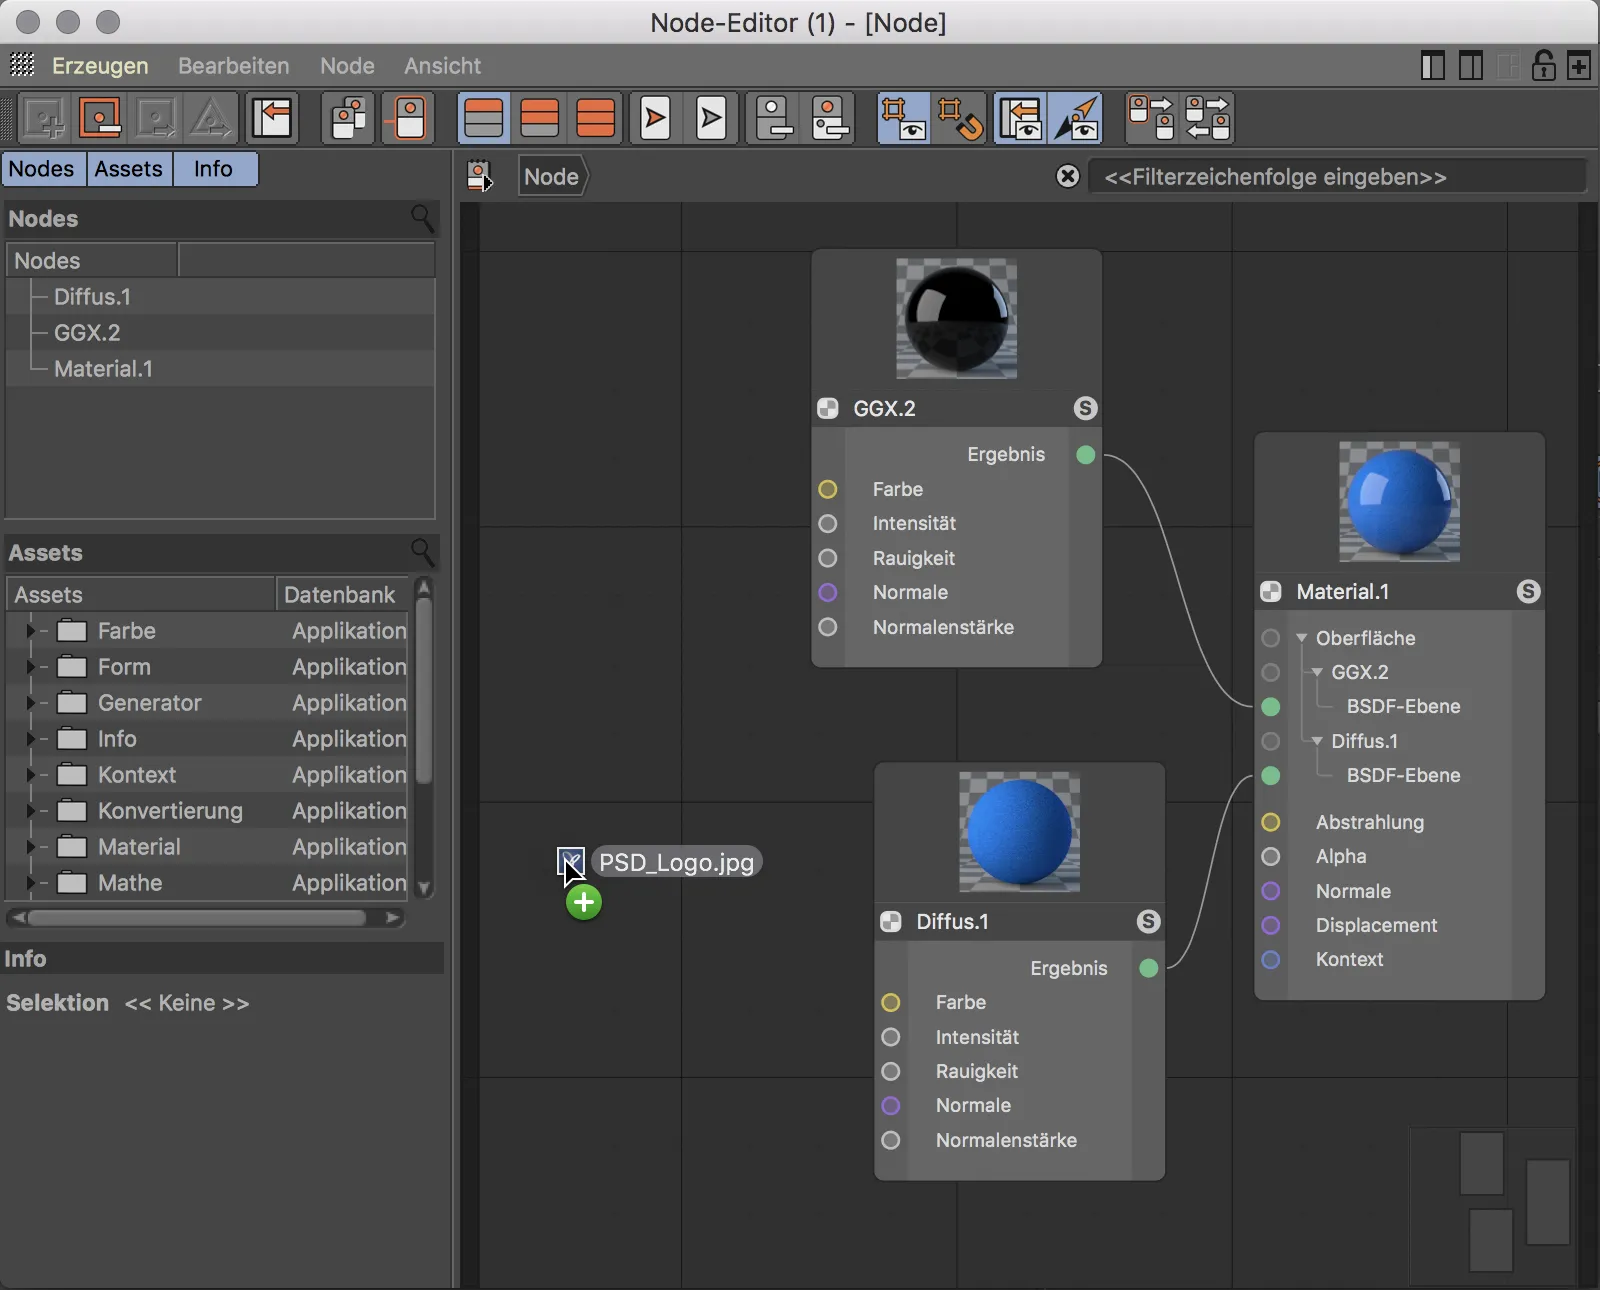
This automatically creates the required image node and stores the texture. To use the texture as a color in the diffuse layer, for example, we connect the yellow result port of the image node with the yellow color port of the diffuse BSDF node.
The color of a port stands for the respective data type. Input and output ports of the same color have the same data type and can therefore be linked without any problems. It is of course also possible to connect ports of different colors. An internal conversion of the data type then takes place, which hopefully produces the expected result.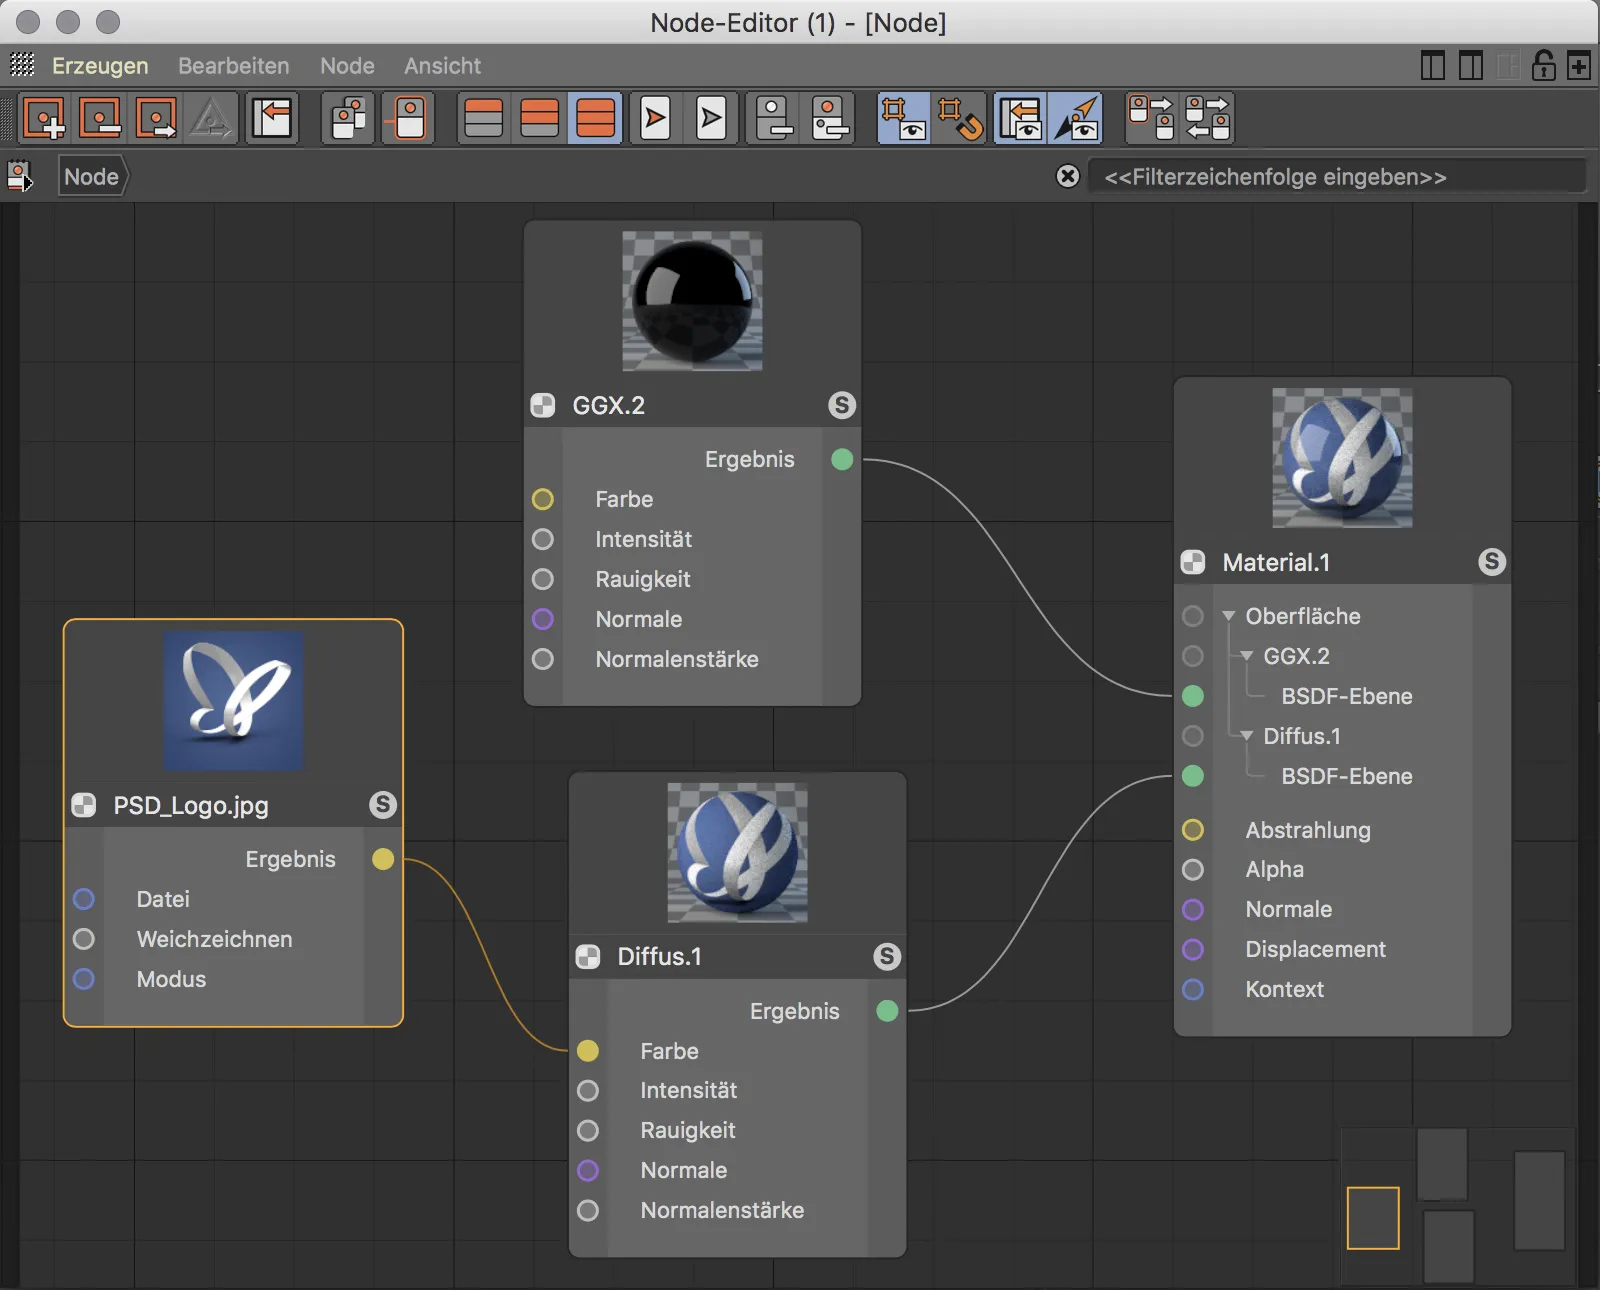
The Node Editor provides a large number of assets in its asset library. The search bar is a great help when searching for the right asset. Instead of laboriously trawling through the directories, you only need to enter a few letters to filter a preselection. Particularly practical: not only the assets that contain the typed letters in the name are displayed, but also those that have a thematic context and therefore have matching keywords.
In the example shown, a noise asset is being searched for to structure the surface.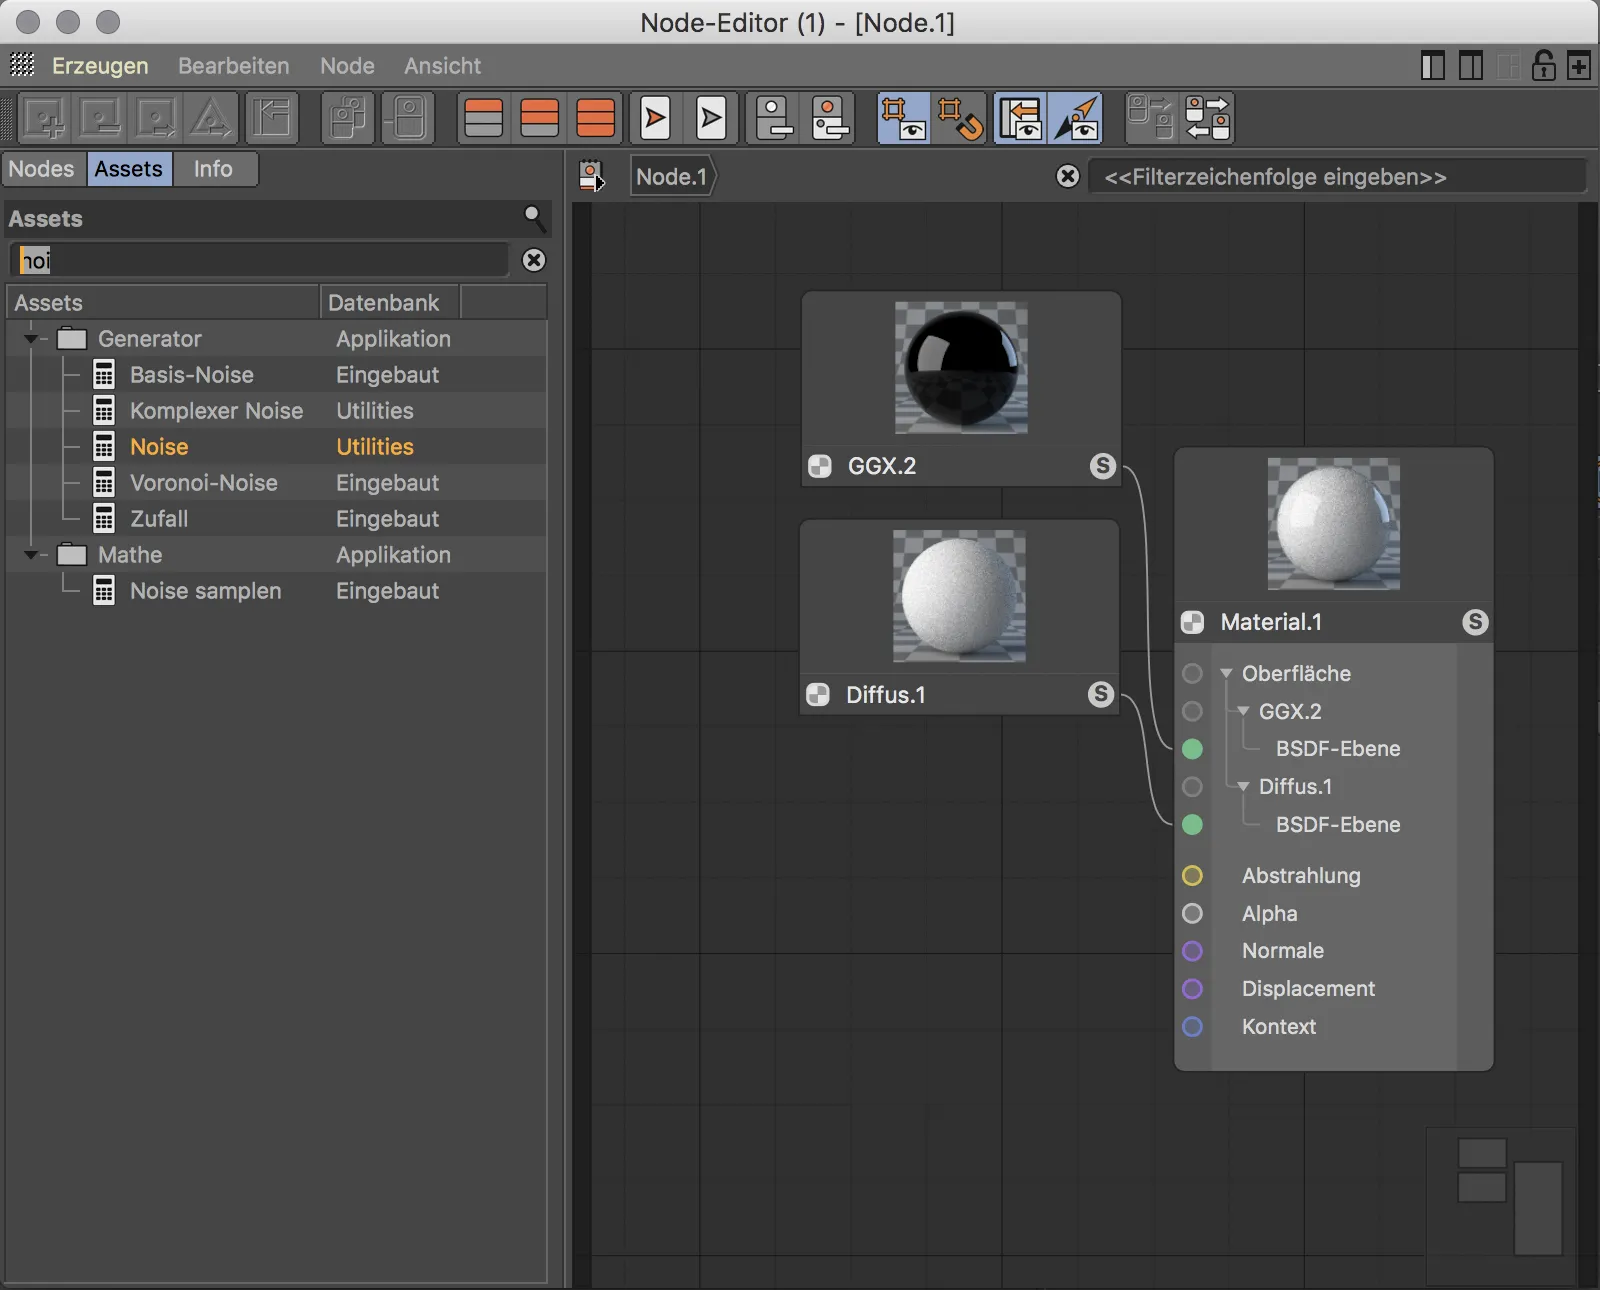
After dragging the noise node from the asset library into the main window, it can be seen from the color coding that the yellow result port of the noise node does not match the purple normal port for the diffuse BSDF layer responsible for structuring the surface. The combined result also shows that the automatic conversion does not help here due to the different data types.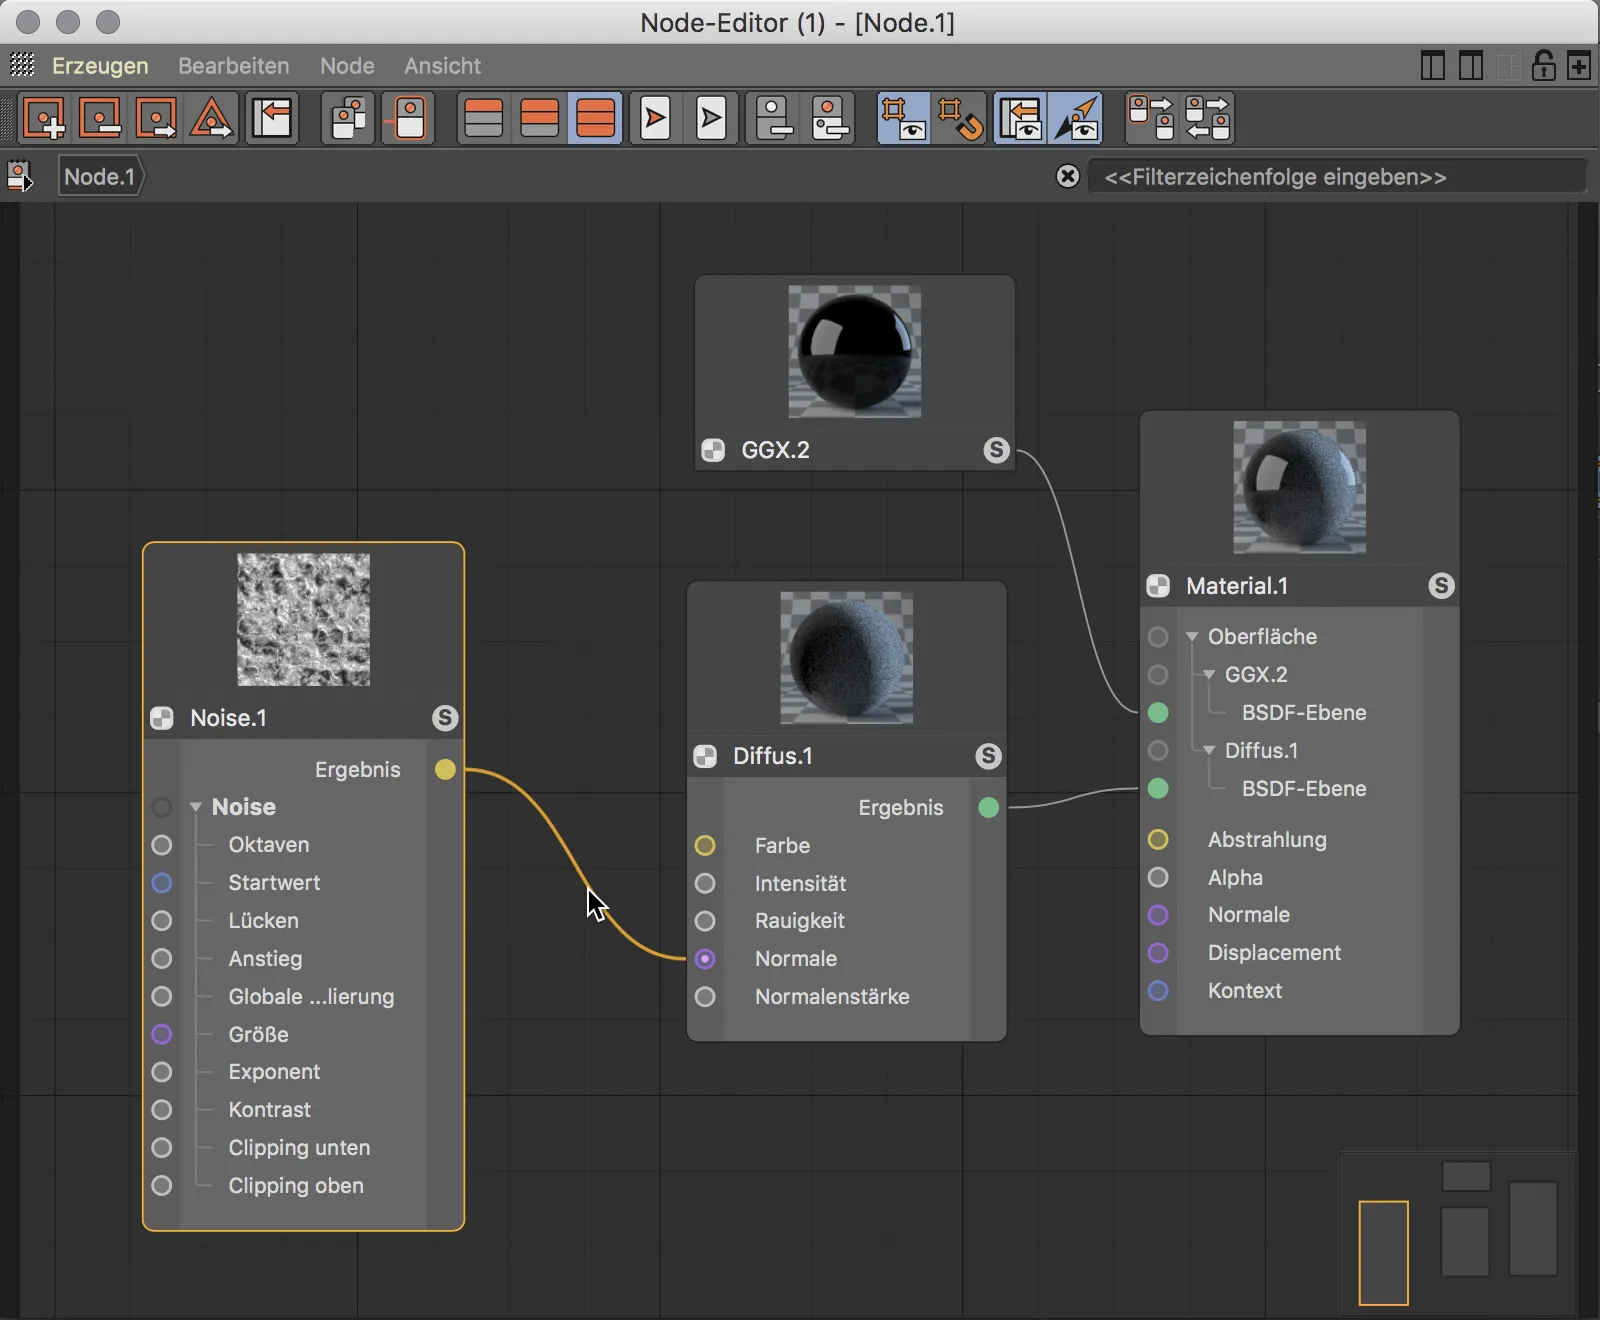
We therefore need an asset that converts the noise node into a bump (relief) map for the normal port of the diffuse layer node. Let's test the context search in the asset search bar and enter the first letters of "Normal". We will find the relief map node displayed alongside a few other thematically similar nodes in the Surface subdirectory. After dragging the relief map node into the main area of the node editor, we can also see from the color of its ports that the conversion matches the data types.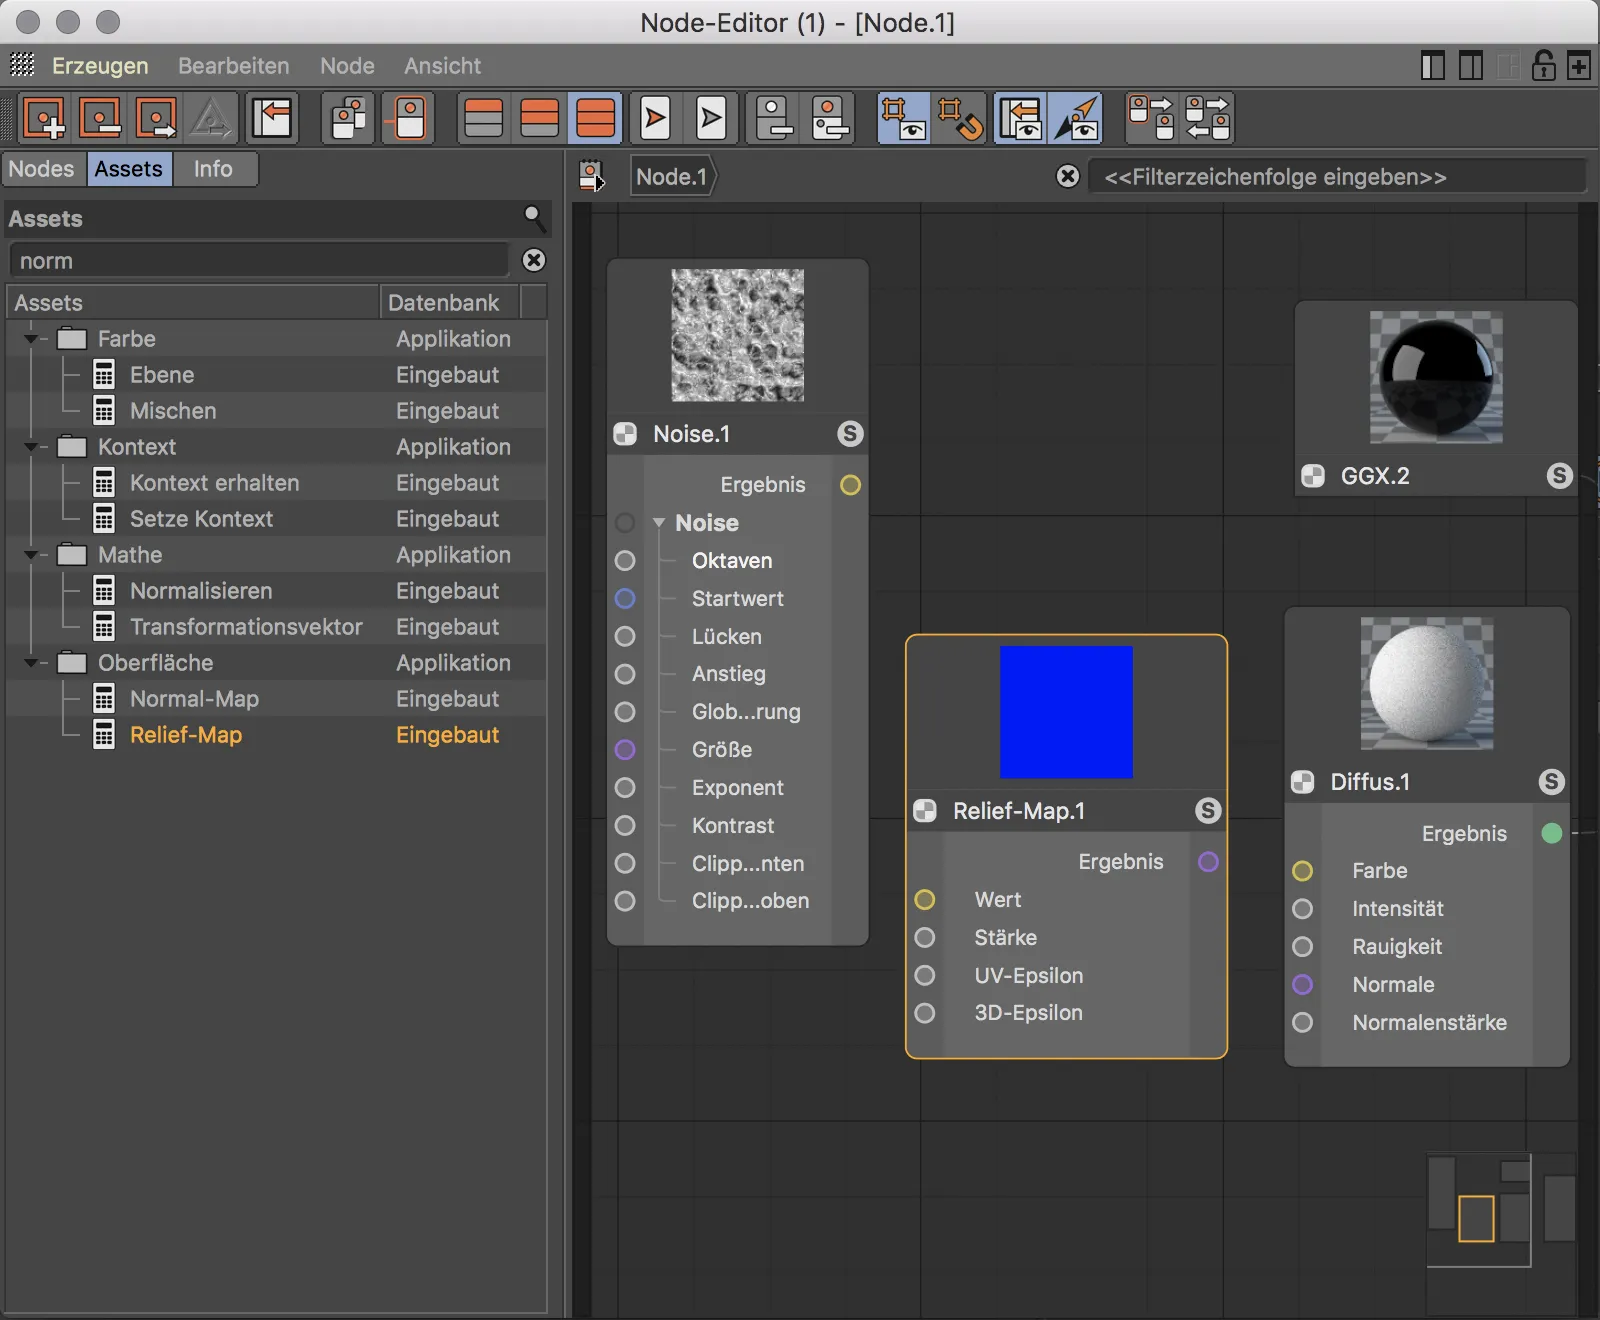
Now all we have to do is place the relief map node between the noise node and the diffuse BSDF node and connect the ports with the correct colors. Conveniently, the preview in the relief map node also shows us the intermediate result with which the diffuse BSDF node is operated. In the preview of the diffuse BSDF node and material node, we can see the effect of the relief map.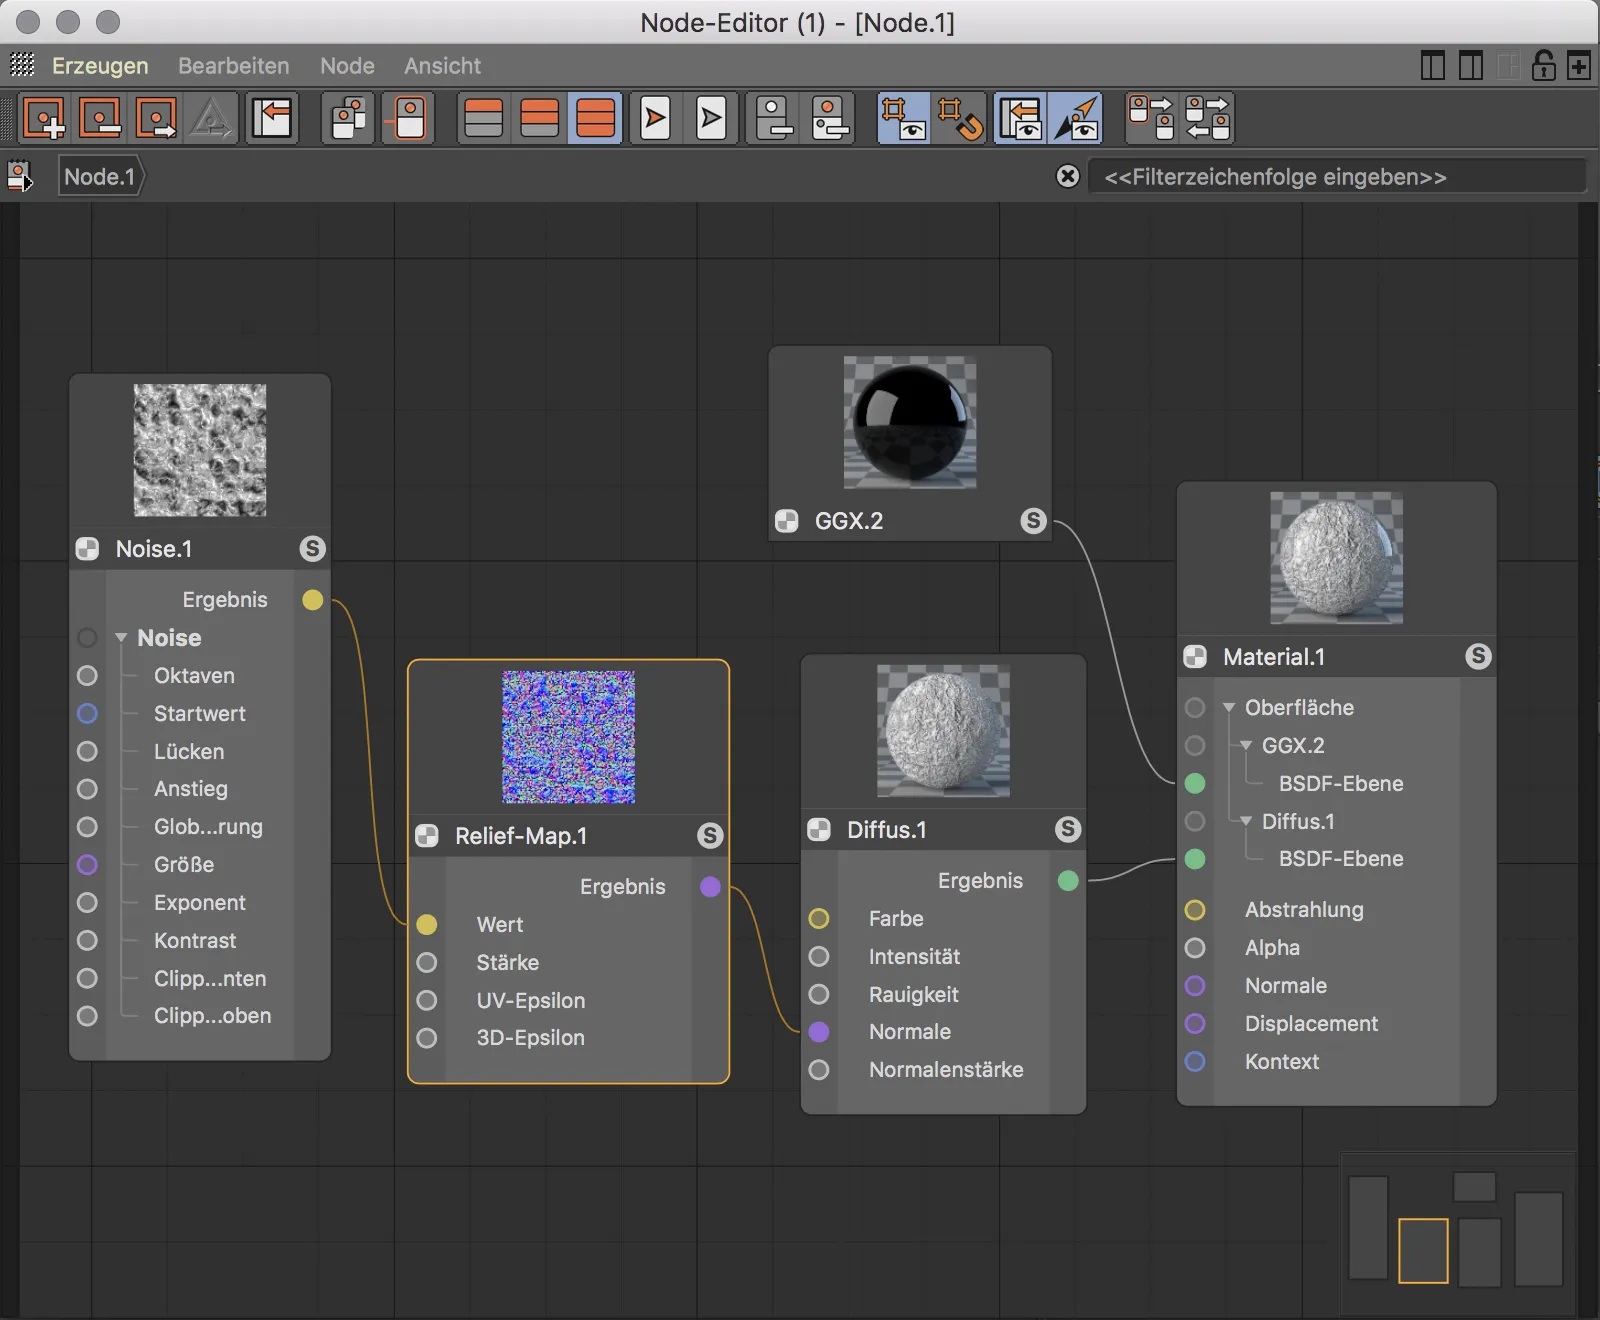
If you haven't worked much with nodes before, you may be wondering what the advantages of defining materials using this method are compared to setting up parameters in the Attribute Manager.
The advantage becomes clear when we want to use the noise node that functions as a relief map for the material color, for example. In order to use a different color at the same time, I also use a color node.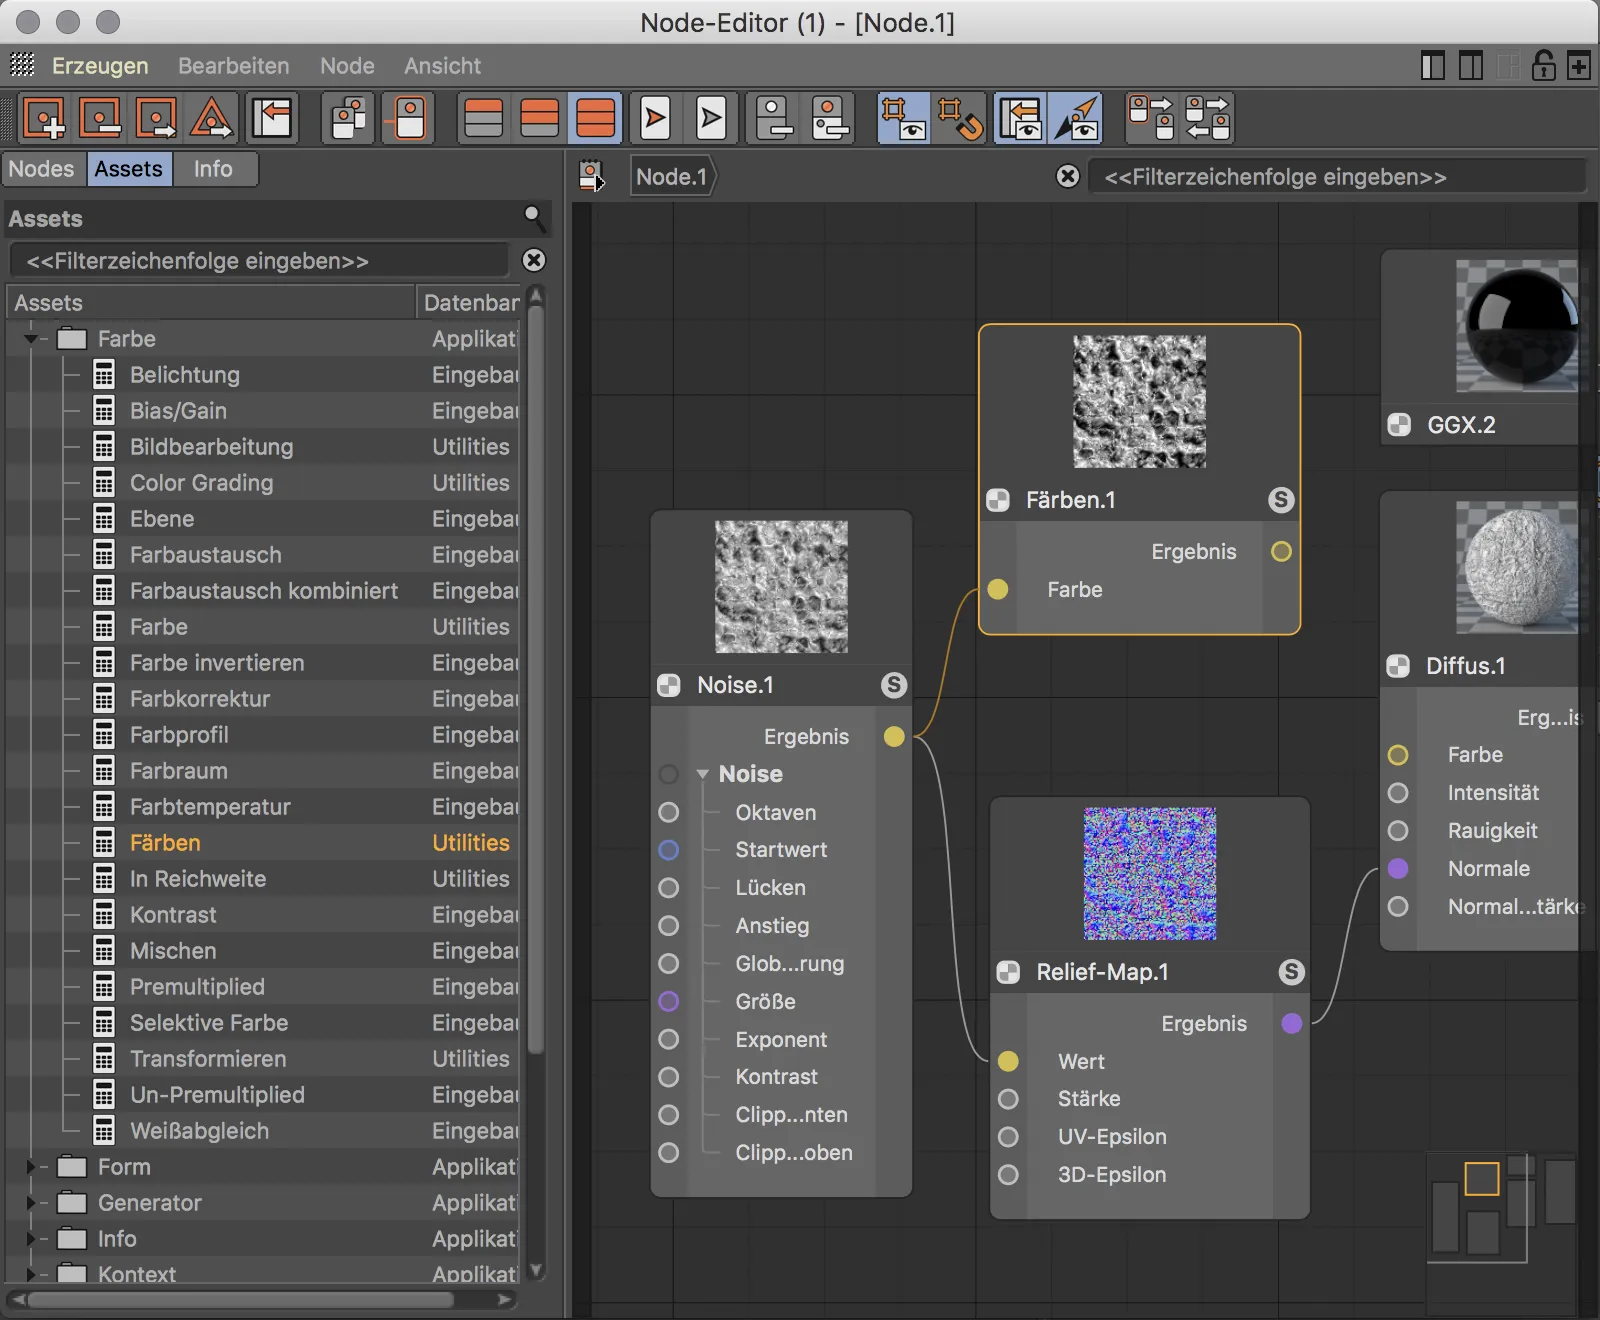
In the settings of the coloring node, I have decided on a strong red.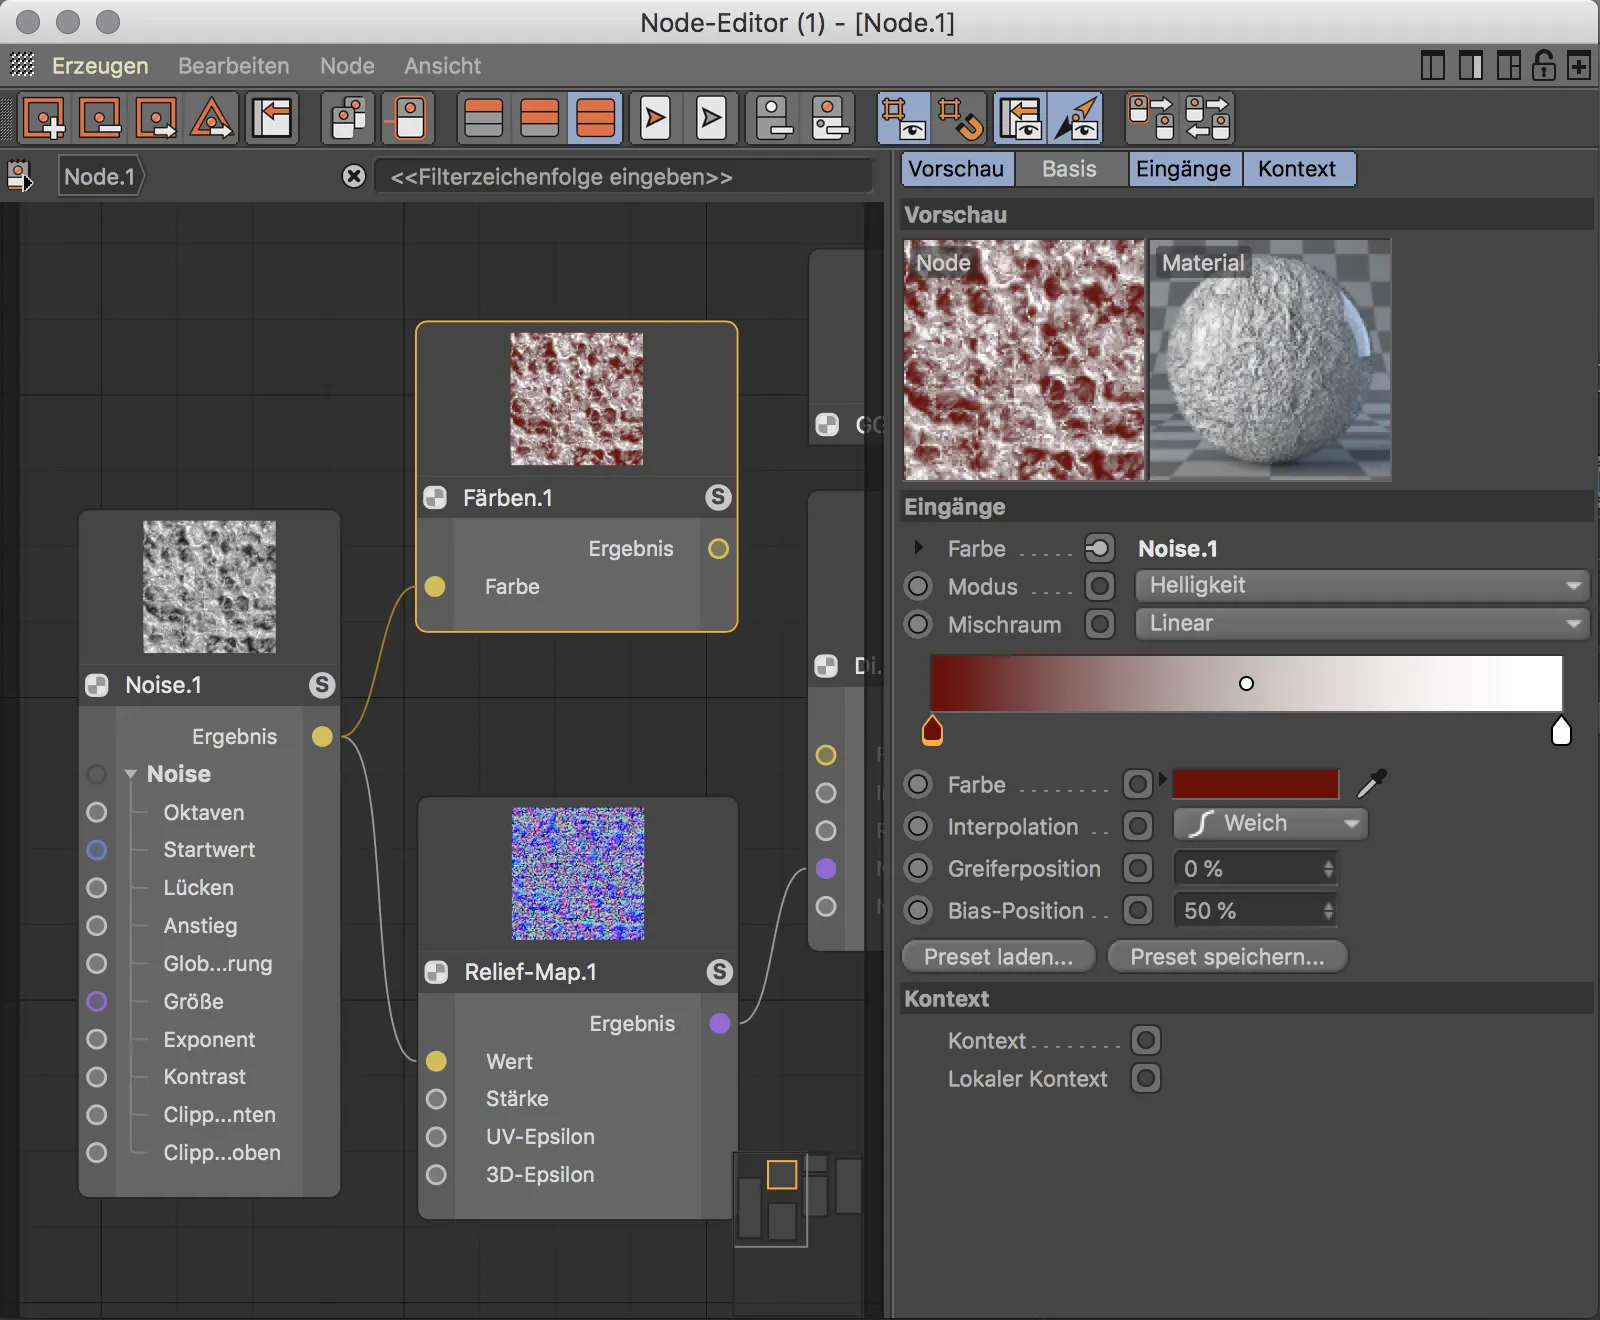
The only thing left to do is to insert the coloring node between the yellow result port of the noise node and the yellow color port of the diffuse BSDF node. We now use the noise node for the material color and as a bump map at the same time. If we want to decide on a different noise patternlater on, we only have to adjust this in one place - on the noise node itself. This was just a simple example of the flexibility of nodes compared to the previous way of working.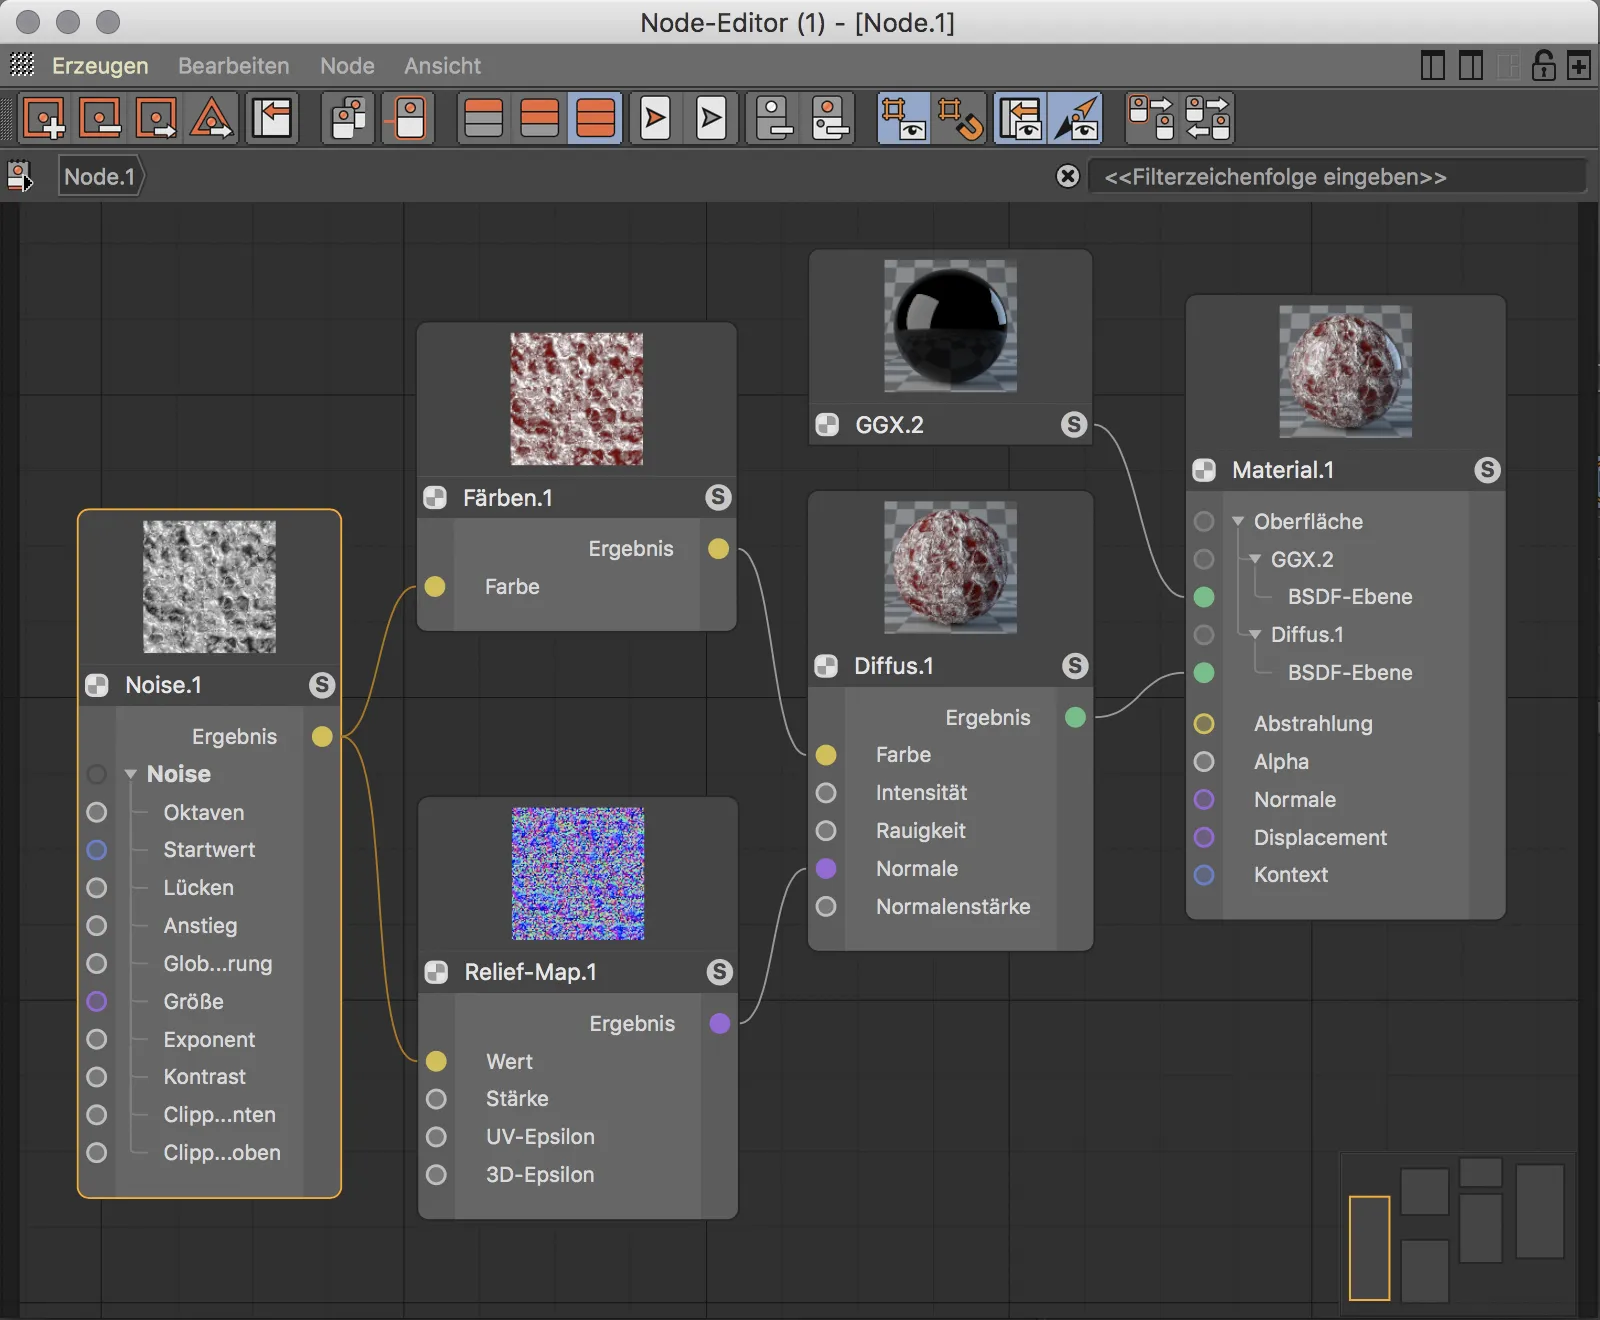
I hope I was able to arouse curiosity about node-based materials with this tutorial. The possibilities for designing materials are almost unlimited, so this tutorial can only be a brief introduction and an invitation to experiment.


