Rising stars, taken at "Glacier Point", a viewing platform in "Yosemite National Park", California, USA. The total exposure time was almost four hours.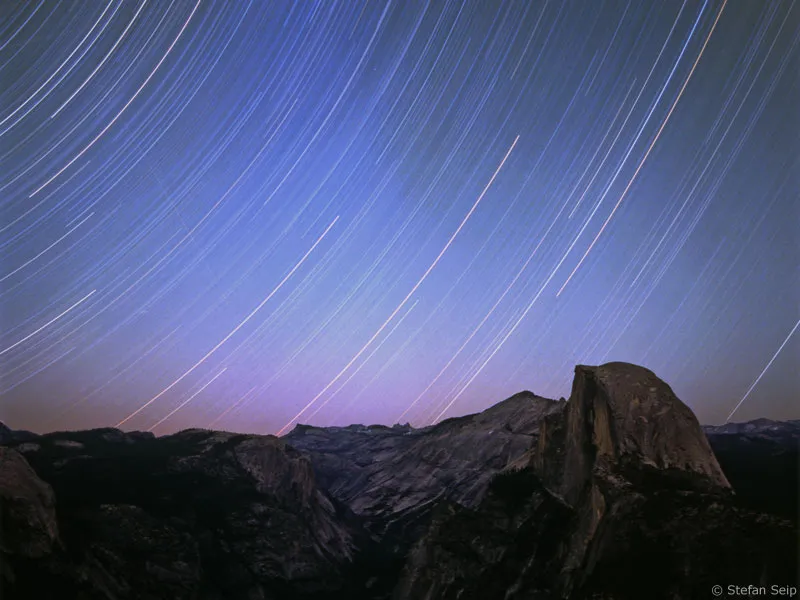
Part 2: Line-trace images of stars
Everyone knows that the sun rises in the east, reaches its highest point in the south around midday and sets again in the west in the evening. In the past, people assumed that the sun actually orbited around us. Well, today we know better: it is the earth that rotates once on its axis in around 24 hours. So, in a way, we are on the "Earth carousel" and view the sky from there.
This also means that this perpetual motion is not only performed by the sun, but also by all other objects in the universe. In fact, the moon, stars and planets also follow this law; they too rise in the east, culminate in the south and set again in the west.
To understand this celestial mechanics even better, we can imagine the sky as a huge hollow sphere with the rotating Earth at its center. All the celestial bodies are located on the inside of the hollow sphere. The earth itself, on which we are standing, blocks our view of half of this "celestial sphere", namely all the objects that are just below the horizon. To the observer, this celestial sphere appears to rotate because the earth is perceived to be at rest. The pivotal point of this celestial movement is the point at which the Earth's extended axis of rotation passes through the celestial sphere. Seen from the Earth's northern hemisphere, this is the so-called north celestial pole, in the immediate vicinity of which (coincidentally) the North Star is located.
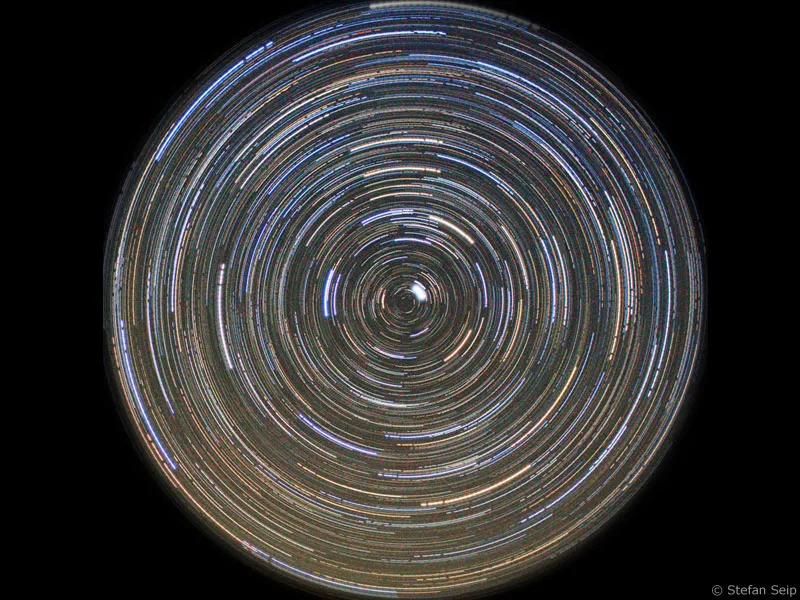
This line trace image of the northern celestial pole clearly shows that Polaris is only close to, but not exactly at, the northern celestial pole. The bright, short streak to the right above the pole is Polaris.
The north celestial pole, i.e. the pole star as a first approximation, can therefore always be found in the "north" viewing direction. The height of the north celestial pole above the horizon corresponds exactly to the geographical latitude of the observation location. In Frankfurt am Main, this is around +50 degrees. Let's imagine the two extreme positions of the North Pole and the equator:
North Pole
If we were observing from the Earth's North Pole, the latitude would be +90 degrees, i.e. Polaris would be at the zenith, the highest point in the sky, above our heads. All the stars would circle around it, in orbits parallel to the horizon. In other words, the same starry sky would always be visible from there, with no star rising or setting. From there, the southern part of the celestial sphere remains hidden forever.
Equator:
At the equator, the geographical latitude is 0 degrees, so the north celestial pole is exactly on the horizon facing north, and the south celestial pole is on the horizon facing south. All the stars rise on the entire horizon in an easterly direction and follow a steep path across the sky until they set again in the west. Within 24 hours, the entire starry sky would be visible, both the northern and southern skies. If, yes, if the sun did not rise at some point. But the sun moves forward within the stars over the course of the year, so that the entire starry sky can actually be observed from the equator over the course of a year. This is the reason why most large observatories are built near the equator.
Germany:
What are the conditions like in Germany? Germany lies between these two extremes; the southernmost parts of the country have a latitude of around +47 degrees, the northernmost around +55 degrees. The north celestial pole with Polaris is therefore at this altitude. All stars that are no further away from the north celestial pole than this angle never set in this country. They can be seen in the sky on every clear night and are called "circumpolar stars". The best-known constellation, the "Big Dipper", for example, consists of circumpolar stars and is always visible. In contrast, the constellation "Orion" is only above the horizon at certain times of the year and at certain times of the day, which is why it is known as the "winter constellation".
Line-track photography
If a camera is mounted on a photo tripod and pointed at the starry sky, the stars leave trails of light when exposed for long periods of time and appear as lines due to their apparent movement. The longer the exposure time, the longer these trails become.
- the longer the exposure time,
- the longer the focal length used and
- the further away the photographed region of the sky is from one of the two celestial poles, because this is where the stars move the fastest.
Determine the cardinal points
It is useful to know the points of the compass when planning your line-track shots. A compass can of course be used for this purpose. Or you can look for the location on a sunny day at midday. If the clocks are set to summer time, 13:00 is the correct time; during winter time, 12:00 is noon. Now position yourself so that the sun is exactly behind you, i.e. your own shadow is pointing straight ahead. North is the direction in which you are facing. Opposite, i.e. behind you, is south. To the right is east, to the left west. This identifies all the cardinal points.
If you look at your shadow on a sunny day at midday, you can determine all the cardinal points (N=North, S=South, W=West, E=East).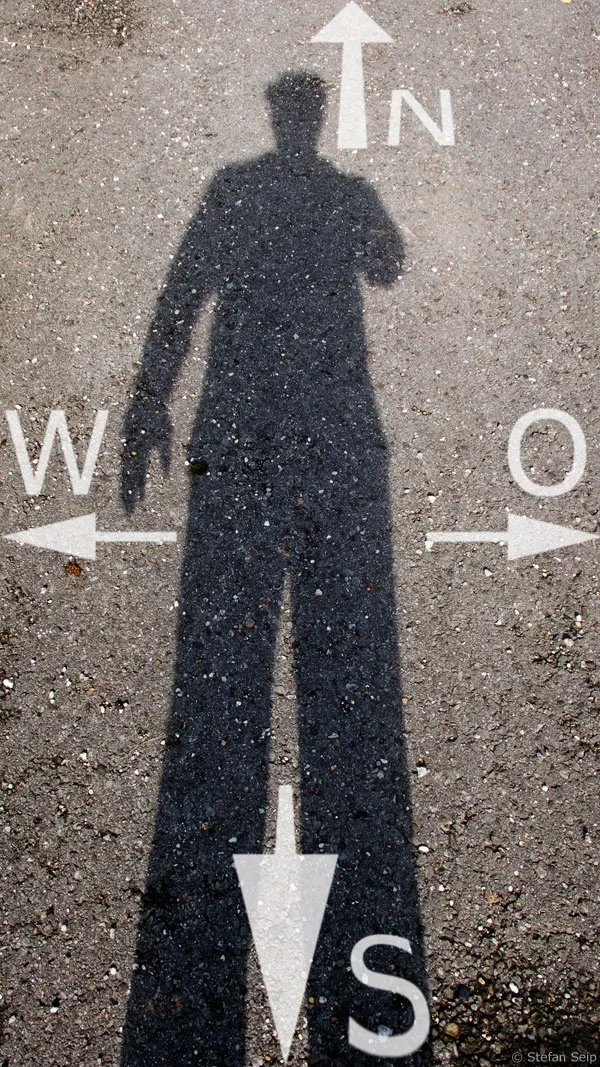
The equipment required for line-track photography is limited. Any digital SLR camera is suitable. Make sure that the lens has an adjustable aperture of at least 1:4.5, faster lenses are preferable. The focal length is not important and can be freely selected depending on the desired image section. However, I would recommend focal lengths up to a maximum of 50 millimeters to start with.
You will also need
- Stable tripod
It must be able to hold the camera reliably during the entire exposure time and should also be able to withstand a gust of wind.
- Cable release / Timer
To trigger the camera without having to touch it. Programmable timers are a great advantage for line-trace photography, as they can be used to automate entire series of shots. For Canon EOS cameras with a one or two-digit type designation (1D, 5D, 50D, 40D, ...), this would be the "Canon TC-80 N3 Timer", for example. Unfortunately, it does not fit three- or four-digit EOS models (400D, 450D, 1000D, ...) because these cameras have a different cable release connection. However, the same device is also available for such cameras under the name "Phottix TR-80 C1" (offered e.g. at www.amazon.de). If you can limit yourself to the longest exposure time that can still be set on the camera (usually 30 seconds), a simple cable release with a locking mechanism, such as the "Canon RS-60 E3", will also suffice.
Canon offers these two cable releases: The simple RS-60 E3 model (above), where the shutter release can be locked. It fits all three- and four-digit Canon EOS models (350D, 400D, 450D, 1000D, ...). One and two-digit Canon models have a different connector to which the programmable TC-80 N3 Timer (below) can be attached.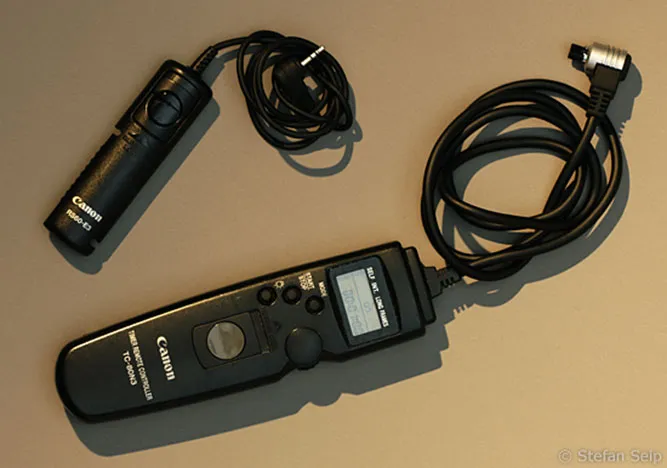
Other accessories:
- Lens hood
To prevent the effects of extraneous light from the side and to delay possible dew fogging of the front lens.
Procedure
In earlier days, when there were no digital cameras, line-trace photographs were taken on film with a single, very long exposure time. The shutter of the camera was often left open for several hours. Even today, this is still the easiest way to capture line-track images. If you like to take line-track photos often, you may even find this a worthwhile activity for an older, almost obsolete analog camera.
Such long exposure times do not make sense with a digital camera. For one thing, the electronic image noise would get so out of hand that a usable result would be unthinkable. On the other hand, overexposure of foreground objects could hardly be avoided, especially if they are illuminated by terrestrial light sources or the moon.
For this reason, digital cameras are used to take many shorter-exposure individual shots - with as short a pause as possible between them - and then combined with an image processing program - such as Adobe Photoshop (Elements) - to create the final line-trace image.
1. preparation
Pack all your accessories in your bag and make sure that the battery is fully charged. Digital cameras require energy even during a long exposure. Depending on the camera model, it may be useful to have one or two spare batteries ready. Also bear in mind the loss of battery power at low temperatures, for example on a cold winter's night.
2. make the basic settings
The following settings must be made on the camera:
File format
I recommend the JPG format in its best resolution for line-track shots, not the RAW format. There are two reasons for this: First, dozens, maybe even hundreds of individual images have to be layered later in Photoshop. Files in RAW format require more time to open and take up more memory. This can quickly lead to memory bottlenecks. With JPG files, such problems do not occur or are delayed. Secondly, some camera models require noticeably more time to save RAW files. To avoid the risk of the pause between two shots becoming too long or even "skipping" a shot, the JPG format is preferable.
If you are working with a camera that can save fast enough and your computer with Photoshop has the appropriate performance reserves, you can of course also set the RAW format.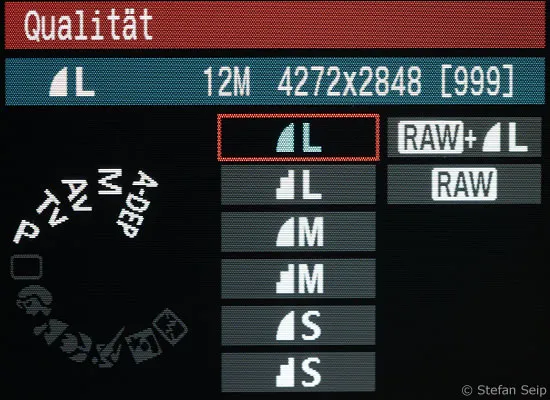
Setting the image quality on a Canon EOS 450D: The JPG format is selected here in the best quality (L for "Large").
Picture style
Photos taken in JPG format are subject to the settings of the selected picture style. It is best to use the Neutral picture style, as this sets the sharpening to zero, or set the sharpening of your preferred picture style to zero. It is not advisable to sharpen stars or star trails.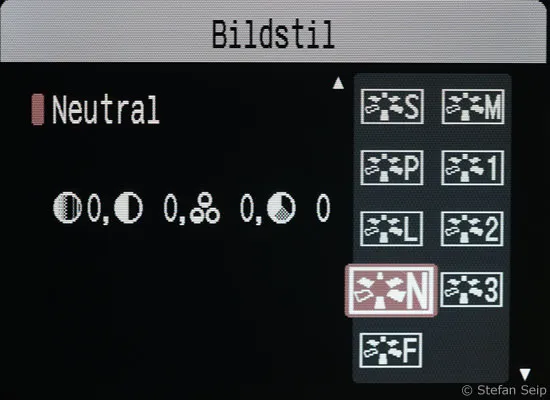
Select the "Neutral" picture style (Canon EOS 450D). All settings are set to zero, whereby the zero setting is particularly important for sharpness.
ISO value
It is difficult to give a good recommendation for the ISO value. Everything depends on the aperture value used, the residual brightness of the night sky and the landscape in the foreground as well as the exposure time of the individual shots. With an aperture of 1:2.8, a good, dark location on a clear night, far away from earthly light sources, ISO 400 with an exposure time of 60 seconds each can be a good guide. If the initial aperture is smaller (about 1:4.0), ISO 800 may be better. However, if the conditions are suboptimal, i.e. if the sky is brightened by the full moon or by stray light from the earth, it may be better to go to ISO 200 or even ISO 100.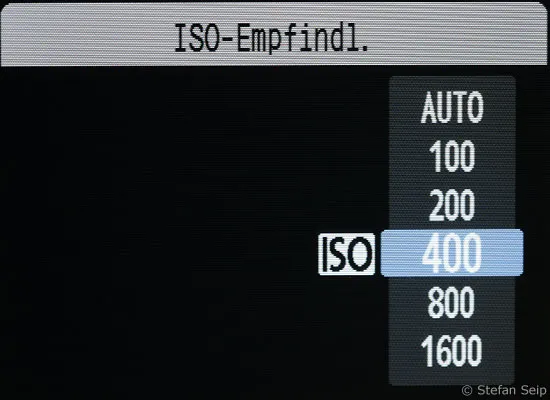
Setting the ISO value to 400 with a Canon EOS 450D.
White balance
An automatic white balance(AWB or AUTO) can lead to different color results in the individual shots. It is therefore better to set it manually to daylight (symbol: sun).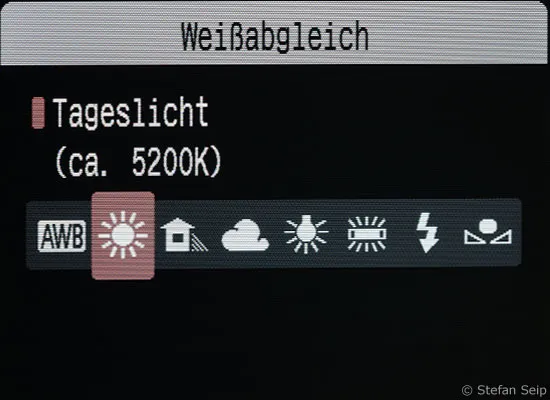
Setting the white balance on a Canon EOS 450D to daylight (5200 Kelvin).
Noise reduction
All functions that reduce noise after the picture has been taken, such as noise reduction for long exposures, must be switched off for continuous shooting. Otherwise the camera will need too much time for this process after each shot and the pauses between the individual photos will be too long. This also applies to the High ISO noise reduction setting on the newer Canon EOS models.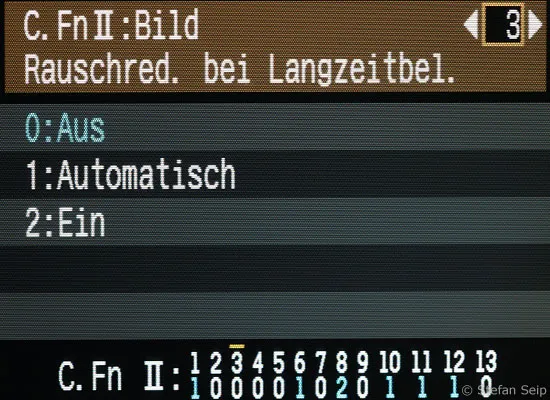
Switching off the noise reduction for long exposures. Select "Off" and not "Automatic".
Exposure program
Only the manual setting(M) is possible. Either set the exposure time to the desired value (e.g. 30 for 30 full seconds) or to B or BULB for exposure times of any length, which are then controlled by a Tim.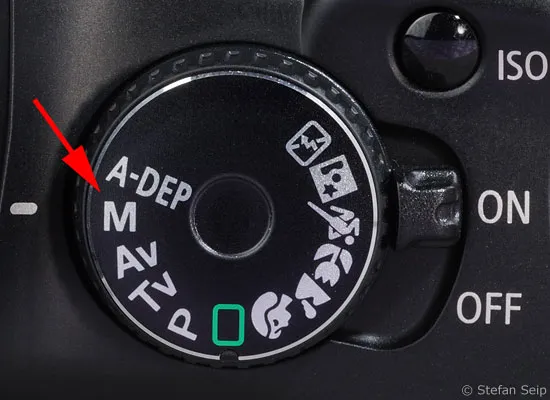
Setting the manual exposure control ("M") on the setting dial of a Canon EOS 450D.
Blender
Start with an aperture of f/2.8. If the lens you are using is faster, stop it down to f/2.8. If this aperture is not available with slower lenses, set the largest possible aperture (i.e. the smallest f-number).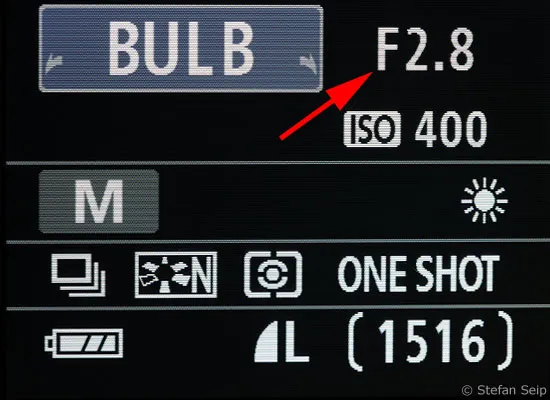
Setting the Blender 1:2.8 (arrow). Many other important settings are also visible on the display of the Canon EOS 450D.
Mirror lock
This setting is used in some cases to prevent camera shake caused by the camera's mirror. It cannot be used for continuous shooting and must be set to Off.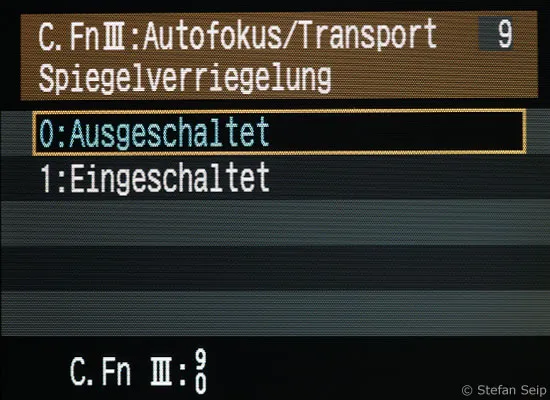
The mirror lock remains switched off during continuous shooting for dash cam shots.
3. taking pictures
First of all, it is important to find a good location. On the one hand, it should be far away from the "light smog" of larger cities, but on the other hand it should also offer a nice foreground motif. It is advisable not only to photograph the starry sky, but also to include a landscape, a tree or a building. This not only looks atmospheric, but also allows the viewer to compare the size of the image later on.
A moonless night is not absolutely necessary for line-track photography. Sometimes it can even be the case that the residual light from the crescent moon makes the scenery in the foreground visible. The sky also takes on a slightly bluish color due to the moonlight, which can be quite attractive. A full moon night, on the other hand, would be too much, as the bright moon forces you to use very short exposure times to avoid overexposure. In addition, on a full moon it will hardly be possible to capture the trails of faint stars if the sky is too bright.
Allow your camera and lens to cool down to the temperature of the night so that the temperature gradient does not cause the focus point to shift during the course of the series. The next challenge is to find the best focus point at "infinity". The best way to do this has already been explained in the first part of this tutorial ("Mood shots at dusk").
The classic way would be to look north in order to have the celestial pole in the field of view, around which the stars rotate. This requires you to identify the pole star and capture it in your photo.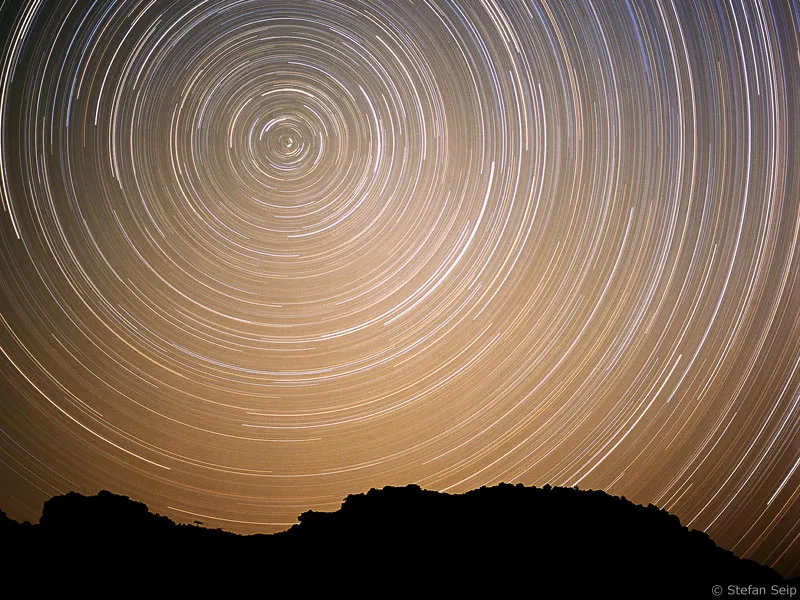
Line-trace photos in which the celestial pole, i.e. the pivot point, can be seen are particularly popular. Can't see the pole star? That's right, because this photo was taken in Namibia, in the southern hemisphere of the earth. You can therefore not see the north celestial pole, but the south celestial pole. Unfortunately, there is no bright star near the pole.
Once you have found the constellation "Big Dipper" (left in the picture), you have a good guide to Polaris: If you extend its trailing edge by about five times (yellow arrow), you will come across Polaris (circled). This in turn forms the end of the drawbar of the little wagon. A line drawn vertically downwards from Polaris points north.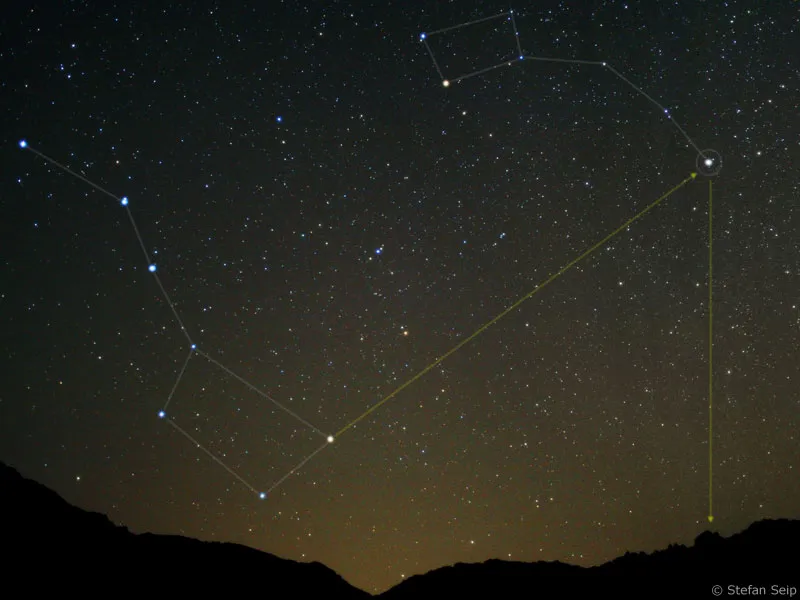
Now it depends on whether you are working with a simple cable release or have connected a programmable Tim. I would like to explain both methods:
Cable release
To take a series of shots automatically with a simple cable release whose release button can be locked, set your camera manually to an exposure time of 30 or (if possible) 60 seconds. Do not use the B setting for BULB. Now change the operating mode of your camera to continuous shooting, which is the continuous shooting function in which the camera takes pictures for as long as the shutter release button remains pressed. To start the series, press and lock the release button on the cable release. To end the series, unlock the release button again.
Programmable Timer
Compared to a simple cable release, the programmable Tim offers more convenience and freedom when selecting the exposure time. Using the "Canon Timer Remote Controller TC-80N3", I would like to show how an exposure series can be programmed. Each individual exposure should last 60 seconds and there should be as short a pause as possible between exposures. The first entry SELF remains at the default setting "00:00:00". Set the interval INT to one second ("00:00:01"), the long exposure LONG to one minute ("00:01:00") and the number of shots per series(FRAMES) always to the maximum number 99. The latter even if you actually want to take fewer shots, because interrupting a series is not a problem, while seamlessly continuing a series that has ended can be difficult. The camera can be set to continuous shooting or single image mode, the exposure time must be set to B for BULB. Use the START/STOP button to start your series. You also press this button to stop the series prematurely, not the Tim release button!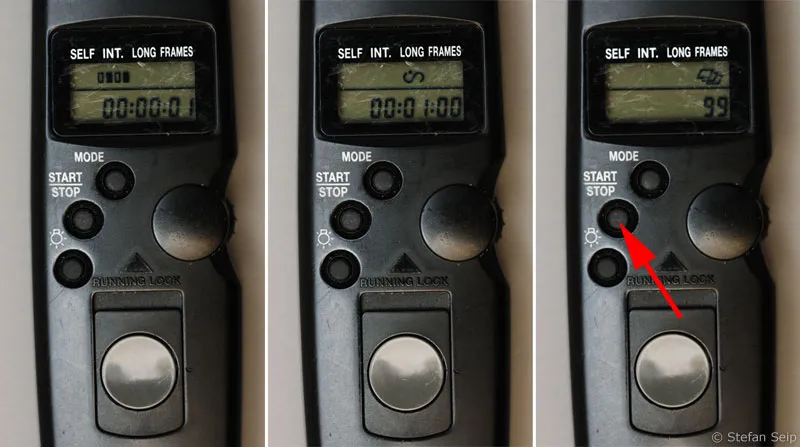
Settings of the "Canon Timer Remote Controller TC-80N3", as described in the text. Pressing the START/STOP button (arrow) would start a series of 99 individual images. Each image is exposed for one minute and there is a one second pause between the images.
Tip: Some newer cameras are supplied with software that enables programmable continuous shooting. For example, all Canon EOS cameras from the 1000D, 450D, 40D, 5D Mark II, 1D Mark III and 1Ds Mark III models onwards come with the "EOS Utility" software, which is installed on a computer, i.e. a laptop, and then communicates with the camera via the USB cable supplied.
Although this eliminates the need for a cable release or Tim, the laptop must be taken to the shooting location.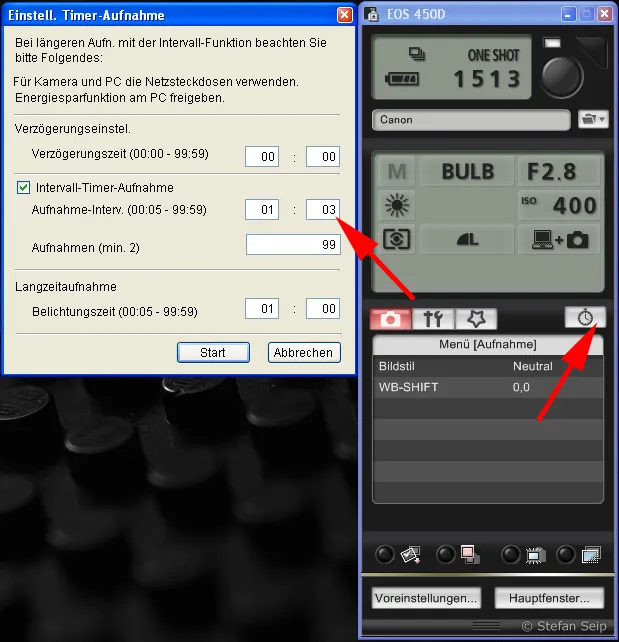
Programming a series of shots with Canon's "EOS Utility" camera control. Click on the stopwatch button (right arrow) to open the dialog box shown on the left. Enter the desired exposure time under "Long exposure", in this example one minute. It is then important to add at least three seconds to this value and enter the result under "Interval timer recording". If you add less than three seconds, the camera may occasionally skip a shot! This value probably depends on the type of camera and the speed of the memory card used. It is best to do "dry runs" with your camera during the day.
This photo shows what happens if the pauses between the individual shots are too long. The line traces are then interrupted and show gaps.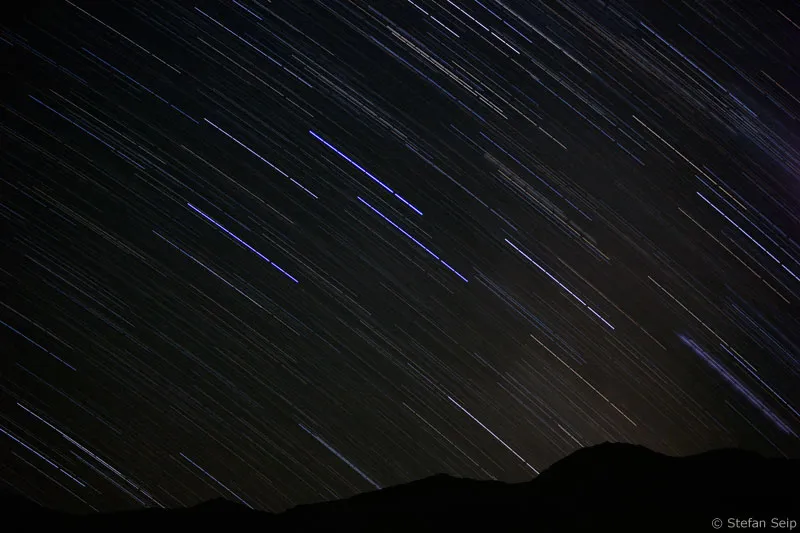
Before you start, it is advisable to take a single test exposure with the final settings and then critically examine them on the camera display. In particular, carefully check the image composition, sharpness and exposure. Make sure that no foreground objects are overexposed, recognizable by fully saturated image areas.
Once the exposure series is running, it's time to "keep your fingers crossed" so that there are no clouds, not so many airplanes flying through the picture that leave their light trails and you don't accidentally bump into the tripod.
4. image processing
As a result of the night-time series of shots, you now have a more or less large number of individual photos, which now need to be combined to form a line scan. The prerequisite for this is that the camera was not moved during the series of shots. This means that the images must be absolutely congruent, except for the stars.
In order to understand the following steps, it is best to first use the sample photos included with this tutorial as a "working file". There are ten images with the file names StarTrails01.jpg to StarTrails10.jpg, which have been taken in the order in which they are numbered.
Open all ten images at the same time in Photoshop and switch to the first image in the series using the Window>StarTrails01.jpg command. To avoid accidentally overwriting it, make a copy of it using the Image>Duplicate command and enter a new name in the As: field, for example "StarTrailsFinished". Confirm with OK.
Photoshop will now create a new image file with the name "StarTrailsFinished", which will serve as our working file. All nine other photos must now be copied into this image as separate layers.
To do this, switch to the second image in the series with Window>StarTrails02.jpg. Now you need the layer palette, which you can display by pressing F7 if it is currently hidden. You will be able to recognize the only layer of this image with the name "Background". Click on the word "Background" with the secondary (i.e. usually right) mouse button and select the Duplicate layer... command from the context menu that appears. A dialog box appears in which you select the "Document" "StarTrailsFinished" as the target. After confirming with OK, a copy of this image is created as a new layer in the "StarTrailsFinished" file.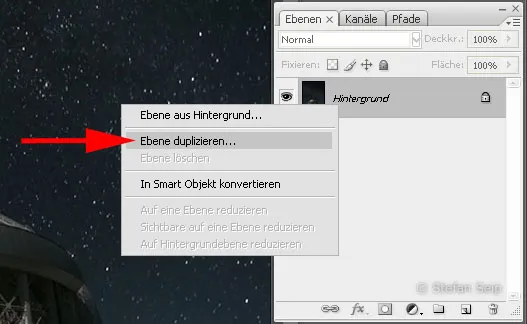
The photo "StarTrails02.jpg" has been activated. Here you can see the layer palette on the right and the context menu after clicking with the secondary mouse button on the "Background" layer. Look for the "Duplicate layer" command (arrow).
Proceed in the same way as described in the last paragraph with the remaining images "StarTrails03.jpg" to "StarTrails10.jpg". Then select the Window>StarTrailsFinished command to return to the working file and see the preliminary result of your work. This file now consists of 10 layers.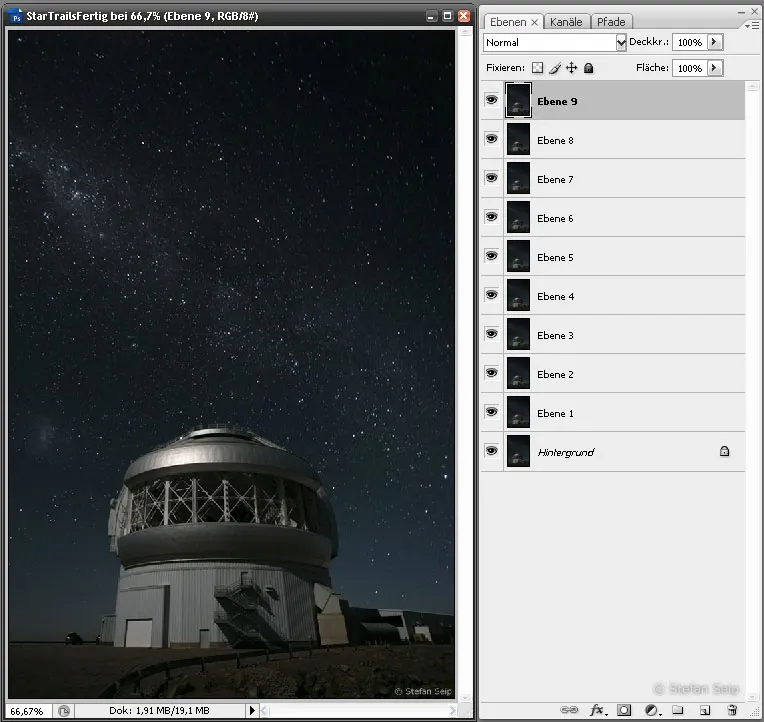
Shown here is the working file "StarTrailsFinished", consisting of a total of ten layers. The layer palette (right) shows the layers. However, only the top layer is visible at the moment.
Now comes the trick of the matter: All layers, with the exception of the bottom layer called "Background", are switched to the Lighten blending mode instead of Normal. To do this, each of the nine layers must be clicked on in turn (and thus activated). Then open the list box next to the Normal setting and select the Lighten entry.
It is best to work your way down from the top layer, then you will see how the star trails become longer and longer - a great experience!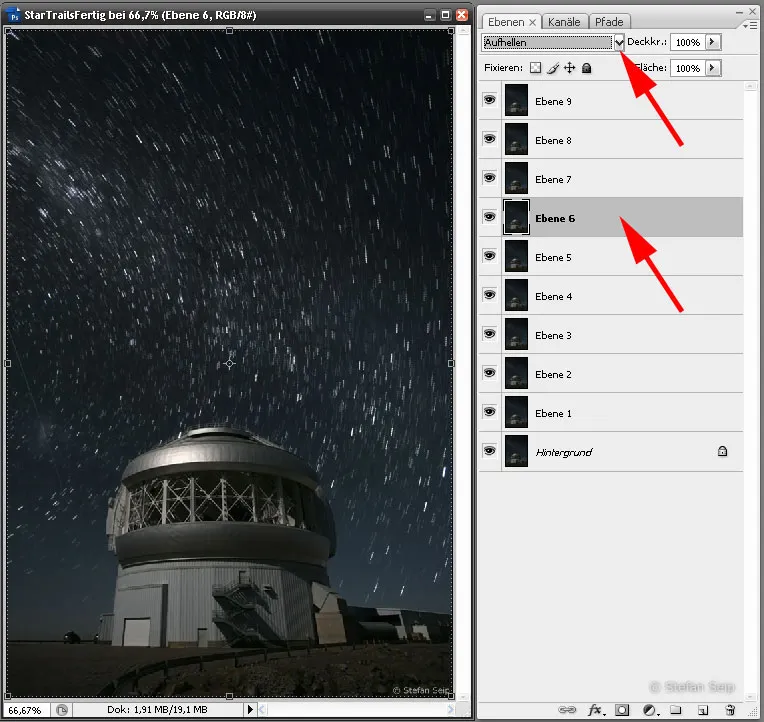
Click on all layers individually in the layer palette (bottom arrow), with the exception of the bottom layer, and then change the blending mode from "Normal" to "Lighten" (top arrow).
Finally, merge all the layers into a single layer using the command Layer>Reduce to background layer. It is best to save the result in PSD format: File>Save file as..., Format: Photoshop (*.PSD; *.PDD).
If your series consists of more than ten images, you would now close all image files except the one just saved to free up memory and open the next ten images in the series. These are handled in the same way as described above. In this way, a large number of individual images can also be processed without memory bottlenecks occurring.
Tip: Layers can also be moved from one image file to another using drag & drop, i.e. a dragging movement with the mouse, although this requires a little practice.
Once all individual images have been added, the blending mode has been set to Lighten and all layers have been reduced to the background layer, you have reached your goal. If necessary, you can use the usual tools to make final corrections, such as adjusting the color balance, brightness or contrast.
Tip: An alternative to Photoshop is the small program "Startrails", which is available in version 1.1 and can be downloaded free of charge from the website www.startrails.de.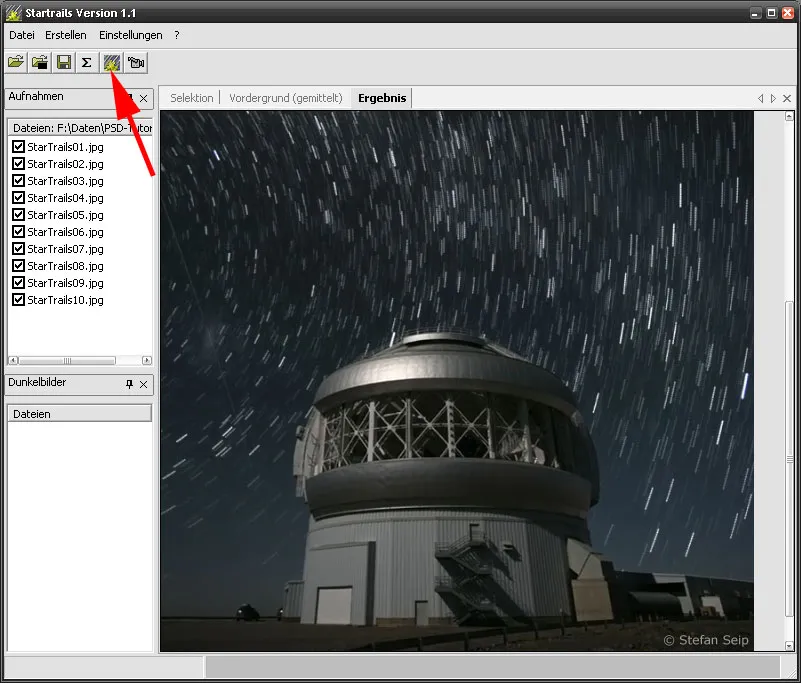
Screenshot of the freeware "Startrails". The arrow points to the button with which the line trace image is created after all the individual images have been opened (left column).
5. sample images
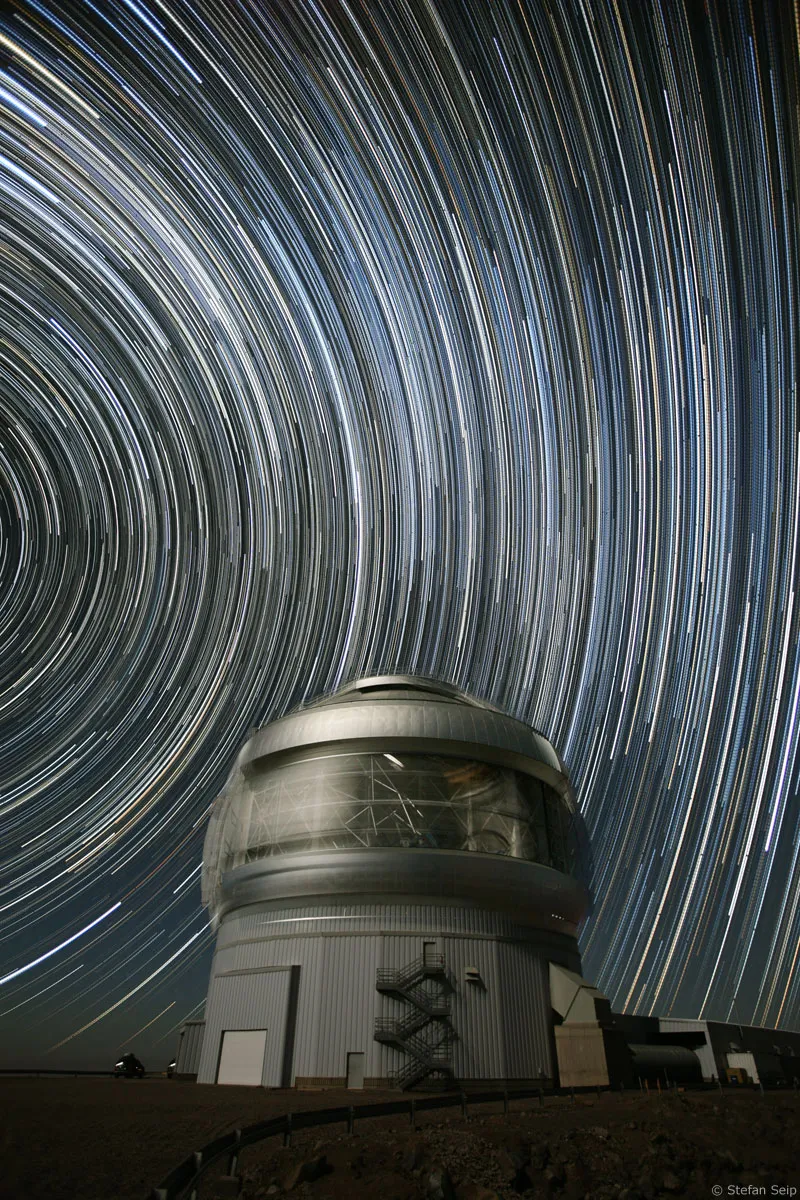
Line trails above the "Gemini South" observatory in Chile. 100 individual images were used, each with an exposure time of one minute at Blender 1:2.8, ISO 800 and a 35 mm lens. The south celestial pole is just outside the left edge of the image.
The celestial (north) pole is also not shown in this photo taken at the Welzheim Observatory near Stuttgart. It was taken with a Canon EOS 20D at 10mm focal length, Blender 4 and ISO 800. 68 single exposures of 60 seconds each were mounted.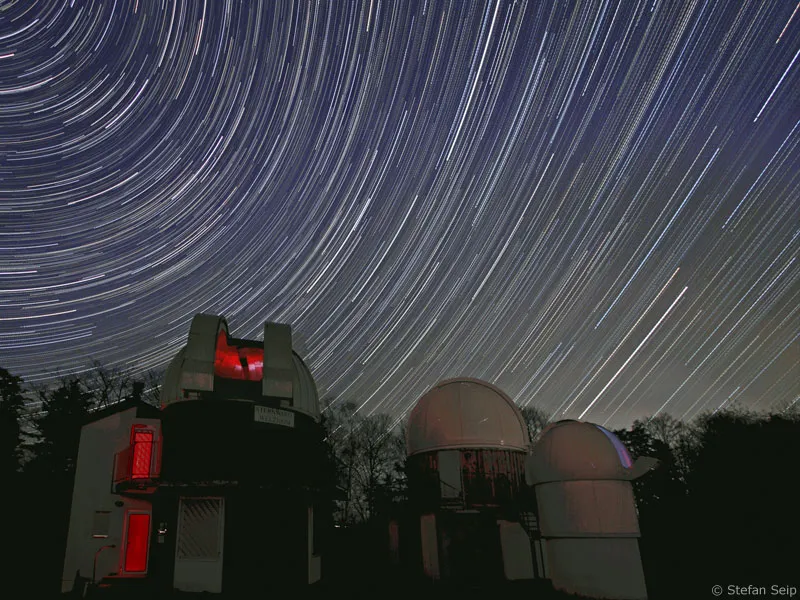
Rise of the star cluster "Pleiades", also known as the Pleiades. To take a photo like this, a little celestial knowledge is an advantage, because then you know when and where the Pleiades will appear. The series of shots must of course be started before they become visible. A 200 mm telephoto lens was used at Blender 1:2.8. The picture was taken in Iran in 2006.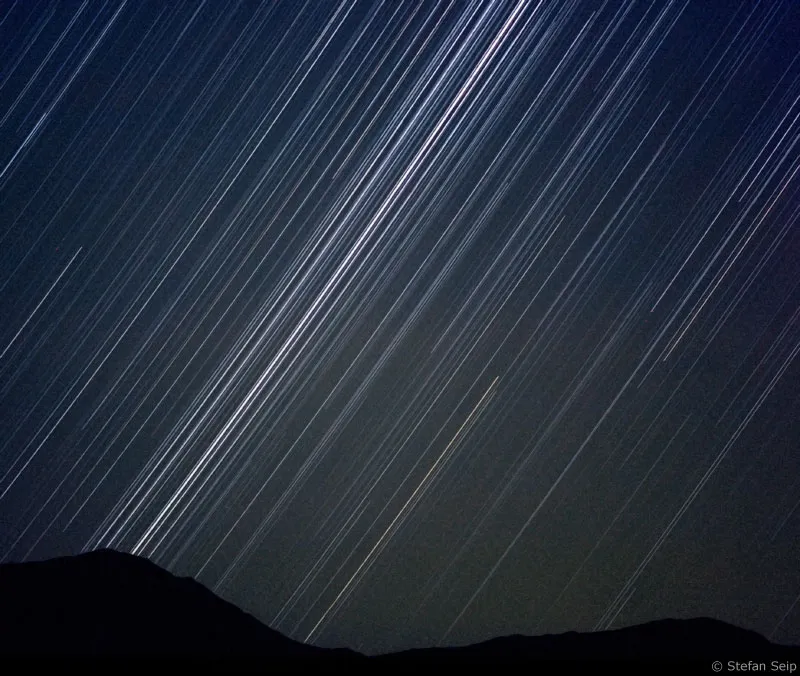
This image is another example of the fact that the celestial pole does not necessarily have to be depicted. Instead, focus on an effective foreground, for example a beautiful landscape.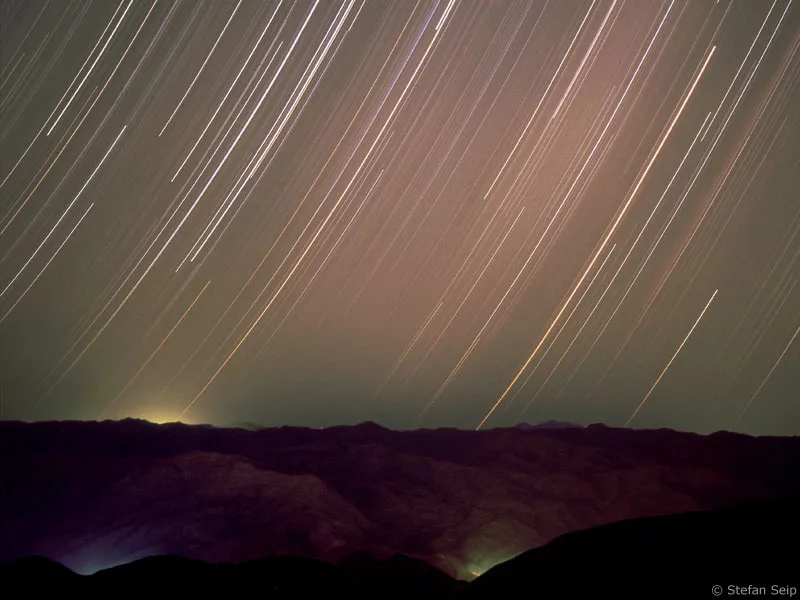
The big car (drawn here to make it easier to recognize) is upside down? The explanation is simple: the photo was taken in Namibia, in the southern hemisphere of the earth. There, the stars of the Big Dipper rise in a northerly direction, do not reach a great height and set again after a short time.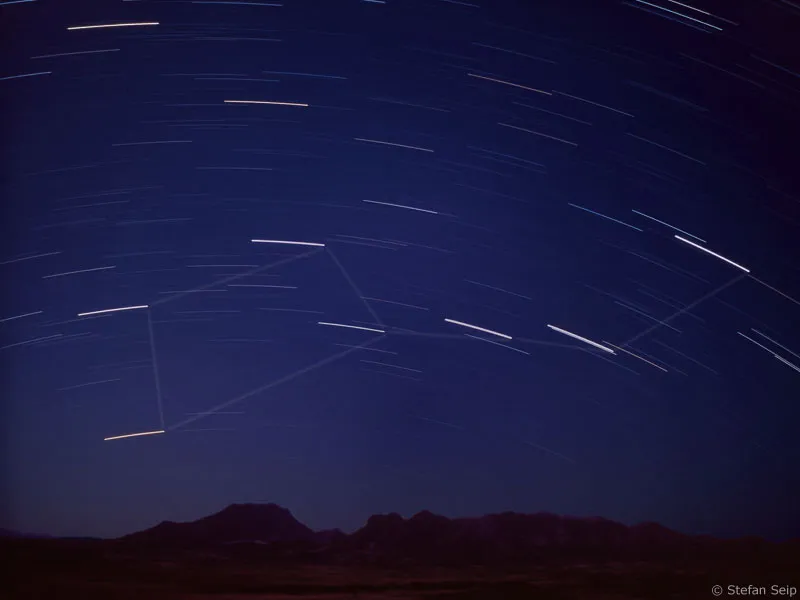
A line-trace image in a southerly direction: some stars only rise above the horizon for a short time.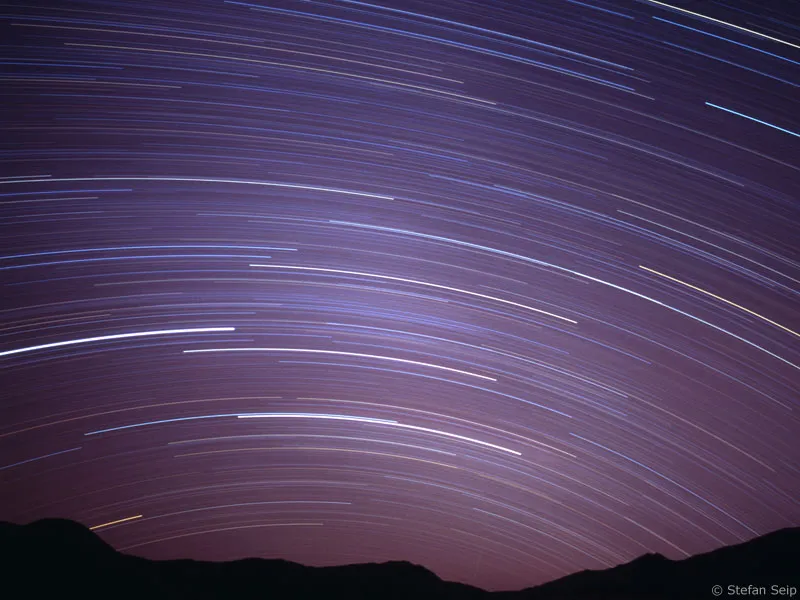
Note on our own behalf:
All photos used were taken in the manner described in the tutorial. In no case were additional image elements - such as foreground objects - added from other photos.
