Hello dear pixel community!
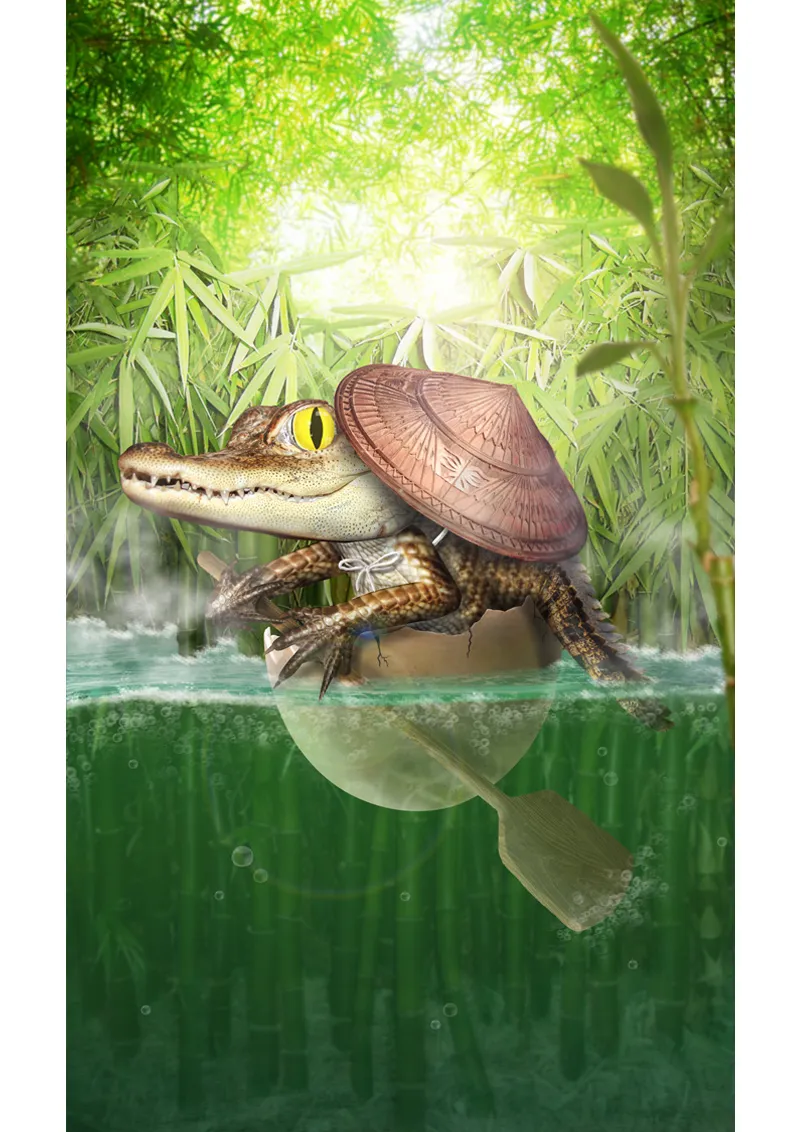
Today I would like to show you how my picture Little journey was created!
The tutorial is divided into two parts:
PART1: The background
- Preliminary considerations
- Preparations
- Creating and editing the background
PART 2: The main motif
- The eggshell becomes a ship
- Creating and editing the alligator
- Small details and effects
But before we start with the tutorial, I'll present you with the contest image: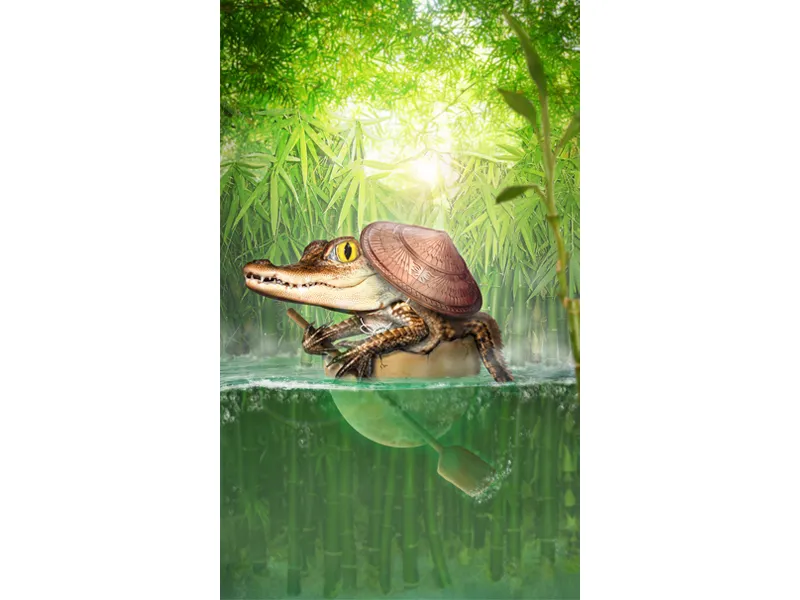
Image on deviantART: CLICK ME!
PART 1: The background
The preliminary considerations
It was January 03, 2014 ... The Quicky kick-off had begun and I was waiting patiently for the Stocker.
Then the time had come: at 8:00 pm, the long-awaited prelude was given ...
... an eggshell.
So, okay ... I only had 6 hours until the deadline. What am I going to do with the Stocker?
Let's think ...
Most people would probably put a chick or something in it - a totally mainstream idea - so I'd rather put something exotic in it ...
hmm ... a baby alligator!
That's how the first rough idea came about. I wanted to tell a little Far Eastern fairy tale about an adventurous little alligator who sets off into the big wide world with his eggshell. The composition was immediately clear to me: portrait format. The alligator with paddle in the eggshell in the center. You should be able to see a lot of bamboo in the background and the overall color of the picture should be yellow-green.
I immediately started looking for suitable Stockers.
I needed lots of bamboo stockers and matching baby alligator pictures. Fortunately, I also found a nice water picture where you can see the break between the surface and the underwater.
After an hour of stock searching, all the images were complete and I could finally get started.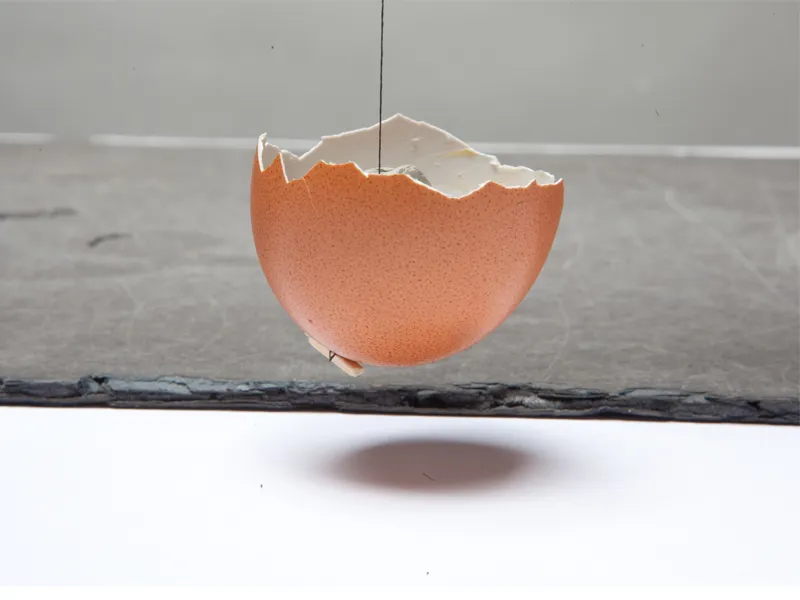
Step 1 - Preparations
Okay! Now I only have 5 hours until the deadline ...
I open the water image and expand the image upwards using the crop tool (C).
Then I pick up the color from the sky with the pipette tool (I) and color the resulting white area above the image with the fill tool (G).
As I want it to be more greenish in color, I change the color. To do this, I create a Hue/Saturation adjustment layer with the following values:
- Hue - 33
- Saturation +13
Now I create 2 folders and rename them "Foreground" and "Background". I add the cropped eggshell and the alligator stick to the "Foreground" folder. I Blender this folder and concentrate on the background. I now add all the bamboo canes to the "Background" folder.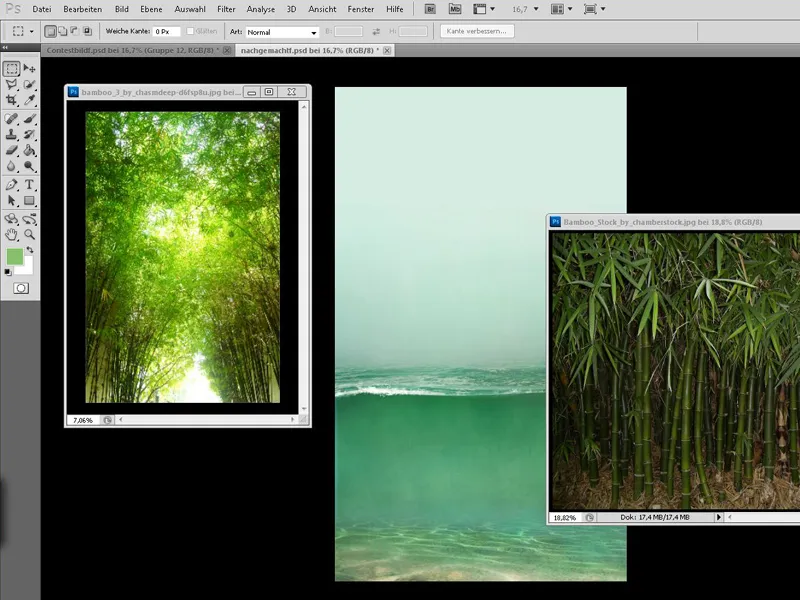
Step 2 - The bamboo in the background
Now we start placing the bamboo: First, let's take care of the bamboo that you can see quite far in the background. This is placed at the very top, and since I really like the colors, I don't change anything about it and try to orient myself to this bamboo stock when it comes to the other bamboo images.
I scale the bamboo image to the right size and blur it using Filter>Blur Filter>Gaussian Blur with a radius of 3.5 px. I then shorten the bamboo so that it only goes as far as the water.
Step 3 - The bamboo under water
Now let's take care of the bamboo in the water. This is first placed in the lower part of the image and then enlarged slightly by holding down the Shift key. Then duplicate this layer by holding down the left mouse button and dragging it onto the Create new layer icon. The copy is hidden and we first take care of the area in the water.
We make sure that there are no leaves or only relatively few leaves under water. In addition, we must not forget that the bamboo appears larger due to the distortion in the water - so the lower part can be slightly larger.
Once we are happy with the bamboo in the water, we can shorten the image until the water breaks.
And since we want the water to look more cloudy, we use the Gaussian blur again at 5.5 px and reduce the opacity of the layer to 50%..webp?tutkfid=53005)
Now there are a few things that bother me and that I can quickly fix with the help of a mask:
First, I create a mask for the bamboo layer and use a soft brush to remove the overlapping areas between the water surface and the bamboo.
And I'm sure you'll also notice this inappropriate reflection at the bottom - we'll remove this in the background layer using the copy stamp tool (S).
The bamboo looks a little too transparent at the bottom ... Here we solve the problem simply by selecting the original underwater color from the background (the Hue/Saturation layer should be hidden for the moment) with the eyedropper tool and painting the bamboo stalks on the background layer.
Then create a new layer above the bamboo layer with the Color mode at approx. 20% opacity and paint the water green up to the break with a soft brush (at an opacity of 100%).
Then we create another layer with the Color mode at about 20% opacity and paint the grass at the bottom pine green.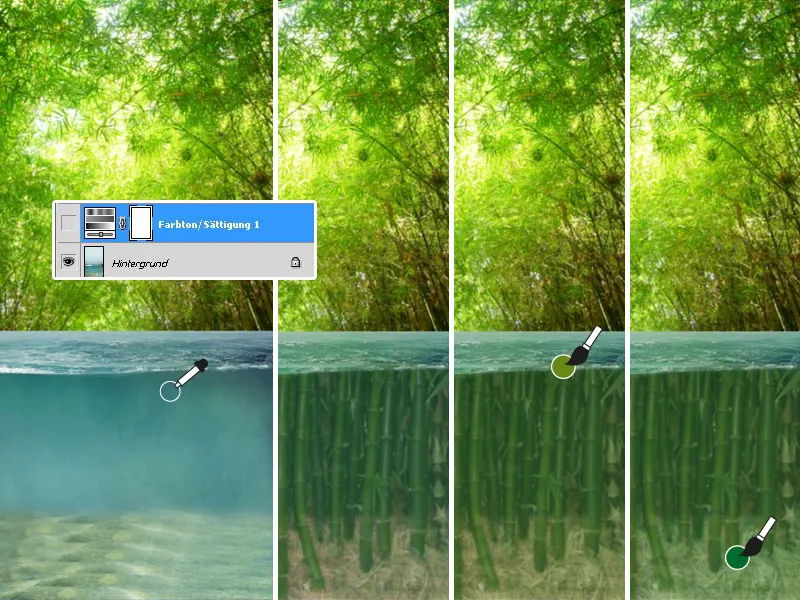
Finally, I create a last color layer (20% opacity ) and set a gradient from blue to transparent in the lower part of the water. Another new layer above all the layers is intended to reinforce the effect of the cloudy water by painting the water with green again until it breaks and reducing the opacity of the layer to 20%.
The cloudy water is finished!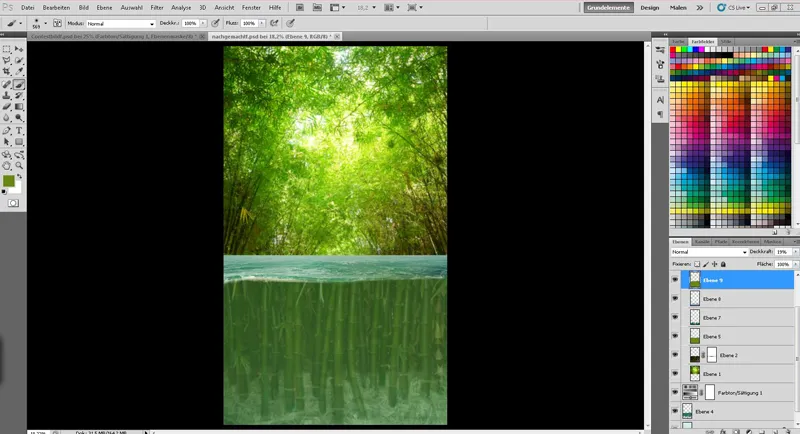
Step 4 - The bamboo above the water
Now we come to the bamboo above the water.
Remember the duplicated bamboo layer? Let's fade it in again and - if necessary - move it back to the top. Then place the bamboo so that everything is roughly right.
We create a mask and can color the lower area (underwater) black.
As I don't have enough time in a quicky to cut out the bamboo individually and cleanly, I take a brush with 50% hardness and 100% opacity, look for prominent areas of the bamboo and paint them away in the mask.
We now look for other prominent areas within the bamboo and paint them away this time with a lower brush opacity (50%).
Done! But now the bamboo looks a bit bare ...
No problem - we create a new layer and use the eyedropper tool to get the leaf color of the bamboo and paint a few leaves with a harder brush (approx. 80% hardness).
It is important that we change the color with the eyedropper tool from time to time to get the light and dark colors of the leaves. This allows the bamboo to blend into the picture much better.
Now it's time to put the bamboo in the water. To do this, we go back into the mask and paint the bamboo along the poles with white at full opacity or use black to remove distracting areas. Here too, the brush should be set a little harder (approx. 80%).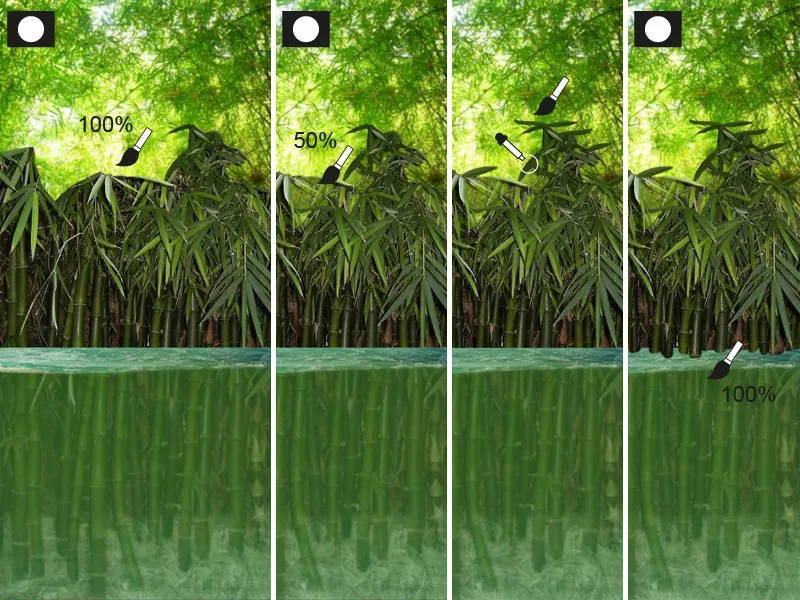
I'm happy with the bamboo and now select all the layers that belong to the upper part of the bamboo and merge them into one layer by right-clicking.
Now I create a selection of the bamboo by left-clicking on the layer thumbnail of the bamboo while holding down the Ctrl key.
I want to lighten the bamboo a little and match the color of the background; to do this, I create a Gradation Curves adjustment layer. Then we'll get the selection of the bamboo again and create a new layer with the Soft light mode at 40% opacity. The selection is then colored yellow-green.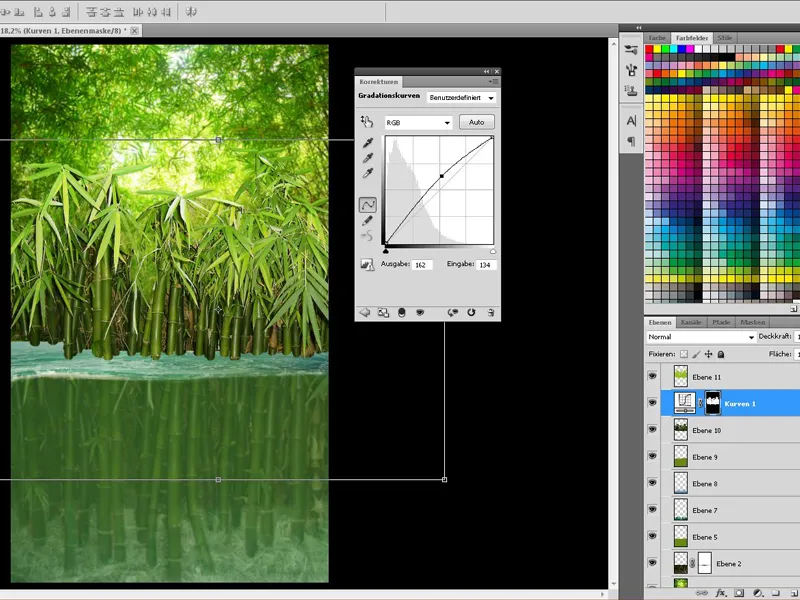
I still don't think we have enough bamboo ...
... and as this is a game with time, it has to be quick and easy:
We duplicate the Bamboo layer, Gradation Curves layerand Soft Light layerand merge the copies.
Then we create a folder, reduce the opacity to 80 - 85% and paste the merged layer there.
Within this folder, we can now duplicate the bamboo several times, mirror it, transform it and simply erase the distracting part (e.g. with the eraser tool).
Once we are happy with the bamboo, we take all the "bamboo" layers above the water (including adjustment and color layers) and merge them together.
As the bamboo is a little further away, we now need to blur the bamboo. To do this, we again use the Gaussian blur with 1.5 px.
We'll soon have finished with the background:
Now I just want to make the lighting conditions more intense. To do this, I'll create a new layer using the Overlay mode and use a large, soft brush to paint the light over the bamboo in the form of a large circle.
The opacity of the layer is reduced to around 50%.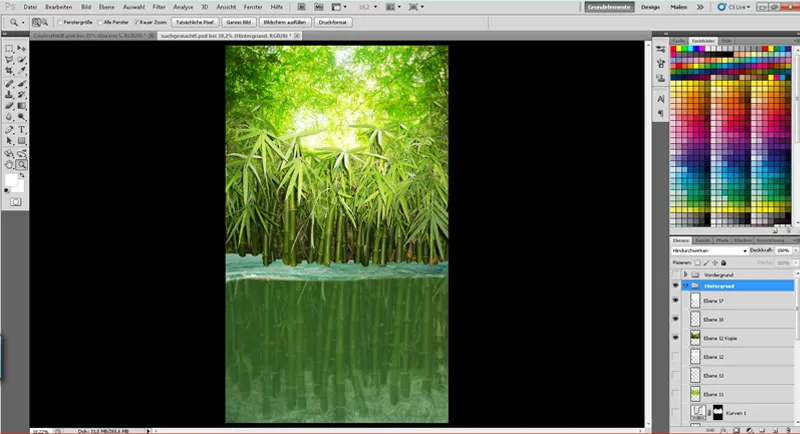
Finally, I created a bit of depth by creating a mask on the bamboo layer (above the water) and on the bamboo layer in the background:
On the bamboo layer above the water, I used a gradient from black to transparency at an opacity of 20% to fade the upper part of the bamboo slightly.
For the bamboo layer in the background, I created a gradient from black to transparency (op acity 100%) from the water upwards.
Now the background is finished and we can concentrate on the alligator!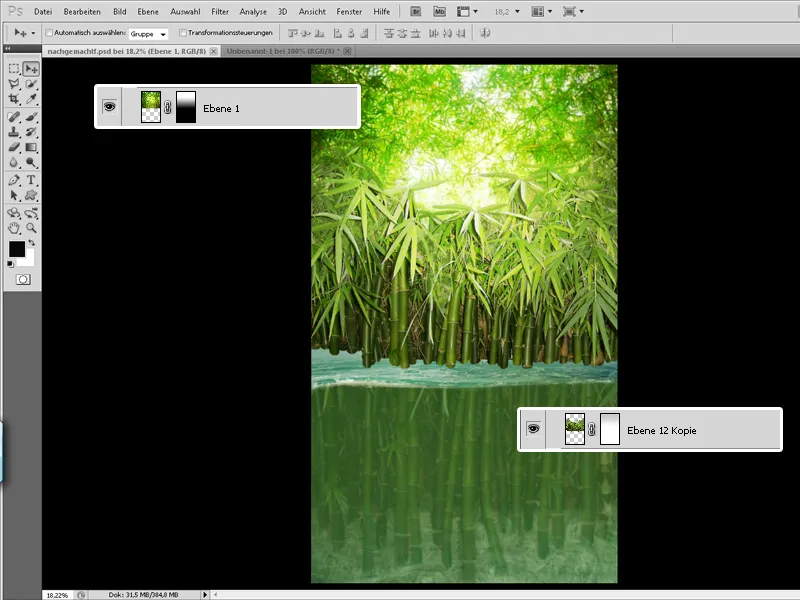
PART 2: The main motif
Step 1 - The eggshell becomes a ship
The time has finally come!
Now we can show the "foreground" folder again and put the little rascal in his "ship"!
We only have one small problem: reptiles don't hatch from chicken eggs ...
So I create a selection of the egg (Ctrl+click on the layer thumbnail of the eggshell) and start painting the shell on a new layer. I use a splatter brush and paint the egg in various shades of green and brown with a low opacity.
A few small details such as dirt or a few cracks should not be missing and are drawn onto the egg.
I also recommend painting in several layers and experimenting a little with the settings and the layer mode.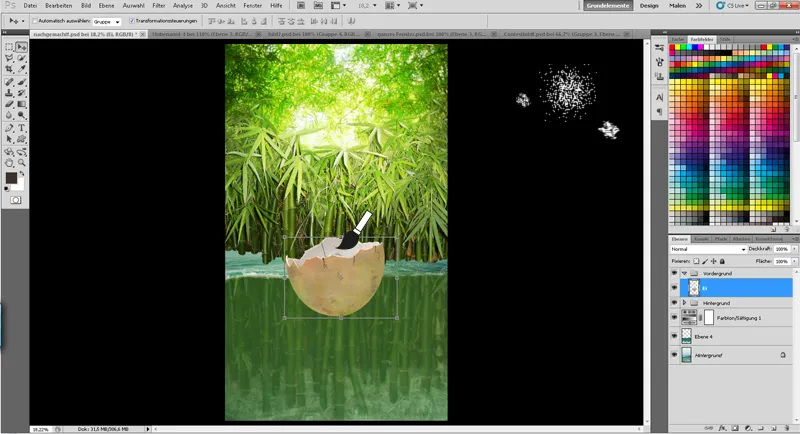
Light and shadow are used to integrate the eggshell into the picture:
To do this, I simply create a selection of the egg and paint in separate layers with a large, soft brush at approx. 15% ...
- ... the shadow in a layer with the Multiply mode
- ... and the light in a layer with the Soft Light mode
Finally, I paint the water reflection on the underside of the bowl on a new layer with the Soft Light mode and reduce the opacity slightly.
To get a soft transition, I erase the upper area with the eraser tool and a large, soft tip.
Now just put everything to do with the egg into a folder and we're done!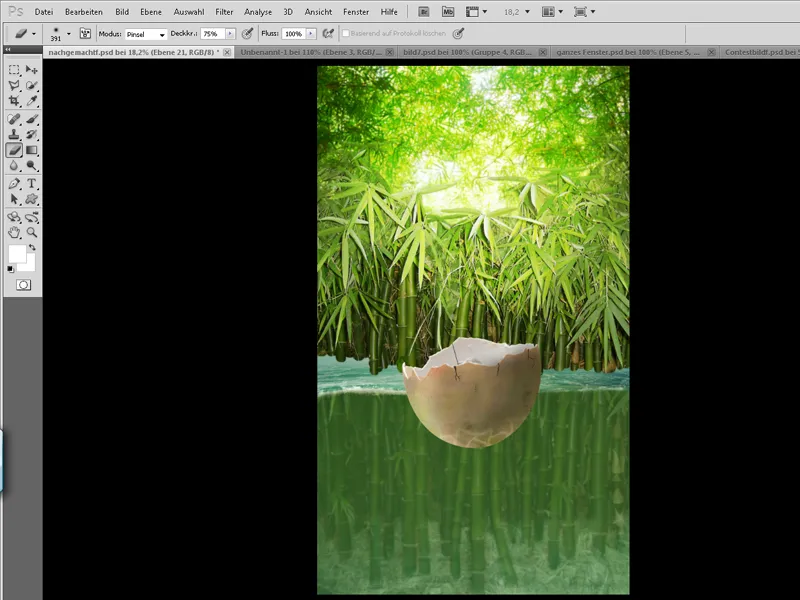
Step 2 - The alligator starts its journey
As I unfortunately didn't come across a baby alligator sitting and paddling in the egg during my search for a Stocker, I had to make one myself from alligator sticks. In principle, the whole thing is very simple:
I divide the reptile into its body parts (head, hand, upper arm, forearm, back, tail) in several layers.
Now I can arrange the limbs the way I want the alligator to look.
Under Edit>Transform I can adjust the body parts by mirroring, distorting and warping them. As the belly is unfortunately hidden in the photo, I improvise and create a belly with the back parts.
Using a mask and a large, soft brush, I can create a nice, flowing transition. Alternatively, you can also touch things up with the stamp tool.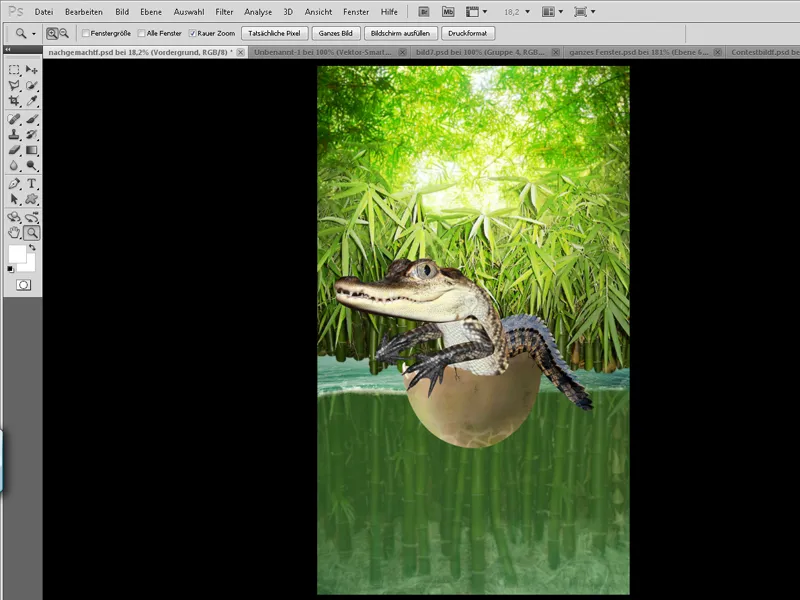
We now increase the "cuddle factor" by enlarging the eyes. To do this, I create a selection of the eye with the lasso tool (L) and transform it with the warp tool.
I'm now happy with the alligator - but I don't like the coloring of the animal! We combine all the layers that have to do with the alligator into one folder and duplicate it.
By right-clicking on the duplicated folder, we can combine the folder into one layer. Now we should have combined the alligator on one level and can create a selection of it.
We can now hide the merged alligator for the time being.
We fill the selection with a nice brown tone of our choice on a separate layer and set the mode to soft light. We can use a mask to remove the brown from areas of the alligator or just tone it down.
Of course, we can also work with other color and soft light layersand reduce the opacity of the layers until we are satisfied with the final result.
And don't forget: Put everything to do with the alligator in the alligator folder.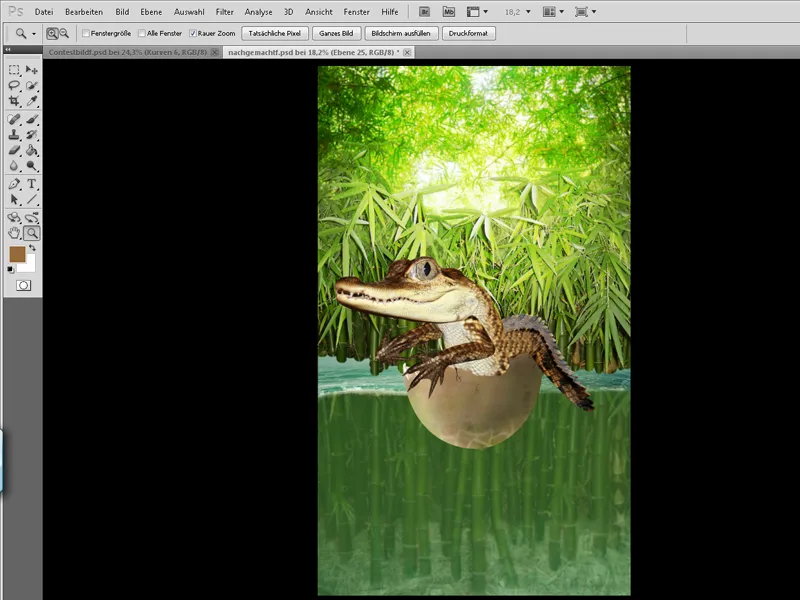
Now some sharpness comes into play: We Blender the merged alligator back in and duplicate it again. These layers should be on top of all the other alligator layers and are now edited as follows:
Top layer:
First, use Ctrl+I to invert the colors. Then set the layer mode to Radiant light.
Filter>Blur Filter>Make Matte
- Radius 18 pixels
- Threshold value 24 levels
Filter>Blur filter>Gaussian blur at 1.6 px.
- Now merge the two layers together using the layer mode Copy into each other and reduce the opacity to approx. 70%.
We can control the sharpness with a mask - from now on this layer should always be in the folder at the top.
Finally, I painted the eye with a slightly harder brush and drew in the corresponding reflections..webp?tutkfid=53016)
Now it's time to really put the little rascal into the ship:
We create a mask in the alligator folder and reduce the opacity for a moment. In this way, we can make the eggshell visible again in the mask and place the alligator correctly.
Finally, simply set the opacity to 100% again.
Now all we have to do - as with the egg - is set the light and shadow.
We can emphasize the shine of the scales with a layer using the Inlay mode, a soft brush and the color white. Under the alligator folder, we add shadows to the eggshell.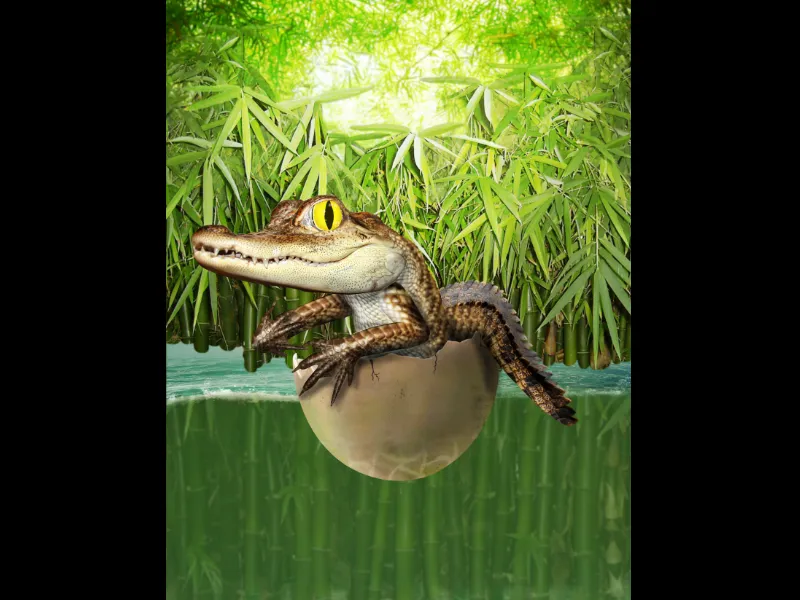
Step 3 - The little rascal won't get far without a paddle
And that's exactly why I quickly create one!
It's very quick and amazingly easy - we quickly paint the basic shape of the paddle with brown using a hard brush.
By holding down the Shift key, you can create a straight line from one point to the next, which is perfect for the handle. Now all we have to do is place a wood texture over the basic shape and limit it to the paddle with a mask, set the layer mode to Overlay and reduce the opacity to 70%.
Finally, simply paint in light and shadow out of habit and use a mask to paint the paddle into the alligator's hands. That's it!.webp?tutkfid=53018)
Step 4 - Into the water with the baby alligator
We are slowly moving towards the final picture. Now we integrate the main motif into the background! To do this, we first duplicate the "foreground" folder and merge it. The resulting layer is hidden - we will need this layer later to get a selection of the entire main motif.
We now create a mask for the foreground folder and paint along the break in the water with a brush, initially at 100% opacity and 50% hardness. We then reduce the opacity of the brush and paint the area below the surface of the water to make it look as if it is still under water.
We can use a soft brush with low opacity to improve the gradient. Once the mask is finished, we can turn our attention to the area below the break.
We take the selection from the main motif and color the lower area green in a new layer above the main motif. The opacity of this layer is reduced to approx. 30% - then I create another layer and fill the lower area with blue. Finally, the layer mode is set to color and the opacity is reduced to approx. 15%..webp?tutkfid=53019)
Now we paint spray and fog into the picture:
Luckily, Photoshop has the perfect spray brush saved (see image), which is great for drawing the foam with 20% opacity and the color white. If you change the size from time to time, the illusion is perfect!
The fog is also created relatively quickly:
The foreground and background color should be black and white so that we get black and white clouds via Filter>Render Filter>Clouds.
The layer mode is set to Multiply negative, a mask is created and made black with Ctrl+I.
Now we can paint in a few clouds of mist with a large, soft brush at low opacity (approx. 20%).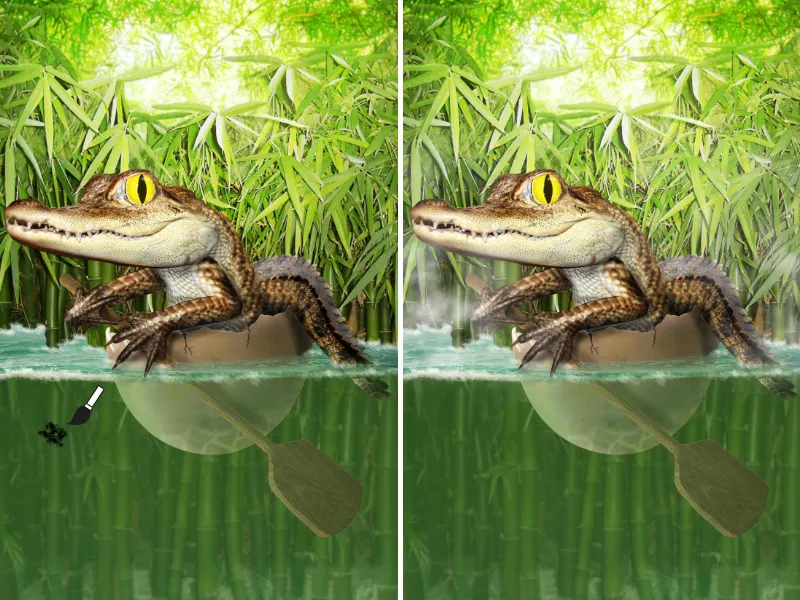
Bubbles!
Let's breathe some life into the water - with a few bubbles!
This link will take you to my bubble brushes: Click me!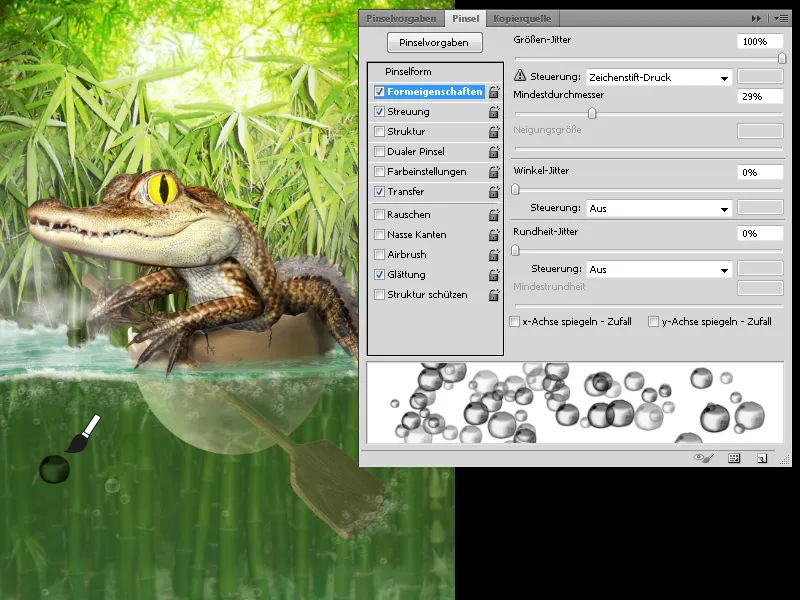
I spread the bubbles over a large area in the water, reduce the opacity slightly and use a mask to determine where and at what opacity I want to see the bubbles.
With Filter>Soft focus filter>Motion blur I can display the flow better at a small distance.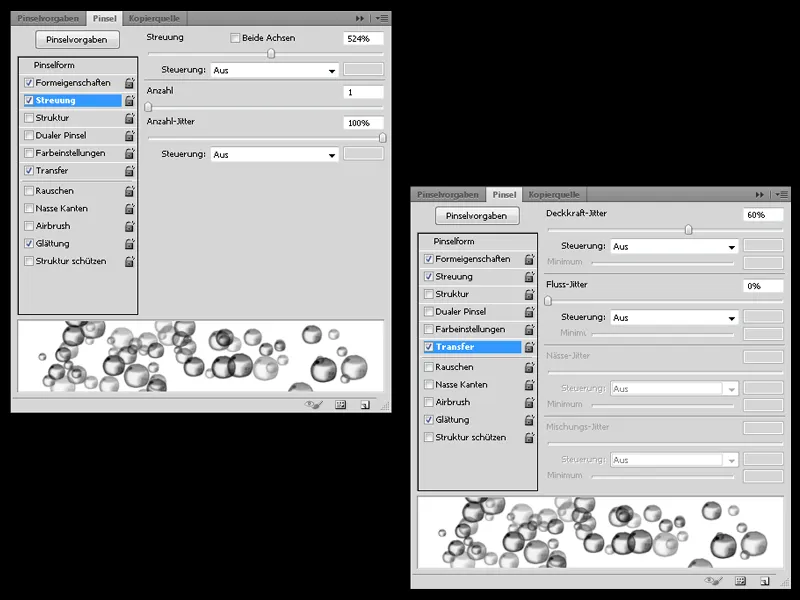
We're almost there:
I just enhance a few shadows in the background and on the main subject in a separate layer and add some light.
I can also improve the color in the background with a new layer using the soft light mode.
Step 5 - The finishing touches
The deadline is approaching and I have to hurry ...
At the last moment, I put a Hanoi (a Chinese rice hat) on the little rascal to emphasize the Far Eastern look.
The string can be done quickly in a few simple steps - just paint the string with a hard brush and add light and shadow in a new layer.
To give the picture more depth, I quickly cut out a single bamboo and place it at the edge of the picture. I blur the bamboo with the Gaussian blur.
Finally, I create a new layer filled with black using Filter>Render filter>Blend spots.
The layer mode is set to Multiply Negative and blurred with the Gaussian Bl ur tool.
Done! I hope you enjoyed the tutorial! If you still have any unanswered questions, please send me a message!