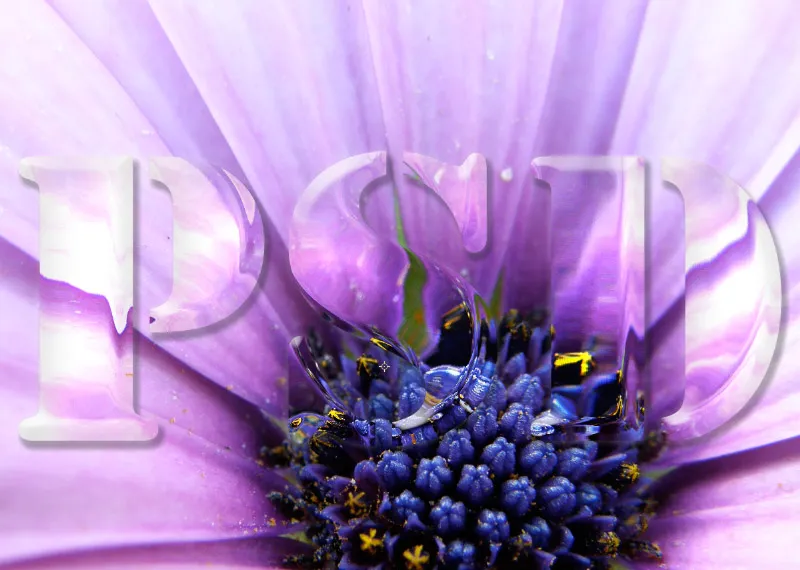
A glass effect brings elegance and depth to your typography and layouts. With its transparency and reflective highlights, it gives your designs a modern and fascinating touch. Whether for logos, headings, or creative compositions, this effect is sure to catch all eyes. In this tutorial, I'll show you step by step how to create a realistic glass effect in Photoshop that can be used for both text and layout elements. Let's get started and enhance your designs!
The first glass effect will appear to flow out/stamped out from the background image, creating a unity with the background.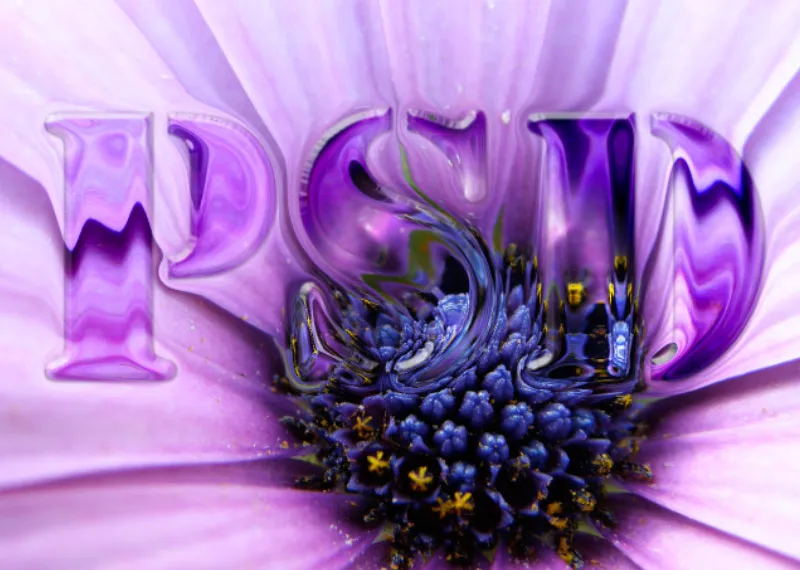
The second glass effect will not be merged with the background but rather appear laid on top and have a dull to slightly frosted glass appearance.
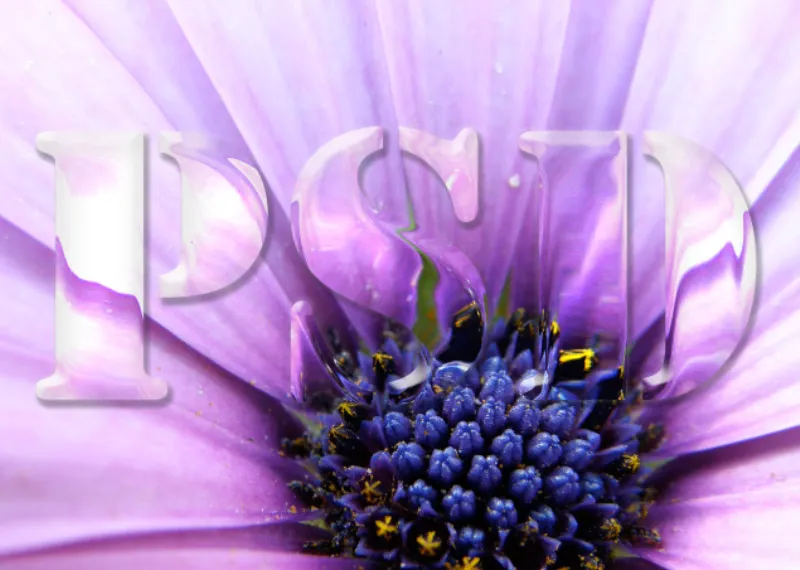
Image sources in this tutorial: archaeopteryx_stocks
Part 1: Creating static glass effect text
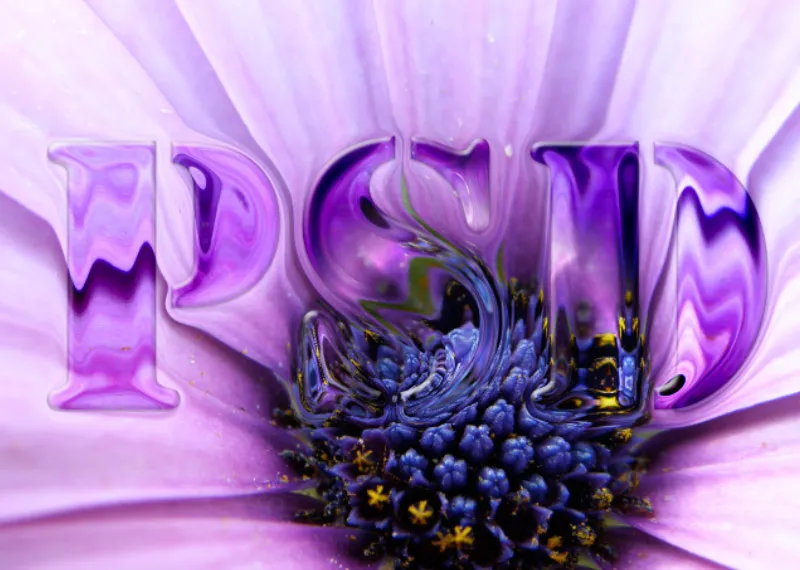
The first glass effect text will appear slightly fluid, like pure glass, looking as if it has been stamped out from the background.
Step 1: Creating a new document
I create a new document using Ctrl+N with the size of 1600x1200 px. Depending on the document size, settings in the fill options and filters may vary.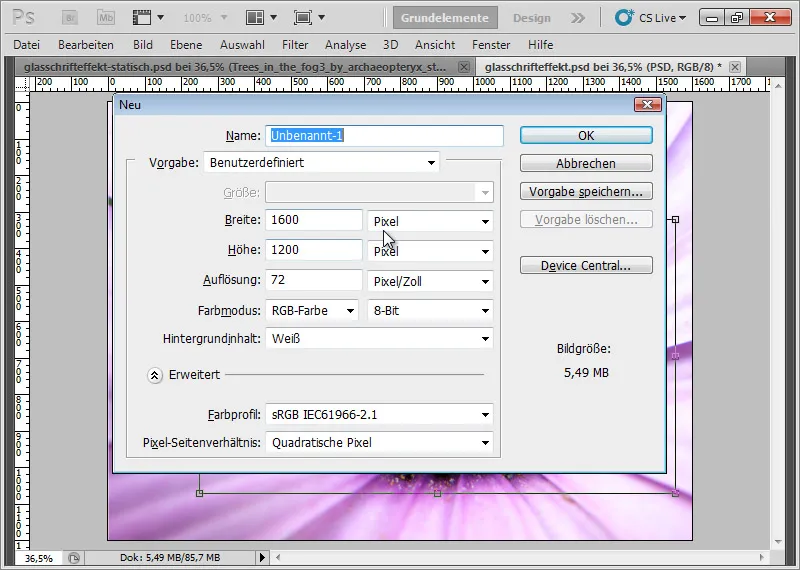
Step 2: Selecting a background image
It is optimal to choose a background image with details for this effect, so that the refraction through the glass text is recognizable. Cloud images are not ideal. I choose a flower image, in which clear structures of the flower are visible.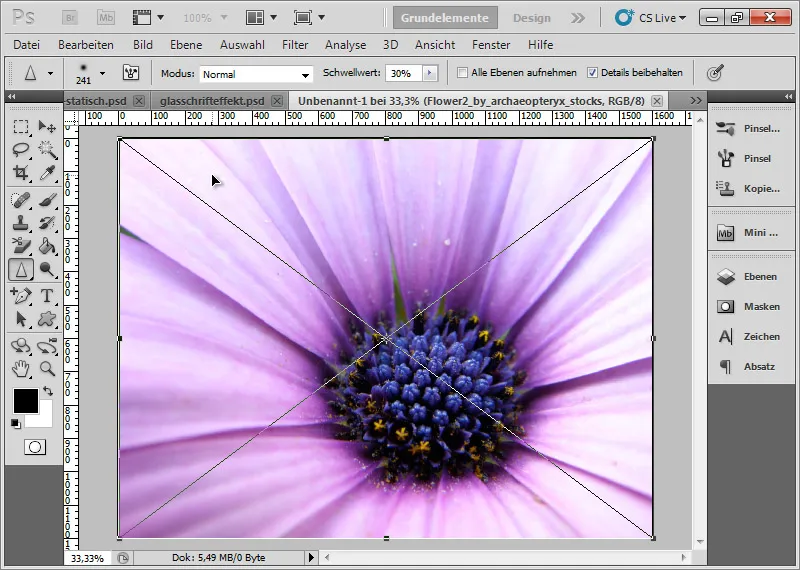
Step 3: Placing the text
To achieve a rounded glass effect, it is advantageous if the selected font already contains curves by itself. I write the letters PSD in a black color with a 640-point army font in the document.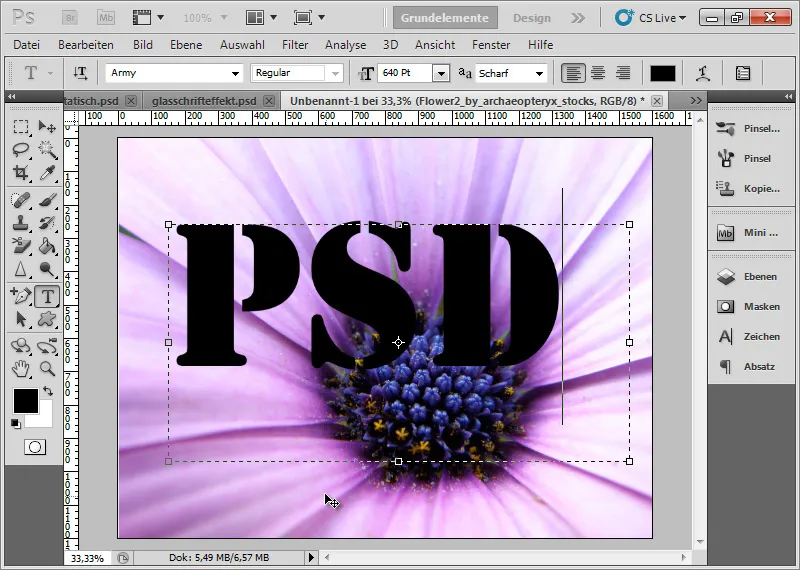
Step 4: Creating a distortion layer for light refraction
I click with Ctrl on the layer thumbnail of my text layer to select the letters.
I bring up the Refine Edge dialog using the shortcut Ctrl+Alt+R. There, I set a rounding and a soft edge of approximately 15 pixels each. Rounding is important because while the serifs of the font are nicely rounded, the letter division itself - the army effect of the font - is too sharp. The soft edge is used to make the effect smoother in the transition when combined with the glass filter.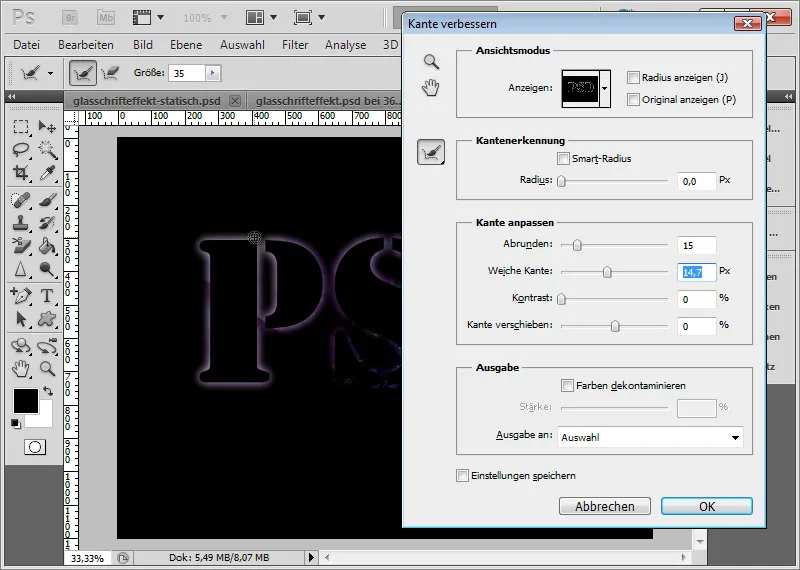
I create a new layer with Ctrl+Shift+Alt+N and fill it with white color. Filling with white is fastest by setting the default colors in the toolbar using the shortcut D and then using the foreground color for filling via the shortcut Ctrl+Backspace. Only the selection area is filled with white!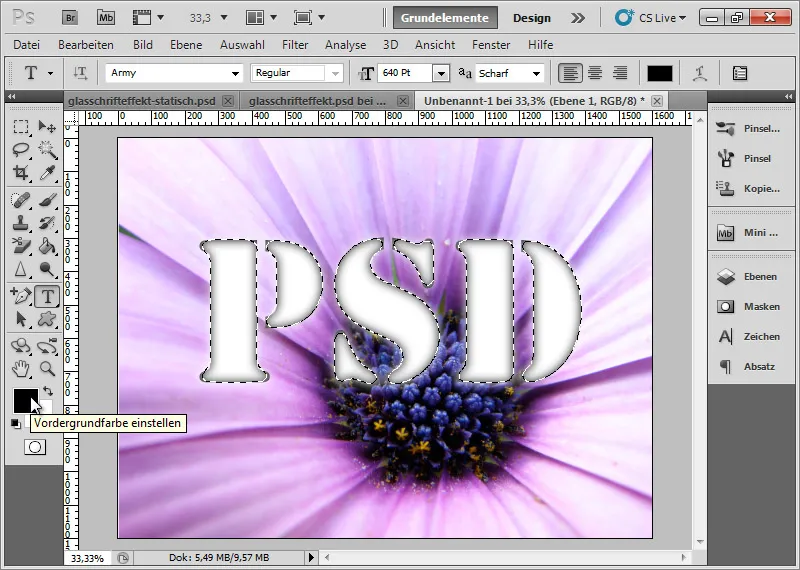
I deselect with Ctrl+D. I create a new layer below the white letter layer - with Ctrl and click on the New Layer icon in the Layers panel, the new layer is automatically arranged below the current layer! - and fill it with black. If the default colors are set in the toolbar, filling with the foreground color is fastest using Alt+Backspace.
I merge all visible layers into one by selecting them and using the shortcut Ctrl+E. It is important that the remaining layer is a background layer, because the subsequent filter requires the matrix as a background layer. If the matrix is not a layer reduced to background, the refraction via the glass filter will not work as desired.
Using the menu Layer>New>Background from Layer, I convert a transparency layer into a background layer.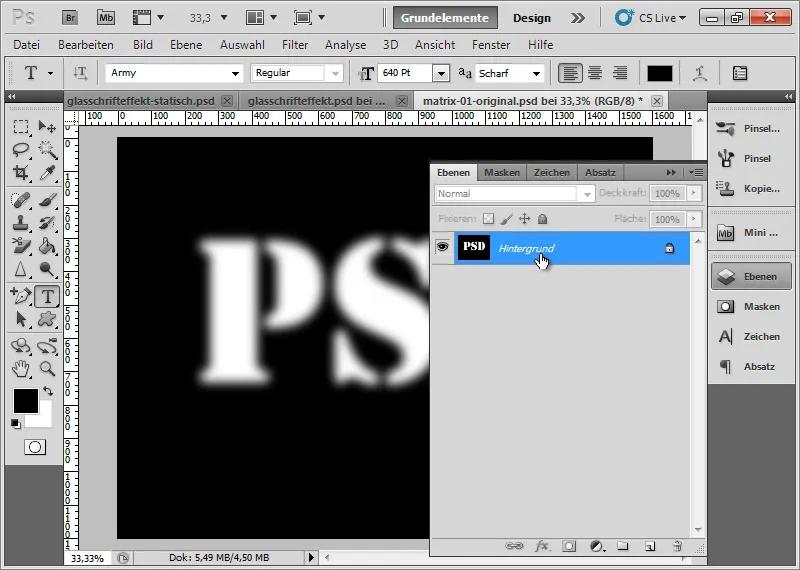
Now, I save the document as a PSD file named Matrix-01-Original.psd.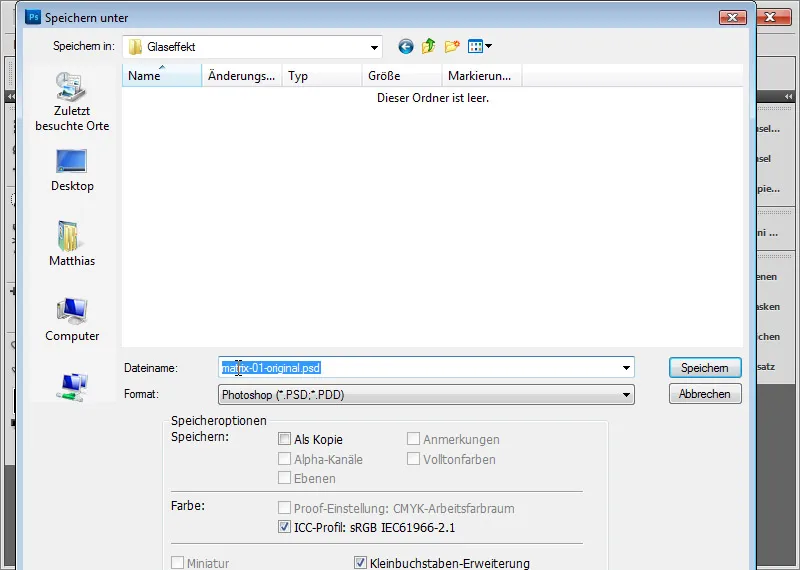
Step 5: Applying distortion filter glass with matrix structure
Firstly, I press the shortcut Alt+Z repeatedly until my original working file is displayed again. I can continue working on the current working file smoothly. It is advantageous to delete the extra layers of the matrix structure and save the working file as a PSD document.
Next, I select my background layer. If it's not a Smart Object yet, I can convert it to a Smart Object by right-clicking in the Layers panel. The benefit of Smart Filters is that they can be variated losslessly at any time. Once a layer is converted into a Smart Object, filters can be applied as Smart Filters.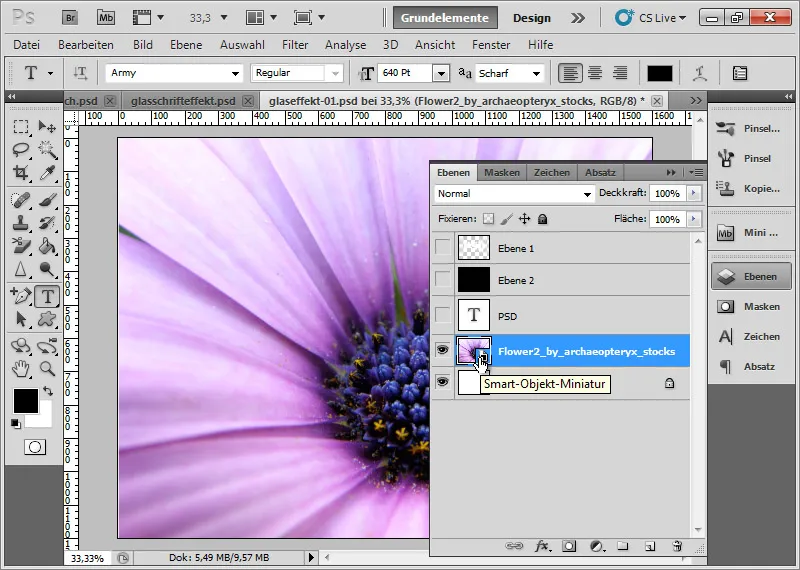
I access the Glass filter via the menu Filter>Distort>Glass. Here, I choose a distortion of 20 and a smoothness of 15.
It's important that I now introduce my matrix as a structural template. I do this by calling up the Structure menu>Load Structure. In the browser that opens, I select my previously saved Matrix PSD file. Now, in the preview, instead of the letters, a blurred glass effect appears.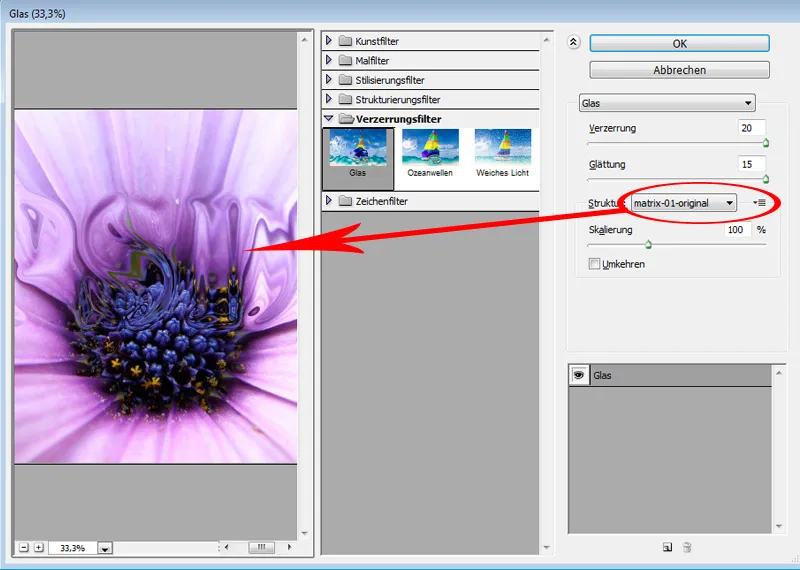
The current effect looks like this: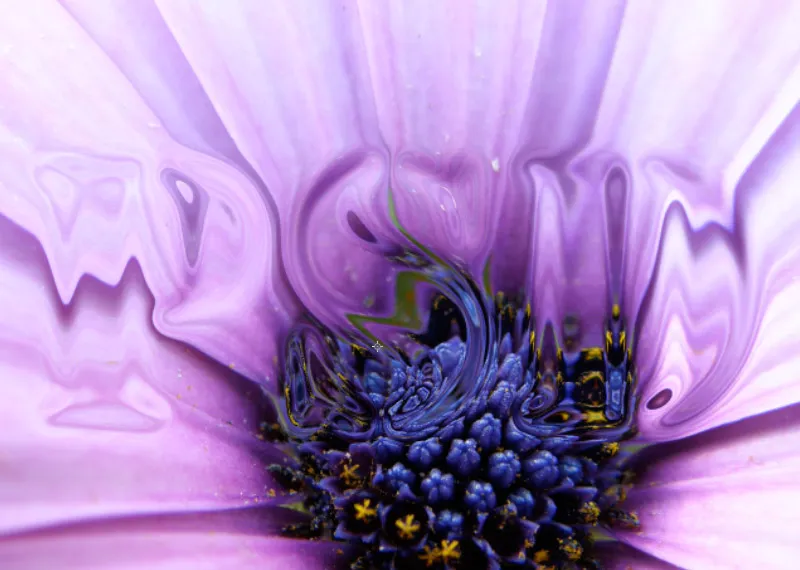
Step 6: Re-activate Text Layer
I reactivate the black text layer that I created at the beginning to generate the Matrix PSD file.
It is advantageous to convert the text layer into a Smart Object. This way, the text itself remains protected in the Smart Object Original (the PSB file), while further edits are non-destructive.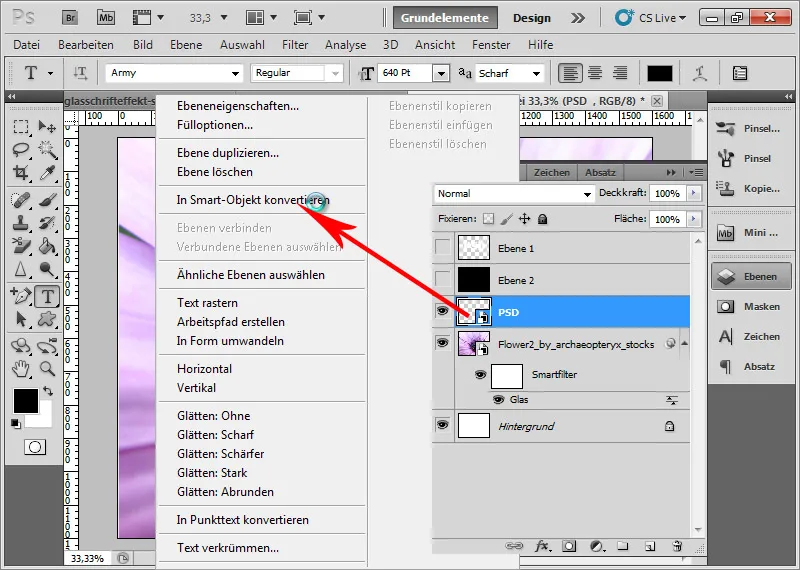
Step 7: Create Text Effect
In the fill options of the text layer, I can set a slightly flattened edge softly chiseled with the following values:
- Depth: 400 percent
- Size: 8 pixels
- Blur: 4 pixels
- Angle: 120 degrees
- Height: 30 degrees
- Blend Mode: Multiply with 40% opacity and 70% brightness (B)
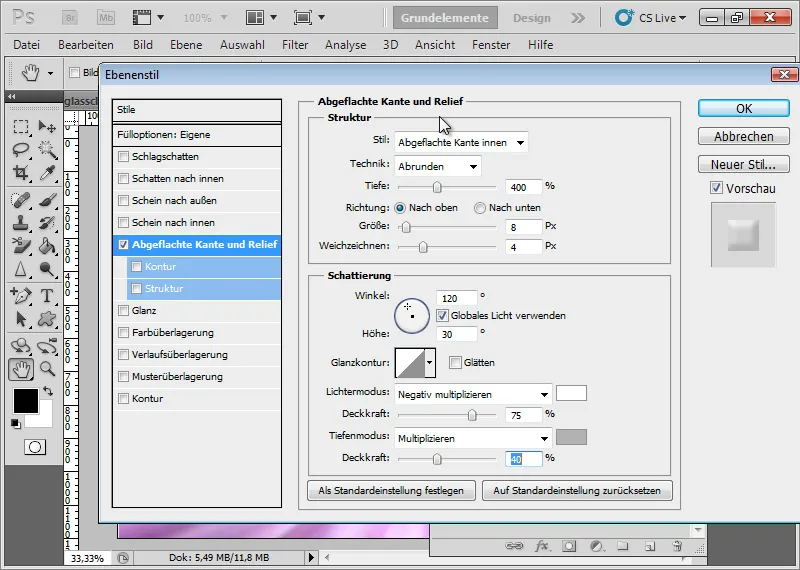
I set the layer's blending mode to Overlay.
As this tutorial will frequently refer to brightness values, I would like to briefly explain what I mean by them. The color picker in Photoshop most closely corresponds to the HSB model with three values: Hue, Saturation, and Brightness. The Hue is the right color bar, Saturation can be adjusted by moving left to right in the color picker, and Brightness by moving up and down. When I refer to a brightness value in this tutorial, I exclusively mean the B value in the HSB model, without reference to Hue or Saturation.
The Blend Mode was set with 70% brightness. Hence, the image in the color picker looks as follows.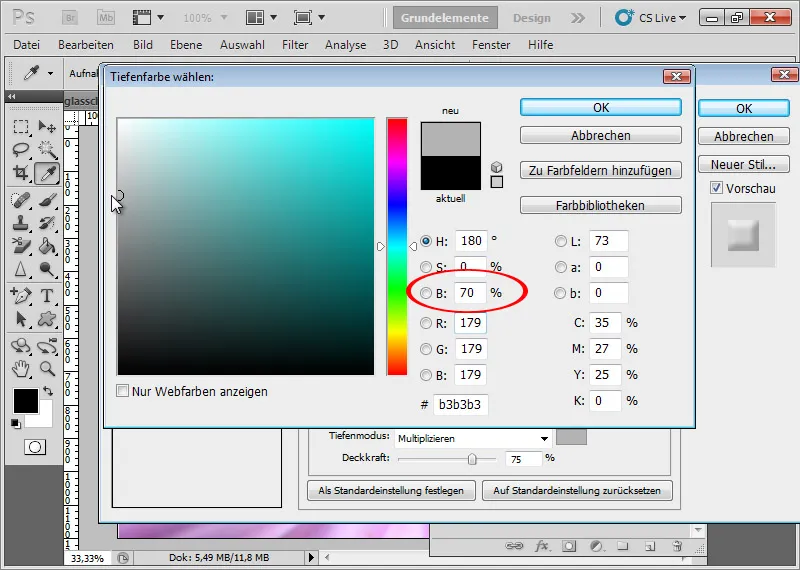
The effect currently appears as follows: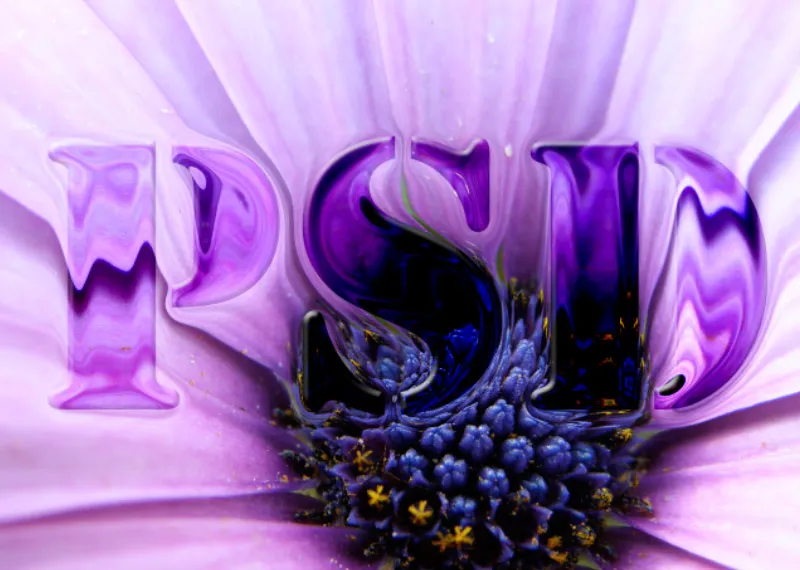
Step 8: Apply Plastic Wrap Art Filter
To enhance the effect further, I will apply the art filter. Firstly, I convert my text layer into a Smart Object, allowing loss-free modifications such as fill option changes etc.
In the art filter Plastic Wrap, I choose the highest possible slider settings:
- Gloss: 20
- Detail: 15
- Smoothness: 15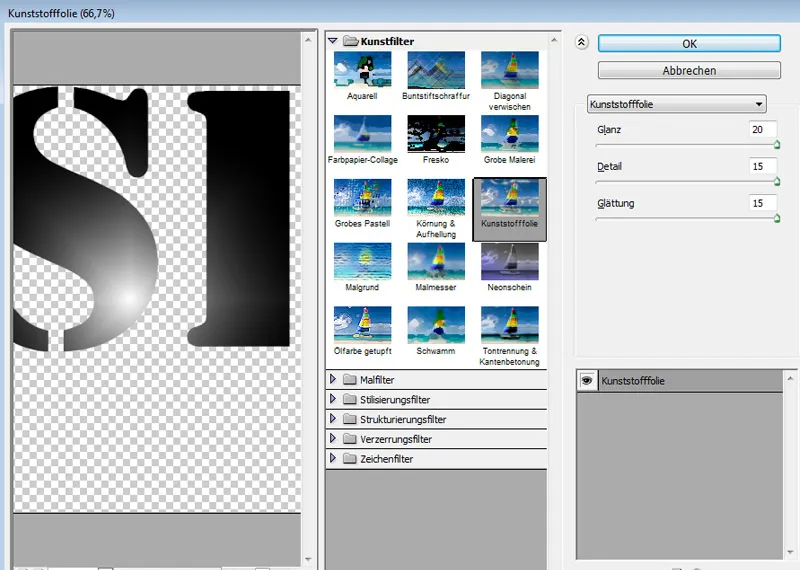
The effect now appears much glassier, similar to glass marbles.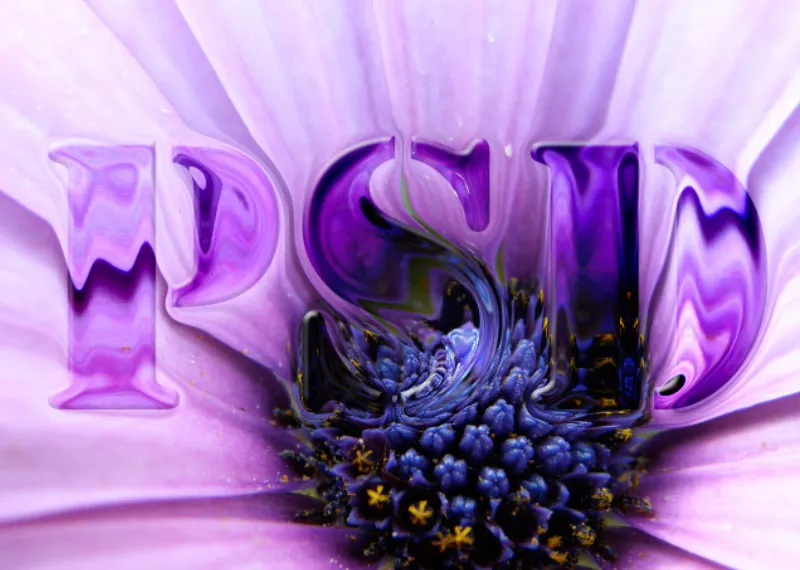
Step 9: Apply Filter Again
To make the effect stand out more, I simply use Ctrl+F to reapply the last filter.
In the Layers panel, the Smart Object now displays the Plastic Wrap smart filters twice, which I can also individually modify as needed.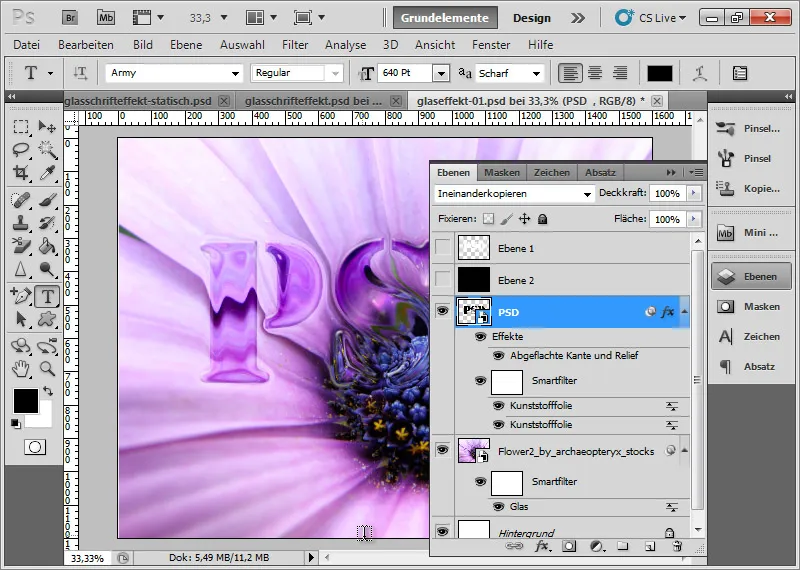
Step 10: Inner Shadow and Drop Shadow
Lastly, I can add a minimal inner shadow at 85% brightness to the layer so that the letters are enclosed very subtly, almost imperceptibly.
To do this, I access the layer's fill options and adjust the shadow's brightness using the color picker. I make additional settings:
- Opacity: 70 percent
- Distance: 1 pixel
- Size: 1 pixel semi-rounded contour
Since the inner shadow is calculated from a light angle, I also need to create a drop shadow that produces the same effect on the opposite side.
The settings are the same as for the inner shadow.
Step 11: Variations
The effect is very easily variable. For example, I can simply choose different modes in the fill options for the Smart Filters and see how the effect changes. Additionally, I can duplicate my text layer at any time and blend it in different layer modes.
I also have the option to apply more filters to the text layer at any time. This provides nearly endless possibilities for variations.
In this example, I envision a smoother transition from the background to the glass effect. Therefore, I select the text letters again with Ctrl and click on the layer thumbnail and bring up the Refine Edge dialog. The selection receives a feathering and a minimal smooth edge, facilitating a smoother transition from text to background.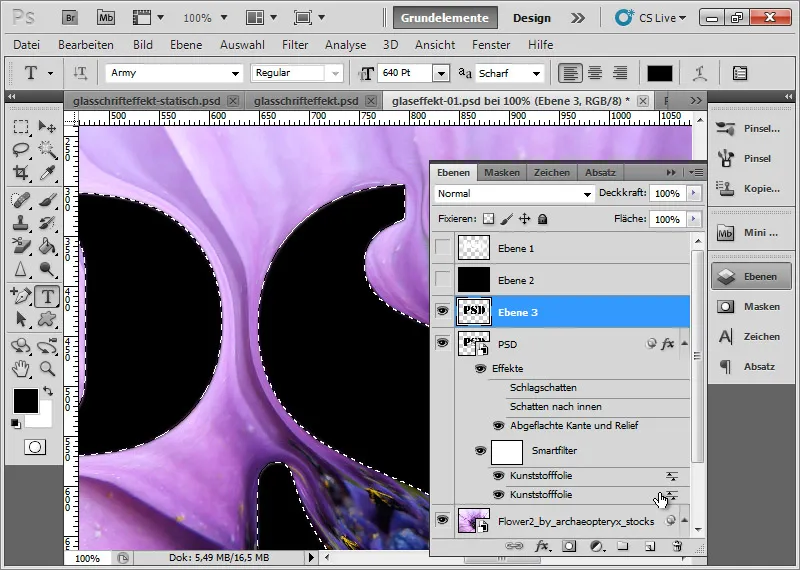
I create a new layer with the shortcut Ctrl+Shift+Alt+N and fill it with black color; with the Default Colors activated in the Tool Bar, I use the shortcut Alt+Backspace.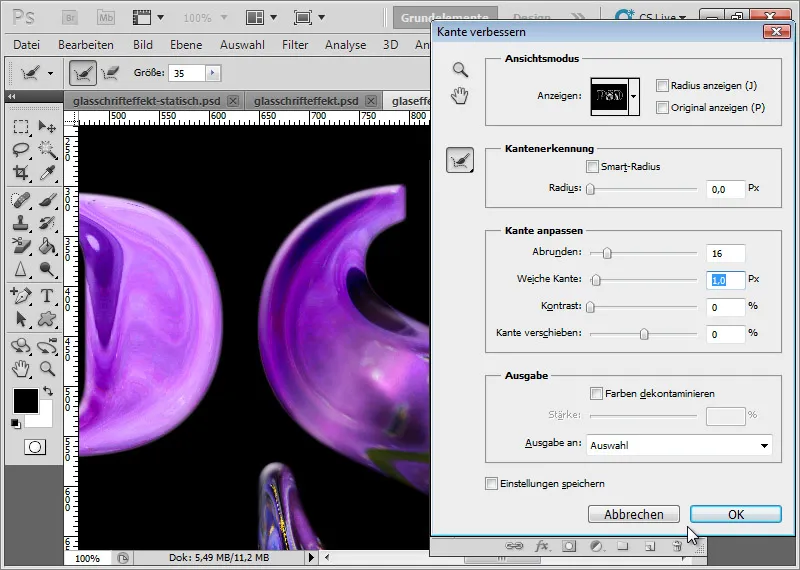
I deselect by using Ctrl+D. Now, I can easily drag and drop the existing Fill Options and Smart Filters of the previous text layer onto my new layer by simply pressing Alt. The Fill Options and Smart Filters will be duplicated. I deactivate the Drop Shadow and Inner Shadow in this case. Afterwards, I can deactivate the original text layer and set the new text layer to Blend If mode.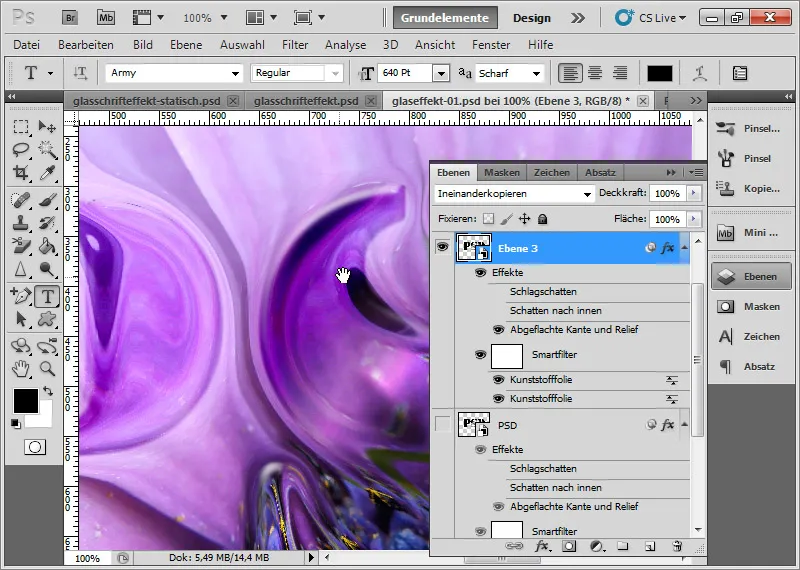
My end result will look smoother and more fluid in transition. As a small variation, I have set the technique to Hard Chisel under Bevel and Emboss.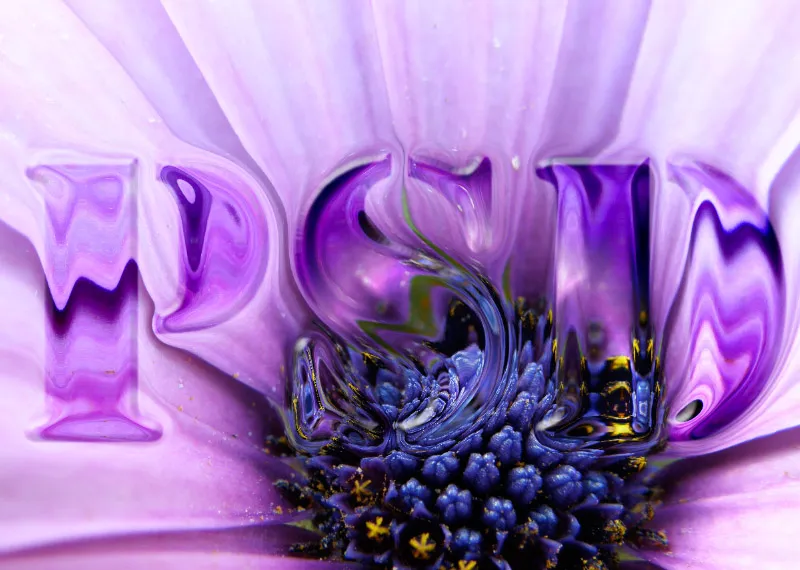
The disadvantage of this glass effect is that I can no longer easily change the positioning of my text. If I change the position, I also have to adjust my corresponding matrix. However, there is a way to create my glass effect text dynamically, so that the refraction adapts to a new position of the text at any time.
Part 2: Creating Dynamic Glass Effect Text
The dynamic glass effect text will have the feature that I can change both the individual letters and the entire text in the document at any time and adjust its size. The refraction remains intact and automatically adapts to the new background.
As an example text, my text will not look as purely etched as in the first example, but slightly duller and milky, laid on top of the background. In this tutorial, you will see two possible ways to create different glass effect texts.
Step 1: Creating a New Document
I create a new document of size 1600x1200px using Ctrl+N. Depending on the document size, the settings in the Fill Options and Filters may vary.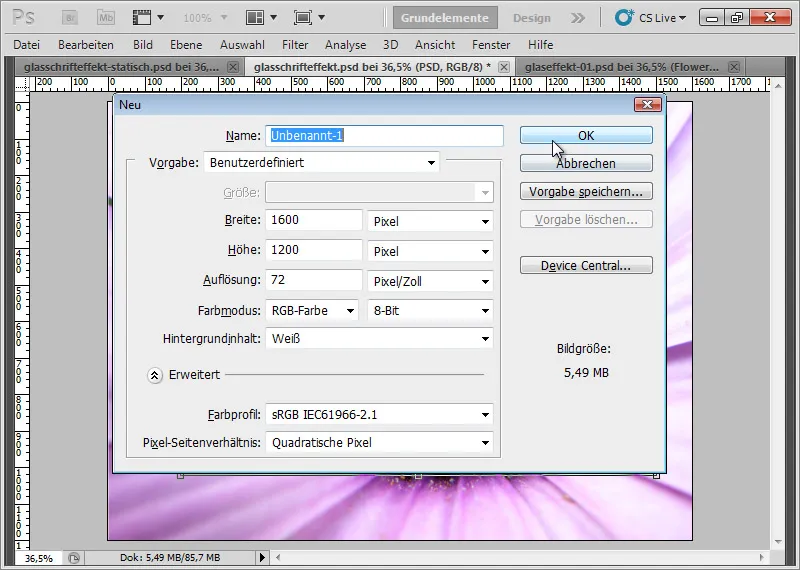
Step 2: Choose Background Image
In this example, I also choose the floral image where clear structures of the flower are visible.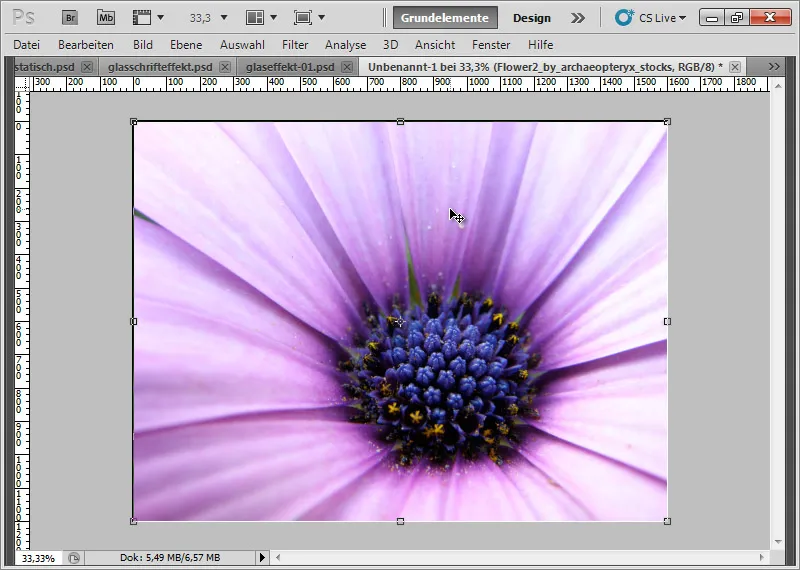
Step 3: Place Text
To achieve a rounded glass effect, it is advantageous if the chosen font already contains curves. I write the letters PSD in any color with a 640-point font size in the document.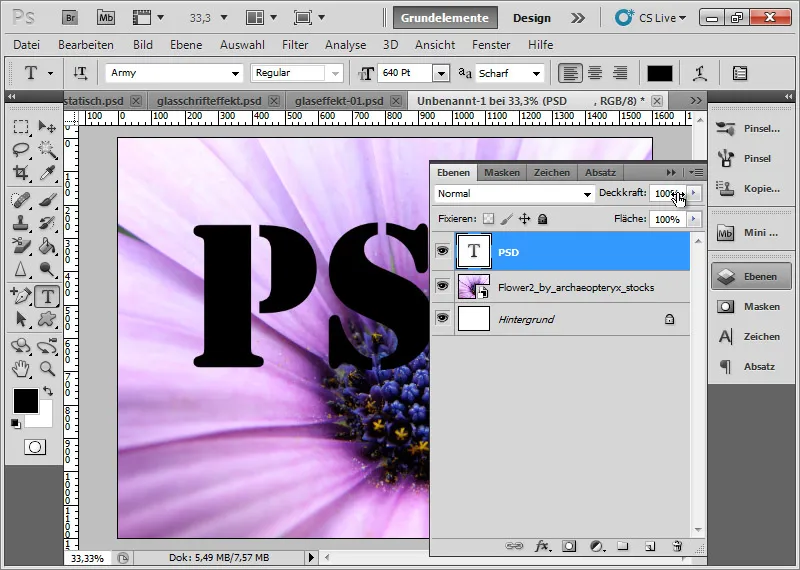
Step 4: Reduce Fill to 0 Percent
I reduce the Fill slider to 0 percent. The difference between Opacity and Fill is particularly visible in this tutorial. While the Opacity slider can vary the transparency of the layer contents and Layer Styles, the Fill slider exclusively addresses the layer content. The selected Layer Styles (via the Fill Options) remain visible.
Since no Fill Options have been applied initially, the current view of the text layer is completely hidden.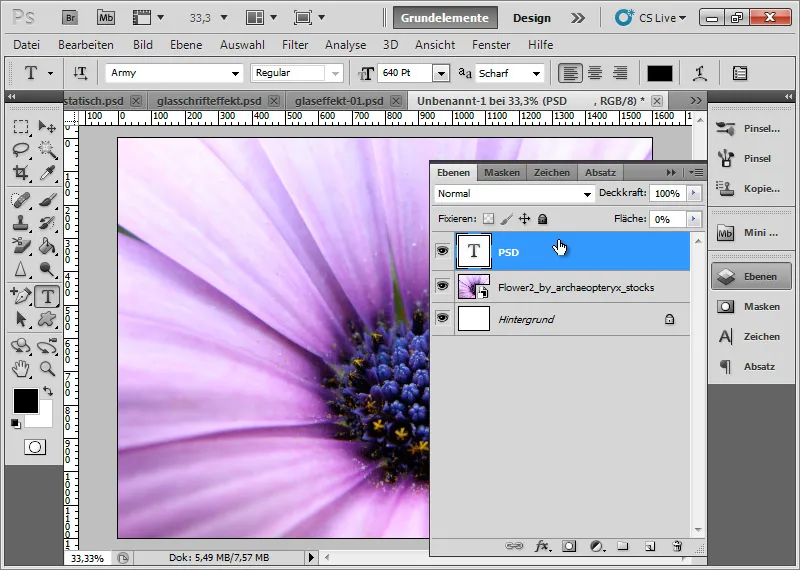
Step 5: Set Glass Effect
By using multiple Fill Options, I achieve a glass-like effect on my letters. Important: Depending on the document and letter size, I need to adjust the settings in the Fill Options.
Drop Shadow:
The Drop Shadow has a 45% Opacity with the following options:
- Blend Mode Multiply
- 60 percent Opacity
- Distance 12 pixels
- Size 10 pixels
- semi-round, smoothed Contour
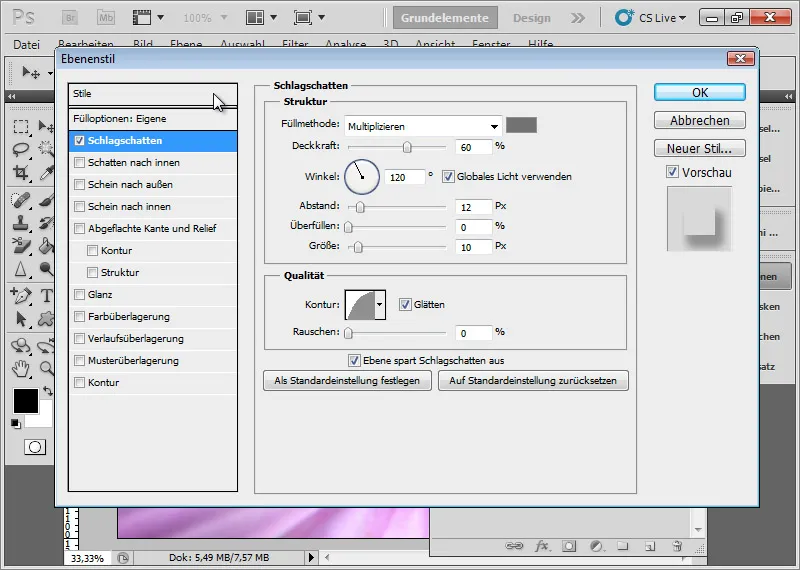
The Drop Shadow effect: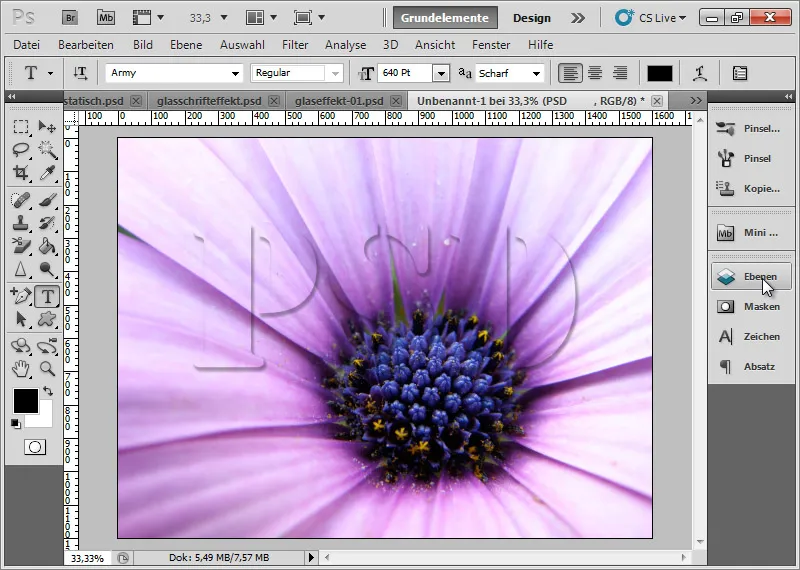
Inner Shadow:
The Inner Shadow has a 90% Opacity with the following options:
- Blend Mode Multiply
- 85 percent Opacity
- Distance 15 pixels
- Choke 30 percent
- Size: 57 pixels
- linear, smoothed Contour
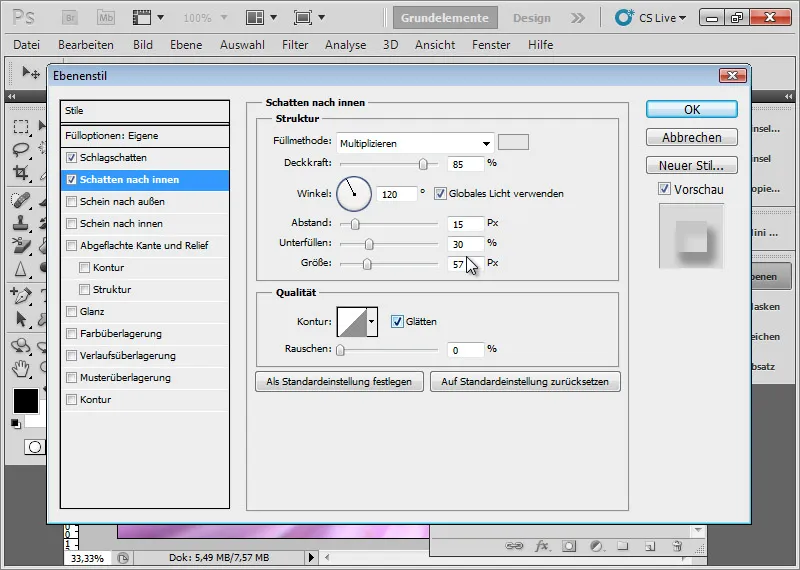
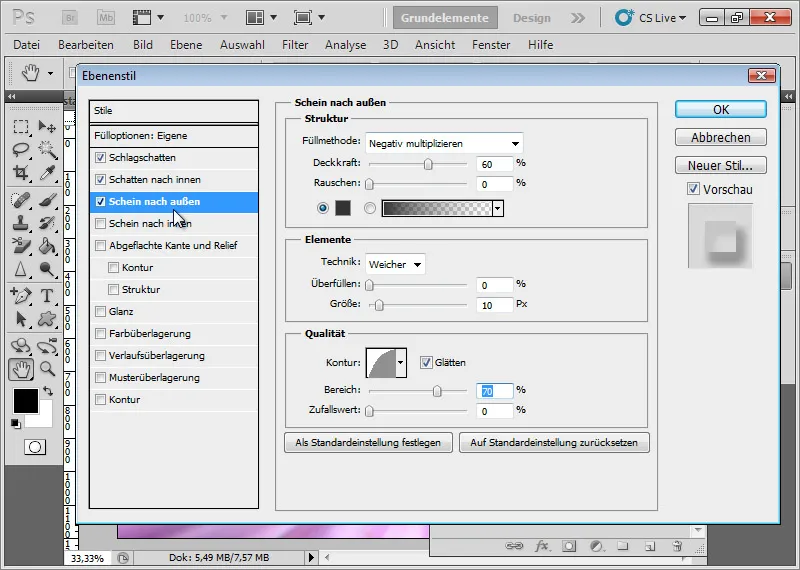
Outer Glow:
The Outer Glow has a 20% Opacity with the following options:
- Fill method Negative Multiply
- Opacity: 60 percent
- Size: 10 pixels
- semicircular, smoothed contour in a 70% range
Flattened edge and emboss:
The flattened edge inside is hard chiseled. As a variation, rounded is also an option!
The following options are to be selected:
- Depth: 100 percent
- Size: 20 pixels
- Blurring: 8 pixels
- Angle 120 degrees
- Height 70 degrees
- Depth mode with 60% brightness at 40 percent opacity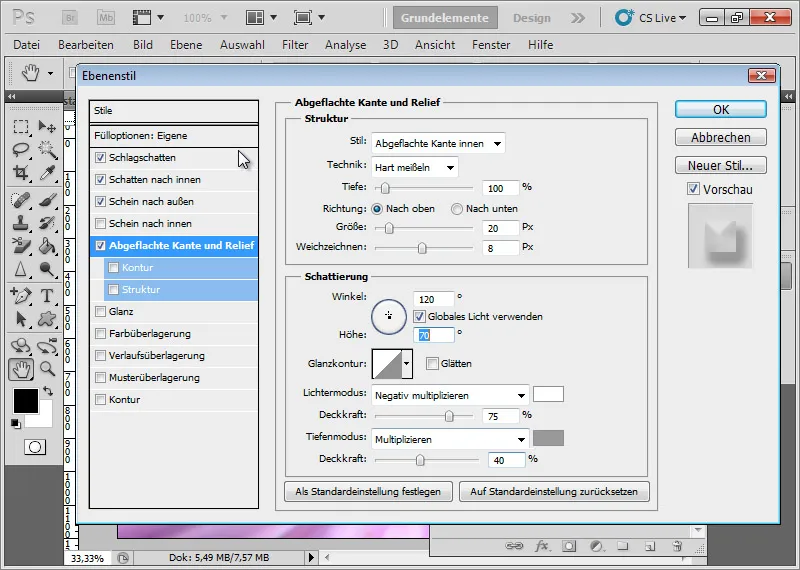
The current effect with the applied settings: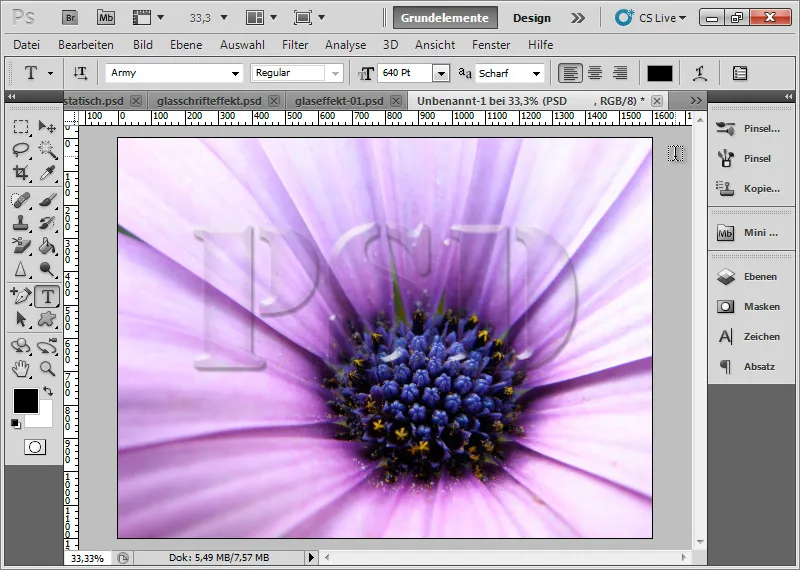
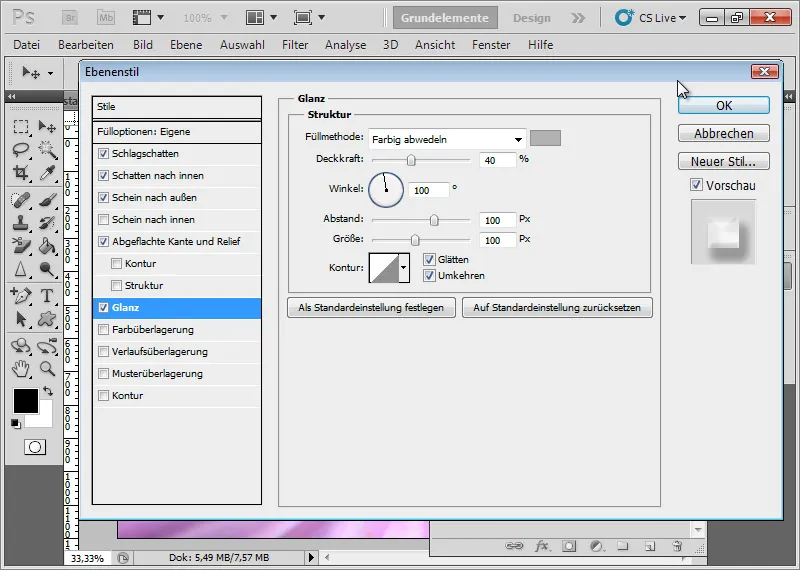
Gloss:
The gloss receives a 70% brightness with the following options:
- Fill method Color Burn
- Opacity: 40 percent
- Angle 100 degrees - Distance 100 pixels
- Size 100 pixels
- linear, smoothed contour
The letter in a glassy style is finished. With variations in the fill options, I can also adjust the glass effect very nicely to be more individual.
I deliberately worked with grayscale in the layer styles so that the glass text can be easily applied to other backgrounds without having to adjust the color to the new image background in the fill options separately. The fill method Color Burn in the Gloss tab already provides the necessary color kick!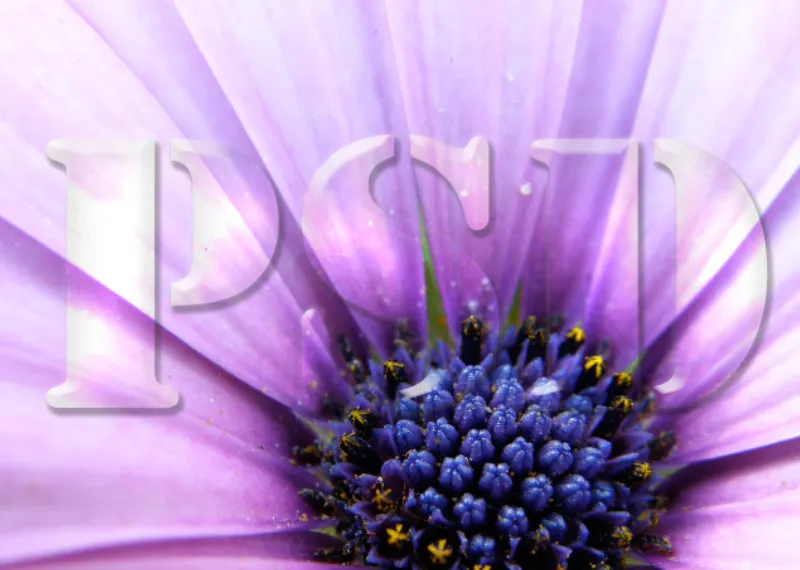
Step 6: Create a Matrix layer for refraction with distortion
I duplicate the text layer using the shortcut Ctrl+J. With Ctrl and click on the New layer icon in the Layers panel, I create a new layer that is below my duplicated text layer. I fill this layer with a gray tone at 60% brightness.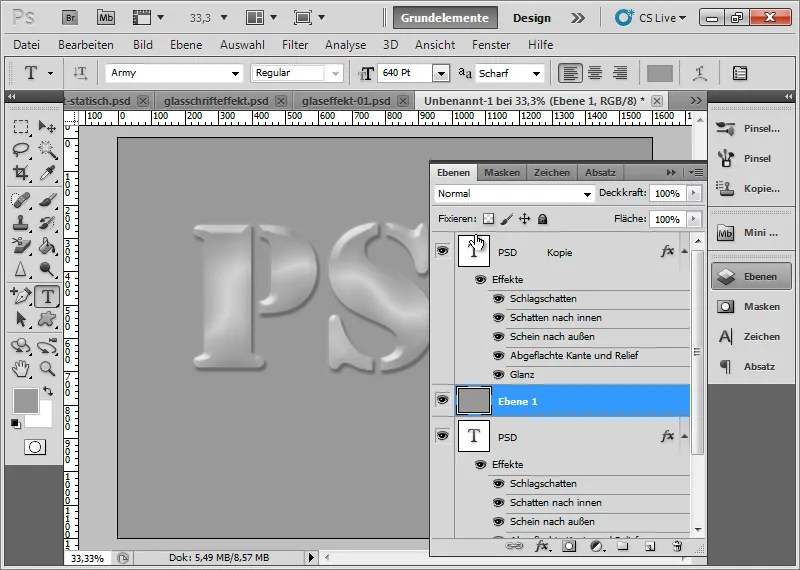
All fill options except for Inner Shadow are deactivated in the text layer. I edit the Inner Shadow in the fill options. There, I reduce the brightness value of my gray to a value around 50%, so the Inner Shadow is a bit stronger.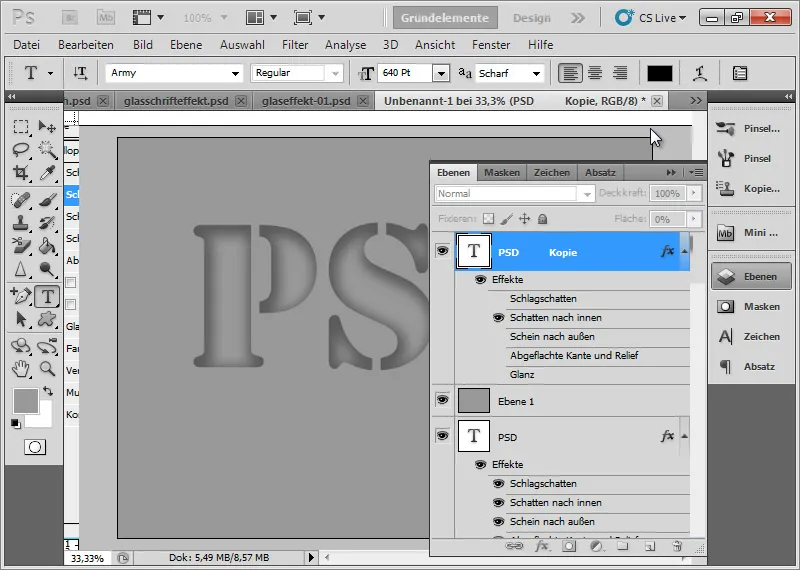
I select all layers and merge them into one using the shortcut Ctrl+E. It is important that after merging into one layer, it is set as a background layer because the subsequent glass filter requires the matrix to be the background layer. If the matrix is not a layer reduced to a background layer, the refraction through the glass filter will not work as desired. I can convert a transparency layer into a background layer via the menu Layer> New> Background from Layer.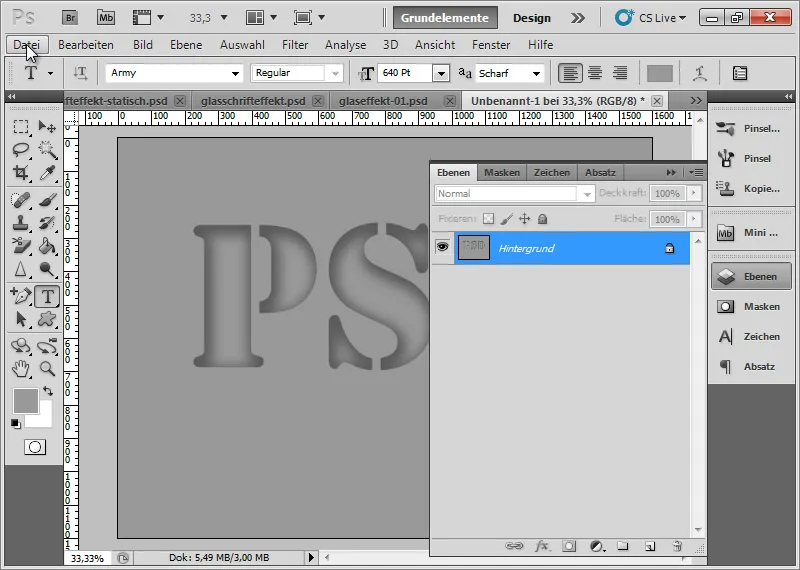
The matrix is created. Now I save the document as a PSD file with the name matrix-02-original.psd.
Step 7: Apply glass filter with matrix structure
I revert back to my original editing state before creating the matrix using the shortcut Ctrl+Alt+Z.
First, I duplicate my initial background image with Ctrl+J.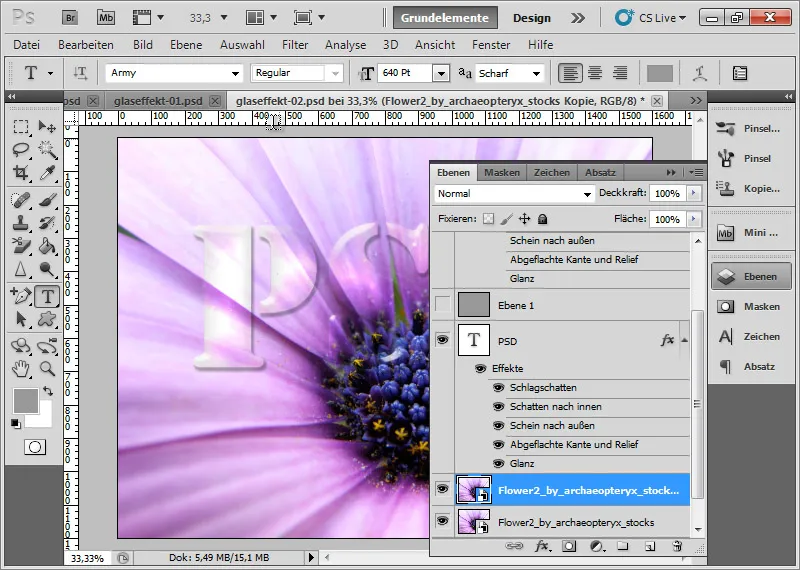
I select the duplicate and choose the distortion filter Glass. For Structure, I load my matrix layer.
I can adjust my distortion effect as desired using the sliders. I choose:
- Distortion: 18
- Smoothing: 12
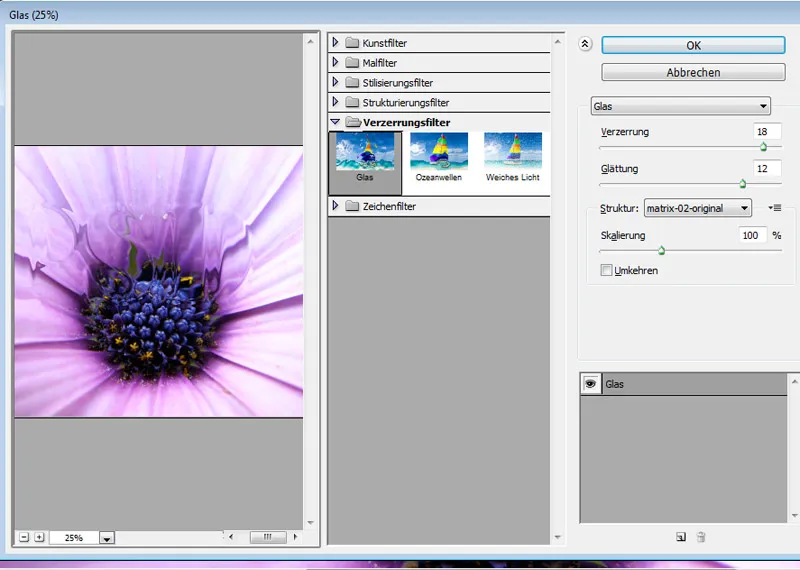
I confirm with OK. Now, exactly where my text is located, my text is refracted. The glass effect appears almost realistic due to the refraction of light.
To ensure that the effect is only visible in the text area and no broken edges occur, I simply select the text with Ctrl and click on the layer thumbnail in the Layers panel and add the selection to my glass filter as a smart filter mask. Then, the effect is cropped exactly to the area where it should take effect.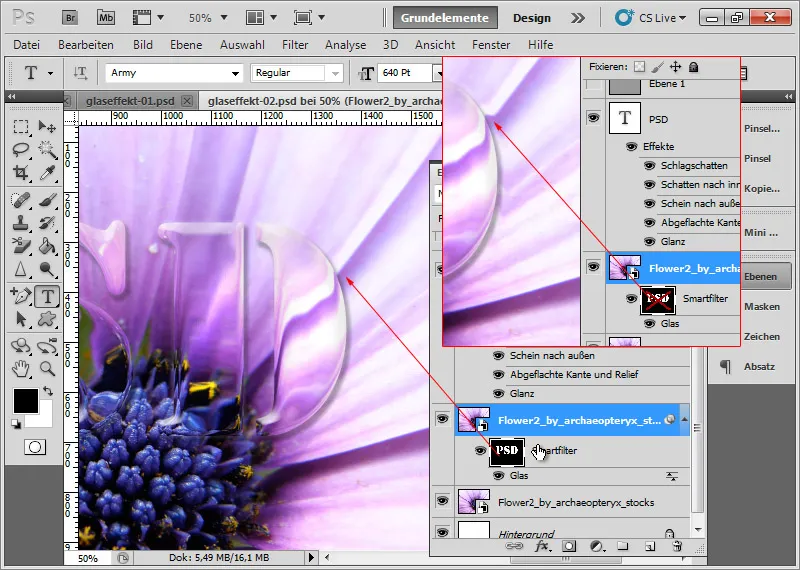
The effect is now complete. If the process via the matrix seems too cumbersome, one can also simply apply the Ripple filter. Although the effect is not optimal, it comes close to an authentic refraction of light.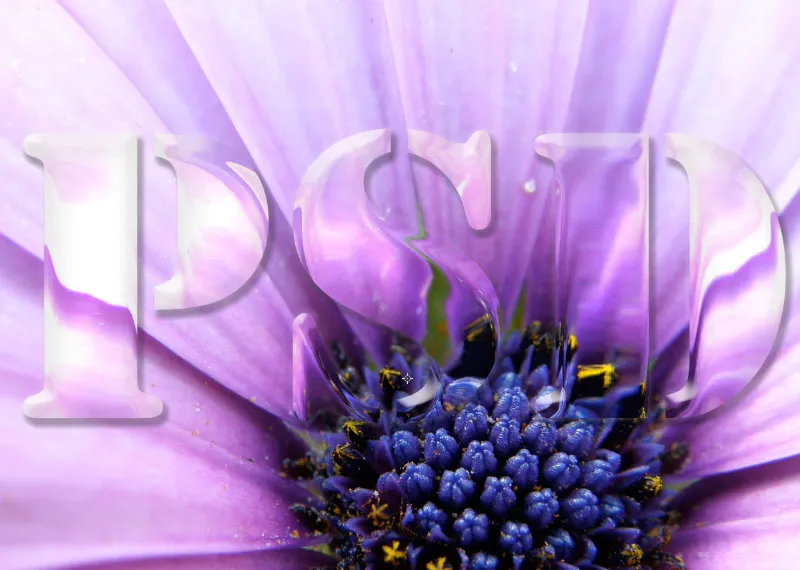
When I want to move my text now, I notice that the refraction in the duplicated background layer does not move with it. This is annoying because now I would have to adjust a new matrix again for the final placement of my text.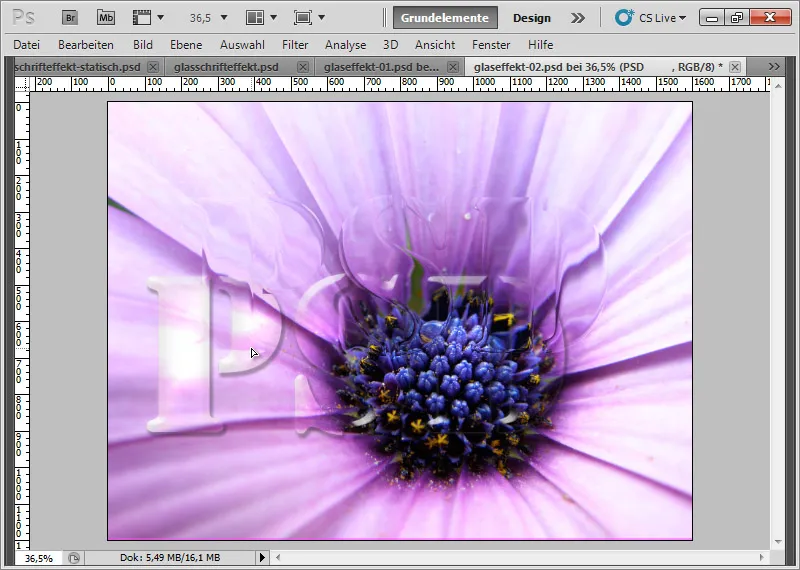
Step 8: Creating a standard matrix
It is better to create a standard matrix for this effect from the beginning, in which all possible placements of the text work well.
I call up my matrix-02-original.psd again, duplicate the text multiple times, and place the duplicates covering the document. I can do this quickly with the Clone Stamp tool since the PSD file consists only of the background layer.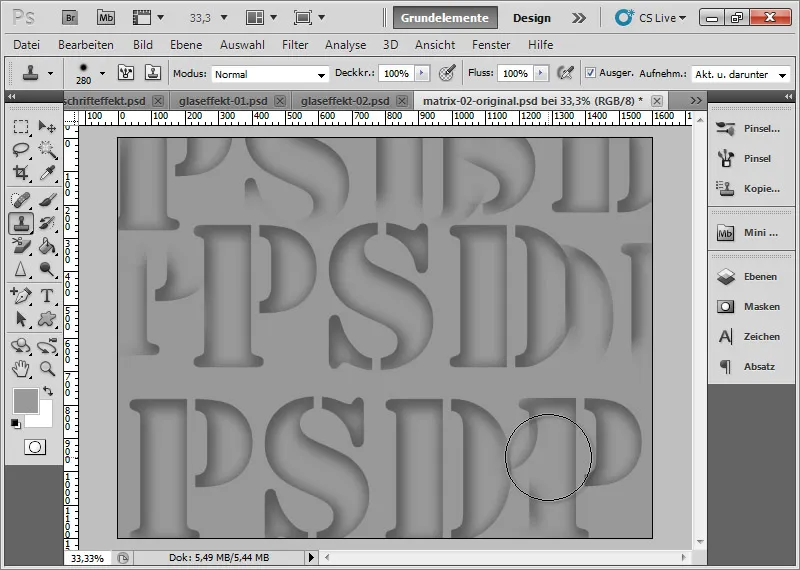
In this example, the PSD text was simply copied. It is also possible to simply paint certain structures into the matrix with a dark brush, which will then be calculated later. This ensures that no characters are visible in the subsequent glass calculation.
Then I save the document as matrix-02-standard.psd.
Step 9: Execute glass filter with the standard matrix
Since the distortion filter Glass has been applied as a Smart Filter, I call it up again with a Double-click. I update the Pattern Preset in the filter menu with the new matrix file matrix-02-standard.psd.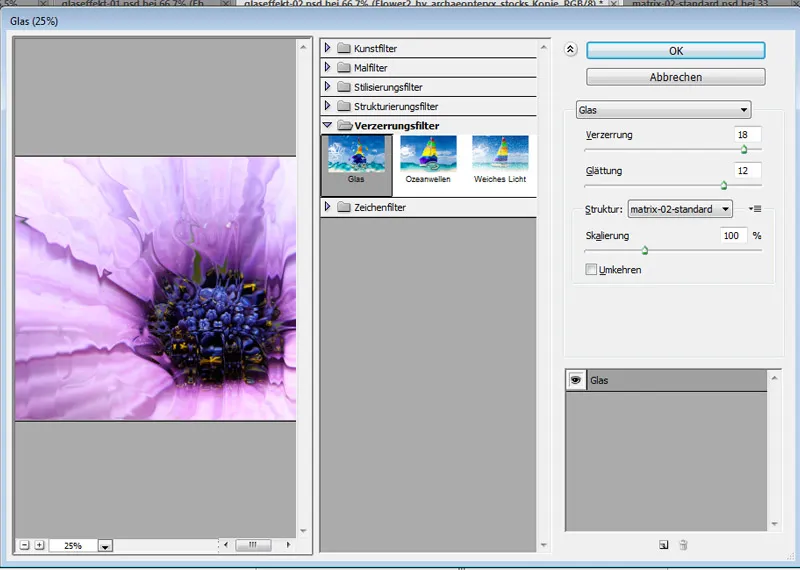
Step 10: Reorganize layer structure
I can now delete the Smart Filter Mask. Because if the text is supposed to move in the document, a mask is too static. I place the layer with the new filter effect at the very bottom of the Layer Panel. Above that is the original background image.
Then I need to convert the layer with the filter effect from a transparency layer to a background layer. I do this through the menu Layer> New> Background from Layer.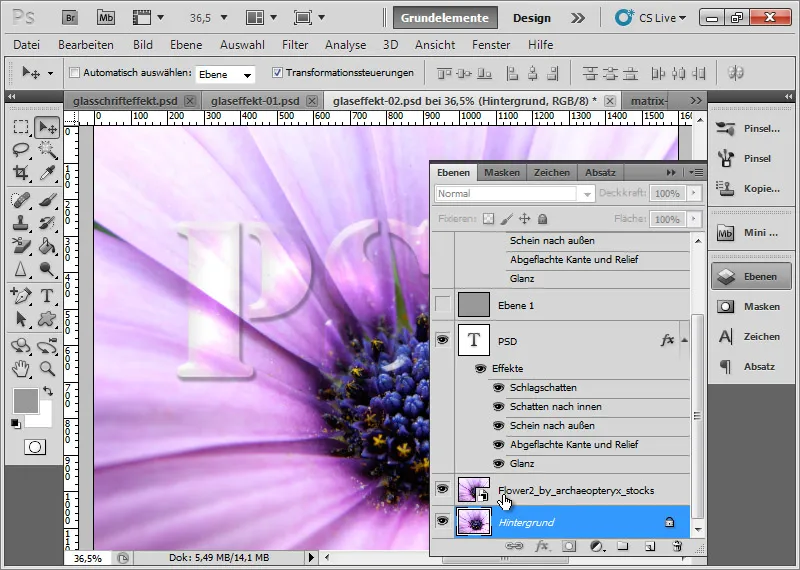
Step 11: Applying masking technique
Due to the new layer structure, the effect is no longer visible. In the following step, we will bring back the refraction effect into the image.
I access the Blending Options of my text layer and activate a strong Knockout under the advanced blending options.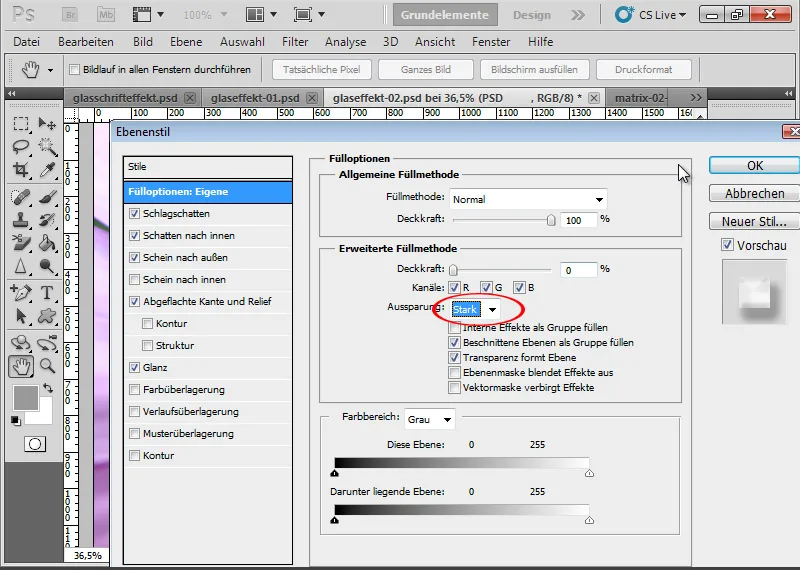
Now, all transparencies in the document are knocked out from the text shape to the background layer. It is like a kind of cutout in the document, regardless of how many layers are visible in the document. The transparency layers are hidden exactly at this point in the text. Since the background layer has no transparencies, the applied filter of the background layer will always be visible at that point.
This way, I can move my text to any position, and the refraction effect will remain in the letters. The previously duplicated background layer ensures that all other areas are displayed without the refraction effect.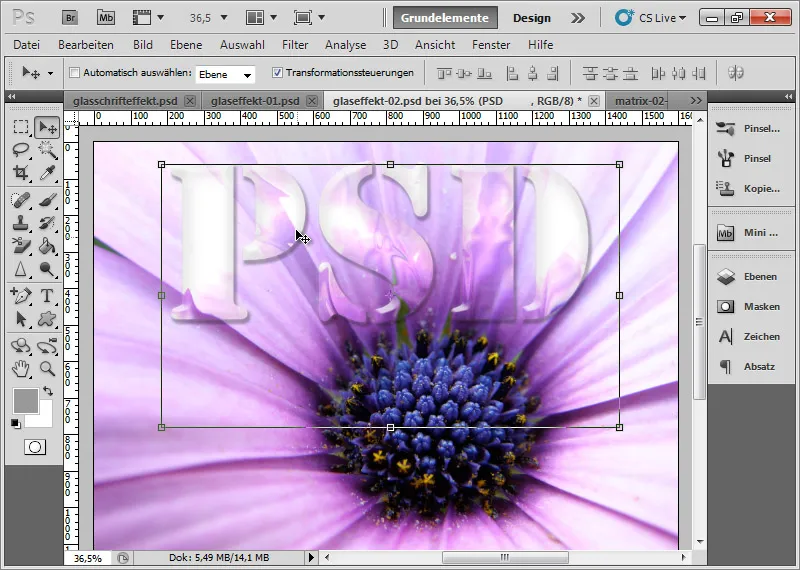
Step 12: Alternative to knockout: the clipping mask
Unfortunately, the knockout technique is not as well-known and somewhat static for variations of the effect. However, there is a good alternative, more familiar in Photoshop's known territory and more flexible for variations: the ordinary clipping mask.
I undo using the shortcuts Ctrl+Alt+Z so that I get the background layer back into a Smart Object with the Smart Filter Glass. I deactivate the knockout in the Blending Options of the text layer. I place the refraction layer, i.e., the newly recovered Smart Object, above the text layer.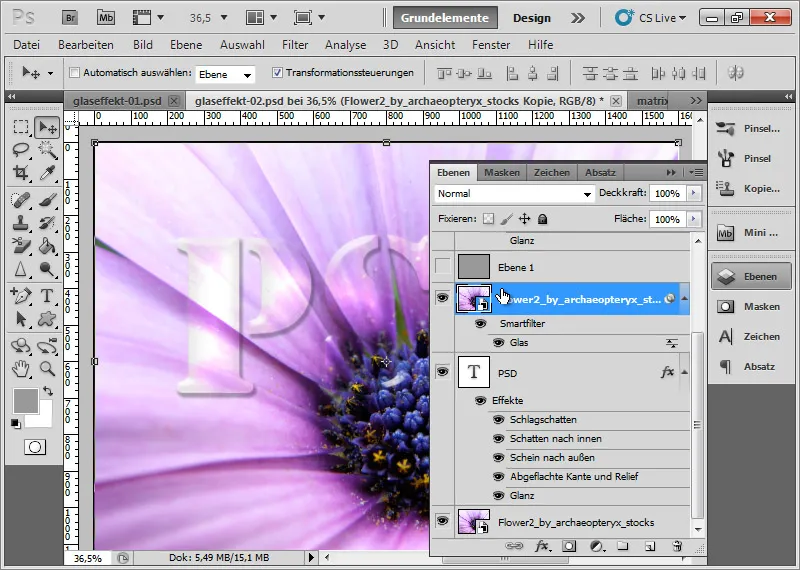
By clicking between the text and refraction layer in the Layer Panel, I create a clipping mask. The same can also be achieved with the shortcut Ctrl+Alt+G.
The clipping mask ensures that the refraction is displayed cut to the text layer.
The effect becomes visible when I set the Fill Slider from 0 percent back to 100 percent. Another advantage of the path via the clipping mask is that I do not need a background layer here and theoretically, the layer can also be used as a Smart Object with Smart Filters and the possibility for lossless variation of the effect.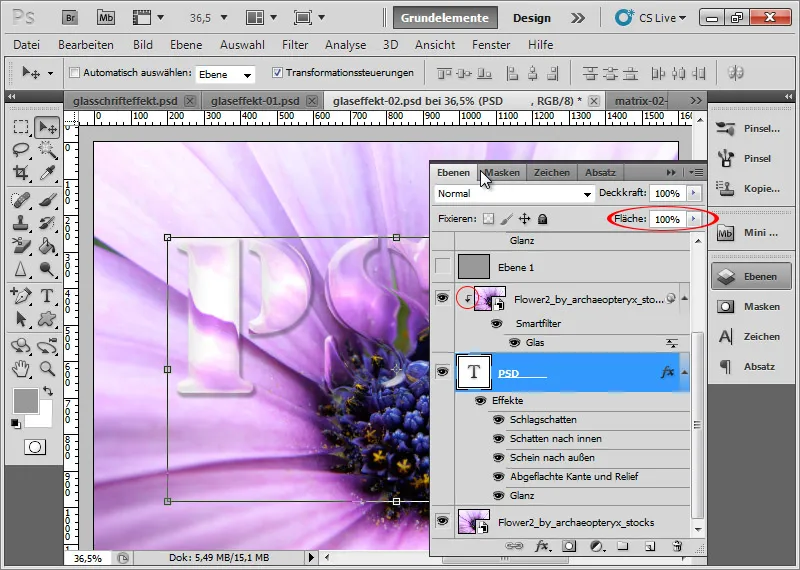
Step 13: Variations
Variations on the text letters are very easy through different fonts as well as through the Blending Options.
The refraction effect can be varied in the distortion filter Glass; this can also be done very well with the preset Cube, for example. Curl or Ocean Waves can also be applied for refraction effects. If the refraction effect is too weak, I simply reapply the filter on the layer with Ctrl+F.
Since the effect was color-neutral in the Blending Options - i.e., mainly worked with gray values for calculation as well as the Color Dodge Fill Method in Glow - new backgrounds can also be easily placed behind the text. The necessary adjustments are limited to running the matrix through the Glass Filter once on the new background.
In this example, I placed a new background image, duplicated it. The duplicate is also applied as a clipping mask to the text layer. With Alt, I can drag the Smart Filter from the existing refraction layer to my new duplicated background. This quickly adjusts the effect to a different background.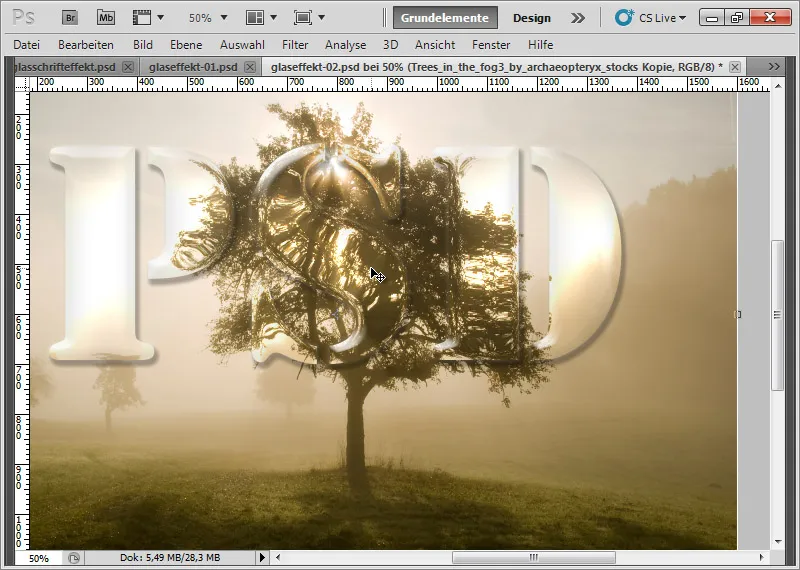
Other possibilities for variations include, for example, slightly blurring or sharpening the refraction. This is particularly useful with a standard matrix to iron out hard structures in the effect. A blurring value of 2 pixels is already sufficient.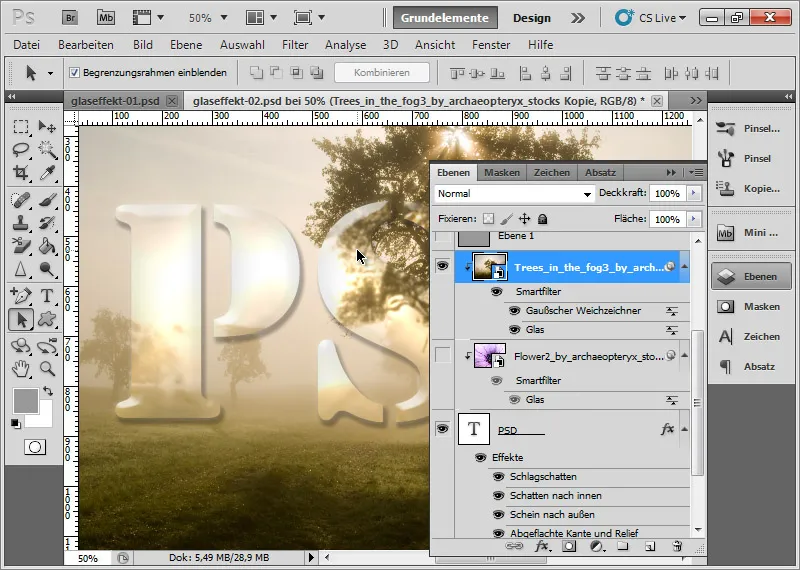
Instead of blurring, sharpening works very well through the Smart Filter High Pass. In the Smart Filter options, I set the filling method to Overlay! This way, I achieve a bit more sharpness and contrast in the refraction, making the refraction effect even more realistic.
Finally, the original image with a High Pass filter: