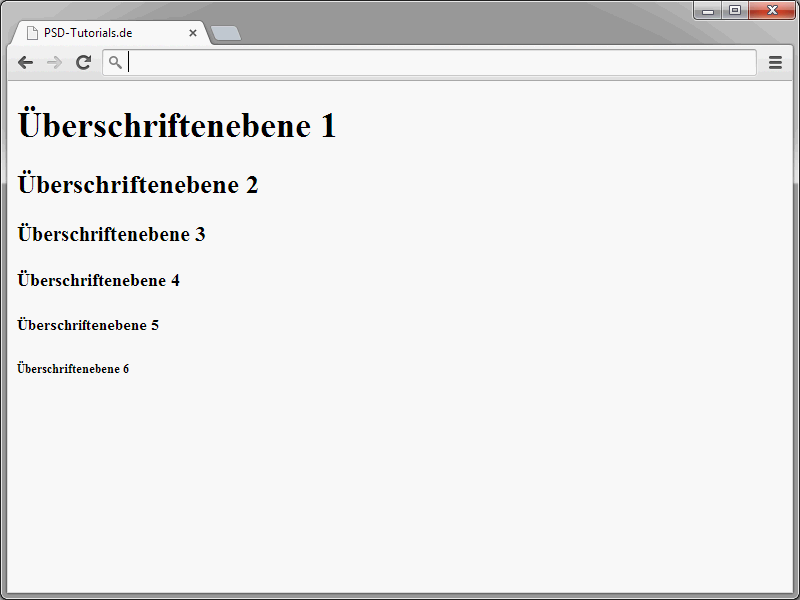
In HTML, a distinction is made between six different heading levels. These are defined by the elements h1 to h6.
<h1>Heading level 1</h1> <h2>Heading level 2</h2> <h3>Heading level 3</h3> <h4>Heading level 4</h4> <h5>Heading level 5</h5> <h6>Heading level 6</h6>
Where h1 represents the largest heading, h6 the smallest. HTML5 also introduced further options for heading definitions, which will be shown later.

The different heading levels help you to structure the text. Take books as an example. There is the book title, which is comparable to the content of the h1 element. Only one h1 element should therefore be inserted per HTML page. The remaining text is then structured by the other levels. The main heading is followed by h2. Sub-chapters of h2 are then identified by the h3 element.
By the way: The size of the heading levels is initially determined by the browsers. However, you can explicitly determine this yourself by using CSS. More on this later.
The heading levels are very easy to use. You enter an h followed by the desired level number.
<h1>PSD-Tutorials.com</h1>
A line break and a space to the following elements are automatically inserted after a heading defined in this way.
Make sure that the numbers in the introductory and closing tags are identical.
Defining paragraphs
In addition to headings, texts naturally also consist of paragraphs. Such paragraphs are also very easy to implement in HTML. The p element is used for this. A paragraph marked in this way inherently has a certain distance to subsequent elements. You can control the size of this paragraph using CSS.
Here is an example of two paragraph definitions:
<p>This is a paragraph</p> <p>This is also a paragraph</p>
A look in the browser provides the following image:
Incidentally, in HTML5 it is not mandatory that open paragraphs are closed again via </p>. For the sake of clarity, however, I would actually use the closing < /p>.
Manual line breaks
Continuous text within paragraphs, lists etc. is automatically wrapped by the browser if it is wider than the browser window, for example. This is practical as it avoids unnecessary horizontal scrolling. However, you can also have text wrapped at any point. The <br /> element is used for this. Note that this is a so-called standalone tag, i.e. it does not have a closing tag itself, but virtually closes itself.
<p>Yeh, this one's for the workers who toil night and day<br /> By hand and by brain to earn your pay<br /> Who for centuries long past for no more than your bread<br /> Have bled for your countries and counted your dead</p>
When using <br />, it does not matter whether it is at the end of a line or in its own line. The result looks like this in both cases:
Back to the automatic line breaks that are inserted by the browsers. These are often problematic because you cannot control where the line break is ultimately inserted. This can lead to undesirable results. Version numbers are a typical example of this.
iPhone 5
This should normally be on one line. The line break should therefore not be between iPhone and 5.
iPhone 5
This can be prevented by using so-called protected spaces. An example:
This character string defines such a protected space. In the browser itself, this is displayed as a normal space: 

For this to work as desired, you must not insert any spaces in the source text. Something like this would not work:
Preformatted text
There may be situations in which you want to output text exactly as it is arranged in the source text. A typical example of this is program listings, as can often be found here on PSD-Tutorials.de.
For such purposes, HTML allows the definition of preformatted text sections. Indentations are then taken into account by the browser as they appear in the source code. The following example shows how this is implemented:
<!DOCTYPE html> <html lang="en"> <head> <title>PSD-Tutorials.de</title> <meta charset="UTF-8" /> </head> <body> <h1>"Hello, world!" in PHP</h1> <pre> <?php echo "Hello, world\\n"; ?> </pre> </body> </html>
The passage that is to be displayed as preformatted text is defined within the pre element. Insert the indentations etc. there exactly as they should ultimately be displayed by the browser.
When looking at the example code, you may notice the strange characters <?php and ?>. In the browser, these are displayed as <?php and ? >. The variant used in the source code is called character masking. This is necessary if you do not want HTML characters to be interpreted by the browser. If you were to enter <?php directly in the source code, the browser would assume that it is an opening PHP area. This is why the characters are masked.
- Replace the character & with the character string &amp;
- Replace the character < with the character string <
- Replace the character > with the character string >
- Replace quotation marks with "
Incidentally, pre is not only suitable for displaying program listings. It can also be used to display tabular data with ease. The following example shows a typical table that has been implemented using only spaces within a pre element.
<pre> Destination Departure Arrival Platform ---------------------------------------------------------------- Berlin 10:23 14:30 2 Hamburg 11:09 13:20 13 Munich 12:04 15:45 1a </pre>
The result in the browser looks like this:
The browsers actually take into account the spaces that you define in the source text. Incidentally, the table variant shown works quite well. I also find it practical for smaller tables. However, as soon as the dataset becomes more extensive, you should fall back on classic HTML tables. Of course, you can also find out how to define these in this series.


