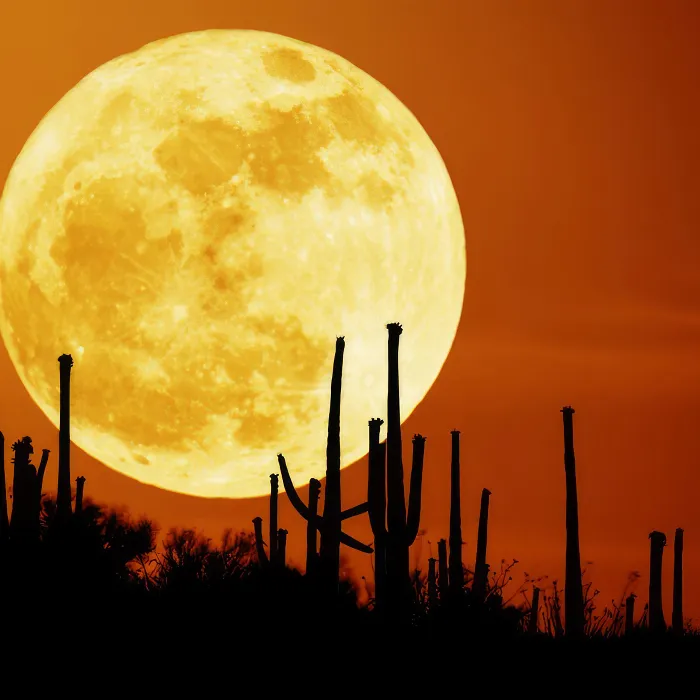
Rise of the full moon behind the cacti of Saguaro National Park in Arizona, USA.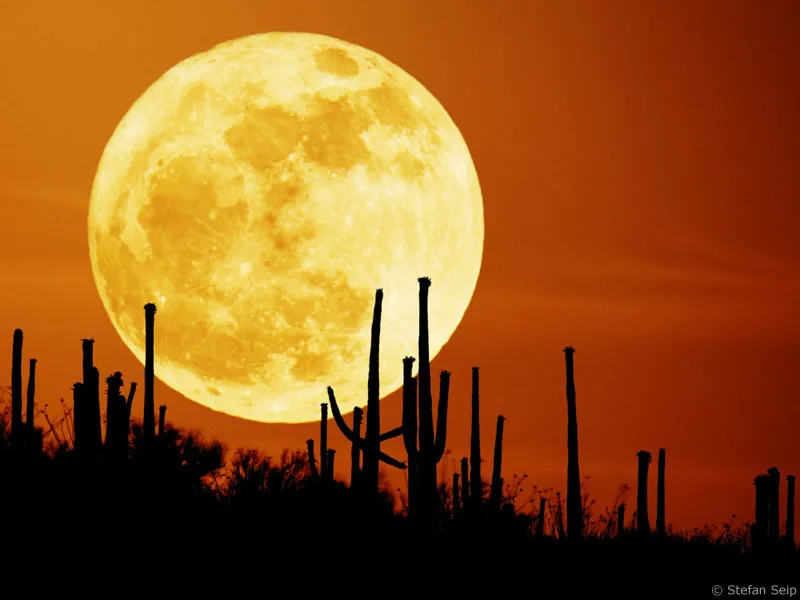
Part 5: Photographing the moon
Astrophotographers have an ambivalent relationship with the moon: on the one hand, it is a rewarding subject, but on the other, its bright light can be distracting on some nights when observing low-light objects. This tutorial will focus on the positive aspects of the moon: Its brightness and (relative) size in the sky eliminate many of the difficulties that an astrophotographer usually has to contend with. And there is no other celestial body in space of which observers on Earth can recognize and photograph so many details on the surface.
But let's first take a closer look at the nature of the moon and its constant phase change: the term "moon" is defined as a natural celestial body that primarily orbits a planet rather than the sun. This implies the correct assumption that other planets also have moons. The four "Galilean moons" of the planet Jupiter, for example, are well known and can be seen through binoculars. When the term "the moon" is used, it is therefore usually a simple simplification of the correct term "Earth's moon". There is only one moon orbiting the Earth, and although it is not the largest moon in our solar system in absolute terms, its relative size to the parent planet is unsurpassed: its diameter is 3,476 kilometers, which is more than a quarter of the diameter of the Earth! But the Earth's moon doesn't do badly in comparison with the numerous other moons in the solar system either: it is the fifth largest moon in the solar system after Ganymede (Jupiter), Titan (Saturn), Callisto and Io (both Jupiter).
The Earth's moon has been well explored, not least thanks to the results of six manned missions between 1969 and 1972. Never before and never since has a human being set foot on another celestial body. It is a "dead" celestial body on which there is neither water nor an atmosphere. Our ancestors were of a different opinion and thought that the spots that can be seen with the naked eye on the moon were seas. The spots still bear the names of these seas (Latin singular "Mare") to this day. With optical aids (binoculars, telescopes) numerous craters become visible, created by a cosmic bombardment.
The Earth was hit just as frequently, but most of the craters that formed have long since disappeared due to weather erosion. With the help of longer focal lengths (telephoto lens, telescope), the craters on the moon can also be photographed well.
All larger craters with diameters of 300 to less than 10 kilometers were named after famous but deceased scientists and artists, smaller craters were named after common first names or, with a letter of the alphabet, assigned to a larger crater.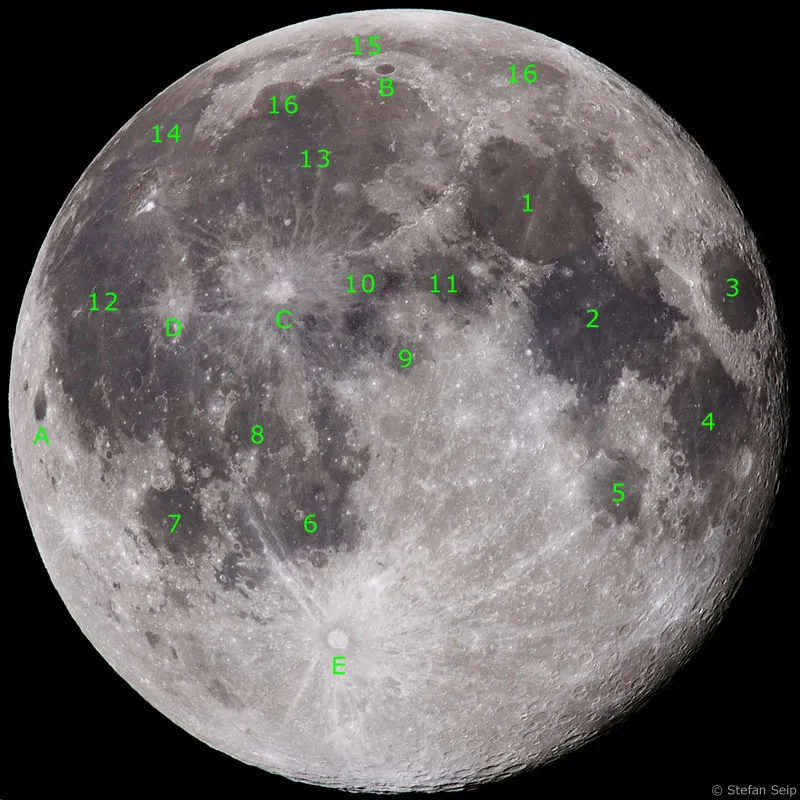
In this photo, all the formations visible to the naked eye on the moon are labeled. Please refer to the table below for the legend.
| detail | German name | Latin name |
| 1 | Sea of serenity | Mare Serenitatis |
| 2 | Sea of tranquility | Mare Tranquillitatis |
| 3 | Sea of dangers | Mare Crisium |
| 4 | Sea of Fertility | Mare Fecunditatis |
| 5 | Sea of Nectar | Mare Nectaris |
| 6 | Sea of Clouds | Mare Nubium |
| 7 | Sea of Humidity | Mare Humorum |
| 8 | Sea of Knowledge | Mare Cognitum |
| 9 | Central Bay | Sinus Medii |
| 10 | Bay of the floods | Sinus Aestuum |
| 11 | Sea of Vapors | Mare Vaporum |
| 12 | Sea of Storms | Oceanus Procellarum |
| 13 | Sea of Rain | Mare Imbrium |
| 14 | Bay of Dew | Sinus Roris |
| 15 | Sea of cold | Mare Frigoris |
| 16 | Rainbow Bay | Sinus Iridum |
| A | Crater Grimaldi | Grimaldi |
| B | Crater Plato | Plato |
| C | Crater Copernicus | Copernicus |
| D | Crater Kepler | Kepler |
| E | Crater Tycho | Tycho |
Due to the influence of the Earth's gravity and the associated tidal effect, the moon always turns the same side towards the Earth, which is known as "bound rotation"; i.e. its own rotation takes just as long as one orbit around the Earth. For us, this means that we never get to see the far side of the moon until we become space travelers. However, due to various effects, the moon shows a wobbling motion, so that over the course of weeks we can see a little more than half of the moon's surface, namely exactly 59 percent. This wobbling motion, also known as libration, is illustrated very clearly in an animation on the website http://antwrp.gsfc.nasa.gov/apod/image/0709/lunation_ajc.gif.
The currently most probable theory of the moon's formation sounds dramatic: a body about half the diameter of the Earth is said to have rammed into the Earth around 4.5 billion years ago, with the moon being formed from ejected material from the Earth as a result of the collision.
Today, it orbits the Earth at an average distance of 384,000 kilometers, a distance that light can travel in around 1.3 seconds. To be precise, the moon does not orbit the earth either, but both bodies rotate around their common center of gravity, which is about 1,700 kilometers below the earth's surface, i.e. inside the earth. And it is also not a circular orbit that the moon describes around the earth, but an ellipse; its distance from the earth fluctuates between 370,300 and 406,700 kilometers. This fluctuation means that the apparent size of the Earth's moon in the sky is also subject to change. The website http://antwrp.gsfc.nasa.gov/apod/ap071025.html provides a good comparison of the size ratios at a distance from the Earth (apogee) and close to the Earth (perigee).
One orbit of the moon around the earth takes 29 days, 12 hours and 44 minutes, if you consider the duration from one full moon to the next (synodic month). However, it reaches the closest or furthest point of its orbit at intervals of 27 days, 13 hours and 18.5 minutes (anomalistic month). The moon's orbit has important consequences for observation and photography. On the one hand, the angular distance between the moon and the sun changes by just under 13 degrees every day, so that the moon's rising and setting times shift from one day to the next. On the other hand, this also results in differences in the angle of illumination, which leads to the formation of the phases of the moon.
This refers to the angular distance of the moon relative to the sun. If the moon is opposite the sun, the angle is 180 degrees, which is the case at full moon. The new moon, on the other hand, is close to the sun, its angular distance to the sun is then 0 degrees, i.e. it can neither be observed nor photographed unless it exceptionally moves in front of the sun, which is only rarely the case and is called a solar eclipse (see tutorial number 8 of the series "Astrophotography and celestial photography").
After each new moon phase, the angular distance increases in an easterly direction, so that the waxing crescent moon can only be seen in the evening sky and shortly after sunset in the west. When the angle reaches 90 degrees, the phase of the waxing crescent moon occurs, which is in the sky in the first half of the night. The full moon rises at sunset and only sets again at sunrise, i.e. it can be seen throughout the night and reaches its peak around midnight.
After the full moon, the angular distance to the sun decreases again. The waning crescent moon is 90 degrees west of the sun and is above the horizon during the second half of the night. The narrow, waning crescent moon in turn moves closer and closer to the sun and only appears in the morning sky, before sunrise, in the east. If the moon rises before sunset or sets after sunrise, the moon will also be visible in the blue sky on a clear day.
In principle, every moon phase is suitable as a photo motif. However, if you are interested in details on the surface, such as craters and lunar mountains, then the full moon phase is an unfavorable time! The reason for this is obvious: during the full moon, the light falls on the moon from the front - as seen from the earth - so that the surface relief of the moon is illuminated without shadows. The irregularities become much more visible when they are illuminated from the side and cast long shadows.
This is the case at the light and shadow boundary of the moon, the so-called terminator. At half moon, the terminator is the straight line that separates the light hemisphere from the dark hemisphere of the moon. If you were standing near the terminator on the moon, the sun would be rising or setting there for the observer.
The position of the moon's orbit in relation to the horizon is subject to annual changes. The months of February to April offer the best viewing conditions for the narrow crescent of the waxing moon, while the months of August to October offer the best viewing conditions for the waning moon. The full moon reaches its highest position in the sky in December and its lowest in June.
The height of the moon above the horizon always plays a role when it comes to taking sharp, high-resolution photos: The higher an object is in the sky, the shorter the path through the Earth's atmosphere in the direction of view. This is because it is the turbulence in the atmosphere that often leads to blurred images despite perfect technology. This "wobbling of the air" is called "seeing" by astronomers. Nights with unfavourable seeing can be recognized by the fact that bright stars flicker conspicuously, while their light is calm on nights with good seeing.
The gravitational influence of the moon on the earth is a key factor in the formation of high and low tides. In contrast, it demonstrably plays no role in the development of weather patterns, despite popular belief. Efforts to link everyday activities (such as going to the hairdresser) to certain phases of the moon, as suggested by countless "lunar calendars" year after year, can be regarded as downright absurd.
On average, the moon's apparent diameter is 30 minutes of arc, i.e. half a degree. (The fact that it appears larger to us near the horizon is due to an optical illusion). As already mentioned, this is a respectable size compared to other astronomical subjects, but only long and very long lens focal lengths are suitable if you want to capture it in as much detail and as full a format as possible.
The image size of the lunar sphere on the sensor can be approximately determined by dividing the focal length used by 110. A lens with a focal length of 500 millimetres therefore produces a 4.5 millimetre image on the sensor. If its size is known, the size of the moon on the overall image can be derived from this. If you use an SLR camera with an APS-C format sensor (i.e. crop factor = 1.6), the sensor size is around 15 x 22 millimetres. With the aforementioned 500-millimeter lens, the lunar sphere will therefore make up just under a third of the image height.
Conversely, this formula can also be used to determine the focal length to be used in order to capture the moon as full-frame as possible: For a camera with a 1.6x crop factor, the focal length for the full moon is around 1500 millimetres and around 2200 millimetres for the crescent moon, which can be photographed in portrait format and for which the long edge of the sensor is the decisive factor.
For full-frame cameras with a 24x36 millimeter sensor, the focal lengths are even 2500 (full moon) and 3800 millimeters!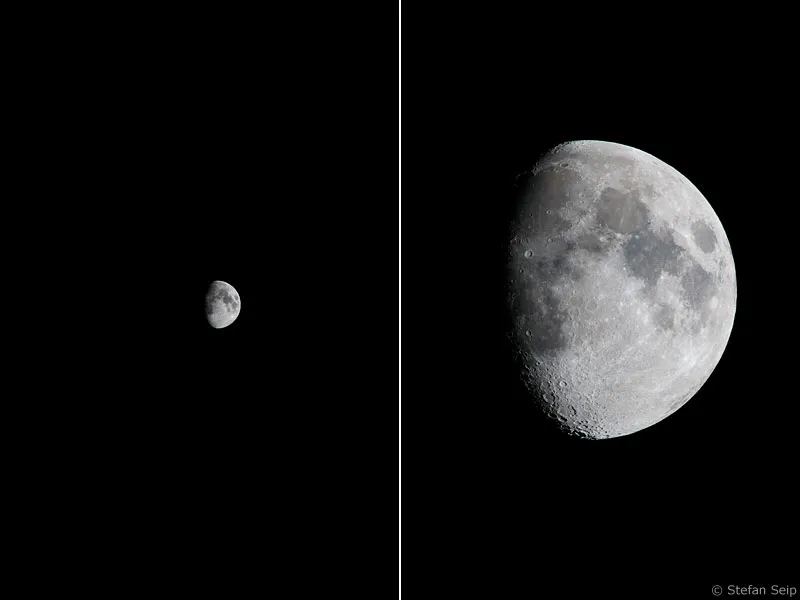
Comparison of the image size of the moon, taken with a Canon EOS 400D at 200 millimeters focal length (left) and at 1200 millimeters focal length (right). Both photos were not cropped.
If such long focal lengths are not available as a lens, an astronomical telescope is often the cheapest solution. An SLR camera can be connected to it if the telescope has an eyepiece connection with a two-inch diameter. Then you only need a so-called T2 adapter and a 2-inch connection sleeve. Both parts are purely mechanical, do not contain any optics and are therefore available at affordable prices. The camera is attached to the telescope instead of an eyepiece, while the optics of the telescope serve as the receiving optics. This type of configuration is also referred to as focal photography - the focal length of the telescope is also the effective focal length.
There are optical components for both lenses and telescopes that extend the effective focal length. In the case of lenses, these are teleconverters that are mounted between the camera and lens and extend the focal length by a factor of 1.4 or 2, depending on the model. Converters with an extension factor of 1.4 lose a full f-stop of light, i.e. you have to expose twice as long as without the converter. Converters with an extension factor of 2 even lose two f-stops and the exposure time is quadrupled.
There are similar systems for telescopes, only they are called "Barlow lenses", which are offered with extension factors of 1.5x to 5x.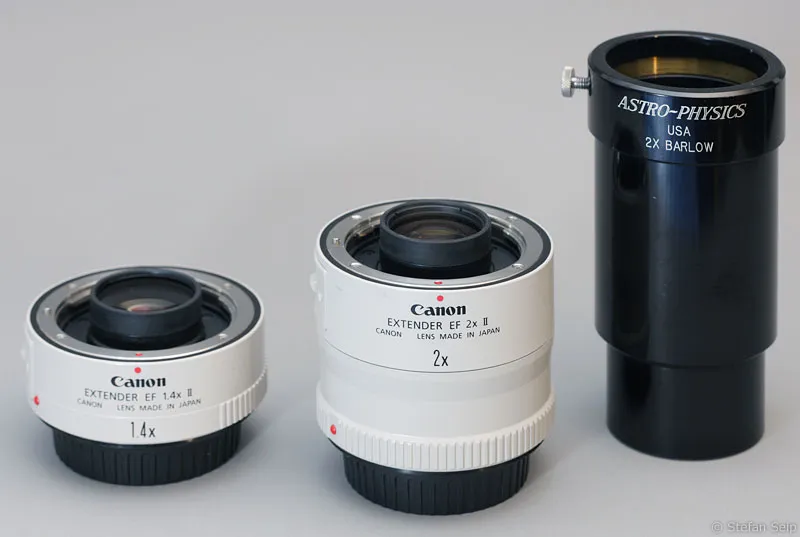
Two teleconverters (left) and a Barlow lens for extending the focal length.
Remember, however, that all options for extending the focal length almost inevitably result in an impairment of the general image quality, because any imaging errors in the optics are of course also affected by the "magnification". With photo lenses, you can stop down the lens by one or two f-stops to mitigate this negative effect. It becomes particularly critical if you use two teleconverters at the same time.
This only works well if the lens already has an exceptionally good image quality and the teleconverters are also excellently manufactured, perhaps even matched to the lens. The combination of zoom lenses with teleconverters is also critical, because many of these lenses are already working at their performance limit even without a converter, and enlarging the image with a converter will not reveal any additional details. Only very high-quality zoom lenses are not affected by this limitation.
However, it doesn't always have to be a full-frame image of the moon if you want to create an image worth seeing. Especially when the moon is still close to the horizon, you can take photos with a shorter focal length in order to integrate the landscape or buildings into the picture, for example. Such motifs in particular can be very atmospheric. But even then, telephoto lenses are a good recommendation, otherwise the moon is just a tiny bright blob in the picture and hardly identifiable as such.
If moonrises or moonsets are your preferred motif, good planning is helpful. The rising and setting times change every day. They can be calculated for any location on earth on the website http://www.calsky.de. To do this, click on Moon and then on Ephemeris after you have entered your observation location (start and then location).
Alternatively, you can also use a good planetarium program (e.g. TheSky, Guide or RedShift). Predicting the rising point on the horizon is more difficult, as this also changes from one day to the next, even if only slightly. Precise knowledge of celestial mechanics and some observation experience are required to obtain reliable forecasts of when the moon will rise from a fixed location, for example exactly behind a distant tower or tree. Sometimes, however, a little bit of luck is enough ...
Technical equipment
In addition to a digital SLR camera, you will need a lens with the longest possible focal length and, if necessary, a teleconverter to extend the focal length. Instead of the lens, you can also use an astronomical telescope as a camera lens.
What else you will need:
- Stable tripod:
The longer the focal length used, the greater the demands on the stability of the tripod if you want to avoid camera shake. The heavier and longer (leverage effect!) a lens is, the more stable the tripod should be. With long lenses, it is not advisable to screw the camera onto the tripod so that the lens protrudes forwards. Instead, the camera and lens unit should be placed on the tripod close to the center of gravity. Most long lenses have a tripod clamp with its own tripod thread for this purpose.
Wood is an excellent material for tripods because it dampens vibrations better than metal. Here you can see a tripod with legs made of ash wood from Berlebach, which can safely support even the longest focal lengths despite an extendable center column: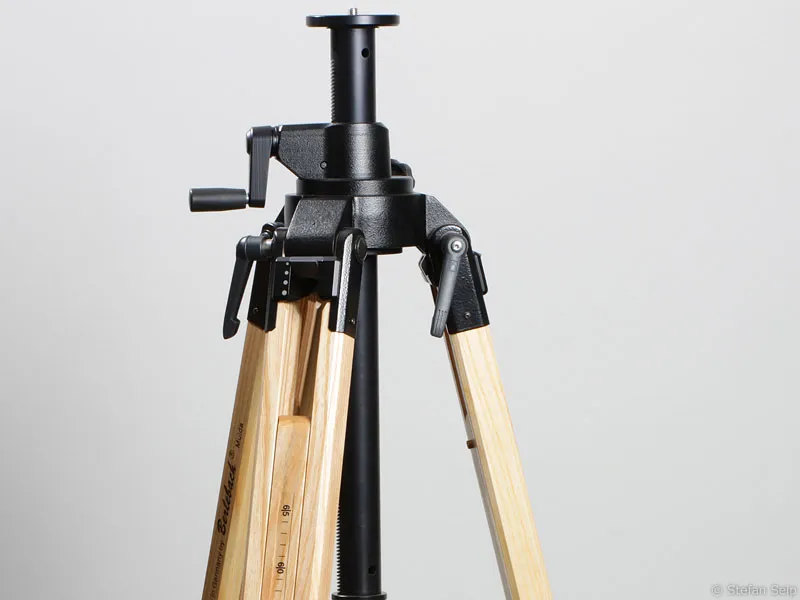
This stable tripod head is a gear head from Manfrotto. The example illustrated shows the mounting of a telephoto zoom with a 2x teleconverter in between. Not the camera, but the clamp of the lens is screwed onto the tripod, which reduces the susceptibility to vibrations: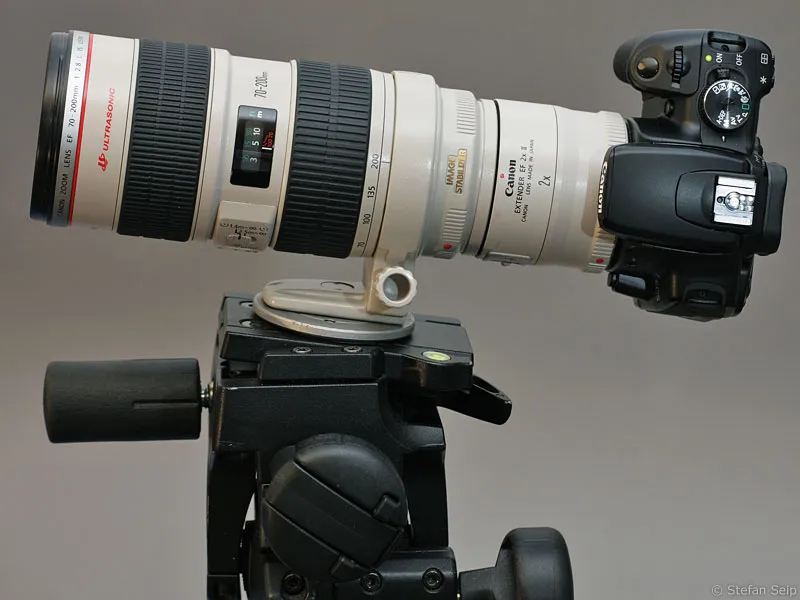
- Cable release / Timer
Cable releases allow the camera to be released without touching it to prevent camera shake, which is essential when working with long focal lengths. Wireless remote triggers also fulfill this purpose.
Procedure
Depending on the situation at the time of shooting, the focal length used and the choice of subject, a wide variety of photos of the Earth's satellite can be taken. In the following, I would like to describe how you can take a picture of the waxing crescent moon in the evening sky with a digital SLR camera and a telephoto lens in such a way that as many surface structures as possible can be recognized.
1. make the basic settings
The following basic camera settings are recommended:
- File format
The RAW format is preferable, whereby JPG files with the highest quality level should be recorded at the same time. The JPG files make it easier to find the best image from a large number of shots later on.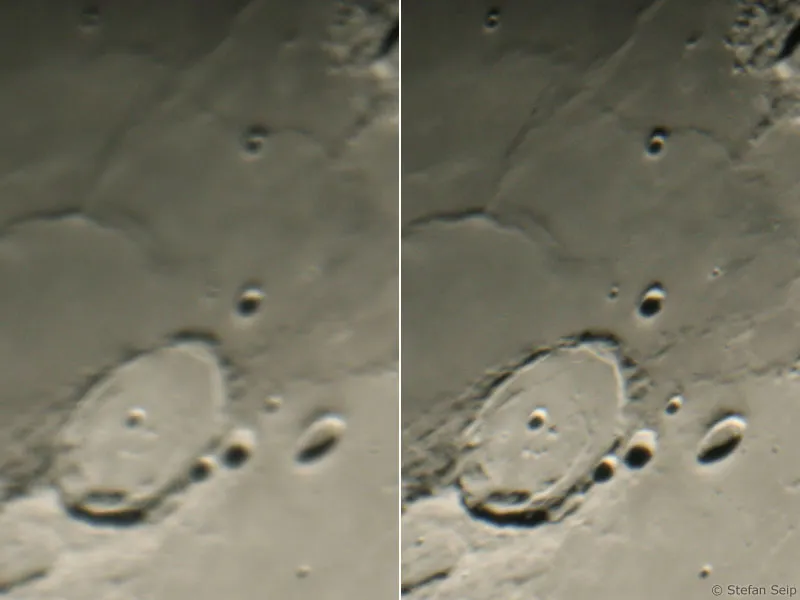
Setting the image quality for a Canon EOS 40D: The RAW format is selected here, while the photos are also saved in the best possible quality of the JPG format ("L" for "Large").
- ISO value
To minimize electronic image noise, first set the lowest ISO value (usually ISO 100).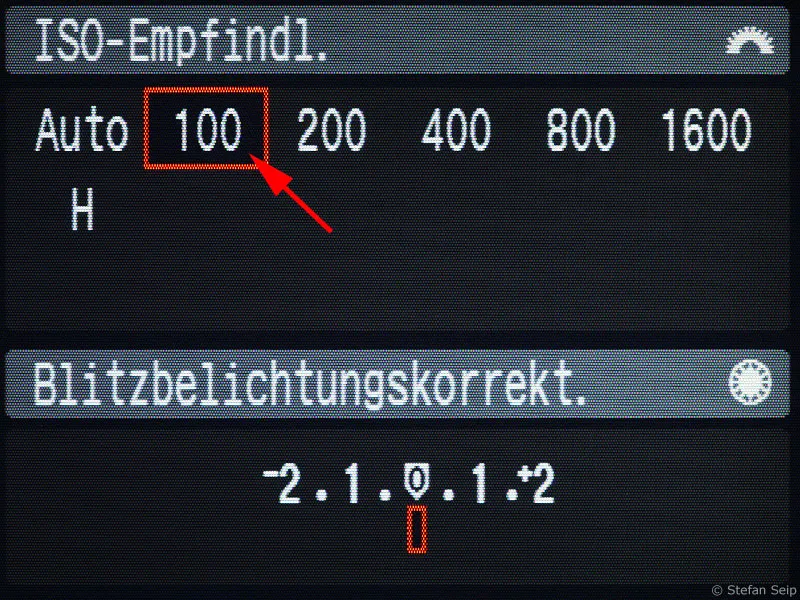
Setting the ISO value 100 on a Canon EOS 40D. Low ISO values mean low image noise.
- White balance
The manual setting for daylight (symbol: sun) has proven to be effective.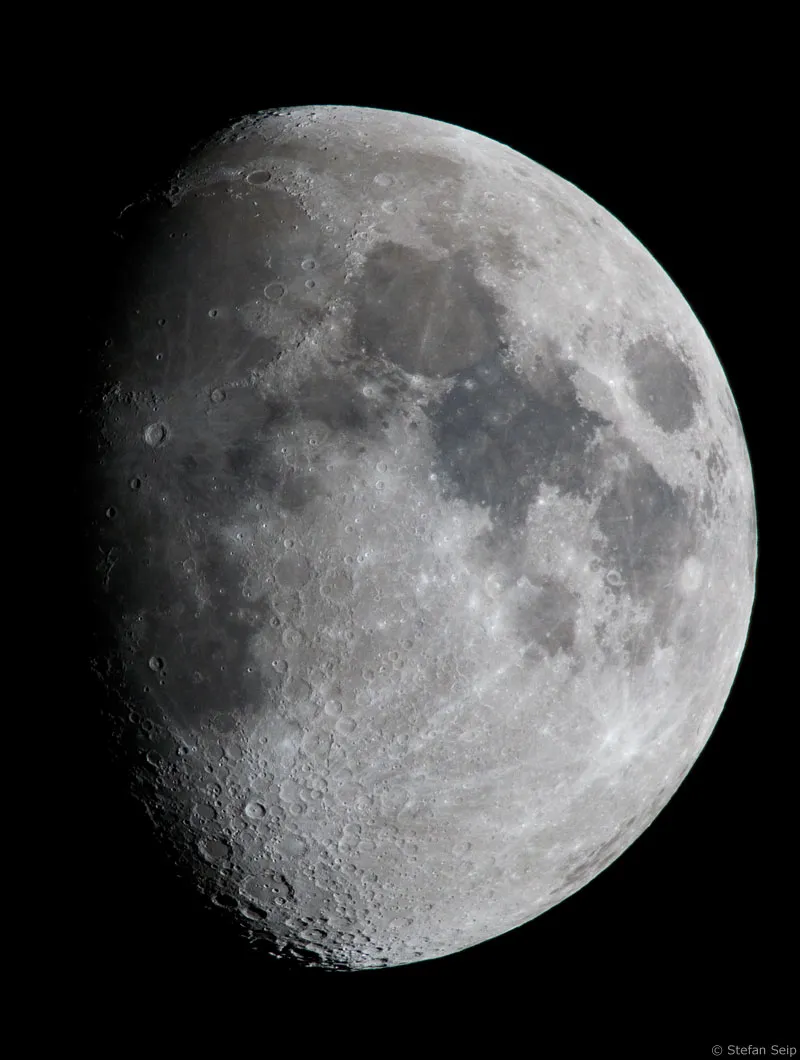
Setting the white balance on a Canon EOS 40D to daylight (5200 Kelvin).
- Exposure program
Select the manual setting (M).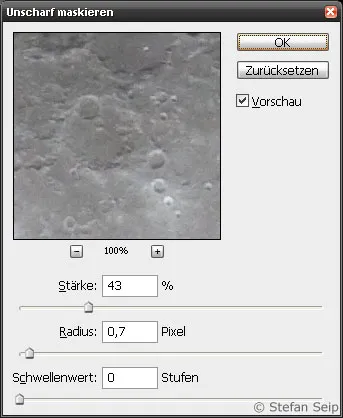
Setting the manual exposure control ("M") on the setting dial of a Canon EOS 40D.
- Blender
The brightness of the moon is so great that you can afford to stop down the lens by one or two stops, starting from the largest possible aperture (i.e. the smallest f-number). The reason for stopping down slightly is the fact that most lenses only reach their maximum image quality in this state.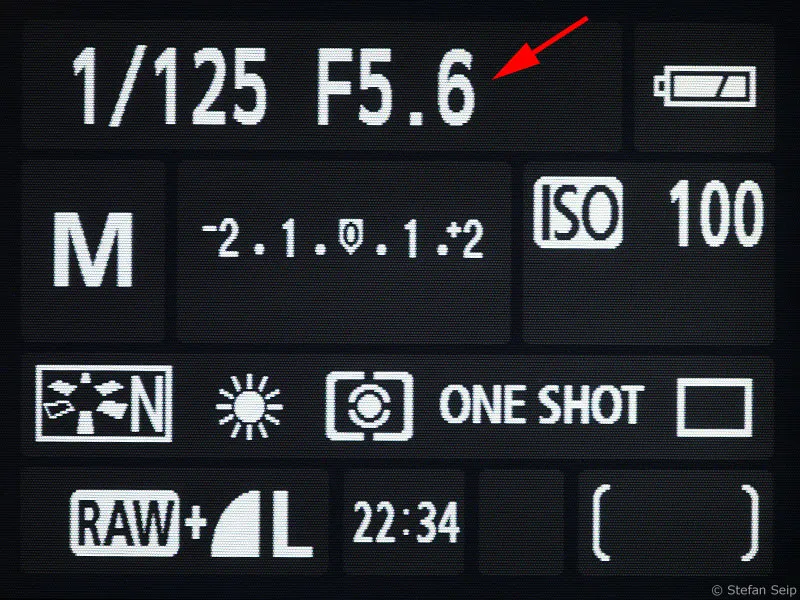
The display of the Canon EOS 40D: The arrow points to the 1:5.6 Blender setting. The lens used has a "light intensity" (smallest adjustable aperture value) of 1:4.0, but has been stopped down one stop to increase the imaging performance.
- Mirror lock
This setting is used to prevent camera shake caused by the camera's mirror. Always make use of this setting when using long focal lengths! The first press of the shutter release button only raises the mirror. Then wait a few seconds before pressing the (cable) release button a second time to start the exposure after the vibrations have subsided.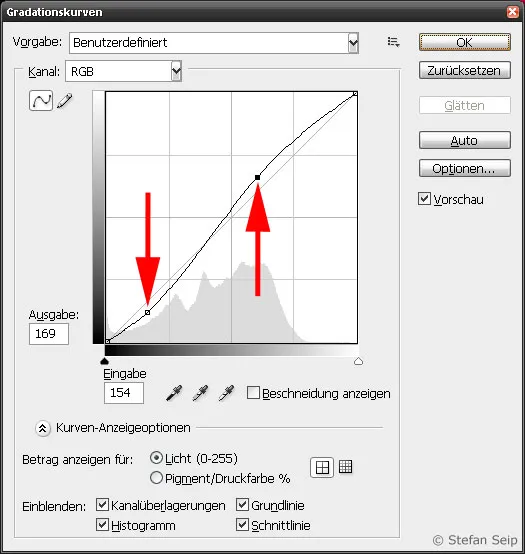
Mirror lock engaged.
- Image stabilizer
It is best to switch off any existing image stabilization mechanism if you are using a tripod.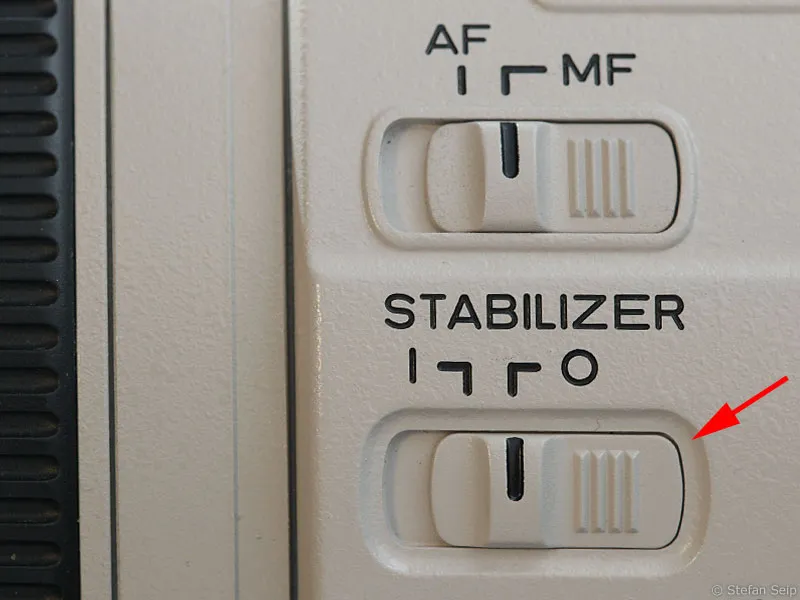
Image stabilizer switched off.
3. taking pictures
First of all, ensure that the focus is exactly at infinity. You can try to use the autofocus for this, as the moon offers enough flat and high-contrast regions.
If the autofocus does not work or no longer works due to the use of a teleconverter, you will have to focus manually. Do this with the greatest possible care, because with long focal lengths the slightest change in focus can make all the difference.
If you own a camera model with "Live View", this task can be completed in no time at all: at the highest magnification level, the live image is assessed on the camera display (or on the screen of a connected laptop). This allows the best focus point to be set quickly and reliably, often even more precisely than the autofocus can.
Camera models with a "live view" function are ideal for focusing, allowing you to aim at a bright star and then focus accurately at high magnification on the camera display.
For cameras without live view, if the autofocus fails, the only thing that can help is a rough focus adjustment in the camera viewfinder and a subsequent series of test shots that can be critically examined on the camera display at maximum magnification.
Now it's all about the right exposure, i.e. choosing the right shutter speed. The following principle applies:
As abundant as possible, but without leading parts of the moon into saturation.
In order to achieve this goal, a camera should - if possible - be configured so that overexposed areas are highlighted by flashing when looking back. This allows them to be easily recognized even if the moon is only depicted relatively small. Here is the corresponding menu entry for a Canon EOS 40D:
If the overexposure warning is switched on, fully saturated areas of the image flash black during review.
The histogram also provides reliable information about the correct exposure. The "mountain of data" represented by the moon must be positioned as far to the right as possible, but without "hitting" the right side.
Example of an underexposed moon photo: The "data mountains" of the histograms are shifted to the left and end at medium brightness values (lower arrow) without utilizing the entire available range (upper arrow). Although such an image can be "rescued" by image processing, this comes at the cost of a significant increase in image noise.
Example of an overexposed moon photo: Here the "mountains of data" hit the right-hand side (red arrows on the right), and the fully saturated image areas also flash black (left arrow). After a moderate overexposure, it may still be possible to repair such areas when converting RAW files, but in the example shown this is no longer possible; the overexposure is too strong for this. In general, overexposure should be avoided at all costs.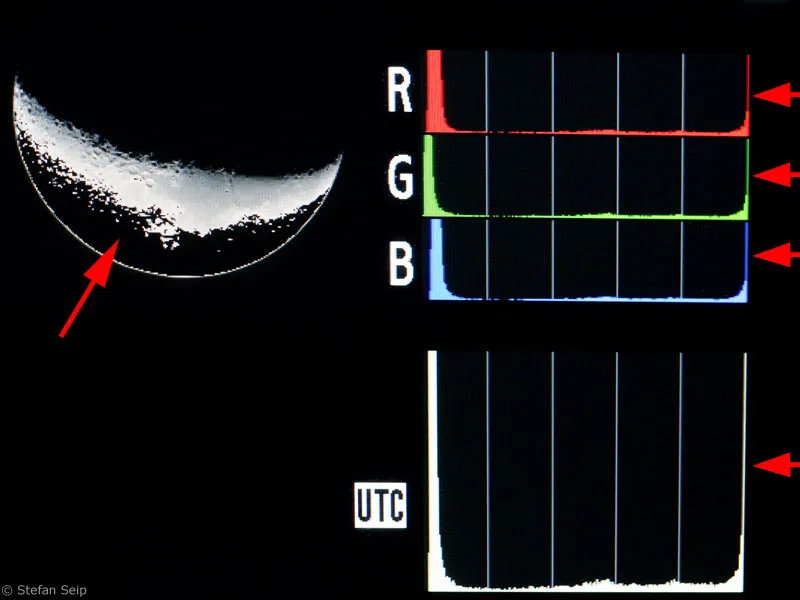
The correctly exposed image shows that the "mountains of data" protrude far to the right without reaching the maximum values of full saturation - no area of the moon's surface is then without structure. The reward for such a balanced exposure is a photo with a good signal-to-noise ratio, i.e. with low image noise. The peak on the far left of the histogram is caused by the proportion of black sky: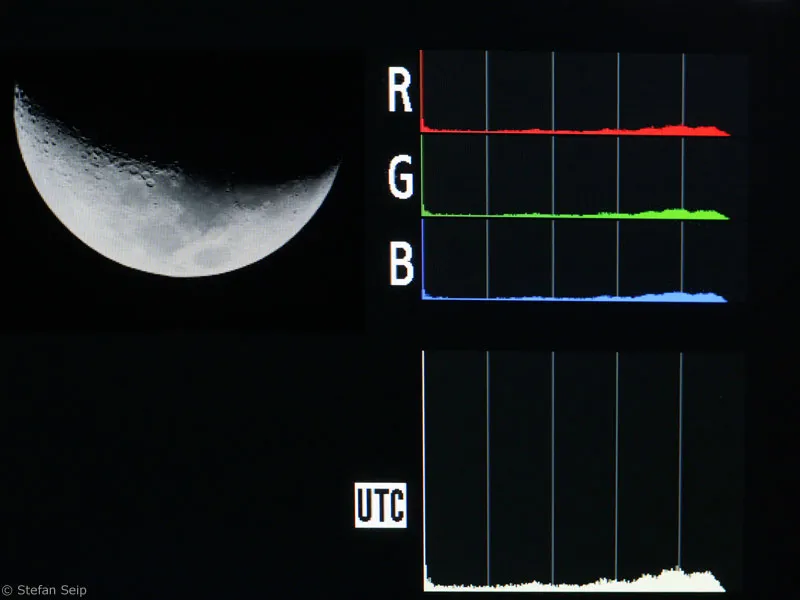
Interpreting the histogram on the camera display can be difficult or even impossible if the moon is only depicted very small and makes up a correspondingly small proportion of the area of the photo.
In practice, a good strategy is to start with short exposure times and then gradually increase the exposure times until you reach the point at which you register overexposure. Then simply reduce the exposure time by one step and you will have reached the optimum.
However, although the moon has an enormous brightness, which normally results in a correspondingly short exposure time, it can happen that the required exposure time is too long when using very long focal lengths and/or low lens speed. If the exposure time is too long, there is a risk of blurred images for two reasons: On the one hand, the risk of air wobbling (seeing) smearing the image increases; on the other hand, the moon also participates in the daily, apparent rotation of the sky. For the best possible sharpness, the following maximum exposure times should not be exceeded:
| Focal length [mm] | Maximum exposure time [s] |
| 100 | 1,5 |
| 200 | 0,7 |
| 500 | 0,3 |
| 1000 | 1/15 |
| 2000 | 1/30 |
| 3000 | 1/45 |
If the required exposure time is above these limits, the ISO value must be increased and/or a larger aperture must be used. A slightly higher image noise and/or a possibly slightly reduced imaging performance of the optics is then preferable to an image that has become blurred due to the movement of the moon.
One way to achieve longer exposure times is to mount the camera on an astronomical mount and follow the rotation of the sky using a motor. What you need for this is discussed in tutorials 9, 10 and 12 of the "Astrophotography and Sky Photography" series. The question of which telescopes are suitable for astrophotography is addressed in tutorial number 13.
Once you are sure of the focus and exposure settings, take a whole series of images. With a single image, there is a high risk that you will catch a moment with poor seeing and the photo will therefore not have the optimum sharpness. You will hardly be able to discover the fine nuances by which the individual shots differ on the camera display, but only later on the PC. The longer the focal length used, the greater the risk of images being spoiled by poor seeing. I have already experienced that even from a series of 50 shots it is possible to find one that is clearly the sharpest!
If you are unsure of the best focus point, you can repeat a series several times, always refocusing between the repetitions.
Important note: Although the mirror lock (see above) prevents camera shake caused by the mirror, it does not prevent camera shake caused by the camera shutter running down. The shutter blades are accelerated enormously when the shutter is released, which in some cases, when using very long focal lengths, can actually lead to blurring. If a more stable tripod is not available, there are only the following remedies: Firstly, you can set the tripod on which the lens is mounted to its lowest height, with any center column fully retracted. This is the most stable position of the tripod. In addition, you can stabilize the tripod legs with weights (sandbags) and hang another weight at the bottom of the center column. Secondly, the camera can be supported by another tripod so that the lens and camera are each on one tripod. However, tracking the moon over time can then become a somewhat laborious task.
Image processing
An important first step is to select the sharpest photo from your series of images. It is best to use the JPG files for this, as they are quicker to open and compare. View one file at a time in Photoshop, always assessing the sharpness in the 100% view ( View>Actual Pixels command ).
One more thing is important: do not limit your assessment of sharpness to one area of the image. Air turbulence (seeing) can cause partial blurring, especially with long focal lengths. In other words, the aim is to find the single shot in a series with the best sharpness over the entire image area.
The focus setting of these two shots is identical! On the left you can see a single image that has become blurred due to the air turbulence. The photo on the right was taken during a moment of good "seeing":
Once you have completed this first step, you are almost there, because there are no more time-consuming or complex image processing steps ahead of you.
First, open the RAW file of the selected moon shot in Photoshop: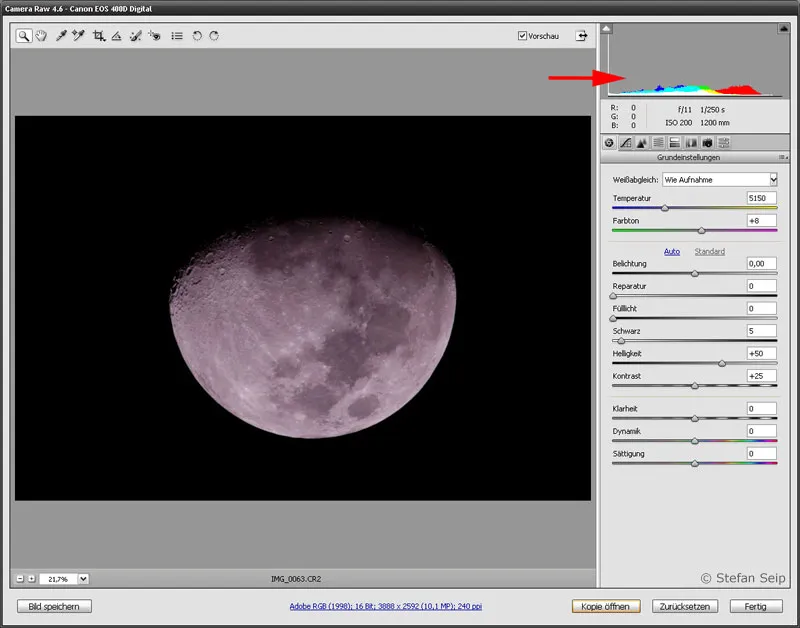
The start screen of Adobe Camera Raw: despite the white balance being set to "Daylight", you will notice a color cast towards red and magenta, which can also be seen in the histogram (arrow).
The color of the moon is rarely exactly matched. However, the RAW format offers the possibility of setting a neutral color without data loss. To do this, click on the pipette (white balance tool) at the top left and then click on an area of medium brightness on the surface of the moon: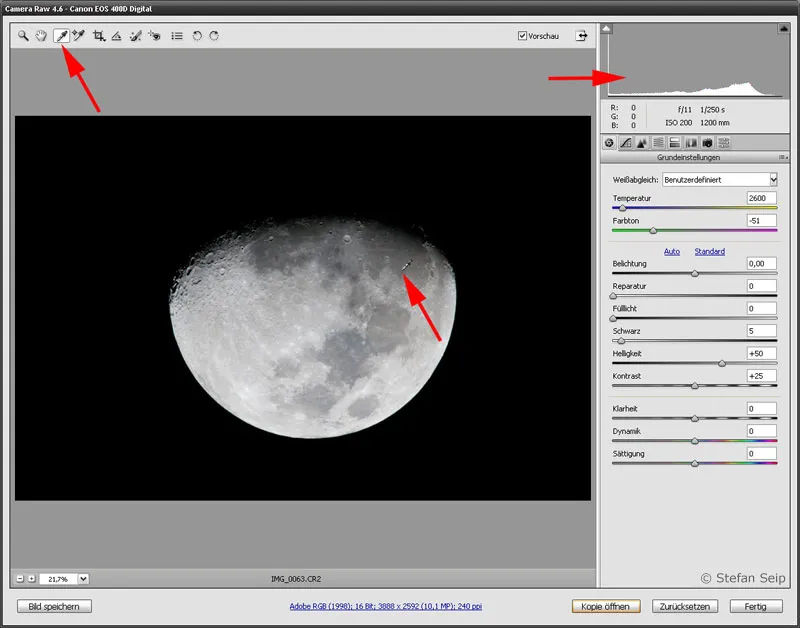
Selecting the white balance tool (upper left arrow) and then clicking on a medium-bright area of the moon (middle arrow) ensures a natural coloration. The red, green and blue components of the histogram then also show a balanced result (top right arrow).
Then open the image with the Open image button.
Depending on the nature of the source file, further improvements can now be made. In my example, I would like to increase the contrast slightly. But be careful: if you do this in the classic way, the moon will "decrease" because the already darker parts of the image along the terminator will be weakened.
To avoid this, I bend the gradation curve (command Image>Adjustments>Gradation Curves...) in the way described below: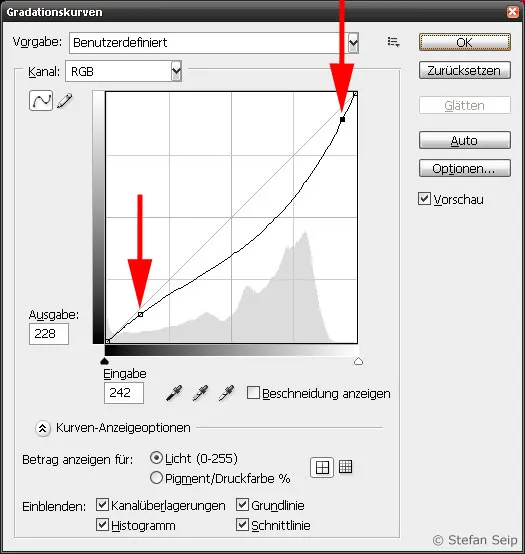
By bending the gradation curve downwards, the image loses brightness (right arrow). A second point (left arrow) ensures that the curve is not lowered in the initial area; this maintains the dark tonal values in the initial state.
The result of this action is an overall lower-contrast but darker image (left before, right after):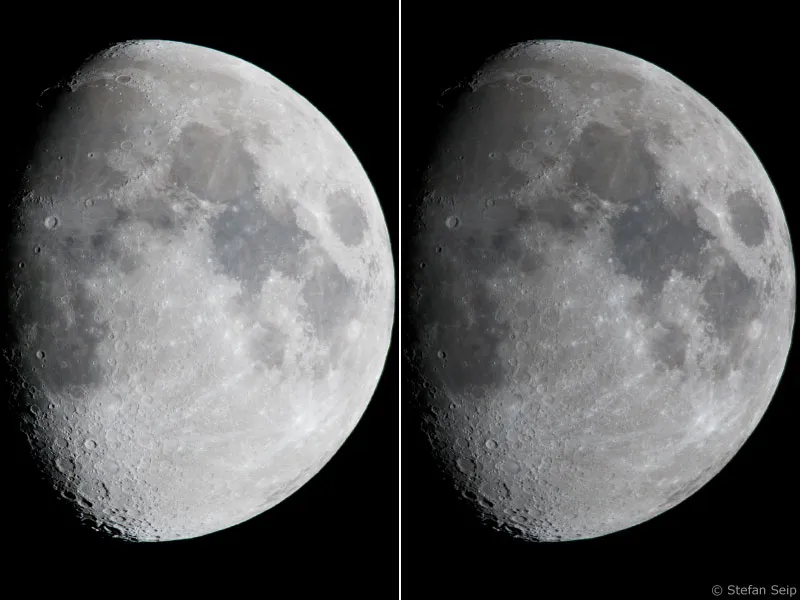
In a second step and with the same command, I now raise the general image contrast.
A slight reduction in the dark tonal values (left arrow) with a simultaneous increase in the upper tonal values (right arrow) results in an increase in contrast:
The image contrast now achieved corresponds to the visual appearance and looks "crisp" (left before, right after).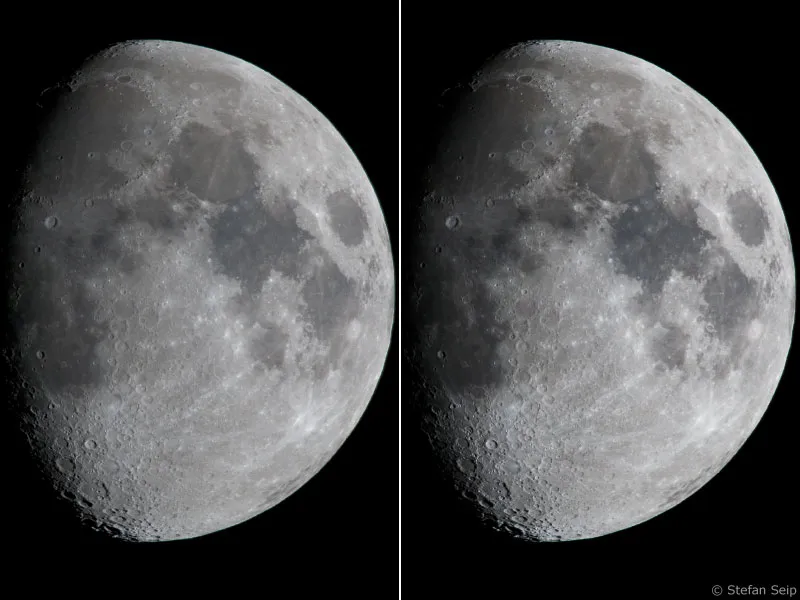
In the last step, you can sharpen your moon shot. To do this, call up the command Filter>Sharpen Filter>Unsharp Mask... in Photoshop:
My image benefited from moderate sharpening with the values visible in this screenshot (Strength: 43%, Radius: 0.7 pixels, Threshold: 0 levels). Which values are optimal depends on the source material; vary the "Strength" and "Radius" values if necessary.
Beware of over-sharpening, which will not make any more details visible, but will instead lead to the formation of artifacts and ultimately to an unnatural-looking result.
This is what the result looks like after oversharpening: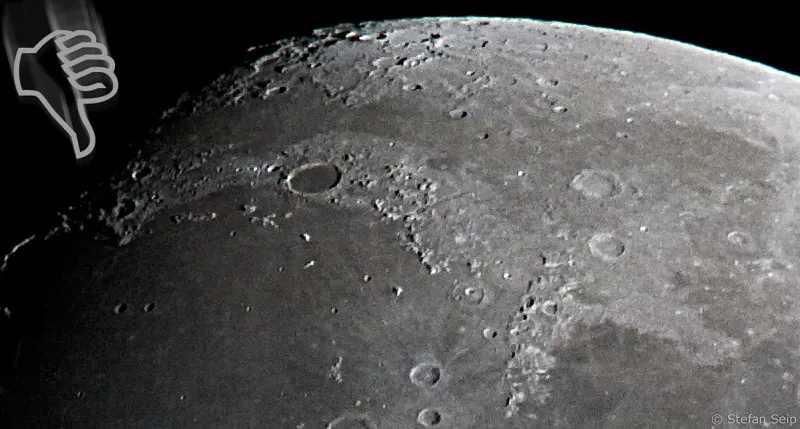
Final, non-oversharpened result after the shot has been cropped and rotated. A Canon EOS 400D, a focal length of 1200 millimeters and a photo tripod were used for the shot. The exposure time at Blender 1:11 and ISO 200 was 1/250 second:
Sample shots
Good advance planning was necessary for this picture. A 300mm lens was combined with a 2x teleconverter to achieve a focal length of 600mm. The exposure time was three seconds at Blender 1:6.7 and ISO 1000. The extremely narrow crescent moon was only 31.5 hours before the new moon position!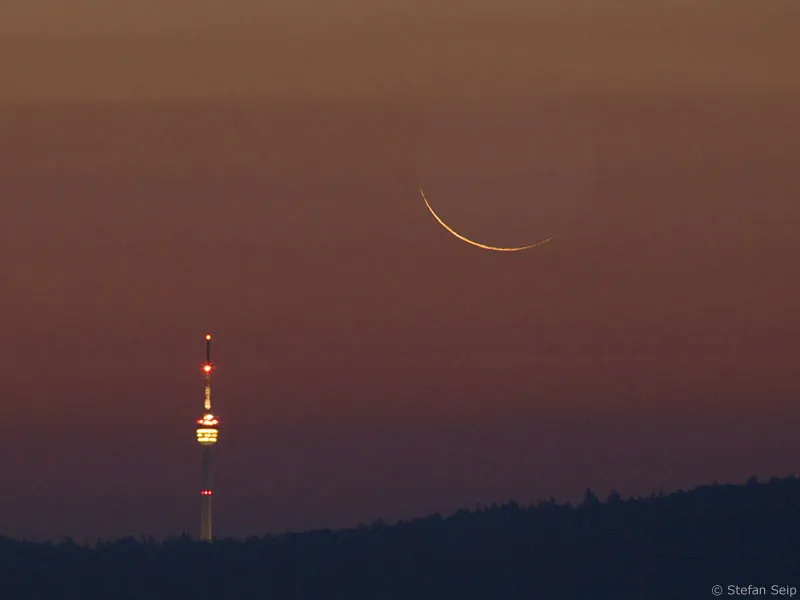
This image of the rising moon in the east was taken through a telescope with a focal length of 1200 millimeters and a focal ratio (aperture) of 1:12. A Canon EOS 20Da was used, which was set to ISO 200 and 1/6 second exposure time. Moonrises and moonsets show the same colors as those of the sun, but these colors are not as visible to the eye.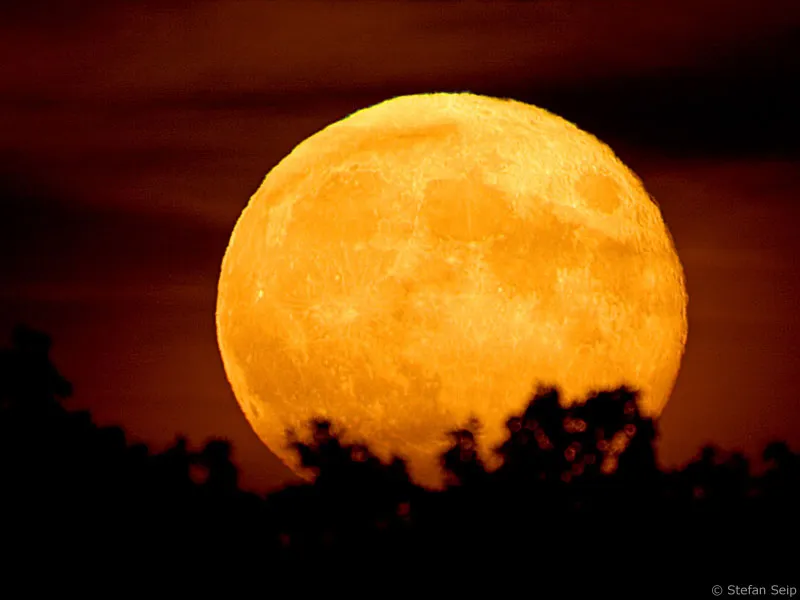
More than 6 months of planning led to this photo of the rising full moon behind the Stuttgart TV tower from a viewing hill about 11 kilometers away from the TV tower. A focal length of 600mm was sufficient and a full-frame camera was used.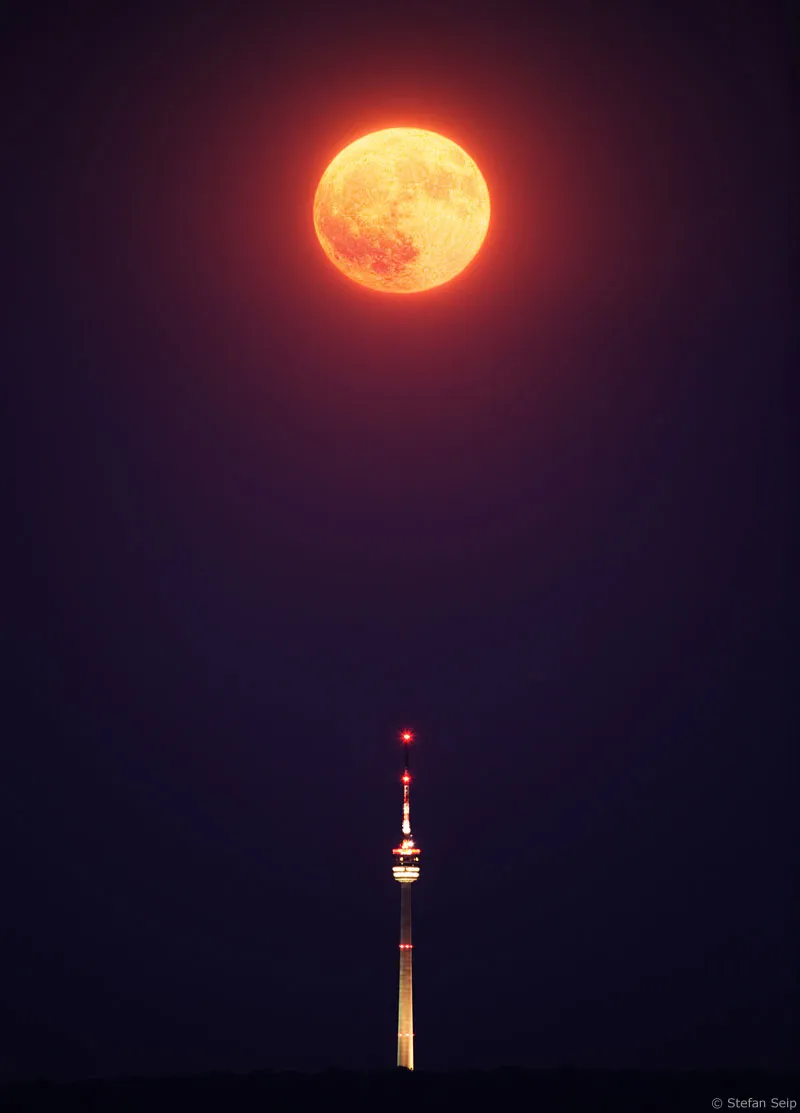
This picture can be considered a stroke of luck. I actually wanted to capture the narrow crescent moon 34 hours and 18 minutes after new moon. The sun was only 3 degrees below the horizon, so its golden light still reached the contrail of a high-flying airplane. Canon EOS 20D, ISO 100, 1/60 second, 1085mm focal length (astronomical telescope), Blender 1:7.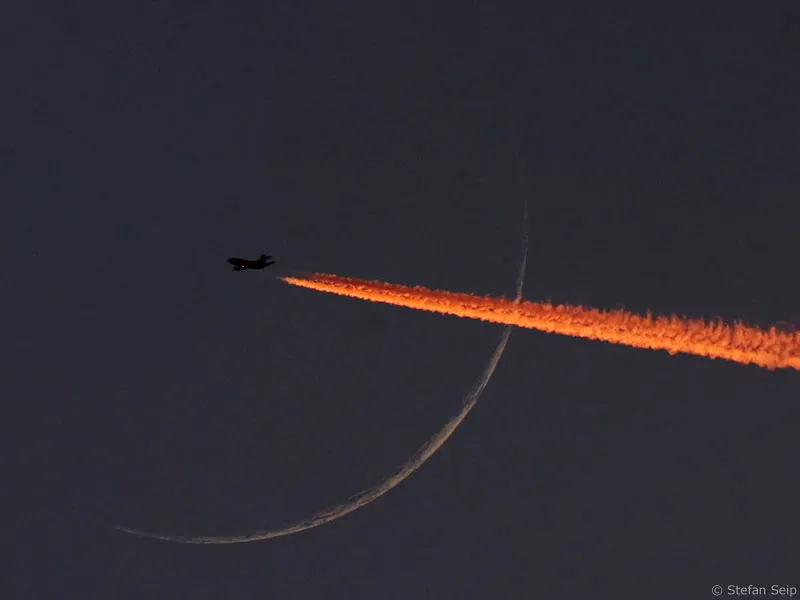
A photograph of the waxing moon taken on June 9, 2008 with a Canon EOS 450D. The exposure was 1/20 second at ISO 400. An astronomical telescope was used as the optical system, the primary focal length of which was extended to 1200mm using a 2x Barlow lens: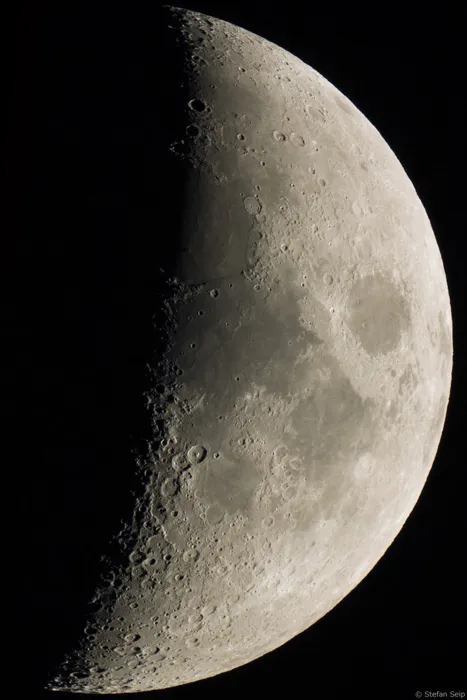
The almost full moon on November 14, 2008. Compared to other moon phases, only a few craters are visible. The focal length was 1200mm, the Blender 1:11 and the exposure time 1/90 second at ISO 100. The camera was mounted on a normal photo tripod.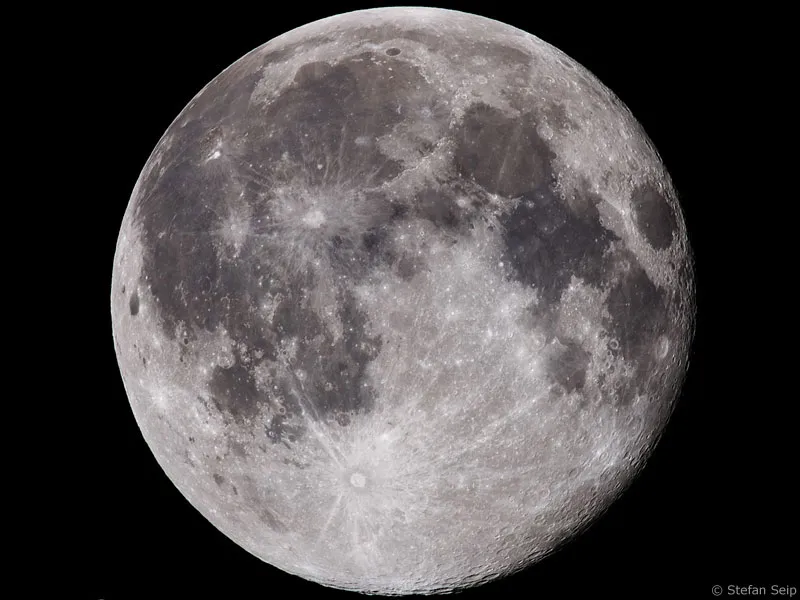
The same shot as the previous one, only I increased the color saturation far beyond the usual level. Are these moon colors real? Compare the photo with the one on the website http://antwrp.gsfc.nasa.gov/apod/ap020316.html of a space probe, and you will discover a certain correspondence! Either way, it's always an interesting experiment!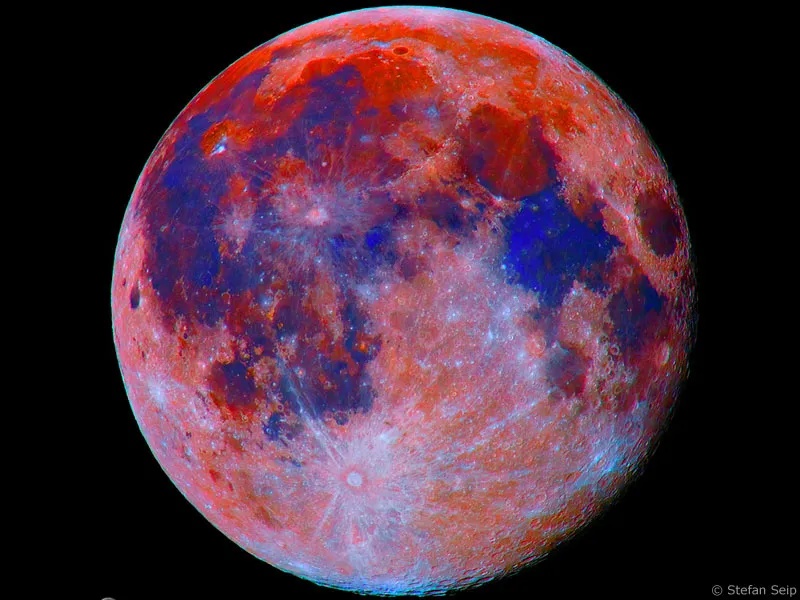
Extremely long focal lengths are required for such detailed images, in this case 9000 millimeters! Only a powerful astronomical telescope can offer this, as the focal ratio was still 1:10. A Canon EOS 40D was used as the camera, at ISO 400 and 1/45 second exposure time. The telescope tracked the movement of the moon. You can see a section of the "Mare Serenitatis" with faults. The largest crater in the image is called "Posidonius" with a real diameter of 100 kilometers. The conspicuous crater on the left edge of the image is "Plinius" with a diameter of 43 kilometers.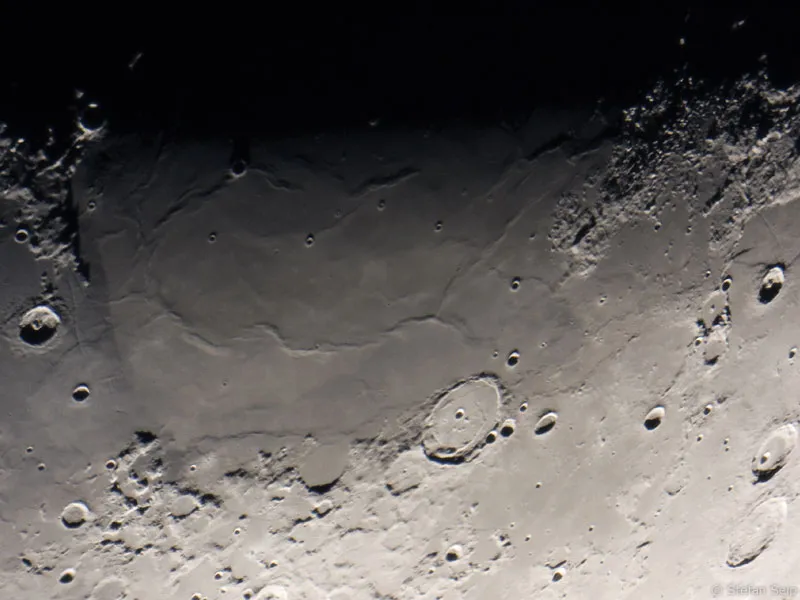
Note on our own behalf:
All image examples used were created in the manner described in the tutorial.
Continue with part 6: "Be careful with photos of the sun".
