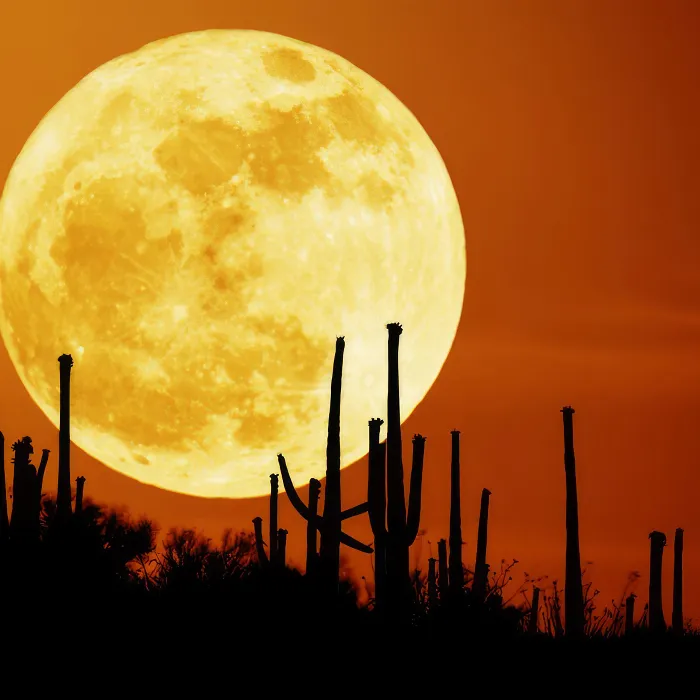
The full moon does not darken completely when it dips into the Earth's umbra. It then often shines pale in a copper-red color.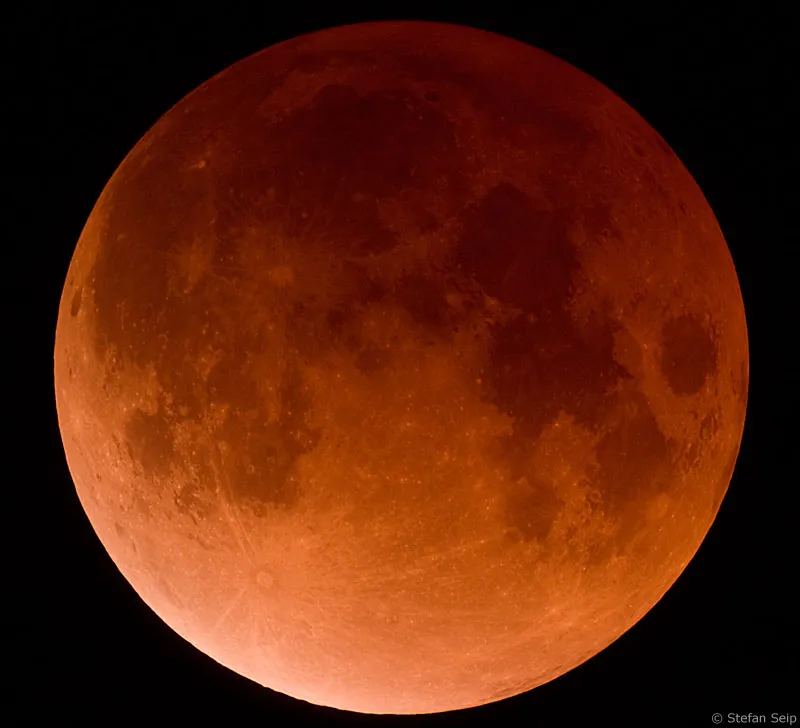
Part 7: Lunar eclipses
A lunar eclipse occurs when the moon passes through the Earth's shadow. This can only take place if the sun, earth and moon are exactly in line with each other. This makes it clear that a lunar eclipse is only possible during the phase of the full moon.
Although a full moon is reached in the interval of 29 days, 12 hours and 44 minutes, a lunar eclipse does not always occur because the moon's orbit is inclined by about 5 degrees to the plane of the Earth's orbit. This means that in many cases the full moon passes either north or south of the Earth's shadow without an eclipse occurring. It is only when it crosses the Earth's orbital plane from north to south or from south to north on its inclined path and it is also a full moon that it is struck by the Earth's shadow. These points in the moon's orbit are called 'dragon points' because in ancient China, when a lunar eclipse occurred, it was believed that a dragon was trying to devour the moon.
Lunar and solar eclipses recur at certain intervals. The best known is the so-called Saros cycle, according to which the relative position of the sun and moon is the same every 18 years and 10.3 or 11.3 days (depending on whether there are five or six leap years in between). This was already known to the Chaldeans in ancient Babylonia (approx. 750 years before the beginning of our era), although not all eclipses in such a series can be seen from one point on Earth. Fortunately, several Saron periods run parallel to each other, so we don't have to wait 18 years for an eclipse.
Globally, solar eclipses (see tutorial number 8 of the "Astro and Sky Photography" series) are more common than lunar eclipses. However, when looking at a location on Earth, observable lunar eclipses are more common because a lunar eclipse can be seen from the entire half of the Earth where the Moon is above the horizon, whereas a solar eclipse can only be followed in a limited corridor that is swept by the Moon's shadow. In the last century, there were 228 solar eclipses, but only 147 lunar eclipses.
There are three different types of lunar eclipse: The penumbral, partial and total lunar eclipse. Let's first take a look at the following diagram, which illustrates how a lunar eclipse occurs: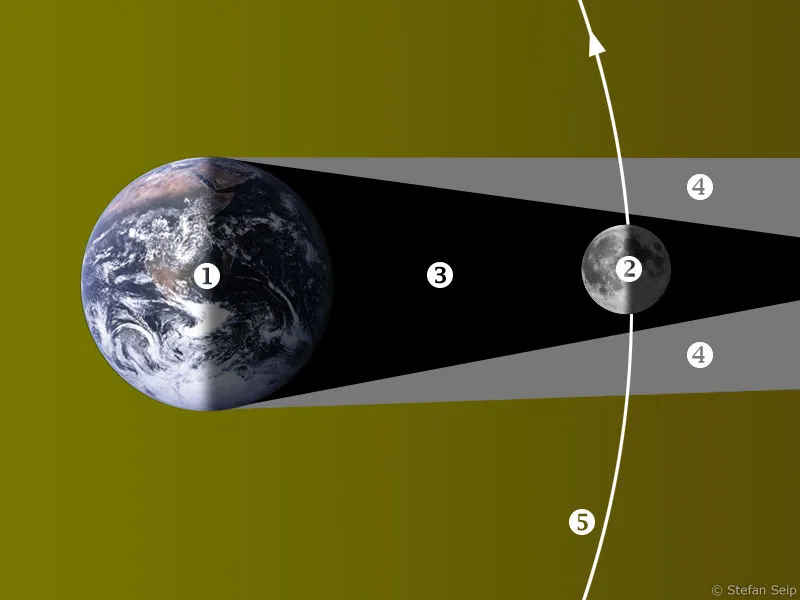
Diagram of the formation of a lunar eclipse. (1) is the earth, (2) the moon and (5) the moon's orbit around the earth. The sunlight enters exactly from the left and creates an umbra (3) and a penumbra (4). The distances, sizes and angles are not to scale. A photo of the Earth was used (© NASA).
The penumbra occurs because the sun is not a point source of light, but has an extension. The sun can no longer be seen from areas in the umbra, as it is completely covered by the earth, while in the penumbra the sun is only partially covered by the earth.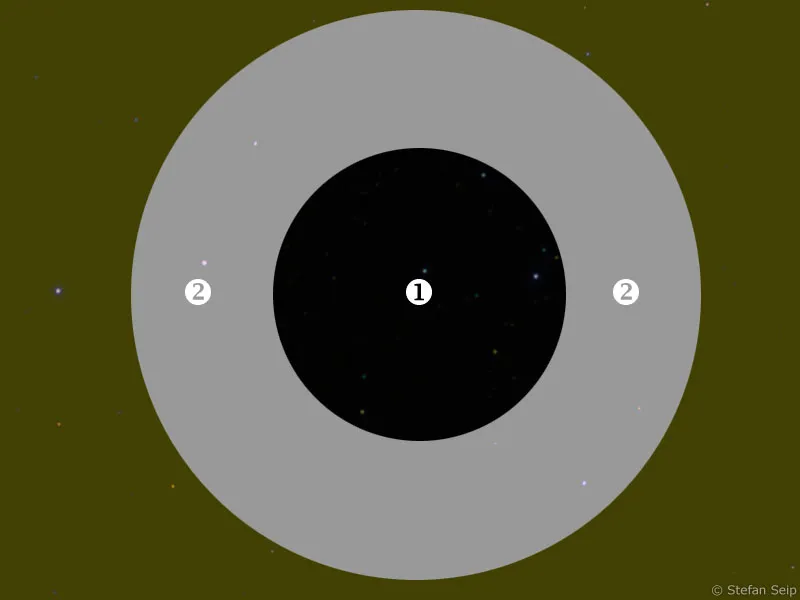
Seen from Earth, the umbra and penumbra look like this at the distance of the moon: Surrounded by a ring of penumbra (2), the umbra represents a circular area (1). This is a diagram, because these shadow boundaries are of course invisible in the sky. Only a lunar eclipse makes them visible in sections! The proportions are not to scale.
Depending on the position of the moon's orbit within this shadow play, one of the following three cases can occur: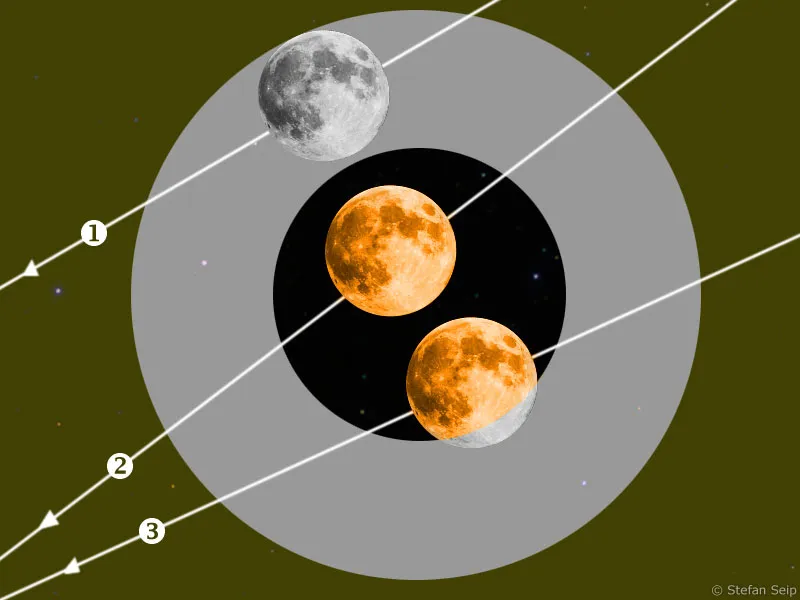
Graphic illustrating a penumbral eclipse (1), a total lunar eclipse (2) and a partial lunar eclipse (3).
Penumbral eclipse
The moon only passes through the penumbra on its orbit around the earth. Such an eclipse is difficult to observe as the full moon only darkens a little. It is practically impossible to see with the naked eye because the darkening is only minimal. At best, when the moon comes very close to the umbra cone, a minimal darkening can be seen on the side closest to the umbra.
Total lunar eclipse
The moon is completely immersed in the Earth's umbra.
Partial lunar eclipse
The moon dips into the Earth's umbra, but not completely at any time, so that part of the moon is not in the umbra but in the penumbra.
As the moon moves through the Earth's shadow along the lines drawn in white, a total lunar eclipse also begins and ends with a penumbral and a partial phase. And a partial lunar eclipse also starts and ends with a penumbral eclipse.
If the moon is completely immersed in the Earth's umbra, it does not disappear completely, but appears in the sky in a mysterious, copper-red or brownish color. The peak of a total lunar eclipse is then reached - an impressive sight! The red coloration during totality is caused by the Earth's atmosphere. On the one hand, it acts like a prism and refracts the blue parts of the white sunlight more strongly than the red. However, the eclipsed moon does not appear blue because, on the other hand, the blue components of dust particles and air molecules are scattered and absorbed much more strongly than the red ones. For the same reason, an unclouded sky appears blue. As a result of attenuation and scattering, less blue light and more red light reaches the moon in the umbra. How bright the totally eclipsed moon appears in the sky and what exact color it has cannot be predicted, but depends on the current state of the Earth's atmosphere. For example, very dark lunar eclipses can be expected after major volcanic eruptions and the associated enrichment of the atmosphere with dust. Another effect of the Earth's atmosphere is that the edge of the umbra does not form a sharp line, making it difficult to determine the exact time of entry into and exit from the umbra to the second.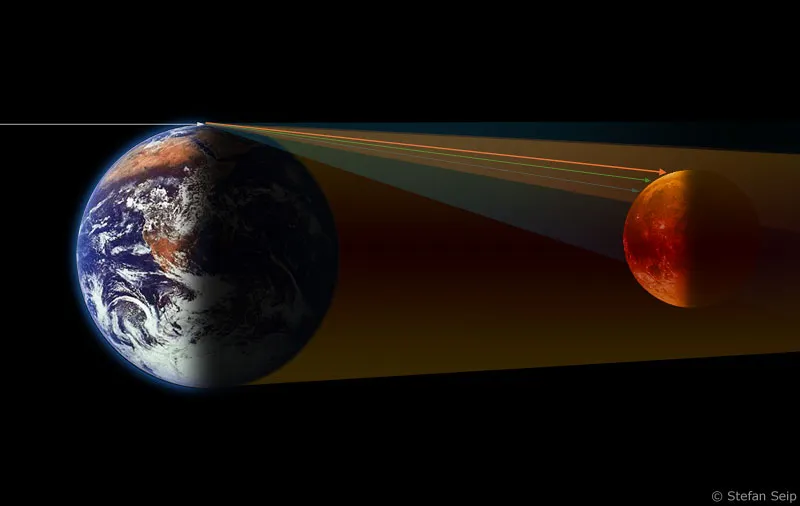
Diagram showing the formation of the red coloration of the full moon during a total lunar eclipse. Details can be found in the text. A photo of the Earth was used (© NASA).
Another interesting aspect of the cosmic shadow play of a total lunar eclipse is the idea of what you would see if you were not on Earth but on the moon. An observer on the moon would see the black (new) earth in the sky, due to the moon's lack of atmosphere in the middle of the starry sky, and surrounded by a bright red to reddish-brown glowing corona. If the Sun were not centrally located behind the Earth, the ring would have an asymmetrical appearance with a maximum brightness at the point where the Sun is closest to the edge of the Earth.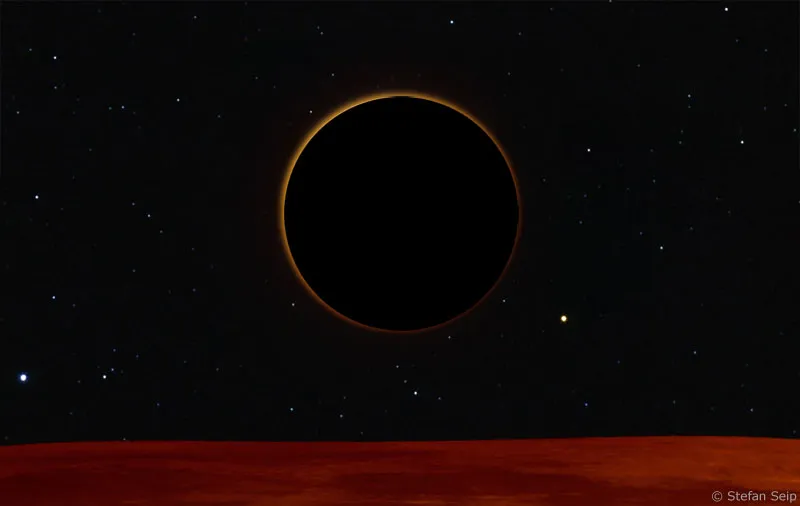
Schematic simulation of the view of a total lunar eclipse from the perspective of an observer on the moon. Details can be found in the text.
The duration of totality, while the Moon is completely in the Earth's umbra, varies from eclipse to eclipse and depends primarily on whether the Moon passes centrally or only through the edge of the umbra. In the case of a central crossing, the maximum duration of totality is one hour and 45 minutes. If the partial phase of such an eclipse is added, the duration is 3.5 hours. Including the penumbral eclipse, the eclipse even lasts six hours.
Total and partial lunar eclipses are particularly productive from a photographic point of view, while penumbral eclipses only attract a small amount of attention.
The following table lists all lunar eclipses observable from Germany up to the year 2025:
Date | Time | Type of lunar eclipse | Remarks | Subject |
| 9.2.2009 | 15:38 CET | penumbral, partial | Moon only above the horizon at the end of the eclipse | - |
| 6.8.2009 | 02:39 CEST | Partial penumbra | Very inconspicuous | - |
| 31.12.2009 | 20:23 CET | Partial | Low degree of eclipse | o |
| 21.12.2010 | 09:16 CET | Total | Moon sets before totality begins | o |
| 15.6.2011 | 22:13 CEST | Total | Moon rises totally eclipsed | o |
| 10.12.2011 | 15:32 CET | Totality | Moon rises only after the end of totality | o |
| 28.11.2012 | 15:30 CET | Penumbra | Moon only above the horizon at the end of the eclipse | - |
| 25.4.2013 | 22:07 CEST | Partial | Entry into the umbra after moonrise | o |
| 19.10.2013 | 01:50 CEST | Penumbra | Inconspicuous | o |
| 28.9.2015 | 04:47 CEST | Total | Passage of the umbra completely visible | + |
| 16.9.2016 | 20:54 CEST | Penumbra | Inconspicuous | - |
| 11.2.2017 | 01:44 CEST | Penumbra | Inconspicuous | - |
| 7.8.2017 | 20:20 CEST | Partial | Moon rises partially eclipsed | o |
| 27.7.2018 | 22:22 CEST | Total | Totality and exit from the umbra completely visible | + |
| 21.1.2019 | 06:12 CEST | Totality | Passage of the umbra completely visible | + |
| 16.7.2019 | 23:31 CEST | Partial | Entry into the umbra after moonrise | o |
| 10.1.2020 | 20:10 CET | Penumbra | Inconspicuous | o |
| 28.10.2023 | 21:14 CET | Partial | Complete course visible | o |
| 18.9.2024 | 4:44 CEST | Partial | Complete course visible | o |
| 14.3.2025 | 7:58 CET | Total | Moon rises totally eclipsed | o |
| 7.9.2025 | 20:11 CEST | Total | Moon rises totally eclipsed | o |
The table contains a column to rate the suitability as a photo motif. "+" stands for good, "o" for average and "-" for unsuitable.
A glance at the table shows that bleak times have dawned for lunar eclipse hunters in Germany. The next total lunar eclipse that can be followed in its entirety (in relation to the umbra passage) will not take place until September 28, 2015. A view of the totally eclipsed moon with the opportunity to take a photo of it will not be available in this country until June 15, 2011 at the earliest, when the moon will rise as it reaches the totality phase and will have reached an altitude of at least ten degrees at the end of totality, 100 minutes later.
If you are prepared to travel, you will have the opportunity to photograph a total lunar eclipse in its entirety on December 21, 2010 at the earliest. The destination should be in the west, for example on the American continent.
So until the next lunar eclipse, there will be plenty of opportunity to optimize your own photographic technique to such an extent that nothing has to be left to chance at the time of the eclipse.
The last ten years looked far more favorable. Total lunar eclipses could be observed in their complete course from Germany on the following nights: 21.01.1999, 9.1.2001, 9.11.2003, 28.10.2004, 3.3.2007 and on 21.2.2008.
Photography of lunar eclipses
Long focal lengths are required to image the moon large and in great detail. The image size of the full moon on the sensor of your camera is calculated as a first approximation using the formula
Focal length [mm] divided by 110.
With a lens focal length of 300 millimetres, the moon is therefore only 2.7 millimetres in size; with a focal length of 1000 millimetres, it is 9.1 millimetres. Conversely, this formula can also be used to determine the focal length to be used in order to capture the full moon as full as possible: For a camera with a crop factor of 1.6x, this results in a focal length of around 1500 millimetres and for full-frame cameras with a 24x36 millimetre sensor, the required focal length is even 2500 millimetres!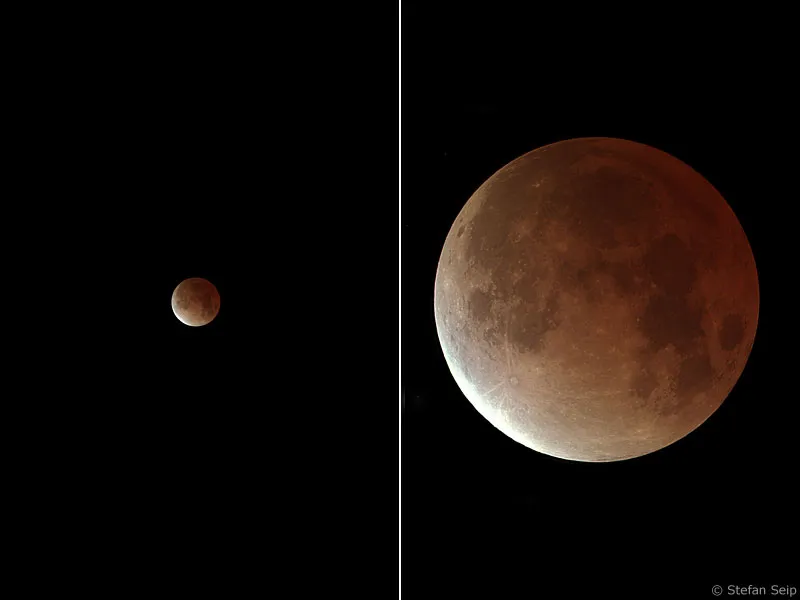
Size comparison: The eclipsed moon on the left with 300mm, on the right with 2000mm focal length. The camera used was an SLR with a 24x36mm sensor ("full format"). Both photos were not cropped.
If such long focal lengths are not available as a lens, an astronomical telescope is often the cheapest solution. An SLR camera can be connected to it if the telescope has an eyepiece connection with a two-inch diameter. Then you only need a so-called T2 adapter and a 2-inch connection sleeve. Both parts are purely mechanical, do not contain any optics and are therefore available at affordable prices. The camera is attached to the telescope instead of an eyepiece, while the optics of the telescope serve as the receiving optics. This type of configuration is also referred to as focal photography - the focal length of the telescope is also the effective focal length.
There are optical components for both lenses and telescopes that extend the effective focal length. In the case of lenses, these are teleconverters that are mounted between the camera and lens and extend the focal length by a factor of 1.4 or 2, depending on the model. Converters with an extension factor of 1.4 lose a full f-stop of light, i.e. you have to expose twice as long as without the converter. Converters with an extension factor of 2 even lose two f-stops and the exposure time is quadrupled. There are similar systems for telescopes, only they are called "Barlow lenses", which are offered with extension factors of 1.5x to 5x.
Remember, however, that all options for extending the focal length almost inevitably result in an impairment of the general image quality, because any imaging errors in the optics are of course also affected by the "magnification". With photo lenses, you can stop down the lens by one or two f-stops to mitigate this negative effect. It becomes particularly critical if you use two teleconverters at the same time. This only works well if the lens already has an exceptionally good image quality and the teleconverters are also excellently manufactured, perhaps even matched to the lens. The combination of zoom lenses with teleconverters is also critical, because many of these lenses are already working at their performance limit even without a converter, and enlarging the image with a converter will not reveal any additional details. Only very high-quality zoom lenses are not affected by this limitation.
Far left the T2 adapter with Canon EOS bayonet, in the middle the 2-inch connection sleeve: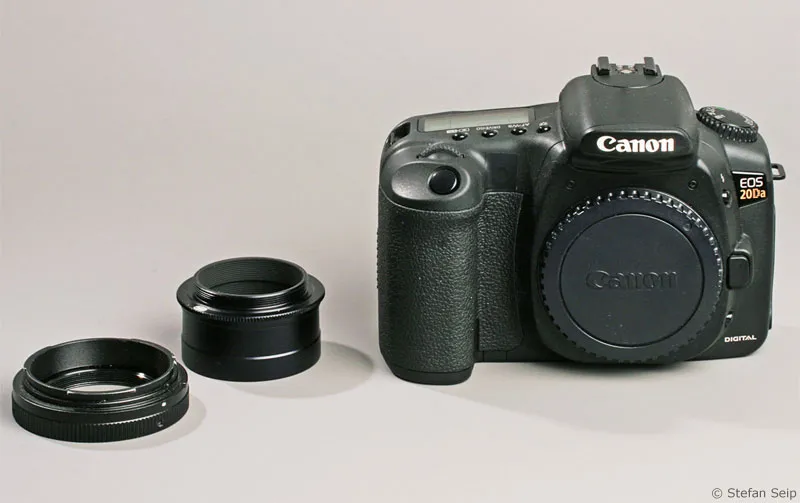
Digital SLR camera with mounted T2 adapter and screwed-in 2-inch connection sleeve. Neither part contains any lenses.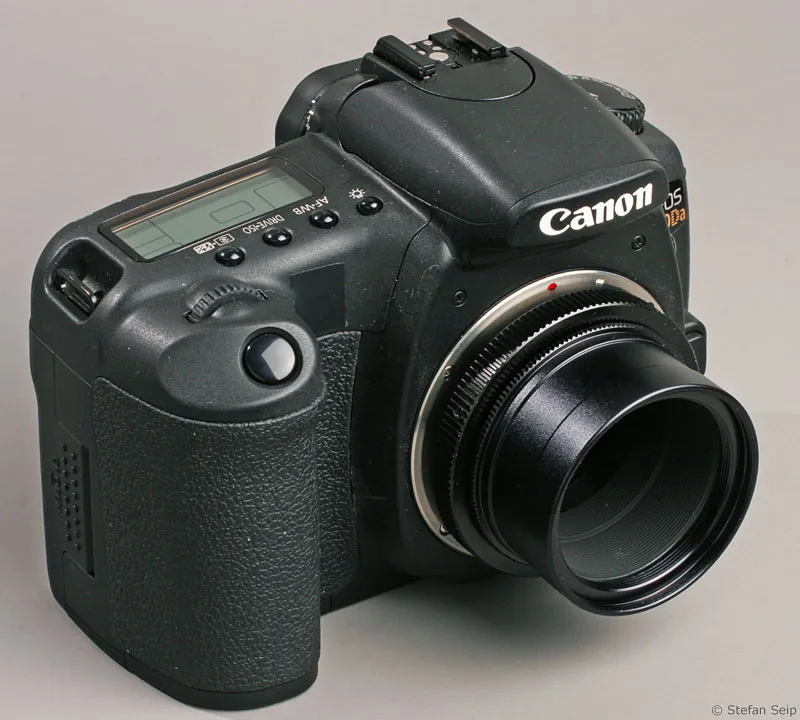
The 2-inch connection sleeve fits exactly into the focuser of most telescopes.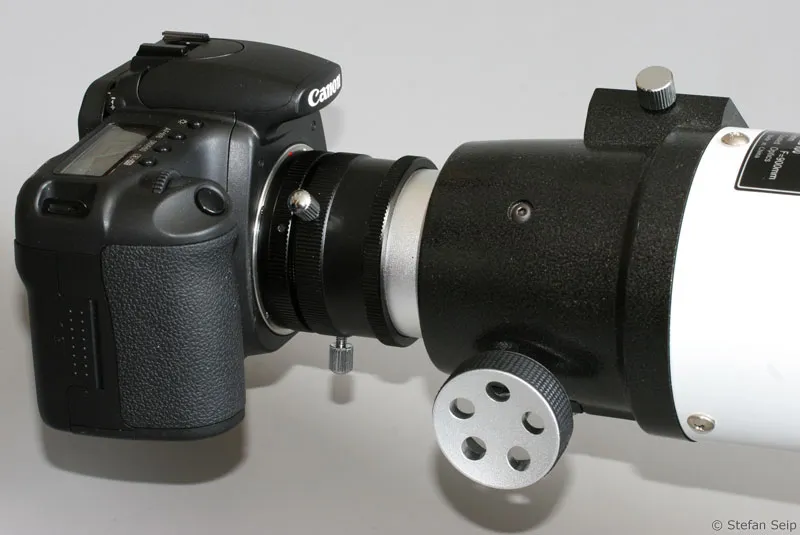
At this point, I would like to describe three different scenarios for photographically capturing a lunar eclipse. There are also other creative approaches, a few of which can be found in the "Example shots" section.
- Partially eclipsed moon
- Totally eclipsed moon
- Documentation of the course of the eclipse using a collage
All three cases are described below.
Partially eclipsed moon
The moon is considered partially eclipsed when part of the moon's surface is already in the Earth's umbra, while the remaining part still receives direct sunlight. During the course of a partial lunar eclipse, this condition is observed for the entire duration of the eclipse, with the exception of the penumbral phase. A total eclipse does not occur at any time. During a total lunar eclipse, the moon is partially eclipsed before and after the totality phase.
In principle, the partially eclipsed moon can be photographed with exactly the same technique and the same settings as the uneclipsed moon in its various phases. Although there are no craters at the light-shadow boundary during the eclipse in the "half moon" phase, as is the case with a "real" half moon, because the light still falls on the moon from the front, the photographic technique is not affected by this.
This also means that completely normal moon phases can be used to obtain practice shots for an upcoming eclipse. Photographing the moon in its various phases is therefore an ideal way of preparing for an eclipse night during the partial phase to avoid mistakes. For all the details, please refer to tutorial part 5 of the series "Astrophotography and Sky Photography" ("Photographing the Moon").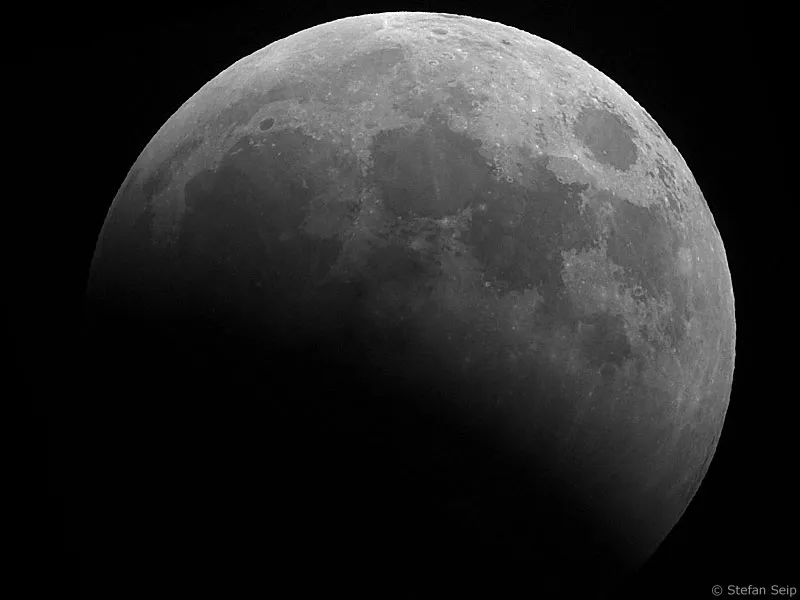
Partially eclipsed moon; almost half of the moon's globe is already in the Earth's umbra. The fact that no craters are visible at the light-shadow boundary on the moon distinguishes this image from a photo of a normal moon phase and proves that it was taken during an eclipse, namely on May 16, 2003 at 4:30 CEST.
In order to document the progressing eclipse with several images, you should retain the exposure settings once selected for all images, as the surface brightness of the still bright areas of the moon does not change or changes only insignificantly, regardless of whether the full moon that has not yet been eclipsed or a narrow "crescent" is photographed shortly before or after the total eclipse. The exposure only needs to be adjusted if rising or receding high fog or a strongly falling or rising height above the horizon has an influence on the brightness of the moon.
Important: If you want to photograph the beginning of an eclipse, it is best to start your series of images 45 minutes before the calculated entry into the umbra so that the first images always show a completely normal full moon. At the end of an eclipse, the series of images should be continued for 45 minutes after the calculated end of the eclipse. The reason for this is the extremely blurred edge of the umbra, which causes the full moon to darken slightly to the side long before the calculated start/end of an eclipse.
Tip: Even if parts of the moon's surface are still in sunlight, experiments with significantly longer exposure times can be worthwhile. This can make it possible to make the regions already in the umbra visible and show their reddish coloration. Overexposure of the areas that are not yet eclipsed must then be accepted.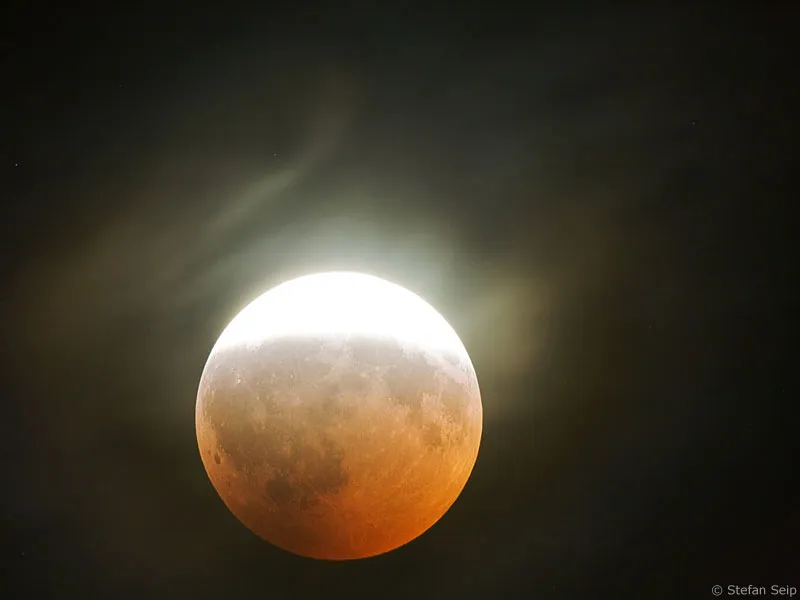
In this image of the partially eclipsed moon, the exposure was not on the bright region of the moon's surface, but on the dark part that is already in the umbra. The veil clouds do not interfere, but enhance the image. August 16, 2008, 23:02 CEST, 1200mm focal length at Blender 1:8, 2 seconds exposure time at ISO 1600.
The following animation clearly shows how different the photos look when the exposure time is varied during the partial eclipse:
http://www.astromeeting.de/moon/080816MoFi3.gif
The individual photos for this animation were all taken on August 16, 2008 at 23:14 CEST in immediate succession. At ISO 1600, the exposure time was varied between 1/20 second and a full 6 seconds.
Totally eclipsed moon
Once the moon is fully immersed in the Earth's umbra, its luminosity decreases so much that the exposure time and/or the ISO value must be drastically increased. It is not possible to say in general terms which exposure is the right one, because a lot depends on the depth of the moon's penetration into the umbra, the height of the moon above the horizon, the weather conditions and, last but not least, the unpredictable amount of residual light that still reaches the moon.
An approximate guide value is an exposure time of 4 seconds at ISO 800 and an aperture of 1:11.
This means that the exposure times are so long that the apparent movement of the moon in the sky can result in a blurred photo if the camera is mounted on a tripod and does not follow the rotation of the sky. The following table shows the maximum permissible exposure times per focal length with which sharp photos can be taken without tracking:
Focal length [mm] | Maximum exposure time [s] |
| 100 | 1,5 |
| 200 | 0,7 |
| 500 | 0,3 |
| 1000 | 1/15 |
| 2000 | 1/30 |
| 3000 | 1/45 |
The table shows that the 4-second exposure time in the above example without tracking results in a blurred image of the totally eclipsed moon. If we increase the ISO value to 3200 (gain: 2 stops) and the Blender to 1:5.6 (gain: also two stops), we end up with ¼ second instead of 4, which is just about sufficient for focal lengths up to 500 millimetres. However, a lens with a focal length of 500 millimetres at an aperture of 1:5.6 (or a telescope with these data) is already a considerable piece of technology.
For sharp images with long focal lengths, an astronomical mount that tracks the movement of the moon is therefore essential. The handling of such a mount is described in detail in part 9 of this tutorial series "Astrophotography and Sky Photography".
Exposing the totally eclipsed moon can cause problems, as it is an almost monochrome subject that can cause problems for the camera's automatic white balance and the light meter.
The following settings are therefore highly recommended:
- Exposure program: Manual ("M")
- White balance: Daylight, "Sun" symbol, 5200 K
- File format: RAW, to correct the white balance later if necessary
Exposure is particularly tricky, as you have to be very careful not to overexpose the red channel. The camera's automatic exposure system fails in this respect, as the red channel receives a lot of signal, while the blue and green channels drop off sharply. The automatic system would strive for a "compromise" and accept the overexposure of the red channel. It is therefore important to work with the manual exposure setting and to check the results immediately after taking the picture. The histograms of the three color channels must be assessed separately, which is only possible with some cameras if you make a corresponding configuration and switch the histogram display from "Brightness" to "RGB":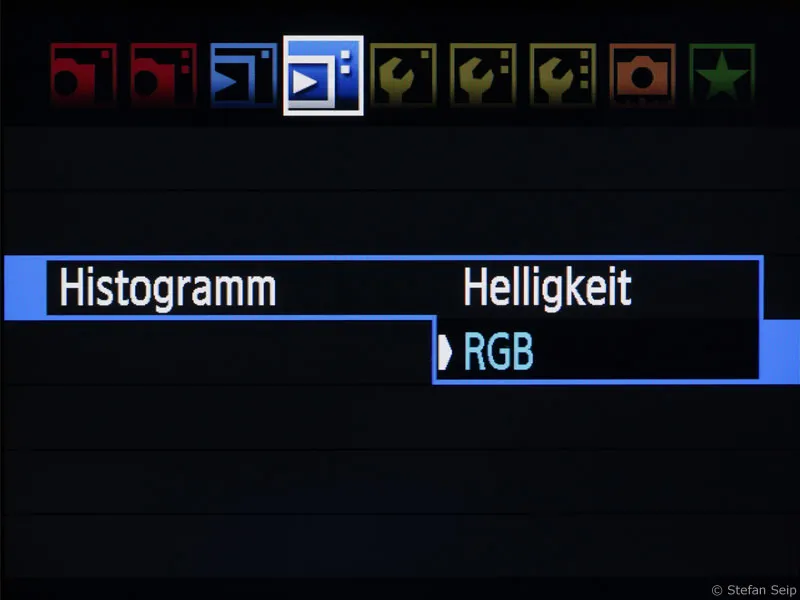
Setting the camera to display a separate histogram for each of the three color channels red, green and blue using the example of a Canon EOS 5D Mark II.
This setting makes it possible to expose in such a way that the red channel is exposed as much as possible without the histogram "hitting" the right edge, which would be equivalent to overexposure.
In the following example, an image of the totally eclipsed moon on February 21, 2008, taken with a Canon EOS 40D, is used to assess the situation of the individual color channels. First the raw image: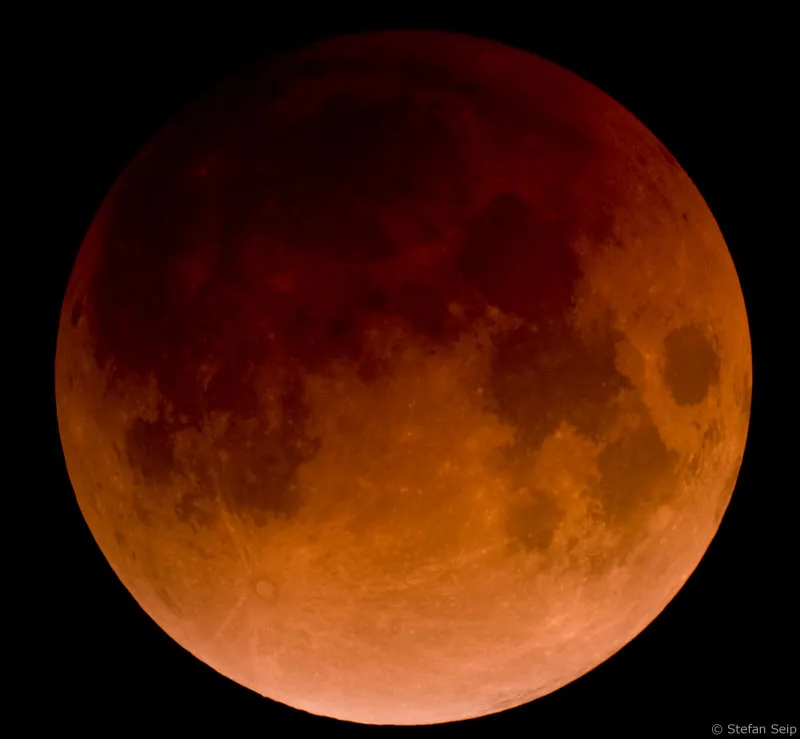
The totally eclipsed moon, taken on February 21, 2008 at 5:12 CET with a Canon EOS 40D. A telescope with 1200 focal length at Blender 1:12 was used. The exposure time was 10 seconds at ISO 400, while the telescope followed the movement of the moon in the sky.
Now we will analyze the color channels individually, including the histograms. In Photoshop, you can view the color channels by selecting Window>Channels and then clicking on the corresponding color channel.
Viewing the individual color channels in Photoshop: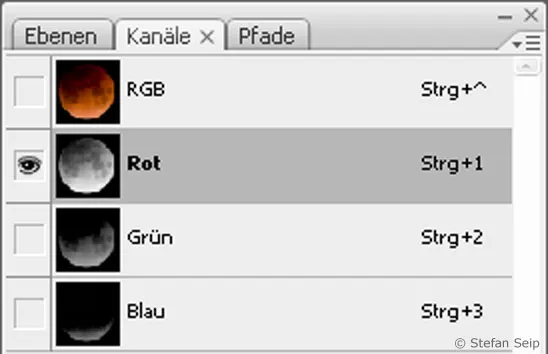
The red channel looks good, and looking at the histogram confirms correct exposure: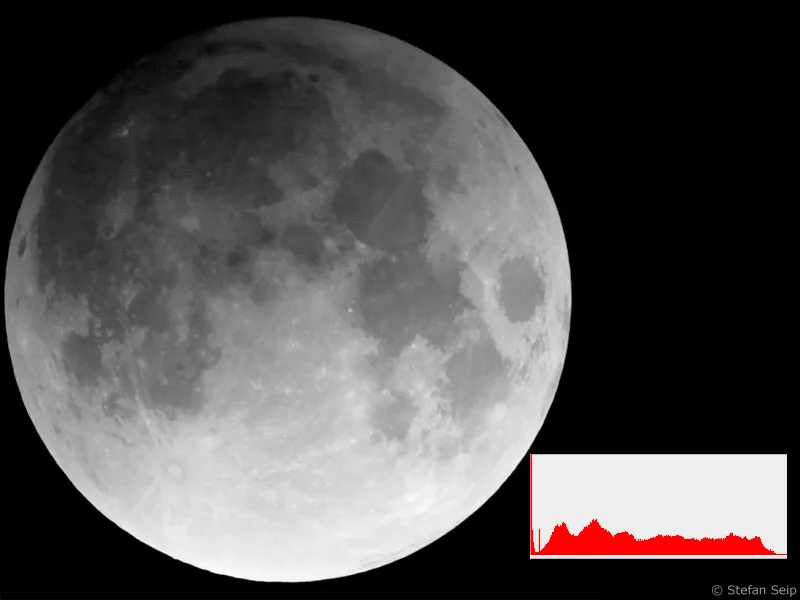
The green channel is different. Strictly speaking, this is underexposed, which is confirmed by the histogram; it already ends approximately in the middle of the tonal value scale: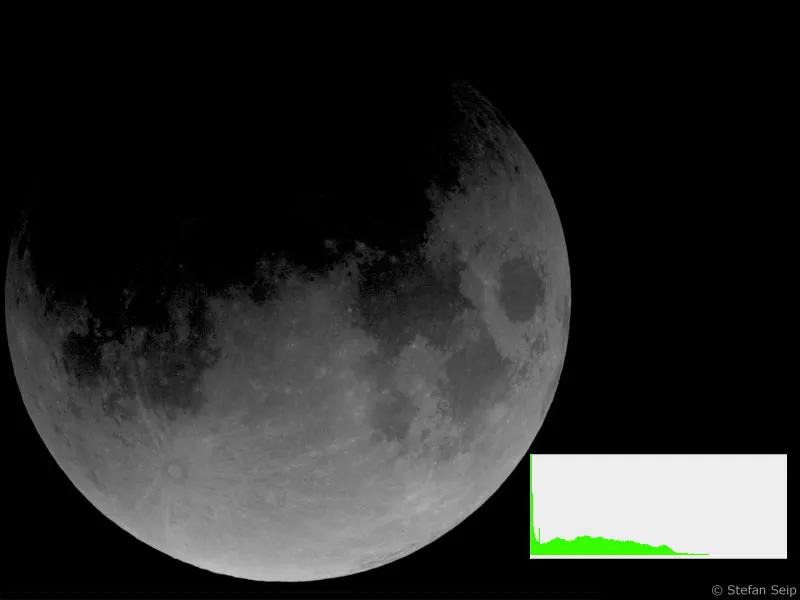
The situation is even worse for the blue channel. In addition to an even greater underexposure, it suffers from strong image noise and an overall low signal level, as is to be expected with a red, almost monochrome subject.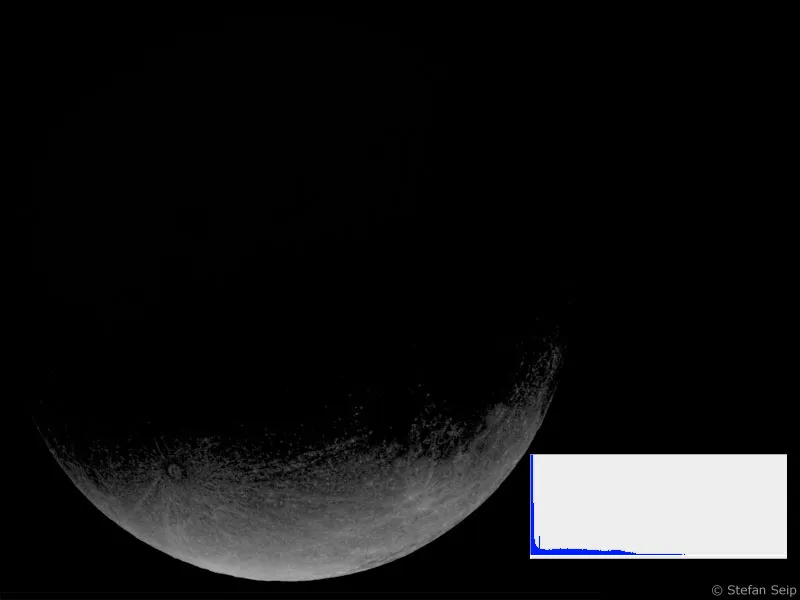
It is clear that only the red channel shows a respectable image. The green channel already shows underexposure, while the blue channel offers a sobering image.
If such a photo is sharpened as an RGB image, the image noise of the green and blue channels becomes clearly visible.
First a section of the unsharpened raw image: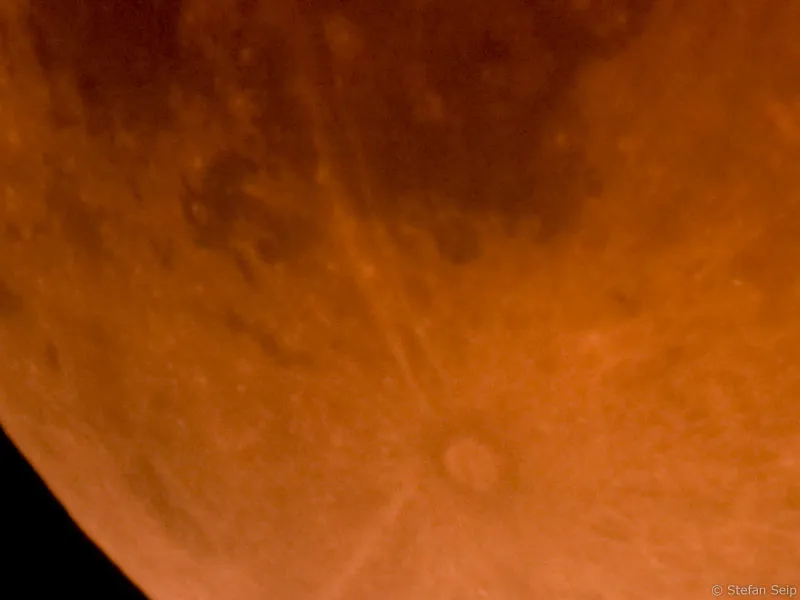
Section of the raw image, still unsharpened.
Sharpening the image using the Photoshop command Filter>Sharpen Filter>Unsharp Mask...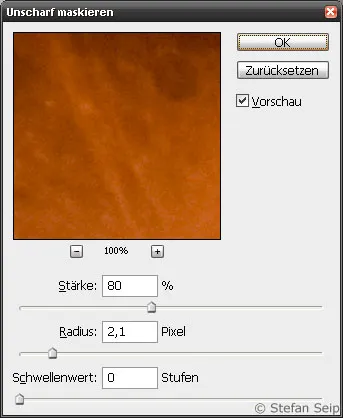
The result of the sharpening is a rather noisy image.
One approach to avoid this noise is to sharpen only the red channel while blurring the green and blue channels.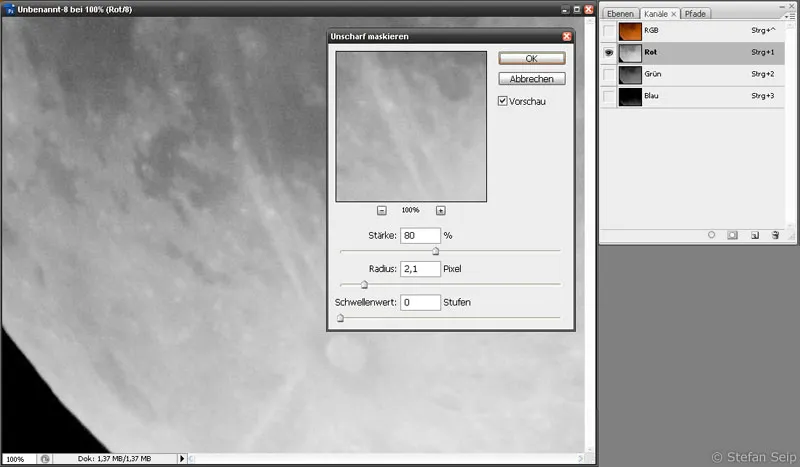
First, only the red channel was displayed, then the Filter>Sharpen Filter>Unsharp Mask... command was called and the same parameters were used as in the example above.
After the green channel was displayed, it was not sharpened, but - on the contrary - blurred using the Photoshop command Filter>Blur Filter>Gaussian Blur... The radius 2.2 results in a moderate blur.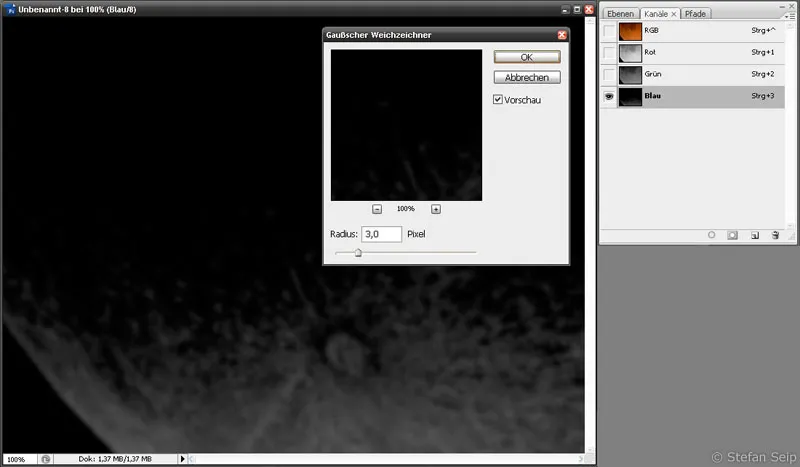
The blue channel, like the green channel, was blurred, but with a radius of 3, which means a stronger blur.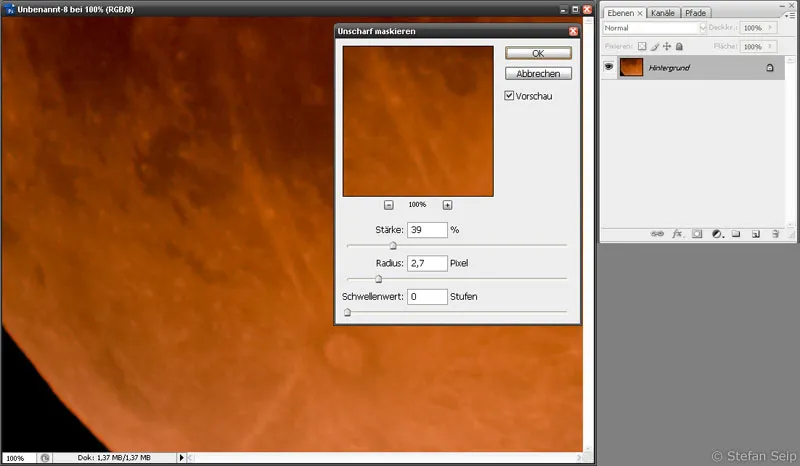
The result of the selective sharpening or blurring of the individual color channels was subjected to a further, moderate sharpening after all three color channels were displayed again simultaneously as a normal RGB image.
The effort for the selective sharpening or blurring of the individual color channels (right image section) was worthwhile: Compared to the result of the general sharpening (left image section), the result is significantly less noisy with a comparable impression of sharpness.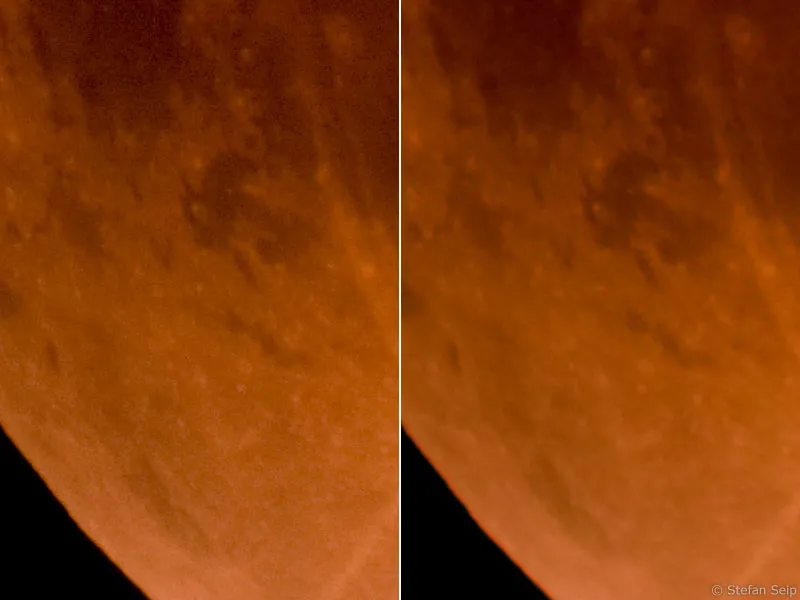
Documenting the course of the eclipse with a collage
It is also very tempting to plan to show the temporal development of a lunar eclipse with several images. You can give free rein to your creativity. The following notes may be helpful:
If the progression is to be shown through a series of images, the intervals between the individual shots should always be identical if the weather conditions permit. Start the series 45 minutes before the eclipse and continue the series until 45 minutes after the end of the eclipse to ensure that images of the moon that is not visibly eclipsed are part of the series.
If clouds are gathering, discard the plan for a series of shots and instead try to use the gaps in the clouds for the best possible individual shots. Don't be discouraged by smaller clouds, as they can even add to the special charm of an eclipse shot!
With collages, anything you like is allowed. However, if you are using a landscape as the backdrop for your montage, I recommend taking the following aspects into account.
Caption: Make it clear in the caption that the image is a montage. This is required by the ethics of photography. "Fake" astrophotographs can be unmasked as such very quickly!
When making montages with a landscape, try to depict as many of the following parameters as possible in a natural way:
- Image angle
The focal length of the photos of the moon and the landscape should be identical (a landscape shot with a wide-angle lens combined with telephoto shots of the moon looks unnatural). - Orientation of the moon relative to the horizon
I.e.: Rotate the moon shots to the correct position if necessary. - Spacing of the individual shots
While the moon photos are being taken, the moon continues to move in the sky. Ideally, you should arrange the individual shots of the moon in such a way that this movement is represented true to life. - The height of the moon above the horizon
In the best case, this corresponds to reality. - The location and time of the shot...
... of the landscape and moon photos should match. I would refrain from integrating photos of a lunar eclipse into a landscape photo from the "archive".
It is not always possible to take all five points into account. For example, if the moon is very high in the sky during the eclipse. If you wanted to faithfully depict the height of the moon above the landscape, you would have to make it very small and the visibility of details would suffer. In such a case, however, try to observe as many of the other points as possible.
In the following exercise, you can make such a montage yourself. To do this, download the exercise file "MoFi_Arbeitsdatei.zip" and unzip the archive. It contains four photos "MoFi00.jpg" to "MoFi03.jpg". Open all four images at the same time in Photoshop.
The photos were all taken with a 600-millimeter telephoto lens near Abenberg (near Nuremberg) during the partial lunar eclipse on August 16, 2008. The exposure time of the landscape photo was 4 seconds at an aperture of 1:4 and ISO 400, that of the moon photos 1/30, 1/30 and 3 full seconds at an aperture of 1:4 and ISO 1600.
The moon was so high in the sky that it is not possible to capture it large and together with the castle in one picture. We therefore want to integrate it into the landscape in the knowledge that the height above the horizon can no longer be depicted true to nature.
First, switch to the photo "MoFi01.jpg", which shows the time after entering the umbra at 21:53 CEST (Photoshop command Window>MoFi01.jpg).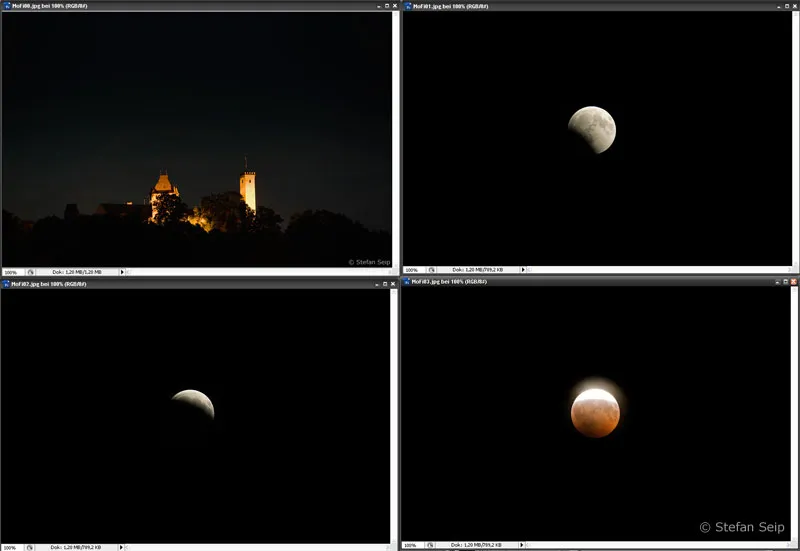
Open all four exercise files in Photoshop at the same time.
Now click in the layer palette (if invisible, display with the F7 key) on the only layer labeled "Background" with the secondary (usually right) mouse button. Select the Duplicate layer... command from the context menu that appears.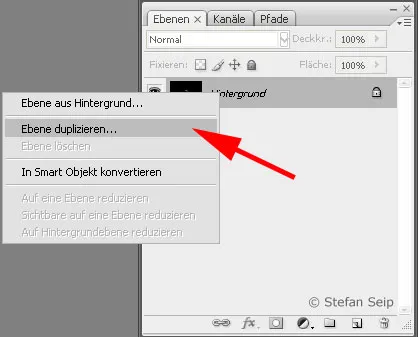
The layer palette after clicking on the "Background" layer with the secondary mouse button.
A dialog box then appears in which the document "MoFi00.jpg" must be selected as the target (the landscape image).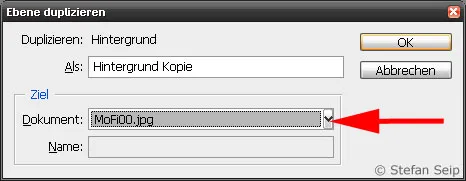
Photoshop dialog box "Duplicate layer". The red arrow points to the place where the document "MoFi00.jpg" is to be selected.
Now switch to the landscape shot with the Photoshop command Window>MoFi00.jpg, which now consists of two layers.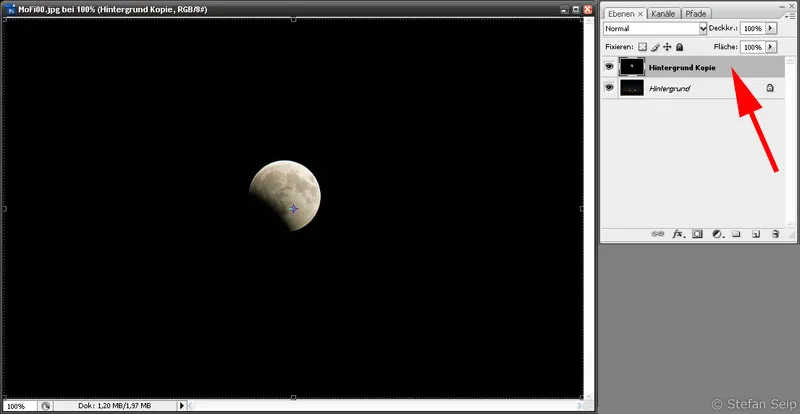
The file "MoFi00.jpg" cannot be recognized as a landscape background photo at the moment because there is a second layer (see red arrow in the layer palette) above it.
The upper one is called "Background copy", whose blending mode must now be changed from Normal to Lighten. This is done in the layer palette.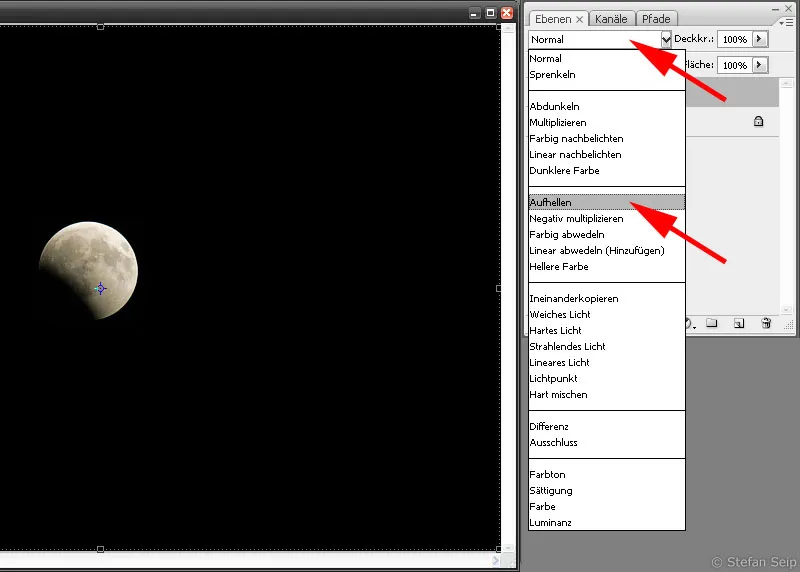
As long as the upper layer ("Background copy") is selected, you can click on the arrow to the right of the "Normal" entry (upper arrow). A selection box will then open from which you can select the "Lighten" blending mode (lower arrow).
Now select the Move tool in Photoshop ( V key ) and position the moon at your preferred position above the castle.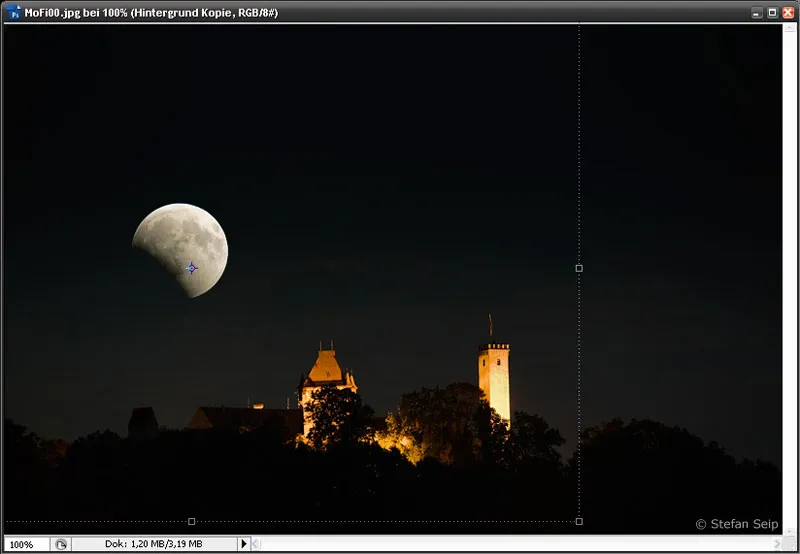
The upper layer can be positioned by dragging with the mouse or by pressing the four arrow keys ("cursor keys") if the Move tool has been selected beforehand.
Then use the same procedure to copy the photo "MoFi02.jpg" as a new layer into the landscape photo "MoFi00.jpg". MoFi02.jpg was taken at 22:36 CEST at a time when the eclipse had already progressed.
Positioning of the third plane: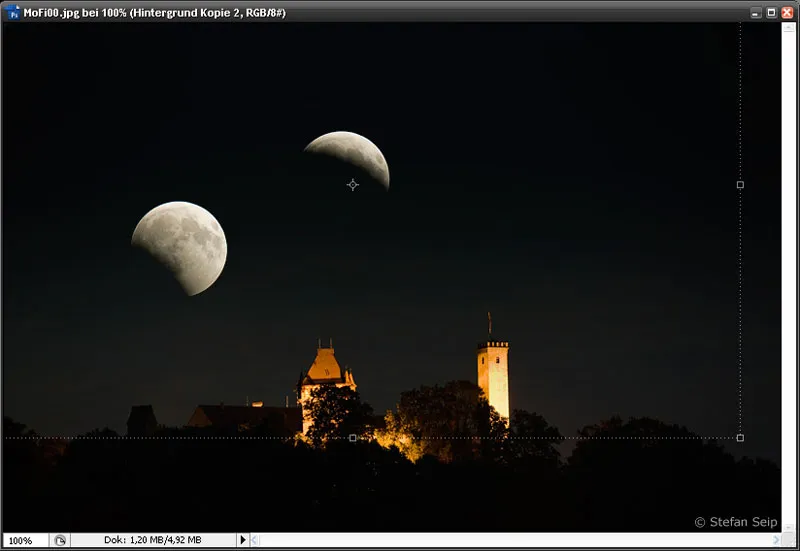
The same game is to be repeated with "MoFi03.jpg", a photo taken at 23:10 CEST when the eclipse was at its peak. It was exposed longer to make the area of the moon visible that lies in the Earth's umbra.
Positioning of the fourth and final plane: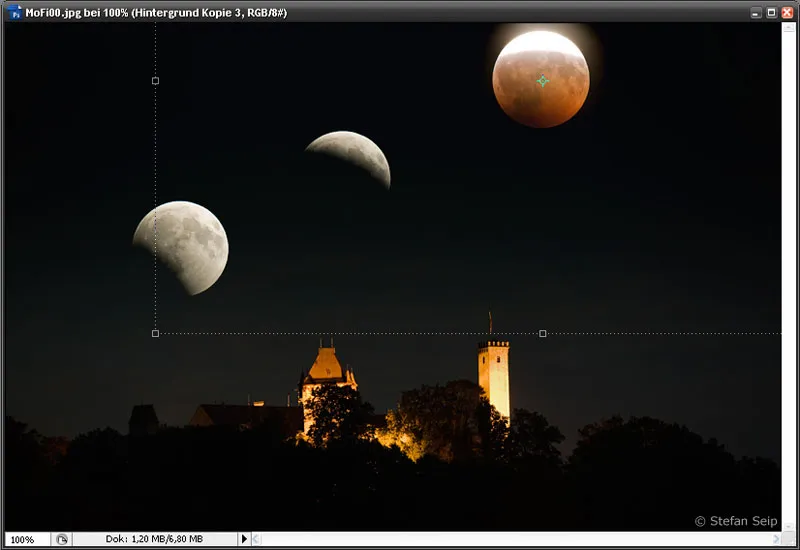
After moving all three moon shots, the result could look like this: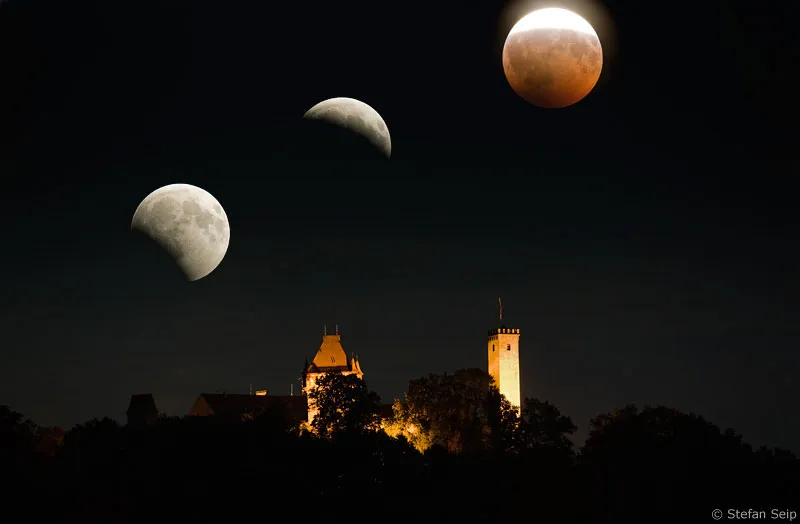
Finished shot, whose different layers can be merged into one layer using the Photoshop command "Layer>Reduce to Background Layer".
The following concessions had to be made as "sacrifices" for this collage: Firstly, the height of the moon above the horizon does not match reality; secondly, the distances between the individual eclipse phases were greatly reduced to allow a large image of the moon in relation to the landscape.
Sample images
This is the image that was used as the "opener" for this tutorial. It was taken on February 21, 2008 at 4:39 CET near Lake Garda in Italy. I used a converted Canon EOS 400D with the IR cut filter in front of the sensor removed. This is usually only useful when photographing gas nebulae, but in this case it resulted in a sharper image compared to the 40D.
A telescope with a focal length of 1200mm at Blender 1:12 was used for the exposure, which lasted 8 seconds at ISO 400.
This image also shows the total lunar eclipse of February 21, 2008. Shortly after the end of totality (4:50 CET), a small area of the moon is already in sunlight. The exposure time was 6 seconds, all other details match the image above.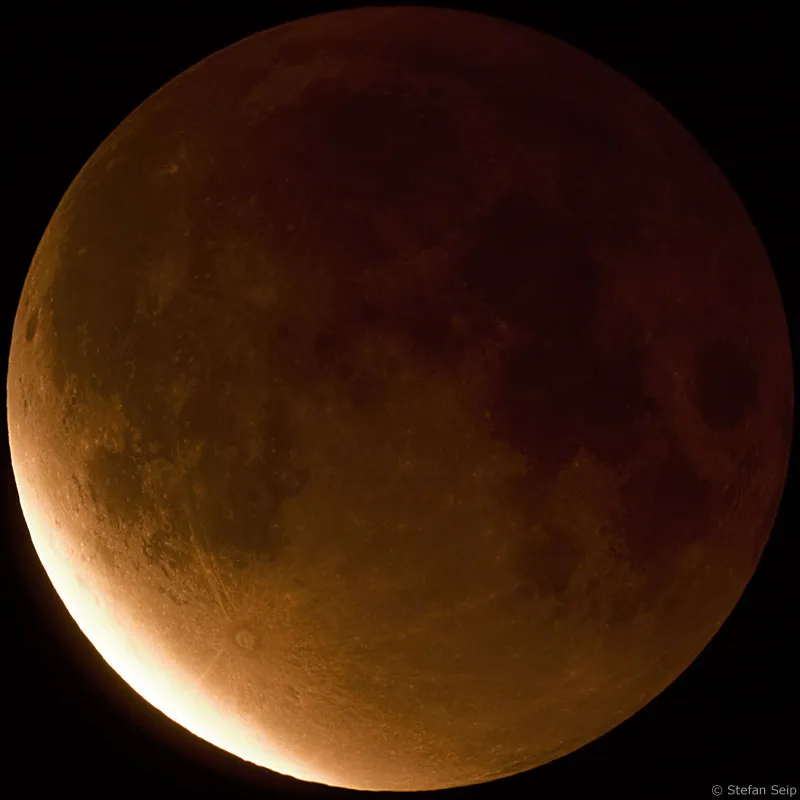
This photo shows the complete course of the total lunar eclipse on March 3, 2007, also near Lake Garda in Italy, in the form of an extreme long exposure of 3 hours and 45 minutes. The red discoloration of the totally eclipsed moon in the middle of the bright streak is clearly visible. The image was taken on chemical film, but there is no reason not to attempt such an image with a digital camera.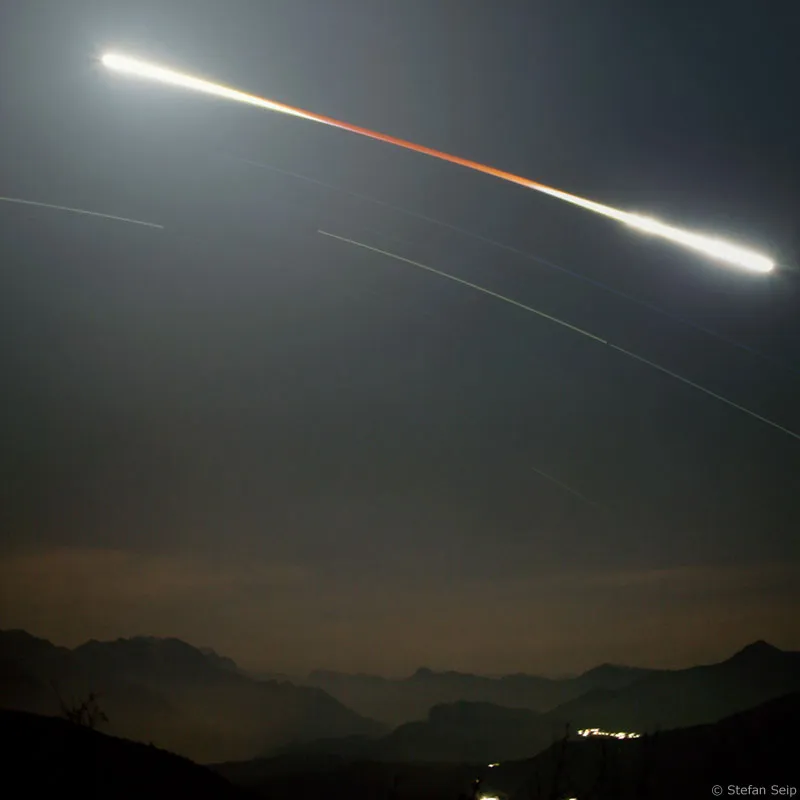
Another shot of totality on March 3-4, 2007, taken at 0:15 CET with a Canon EOS 1Ds Mark II and a 600mm photo lens at Blender 1:5.6. The exposure time was 2 seconds (moon) or 60 seconds (star field) at ISO 400, while the camera was tracked on an astronomical mount. A total lunar eclipse offers the rare opportunity to show the full moon in the vicinity of many stars that would otherwise be outshone by the moon's brightness. I had to abandon my original plans to take high-resolution photos of the eclipsed moon because the air turbulence was extremely bad and the image was very "wobbly". I then made a quick change of plans and decided to make the best of the situation.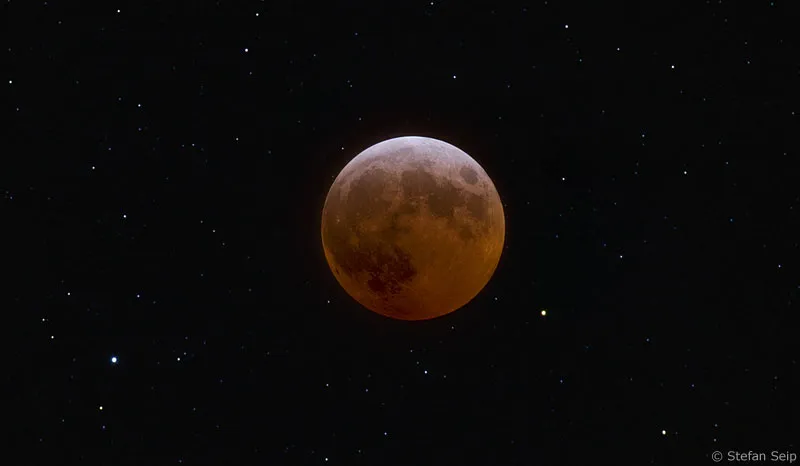
I also had a stroke of luck with this photograph of the partial lunar eclipse on September 7, 2006. I caught the rising of the already partially eclipsed moon, but just a few minutes after taking this photo it was pouring with rain. I quickly dismantled my equipment, a Canon EOS 1Ds Mark II with a 300 millimeter lens, whose focal length was extended to 600 millimeters by a 2x teleconverter. The exposure time was 1/6 second at ISO 400 and Blender 1:11.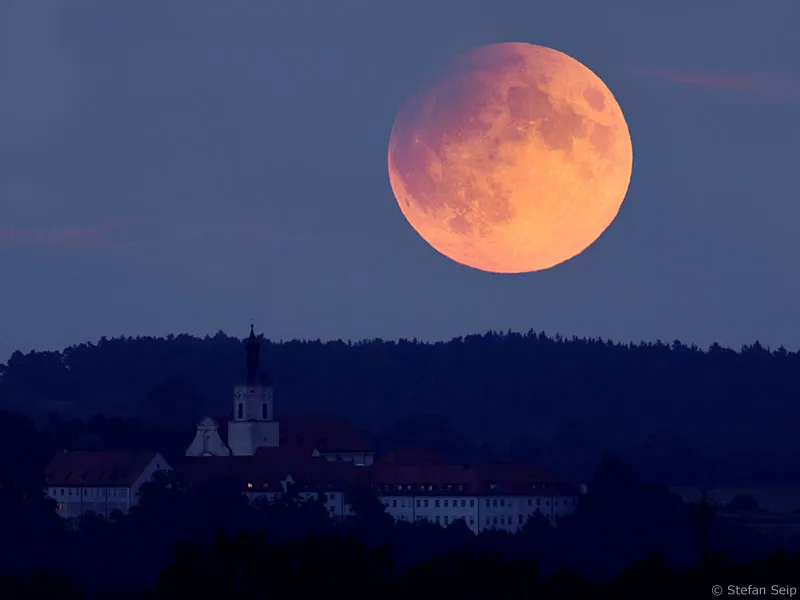
Collage of individual shots of the total lunar eclipse on January 9, 2001: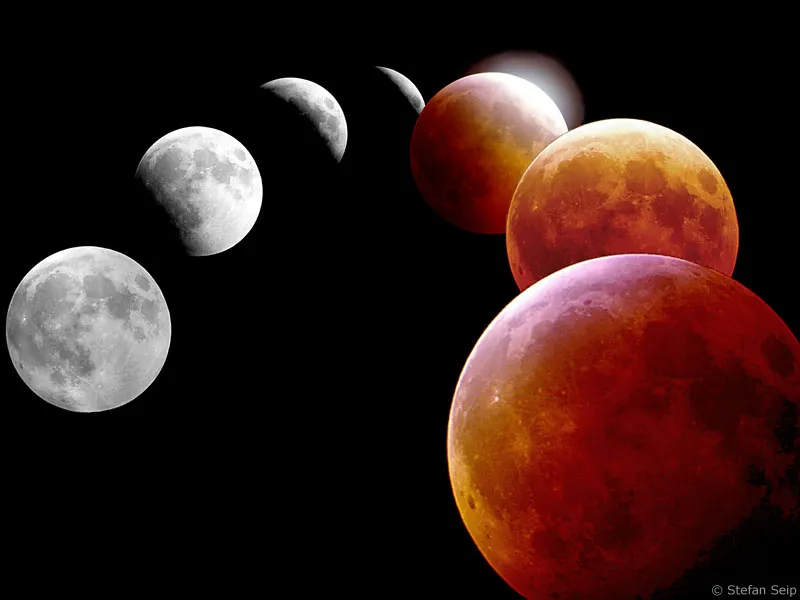
Hardly any attention was paid to this penumbral eclipse of the moon on the night of March 14 to 15, 2006. Usually penumbral eclipses are hardly noticeable, but in this case the moon came within 200 kilometers of the Earth's umbra cone! A comparison of the eclipsed moon on the left (14.3.06, 22:50 CET) with the peak of the eclipse on the right (15.3.06, 0:47 CET) shows a clear drop in brightness at one point.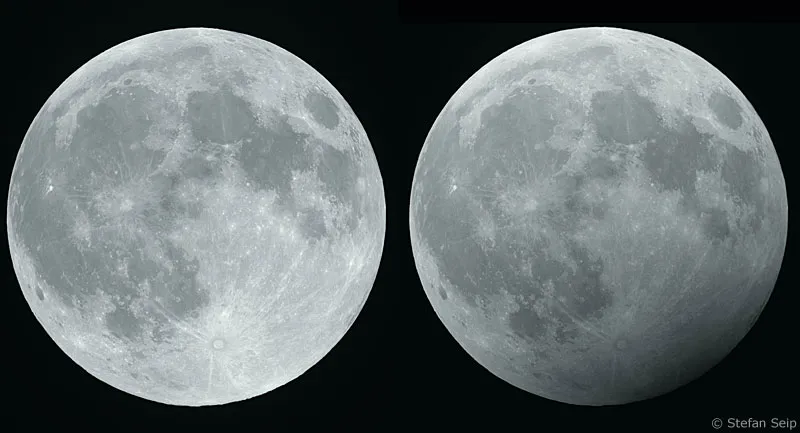
Here is a collage of the partial lunar eclipse on August 16, 2008, created by Anthony Ayiomamitis from Greece. He arranged various individual phases "correctly" so that a larger sector of the umbra boundary can be seen:
http://antwrp.gsfc.nasa.gov/apod/ap080820.html
