Practical tips for using studio and outdoor flash systems
The best flash system is useless if you can't use it effectively ("do right things") and efficiently ("do things right"). Regardless of the technical operation of the respective devices, which should be adequately described in the accompanying operating instructions, there are also many tricks and special features that only those who have either years of experience in handling flash systems or have undergone intensive training will know. This tutorial should help you to use this artificial light effectively and creatively from the outset like an experienced professional - without having gone down the laborious and lonely path of "trial and error" beforehand.
8.1 The importance of the relative distance to the light
Light has the amazing property of increasing or decreasing disproportionately when the distance from the model to the light source is changed. And it does so quadratically. If the distance from the light source to the model is doubled, the light decreases. The brightness is now only ¼ of the previous value!
Example
If the model is standing 2 meters away from the frontal main light and is photographed with an aperture of 5.6, a (often unintentional) new distance to the main light (for example, because a short make-up break has been taken), which is now only 1 meter, must be photographed with an aperture of 11. This is because when the distance to the light source is halved, the light is 4x brighter than before!
In practice, this means that beginners in particular (if they don't know about this problem or don't think about it), who don't yet have their own studio and often take photos at home or in other small spaces, have problems achieving a constant brightness in their photos. It is very easy to forget how important it is to keep the exact distance to the flash heads of the flash system. After all, small changes in the distance between the model and the light are not uncommon (for example in fashion photography, where moving subjects are often photographed).
However, this problem mainly occurs when photographing in smaller rooms, as the distances between the model and the light source are inevitably small.
However, professionals with their large studios are also affected by this phenomenon. Because the light characteristics also change with distance, many photographers set up the lighting set so that the flash heads, equipped with the light shapers, are relatively close to the model.
For example, it makes no sense to set up a large softbox 10 meters away from the model. Then the light character of this light shaper would not come into its own. For this reason, surface lights in particular are often positioned very close to the model or the object being photographed.
Changes in distance (e.g. of 1 meter) in a small space therefore have a major influence on the brightness. Changes in distance of 1 meter are hardly noticeable if all light sources (here: flash heads) are more than 10 meters away, for example. But, as we have just seen, this is the exception rather than the rule.
Due to this circumstance, every photographer is therefore required to pay as much attention as possible to ...
- either not to allow the model to move away from the light (for example, in many studios a marker is stuck to the floor to indicate where the model is standing) ...
- or to constantly compensate for the changes in distance by changing the power of the respective flash heads.
Changes to the aperture setting are rather unusual, because if a model changes the distance, the flash heads (usually at least 2 flash heads are aimed at the model with main light and effect light) will be affected differently. Changing the aperture on the camera can only lead to more or less brightness across the board - but cannot compensate for individual flash heads becoming brighter or darker. The light from all flash heads is always rendered brighter or darker.
However, if these are at different distances from the model, changes in distance will mean that moving closer to flash head 1 will inevitably increase the distance to flash head 2.
Figure 8.1: If the model moves forwards, the distance to the two narrow softboxes in the background increases. If, on the other hand, the model moves to the left, the distance to the left rear narrow softbox is shortened, while the distance to the right rear narrow softbox is increased at the same time. And so on.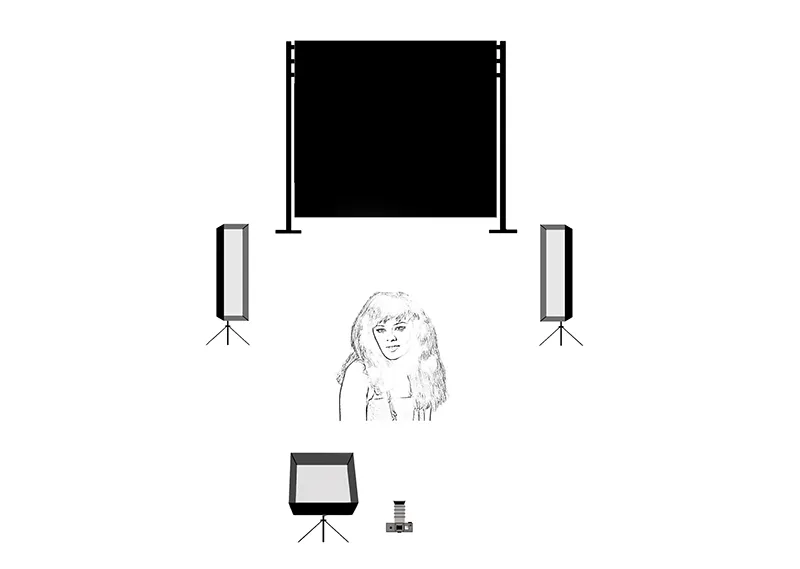
Figure 8.2: Changes in the distance between the model and the flash heads should therefore be specifically compensated for by adjusting the power of the affected flash heads to ensure consistently correct exposure.
(Photo © 2013: Jens Brüggemann - www.jensbrueggemann.de)
Figure 8.3: In case A, the model is far away from the light source. A few centimeters change in distance does not matter. In case B, however, the light source is very close to the model. The width of the head is extremely relevant in terms of exposure, because in percentage terms it accounts for around 30% of the total distance between the model and the light source.
In case A, on the other hand, a head width is negligible in relation to the total distance (approx. 7%). The change in distance in case A does not require any correction, whereas the change in distance in case B must be taken into account.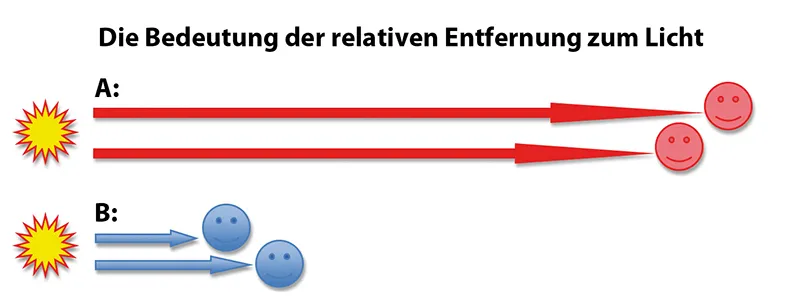
Note: The following must be borne in mind: In a small room, changes in the distance between the model and a flash head make it necessary to adjust the output of the different flash heads. Outdoors, however, in sunlight, it makes no difference at all whether the model is lying on the ground or standing on a 3 meter high ladder (and is therefore 3 meters closer to the sun). In relative terms, this difference is not significant outdoors: the earth is 149.6 million kilometers away from the sun. A difference of 3 meters doesn't matter.
In the studio, on the other hand, a change in distance of 3 meters is enormous. They make the model appear much brighter or darker, depending on whether the distance has been shortened or lengthened. So make sure that your model has a mark on the floor as a point of view. Or, when changing the distance, remember that the power of individual flash heads may need to be adjusted.
8.2 The addition of light
Light adds up: The total output of a generator of 1,000 watts can be divided between two flash heads with 500 watts each. The shutter speed of 1/30 second results (ceteris paribus) in a photo that is twice as bright as with a shutter speed of 1/60 second. The whole thing is logical - but cannot be emphasized often enough ;-)
Figure 8.4: Where the light cones overlap, it is particularly bright. Light adds up. This applies to both continuous light and flash light. Logical, because a flash is actually nothing more than a very short continuous light - only with high intensity.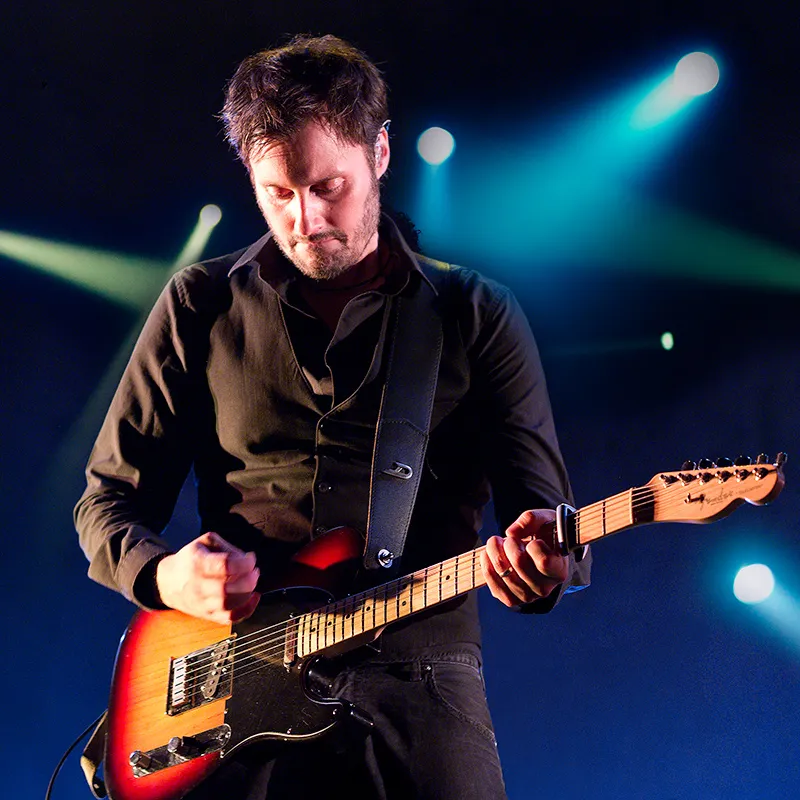
(Photo ©2011: Jens Brüggemann - www.jensbrueggemann.de)
8.3 The light shapers determine the light characteristics
When buying a flash system, a lot of time is spent comparing the performance data of generators or compact flash units. But which light shapers are in the program of the respective company is only considered later, when the flash system is expanded. It is the light shapers that are essentially responsible for the light characteristics.
The following applies to light shapers: the more (different) light shapers you have, the better! Every light shaper produces a different light, which is why it is also worth using unconventional ones.
Figure 8.5: Softboxes are particularly popular with photographers. In product photography, they provide beautiful reflections; in model photography, they provide soft lighting.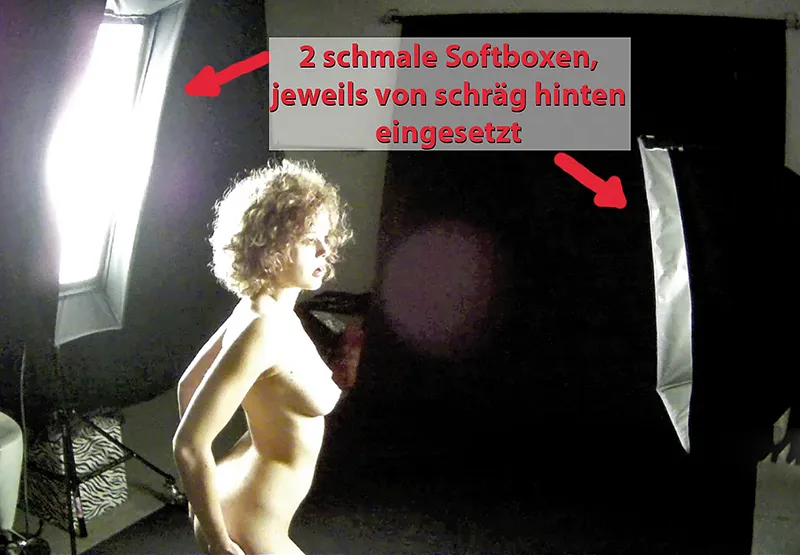
(Photo © 2012: Jens Brüggemann - www.jensbrueggemann.de)
Figure 8.6: The term "light tongs" is used when two softboxes are used in such a way that they face each other and flash with approximately the same intensity.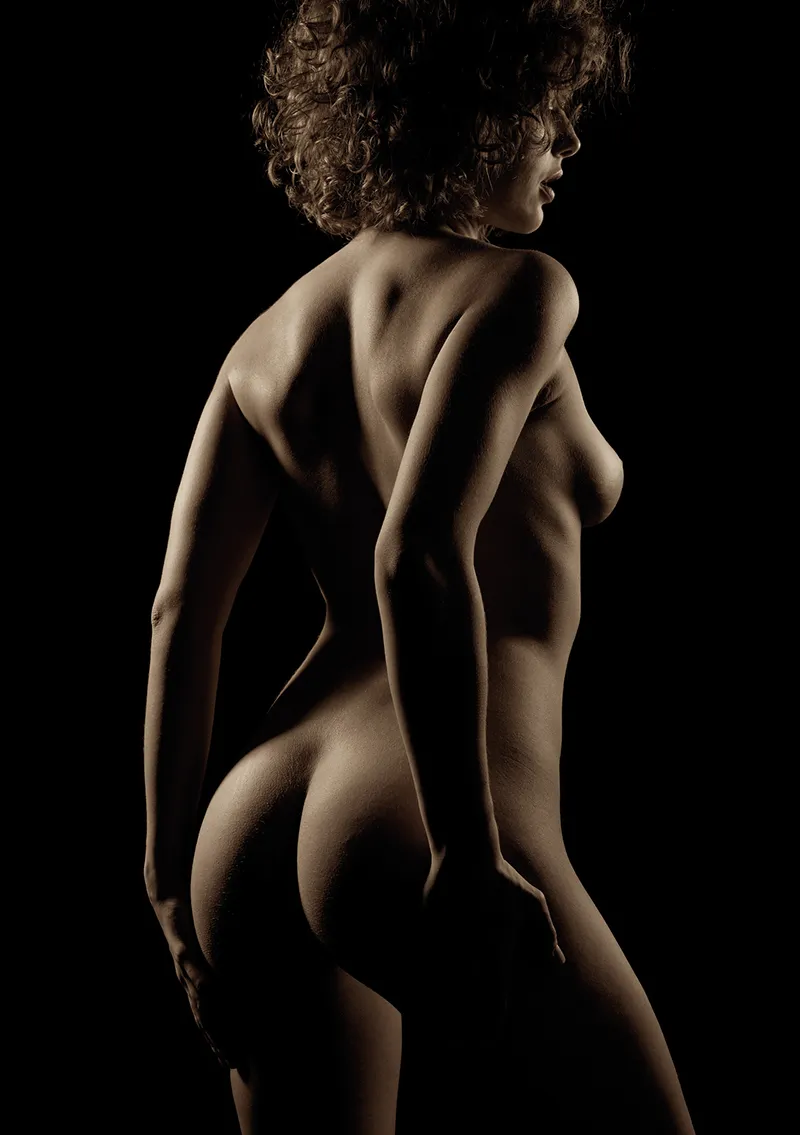
(Photo © 2012: Jens Brüggemann - www.jensbrueggemann.de)
Figure 8.7: I prefer to use the normal reflector for outdoor photo shoots. It has a high light output and is also the least susceptible to wind. Especially with a high (natural-looking) use of the flash head, it can quickly happen that the wind causes the whole thing, including the tripod, to wobble.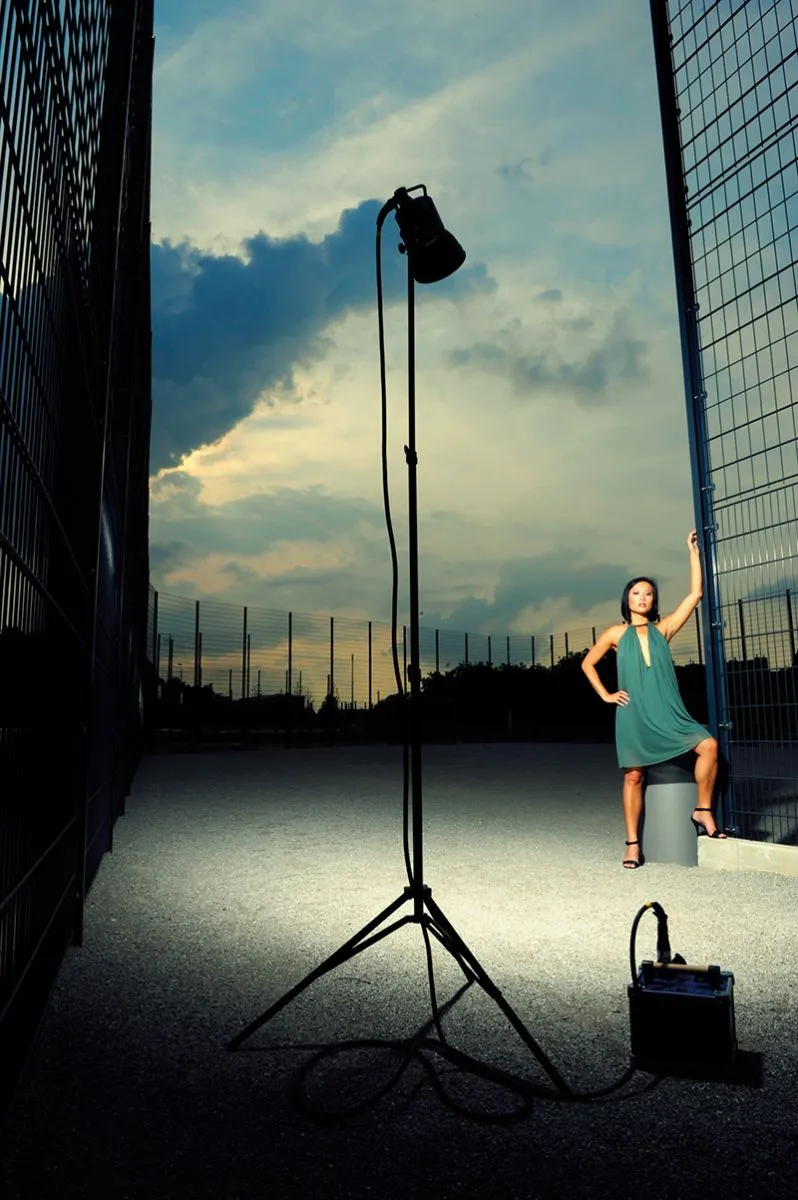
(Photo ©: Jens Brüggemann - www.jensbrueggemann.de)
Figure 8.8: If you follow this tutorial series carefully, you will quickly achieve the goal of mastering professional lighting. It is not the generators or compact flash units, but the light shapers that are essentially responsible for the light characteristics. Reason enough to keep looking around for new attachments on the market. Here I used the "MOLA" for the first time. I also used a Sunbounce brightener from the left side, because they provide great reflections not only outdoors but also indoors. Nikon D3S with 2.8/105mm Micro Nikkor. 1/125 second, Blender 3.5, ISO 200.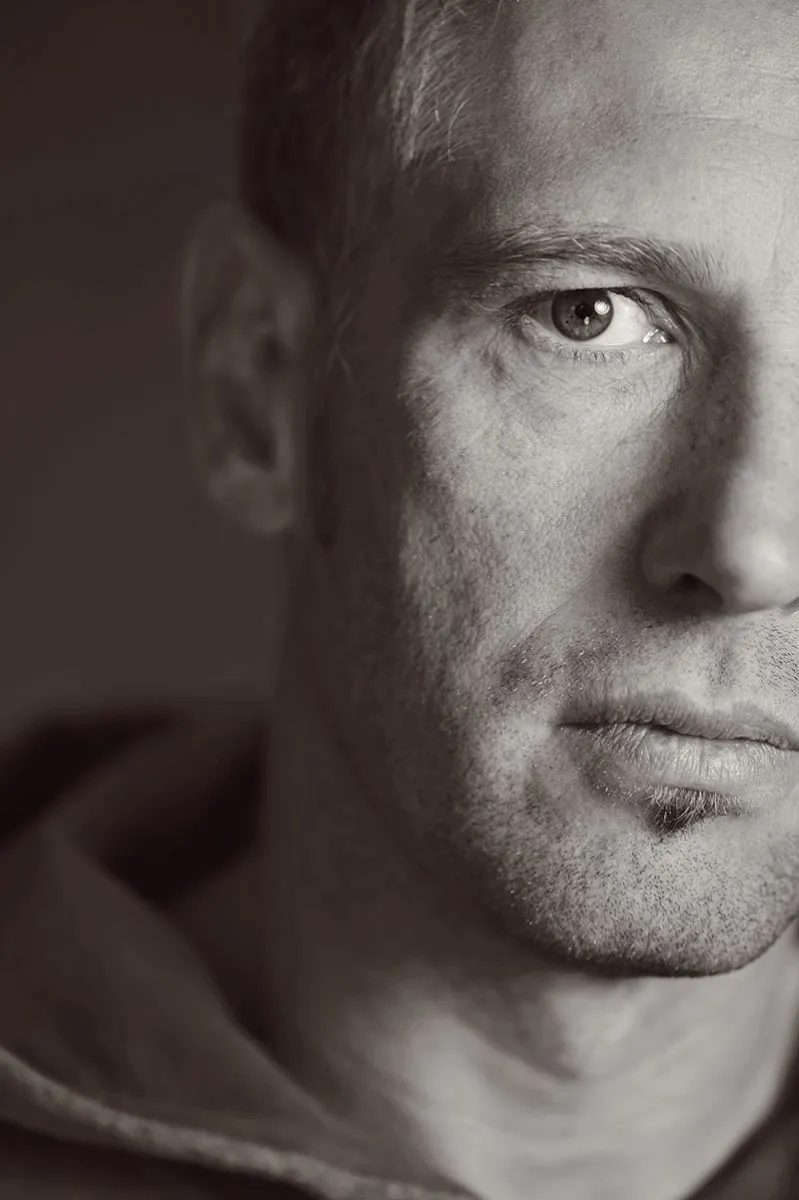
(Photo © 2011: Jens Brüggemann - www.jensbrueggemann.de)
Figure 8.9: The "MOLA" provides a mixture of soft light with a striking accent and is therefore particularly suitable for portrait and fashion photos. The "MOLA" has a wave-shaped construction with a matt white surface on the inside. The flash tube is only partially covered by a close-meshed grid, which means that a certain percentage of the flash light is reflected (soft part of the light) and the remaining part falls directly on the model (hard part of the light).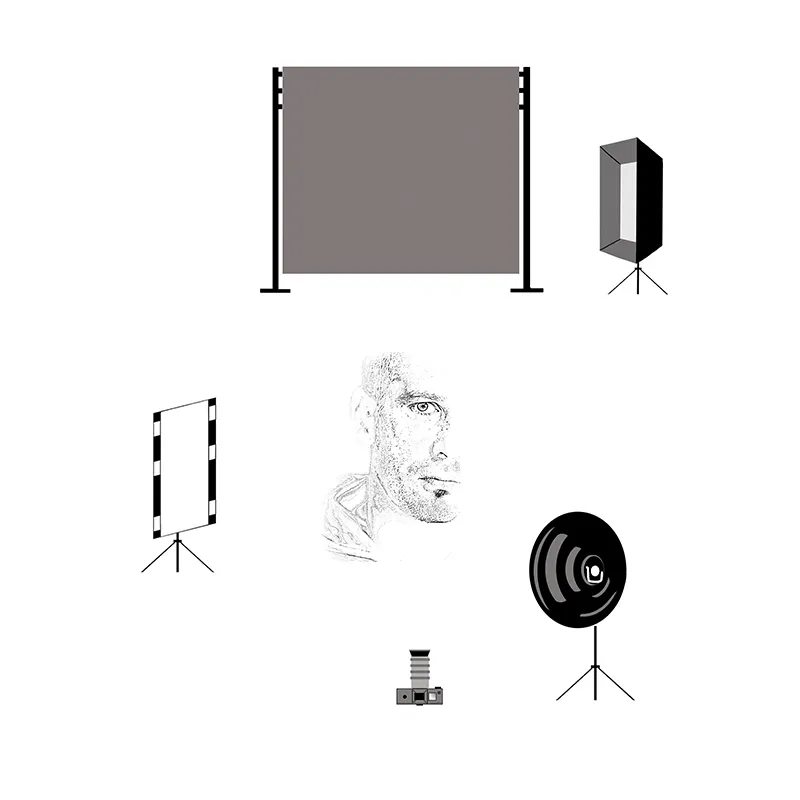
Figure 8.10: Even with the same light shaper, differences can still be "teased out". Shown here is the "P-Soft" from broncolor (left). It belongs to the beauty dish category, but is equipped with a matt silver reflective surface instead of a white one. To soften the light, a diffuser attachment can be attached to the front of the reflector as an accessory. If, on the other hand, you want to make the light more directional, a honeycomb attachment can be attached to the reflector.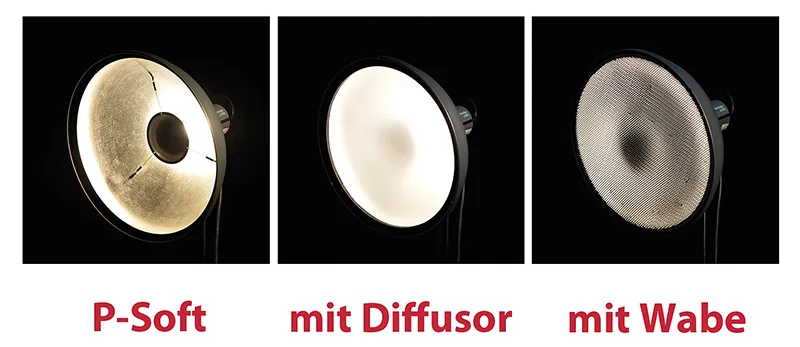
(Photo ©: Jens Brüggemann - www.jensbrueggemann.de)
Figure 8.11: In product photography, light shapers whose reflections are not disturbing are preferred. Softboxes and Striplites are the first choice for reflective surfaces.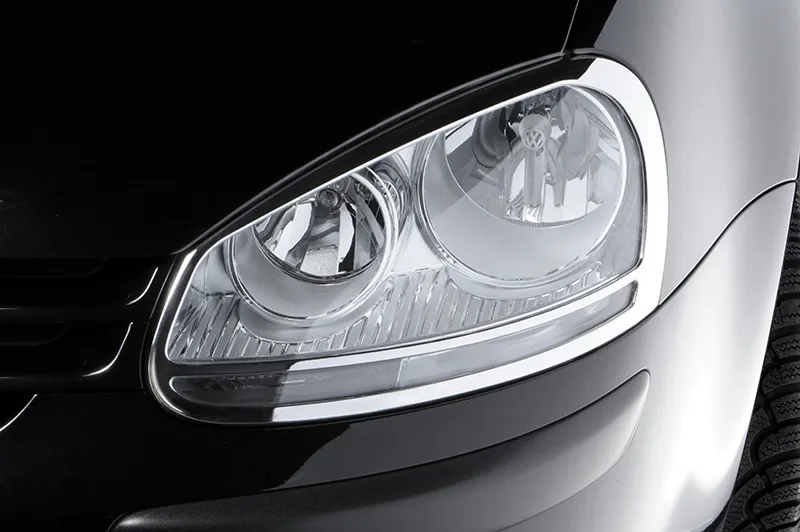
(Photo ©: Jens Brüggemann - www.jensbrueggemann.de)
Figure 8.12: Surface lights can be used to create clear light edges, which are often used to support the shape of the product as light lines.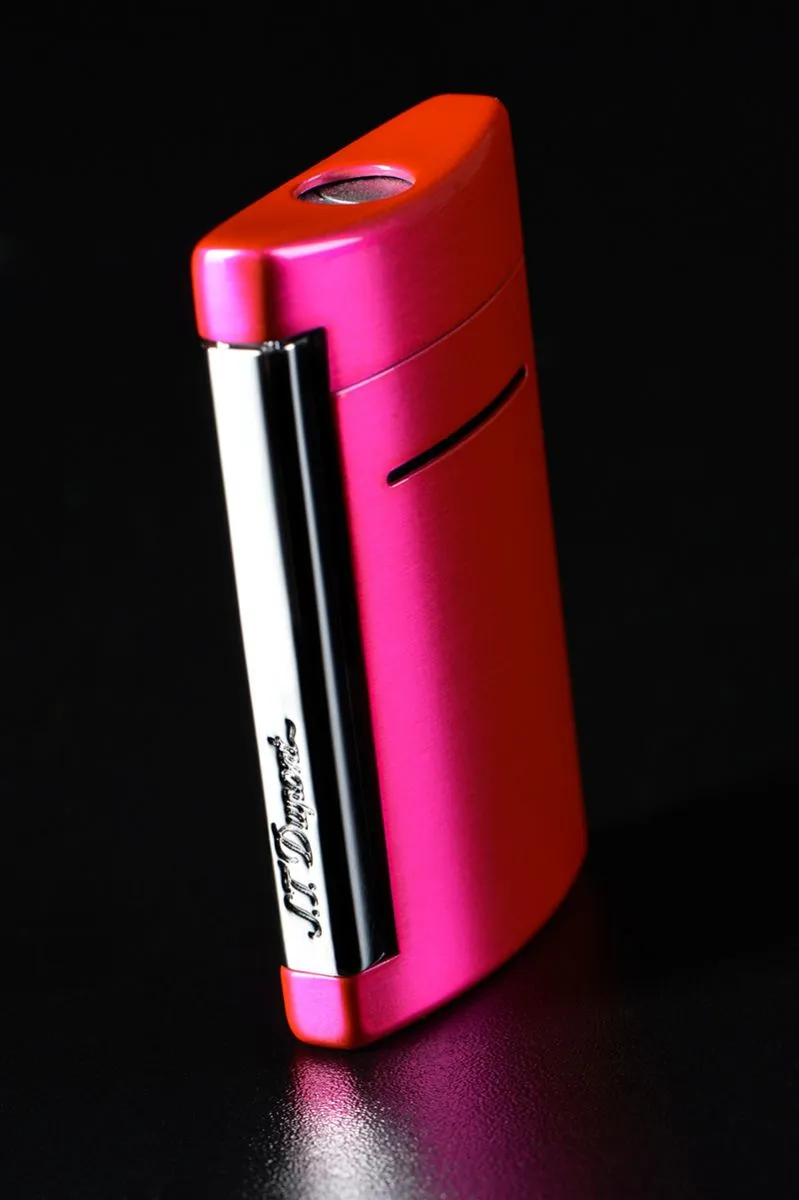
(Photo ©: Jens Brüggemann - www.jensbrueggemann.de)
8.4 Light - and shadow?
Where there is a lot of light, there should also be shadow! Shadow-free lighting is usually boring and looks flat. Shadows, on the other hand, give the photo plasticity and depth.
Figure 8.13: At my photo workshops in Andalusia, we always take photos in the afternoon. When the glowing sun goes down and the lengthening shadows provide more plasticity, the result is fantastic photos. Usually with a model, but sometimes, as in this photo taken from an old pirate fortress, without.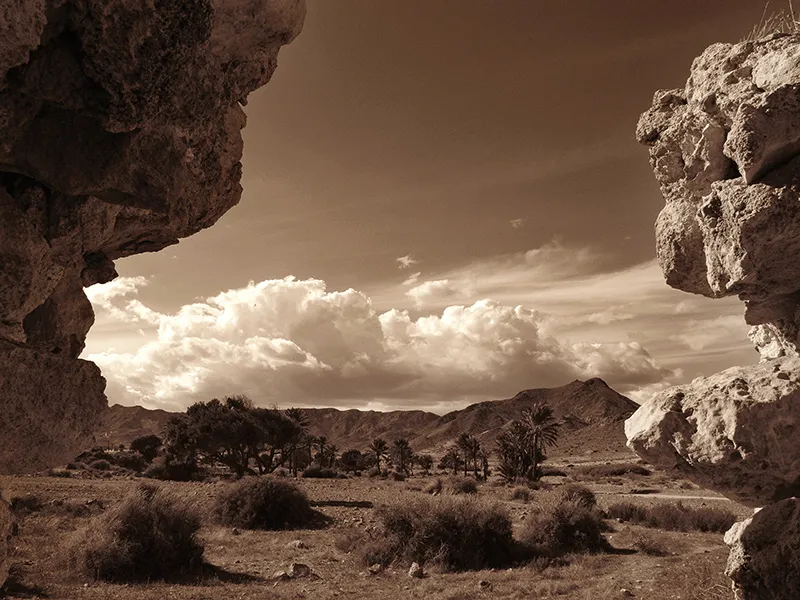
(Photo ©: Jens Brüggemann - www.jensbrueggemann.de)
Figure 8.14: Shadows are also very important in model photography. In this male nude, the interplay of light and shadow ensures that the trained body is shown to its best advantage.
(Photo ©:Jens Brüggemann - www.jensbrueggemann.de)
8.5 The proportionality of the modeling light to the flash
If you are working with individual power distribution, it is necessary that the modeling light is also regulated automatically (by the device), because only then can the light progression during flashing really be assessed on the basis of the modeling light. In other words: If the flash heads have different power distributions, the lighting situation can only be assessed in the correct proportion to the effective flash power if the modeling light also shines in proportion to the flash power.
Example 1a
If flash head 1 flashes at 25% of the maximum output, its modeling light should also only shine at 25%. If flash head 2 flashes at 40% of the maximum output, its modeling light should also shine at 40%. And if flash head 3 is used at only 10% of the maximum output, it is important that its modeling light also only shines at 10% of the maximum output.
However, it is even better if the generator not only offers "proportionality", but also "proportionality maximum (Pmax)". This means that the modeling light of the flash head with the highest flash output setting lights up at maximum output (e.g. 650 watts). All other modeling lights of the other flash heads then light up correspondingly weaker, but in such a way that the ratio selected for the flash output is also maintained for the modeling light.
Example 1b
With reference to the above example, flash head 2 would therefore light up with the maximum possible modeling light, i.e. with 650 watts, for example. Flash head 1, on the other hand, with 406.25 watts and flash head 3 with 162.5 watts.
This "proportionality maximum" has the advantage that even with a low flash output, a sufficiently strong modeling light is still available so that the photographer can assess the lighting situation well and the autofocus can focus quickly and precisely.
Figure 8.15: The proportionality (Pmax) of the modeling light to the flash is important in order to be able to assess (and, if necessary, improve) the light curve. This function is relevant when using two or more flash heads as soon as they are used with different flash output.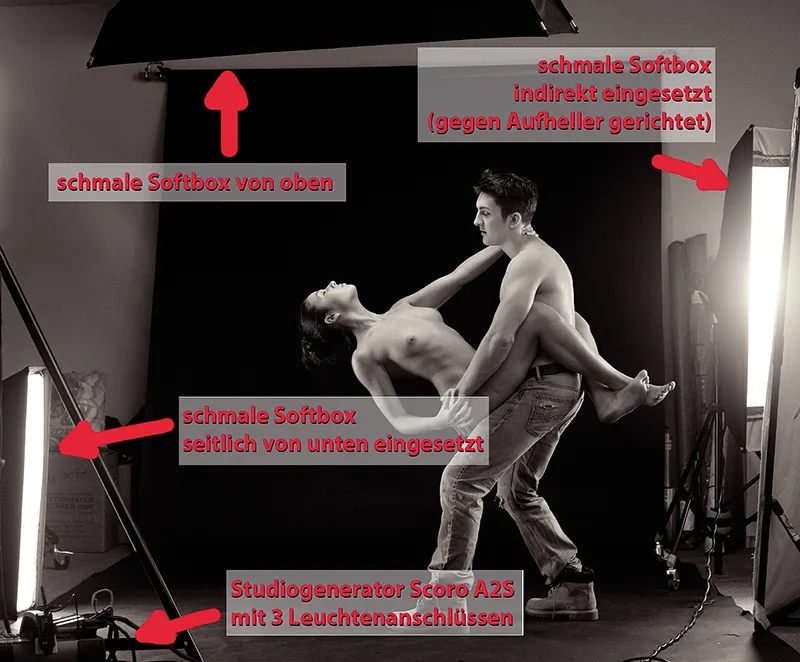
(Photo © 2013: Jens Brüggemann - www.jensbrueggemann.de)
Figure 8.16: This allows you to see exactly how the light progression, light characteristics and light intensity of the different flash heads relate to each other before the first shot is taken. If you then take the photo, the flash result corresponds exactly to what you saw with the modeling light: What you see is what you get!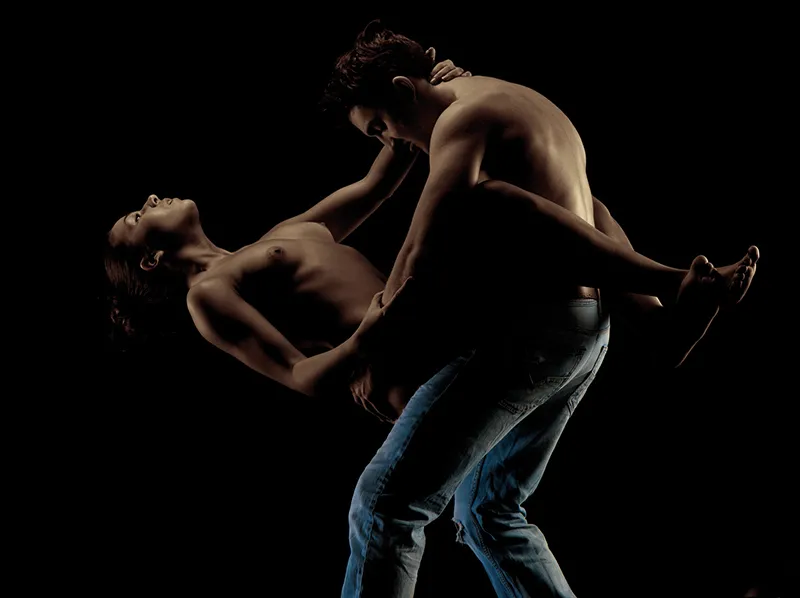
(Photo ©2013: Jens Brüggemann - www.jensbrueggemann.de)
8.6 The light output when using different light shapers
The light shapers not only provide different light characteristics; they are also responsible for how much light falls on the model. There are light shapers that have a very high light output, for example because they focus the light or because they have a shiny silver, smooth coating.
Others, on the other hand, "swallow" part of the light, for example because they have a fabric diffuser, as is the case with softboxes.
Figure 8.17: If I'm flashing outside and need a high flash output, I don't use softboxes or similar because they would "swallow" too much light (1-2 f-stops, depending on the fabric texture and thickness). In addition, surface lights are very susceptible to wind, which makes them almost impossible to use, especially by the sea. Here, the broncolor "mobil" (1,200 watt seconds maximum output) was used with the extremely practical (small) "mobilite" flash head.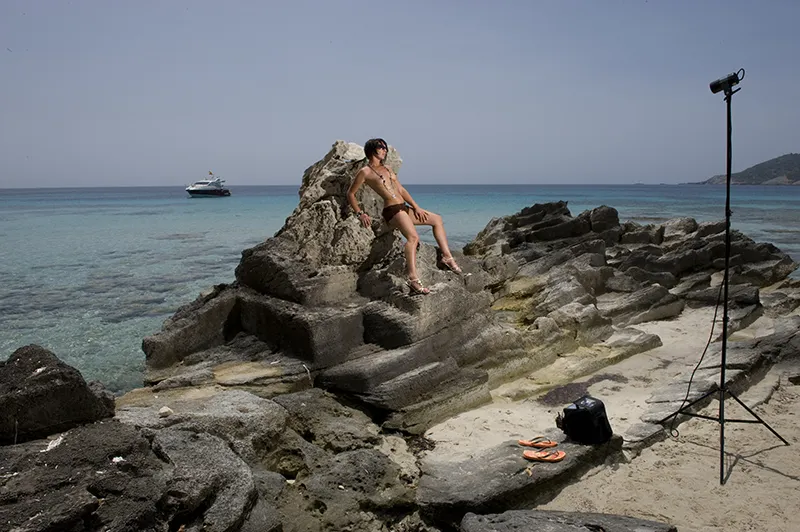
(Photo ©: Jens Brüggemann - www.jensbrueggemann.de)
This fact of the different light output of the various light shapers can also be utilized, for example, if you need weaker flash light, but this is not feasible from the setting of the flash system (because the system has already been turned down as far as possible): In this case, for example, a softbox, possibly also fitted with an internal diffuser, would be the solution instead of a normal reflector.
Note
It is not only the set output of the flash system and the distance of the light source to the model, but also the design of the light shaper that determines how high the light output is.
Preview
In the next part of this tutorial (Part 9: Professional indoor lighting), I will show you some of my photo work that was taken indoors on location or in my studio. I've also compared several light shapers in a direct comparison so that you can better assess the respective light characteristics. This will help you later on when choosing the right light shaper for defined photographic tasks.
