Observing a total solar eclipse is an incomparable experience and leaves a deep impression.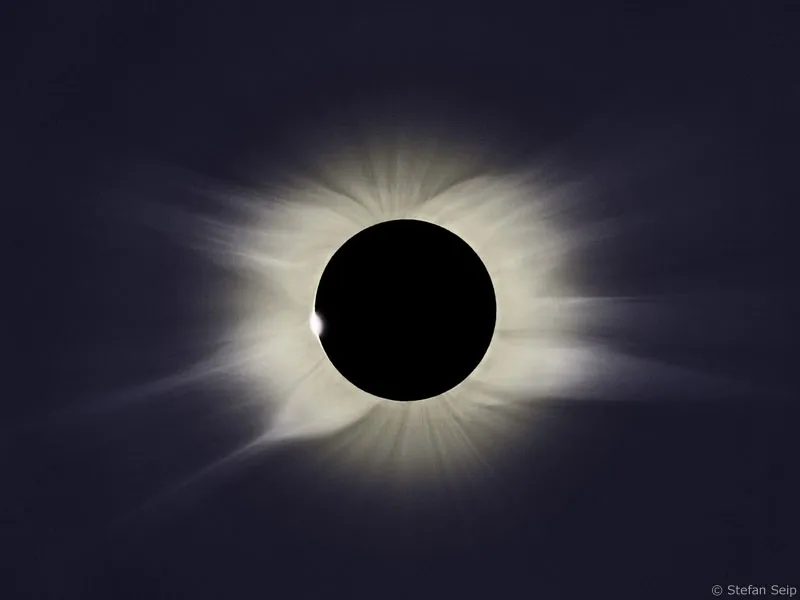
Part 8: Photographing solar eclipses
+++ CAUTION! +++ WARNING! +++ CAUTION! +++ WARNING! +++
As soon as you point an optical device at the sun, there is a fundamental risk that the intensity of the radiation will destroy the device or irreparably damage your eyesight! It is therefore essential that you take all the precautions contained in this tutorial to heart BEFORE taking your own photos of the sun. Thank you.
+++ CAUTION! +++ WARNING! +++ CAUTION! +++ WARNING! +++
If the sun, moon and earth are exactly in line with each other, the shadow of the moon will fall on the earth and a solar eclipse will occur. In principle, a solar eclipse is therefore only possible at new moon.
Although the moon reaches a new moon position every 29 days, 12 hours and 44 minutes, an eclipse does not occur every time. Due to the inclination of the moon's orbit by a rounded five degrees in relation to the Earth's orbital plane, the new moon usually passes to the north or south of the sun without its shadow cone touching the Earth's globe.
Only if the new moon happens to occur at the time when the moon crosses the Earth's orbital plane on its path does its shadow fall on the Earth and cause a solar eclipse.
Globally, solar eclipses are slightly more common than lunar eclipses (see tutorial number 7 in the "Astrophotography and sky photography" series). However, this does not apply if you look at the situation for a specific location on Earth. Then the observable lunar eclipses are more frequent, because a lunar eclipse can be seen from anywhere where the moon is above the horizon, whereas a solar eclipse can only be followed in a limited corridor that is swept by the moon's shadow.
In the last century, 228 solar and 147 lunar eclipses took place.
Despite the position of the new moon, no solar eclipse takes place. This graphic is to be interpreted spatially, the moon's shadow must be imagined in front of or behind the globe (1). The moon (2) passes above or below the sun on its orbit (5) so that its shadow does not hit the earth. The sunlight enters exactly from the left and creates an umbra (4) and a penumbra (3). Distance, size and angle ratios are not to scale. Photo of the Earth: © NASA. The Earth's shadow is not shown.
There are three different types of solar eclipse: The partial, the annular and the total solar eclipse. The decisive factor here is whether only the penumbra or also the umbra of the moon reaches the earth's surface. The penumbral shadow occurs because the sun is not a point source of light, but has an extension. The sun can no longer be seen from areas in the umbra, as it is completely covered by the moon, while in the penumbra the sun is only partially eclipsed by the moon.
1st total solar eclipse
Undoubtedly the most spectacular of all eclipse events is a total solar eclipse. It occurs when the moon's umbra hits the earth. For an observer on Earth who is in the umbra zone, the sun is completely covered by the moon.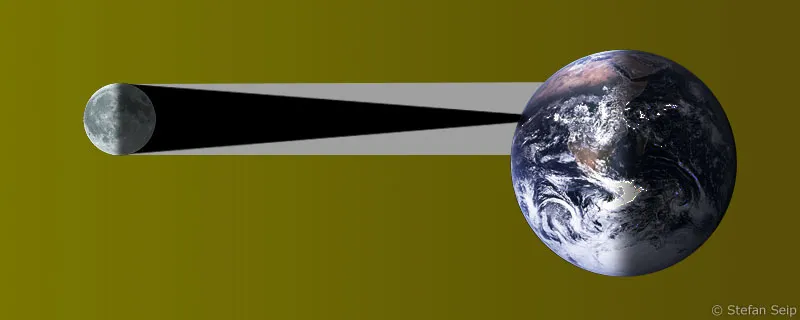
Diagram showing the formation of a total solar eclipse. The tip of the umbra cone reaches the Earth's surface. Photo of the Earth: © NASA.
The diameter of the moon's shadow on the Earth is 273 kilometers in the best case, when the moon is on its elliptical orbit close to the Earth. Due to the rotation of the moon around the earth, this shadow moves across the earth's surface, so that the total solar eclipse is visible at different times within a corridor, the so-called eclipse path. The following diagram shows the complete eclipse path of the total solar eclipse of August 11, 1999: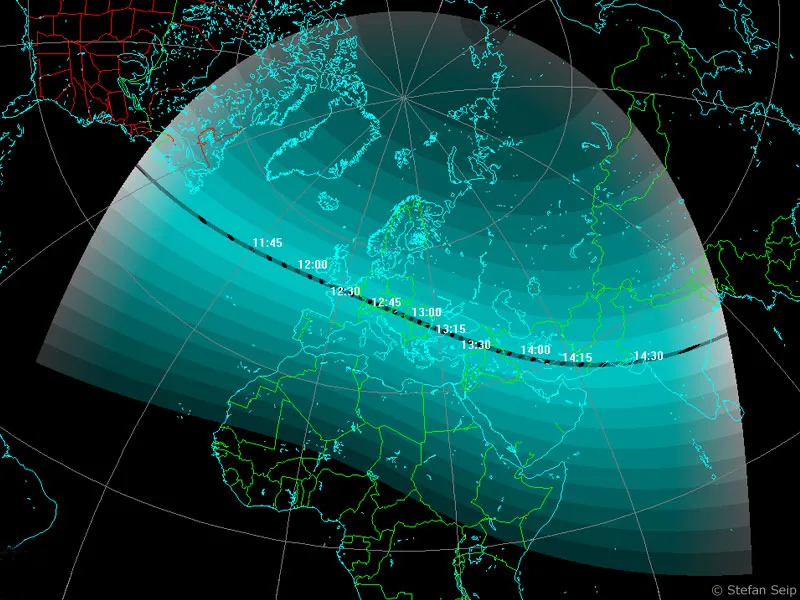
Eclipse path of the total solar eclipse on August 11, 1999. Only within the narrow, dark central line stretching from the western Atlantic across France, Germany to India was the eclipse of the sun actually total. The graphic comes from the "Guide 8" program(www.projectpluto.com).
Of the areas colored in different shades of blue in the graphic, the moon only partially eclipsed the sun and the peak of the total eclipse did not occur. Outside this area, for example in South Africa, there was no solar eclipse on this day.
The same map, zoomed in on Germany: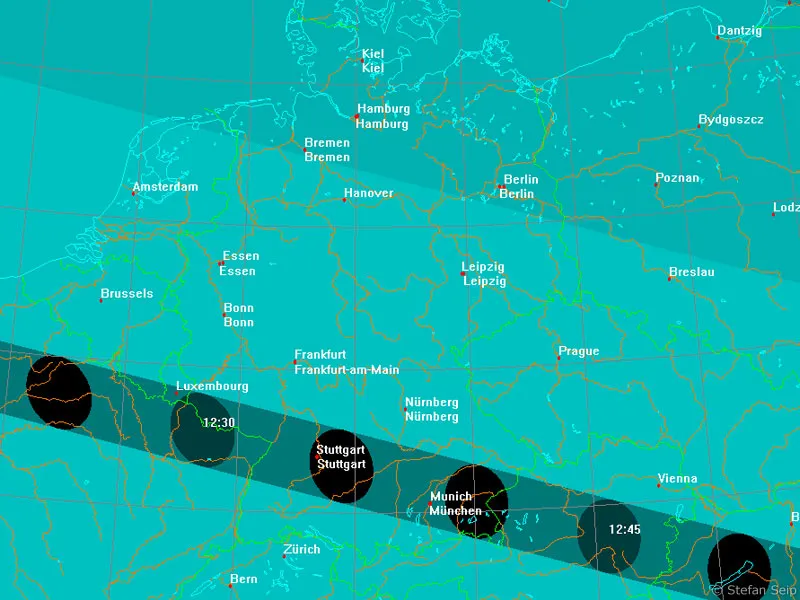
Eclipse path of the total solar eclipse over Germany on August 11, 1999. The path of the total eclipse shows the shape of the moon's shadow at certain times. It can be seen that the eclipse was total in Stuttgart and Munich, but only partial in Berlin and Essen. The graphic comes from the "Guide 8" program(www.projectpluto.com).
Progression: For an observer in the zone of totality, a total solar eclipse begins with the pitch-black new moon gradually moving in front of the blazingly bright sun. This is the partial phase of the eclipse. The same safety rules apply when observing it as when observing the eclipsed sun (see below).
The time when the new moon is visible for the first time as a tiny indentation in the solar disk is known as first contact. After that, the moon obscures larger and larger parts of the sun until the second contact is reached about 80 minutes after the first. This is the moment when totality occurs, i.e. the sun has now completely disappeared behind the moon. The maximum possible duration of totality is 7 minutes and 30 seconds. After this, the third contact occurs and a narrow crescent of the sun becomes visible again. A further 80 minutes later, the eclipse ends with the fourth contact.
Course of the total solar eclipse on March 29, 2006 in Turkey. Collage of 18 individual images. The distances between the individual images are not faithfully reproduced:
For observers outside the zone of totality, the eclipse is not total, but only a partial eclipse. The closer the observation site is to the path of totality, the larger the maximum area of the sun covered by the moon.
Due to the limited size of the moon's shadow, a total solar eclipse is a rare event. On average, a total solar eclipse can only be seen from a specific location on Earth every 375 years. The last one in Germany took place on August 11, 1999, when totality lasted around 2 minutes and 15 seconds. The next one on German soil will not take place until September 3, 2081, when the moon's umbra again passes over southern Germany. The solar eclipse with the longest totality in this century occurred on July 22, 2009 (best observation location: China, duration of totality: max. 6 minutes and 39 seconds).
If you were on the side of the moon facing the earth during a total solar eclipse, you would see the "full earth" in the sky with a dark spot, the shadow of the moon: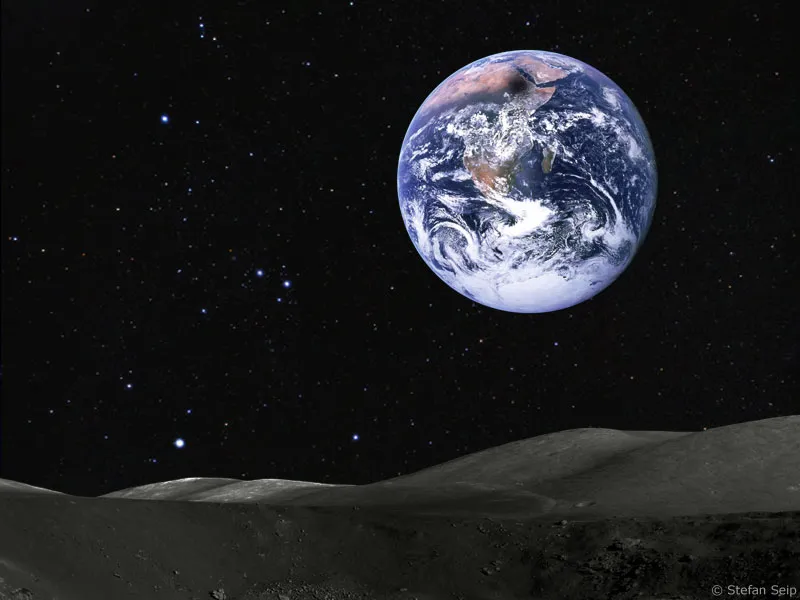
Schematic simulation of the view of a total solar eclipse for an observer on the moon. The dark spot in North Africa on the border with Saudi Arabia represents the shadow of the moon. Two photos from NASA (©) were used for this collage (Earth and lunar landscape).
Anyone who wants to see and photograph the celestial spectacle of a total solar eclipse should therefore be prepared to travel. Quite a few people make pilgrimages halfway around the globe to experience the few minutes of totality. Why?
Let's start with the facts: Although the moon is around 400 times smaller than the sun (in terms of diameter), the sun is also around 400 times as far away as the moon. Due to this coincidence, both celestial bodies have the same apparent size in the sky, so that the moon completely covers the sun during totality. If this is the case, the sun's atmosphere, the corona, becomes visible. It then appears as a bright ring around the black lunar disk.
At times of sunspot minimum, the corona is more differentiated, with the "rays" following the magnetic lines and being longest in the equatorial plane of the sun. If there is a sunspot maximum, the "rays" are approximately the same length in all directions. At the edge of the sun, the prominences become visible, red tongues of flame within the chromosphere, which can otherwise only be seen through special solar filters (H-alpha filters, see tutorial number 6 of the "Astrophotography and Sky Photography" series). During totality, you can and must observe without any protective filters!
But in addition to the facts, there is an emotional component that is probably decisive for many solar eclipse hunters. Shortly before second contact, it becomes increasingly darker and the landscape is bathed in a pale, ochre-yellow light. The temperature drops noticeably, birds stop chirping, dogs start barking and nocturnal animals appear on the screen.
With the second contact, the scenery changes again dramatically. Now the black disk of the new moon stands against the black-blue vault of the sky, surrounded by the corona's halo of rays. Bright stars and planets become visible and you get the feeling that the world is holding its breath. The reactions of the observers vary. Many simply stand there in amazement, others scream, some cry. Still others are so impressed and moved that they forget to press the shutter button on their camera! No, the latter didn't happen to me, but I'm happy to admit that even as I write these lines, the goosebumps from the two total solar eclipses I've already experienced are returning.
2nd annular solar eclipse
If a solar eclipse occurs while the moon is far from the earth on its elliptical orbit, the tip of its shadow cone does not reach the earth's globe. For an observer on Earth, the moon therefore appears relatively small, so that it is not able to completely cover the sun's disk. A glistening bright ring therefore remains visible around the new moon even during the peak of the eclipse.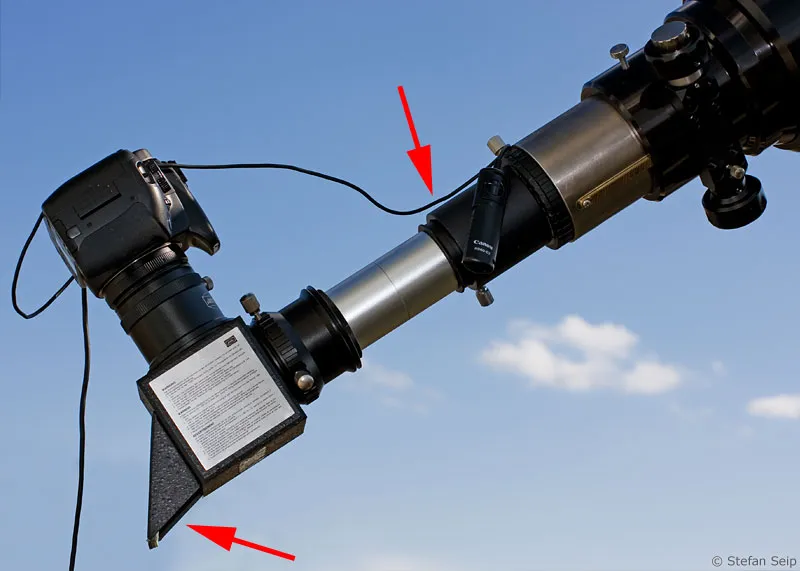
Diagram showing the formation of an annular solar eclipse. The tip of the umbra cone does not reach the Earth's surface. Photo of the Earth: © NASA.
An eclipse path can also be specified for an annular solar eclipse. This is the strip on the Earth's surface within which the eclipse can be observed in an annular shape. Along the center of this path, the moon is exactly in the middle of the solar disk at one point in time. At the edges of the path, however, the moon remains off-center in front of the sun, even during the peak of the eclipse. Outside this path, the eclipse is no longer annular, but partial.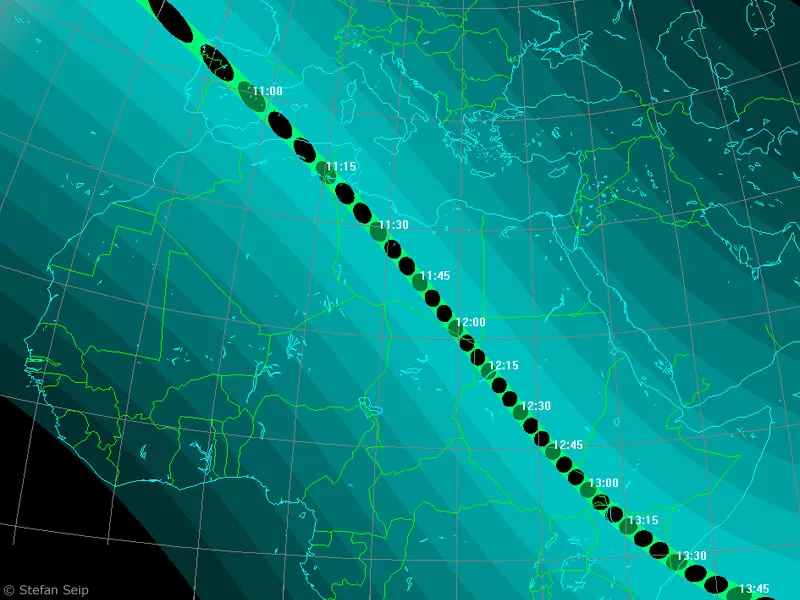
Eclipse path of the annular solar eclipse on October 3, 2005. The narrow central line stretches from the Atlantic across Spain and Africa. The graphic comes from the "Guide 8"program (www.projectpluto.com).
Course: For an observer located within the central line, an annular solar eclipse begins with the first contact, when the edge of the moon touches the edge of the sun for the first time. This is the partial phase of the eclipse. The moon then moves further and further in front of the sun until it is completely visible in front of the solar disk and its edge separates from the inner edge of the solar disk. This is the second contact. The third contact is the moment when the edge of the moon touches the edge of the sun again from the inside. The eclipse ends with the fourth contact, when the sun is completely visible again.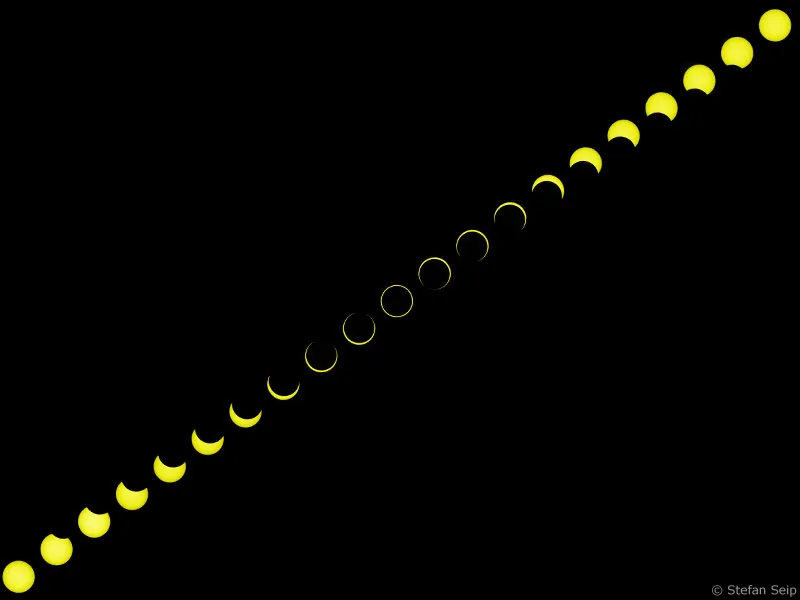
Course of the annular solar eclipse on October 3, 2005 in Spain. Collage of 21 individual images. The distances between the individual images are not faithfully reproduced.
Compared to a total solar eclipse, an annular solar eclipse is less exciting. The corona is not visible at any time. Depending on the area of the sun that the moon darkens during the annular phase, only a weakening of the sunlight is noticeable, which a person who is unaware of the eclipse may not even notice. This is because looking at the sun without a protective filter during the annular phase still shows a glistening bright sun, so that the ring cannot be recognized as such.
However, there are borderline cases in which the eclipse is annular but almost total. The transition is fluid and sometimes even depends on the observation location. Some solar eclipses are hybrid, i.e. they begin and end annularly, while in the middle the umbra cone of the moon touches the earth's surface and the eclipse becomes a total solar eclipse. The reason for this is the spherical shape of the Earth.
The next annular solar eclipse that can be observed in the German-speaking area will take place on July 13, 2075, when the zone of annularity will pass over Austria, Switzerland and northern Italy.
3. partial solar eclipse
A solar eclipse is described as partial when the core shadow cone of the moon passes close to the earth while the penumbra hits the earth.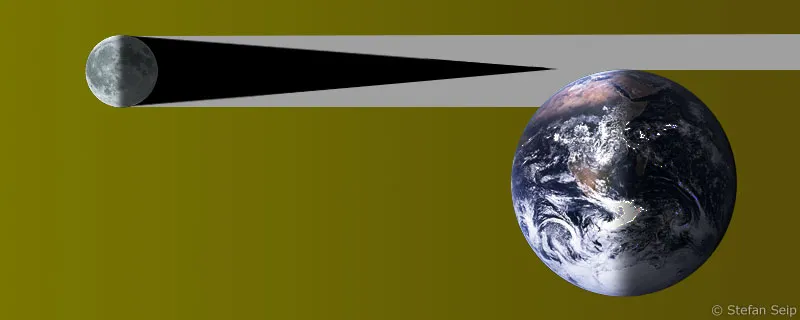
Diagram showing the formation of a partial solar eclipse. The tip of the umbra cone misses the Earth. Photo of the Earth: © NASA.
An eclipse path cannot be specified for a partial solar eclipse. Rather, the representation of the eclipse on the world map only shows the regions from which the eclipse can be observed at all.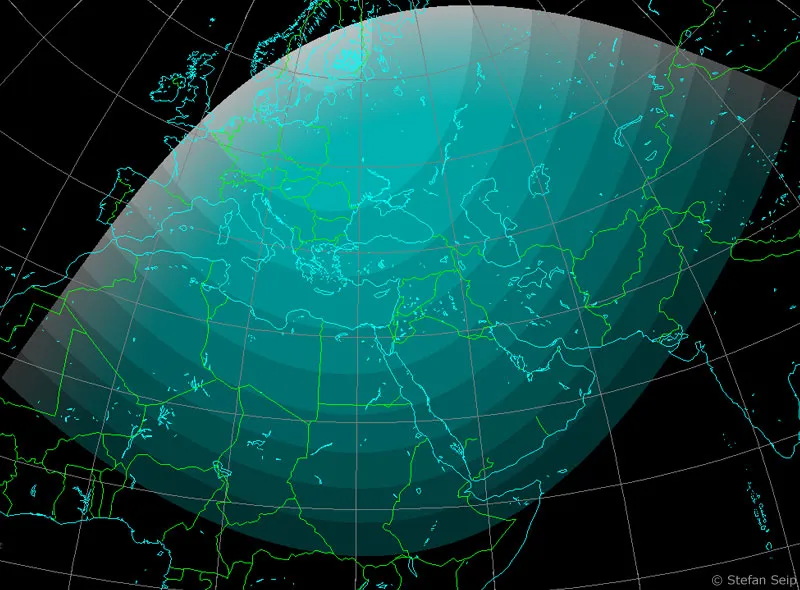
Visibility of the partial solar eclipse on January 4, 2011 The brighter the shade of blue used, the greater the maximum degree of eclipse. In Germany, the moon therefore covers a larger part of the sun than in Central Africa The graphic comes from the "Guide 8" program(www.projectpluto.com).
A partial solar eclipse is characterized by the time of first and second contact, i.e. the entry and exit of the moon in front of the sun. Also of interest is the "center of the eclipse", i.e. the time of maximum eclipse and an indication of the degree of eclipse.
The latter is referred to as the "magnitude of the eclipse" and is a number that is less than 1 and greater than 0. The diameter of the sun is used as a scale and represents the "1", so to speak, while the "size of the eclipse" is used to express the maximum proportion of it that the moon covers. A partial eclipse with a "size" of 0.95 is therefore almost total or annular, whereas a partial eclipse with a size of 0.1 merely "nibbles" at the edge of the sun.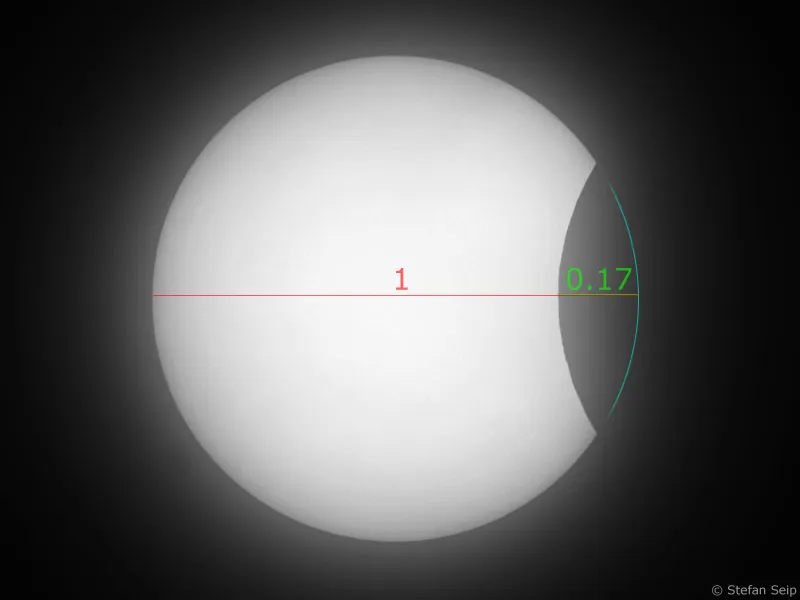
Photo of a partial solar eclipse with a "magnitude" of 0.17. All colored elements have been added to the image for illustrative purposes. The green line is 0.17 times the length of the red line.
Partial solar eclipses are - compared to a total eclipse - unspectacular and are practically unnoticed by unprepared people, even if the size of the eclipse is 0.8, for example. The gradual decrease in daytime brightness is hardly noticeable, and even a heavily eclipsed sun still provides sufficient daylight. Therefore, the use of suitable protective filters (see below) is mandatory during the entire course of the eclipse.
The next partial solar eclipse that can be seen from Germany will take place on January 4, 2011.
Solar eclipses until 2025
The following table lists all solar eclipses up to the year 2025:
| Date Time | Type of solar eclipse | D | Locations for optimum visibility |
| 22.7.2009 3:35 CET | Total | No | India, Nepal, China, Pacific |
| 15.1.2010 8:06 CET | Annular | No | Central Africa, India, China |
| 11.6.2010 20:33 CET | Total | No | South Pacific, Easter Islands, Chile, Argentina |
| 4.1.2011 9:50 CET | Partial | Yes | Europe, Africa, Central Asia |
| 1.6.2011 22:16 CET | Partial | No | Asia, North America, Iceland |
| 1.7.2011 9:38 CET | Partial | No | Indian Ocean |
| 25.11.2011 7:20 CET | Partial | No | Africa, Antarctica, Tasmania, New Zealand |
| 21.5.2012 0:53 CET | Annular | No | China, Japan, Pacific, western USA |
| 13.11.2012 23:12 CET | Total | No | North Australia, South Pacific |
| 10.5.2013 0:25 CET | Annular | No | Northern Australia, Central Pacific |
| 3.11.2013 13:46 CET | Annular / total | No | Atlantic, Central Africa |
| 29.4.2014 7:03 CET | Annular | No | Antarctica |
| 23.10.2014 22:44 CET | Partial | No | North Pacific, North America |
| 20.3.2015 10:.46 CET | Total | Partial | North Atlantic |
| 13.9.2015 7:54 CET | Partial | No | South Africa, South India, Antarctica |
| 9.3.2016 2:57 CET | Total | No | Sumatra, Borneo, Sulawesi, Pacific |
| 1.9.2016 10:07 CET | Annular | No | Atlantic, Central Africa, Madagascar, India |
| 26.2.2017 15:53 CET | Annular | No | Pacific, Chile, Argentina, Atlantic, Africa |
| 21.8.2017 19:25 CET | Total | No | North Pacific, USA, South Atlantic |
| 15.2.2018 21:51 CET | Partial | No | Antarctica, southern South America |
| 13.7.2018 4:01 CET | Partial | No | Australia |
| 11.8.2018 10:46 CET | Partial | No | Northern Europe, north-eastern Asia |
| 6.1.2019 2:41 CET | Partial | No | North-east Asia, north Pacific |
| 2.7.2019 20:23 CET | Total | No | South Pacific, Chile, Argentina |
| 26.12.2019 6:17 CET | Annular | No | Saudi Arabia, India, Sumatra, Borneo |
| 21.6.2020 7:40 CET | Annular | No | Central Africa, South Asia, China, Pacific |
| 14.12.2020 17:13 CET | Total | No | South Pacific, Chile, Argentina, South Atlantic |
| 10.6.2021 11:42 CET | Annular | Partial | Northern Canada, Greenland, Russia |
| 4.12.2021 8:33 CET | Total | No | Antarctica |
| 30.4.2022 21:41 CET | Partial | No | South-east Pacific, south-south America |
| 25.10.2022 12:00 CET | Partial | Yes | Europe, north-east Africa, Middle East, west Asia |
| 20.4.2023 5:17 CET | Annular / total | No | Indonesia, Australia, New Guinea |
| 14.10.2023 18:59 CET | Annular | No | Western USA, Central America, Colombia, Brazil |
| 8.4.2024 19:17 CET | Total | No | Mexico, parts of the USA, eastern Canada |
| 2.10.2024 19:45 CET | Annular | No | Southern Chile, southern Argentina |
| 29.3.2025 11:47 CET | Partial | Yes | Northwestern Africa, Europe, northern Russia |
| 21.9.2025 20:42 CET | Partial | No | South Pacific, New Zealand, Antarctica |
Table with all solar eclipses up to the year 2025.
The table reveals that Germany has little to offer in terms of solar eclipses over the next few years. After the partial eclipse on January 4, 2011, you will have to wait until March 20, 2015 to experience the next eclipse in its partial phase. The next but one will occur on June 10, 2021, also "only" a partial one. If you want to photograph a total solar eclipse, you sometimes have to travel long distances to the eclipse zones, but you have the opportunity to do so almost every year.
Photography of solar eclipses
First of all, I would like to repeat the warning that was already given in Part 6 of the tutorial series "Astrophotography and Sky Photography" ("Be careful when taking photos of the sun").
This warning applies to ALL phases of a solar eclipse without exception, with the exception of the totality of a total solar eclipse.
Only during totality may and must be observed and photographed without a protective filter!
Anyone wishing to observe or photograph the partially eclipsed sun must take certain precautions to avoid damaging their eyesight and/or the equipment they are using. If the light and energy of the sun is bundled in a focal point by using an optical device, high temperatures can be generated that have a devastating effect on eyes and equipment. All it takes is a fleeting glance at the sun through small binoculars or a telephoto lens to irreparably deprive the eyes of their sight! This is true even if only a tiny part of the sun's surface is still undarkened. No photo is worth taking such a risk. Therefore:
Solar observation ONLY with suitable solar protection filters!
Only filters that are specifically designed for solar observation and photography are "suitable". We generally advise against all other solutions, especially the use of various "home remedies". Never use filters for solar observation:
- Soot-blackened panes
- Pieces of developed, blackened film
- "Golden rescue film" from the automotive accessories trade
- Two polarizing filters "twisted" against each other
- Black-looking infrared pass filters (for IR photography)
- Eyepiece filters (small filters that are screwed into the eyepiece of a telescope)
- Damaged solar filters
- Solar filter foils with kinks, holes or tears
Only the following protective filters are recommended:
- Special solar filters BEFORE the lens of optical devices. This prevents the energy from penetrating the device in the first place and cannot cause any damage.
- Special filter film intended for solar observation. The product "AstroSolar", for example, is of good quality and can be obtained from Baader-Planetarium(http://www.baader.planetarium.de or http://www.baader-planetarium.de/sektion/s46/s46.htm) for only EUR 20 per A4-sized sheet. The sheet can be used to make a number of small filters for various lenses yourself. Instructions are included with the sheet. Choose the film with the attenuation factor of ND 5.0 for visual purposes. ND 5.0 means a "neutral density" of 105= 100,000, which corresponds to a light attenuation of 16.6 f-stops!
- Solar protection filter made of glass for the entrance aperture of a telescope. Depending on the diameter required, a solar filter of this type can be very expensive if it is of high quality.
The following points must be observed when fitting and using these filters:
- Educate any people present about the dangers to prevent someone removing the filter "as a joke" while observing.
- Pay particular attention to children at all times.
- Sun protection filters must be firmly and securely fastened and must not fall down due to a gust of wind or mechanical shock. Do not rely on a strip of Sellotape that has already been used several times!
- Also remember to cover viewfinder telescopes etc.
This filter for a photo lens contains "Astro-Solar" filter film and offers optimum protection and good image quality.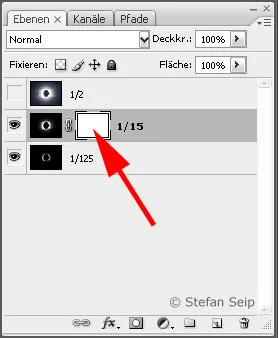
For those who already have relevant experience in observing the sun, the following aids may also be considered:
- Photographic filter film (e.g. "AstroSolar") with an attenuation factor of ND 3.8. With a factor of 12.6 f-stops, this film allows significantly more of the sunlight to pass through than the visual film with an ND factor of 5.0 (see above). With the additional use of appropriate gray filters, the exposure time can be controlled even with the longest focal lengths and/or small aperture ratios so that the exposure time is still short enough to avoid blurring due to air turbulence. The additional use of an infrared/UV blocking filter is absolutely essential!
- Herschel prism, also called Herschel wedge. This optical instrument can only be used in conjunction with a refracting telescope and enables high-quality solar observations. The disadvantage is that it is attached to the eyepiece end of the telescope so that the unfiltered energy of the sun is bundled in the tube. The Herschel prism deflects 95.4% of the incident light out of the device, while the remaining 4.6% can be reduced to the desired residual brightness with additional gray filters.
Highly recommended is the Herschel prism from Baader-Planetarium(http://www.baader-planetarium.de/sektion/s37/s37.htm#herschel), which does not allow the unused radiation to escape, but eliminates it by means of an elaborately constructed "light trap".
When using both methods, it must be borne in mind that the residual brightness of the sun without the use of additional gray filters is still so high that the eye can be damaged.
A Herschel prism in use. The left arrow points to the point where the unneeded light leaves the prism. Newer designs have a built-in "light trap" there.
In the case of digital cameras, it is the sensor that can be destroyed if it is exposed to the high, unfiltered brightness and heat of the sun. A sharp, focused image of the sun on the sensor can cause damage within a relatively short exposure time if no protective filter is used. Compact and Bridge cameras that use the image sensor to create the viewfinder image are particularly at risk, as are digital SLR cameras in "live view" mode. When using a tripod, the risk increases because the sun can then act on the same part of the sensor over a longer period of time.
A "normally" exposed landscape shot, in which the partially eclipsed sun can be seen in the picture very close to the horizon and thus greatly attenuated, can be taken with a digital SLR camera, but if possible without using the "Live View" function.
It is also safe to use any camera system behind a lens with a solar filter attached.
Recording technique
Partial and annular phase
Photos of the partial phase of a solar eclipse, which in this case also includes the annular phase, are taken in exactly the same way as photos of the eclipsed sun. At this point, I therefore refer you to part 6 of the tutorial series "Astro and sky photography" entitled "Be careful when taking photos of the sun".
In order to document the different stages of an eclipse with several images, you should keep the same exposure settings for all images, as the surface brightness of the still eclipsed surface of the sun does not change. This means that even a narrow solar crescent is photographed with the same exposure as the eclipsed sun. The exposure only needs to be adjusted if rising or receding clouds or a sharply falling or rising altitude above the horizon have an influence on the brightness of the sun.
This means that completely normal sunny days without an eclipse can be used to obtain practice shots for an upcoming eclipse. Photographing the non-eclipsed sun is therefore good preparation to avoid making any mistakes at the time of a partial solar eclipse.
Totality
The few precious minutes during which the sun is totally eclipsed must be used as efficiently as possible. There is no chance to simulate the conditions of totality in advance in order to take test shots. And after totality has ended, the opportunity for a second attempt only arises after a long time. Therefore, all settings on the camera should be correct.
Anything that takes a lot of time should be avoided, as experience has shown that people get quite nervous during the peak of a solar eclipse, which increases the risk of errors. It is not advisable to "modify" the camera, for example by changing the lens or connecting the camera to a laptop. Remember that it gets very dark during totality, which makes it difficult to operate the camera, and have a flashlight ready for this purpose.
I recommend the following basic settings:
Focal length
The sun's corona extends far into space. In order to capture even its faintest fringes, the focal length used should not exceed 500 millimetres (full format) or 300 millimetres (APS-C format = 1.6x "crop factor"). Only if you want to show details, such as the "string of pearls phenomenon" (see below) or prominences at the edge of the sun, should longer and longer focal lengths be preferred. As a rule, this means using an astronomical telescope instead of a telephoto lens.
Sharpness
Precise focusing is important, especially if you want to work with an open aperture, as the depth of field is then minimal. You cannot rely on autofocus during totality and there is no time for LiveView. I therefore advise you to focus carefully during the partial phase, using an AstroSolar film filter in front of the front lens! The filter is removed after the onset of totality, so that the focus does not shift. Important: Always switch off the autofocus after reaching the best focus point ("MF" instead of "AF")!
Exposure
The brightness gradient of the solar corona is immense. The luminosity of the inner area exceeds that of the finest outer extensions many times over. Neither film nor digital cameras can capture this dynamic range in a single image. The way out of this dilemma is to use a series of exposures with different exposure times (and/or ISO values): With tight exposures, the inner part is correctly exposed, while the low-light regions are totally underexposed and are not visible in the image. Images with ample exposure then show the low-light outer areas, whereby a complete overexposure of the central areas cannot be avoided.
The final result is later created in Photoshop from the individual shots of this "exposure fan". How this works is described in detail in the "Image processing" chapter (see below).
Vary the exposure over a wide range because the conditions are unpredictable. For example, in order not to overexpose the brightest areas and to make the prominences visible, I used the setting:
ISO 100, 1/1000 second at Blender f/4.8: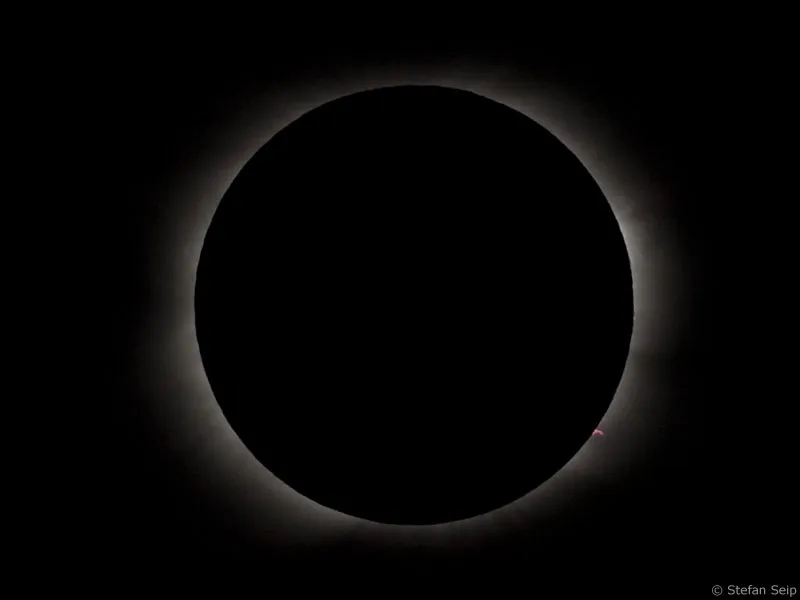
Raw image (unprocessed) of a total solar eclipse, taken at ISO 100, 1/1000 second at Blender 1:4.8. Shown is a cropped enlargement from the center of the image.
At the other extreme was a very rich exposure, which even resulted in details on the surface of the new moon:
ISO 200, 1.5 seconds at Blender f/4.8: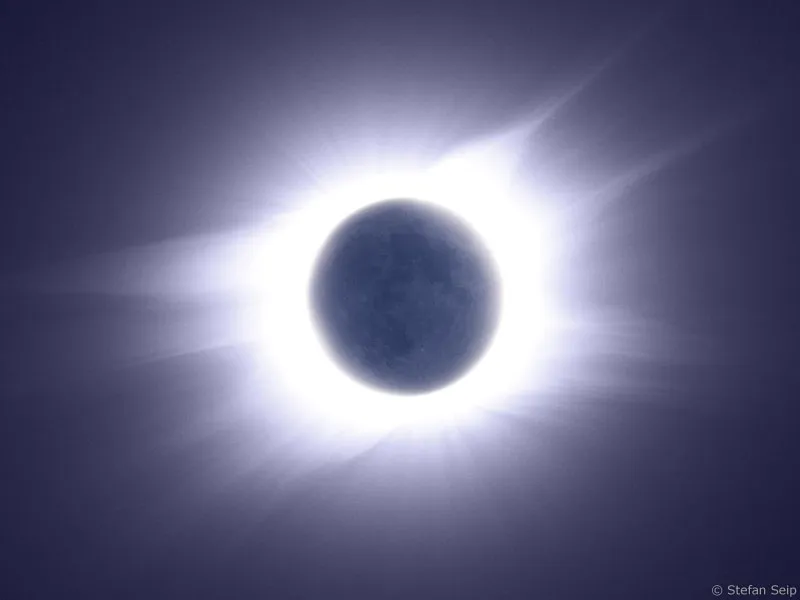
Total solar eclipse, taken at ISO 200, 1.5 seconds at f/4.8.The surface structures of the new moon became visible because the bright "full earth" illuminated them - a shot,rarely seen! The strong overexposure of the central corona areas was accepted for this. Shown here is a slightly enlarged section.
With a "medium" exposure, individual images worth seeing can be created. However, these usually show overexposure in the central area and underexposure of the peripheral corona:
ISO 100, 1/15 second at Blender 1:4.8: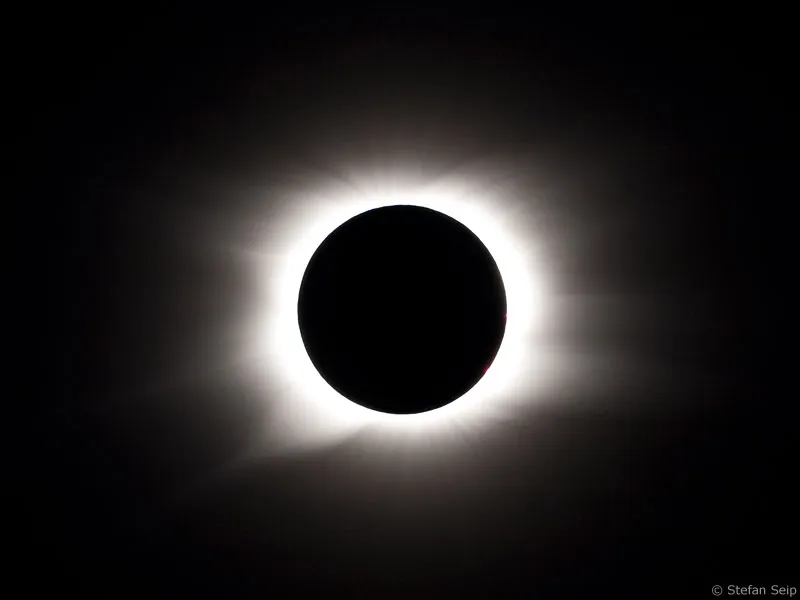
Unprocessed raw image of a total solar eclipse, taken at ISO 100, 1/15 second at Blender 1:4.8. Shown is a cropped enlargement from the center of the image.
The examples shown show that it is really worth varying the exposure over a wide range. However, this takes time and must be done quickly. I would therefore recommend working in steps of two. When changing the exposure time, for example, 1/1000 sec, 1/250 sec, 1/60 sec, 1/15 sec, etc. Leave out the intermediate steps, whereby the camera setting also plays a role. In many cases, the basic camera setting is to change the exposure in thirds. It is somewhat quicker if the camera is configured so that the exposure can be set in half steps.
However, don't just think about the photos during a total solar eclipse, but also plan a little time to look at the totally eclipsed sun (perhaps with binoculars)!
Important: Always finish your series of photos in good time before the end of totality! Otherwise you run the risk of starting a longer exposure after the third contact, the bright sun will reappear and the sensor of your camera will be damaged. It is best to put the sun protection filter back in front of the lens immediately after completing the series of shots.
With very long exposure times and focal lengths, remember that the camera may have to be readjusted in order to obtain a sharp image. For this reason, I am again listing the table with the maximum permissible exposure times when the camera is firmly mounted on a photo tripod:
Focal length [mm] | Maximum exposure time [s] |
200 | 0,7 |
500 | 0,3 |
1000 | 1/15 |
2000 | 1/30 |
If these limit values are exceeded, the ISO number must be increased if necessary. Alternatively, you can mount the camera and lens on an astronomical mount that tracks the camera to the movement of the sky. The handling of such a mount is described in detail in the next part of this tutorial series "Astrophotography and Sky Photography".
Miscellaneous
- Tripod - the use of a stable tripod is mandatory to avoid camera shake. It should be stable enough to do without a mirror lock-up, as this costs valuable time.
- Cable release - also a must to avoid camera shake despite the use of a tripod. Of course, a wireless remote control also fulfills this purpose, whereby fresh batteries should be used.
- Image stabilizer - if the lens or camera used has an image stabilizer (IS), you should switch it off when the camera is mounted on a tripod.
- Exposure program - only the Manual (M ) setting is suitable , otherwise the desired exposure series cannot be achieved.
- ISO value - as low as possible to minimize image noise and as high as necessary to prevent blurring with a fixed camera and relatively long exposure times.
- White balance - the best setting is daylight ( sun symbol , 5200 K).
- File format - always set to RAW to take advantage of the slightly better dynamic range compared to the JPG format.
- Memory card - an empty, freshly formatted memory card with sufficient capacity is a good prerequisite.
- Battery - only a fully charged battery is suitable. A spare battery within easy reach provides additional safety.
- Sensor cleaning - if necessary, clean the sensor before the eclipse.
- Setting the date and time - seconds count during a solar eclipse. To ensure that the photos have the correct time stamp in the Exif data, it is advisable to set the time to the nearest second.
How to proceed
You capture the partial phase of solar eclipses in the same way as images of the eclipsed sun (see part 6 of the tutorial series "Astrophotography and sky photography": "Be careful when taking photos of the sun"). I will therefore limit myself here to the phase of totality.
When totality is reached, the conditions change abruptly. If you have previously taken photos of the partial eclipse with the camera, the shooting parameters must be changed just as suddenly. To set the above parameters on the camera as quickly as possible, it is advisable to save them in advance as "camera user settings". Only some cameras offer this function, such as the Canon EOS 40D, where three such configurations are saved and can then be called up in a flash by setting the mode dial to "C1", "C2" or "C3". This not only saves time, but also avoids errors.
Once the camera is set as desired and the focus is set, the next step is to take the series of shots with the different exposures in the shortest possible time.
Important: AFTER totality has occurred , the sun protection filter must be removed!
Start with a very slow shutter speed (e.g. 8 seconds) and reduce this speed by two steps for each subsequent shot:
8 - 2 - 0.5 - 1/8, 1/30, 1/125, 1/500, 1/2000, 1/8000 sec.
If the phase of totality is long enough, you can also proceed in steps of one level:
8 - 4 - 2- 1- 0.5 - 1/4, 1/8, 1/15, 1/30, 1/60, 1/125, 1/250 - 1/500, 1/1000, 1/2000, 1/4000, 1/8000 seconds.
If you want to invest even more time in your photos, repeat the series, starting again with the longest time. The short exposures are then at the end of the series. When the third contact takes place, a long exposure should never be taken!
Important: The sun protection filter must be replaced BEFORE the end of totality!
A slightly different procedure is necessary if you want to capture the following phenomena:
Diamond ring effect
A "diamond ring" can occur shortly BEFORE and shortly AFTER totality if the lunar limb profile contains a valley through which a tiny area of the bright solar disk is visible. This area then forms the "diamond" of the ring for a short time: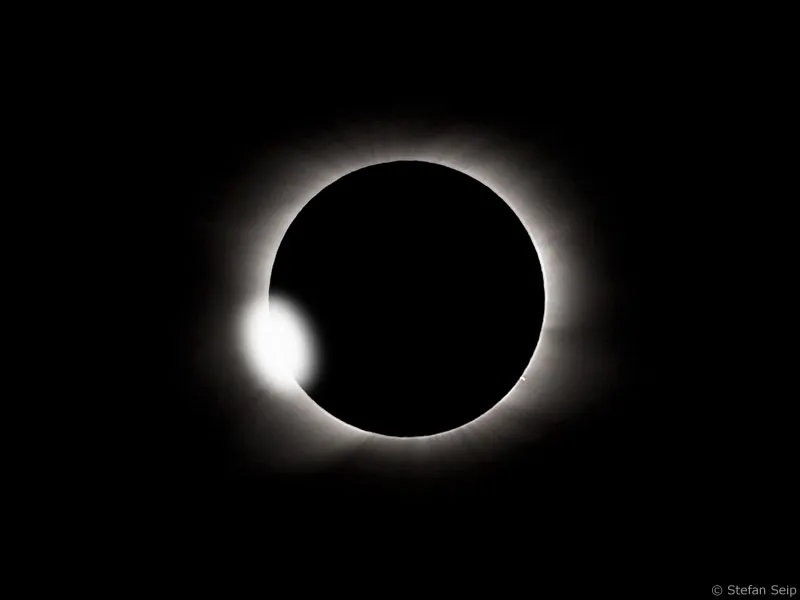
A diamond ring effect heralded the end of totality of the solar eclipse on March 29, 2006.
As the "diamond ring" is a very short-lived phase of the eclipse, it is best to set the camera to continuous shooting mode and the exposure to, for example:
ISO 100, 1/500 second at Blender 1:4.8.
As soon as the diamond ring effect appears, run the camera in continuous shooting mode and take as many pictures as possible.
Images of the diamond ring effect are taken without a solar filter attached. Therefore, extreme caution is required!
String of pearls phenomenon
The string-of-pearls phenomenon also occurs because the edge of the moon is not a smooth, exact curve, but shows a profile formed by lunar mountains and valleys. Shortly before and shortly after totality, the extremely narrow crescent of the still visible (or already visible again) sun has strikingly bright and dark areas. The brighter regions are lunar valleys, and where the crescent is "interrupted", a lunar mountain rises above the edge of the moon.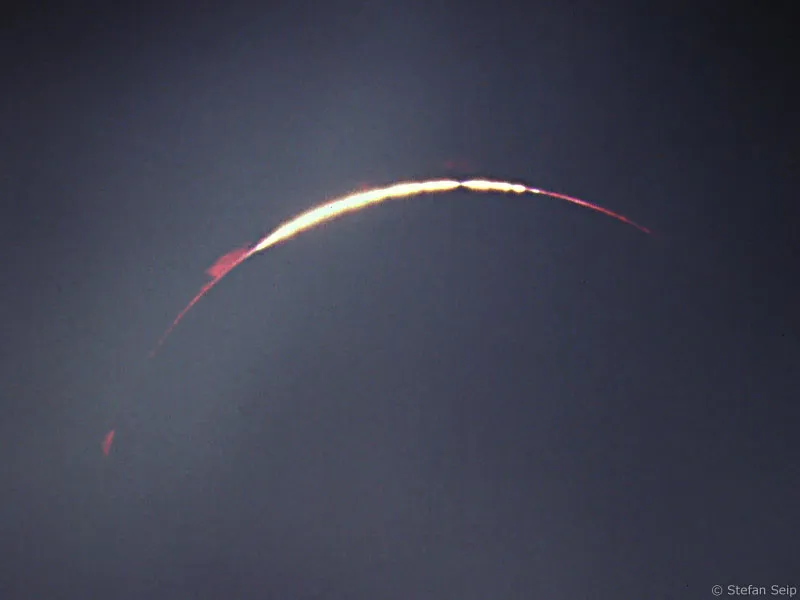
String of pearls phenomenon of the total solar eclipse on August 11, 1999, photographed on chemical film. The red chromosphere of the sun with scattered prominences can be seen next to the string of pearls.
If you want to photograph the string of pearls phenomenon, we recommend using the longest possible focal length. The procedure is the same as when photographing the diamond ring effect. Here, too, you are working without a solar filter in place, so extreme caution is required to prevent damage to the camera and/or eyes.
Image processing
Using three individual photos with different exposure times taken during the total solar eclipse on March 29, 2006, image processing is used to create an image that makes the entire dynamic range of the solar corona visible. However, this is only a matter of principle, because in an "emergency" more than three images would be processed in this way.
To carry out such processing yourself, download the exercise file "SoFi_Arbeitsdatei.zip" and unzip the archive. It contains three photos "SoFi01.jpg" to "SoFi03.jpg". Open all three images at the same time in Photoshop.
The only difference between the photos is the exposure time:
SoFi01.jpg: 1/125 second
SoFi02.jpg: 1/15 second
SoFi03.jpg: 1/2 second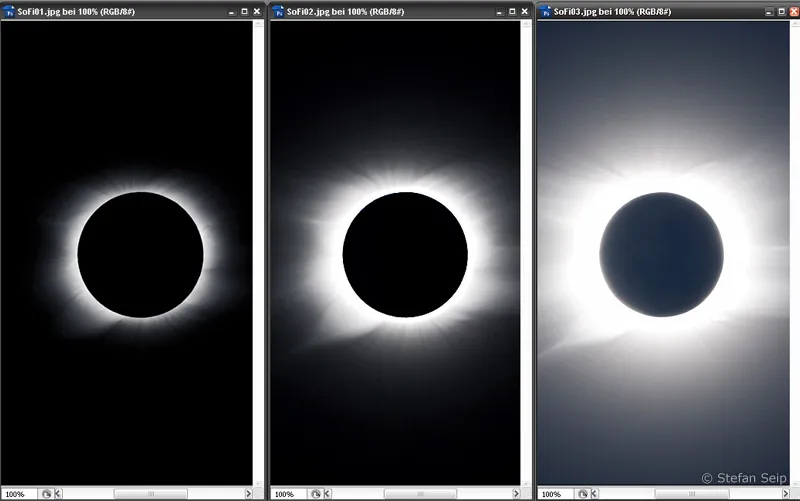
The three photos of a total solar eclipse opened with Photoshop, taken from left to right with increasing exposure time.
The initial aim is to combine all three images as layers in a single file, with the image with the shortest exposure time at the bottom and the image with the longest exposure time at the top.
"SoFi01.jpg" will therefore be our working file. To insert "SoFi02.jpg" there as a second layer, switch to SoFi02.jpg with the Photoshop command Window>SoFi02.jpg. Now you need the layer palette, which is displayed - if necessary - by pressing the F7 key. You will then see the only layer in this file. It has the name "Background".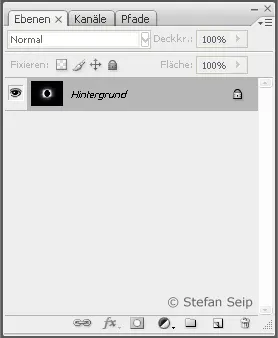
Layer palette with the only layer called "Background".
If you now click on the word "Background" with the secondary (usually right) mouse button, a context menu appears in which the command Duplicate layer... is selected: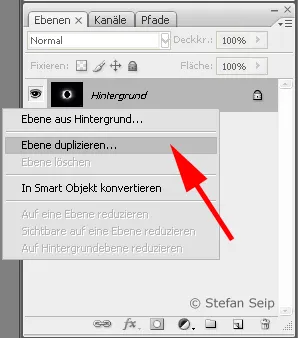
A duplicate of the background layer is created.
A dialog box then appears in which I have entered the exposure time of SoFi02.jpg, i.e. "1/15", under As:. However, it is more important that the document SoFi01.jpg is selected under Target: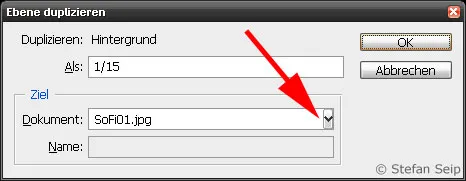
The name and destination of the duplicate are specified.
Confirm with OK and a copy of SoFi02.jpg will be created as the second layer in the SoFi01.jpg image.
Now switch to SoFi03.jpg with the Photoshop command Window>SoFi03.jpg and proceed in the same way (duplicate layer):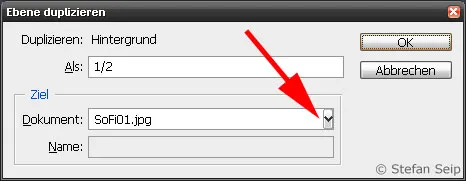
A duplicate of the image with the longest exposure time is added as the third layer of the file "SoFi01.jpg".
Now switch to SoFi01.jpg with the Photoshop command Window>SoFi01.jpg, then you can see for yourself in the layer palette that this file now consists of three layers: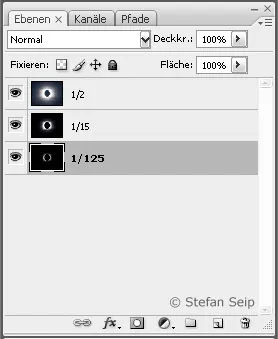
The three resulting layers of "SoFi01.jpg". I renamed the bottom layer, which was originally called "Background", by double-clicking on the word "Background". I used "1/125" as the name, so that ultimately all layers contain a reference to the exposure time.
Now hide the "1/2" layer by clicking on the symbol with the eye to the left of the reduced image. The "1/15" layer then becomes visible. Activate it by clicking on the layer name "1/15":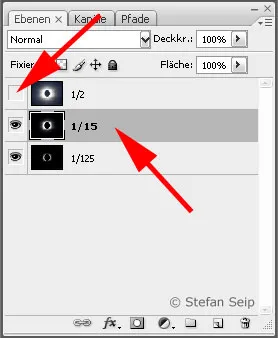
Click on the "eye" to the left of the layer "1/2" to hide the layer (upper arrow). Then click on the middle layer (lower arrow) to activate it; it will then have a dark gray background.
Now add a new layer mask to this layer by clicking on the corresponding icon: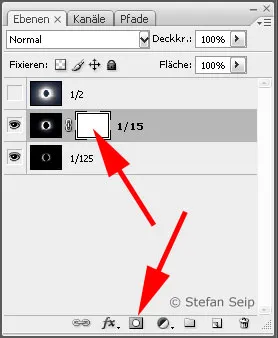
Clicking on the corresponding icon (bottom arrow) creates a layer mask. This is then visible as a white area (upper arrow).
Now you need the selection ellipse tool to create a circular selection marker around the moon. Tip: If you hold down the Shift key while doing this, you will create a circle and not an ellipse. Once you have finished, you can move the selection with the mouse or the arrow keys to center the selection around the moon disk.
If the selection fails, delete it with Ctrl+D and try again. The result should look something like this: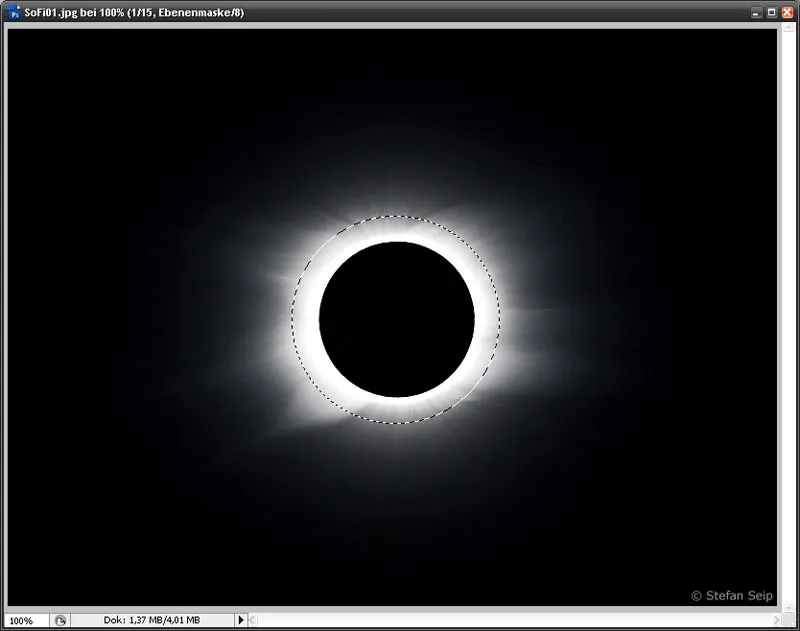
The circular selection to be created should include all areas that are overexposed.
Now hold down the Alt key and click on the layer mask in the layer palette.
The "Alt" key remains pressed while you click on the layer mask.
The displayed image will then turn white, but the circular selection will remain visible!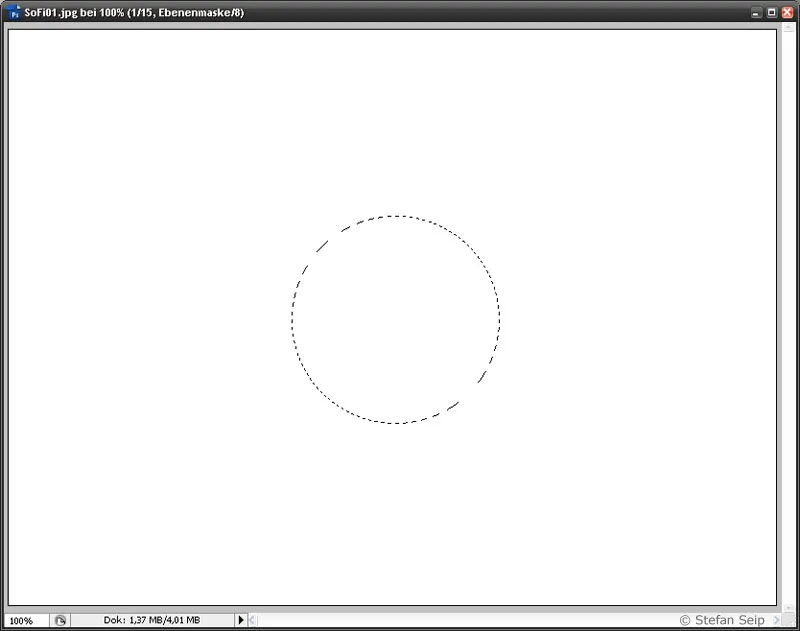
The layer mask is now visible. In this specific case, a white image in which the circular selection is visible.
Now press the D key to ensure that white is the foreground color and black is the background color.
Now fill the selection with the background color, preferably using the key combination Ctrl+Backspace (Backspace is the delete key with the left arrow symbol ). The circle is now filled in black:
Circle selection after filling with the color black.
Now delete the selection with Ctrl+D.
Now click first on the image of the solar eclipse, to the left of the layer mask, and then on the layer mask again.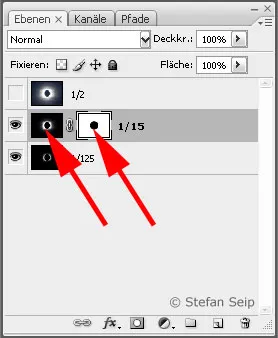
First click on the image (left arrow), then click on the layer mask again (right arrow).
The solar eclipse will then become visible again in the image window. However, pay attention to the title bar of the image window; it must say "Layer mask":
If the word "Layer mask" appears in the title bar of the image window, all subsequent commands refer to the mask and not to the photo. You can also see that the mask boundary is still sharp.
The layer mask causes the lower image (SoFi01.jpg; 1/125) to show through the second layer (SoFi02.jpg, 1/15) where the layer mask is black. Because the layer mask contains a sharply defined circle, the transition is still abrupt and very unattractive at the moment. Therefore, we will now blur the layer mask using the Photoshop command Filter>Blur Filter>Gaussian Blur... I would suggest the value 12 as the radius in the dialog box that appears:
Blur Layer Mask.
After confirming with OK, the edge is softer but still visible. For this reason, we then shift the gray value of the layer mask with the Photoshop command Image>Adjustments>Tone value correction..., from its position "1.00" to "2.80":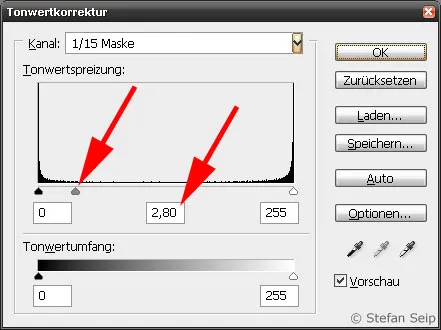
Shifting the gray value of the layer mask. The gray value is represented by the gray triangle (left arrow) and the numerical value in the middle field (right arrow).
The transition edge is now no longer visible: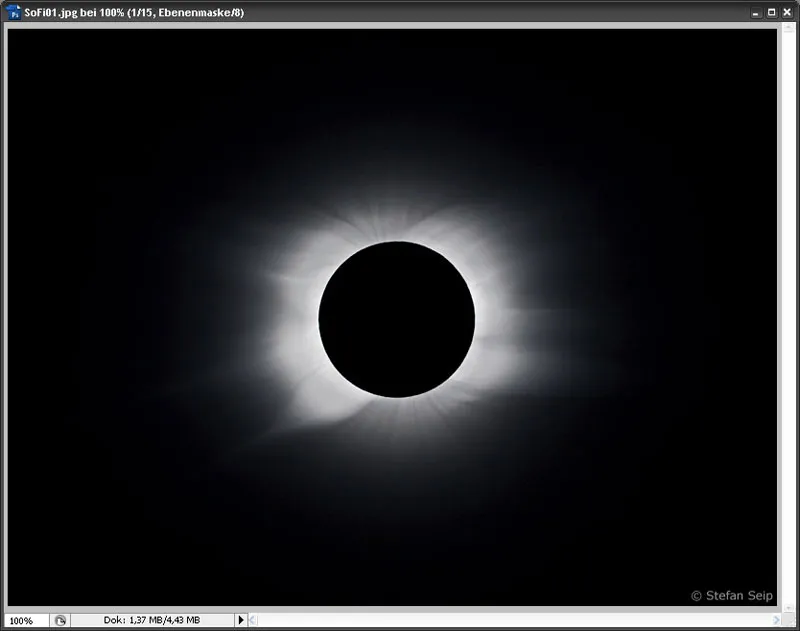
Editing the mask creates a smooth transition.
Now show the third layer (SoFi03.jpg, 1/2) again by clicking on the empty box in which the eye symbol then appears: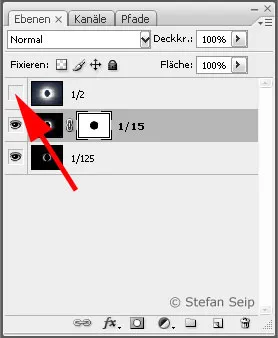
Display the top layer by clicking in the empty box to the left of layer "1/2".
The steps from the creation of the layer mask must now be repeated for this layer. This means
Create a new layer mask and create a circular selection, which must now be a little larger: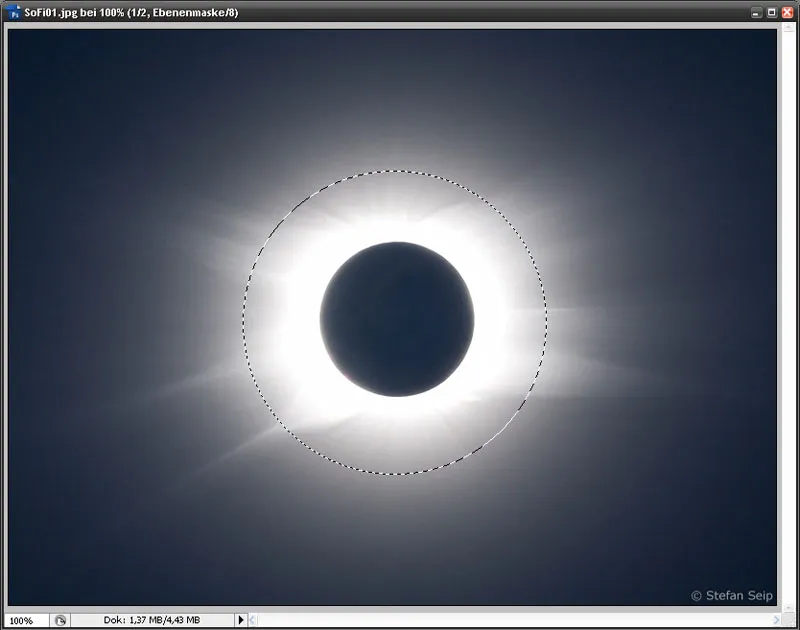
The selection for the third layer must be larger because the overexposed area is larger.
Alt-click on the layer mask and fill the selection with black. Then click on the reduced image and then on the layer mask again. Now blur the layer mask, in this case I have selected a radius of 40: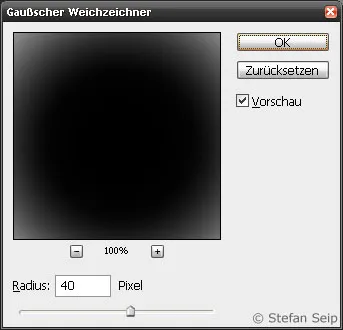
The blurring is now also slightly more intense than in the first pass.
After subsequent tone value correction (gray value to 2.80), the result is already impressive: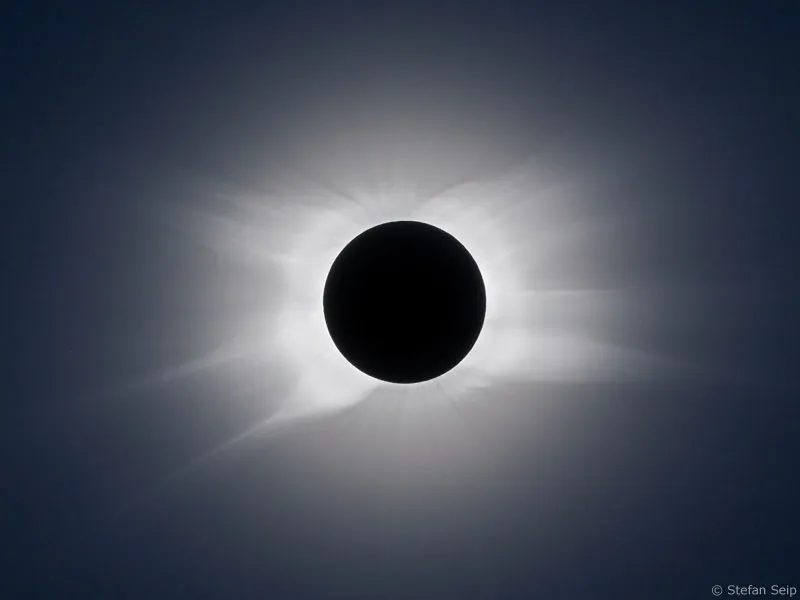
Preliminary result showing both the innermost and outer areas of the corona.
The final touches are made to another layer. To do this, select the entire image with Ctrl+A and then select the Photoshop command Edit>Copy reduced to one layer. Followed by the Edit>Paste command, which adds the result of the previous work as a new, fourth layer.
In this layer, I suggest increasing the contrast. To do this, you can select the Image>Adjustments>Gradation Curves... command and bend the curve to your heart's content in the dialog box that appears, whereby personal taste plays a role: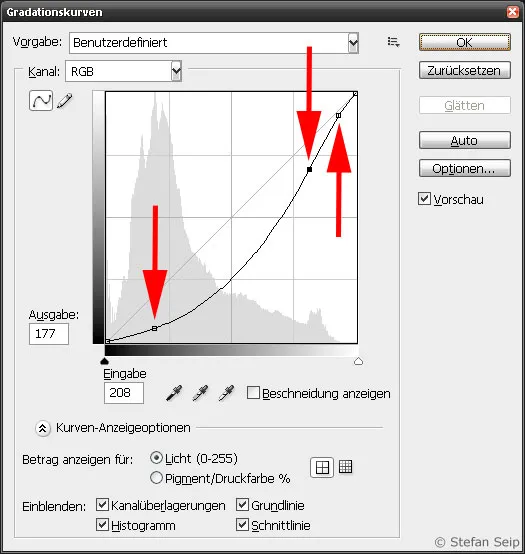
By bending the gradation curve, the result can be influenced in almost any way.
In the case shown, I lowered the lower tonal values, but made sure that the bright areas of the image were not darkened too much. This approach led to the final result: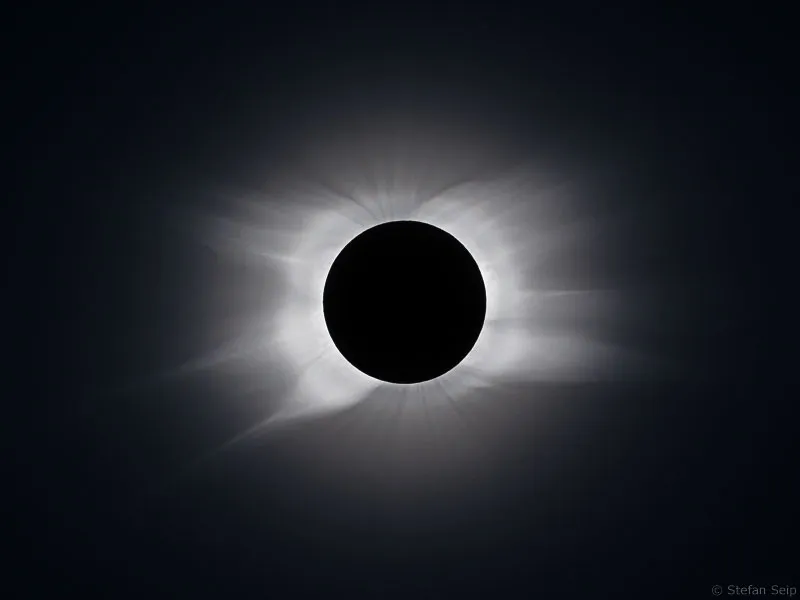
Final result that is a first approximation of the visual impression through binoculars.
Sample images
Partial solar eclipse on August 1, 2008 in Germany. The new moon only "nibbled" at the sun. In this case, the clouds hardly interfered and even helped to make the image more interesting.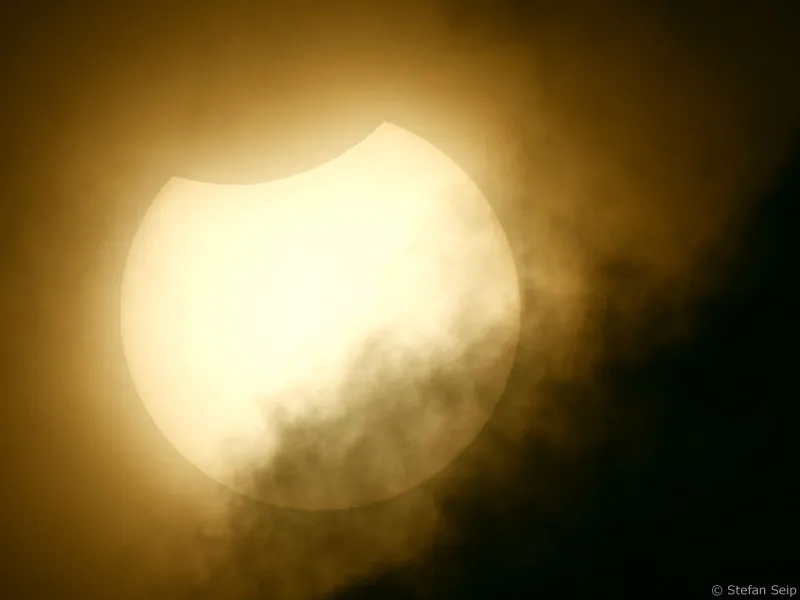
Three different photos of the partial solar eclipse on August 1, 2008. They were assembled in such a way that the largest possible section of the lunar limb profile is visible. Light clouds add to the "artistic" aspect of this photograph.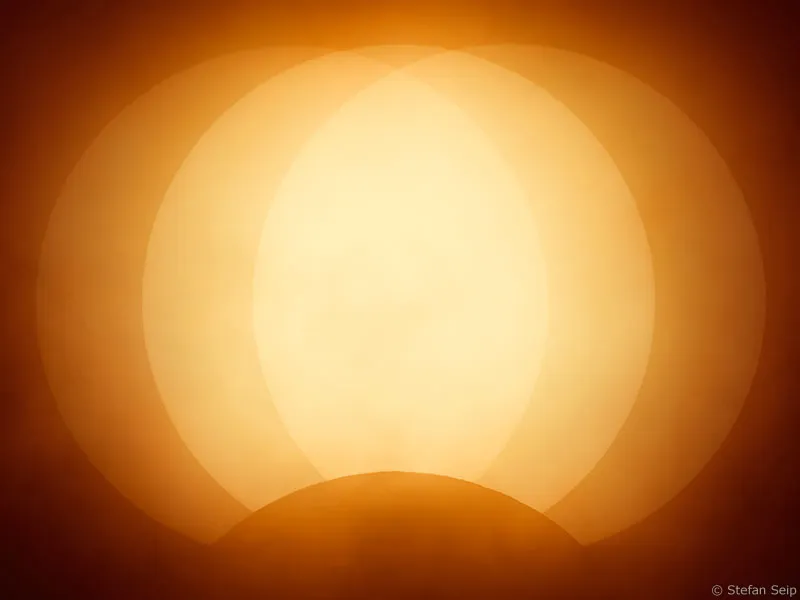
Rise of the partially eclipsed solar crescent on May 31, 2003.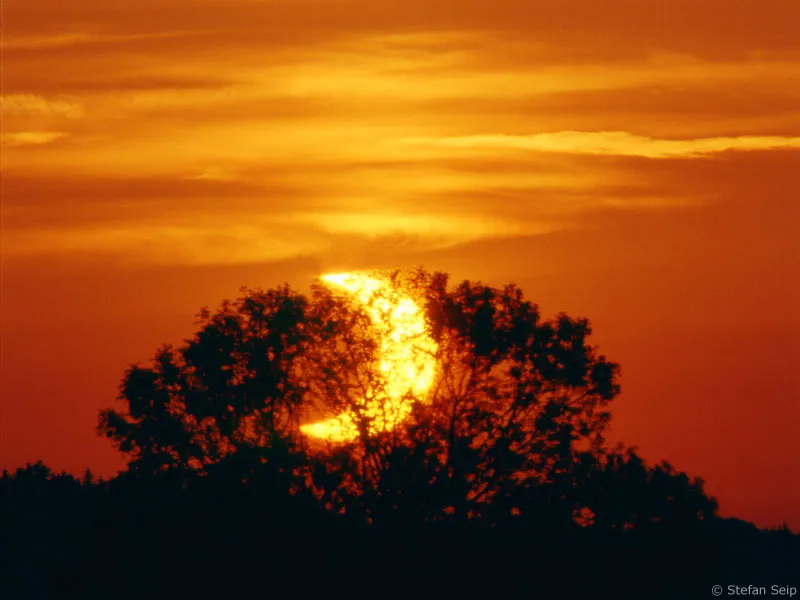
Annular solar eclipse on October 3, 2005 in Spain. The photo was taken through an H-alpha filter; otherwise the prominences would not be visible.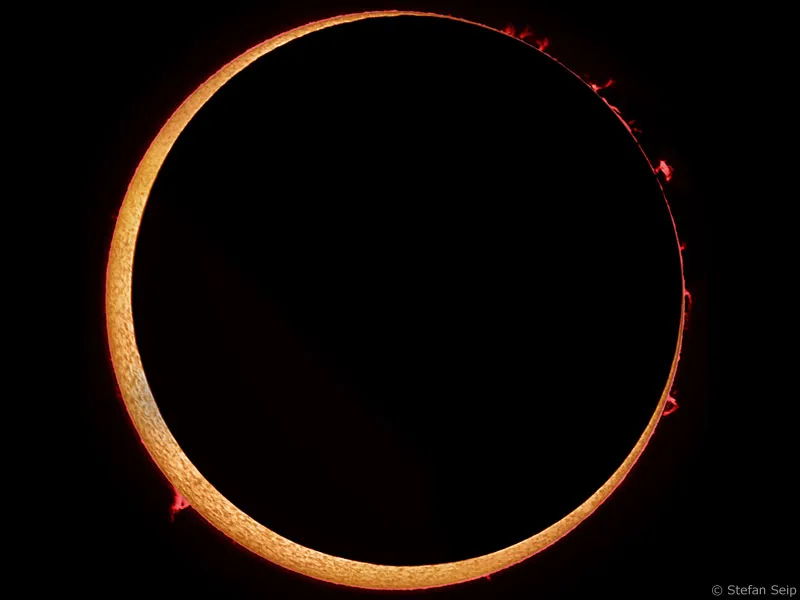
Annular solar eclipse on October 3, 2005 in Spain. Two H-alpha photos of the eclipse were mounted in such a way that one has the impression of being able to recognize the circular new moon in the middle. This montage also contains two photos of the moon, taken 26.5 hours before the eclipse (left) and 58 hours after (right).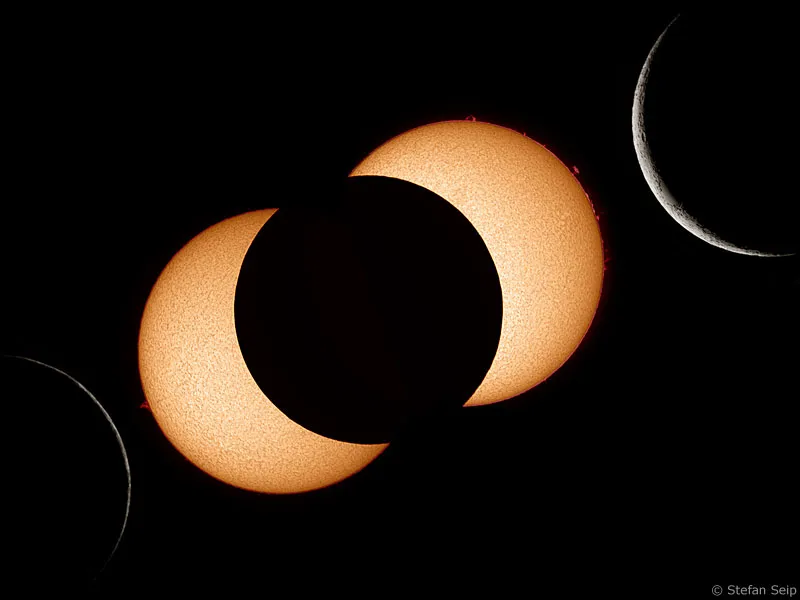
Annular solar eclipse on October 3, 2005 in Spain. The course of the eclipse was added to the landscape by 23 individual shots, as explained in Part 7 of the tutorial series "Astro and Sky Photography": "Lunar Eclipses"). The distances between the individual images are not faithfully reproduced: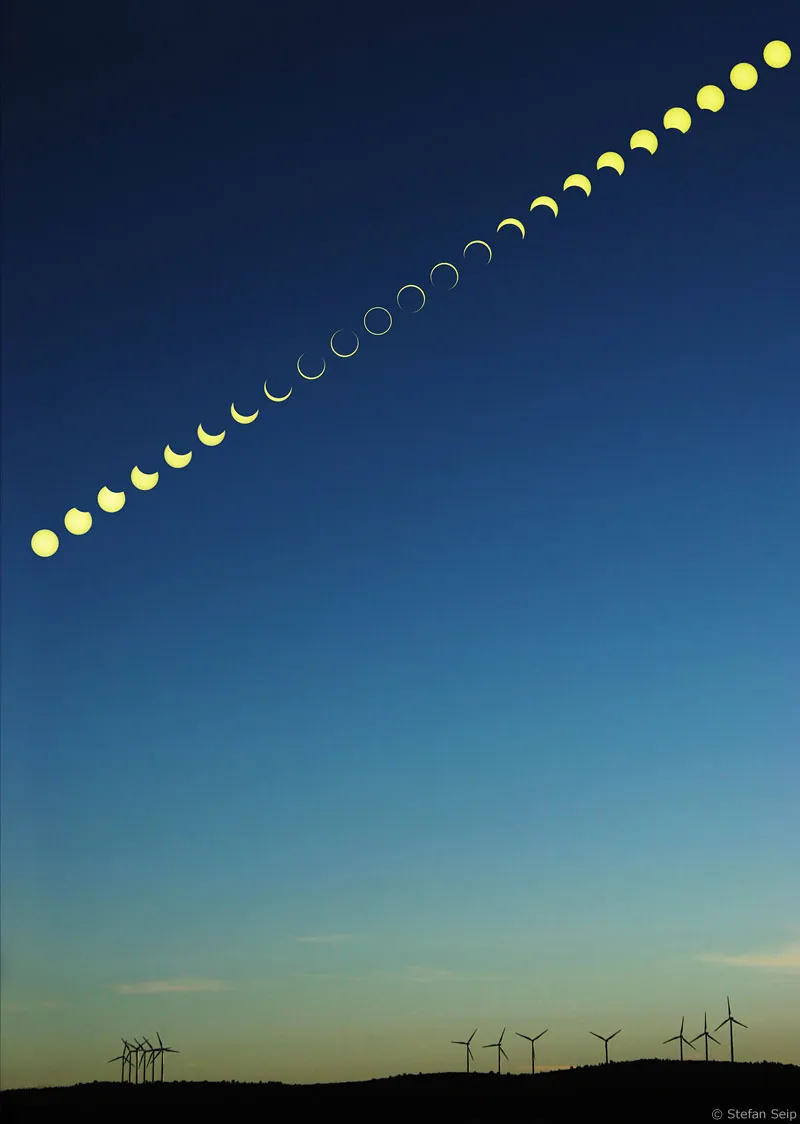
Annular solar eclipse on October 3, 2005 in Spain. Two H-alpha images taken at different times during the eclipse have been arranged to create a stereo effect.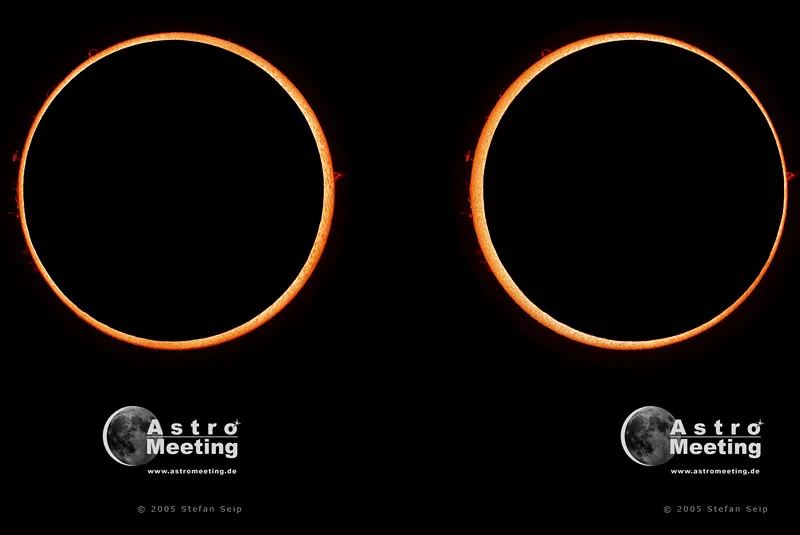
If you manage to look at this image using the "squinting technique", you will see the new moon hovering in front of the solar disk!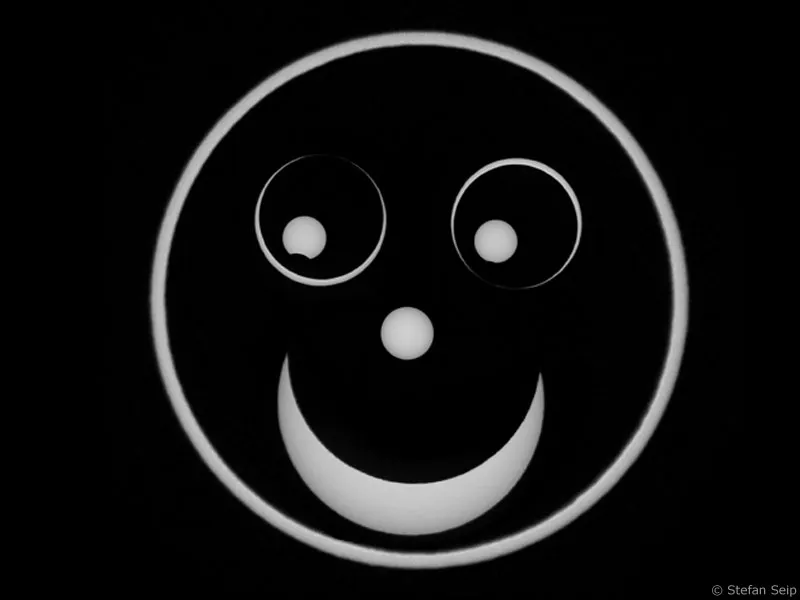
Total solar eclipse on March 29, 2006 in Turkey. 18 individual images of the different phases were inserted into a real landscape image of the observation site. The distances between the individual images are not faithfully reproduced: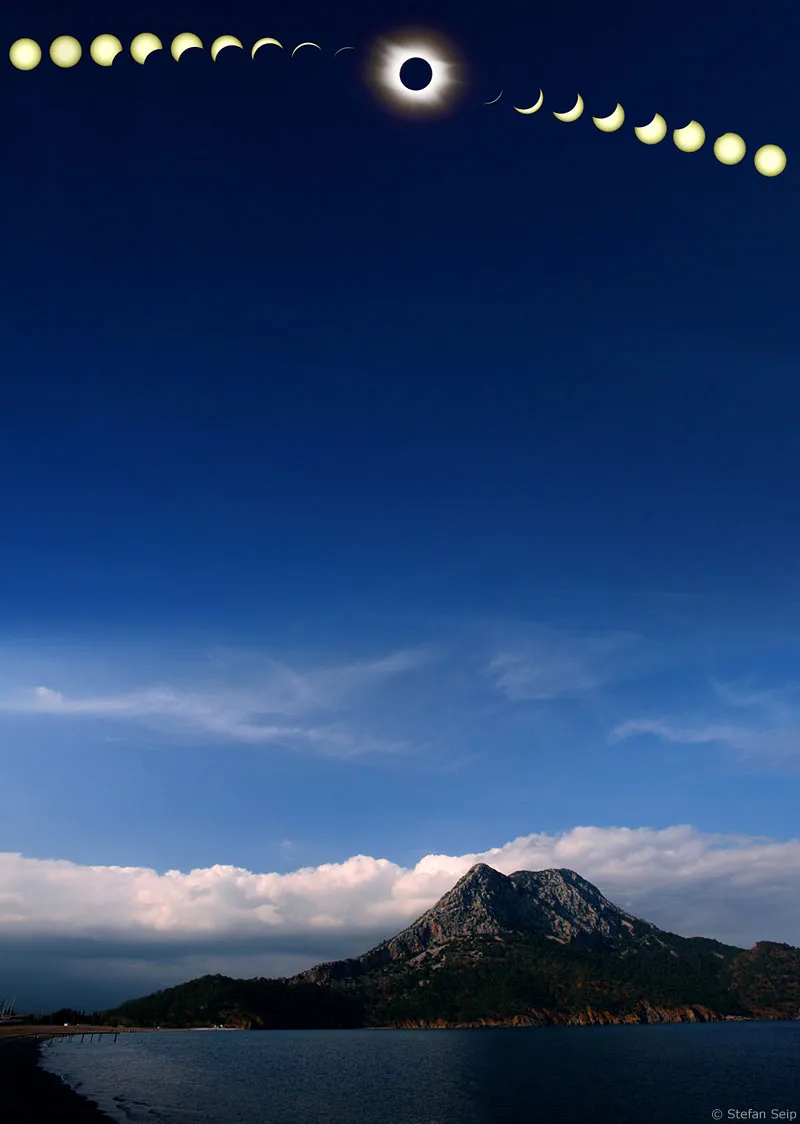
The cover image of this tutorial. It is based on the combination of 18 differently exposed individual shots, which were processed as described in the "Image processing" chapter. One photo in the series was taken at the time of the diamond ring effect.
Note on our own behalf:
The image examples used were created in the manner described in the tutorial.
