10 The post-processing
Figure 10.1: The photo shows the drummer at the Milow concert on September 1, 2011. Once the data has been backed up (and archived), it is necessary to select the very best photographs. These then need to be slightly edited and keyworded.
Only then can they be saved separately and made available for publication (hopefully: sale). Nikon D3S with 4.0/24-120 mm Nikkor at a focal length of 70 mm. 1/200 second, Blender 4, ISO 1,600.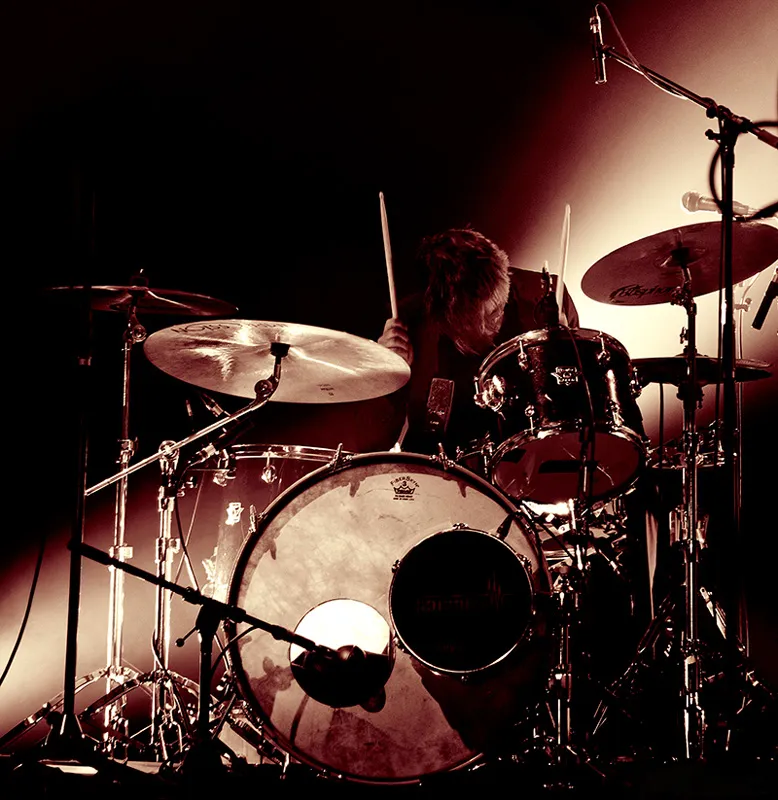
(Photo © 2011: Jens Brüggemann - www.jensbrueggemann.de)
10.1 Data backup and archiving
Before I look at the photos or make a selection, the first step in post-processing is to back up (and archive) the original files, which for concert photographers are usually RAW files (due to the difficult lighting conditions, the RAW file format makes the most sense because it allows the most to be "extracted" from the shots). Only when all the photos have been backed up correctly (and in duplicate) do I start the selection process.
There are different systems for backing up data. I prefer a double data backup on 2 different RAID systems ("StudioRAID Blueline" on the one hand and "myRAID" on the other, both from Certon Systems; available for example at www.calumetphoto.de), which are used separately from each other. The redundancy that inevitably results from this method serves the purpose of data security, because if one RAID system is stolen or destroyed in a fire, all my important photos are still available on the other system.
Figure 10.2: I use the RAID system "Studioline" from Certon Systems (RAID = "Redundant Array of Independent Discs") for my ongoing data backup. This consists of 8 hard disks, up to 2 of which can fail at the same time (and still keep all the data backed up). After all, photos are the capital of us photographers and it would be very annoying if valuable images were lost due to sloppy and unprofessional data backup. This system is designed as NAS (Network Access Storage), i.e. employees can access it via the network as well as, for example, customers from all over the world via the Internet. To prevent misuse and unauthorized access, folders with access rights can be created.
For me, this solution is far more attractive (and more secure) than storing important data in an abstract "cloud" (i.e. at a data center somewhere in the world that I don't know).
(Photo © 2011: Jens Brüggemann - www.jensbrueggemann.de)
Photographers should store their photos according to a proven pattern that allows them to find the photos quickly as soon as they are needed (for example for a sale to a music magazine). Databases are ideal for this. However, this only applies to the best, selected photographs. The complete photos from the photo shoots are best stored in chronological order, for example according to the following pattern:
...
2013-04-22 - David Garrett - Concert - Berlin
2013-05-16 - Eros Ramazzotti - Concert - Berlin
2013-06-08 - Depeche Mode - Interview - Berlin
2013-06-09 - Depeche Mode - Concert - Berlin
2013-06-16 - State Opera for All - Concert - Berlin
2013-07-12 - Blackmail - Concert - Bochum
...
So you will already recognize in the table of contents what kind of recordings it is. The sorting is necessarily chronological in ascending order due to the preceding date. If you have also saved your best, selected and edited photos in a database, you are ideally equipped for all purposes, because on the one hand archiving can be carried out efficiently and on the other hand the required photos can be found quickly.
Figure 10.3: The best selected photos are also stored in a database so that they can be found quickly when customers search for them. This requires professional keywording, as the keywords can later be used to filter the search query accordingly. Violinist David Garrett in concert at the Philharmonie in Berlin on April 22, 2013. Canon EOS-1D X with EF 2.8/300mm. 1/250 second, Blender 4.0, ISO 4,000. Manual setting of the exposure parameters. Selected metering method: spot metering.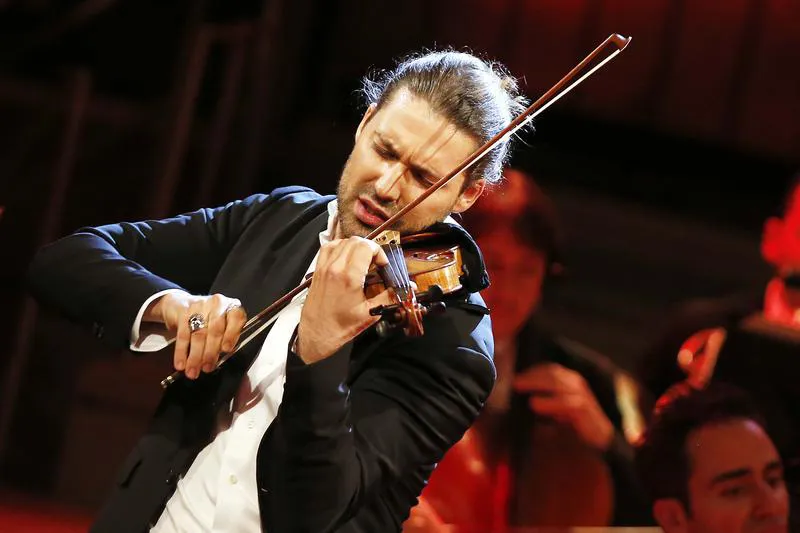
(Photo © 2013: DAVIDS/Sven Darmer - www.svendarmer.de)
10.2 The image selection
Many photographers make the mistake of rushing through the image selection process, preferably immediately after the concert when the impressions are still fresh. This approach is perfectly legitimate if Schick is decisive for sales success; for example, press photographers who have to send a selection of photos to the local daily newspaper on the same evening so that the photo can be published in the newspaper the following day together with a concert report. For all other concert photographers, however, the principle applies that there should be at least one night (better: 24 hours) between the shooting and the selection of photos. This will allow you to select the photos a little more "objectively", at least with a little more distance.
Figure 10.4: I chose this photo because, in my opinion, I managed to take a "typical" photo of the artist for this concert. Jan Delay sings, jumps, is dressed extravagantly and stands demonstratively in the foreground while the band disappears at the back of the stage. Of course there are similar photos, but this one is one of my 5-star favorites. Jan Delay at his concert on August 20, 2010 at the Zeltfestival Ruhr in Bochum/Witten. Nikon D3S with 2.8/24-70mm Nikkor with 24mm focal length used. 1/1000 second, Blender 3.5, ISO 3,200. (Photo © 2010: Jens Brüggemann - www.jensbrueggemann.de)
Which program is used for the selection is actually irrelevant. I use Bridge from Adobe.
What almost all image selection programs have in common is that the photographs can be assigned priorities, for example by assigning colors or using asterisks. In a first step, it is advisable to rate all the apparently best photos with three *** stars while the view size is still medium.
In the subsequent second round, where only all photos with three stars *** or more are displayed, the better ones from the first round are then either rated with four stars **** or the biggest favorites with five stars *****. Those photos that are slightly weaker than the average of the photos rated with three stars *** are downgraded by two stars ** and disappear from the display (because only photos with three stars *** or more are displayed).
Finally, in another round, you can view all the photos in a large view that you rated with four **** or five stars in the previous round . Now you should rate all photos that are to be edited and added to the sale with five stars. This gradual, systematic approach allows you to find the most successful photos/motifs even from very similar ones. You can also keep track of how many top photos were actually taken at the concert and how many photos were selected for further processing.
Figure 10.5: Sometimes it is difficult to make a decision; many shots are similar, differing only in nuances. It can often make sense to combine several photos in a collage, as in a "study". Here I found it interesting that the drummer was lit almost the same (with natural daylight), while the background kept changing color. Nikon D800 with 2.8/70-200mm Nikkor with 100mm focal length used. 1/320 second, Blender 3.5, ISO 800.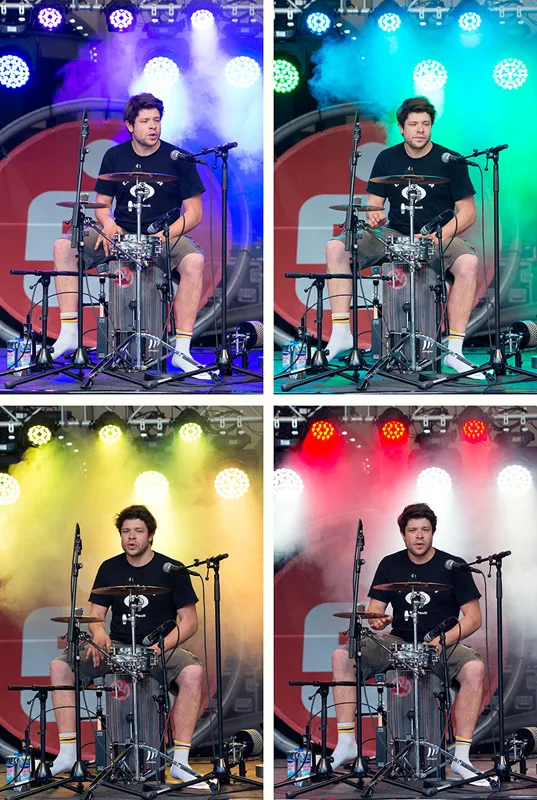
(Photo © 2013: Jens Brüggemann - www.jensbrueggemann.de)
10.3 Image processing tips
Concert photography is generally regarded as photography with a documentary character. This is due to the fact that most publications are made in the context of concert reports. It is therefore obvious to present (newspaper and magazine) readers with genuine, unadulterated image material.
In this case, image processing will only be carried out very discreetly. Brightness and contrasts are optimized, excessive colour casts (usually caused by unfavourable spotlighting) are filtered out.
Noise reduction is also often necessary, as many concert photos are inevitably taken with high light sensitivity (ISO 3,200 and more). Noise reduction is used to reduce the disturbing image noise so that you can deliver technically flawless (or at least better) photos.
Figure 10.6: Camera Raw offers the option of performing noise reduction on the photos when developing the RAW files. This function is appreciated by many concert photographers, because due to the relatively low light conditions at most concerts, we often have to set ISO sensitivities of 3,200 ISO or even more in order to be able to take reasonably blur-free photos (without a tripod!). Here you can see an example of noise reduction in one of my photos (for a better assessment of the effect in a cropped view of the image at 100%, see next page).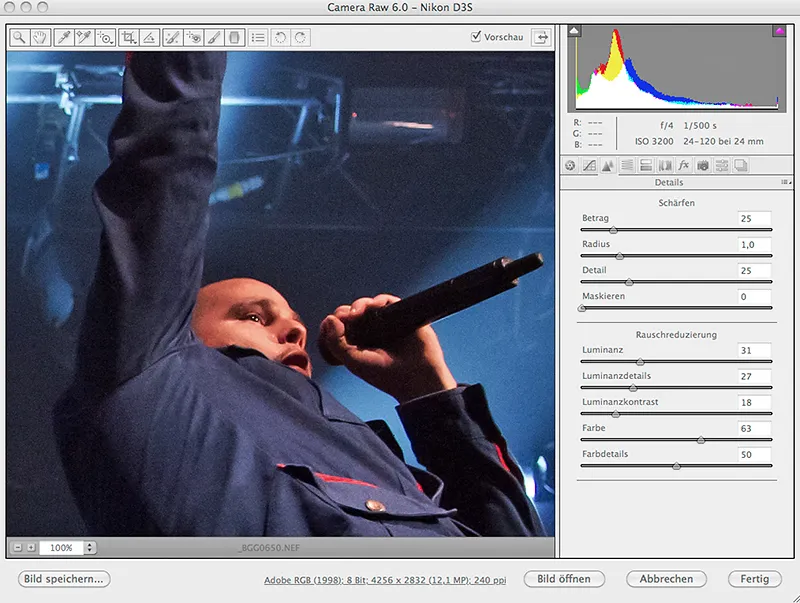
(Photo © 2011: Jens Brüggemann - www.jensbrueggemann.de)
Figure 10.7: Culcha Candela on August 20, 2011 at the Zeltfestival Ruhr. Nikon D3S with 4.0/24-120mm Nikkor, with 24mm focal length used. 1/500 second, Blender 4.0, ISO 3,200.
(Photo © 2011: Jens Brüggemann - www.jensbrueggemann.de)
Figure 10.8: Udo Lindenberg in concert in Berlin on October 15, 2008. Post-processing of the best (selected) photos is part of the process. At the very least, the brightness and contrast of each photo should be checked and optimized if necessary. Image sharpening (using Photoshop: Filter>Sharpen Filter>UnsharpMask) before the photos are published is also part of the process. Make sure, however, that you do not overdo the sharpening and that it is the last step before sharing the image!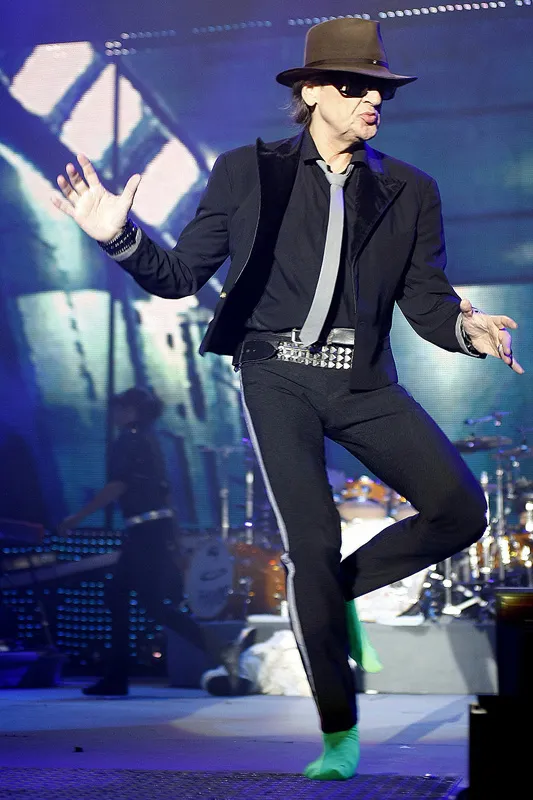
(Photo © 2012: DAVIDS/Sven Darmer - www.svendarmer.de)
Changing the color of the image can also be considered a permissible intervention without the photo losing its authenticity. Daily newspapers in particular used to publish photos in black and white anyway. Now that most newspapers have switched to color printing and all pages are now presented in color, this has changed, but black and white photos are still "in" and popular with young and old alike.
It should be noted, however, that not all photos are equally effective in black and white; for some, the color simply plays too big a role in whether the photo is effective or not. Other images, on the other hand, are much more expressive in black and white, which is why every photographer is encouraged to examine their concert photos to see if there are any shots that are better received by the viewer when edited accordingly.
Figure 10.9: Here are three examples of the same photo: The photo above shows the original. It has not been edited, the colors red and blue in the background have a strong signal effect. At first glance, one would probably say that the colors in this photo are essential for the image effect. After removing the colors (here simply by completely reducing the color saturation), a black and white photo (center) is created, which looks rather boring, pale (and colorless) compared to the original. In a direct comparison, everyone would probably prefer the original. However, the skill of the person editing the photo also plays a major role. As you can see from this example, simply reducing the color saturation to achieve a black and white image is not necessarily optimal. Further/other editing steps are necessary if the photo is to be effective. Here I decided to give the black and white photo a much warmer "touch" by toning it in sepia colors (bottom photo).
When I compare it with the original, I like it much better because the strong red and blue colors no longer distract from the singer. The photo now does more justice to Milow 's partly soft music than the colorful original. Milow concerton September 1, 2011. Nikon D3S with 1.4/85mm Nikkor. 1/160 second, Blender 2.2, ISO 1,250.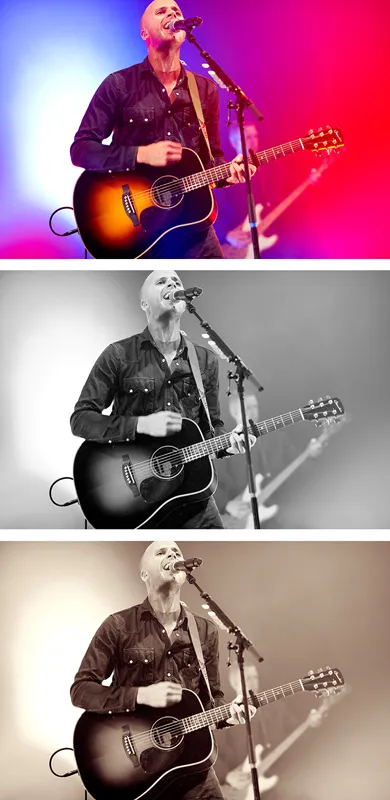
(Photo © 2011: Jens Brüggemann - www.jensbrueggemann.de)
Figure 10.10: In Photoshop, I saved a standardized command sequence for converting colour photos to sepia under Actions. This not only saves time, but also guarantees that most of the photos I convert to sepia match each other. If you do the sepia tinting individually each time, it can happen that the photos look too different and don't match each other. However, I still reserve the right to change the tint individually - but only in individual cases - for example, if I am not 100% satisfied with the standard command sequence. However, the option in Photoshop to save (and name) editing command sequences under Actions is a great help when it comes to editing several photos (for a client, for example) in the same way.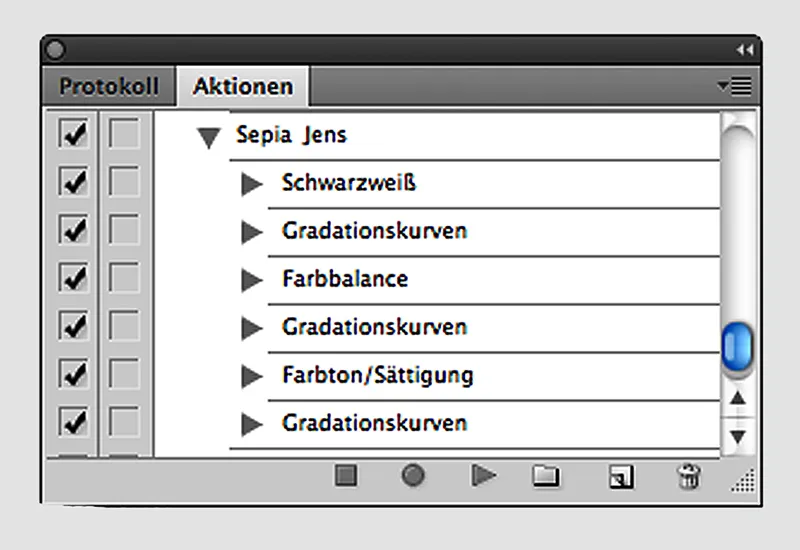
In individual cases, however, further image editing is perfectly legitimate or even helpful if, for example, you do not want to use the photos for press coverage but are planning publications that are not related to a specific concert or specific artists (i.e. "neutral", so to speak).
Figure 10.11: I normally don't like to distort my photos. It's easy to get carried away with such effects. Occasionally, however, when you need abstract photos that fit the theme of "music" but should not be individually assigned to a musician or a band, they are an effective means of alienation. Nikon D3S with 4/24-120 mm Nikkor at a focal length of 105 mm. 1/200 second, Blender 4.0, ISO 2,500. Manual adjustment of the exposure parameters.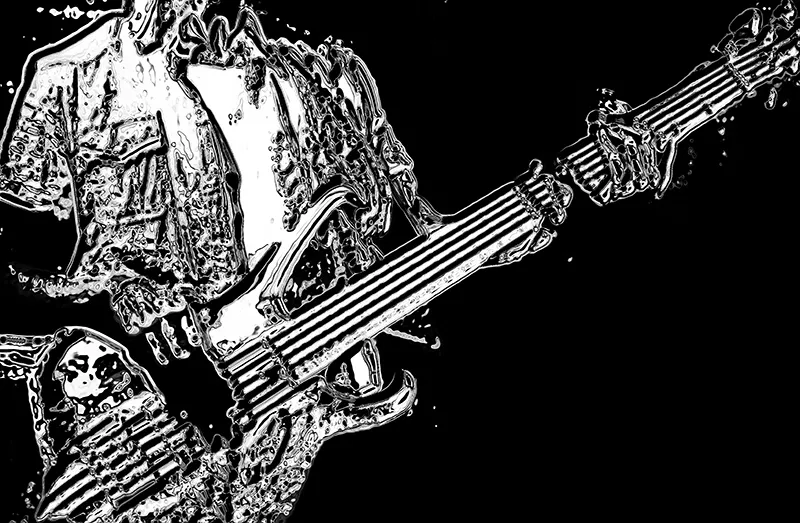
(Photo © 2011: Jens Brüggemann - www.jensbrueggemann.de)
Figure 10.12: Here I liked the tile effect very much after I had additionally changed the color of the photo. However, you should be careful not to apply such effects too often, especially when using Photoshop filters. It also makes sense not to always apply these effects with the same settings, but to look individually for each photo to see which combination of parameters produces the best effect. Sunrise Avenue in concert on August 27, 2012. Nikon D4 with 1.4/85mm Nikkor. 1/640 second, aperture 2.5, ISO 2500, aperture priority (aperture priority).
(Photo © 2011: Jens Brüggemann - www.jensbrueggemann.de)
Figure 10.13: Originally I was a black and white photographer. I couldn't do anything with the mostly random colors of many photos; in my opinion, the reduction to black and white (or often sepia) made my photographs more expressive and interesting. At some point, back in the analog days when I was still shooting with film, I discovered the "crossing" of photos (a slide film is exposed and then developed like a negative film, in C41 instead of E6).
The result, once I had found the right film for my purposes, was that the photos were much more colorful, with stronger contrasts. This also works in digital photography: with the help of the color saturation and gradation curves commands, you can create photos that are "brightly colored" and look almost graphic due to the contrasts.
The photo above shows the original shot. In a first step, I made the picture narrower by cutting off a bit of the bottom edge; I also increased the color saturation of the shot a lot to get the pop colors (see middle photo). We are heroes in concert on August 25, 2011. Nikon D3S with 1.4/85mm Nikkor. 1/250 second, Blender 3.5, ISO 2,000. Manual adjustment of the exposure parameters.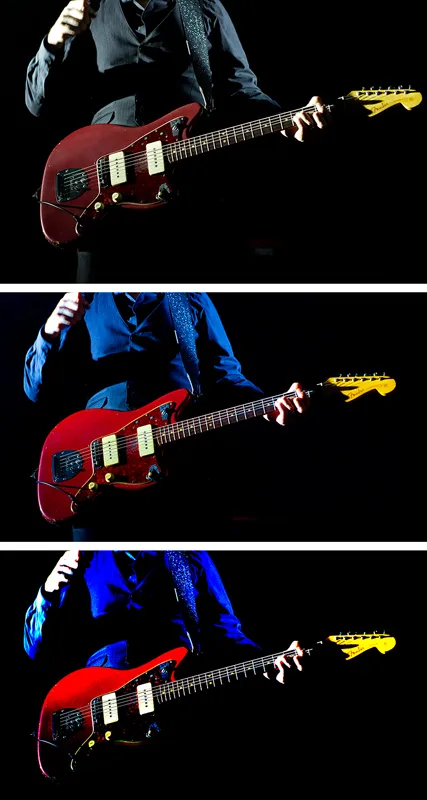
(Photo © 2011: Jens Brüggemann - www.jensbrueggemann.de)
Figure 10.14: For further abstraction and to achieve an almost graphic effect, I then greatly increased the contrasts of the photo in a second step using the gradation curves in Photoshop.
Note: The possibilities for image editing and manipulation are almost unlimited, especially when using Photoshop. However, pay attention to how your photos are to be used. Too much editing or distortion can defeat the purpose of authentic concert reporting.
However, if the photos are exhibited in galleries, i.e. if the focus is on the artistic expression of the photographs themselves and less on the musicians depicted, alienation of any kind is of course a tried and tested means for the photo artist to express his point of view.
Orientation towards the purpose of publication is therefore a good way of deciding how much image processing is permitted and necessary.
10.4 The presentation
If you present your photos to the public, you should remember to present them as "chic" as possible. A frame around the photo (in Photoshop you create this using the Workspace command ) then has the same function as the passe-partout in analog times.
This "extra effort", which is required to present the photos in an appropriately "chic" way, is definitely worth it. The photographs look more elegant and of higher quality.
If you intend to use lettering (e.g. the photographer's name) on the photo or the passe-partout, you should either use a neutral "color" (black, gray or white) or a color that is also present in the image.
Figure 10.15: To make the white frame ("passe-partout replacement") stand out from the white paper background, I added color to the corners (in Photoshop: use a very soft brush that only "brushes" the corners). Concert by Jan Delay with band on August 20, 2010 at the Zeltfestival Ruhr. Nikon D3S with 2.8/24-70mm Nikkor at a focal length of 70mm. 1/1250 second, aperture 3.5, ISO 3,200. Aperture priority (aperture priority).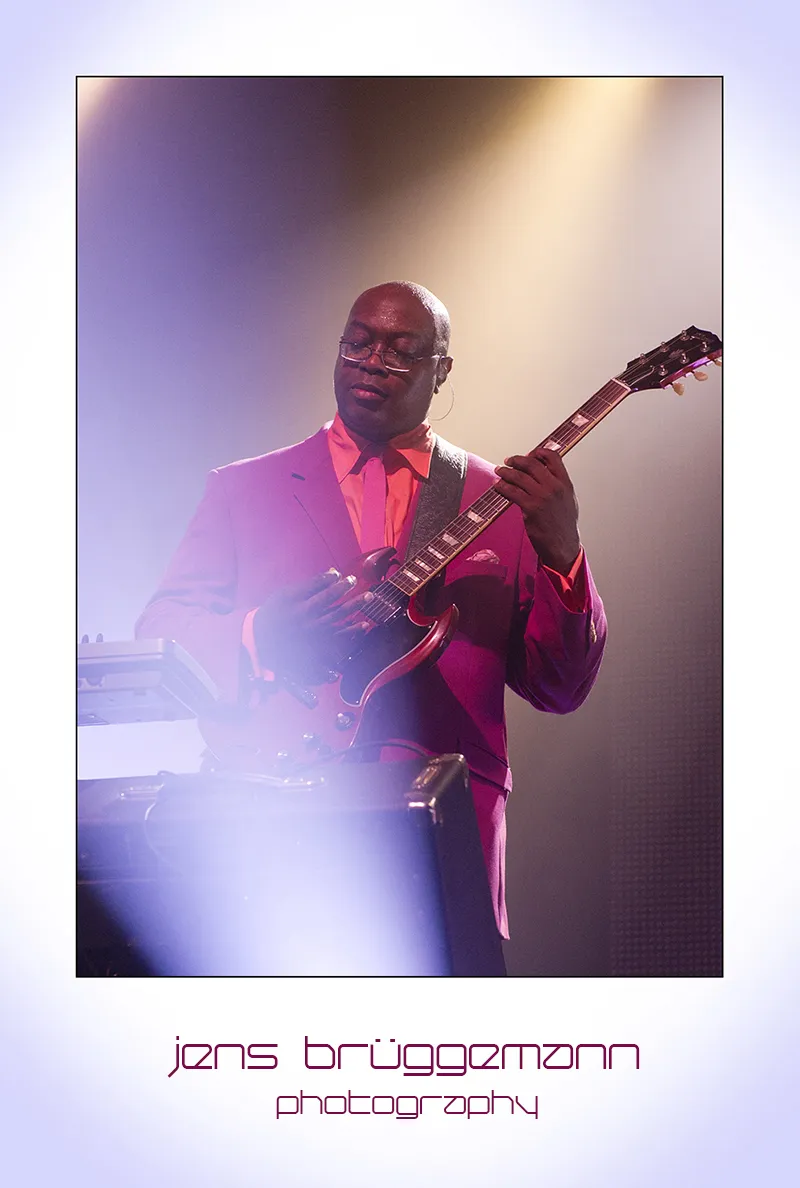
(Photo © 2010: Jens Brüggemann - www.jensbrueggemann.de)
10.5 Keywording
If you pass on photos for commercial purposes, especially to professional users (editorial offices, picture agencies, etc.), you should make sure that important information about the content of the photo is not missing.
In concert photography, for example, this includes Name of the performing band, name of the artist at the center of the photo, venue and location of the performance (for example, "Olympiastadion Berlin"), date and time of the recording, special features (for example, "the last concert with his band before he left them") and, of course, name of the author of the photo and other copyright information (for example, for publications, that not only the name of the photographer is mentioned, but also the Internet address).
It can also be useful to provide bank details so that commercial users have the bank details to transfer the license fees (in addition to the invoice, in case it supposedly does not arrive).
Figure 10.16: Keywords help you to search for images for specific purposes. The photo above can be found easily when searching for photos on the topics of live music, concert, classical music, stage performance etc.. And the photo above would also be pre-selected for the topic "blind people" based on the keywording. It could be published in a newspaper article about blind artists, for example. Andrea Bocelli in concert at the Philharmonie in Berlin on May 15, 2013. Canon EOS-1D X with EF 2.8/300mm. 1/200 second, aperture 4.0, ISO 3,200, shutter priority (aperture priority). Selected exposure metering method: center-weighted integral metering. (Photo © 2013: DAVIDS/Sven Darmer - www.svendarmer.de)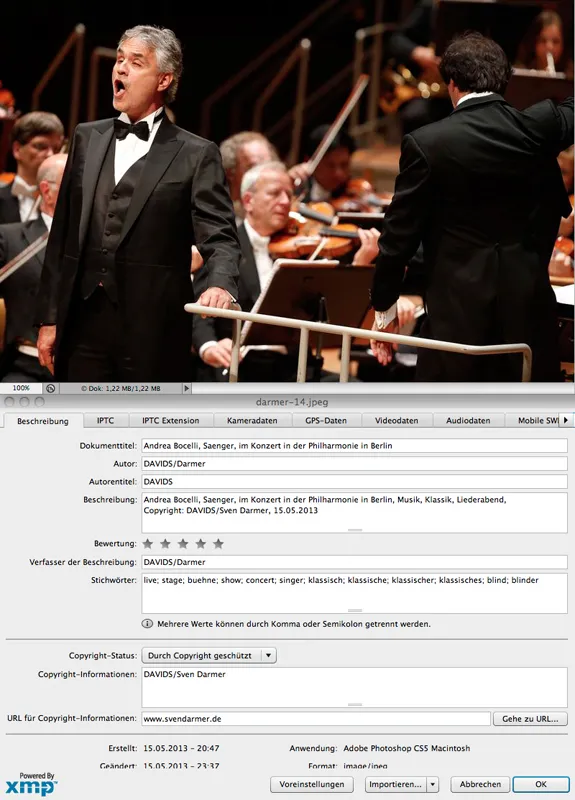
Note: Keywording is used to quickly find images that match the topic you are looking for. However, only meaningful keywords should be listed. Some (concert) photographers are a little too generous with the keywords, which means that the photos often appear in search queries - but rarely really match the topic. This can quickly spoil the good relationship with the customer, which is why the choice of keywords should really be carefully considered and sensibly matched to the image content.
Figure 10.17: Percussionist Martin Grubinger in concert at the Philharmonie in Berlin on April 11, 2012. When writing this tutorial, my colleague Sven Darmer's keywords in the Photoshop file information helped me a lot, because without them I wouldn't have known all the musicians' names. Canon EOS-1D Mark IV with EF 2.8/300mm. 1/160 second, aperture 2.8, ISO 1,600, shutter priority (aperture priority). Exposure metering method: center-weighted integral metering.
(Photo © 2012: DAVIDS/Sven Darmer - www.svendarmer.de)
I wish you "good light" at all times and many great concerts!
Jens Brüggemann, April 2014

