Professional outdoor lighting
When photographing outdoors, you have to expect the lighting conditions to change quickly and imperceptibly. Our eyes get used to changing brightness - the camera does not. This is the reason why even professionals like to work outdoors with one of the automatic functions (aperture priority, shutter priority or program automatic) (or at least constantly orient themselves to the values of the light meter).
However, if you use a battery-powered flash unit, you also have to work manually outdoors. The only option is to constantly check the camera monitor in order to notice fluctuations in the brightness of the available light and take them into account accordingly. Depending on the "mixing ratio" between the available (continuous) light and the flash light used, fluctuations in the brightness of the continuous light are more or less significant.
Example
If I use a low-power flash system outdoors during the day and my camera settings are, for example, 1/60 second at f/4.0 and ISO 200, then it becomes clear that the available light has a relatively large influence on the image result. If, on the other hand, I use 1/160 second at Blender 16 and ISO 100 and flash with 1,000 watt seconds, then the proportion of daylight will be much lower.
Figure 10-1: What looks so dramatic here was actually a completely normal summer's day in Ibiza. In addition to the high-contrast sunlight, I used my mobile generator with 1,200 watt seconds of flash power. You can clearly see the flash head in the top left of the picture. If you want to use flash in such extreme lighting conditions, as prevail in southern countries, you need a lot of flash power to combat the strong sun. Nikon D3 with 2.8/24-70mm Nikkor. 1/200 second, Blender 22, ISO 200.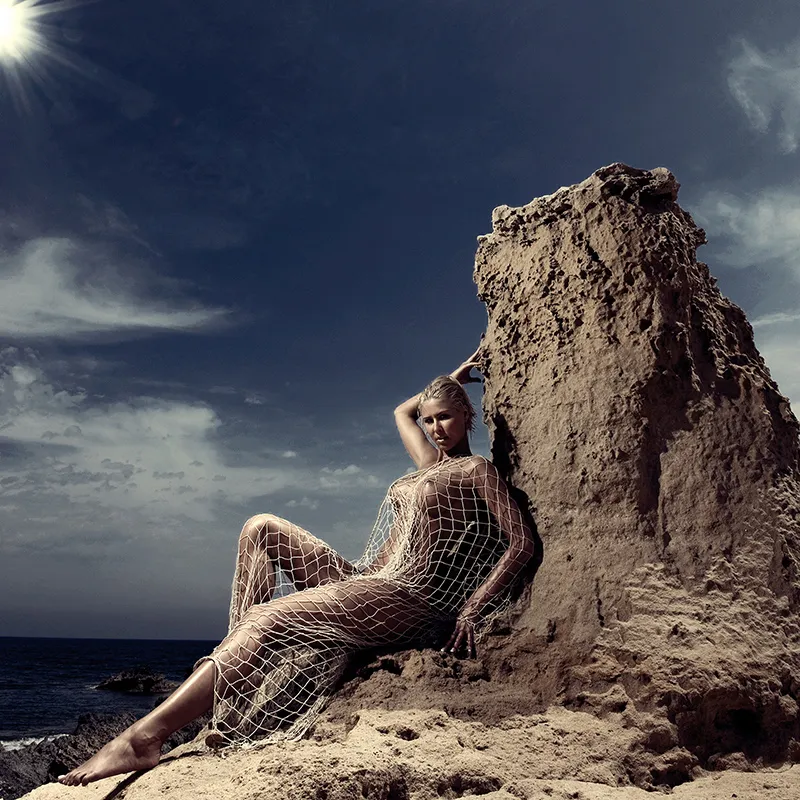
(Photo ©: Jens Brüggemann - www.jensbrueggemann.de)
10.1 Working without aids
When photographing on location, you don't always have lighting equipment with you to get a handle on difficult lighting situations. The only option then is to make the best of the situation.
If the sun is shining strongly, you have to make sure that the contrasts are not too great. It is then always better to base the exposure on the areas illuminated by the sun. Although this makes the overall image darker, this is more likely to be tolerated than if areas that are too bright are unattractively blown out.
Backlit situations in clear sunshine are taboo, because correctly exposing a model in backlighting without brightening would mean that the background would be hopelessly overexposed. It is better to let the model "sink" and expose the background correctly. This means that the model is only rendered as a silhouette, but if the pose is chosen to create a theatrical effect, it can look very expressive.
Figure 10-2: Impressive photos can be achieved in sunshine and with strong contrasts even without lighting aids. In this photo, which was taken spontaneously when I was looking for new locations for my photo workshops in Ibiza together with my assistant, I simply photographed against the light. With such an expressive outline of model and rock, additional lighting from the front was no longer necessary. Canon PowerShot G9. 1/1,600 second, Blender 8, ISO 80.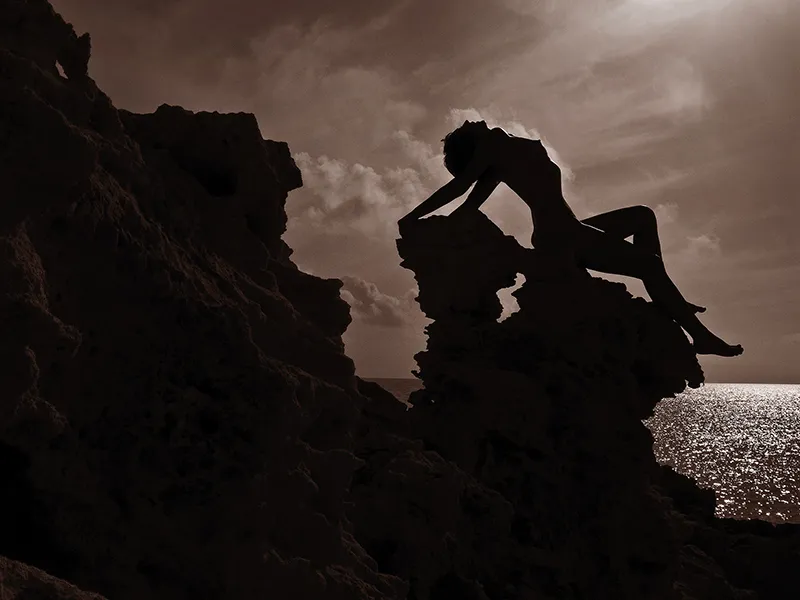
(Photo ©: Jens Brüggemann - www.jensbrueggemann.de)
If you want the model to be sufficiently bright, you have to position it so that it is exactly facing the sun. The exposure should then be adjusted accordingly. Counting "1, 2, 3" helps to prevent Blender (when the model is dazzled by the sun). At 3, the model opens her eyes very briefly and the photographer pulls the trigger. This actually works quite well!
10.2 Working with fill light and shading
In order to achieve balanced lighting, you need to get a handle on the contrasts (between the areas illuminated by the sun and the shadow areas). However, these are not always disturbing; it just depends on the subject and the lighting situation.
Contrasts will hardly occur when the sky is cloudy. At most, if a person is standing outside on a dark surface and the light from above ensures that the eye sockets do not receive any light. Normally, however, when the sky is cloudy, the light hits the model softly and with multiple reflections. Diffuse light is therefore ideal for photographers, as you don't have to worry about how to manage the contrasts.
Problems only arise when the clouds disappear and clear weather ensures that the sunlight hits the earth (or our model) directly and unhindered.
Figure 10-3: I use brighteners from California Sunbounce in my photo workshops abroad (here a photo from the Andalusia workshop in 2010). Here the participants used the "Sun Mover". It can be focused using the two handles, which leads to a concentration of light.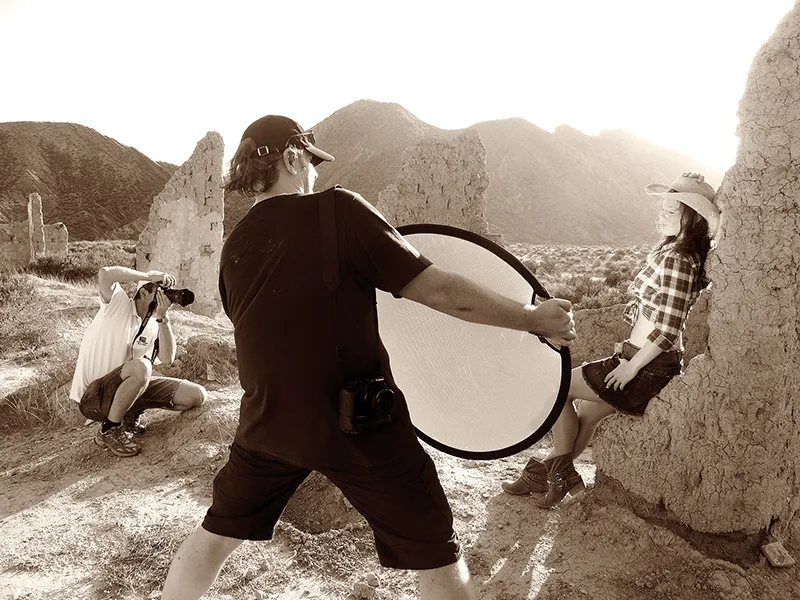
(Photo © 2011: Jens Brüggemann - www.jensbrueggemann.de)
The operation of the brightener and shading device is easy to understand. They can therefore also be used by inexperienced people. If you realize that the light entry angle is equal to the light exit angle, you will immediately achieve the desired result. A slight wobble back and forth helps to make sure that the reflected light is still hitting the model perfectly.
Figure 10-4: You don't necessarily need an assistant to use the Sunbounce brightener. A conventional light stand also helps. The brightener is attached to the tripod using a "grip head". Nevertheless, it can be swiveled and rotated in all directions for alignment. (Photo ©: Jens Brüggemann - www.jensbrueggemann.de)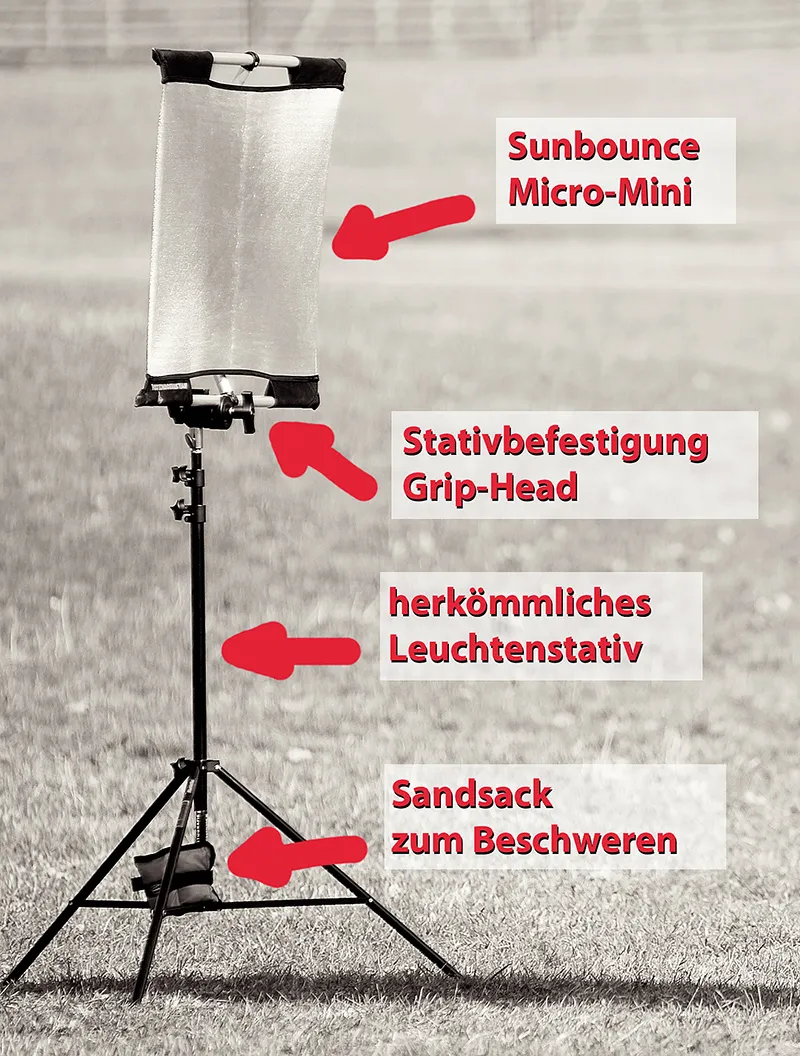
Figure 10-5: Direct sunlight leads to strong contrasts. In order to take a technically perfect photo, you need aids to soften the contrasts. A shade, which is held between the sun and the model, and a brightener (here attached to the tripod using a grip head), which indirectly brightens the shady sides of the model with sunlight, form an ideal combination.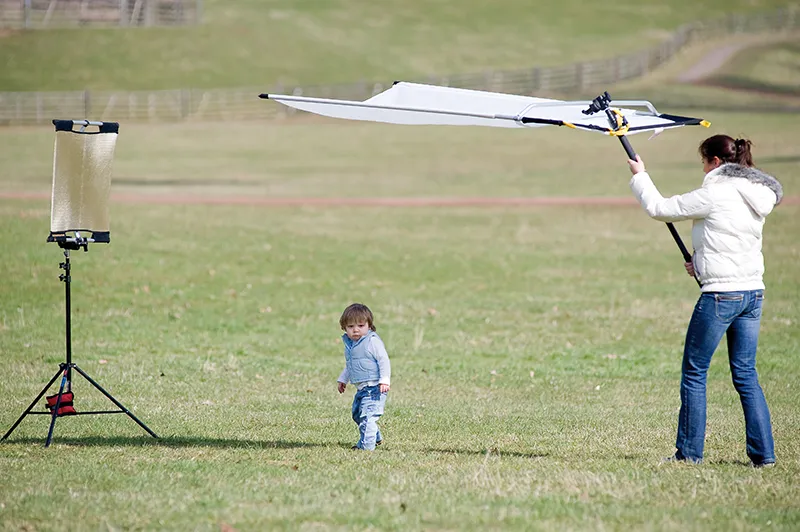
(Photo ©: Jens Brüggemann - www.jensbrueggemann.de)
Figure 10-6: The result is a photo with balanced lighting. This approach is also ideal for fashion shots. The fact that the background, which is illuminated by direct sunlight, appears brighter is a positive side effect: the photo appears bright and friendly, which is always desirable, especially in advertising shots. Nikon D3 with 2.8/300mm Nikkor. 1/800 second, Blender 4.5, ISO 200.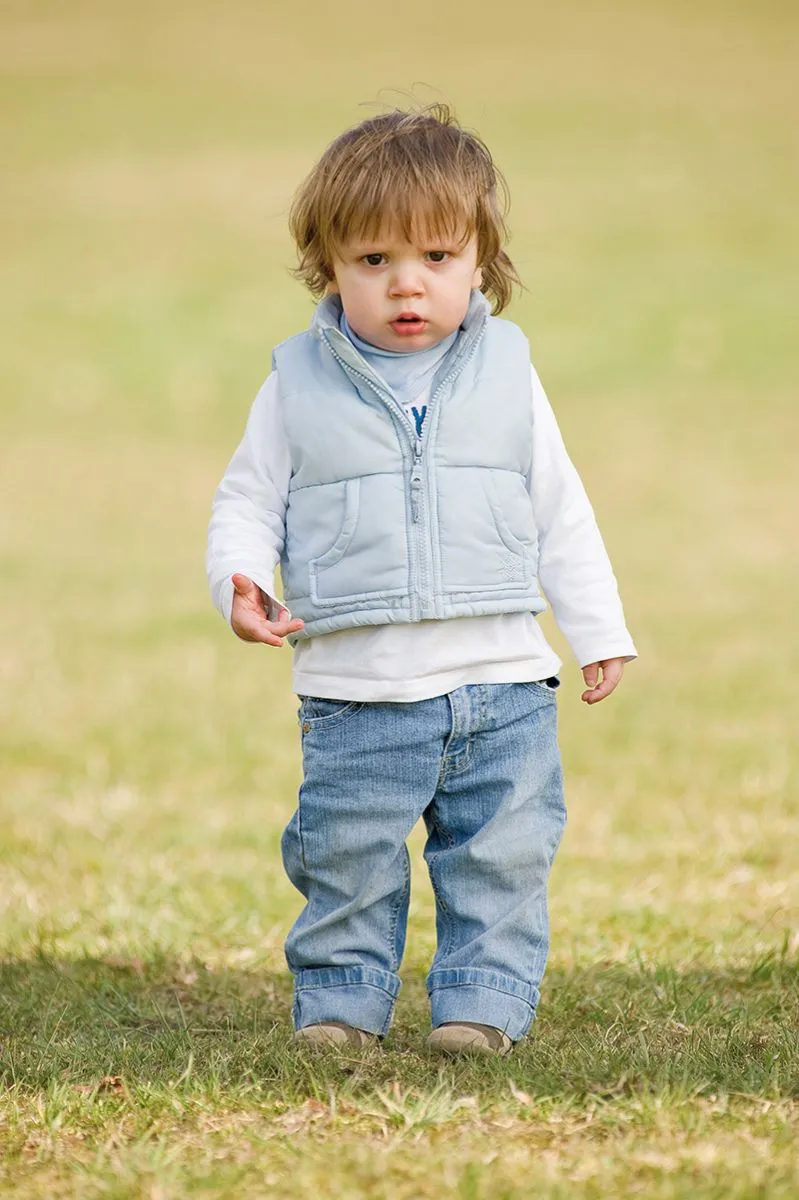
(Photo ©: Jens Brüggemann - www.jensbrueggemann.de)
Note: If you don't have a brightener or darkener available, you can use natural brighteners or darkeners. For example, wedding photographers like to place the bride and groom under a tree. The crown of the tree's leaves forms a natural shading effect (although the slight green tint that occurs should be taken into account).
A white house wall, for example, can act as a brightener. Light-colored sand (for photos on the beach) can also have a brightening effect, depending on the position of the sun.
Figure 10-7: Shadows can also be brightened up in diffuse light. The natural daylight coming from above is reflected here using a sunbounce reflector. The Sunbounce is held in such a way that the shadows (of the eye sockets, under the chin and under the nose) of the mother and daughter are lightened.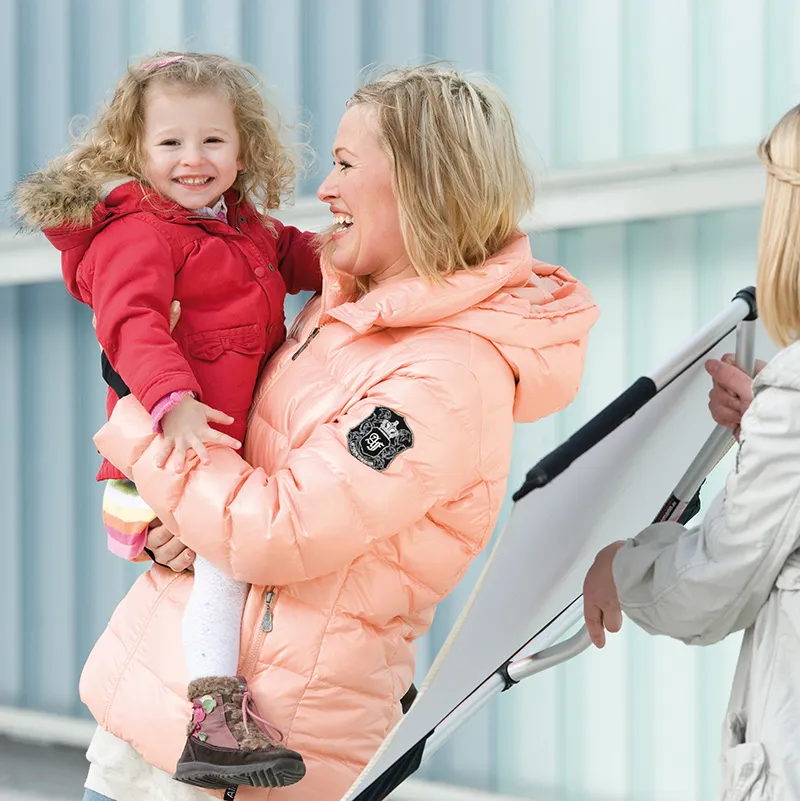
(Photo ©: Jens Brüggemann - www.jensbrueggemann.de)
Figure 10-8: The result is impressive: A professional photo thanks to a single small (simple) aid.
(Photo ©: Jens Brüggemann - www.jensbrueggemann.de)
10.3 Working with the system flash unit
System flash units have the advantage of being light and handy. They can therefore fit into any photo bag, which is why they are predestined for outdoor use. Even on long walks, they won't weigh too much.
To achieve a more interesting illumination of the model, I strongly recommend using the system flash unleashed. This allows you to achieve a much more "three-dimensional" effect of the light than if it were attached to the camera's hot shoe.
Figure 10-9: The built-in flashes of amateur cameras have the disadvantage that they often appear flat and cannot be used indirectly or unleashed. However, I was able to avoid the resulting disturbing shadow in the background in this shot because the background was too far away. In addition, the backlight from the setting sun also ensured that the shadows of the child could not be seen.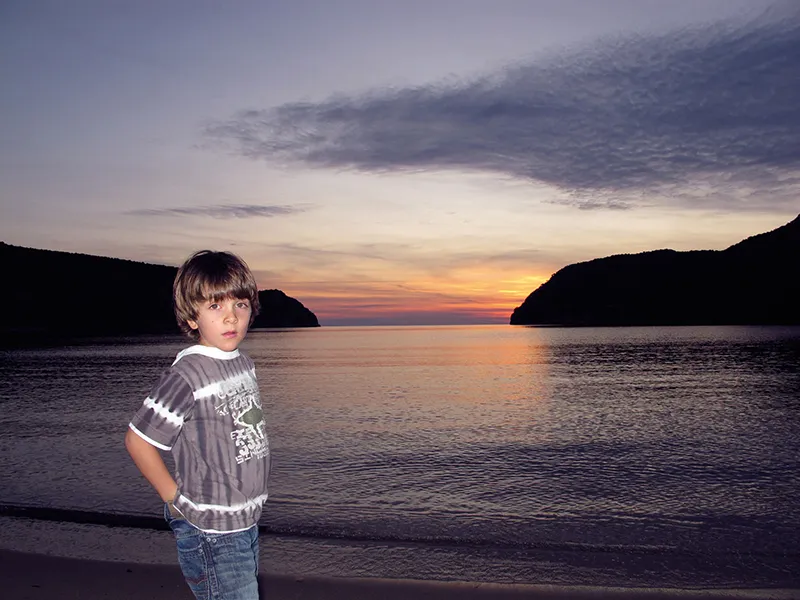
(Photo ©: Jens Brüggemann - www.jensbrueggemann.de)
Figure 10-10: The "Eliptical Diffusion Dome" from the "Calumet Reflector Set for Flashes" (costs 79.90 euros gross and also includes 1 mini beauty dish with 2 different inserts and with 3 honeycombs and 4 color filters as well as 1 spot attachment) provides soft light. As it emits light all around, a helper also held a brightener here at my Ibiza workshop in 2011 so that the flash light from the side of the "Eliptical Diffusion Dome" facing away from the model was also reflected onto the model. The result was impressive, which is why this "Eliptical Diffusion Dome" is one of the very few attachments that I can recommend for system flash units. (Photo ©: Jens Brüggemann - www.jensbrueggemann.de)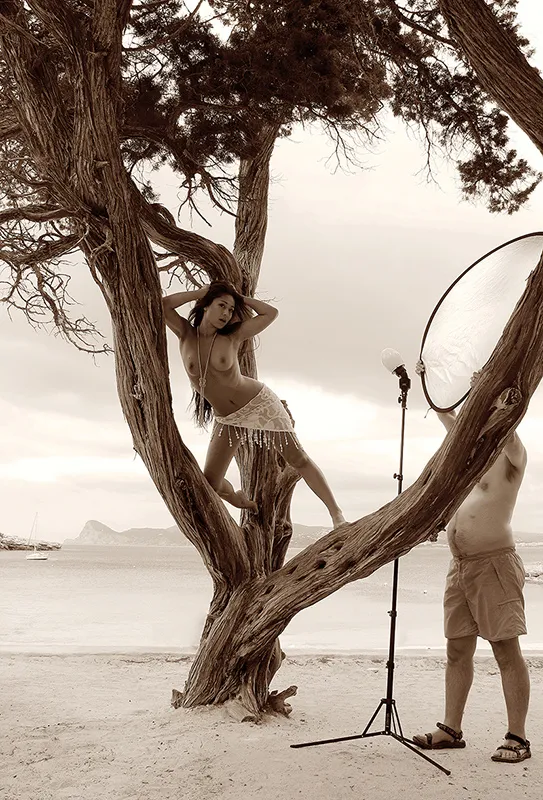
10.4 Working with the battery-powered flash unit
If, on the other hand, you need stronger light or different light characteristics for creative effects, there is no getting around the purchase of a battery-powered flash unit.
The good news is that a lot has happened with outdoor flash units in the last 5 years. Today you can choose between many options. There is a suitable (flash) solution for almost every requirement.
It is important that you are always aware that light no longer exists; from now on there are two different (!) types of light: the available daylight and the (extremely short) flash light.
The most important task for anyone working outdoors with a flash system is to find a sensible (effective) ratio between the two types of light. How much daylight should make up the exposure of the photo? How much flash light? Should the natural sunlight dominate - or the artificial flash light? (Flash light doesn't have to look artificial; in many of my photos you can't tell whether the dominant main light was flash or sunlight).
The procedure is quite simple: I recommend first looking at the background and choosing an exposure (by trial and error, for example) that produces the desired effect. Only then should the flash be added. The fact that we can control the flash power means that we can use the flash with exactly the power required for the exposure parameters selected (and set on the camera) (time, aperture, ISO sensitivity).
An example
I want to photograph a model on a rock against the backdrop of the setting evening sun. As the sun is behind the model, the model needs to be brightened or flashed from the front. I opt for a "crisp" flash.
To determine the correct exposure for the background, I set my camera to aperture priority. I set the shutter speed to 1/160 second, which is also suitable for flash systems. I use ISO 100 as the ISO value.
I take the photo with the desired image section, but only of the landscape in the background. The model steps a little to the side to avoid standing in the selected image section. The automatic aperture control determines (only for the background) aperture 11 (at 1/160 second and ISO 100). I like the way the background is rendered, because the backlight (the last rays of sunlight) has ensured that the rest of the landscape and the sky are slightly underexposed.
I now set my DSLR to manual control. I leave the camera at ISO 100, also leave the shutter speed at 1/160 second and set the Blender to 11.
Now the model can take the desired position. I turn on the flash unit, point the light from the flash head at the model at the desired angle and take a test shot with, for example, 62.5 watt seconds of flash power.
The background of the test shot is perfect (which was to be expected), but the model in the foreground is far too weakly lit. I increase the flash output by two f-stops to 250 watt-seconds. This means that I now use four times the flash power.
After taking the photo and checking the result, I realize that both the foreground and background are perfectly rendered (bright enough, but not too bright). Now I can start "shooting" variations of this motif. Since it's a sunset, I know I have to hurry because there are only a few minutes left before the sun goes behind the landscape in the background. (See the photo below!)
Fig. 10-11: In the morning and evening, when the sunlight is no longer so strong, flash units with "only" 250 watt seconds of power, for example, are also sufficient. However, you should pay attention to which light shaper you use, as the difference in light output between a normal reflector and a softbox can be as much as two f-stops. The distance from the light source to the model also plays a significant role.
(Photo ©: Jens Brüggemann - www.jensbrueggemann.de)
Fig. 10-12: When working outdoors with a battery-powered flash unit, it is very important to keep checking the exposure, because the daylight (depending on the percentage with a greater or lesser effect on the image result) can change imperceptibly. As our eyes adapt very quickly to changing light situations automatically, we do not see these changes. However, with manual exposure settings on our camera (which is necessary when using a flash system), changes in natural lighting conditions can have a significant impact on our photos! So take advantage of the huge benefit of digital photography, which allows you to view the image result immediately on your camera monitor (and discover any errors straight away).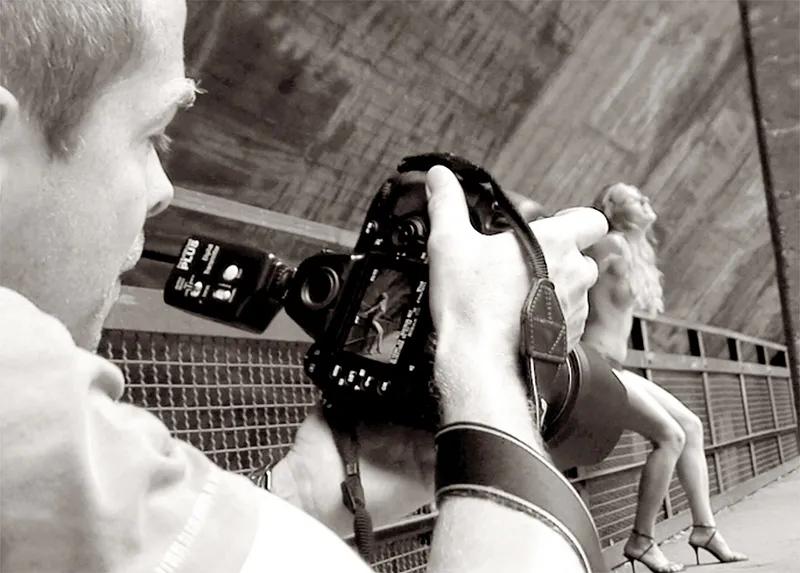
(Photo ©: K. Bloch)
Figure 10-13: Backlit photos are particularly atmospheric. However, if you photograph models backlit by the clear sun in a cloudless sky, they will be rendered far too dark. So if you don't just want to photograph the silhouette, you have to brighten up from the front. You need a lot of "power" to cope with the strong sun in southern countries. That's why I recommend purchasing battery-powered flash units with an output of no less than 1,000 watt seconds.
This sometimes means a lot of lugging around, but if you like the results, it's worth the effort. For these photos, I walked about 4 kilometers along the beach with the model to get to the desired location. I had to carry a camera backpack, flash generator, flash head, tripod and drinks. The model had enough to do with her make-up and clothes, although we didn't use the clothes after all, except for the jewelry ... Nikon D3X with 2.8/14-24mm Nikkor. 1/250 second, Blender 22, ISO 100.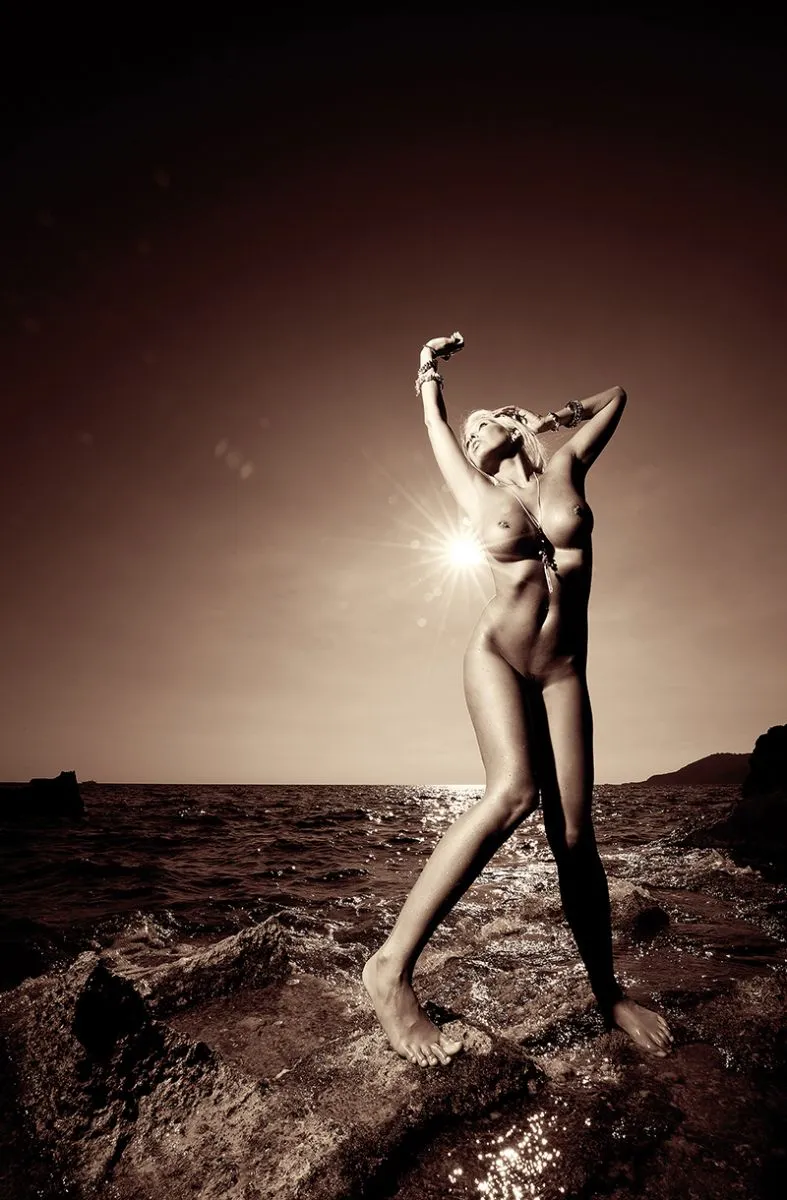
(Photo © 2011: Jens Brüggemann - www.jensbrueggemann.de)
Figure 10-14: When working outside with flash, the colors of the clothing are intensified. The blue of the sky is also rendered more vividly if it is slightly underexposed. Nikon D3S with 2.8/24-70mm Nikkor at a focal length of 24mm. 1/250 second, Blender 22, ISO 200.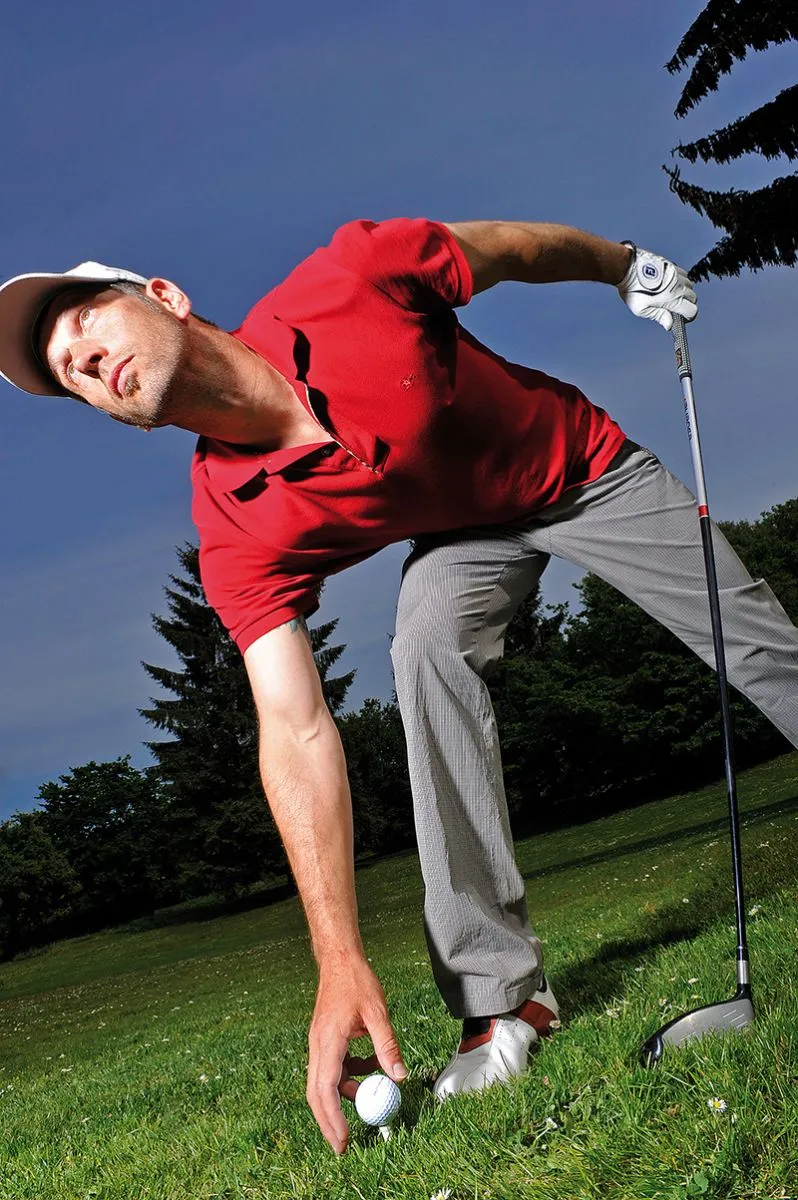
(Photo © 2011: Jens Brüggemann - www.jensbrueggemann.de)
Note: Battery-powered flash units also offer the option of using modeling light. However, this does not really make sense outdoors, depending on the ambient brightness. For this reason, the modeling lights on the better systems are also timer-controlled (often for a duration of 10 or a maximum of 30 seconds). This prevents you from accidentally leaving the modeling light on unnoticed, which would lead to a rapid drop in battery capacity.
So if battery-powered flash units have a (more or less strong) modeling light, it is only to be able to assess the lighting and light characteristics either in the dark (early in the morning or in the evening) or indoors. During the day, when the sun is shining, even a powerful modelling light of 650 watts is of no help at all.
Because the modeling light cannot be used, it is therefore necessary to align the flash head very carefully, as it can quickly happen that the flash does not hit the model correctly and the light misses it.
Fig. 10-15: Before you buy a new flash system, it makes sense to rent the appropriate equipment (and preferred light shapers) at least once, for example for a long weekend, from a photo retailer (for example Calumet; there are branches in Germany in Berlin, Hamburg, Düsseldorf, Essen, Stuttgart and Munich). This allows you to test whether the selected flash system meets your expectations without obligation. But not only dealers, many manufacturers also offer the option of renting their equipment. Incidentally, the rental fee is often credited towards the purchase of a new flash unit at a later date.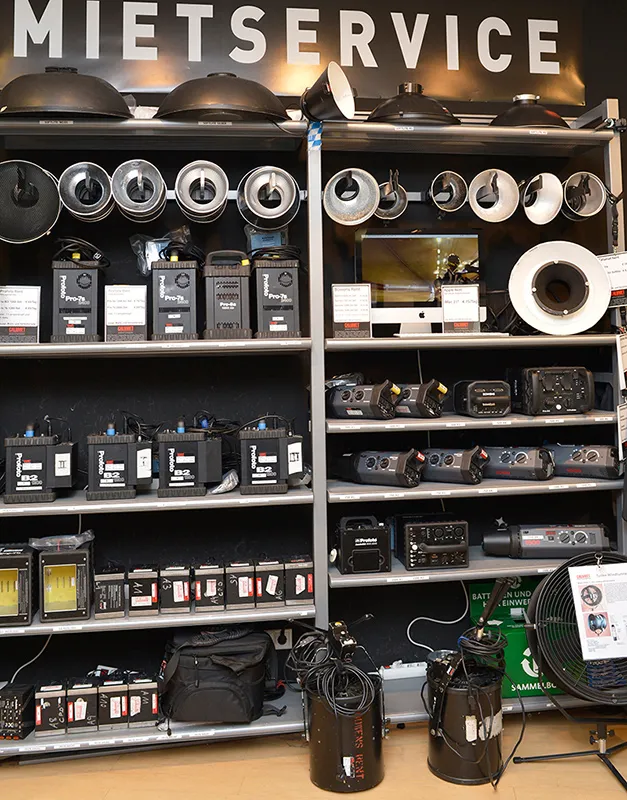
(Photo © 2013: Jens Brüggemann - www.jensbrueggemann.de)
Conclusion
This tutorial "Professional lighting technology and lighting control" was intended to introduce you to the terminology of professional (!) lighting technology. The correct use of flash systems was one of the most important focal points, as many of the tricks revealed here are only known to professional photographers with many years of flash experience.
The overview of recommended flash units may have seemed too short to many. There are so many more units from good manufacturers! However, I wanted to limit my comments to units that I myself am convinced meet professional standards. It was important to me to only write about devices that I have already worked with in the course of my professional career or about which colleagues have only told me good things. This seemed to make more sense to me than simply copying the technical data from company brochures (as is often the case). I was also happy to accept a certain degree of incompleteness.
Reliability and longevity of the flash system are basic requirements for professional users. A new purchase must therefore be seen as an investment decision. Unfortunately, these are not "bargains", but unlike most modern cameras, good flash units do not become obsolete so quickly. 25-30 years of intensive use should not be a problem for professional equipment. It should be clear to everyone that this does not come at a bargain price. Quality has its price here too.
Light management with flash units is less complicated than many newcomers think. Anyone who has understood the principle of using a modeling light that is proportional to the flash to assess the exact progression of light before the shot is taken will have no difficulty in creating effective photos themselves with the help of flash systems.
For us photographers, the use of lighting technology makes our work easier, increases efficiency and expands our creative scope.
I wish you lots of fun and success in realizing your own ideas! Whether indoors or outdoors!
Jens Brüggemann, www.jensbrueggemann.de, 2013!
