This image of the Milky Way with a fisheye lens was exposed for eight minutes. However, without tracking the camera, the stars would not have been shown as dots, but as small lines.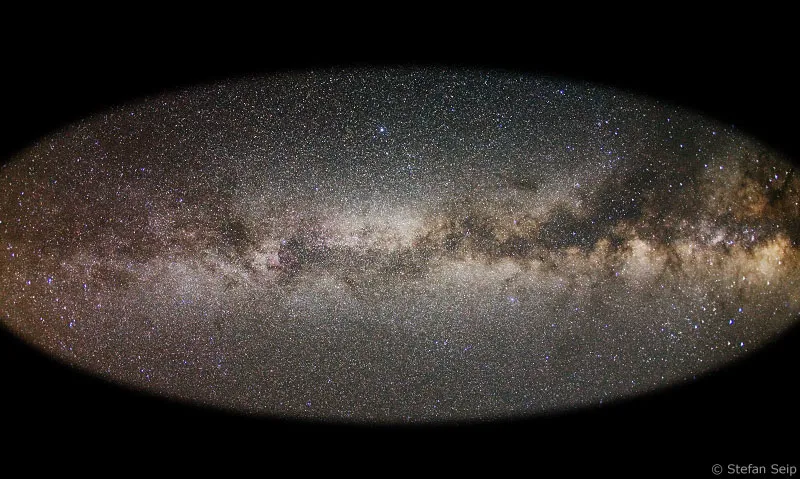
Part 10: Long exposures with a tracking camera
In episode number 9 of the "Astrophotography and Sky Photography" series, the "Handling of an astronomical mount" was explained. Thanks to its motorized tracking, such a mount enables us to work with longer exposure times without the stars becoming streaks.
This tutorial will deal with how long exposures are realized with the astronomical mount. It is assumed that the mount has been set up, aligned, balanced and put into a working condition, as described in episode number 9.
Why tracking?
1. sharp stars
The most important argument in favor of tracked images is the possibility that the stars remain points and are not imaged as lines despite longer exposure times. Without tracking, the rotation of the earth causes star lines to appear after just a few seconds, depending on the focal length used, among other things.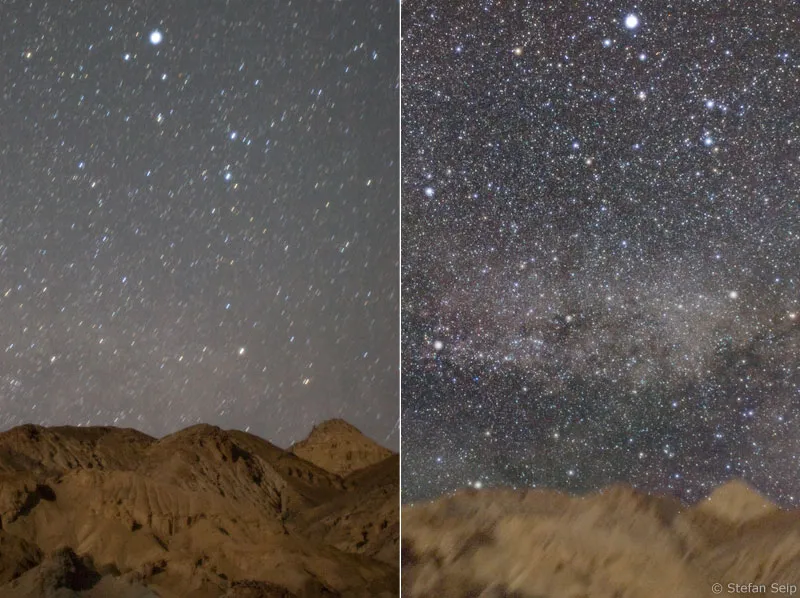
With a fixed camera and longer exposure time, the landscape becomes sharp, but the stars have become lines (left). With tracking it is the other way round: the landscape is blurred and the stars are sharp (right). In addition, more stars were visible with tracking than without.
Star trails are taken without tracking. One aim of tracking is to obtain longer-exposure astrophotographs with a sharp image of the stars.
Star trails have their own charm (see number 2 of the series "Astrophotography and sky photography": "Star trails").
2. capture fainter objects
Due to tracking, faint stars and other celestial objects have more time to affect one and the same spot on the image sensor. On the one hand, this makes it possible to photograph significantly more stars than are visible to the naked eye. On the other hand, many faint objects, such as colorful gas nebulae, only reveal their full beauty in photos after a long exposure time.
3. better image quality
Overall, tracking makes it possible to improve the general image quality. The reason for this is the liberation from the predicament of having to "buy" the necessary short exposure times with high ISO values and/or the use of photo lenses at full aperture in the absence of tracking.
- a) ISO value
High ISO values lead to an increase in electronic image noise. Low ISO values produce images with less noise. Due to tracking, you can therefore limit yourself to lower ISO values (up to max. ISO 800) and expose for longer to compensate.
- b) Aperture opening
Almost all photo lenses show more or less pronounced aberrations at full aperture, especially outside the center of the image. Many of these aberrations disappear or are at least mitigated if the aperture is closed by 1 - 3 exposure stops.
The following aberrations are reduced by stopping down: vignetting (dark image corners), longitudinal chromatic aberration (colored "halos" around bright stars), curvature of the focal plane (blurred star image in the peripheral areas) and coma as well as astigmatism (e.g. "butterfly-like" distortions of the stars towards the edges of the image).
The level of dimming at which a lens performs acceptably in the starry sky must be determined by taking test shots, as even individual lenses of the same series sometimes show significant differences. A welcome side effect of stopping down is an increase in depth of field and therefore a greater tolerance when setting the focus to infinity.
However, stopping down too much is counterproductive, because with very small apertures the diffraction of the light at the aperture blades becomes increasingly noticeable as an impairment of the general sharpness performance. Many lenses deliver the peak of their imaging performance at medium apertures (around 1:2.8 to 1:8). You should not expect miracles from faster lenses (f/1.2, f/1.4, f/1.8) at open aperture, even if they are expensive lenses from a well-known manufacturer.
Whatever aperture your lens delivers good results at: thanks to tracking, you can now afford to stop it down to this value and expose longer accordingly.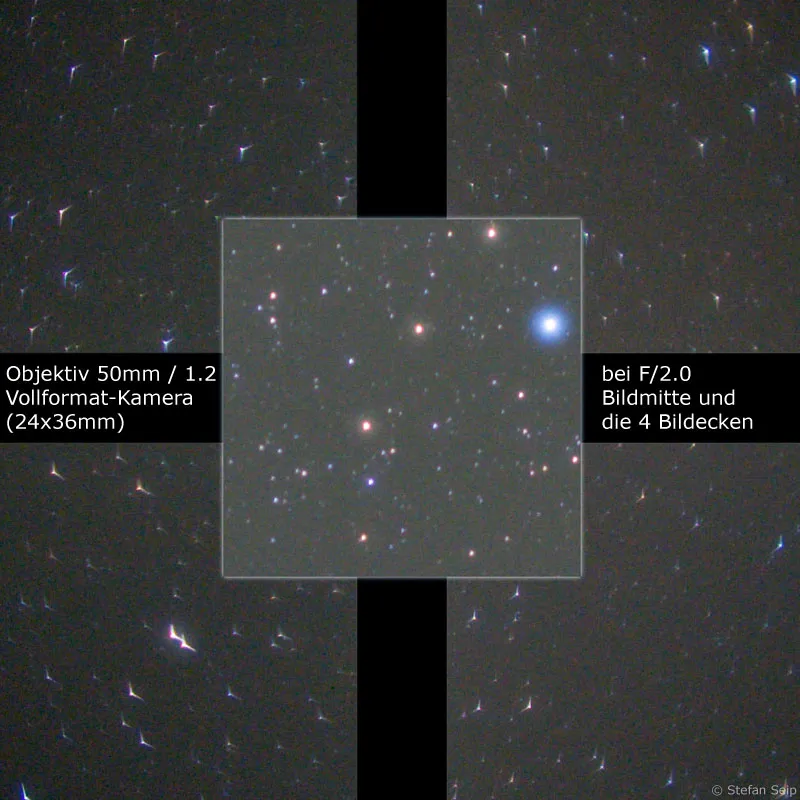
Test shot with a 50mm lens with a speed of 1:1.2, stopped down to 1:2.0. Even when stopped down, clear image weaknesses are still visible: in the center of the image, longitudinal color aberration (chromatic aberration) in the form of colored halos around the stars, in the corners of the image, strongly distorted stars due to coma and astigmatism.
The planet Jupiter (some of Jupiter's moons are visible) with the same lens. While the quality in the center of the image (top row) only reaches its maximum at an aperture of 1:3.5, the lens has to be stopped down even further until the image quality in the corners of the image (bottom row) is satisfactory. To the manufacturer's credit, it must be said that this lens was exchanged for a much better one as a gesture of goodwill.
Vignetting, i.e. dark image corners, is completely normal when using very fast lenses at open aperture. This shot of the big car was also taken with the 50 mm F/1.2 lens at full aperture. As the aperture is stopped down, the vignetting disappears more and more.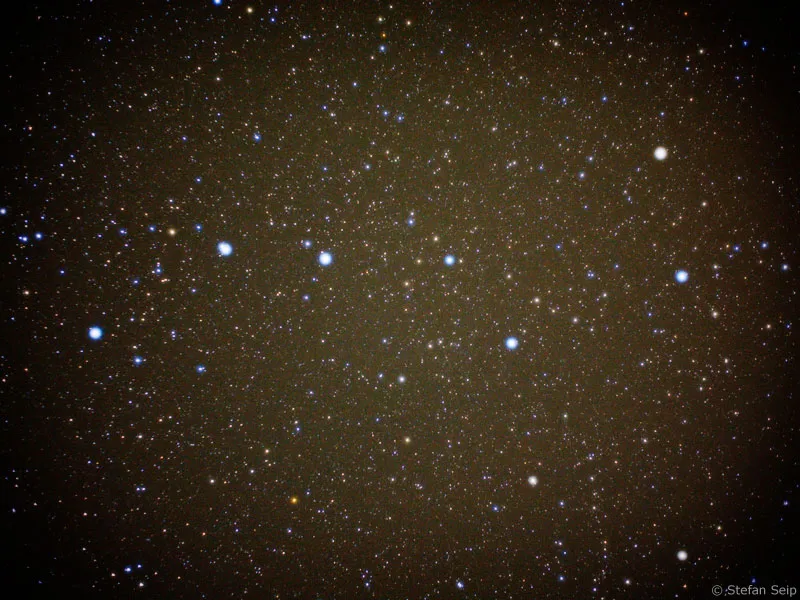
4th series of congruent shots
In order to prevent the brightness of the sky background from becoming too high and the brightest stars in the image field from being overexposed during long exposures, it has proven useful in astrophotography to take several photos with shorter exposures instead of a single exposure with a very long exposure time in order to combine them later to produce the final result (see episode number 16 of the series "Astrophotography and Sky Photography": "Getting to grips with electronic image noise").
In order to calculate an "average value" from several images, the images must of course be congruent or aligned accordingly. This task is much easier if the section of the individual photos is as identical as possible. The use of an astronomical mount with tracking is the best basis for this.
5. detecting moving objects
All stars appear point-like on a photo with a long exposure time. However, if you discover a single object that is not shown as a point but as a line, it is certainly not a star but an object that has its own motion in relation to the stars. This could be a comet, a minor planet (planetoid) or even a satellite orbiting the Earth.
Sometimes a small planet comes quite close to the earth, so that its relative movement to the stars is so fast that it appears as a line on a tracked photo with an exposure time of just a few minutes or even seconds and can therefore be recognized.
This image is an enlargement of a section of an image that was exposed for five minutes with a focal length of 300 millimeters. During the exposure time, the camera followed the stars. The line in the image is the minor planet "2002 NY40", which is one of the Earth's orbital crucians. Close to the Earth, it moves at high speed relative to the stars.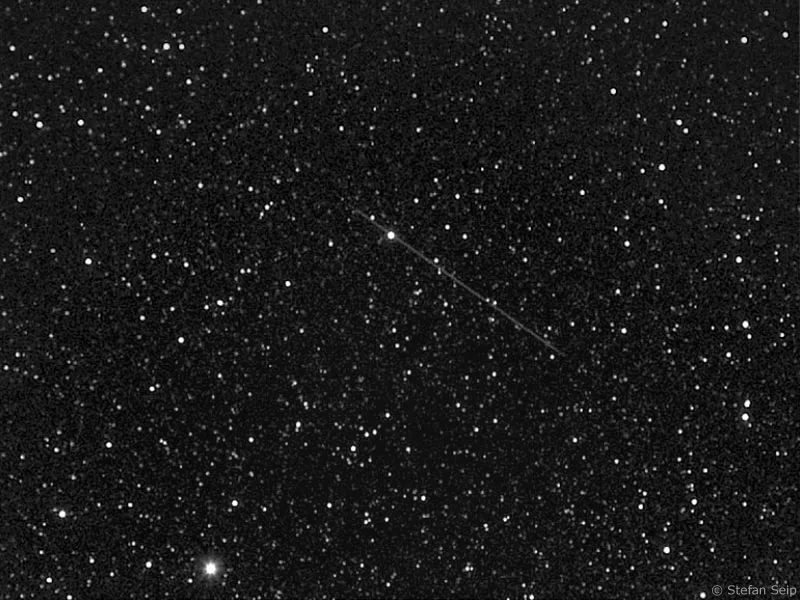
Mounting the camera
For tracking shots, the camera must of course be attached to the moving part of the mount. It does not matter where it is mounted and in which direction the lens "looks". It is only important that the connection between the mount and the camera is stable enough to prevent unwanted camera movements during the exposure times, which in turn can cause blurred photos, as can be the case with undersized or poorly manufactured ball heads, for example. The corresponding clamping screws must be tightened firmly.
If no telescope is used, a good solution is to screw a sufficiently stable ball head firmly to a dovetail bar, which in turn is inserted into the dovetail guide of the mount. In this configuration, the ball head allows additional degrees of freedom when selecting the image section. If the camera were to be attached directly to the dovetail bar, the camera would only have to be aligned to the desired celestial object by adjusting the hour and declination axis of the mount.
This works in principle, but it is not possible to optimally align the camera by rotating it around the optical axis of the camera lens. This can be very annoying if, for example, you want to capture a constellation in full format. The ball head allows the necessary rotation of the camera just like a telephoto lens in a tripod clamp.
If a telescope is installed on the mount, the camera can either be piggybacked on the telescope or attached to the counterweight rod, as long as the telescope is not to be used as a camera lens. For the application discussed here, it does not matter whether the camera is aligned to the same region of the sky as the telescope or not.
The "AstroTrack 320x" mount can only support the smallest telescopes, it is ideally suited for tracking a camera with a photo lens. However, a tripod, tripod head and an additional ball head must be available or purchased separately.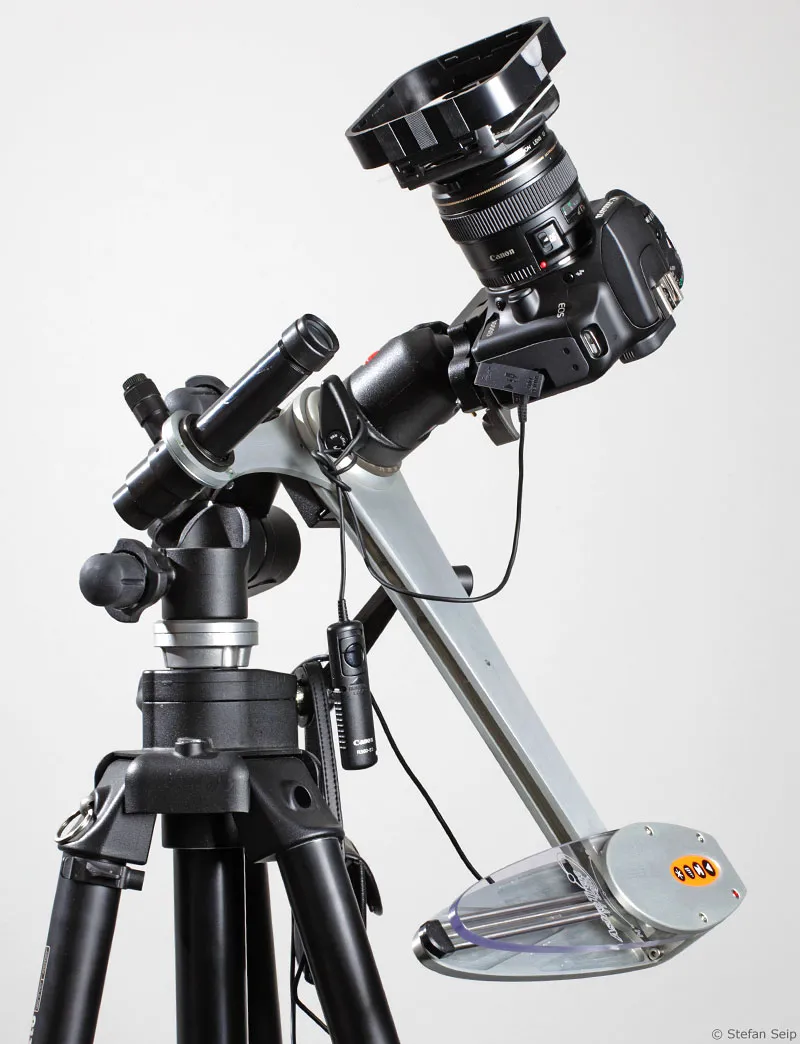
Direct mounting of the camera on an equatorial mount. A ball head was screwed onto the dovetail bar in order to have more freedom when selecting the desired image section.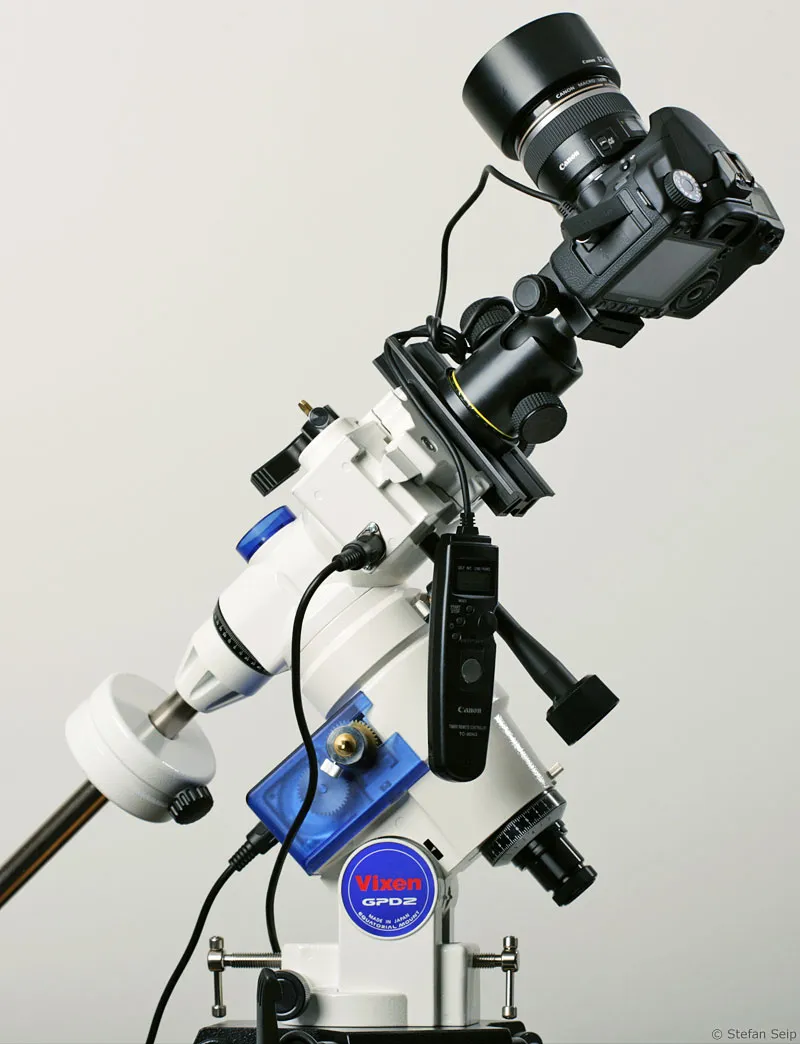
If a telescope is mounted on the mount, the camera can be screwed onto the telescope piggyback. The camera does not necessarily have to look in the same direction as the telescope. Just make sure that no parts of the telescope tube protrude into the field of view.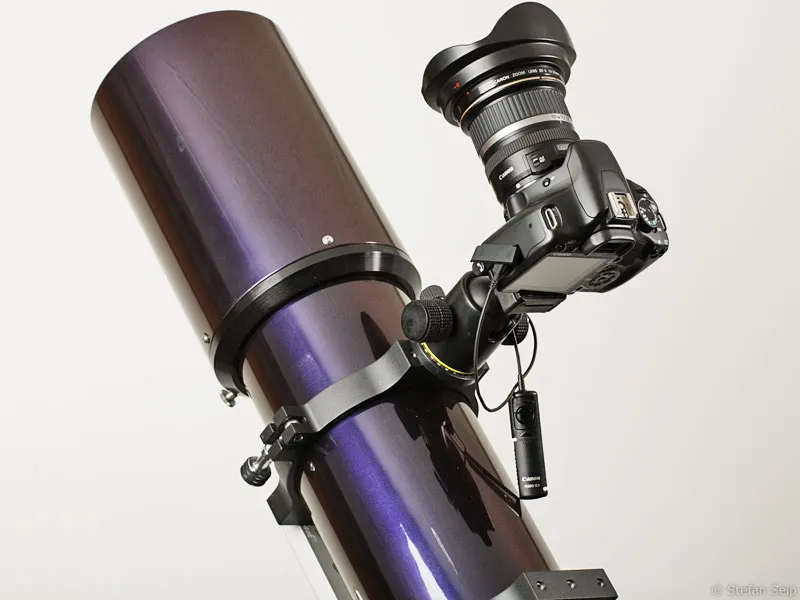
Attaching the camera to the counterweight rod of a mount. The "Manfrotto Super Clamp 035 tripod clamp" was used here, as well as a ball head that allows the camera to be panned in all directions.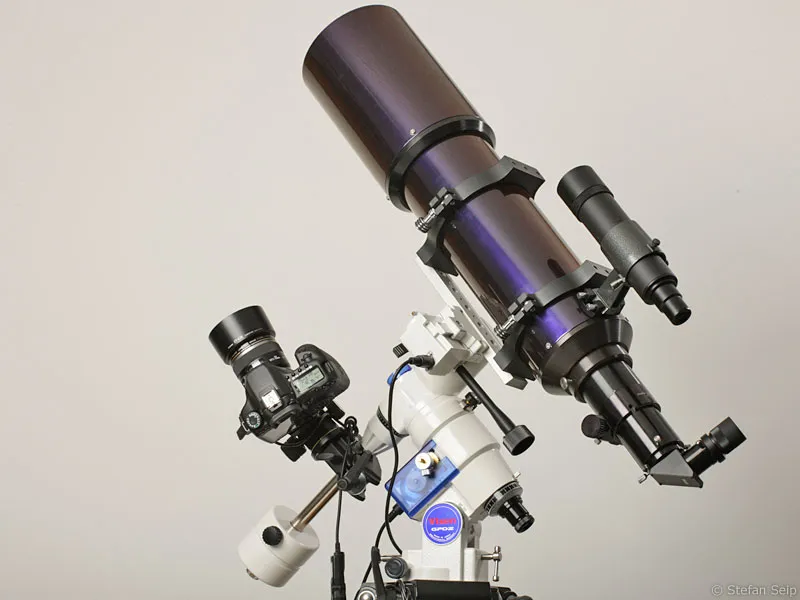
Start small
Astrophotography with tracking requires a little practice. It simply takes a certain amount of time to set up and align the mount with the required accuracy. I would therefore recommend starting "small" when choosing the focal length. Frustration and disappointment are inevitable if you try to connect the camera to a telescope with a focal length of 2500 millimetres and hope for sharp, long-exposure photos without any training. Such an undertaking is a challenge even for an experienced astrophotographer!
A good start is to use a wide-angle lens with which entire constellations can be captured. Gradually increasing the focal length then leads to telephoto lenses, which can be used to image many distant celestial objects such as star clusters, gas umbels and galaxies. Once you have reached a point where you can take successful photos with telephoto lenses (up to 200 or 300 millimetres focal length), the next step may be to try a short focal length telescope. The focal length should not exceed 500 or 600 millimeters. Much longer focal lengths then require tracking control.
In this way, and over the course of many nights of shooting, you will develop a feeling for how precisely the mount needs to be set up and how long the maximum exposure time can be in order to obtain photos with sharp star images with the equipment used. With longer and longer focal lengths, you will realize that at some point you will reach a limit at which the inaccuracy of the mount used and/or the non-optimal alignment will produce small star lines despite tracking if the exposure time is long enough. Getting to know these limits is an important process. While you can optimize the polar alignment, the only way to counteract the tracking inaccuracy is through guiding, as described in the next but one episode of the "Astrophotography and Sky Photography" series.
Procedure
I would now like to describe in detail how you can take your first tracked astrophotograph. The aim should be to capture any constellation with a maximum focal length of 50 millimetres, i.e. a photographic lens. A clear, moonless night is best suited for this.
1. preparation
First of all, you need to set up your equatorial mount in a suitable location, preferably far away from sources of terrestrial light interference, align it and get it ready for use (see episode 9 of the series "Astrophotography and sky photography": "Handling an astronomical mount"). The camera and lens are attached to the mount.
A cable release / Tim or wireless remote release must be used in order to release the camera without touching it and thus without causing vibrations. Alternatively, camera control via software (connected laptop) is also an option. For long exposures, programmable timers are a great advantage, allowing you to pre-select an exposure time of any length while the camera is set to 'Bulb'.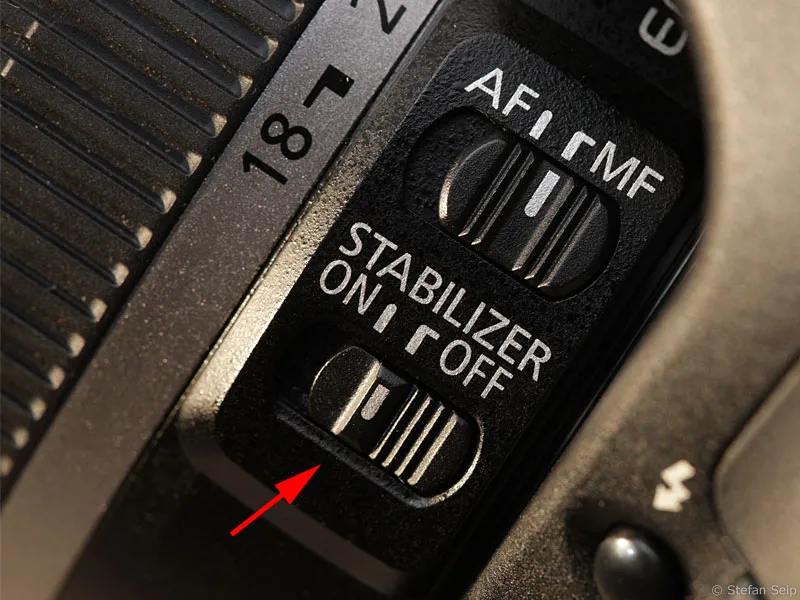
Canon offers these two cable releases, the simple RS-60 E3 model (above), where the shutter release can be locked. It fits all three- and four-digit Canon EOS models (350D, 400D, 450D, 1000D, ...). One and two-digit Canon models have a different connector to which the programmable TC-80 N3 Tim (below) can be attached.
A lens hood should be used to prevent the effects of extraneous light from the side and to delay possible dew on the front lens.
A soft-focus filter can be considered to preserve the colors and the visual impression of brightness of the stars. The effect of soft focus in astrophotography is described in detail in Part 3 of the series "Astrophotography and sky photography": "Photographing constellations".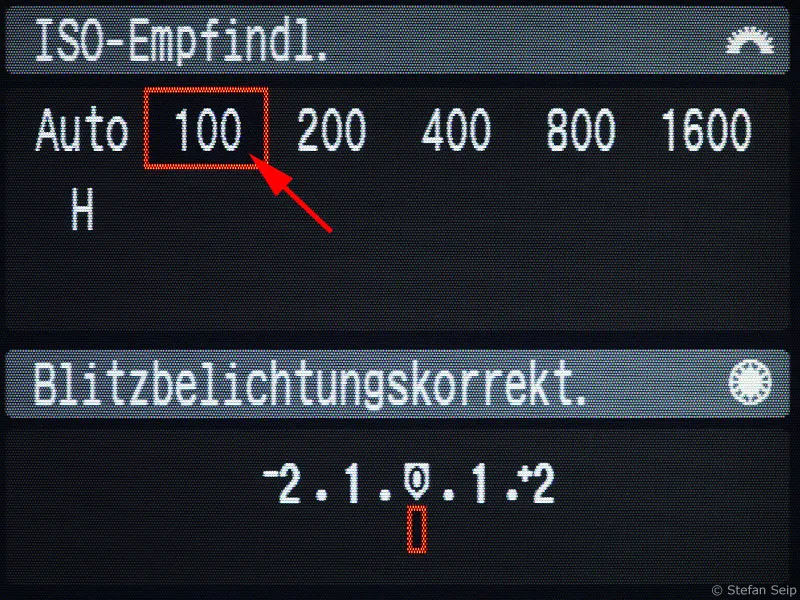
Camera with Cokin P840 soft-focus filter attached.
2. make the basic settings
The following camera configuration is recommended:
- File format
The RAW format is the first choice for taking pictures of constellations and is highly recommended. You should therefore set your camera to RAW or RAW+JPG.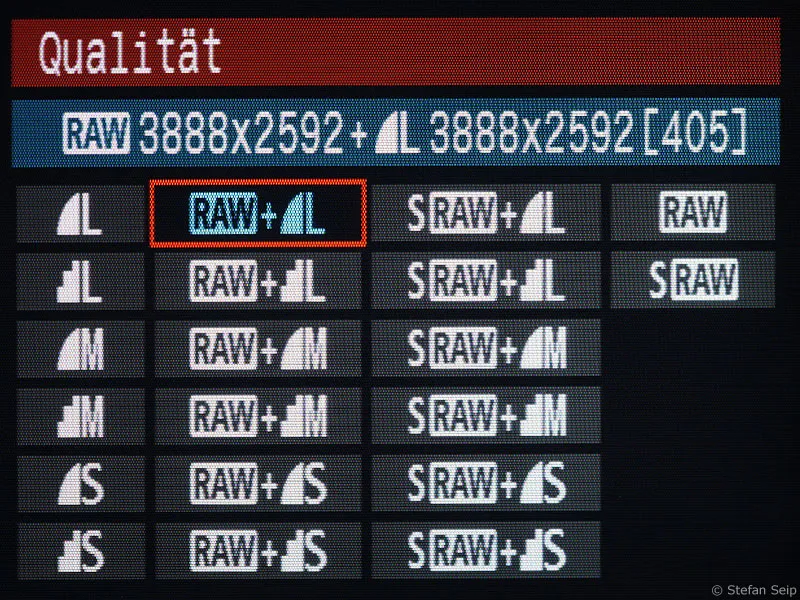
Setting the image quality on a Canon EOS 40D: The RAW format is selected here, while the photos are also saved in JPG format at the same time. The JPG files are helpful for quickly preselecting the best shots.
- ISO value
As the camera is tracking and longer exposure times are not a problem, a low ISO value can be set to keep image noise to a minimum. Try ISO 100, but if you prefer higher ISO values, do not go above ISO 800.
Setting the ISO value to 100 on a Canon EOS 40D. The electronic image noise is minimal at low ISO values.
- White balance
Manual setting to "Daylight" (symbol: "Sun") is best.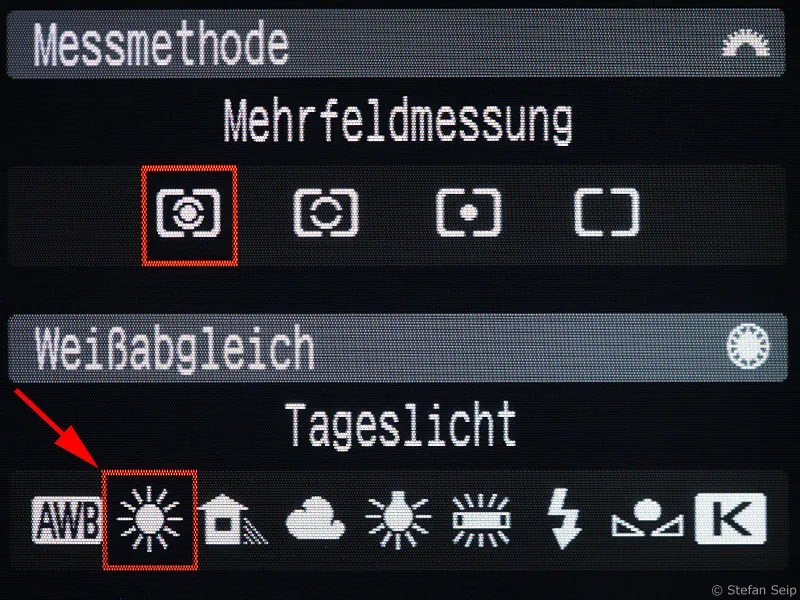
Setting the white balance on a Canon EOS 40D to daylight (5200 Kelvin).
- Noise reduction
If noise reduction is switched on for long exposures, the camera produces a dark image with the same "exposure time" after each shot with a longer exposure time (from one second). This means that after a 5-minute exposure, the camera is blocked for a further 5 minutes. This can have a positive effect on the remaining image noise, but costs a lot of observation time and battery power. I therefore suggest switching this function off for the time being. Determine at a later date whether switching on noise reduction for long exposures on your camera actually leads to a visible improvement in the results and then decide whether you want to invest the necessary waiting time after each individual shot.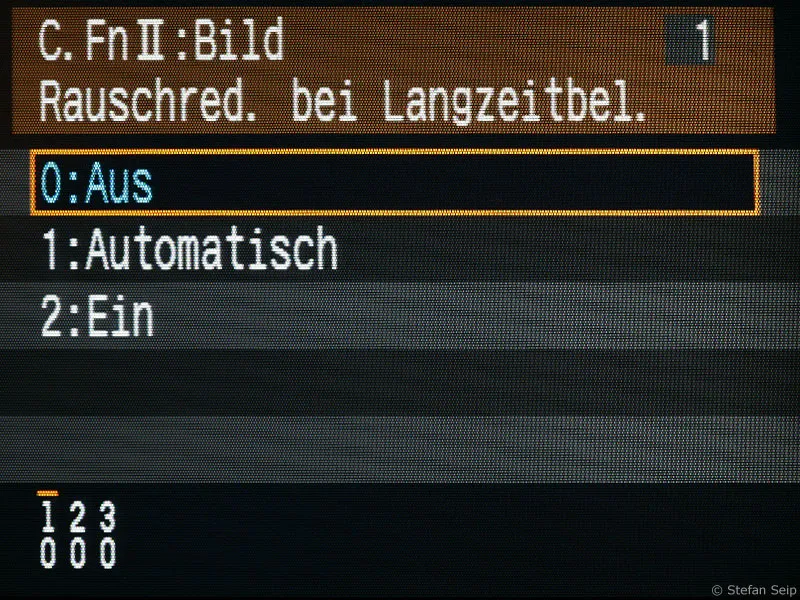
Switching off noise reduction for long exposures, here using the example of a Canon EOS 40D.
I have not had good experiences with the High ISO noise reduction setting (newer Canon EOS models) and therefore always leave it switched off.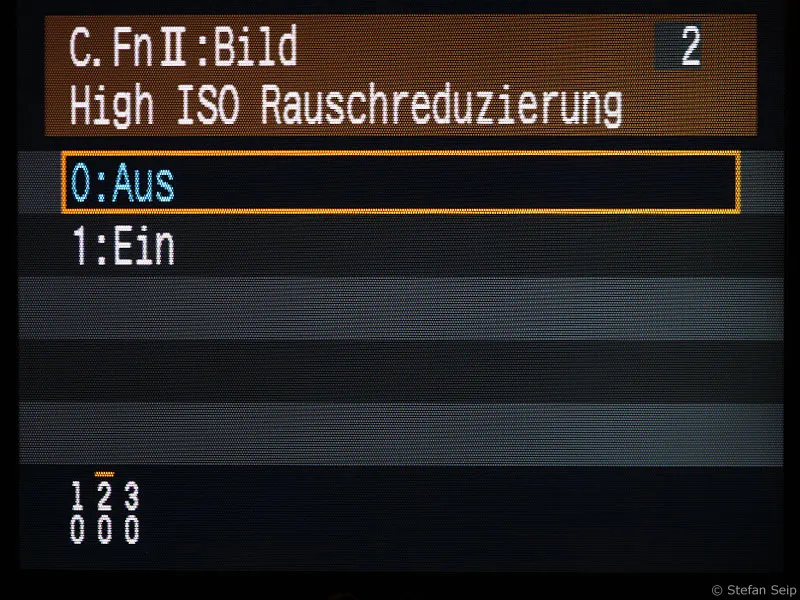
The "High ISO noise reduction" is switched off.
- Exposure program
Only the manual setting ("M") and setting the exposure time to Bulb for exposures of any length are possible. On some cameras, the setting dial must be set to M and Bulb selected as the exposure time; others have both B and M as selectable variants on the setting dial, in which case B must be set directly.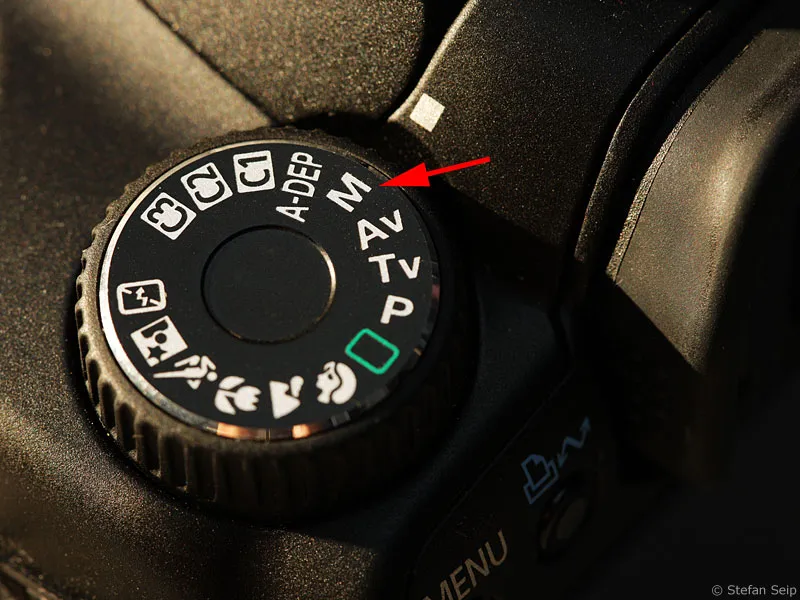
Setting the manual exposure control ("M") on the control dial of a Canon EOS 40D.
The Canon EOS 5D Mark II has "B" as a directly selectable function on its control dial: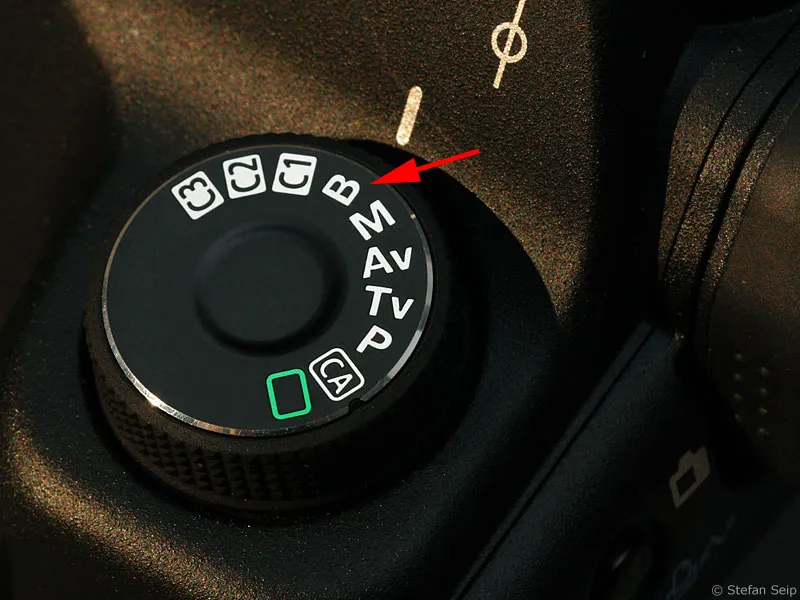
- Blender
Stop down your lens! Starting at the largest possible aperture (i.e. the smallest f-number) by at least one exposure stop, depending on the aperture at which the stars in the peripheral areas of the photo become sufficiently sharp. With some lenses, this even requires stopping down by two or three stops.
Here is an excerpt from the internationally standardized aperture scale, showing full and half stops of exposure (full stops are printed in italics):
| 1,2 | 1,4 | 1,8 | 2,0 | 2,5 | 2,8 | 3,5 | 4,0 | 4,5 | 5,6 | 6,7 | 8,0 | 9,5 | 11 | 13 | 16 |
If you wanted to stop down a lens with an initial light intensity (largest aperture) of 1:2.8 by one exposure stop, you would have to set the aperture to 1:4.0. Stopping down by two stops would mean an aperture of 1:5.6.
If the Blender value is not adjusted in half stops but in thirds, an aperture of 1:6.7, for example, cannot be set. The following gradation then exists between 1:5.6 and 1:8.0:
| 5,6 | 6,3 | 7,1 | 8,0 |
Many cameras allow you to configure in the menu whether the exposure can be set in half or thirds steps.
Changing from one full step to the next always means that the exposure must be doubled or halved to compensate for this. The following example combinations therefore result in an identical exposure:
| Blender | Exposure time | |
| 1. | 1:5,6 | 60 seconds |
| 2. | 1:8,0 | 120 seconds |
| 3. | 1:4,0 | 30 seconds |
The display of the Canon EOS 450D: The arrow points to the 1:4.5 Blender setting. Although the lens used has a "light intensity" (smallest adjustable aperture value) of 1:2.0, it has been stopped down by two and a half stops to increase the imaging performance.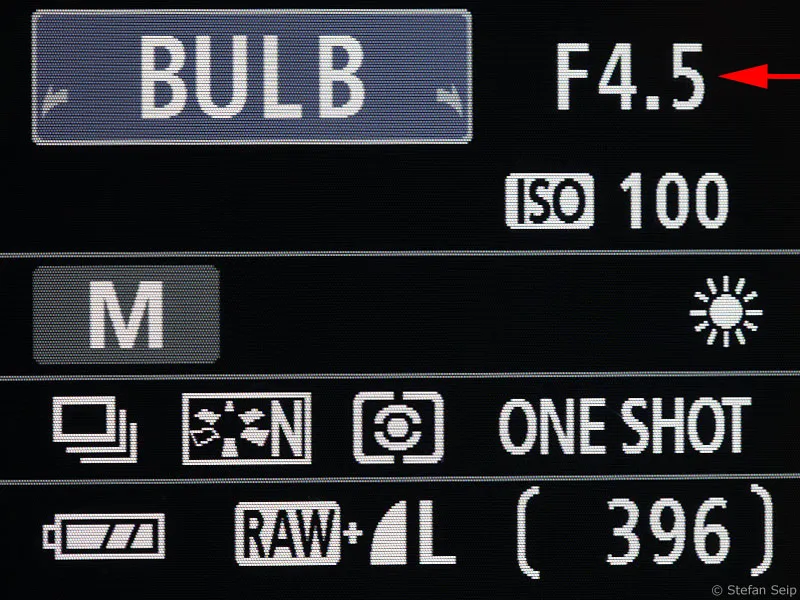
- Mirror lock
This setting is used to prevent camera shake caused by the camera's mirror. If you make use of this setting, the first press of the shutter release button only raises the mirror. Then wait a few seconds until the vibrations caused by the mirror bounce have subsided before pressing the (cable) release button a second time to start the exposure.
Note: When controlling the camera via software, the mirror lock-up must be omitted if the software used does not support this (e.g. Canon EOS Utility, remote control).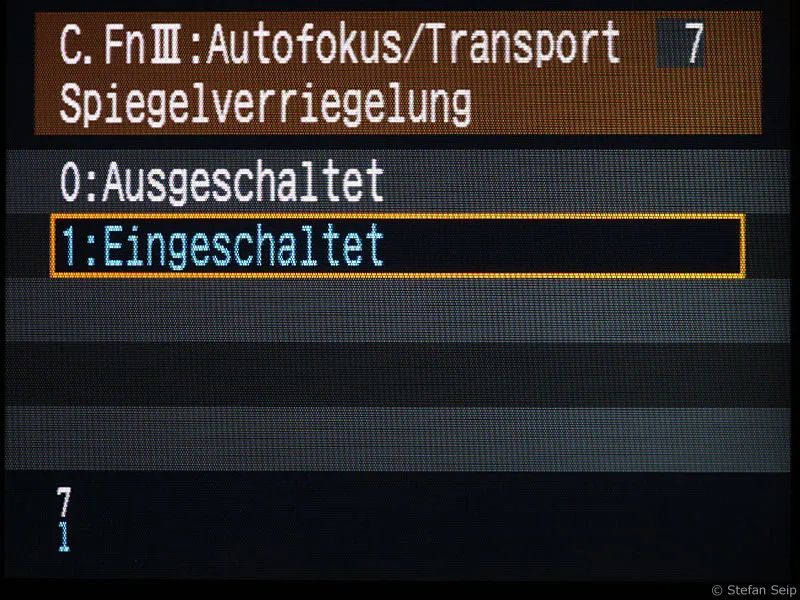
Mirror lock switched on.
- Image stabilizer
It is very important to switch off any existing image stabilization mechanism!
The image stabilizer should be switched off when the camera is attached to a mount.
3. taking pictures
First of all, focus as precisely as possible to "infinity". Autofocus will fail in most cases, even with bright stars, so manual focusing is the only option, unless you find a "substitute object" in the distance, such as the lights of a city.
Never use the "infinity stop" of an autofocus lens, as these can usually be turned beyond infinity.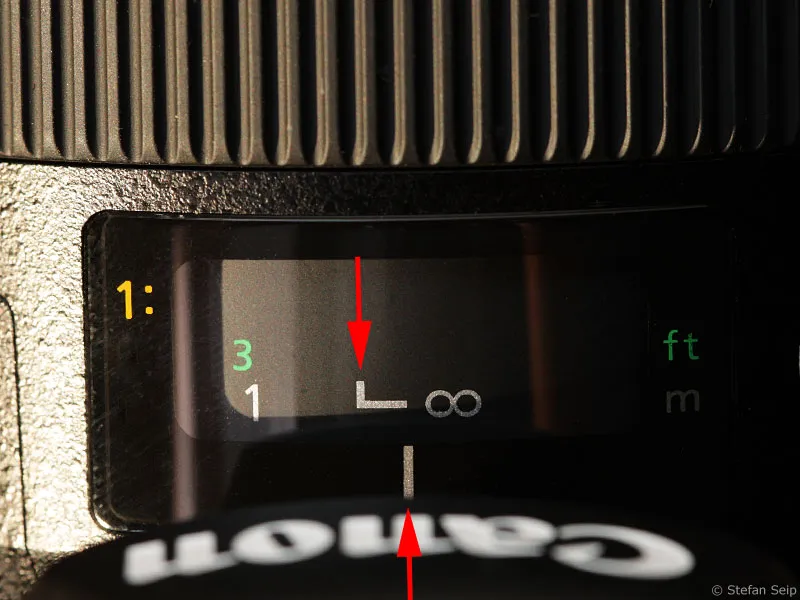
A completely blurred star image would be the result if you turn the distance ring of an AF lens to its "infinity stop".
The infinity index on some lenses is also generally not precise enough.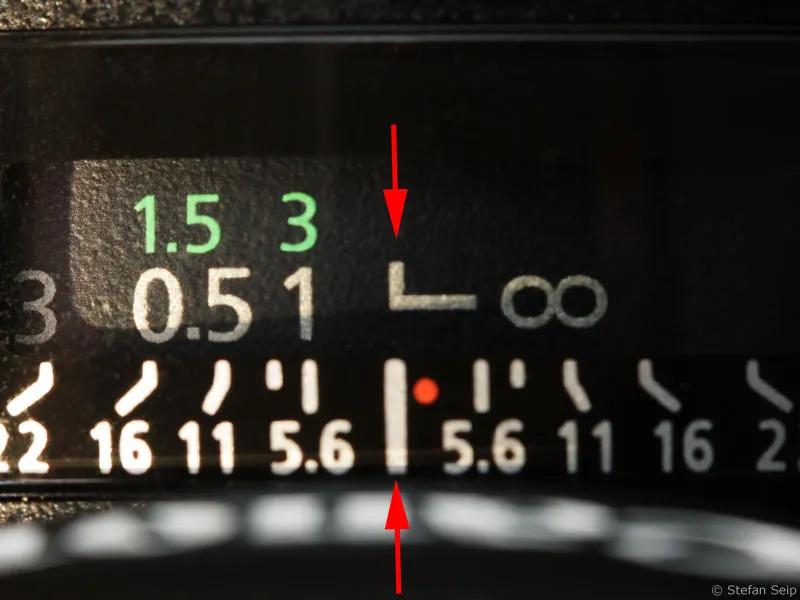
The index mark for "infinity" is no guarantee for sharp photos of stars.
Camera models with a "live view" function are ideal for focusing, allowing you to aim at a bright star and then focus accurately at high magnification on the camera display.
If your camera does not have such a live view function, point it at a very bright star and first set the best possible focus point manually in the viewfinder. Then take test shots with the Blender fully open and an exposure time of one or two seconds.
Evaluate the result at maximum magnification on the camera display. You can approach the best focus point in ever smaller steps. Go beyond the supposed optimum point once and then correct in the opposite direction again to get a feel for the optimum focus point.
This sounds like a tedious, time-consuming process. Nevertheless, it is worth the effort, because the focus will determine the success or failure of the shot.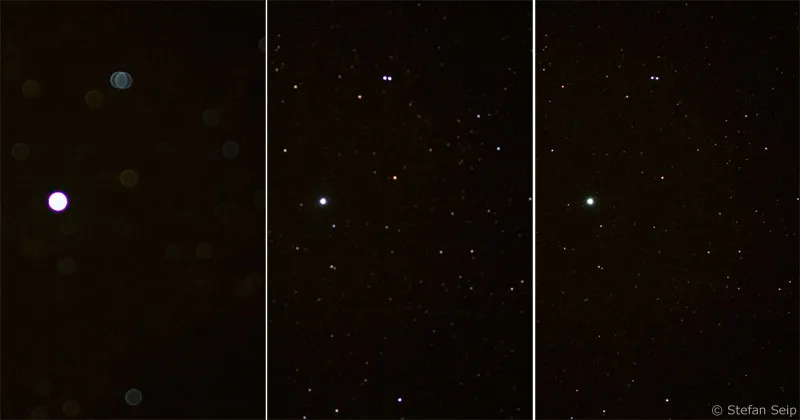
The area around the bright star Vega in Lyra. On the left you can see the result of the autofocus, in the middle the best focus point that was possible with classic focusing using the SLR viewfinder. The picture on the right shows the best sharpness after using the "Live View" function.
The autofocus switch remains on "MF" for manual focus even after focusing.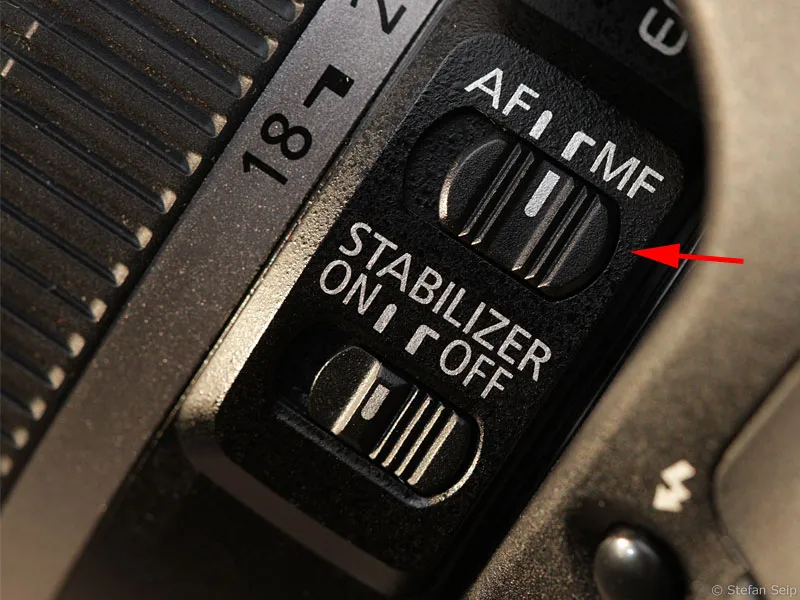
Tip: After some time, when the outside temperature may drop, it may be necessary to check the focus and correct it if necessary. Some lenses react to changes in temperature with a focus drift.
Once the focus is set, select your final image section and let the mount run for a few seconds until the drive worm has fully engaged with the teeth of the gear rim. Then start with an exposure time of one minute and then check on the camera display whether the stars are sharp and have not become small lines, as would be the case without tracking. If the stars are sharp, extend the exposure time by a further minute and repeat the exposure. Handle a cable release carefully to avoid shocks during the exposure.
Check your photos on the camera display with the histogram display switched on to find out when the maximum sensible exposure time has been reached. Note the steep slope on the left-hand side of the histogram, which represents the dark sky background and which moves further and further to the right as the exposure time increases. It makes perfect sense to place it at the right end of the left third in order to keep the sky out of the leftmost area of the histogram, where the noise occurs.
The sky will then appear quite bright in retrospect on the camera display, but this should not irritate you, as this impression can be quickly corrected by the subsequent image processing.
However, also pay attention to what happens on the right-hand side of the histogram: If a "peak" appears at the right stop, this means that many bright stars are oversaturated and the image is therefore overexposed.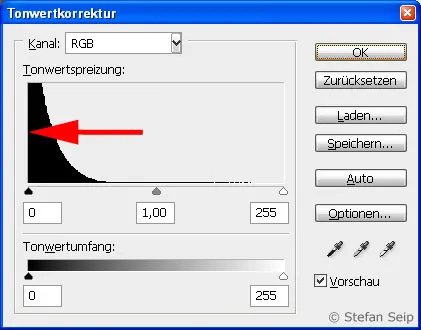
Example of an underexposed star field image. The "mountain of data" hits the left side (arrow).
Example of a correctly exposed star field image. The steeply rising flank (arrow) of the "data mountain" lies in the left third of the scale far to the right. This means that the sky background has a sufficient distance to the electronic image noise, which is located further to the left in the histogram.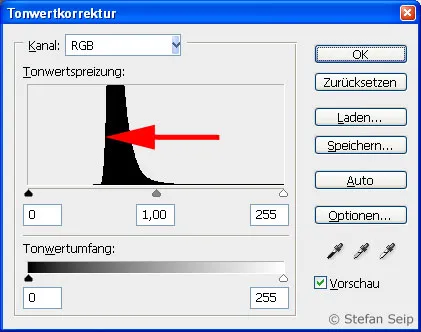
Example of an overexposed star field image. The sky background (left arrow) has moved very far to the right, while bright stars are already in full saturation and appear pure white, which can be recognized by the data peak of the histogram (right arrow) at the right stop.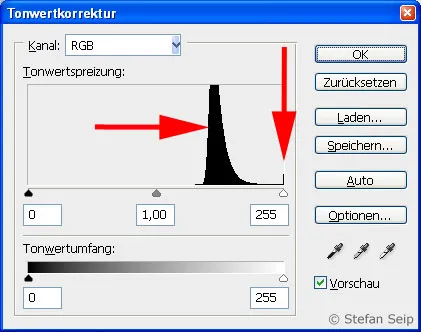
Once you have determined the best combination of ISO value, Blender and exposure time for your location, you can use lenses with a longer focal length for the next shots to capture objects such as star clusters, nebulae or galaxies.
However, always check whether the stars in the photos are still point-like, as at a certain point you may have reached the limits of your mount's tracking accuracy.
Image processing
The image processing of tracked star field images cannot be generalized; the nature of the source material is too different. In the following, an image of the Andromeda galaxy, taken with a 135-millimeter telephoto lens, will serve as an example of the various steps involved in image processing.
The main focus will be on solving typical and recurring image processing tasks: E.g. combating residual image noise, removing vignetting and achieving a dark, neutral-colored sky.
First, I open the RAW file of my star field image in Photoshop. The Camera Raw module appears, in which the image is "developed".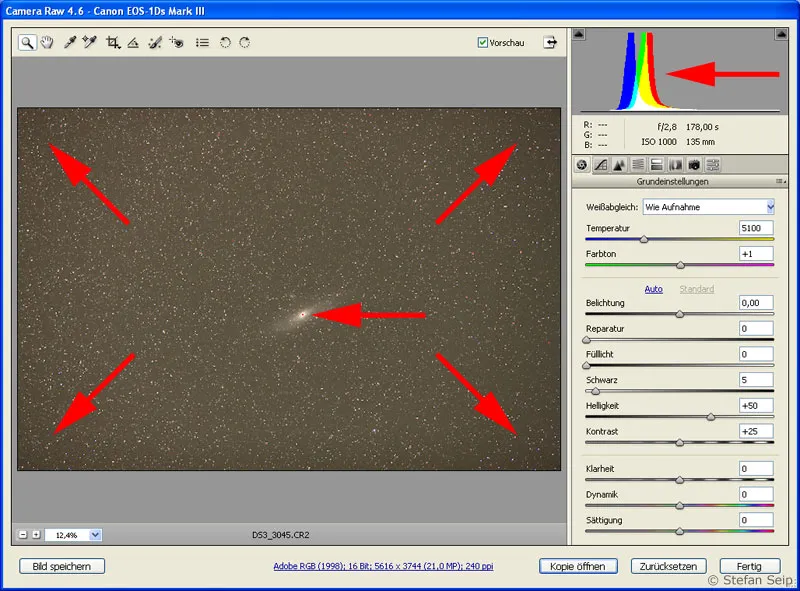
Already on the start screen of "Camera Raw" I recognize problems that need to be solved: The dark corners of the image (four arrows), the non-neutral gray sky background (arrow pointing to the histogram in the top right) and the slightly overexposed center of the galaxy (red spot, arrow in the center of the image).
I get a color-neutral sky background after I click on the white balance tool (left arrow) and then on the image in the sky area. The histogram (right arrow) shows the success of this action.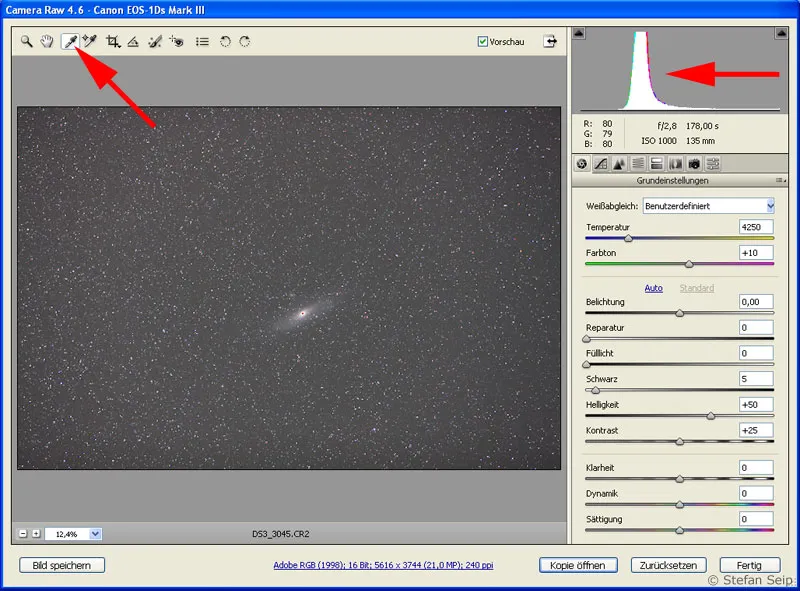
In the Basic Settings tab, there is the Repair slider, which I move to a value of 33 (right arrow) until the initially overexposed center of the galaxy no longer shows an overexposure warning (left arrow).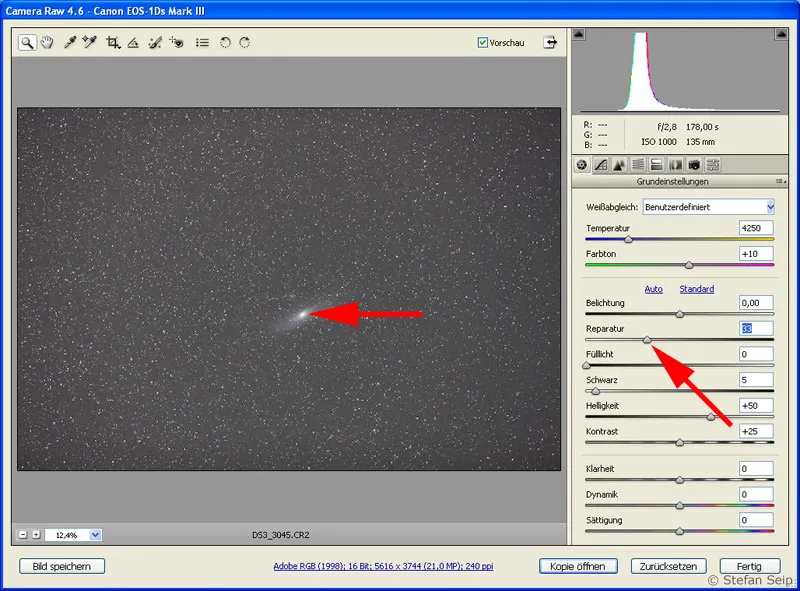
To check the sharpening and noise reduction, I zoom the preview of the image to 100% (bottom left arrow). I can then use my hand (top left arrow) to select a particularly interesting section of the image for the preview; in the example shown, the center of the galaxy.
The third tab (top right arrow) takes me to the details. There I make sure that the amount of sharpening is set to zero, because sharpening impairs the display of the stars (middle right arrow). For the noise reduction of the luminance channel (bottom right arrow), I opt for a moderate noise reduction.
The next step is to remove the dark corners of the image. To do this, I set the zoom to In view (left arrow), then the entire image appears again in the preview. Then I click on the Lens Corrections tab (top right arrow). I move the Lens Vignetting>Strength slider to the right (bottom right arrow) until the dark corners of the image have disappeared from the preview.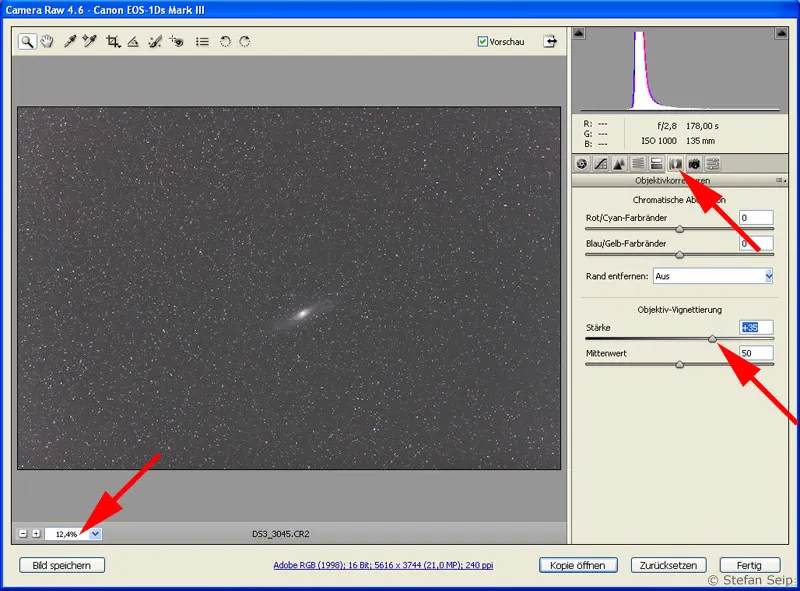
I now declare "image development" complete and open the image with the Open image button. It now appears as a file window in Photoshop.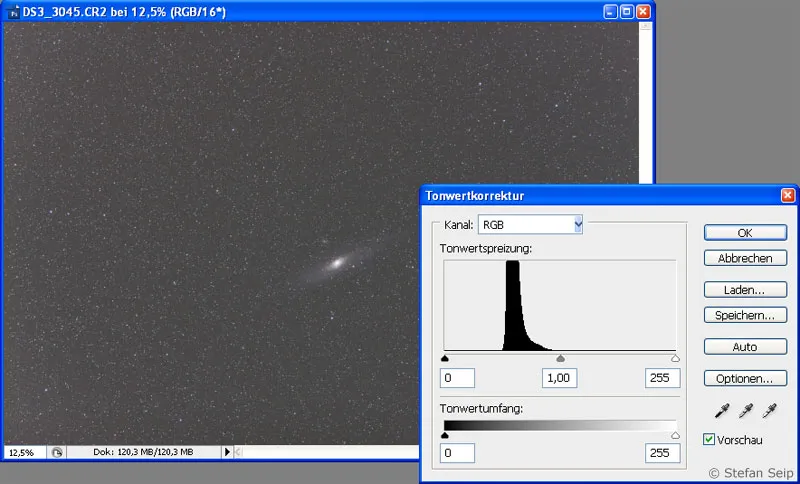
A look at the histogram (Photoshop command "Image>Adjustments>Tone correction...") shows that the brightness of the sky background is too far to the right, i.e. the sky is too bright.
I move the black point (black triangle, left arrow) to the right to crop the histogram. The sky then becomes dark, of course. But I also adjust the gray point (gray triangle, right arrow) and drag it to the left to make the galaxy and stars brighter.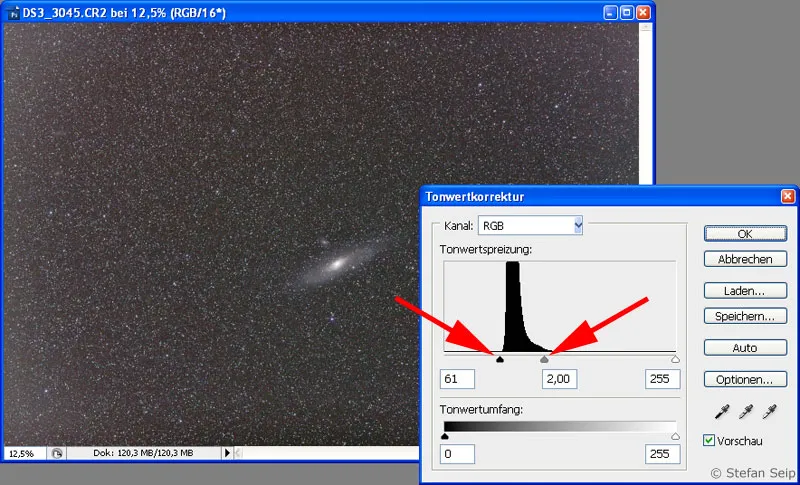
Subsequent corrections depend on personal taste, among other things. I decided to use the Photoshop command Image>Adjustments>Gradation Curves... to increase the contrast and make the image brighter overall.
I moved the starting point of the curve to the right (left arrow), which is equivalent to another histogram crop. With a second intervention (right arrow), I pulled the gradation curve upwards overall to make the stars and the galaxy appear even brighter. You can find the final result of my image processing of this shot in the following chapter "Sample shots".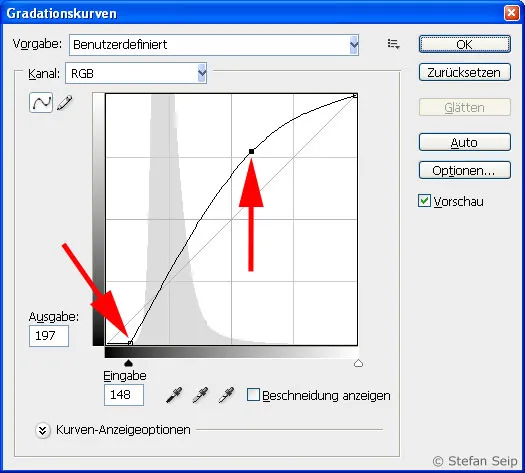
Sample images
This image of the total lunar eclipse on February 21, 2008 was exposed for 8 seconds at a focal length of 1200 millimetres (telescope). It would not have come into focus without tracking.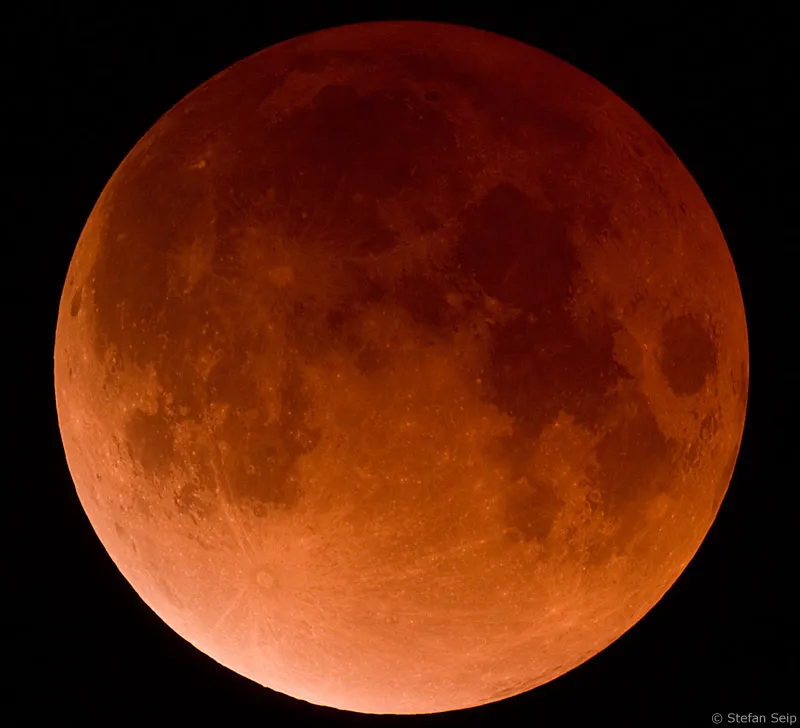
The constellation "Great Dog" with the brightest of all stars, Sirius. You can also see three open star clusters from the "Messier catalog", therefore abbreviated to "M".
The image was taken with a 35 millimeter lens at Blender 1:2.8, ISO 400 and an exposure time of 2 minutes. A soft focus filter was used and the "AstroTrack 320x" mount shown above was used for tracking.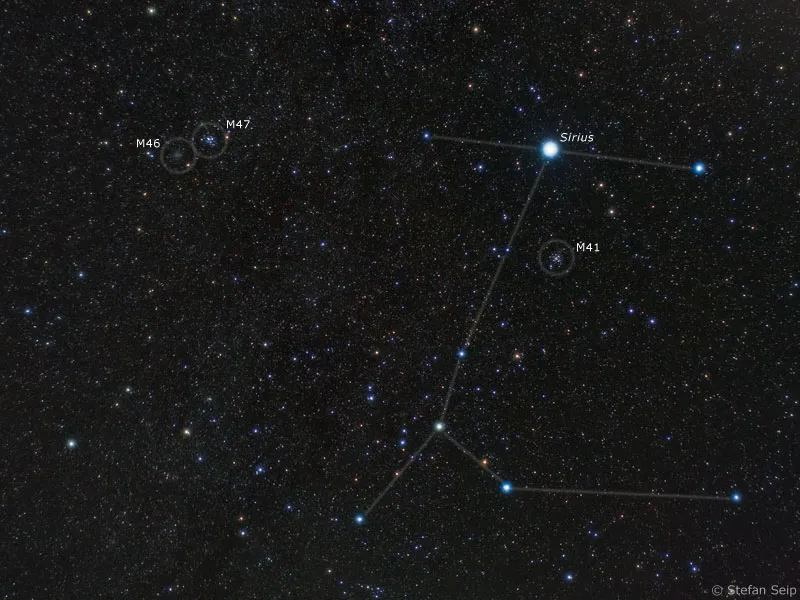
Probably the best-known constellation in the southern sky: the "Southern Cross". Taken in Namibia with a 135-millimeter lens, stopped down to 1:5.6 and an exposure time of 18 minutes. The "coal sack", a dark cloud of intergalactic dust, is visible below the constellation.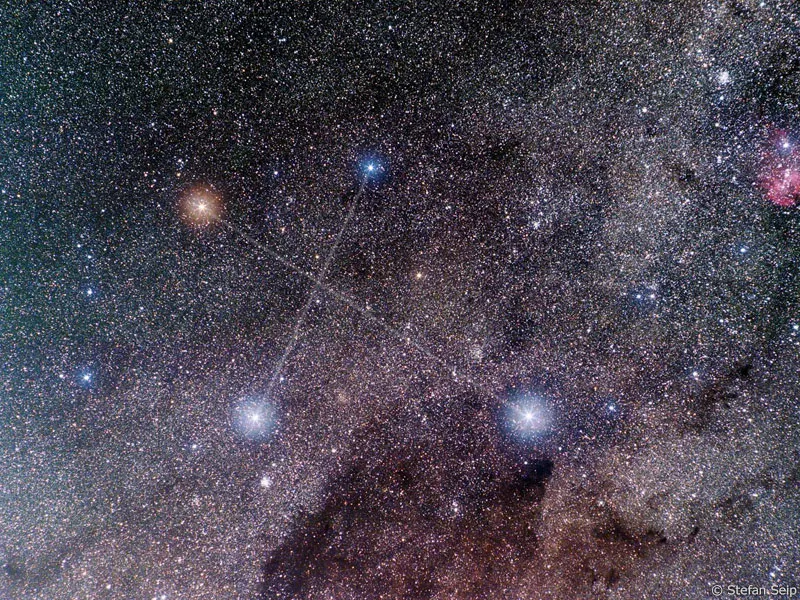
The constellation Sagittarius against the background of the Summer Milky Way. It was exposed for 50 minutes under optimal observation conditions (Namibia). Obviously, this would not work without tracking.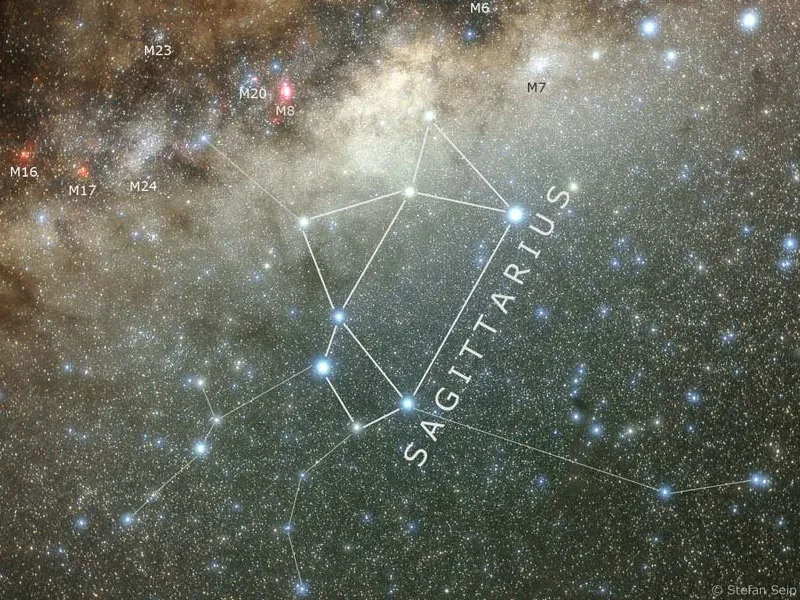
This photo cannot be recognized as a tracked image at first glance, because not only the stars but also part of the foreground (people, large tree) appear sharp. The reason for this is that these areas were illuminated by a flash unit that flared up briefly! The more distant part of the landscape not covered by the flash is actually out of focus due to the tracking of the stars.
This image was exposed for 60 seconds with a 15-millimeter fisheye lens at Blender 1:3.5. The planet Mars is in the middle of the winter hexagon, formed by bright stars of various winter constellations. The Pleiades star cluster and the comet "Holmes" can be seen on the right.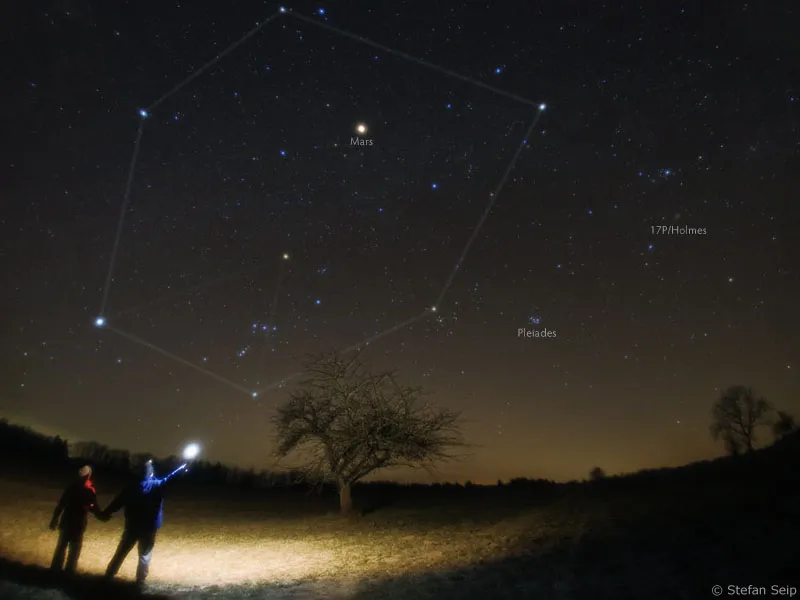
The cover image of this tutorial shows the Milky Way from one horizon to the other, taken with a 15-millimeter fisheye lens. The exposure time was eight minutes at ISO 800 and Blender 4.0. The black oval was created in Photoshop. The shooting conditions in Iran were ideal.
While the camera was tracking the course of the stars with a 130-millimeter telephoto lens, an Iridium satellite crossed the field of view, its antennas reflecting the sunlight towards the camera. The flash is known as an "iridium flare". If you want to know when and where such an event can be seen, you can find out on the website www.heavens-above.com.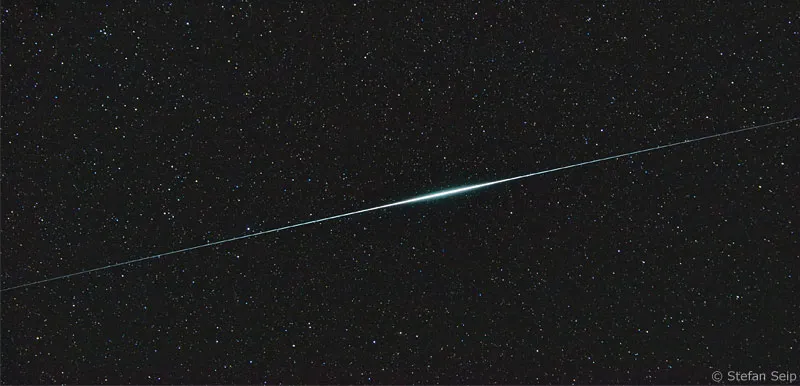
Andromeda galaxy, taken with a 135-millimeter lens at an aperture of f/2.8 (stopped down one stop). The exposure time was 3 minutes at ISO 1000, with the "AstroTrack 320x" mount providing the tracking.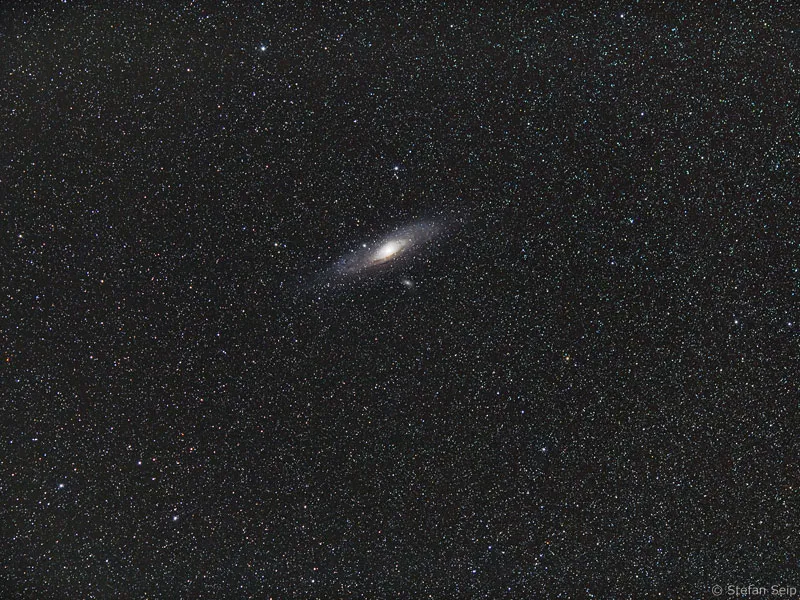
Enlargement of the image above. It is amazing what details of this galaxy become visible with a light telephoto lens when the camera is tracking the stars. For example, various bands of dust that wind around the core of the Andromeda galaxy are clearly visible.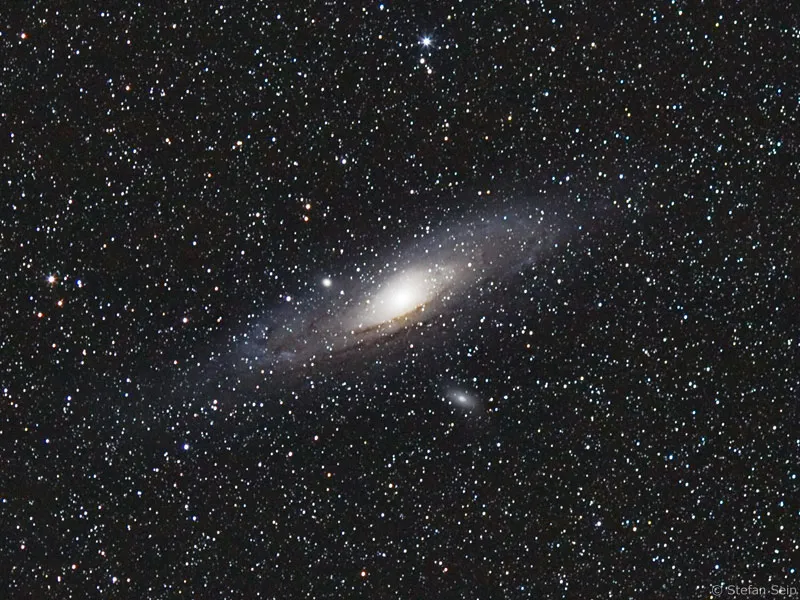
The constellation Triangle ("Triangulum", below), photographed with a 135-millimeter telephoto lens. The so-called "Triangulum Galaxy", Messier 33, is clearly visible on the right, and the open star cluster NGC 752 on the top left. The image data are identical to the image of the Andromeda galaxy above. Both photos were taken in quick succession under the best sky conditions.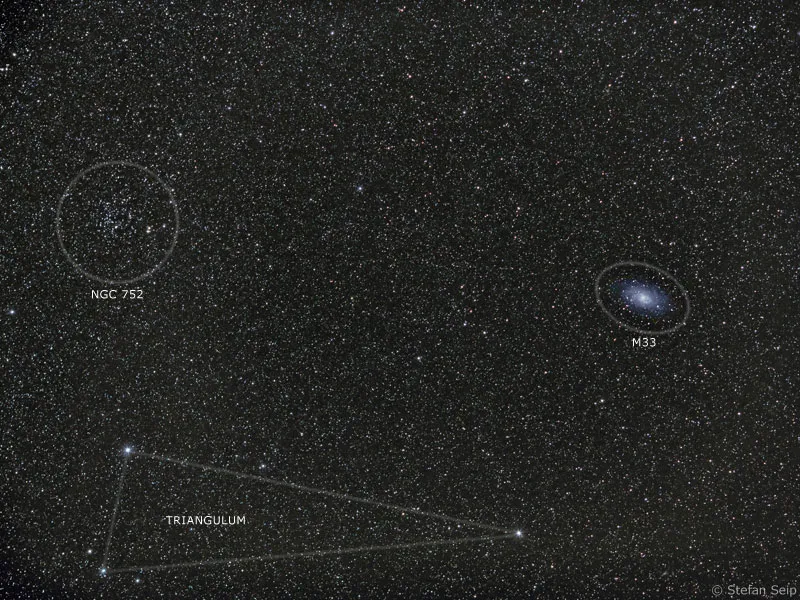
Enlargement of M33 from the image shown above. The spiral arms of this galaxy, which is about 3.1 million light years away, are clearly visible.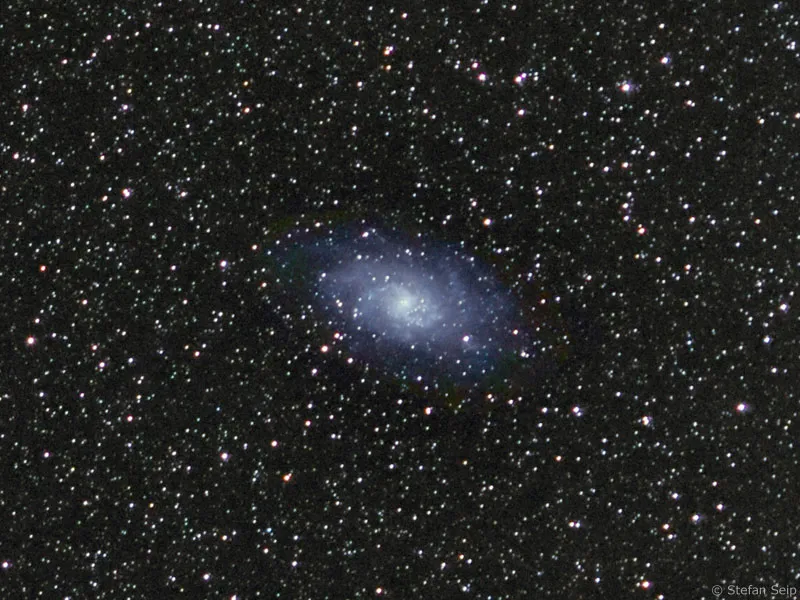
Note on our own behalf: All image examples used were taken in the manner described in the tutorial.
