In this tutorial, I will show you different ways to crop trees, e.g. to add a different sky. Of course, you will encounter very different difficulties, e.g. with color fringes or that the tree cannot be cropped so quickly if you don't know how. That is why I would like to present several methods here, because there is no super function that fits all cases.
I open the first example image via File>Open.
As you can see, the sky is a bit dull. I would therefore like to remove it and replace it with another sky.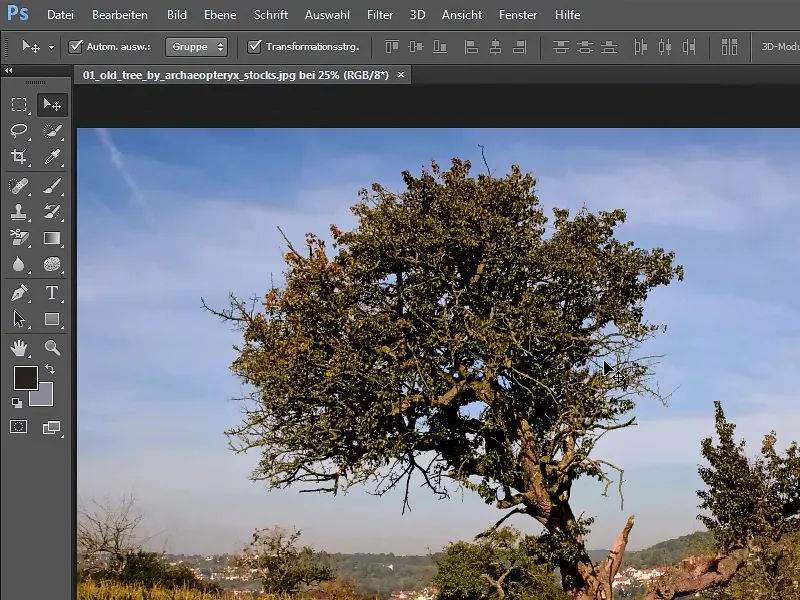
1. magic wand tool
The first way to remove trees is with the Magic Wand tool.
1.1 Selecting the Magic Wand tool
I select the Magic Wand tool from the toolbar.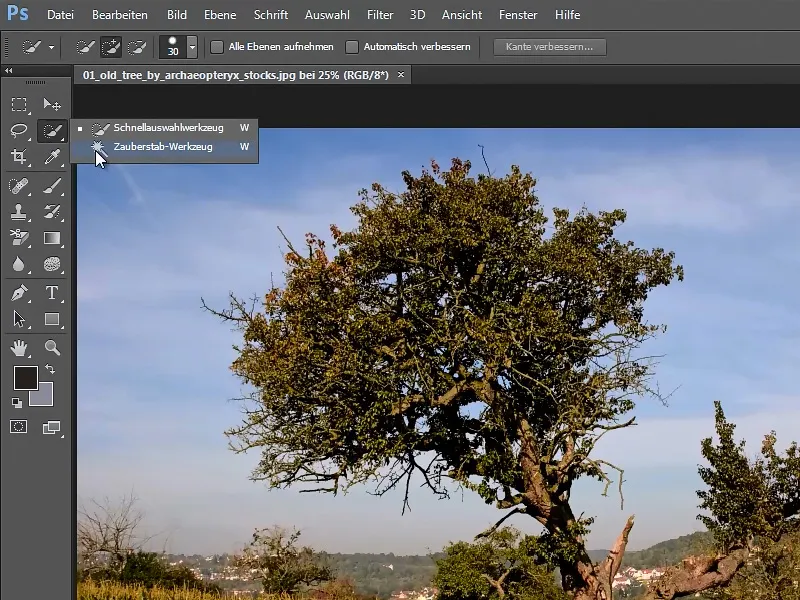
1.2 Using the magic wand tool
I now click once in the blue of the sky with the magic wand tool. This selects a part of the sky.
Holding down the Shift key(a + appears next to the magic wand ), I now click on all the areas of the sky that have not yet been selected. In this way, I gradually select the sky until it is completely covered.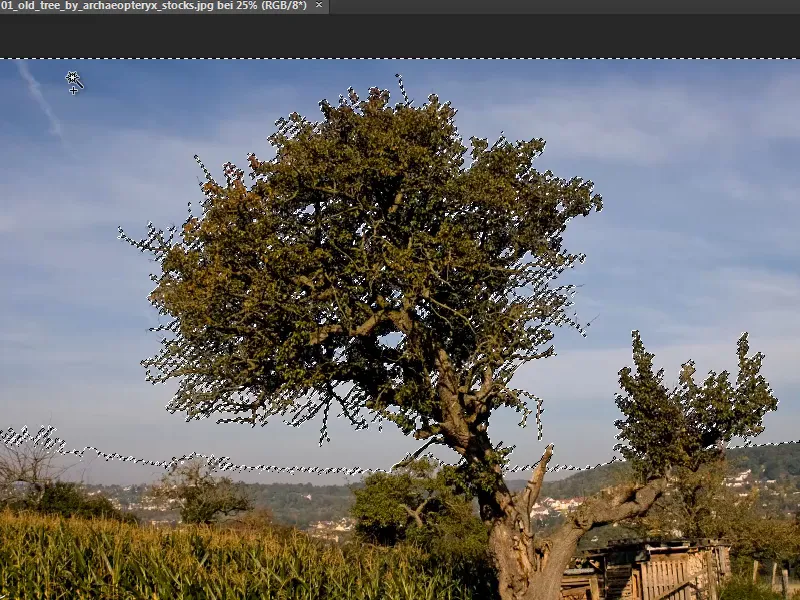
Incidentally, you should not check the Neighboring option, because otherwise only the parts of the sky that are in the immediate vicinity of my click would be selected. However, the corresponding places in the tree where the sky flashes out should also be selected.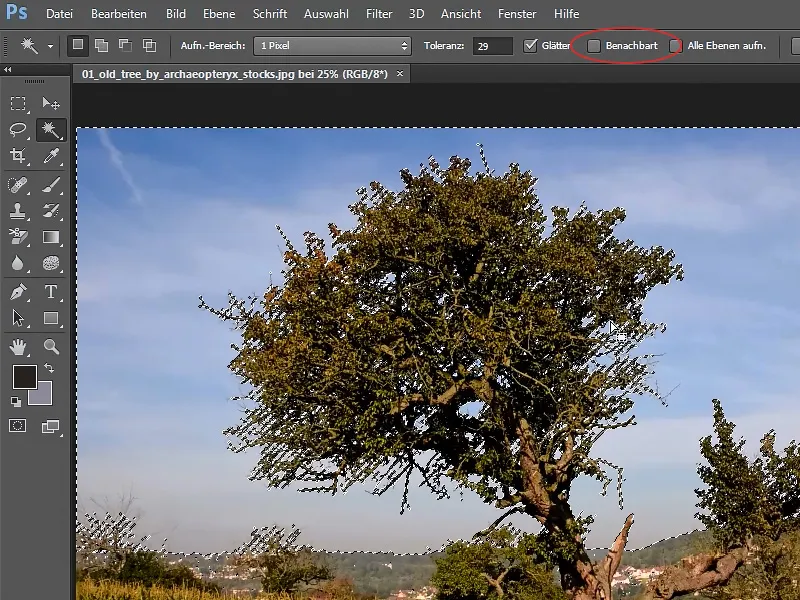
1.3 Adding a layer mask
I then click on the Add layer mask icon.
This makes the tree transparent - but that's not what I want. The mask should be reversed.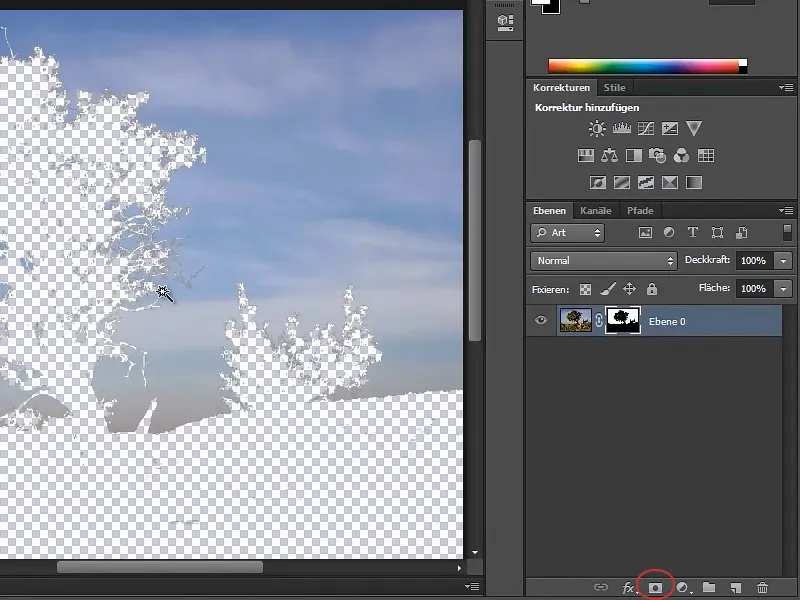
To invert the mask, I click on the small preview image of the layer mask and press Ctrl+I.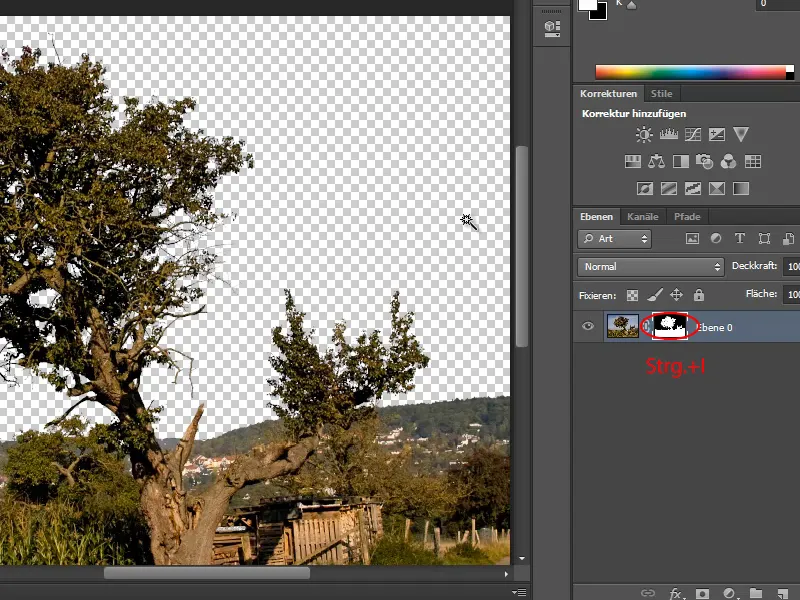
Now the sky has disappeared and I can insert a new one ...
1.4 Inserting a new sky
I open another sky via File>Place and adjust the size accordingly by dragging the marked points.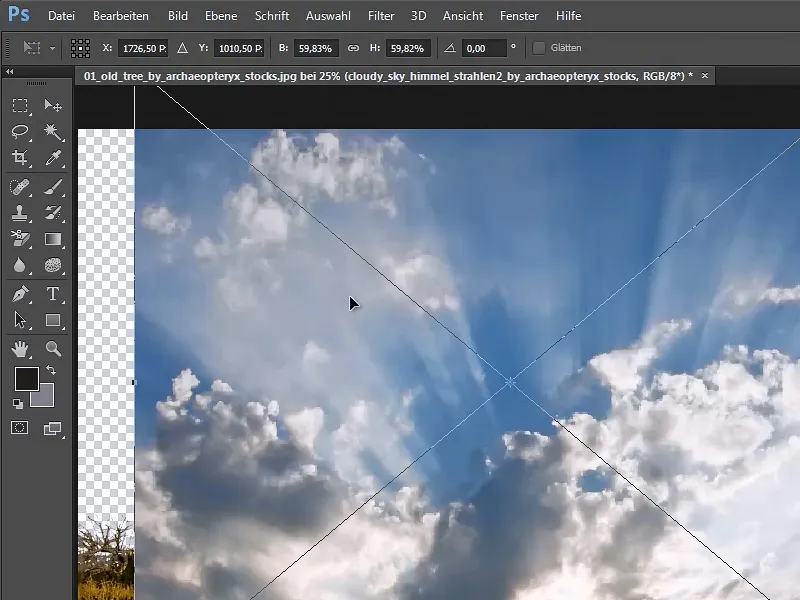
If the size and position are correct, I confirm with Enter.
I now drag the layer with the new sky under "Layer 0". And so the new clouds are perfectly inserted.
That wasn't actually difficult at all. But if you look closely, you can see a few elements that are not yet 100% perfect. But that's not a problem because we have a mask that we can edit.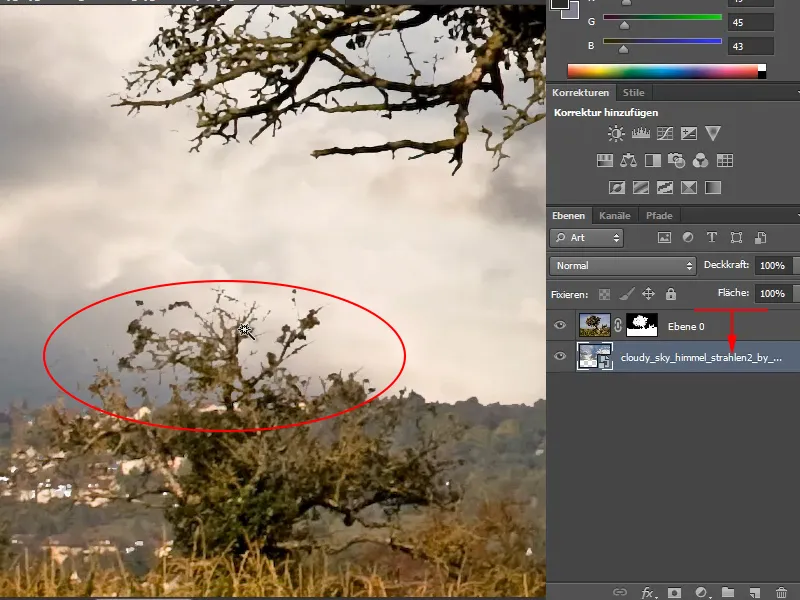
1.5 Improving the mask
I right-click on the mask in "Layer 0" and select Improve mask in the context menu.
You can then simply paint over these small branches and the mask will be improved accordingly.
I also go over other places where a few branches have not been included.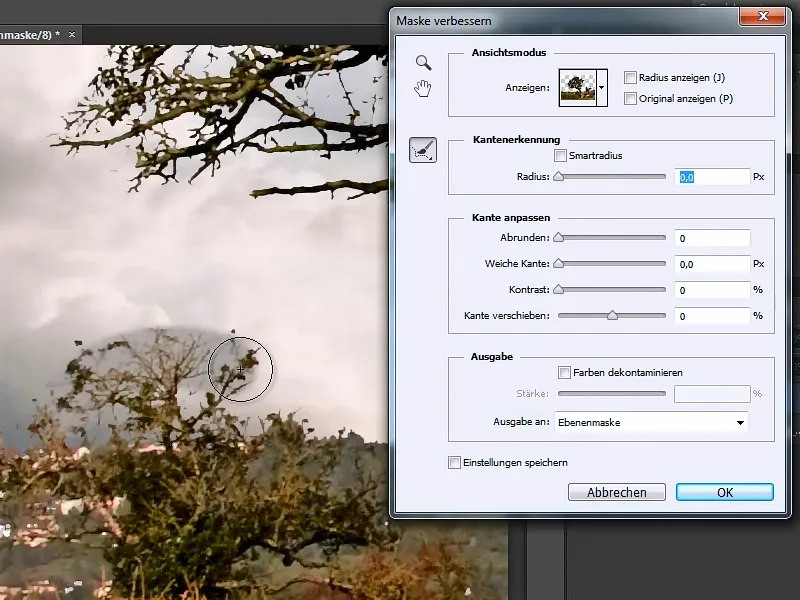
Depending on what I need, I can also set the mask to have more contrast or move the edge.
When I click on OK, the layer mask is updated.
The result then looks like this: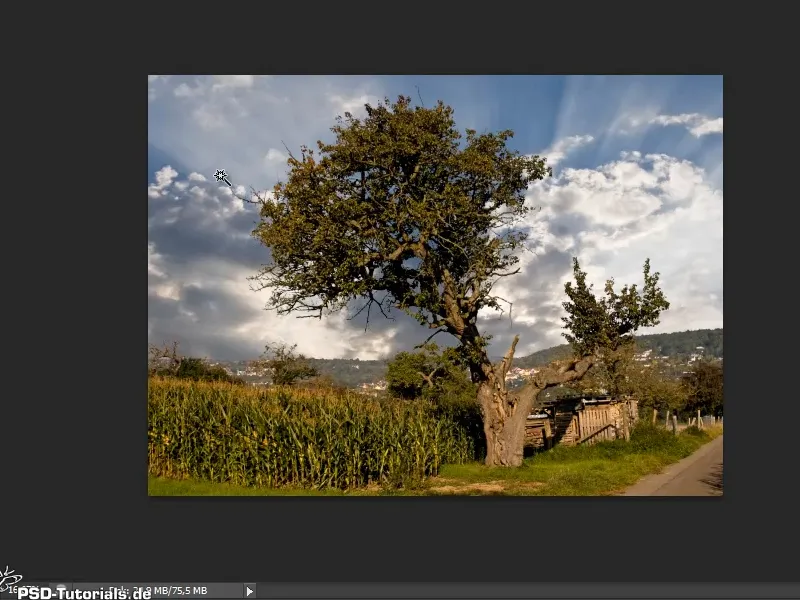
If the background is uniform, the easiest way is to crop trees with the magic wand tool. And then you just have to readjust with Enhance Edge.
2. color range
To show a different method, I'll get my second example image via File>Open.
In principle, the Magic Wand tool could of course also be used for this image, but the difficulty would be that clicking on the sky would also select large parts of the ground. This is because the colors are very similar.
2.1 Selection with color range
I open the Color range settings window via Selection>Color range ...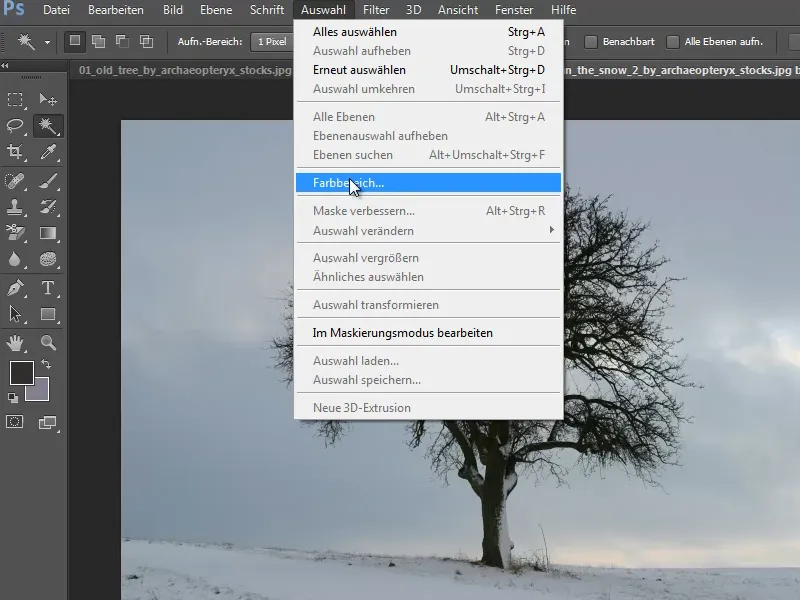
The Localized colour groups checkbox is ticked, which is good. And then I can click into the image with the eyedropper tool and specify what is to be retained.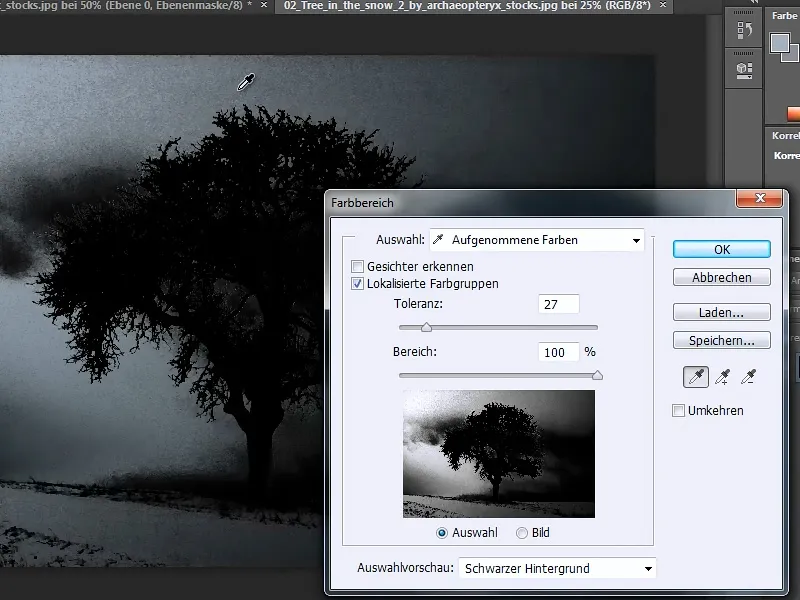
If I want to extend the selection and add more colors, I select the middle eyedropper in the settings window under Save ... and use it to select additional points in the image.
Alternatively, of course, I can also simply keep the Shift keypressed and continue selecting. I click quite often until it looks something like this: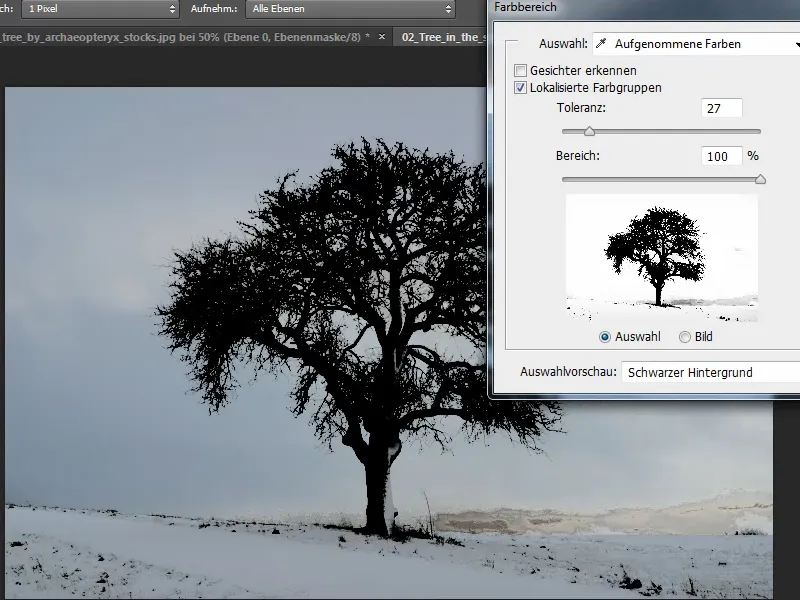
Under Selection preview, you can display the selection in different ways: In front of a black or white background, in grayscale or in masking mode, then I can see exactly what everything is masked.
I could also increase the tolerance, but at the moment it is set quite well.
2.2 Creating a layer mask
In the same way as with the magic wand tool, I also create a layer mask here, which I then invert with Ctrl+I.
The sky has now disappeared, but so has part of the ground.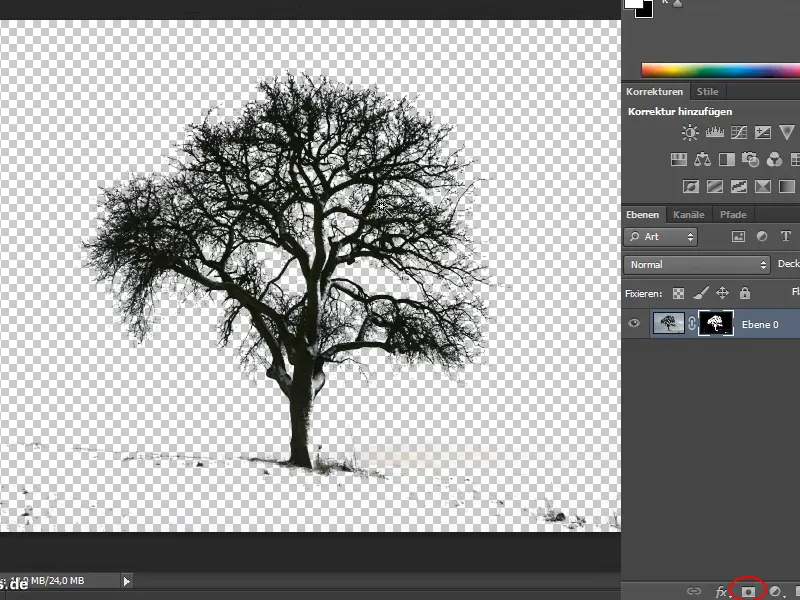
But what has disappeared too much can easily be brought back ...
2.3 Editing the mask
I choose a large brush with a high hardness and set the foreground color to white. I use it to paint over the floor and reveal it again.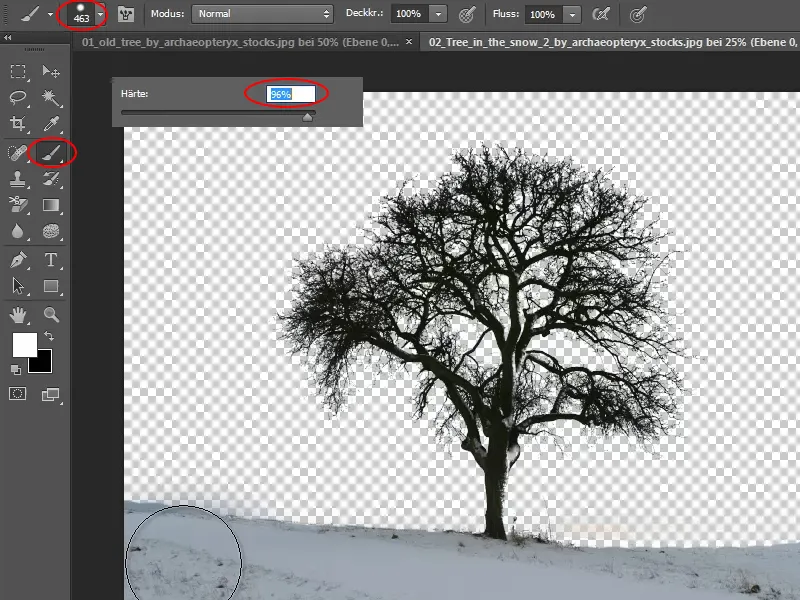
Now I've gone a bit too far into the sky and brought out too much.
To be able to work even more precisely, I can zoom into the picture with Ctrl++. And then use the black foreground color to paint away the excess.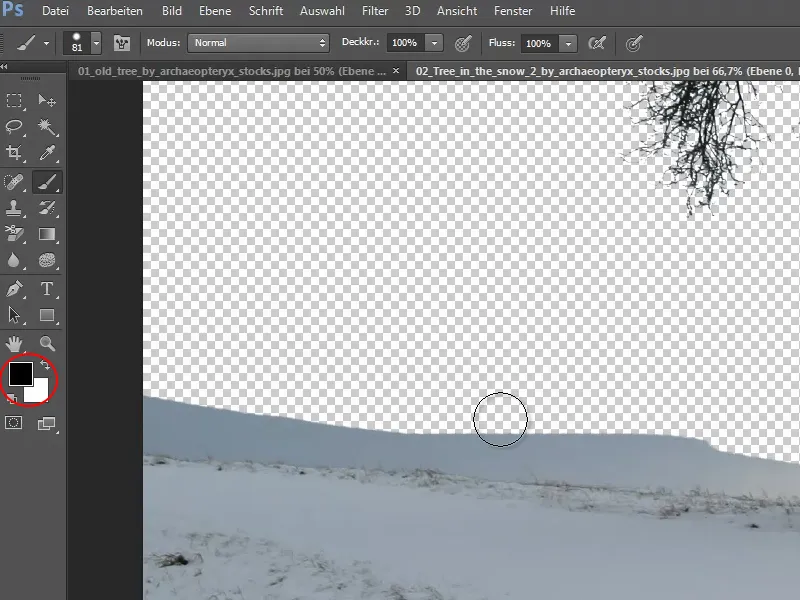
Here, too, I recommend working with Enhance mask again. Right-click on the mask to open the settings window and roughly brush over the edges where there is still grass. Then I don't have to worry about cutting it out perfectly everywhere, because the grass remains intact.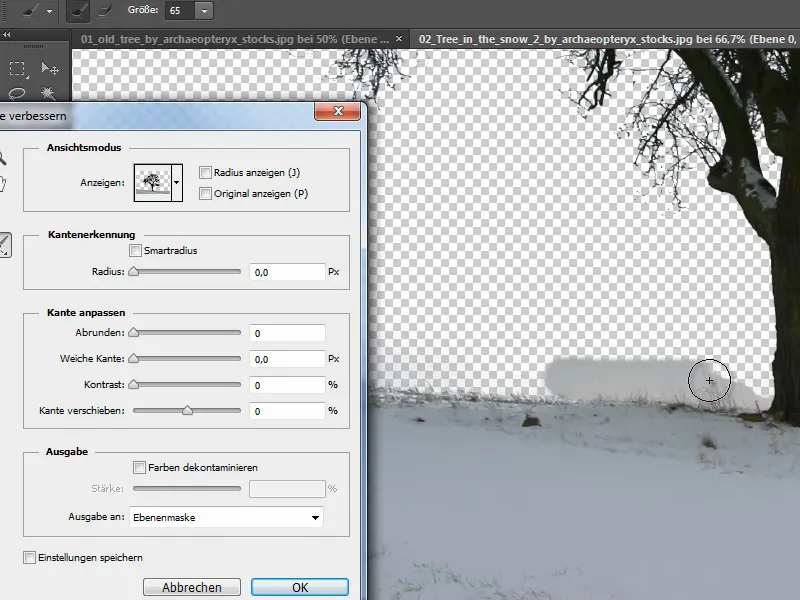
2.4 Inserting the background
This works even better if the new background is already in place. That's why I insert a new cloud image via File>Place and enlarge it proportionally by holding down the Shift key.
I confirm with Enter and drag the new layer below "Layer 0"
As the color of the new sky is a little too bright, we should reduce the saturation a little. So we add a new Hue/Saturation adjustment layer and reduce the saturation accordingly.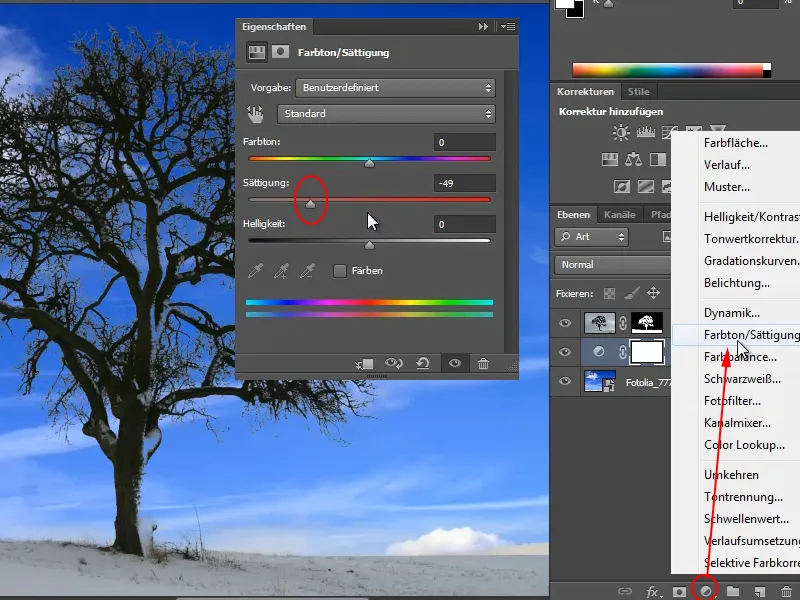
2.5 Final touches
To put the finishing touches to the photo, I right-click on the mask again and go to Improve mask and paint with the brush between the sky and the ground to make the grass stubble visible and thus create a clean horizon line.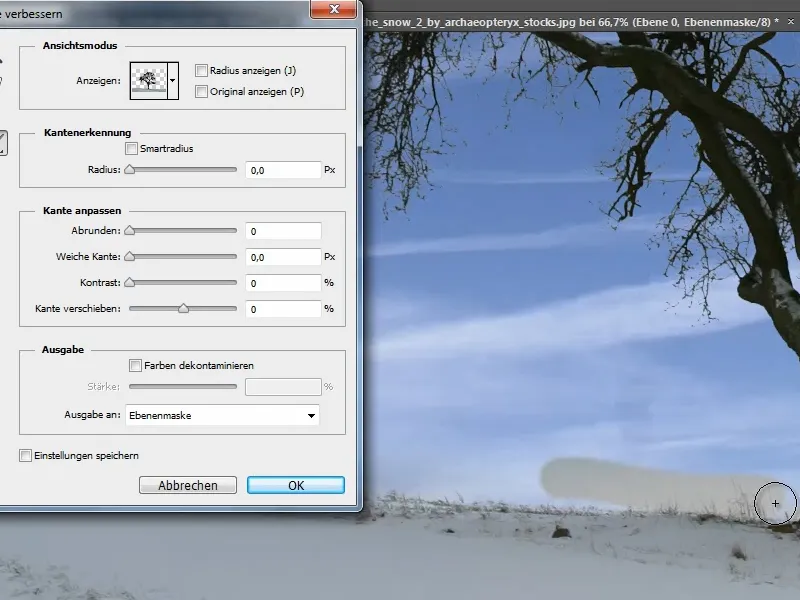
When I zoom in on the tree, I can see that a little too much has been removed from the trunk because there was snow on it. But that's not a problem at all.
I simply click on the layer mask and use the brush and the foreground color white to redraw the tree trunk.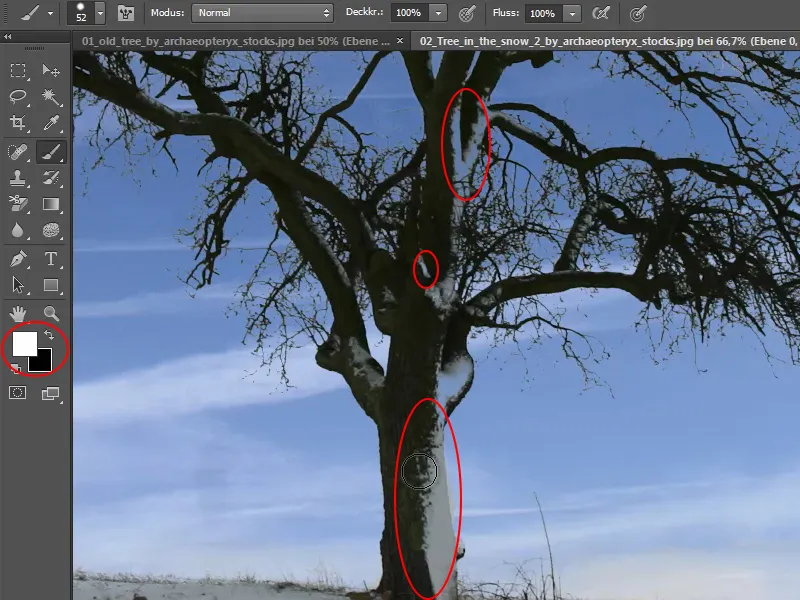
I use the X shortcut to quickly switch between the black or white foreground color.
I achieve this result via selection and color range: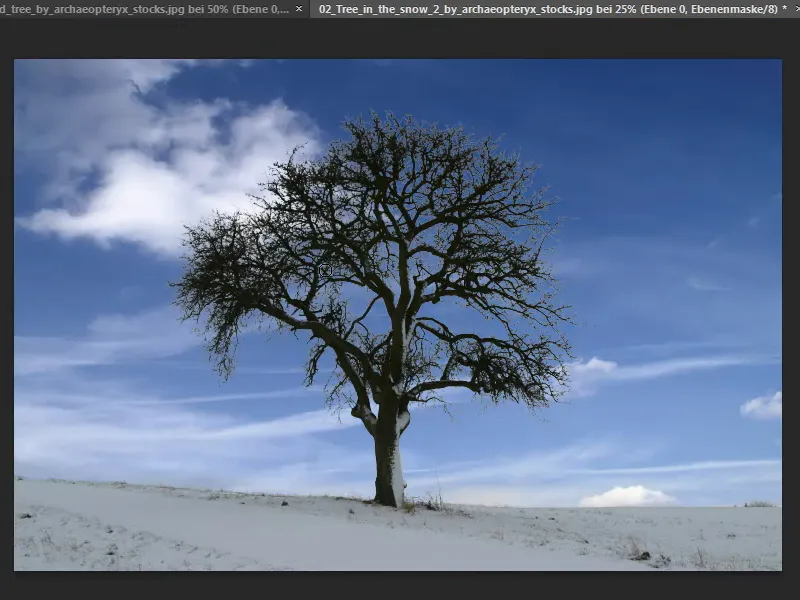
3. background eraser tool
A third method I can use to crop a tree is via the background eraser tool.
It is important that the tool is set to Capture: Once, the borders: Not consecutive and the foreground color must be protected (check Protect foreground color).
I set the tolerance here to 60%.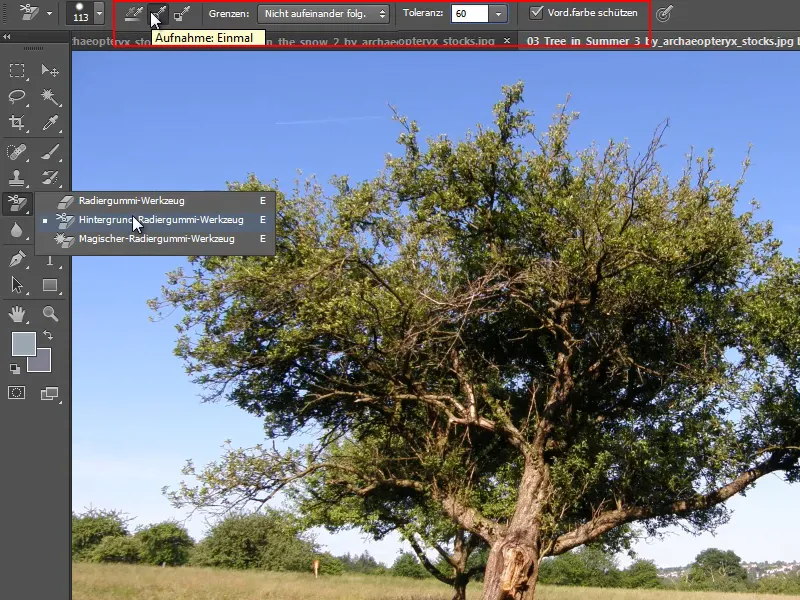
3.1 Protect foreground color
I select the foreground color to be protected as follows: First, I click on the Set foreground color icon in the toolbar. This automatically gives me an eyedropper, which I then use to select the green of the tree. I confirm with OK.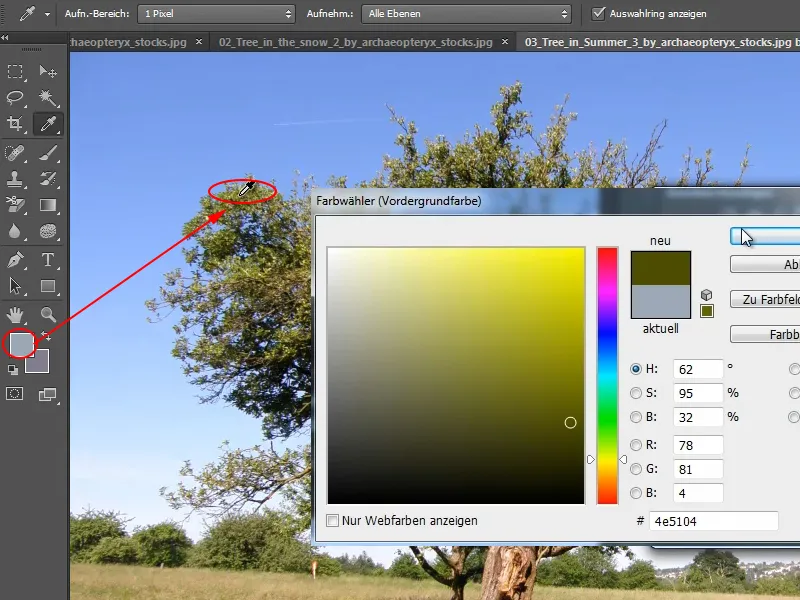
3.2 Erase background
Next, I duplicate the "Background" layer with Ctrl+J and hide it by clicking on the eye symbol. Then I can get started.
I zoom in hard and click where the crosshairs are. This means that the color should be removed when I click and I don't have to let go of the mouse button, but can simply drag on. I can also drag into the tree and only the blue of the background is removed.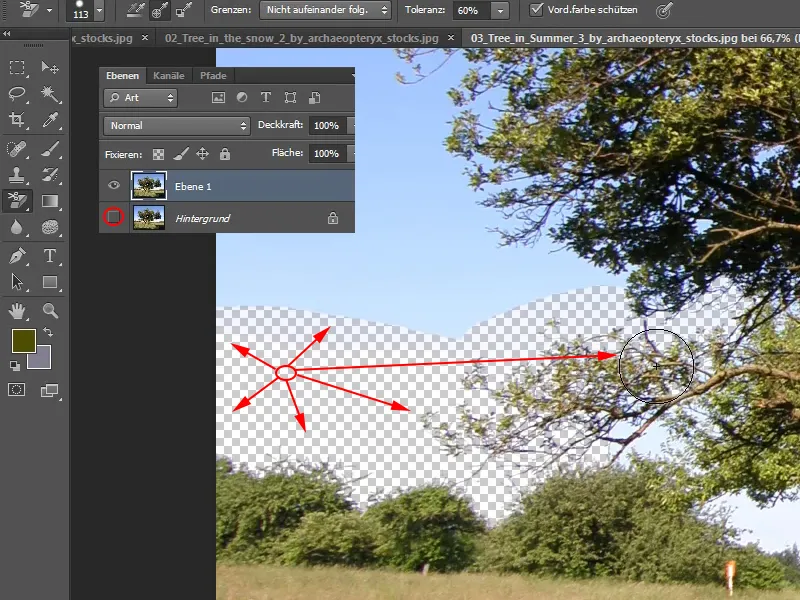
This works very well and there is actually no large color fringe.
If the blue is not completely removed, I simply click on the blue again and erase over it once more - or I increase the tolerance.
However, you can start with a lower tolerance value so that you don't erase more than you want to at the beginning.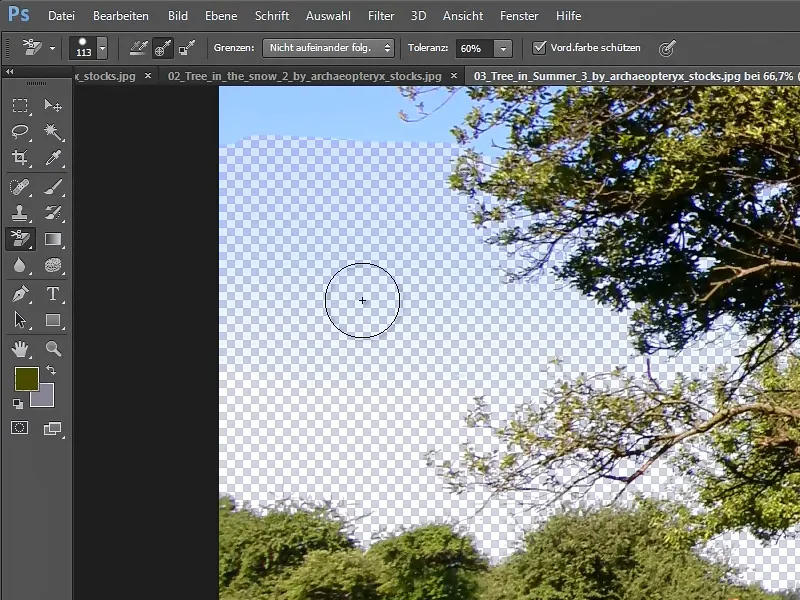
In this case, I increase the tolerance to about 80%, but then keep a very close eye on it, as otherwise areas of the tree can easily be lost.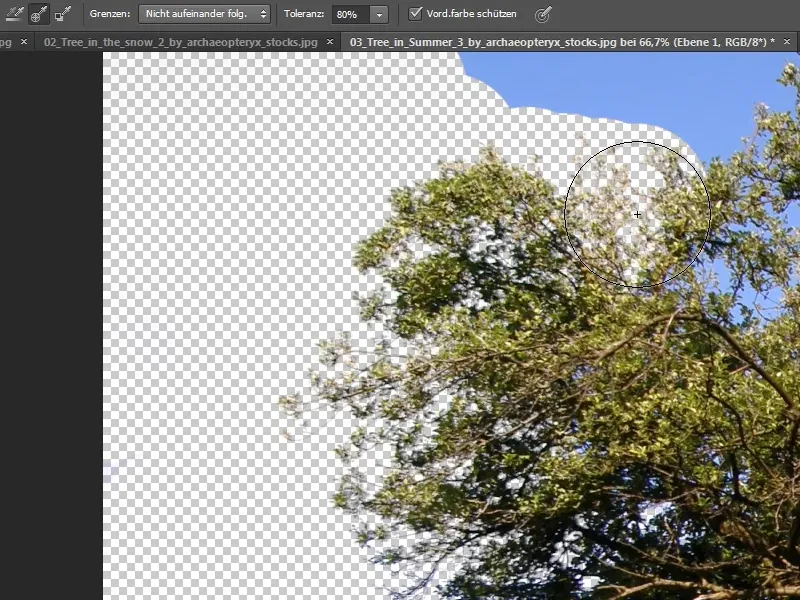
I zoom out of the image again with Ctrl+Minus(-) and erase the rest of the sky completely.
In the treetop, I reduce the tolerance back down to 50% so that only the sky that occasionally shows through is removed.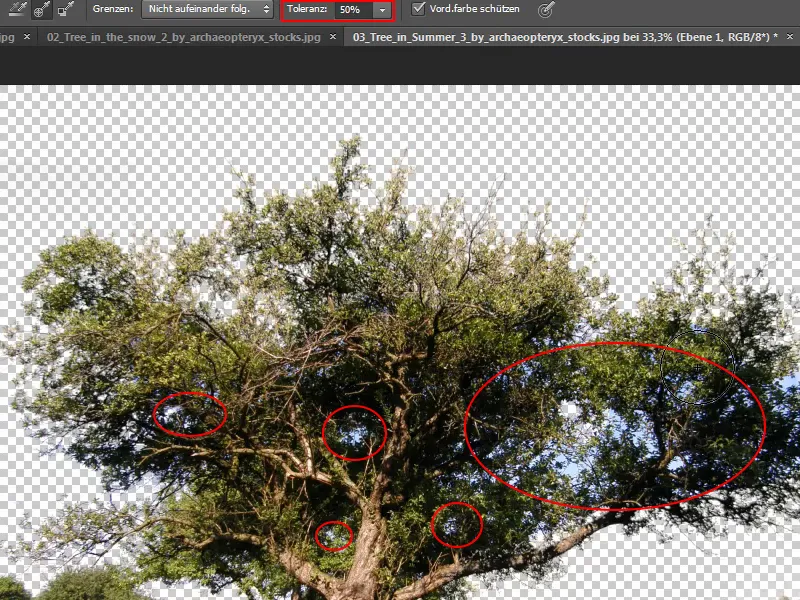
This has worked well before, but this method is also destructive. The sky is gone forever. But that's why I duplicated the background layer at the beginning, so that I still have the layer in principle.
3.3 Inserting a new background
Now we can insert a new sky via File>Place to see even better how well we have cropped.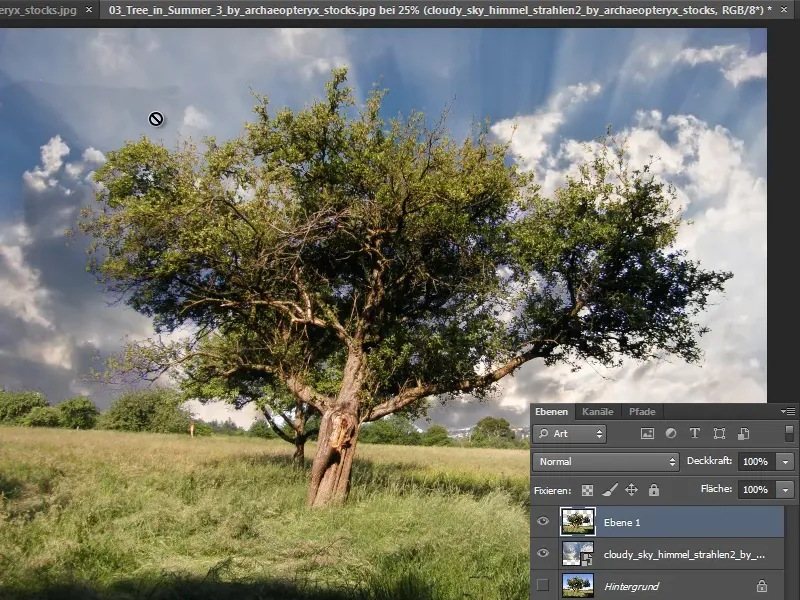
3.4 Edit
There is still an unclean area at the top left, so I'll just go over it again with the background eraser tool.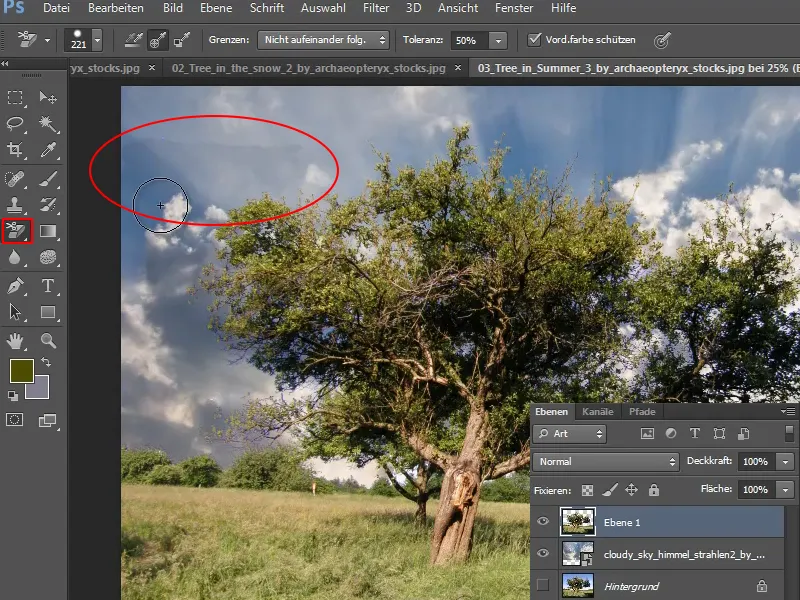
3.5 Create layer mask
This looks really good. However, as I have just mentioned, we have worked destructively. How can we now turn the destructive layer into a non-destructive one so that we also have a layer mask and the original is still there?
To do this, I duplicate the "Background" layer again and drag it to the position below "Layer 1".
Hold down the Ctrl keyand click on "Layer 1" to make a selection. I hide the "Layer 1".
Then I activate the "Background copy" layer again and click on the mask symbol at the bottom.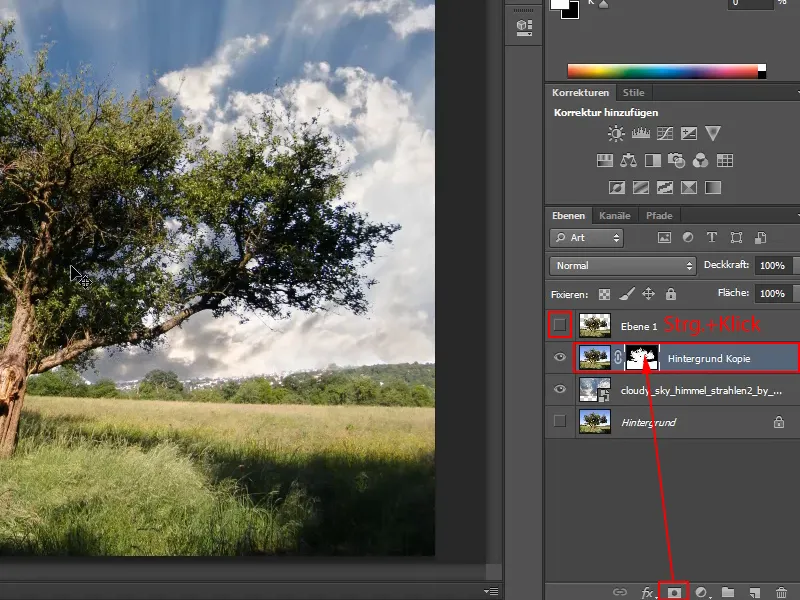
3.6 Editing the layer mask
To remove any color fringing that may have occurred, I create a Hue/Saturation adjustment layer.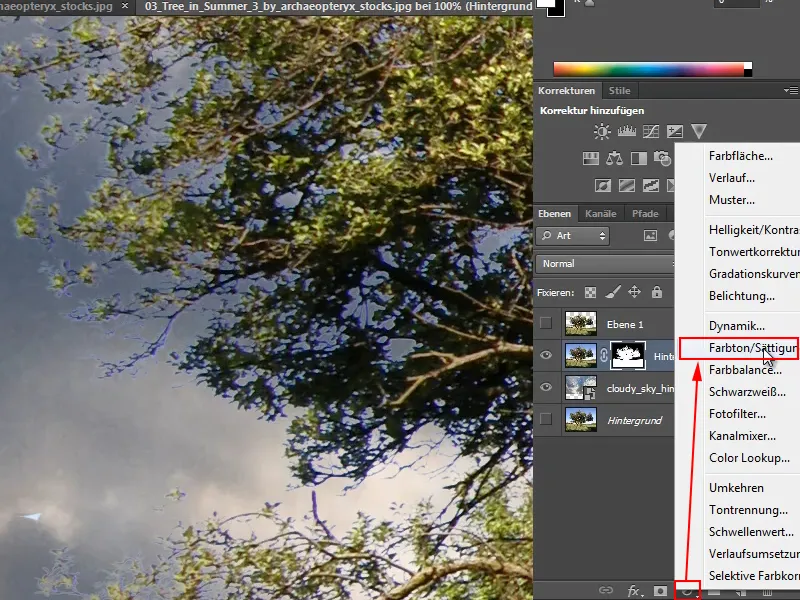
Now I reduce the saturation for the color range that is causing the color fringing. In this case, it is the blue tones. For these, I set the Saturation slider to -100 and reduce the brightness at the same time.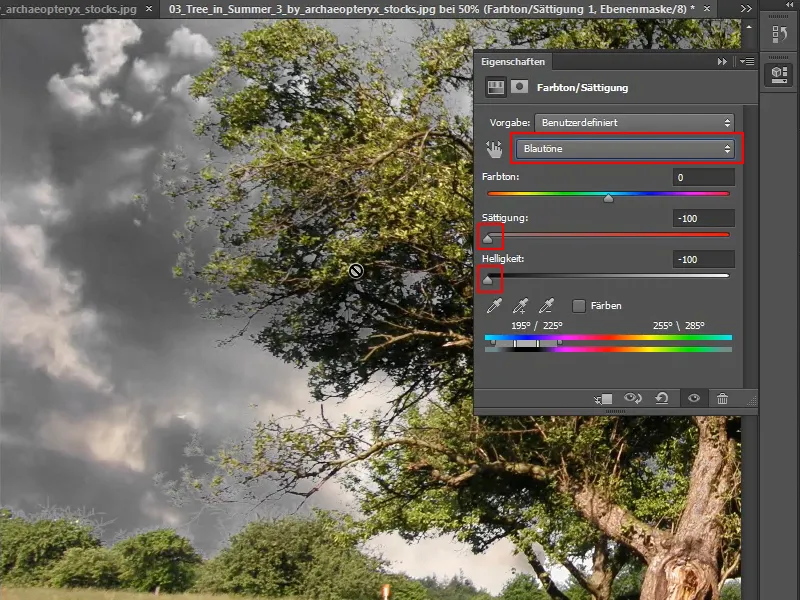
Now not only has the color fringe disappeared, but also the saturation of the entire sky.
To ensure that the reduction in saturation only affects the cropped tree and not the new sky, I create a clipping mask by holding down the Alt keyand clicking between the two layers.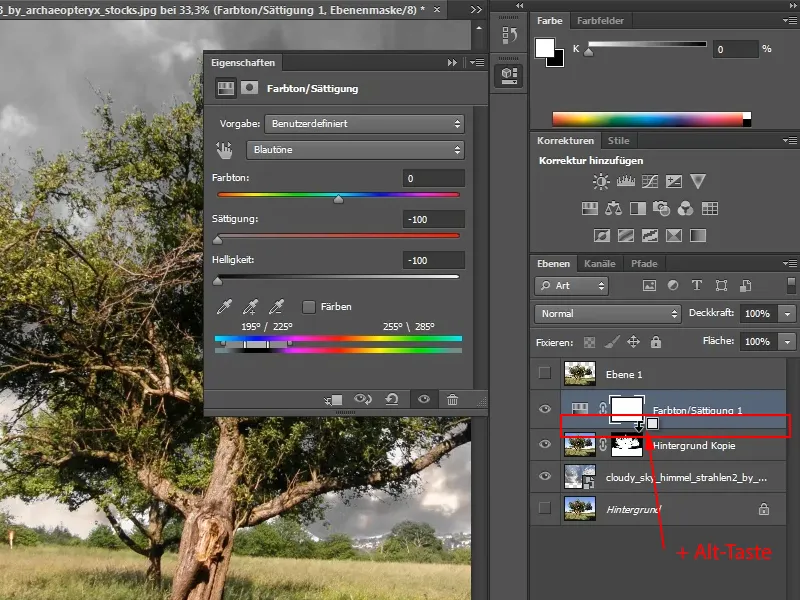
The bent arrow at the beginning of the adjustment layer indicates that the settings now only apply to the layer below.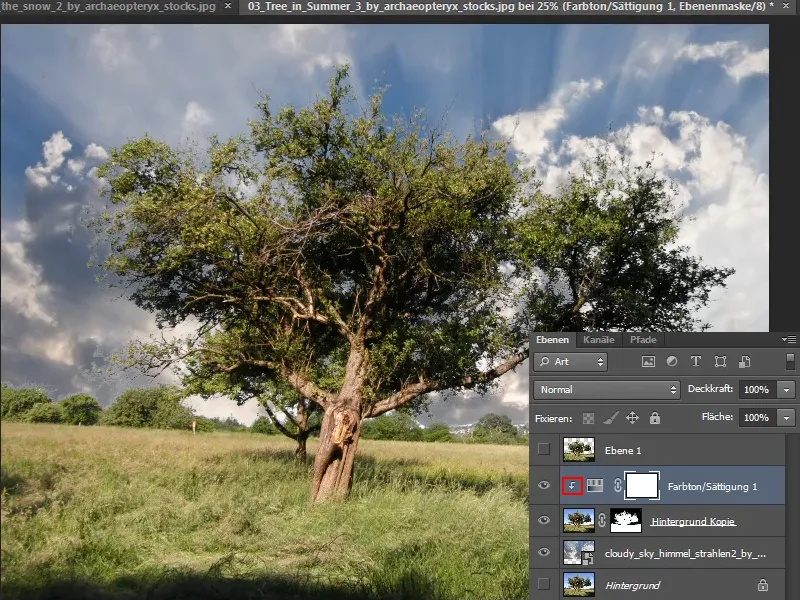
I am now very happy with the image. Compared to the original photo, it looks much more dynamic and powerful.
4. magic eraser tool
How can I crop this tree well here? The contrast is very good and in principle I could also use the magic eraser tool. But I would like to show another method here.
I select the Magic Eraser tool and first duplicate the "Background" layer. I can then hide the original background layer.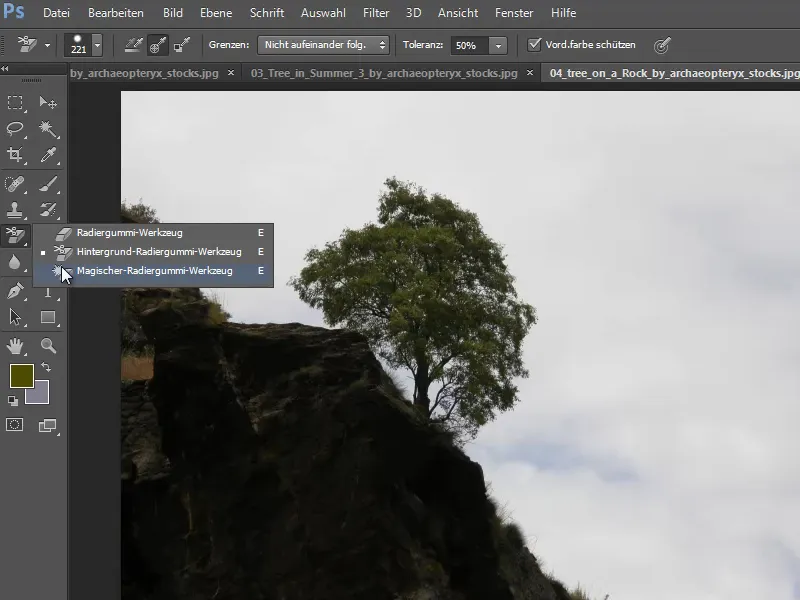
I simply click on the sky with the tool and a large part of it disappears with the first click. I click into the rest again and then it looks like this with just a few clicks.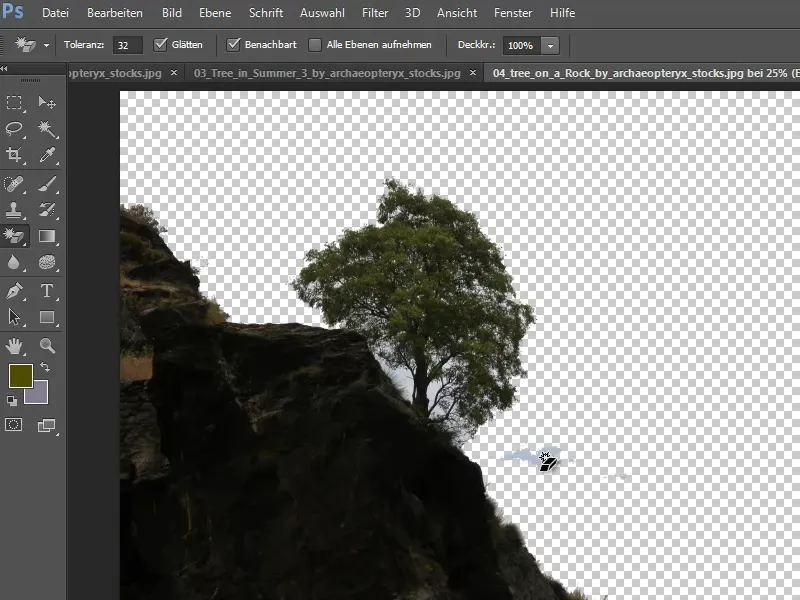
However, the closer I get to the tree, the more problematic it becomes. I simply can't get rid of the gaps between the branches with this tool.
If I try to increase the tolerance, half the tree may disappear. That's not ideal.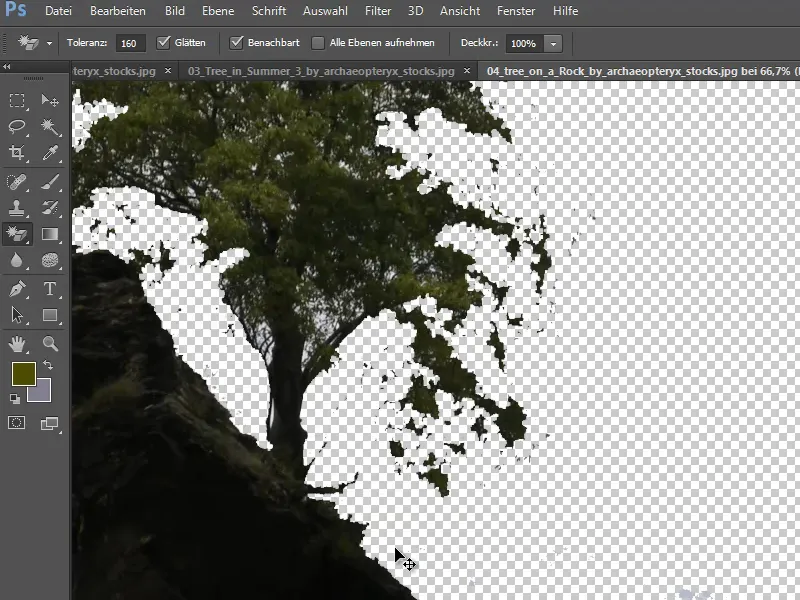
So this is not the right tool for the job and I'm going to undo everything again.
5. color range
I start again and first select the Color range ... panel again via Selection.
Then, with the eyedropper tool and the Shift keypressed, I click on all the shades of the sky that I want to remove and confirm with OK.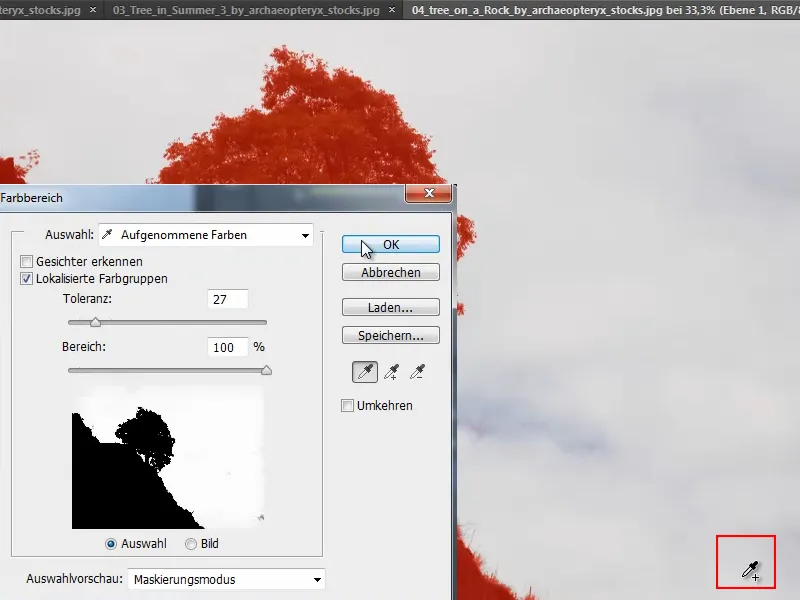
5.1 Create and invert mask
Now I have the selection. Now I create a mask by clicking on the mask symbol in the bottom bar and invert it with Ctrl+I.
I hide the "Background" layer.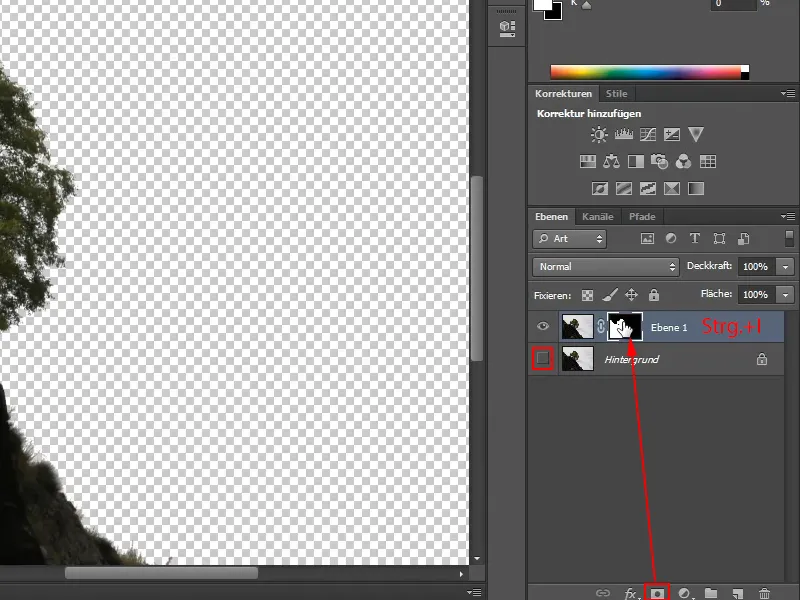
5.2 Inserting a new background
I select a new sky via File>Place, adjust the size and move the layer to its position so that the sky appears behind the rock and tree.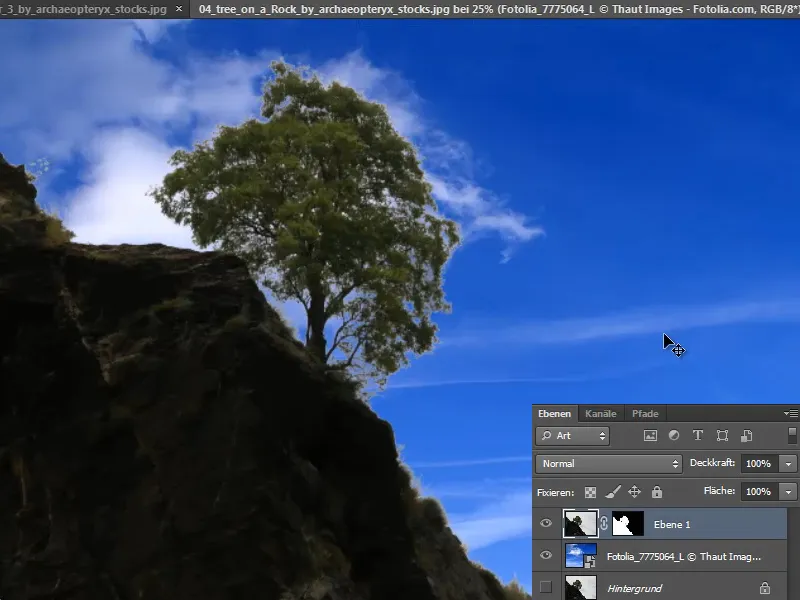
Now you can see the color fringes that have been created.
5.3 Improving the mask
I can correct these color fringes again using the mask. I right-click on the mask and select Improve mask.
I then use the improve radius tool to roughly paint along the relevant areas and the color fringes disappear.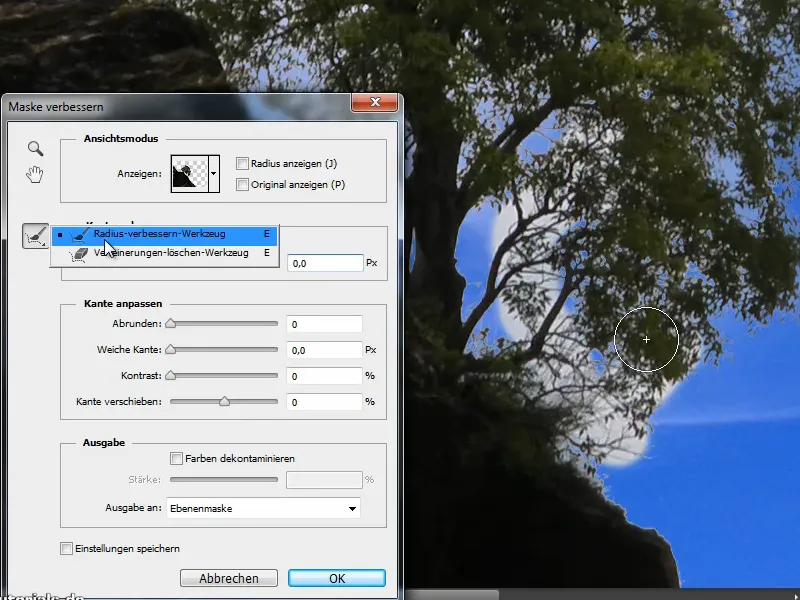
Sometimes you simply have to combine several methods to achieve your goal.
5.4 Adjusting colors
This already looks very good. However, I could change the colors a little so that it looks a little warmer and the foreground and background match better.
To do this, I select a photo filter adjustment layer and increase the density.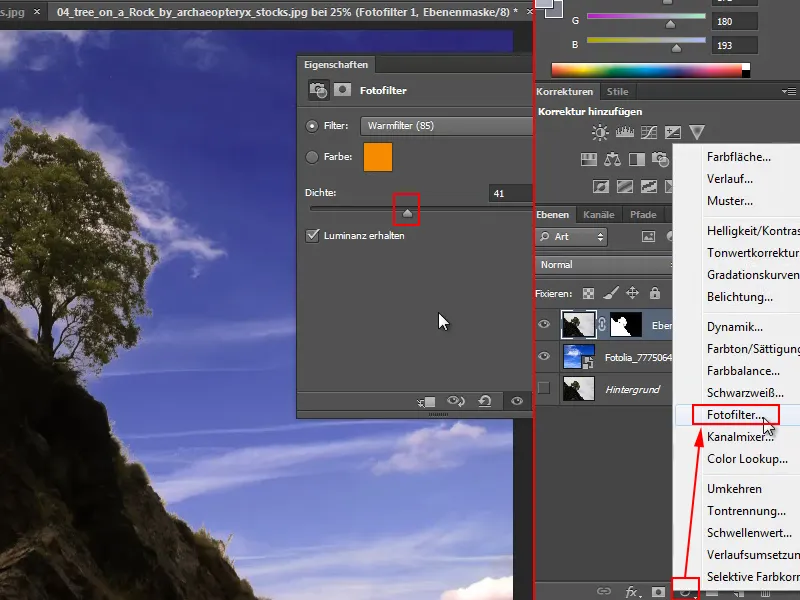
Depending on the effect I want to achieve, I could of course also set a completely different color. Or then reduce the opacity of the adjustment layer slightly.
Alternatively, if I wanted the colors to be a little stronger, I could also adjust the tree to the sky. To do this, I would activate the tree layer and place a hue/saturation adjustment layer on top of it.
I set the saturation so that I like the colors, and then I create a clipping mask (as above: click between the layers while holding down the Alt key).
This ensures that the increase in saturation only affects the layer with the tree and the sky remains unchanged.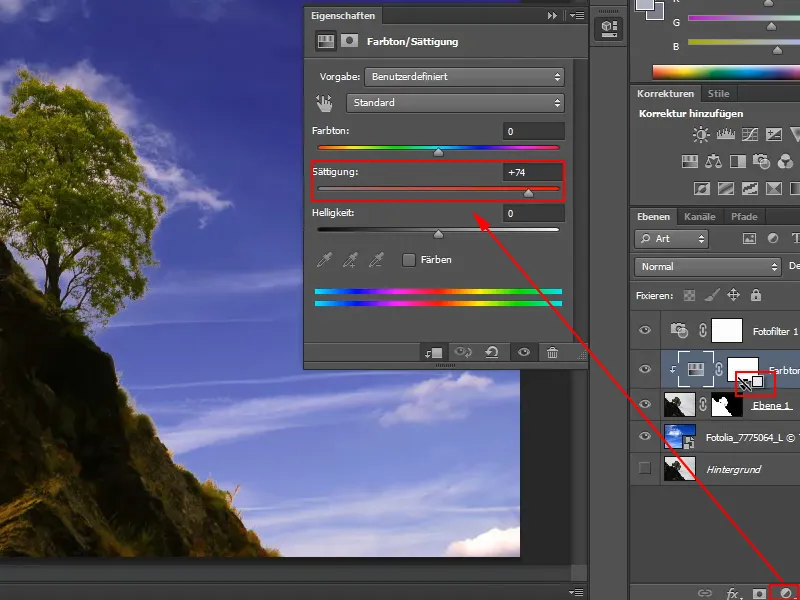
6. clipping via channels
I open another image via File>Open and want to crop this tree using a channel.
In the Channels tab, I find all the channels available in the image.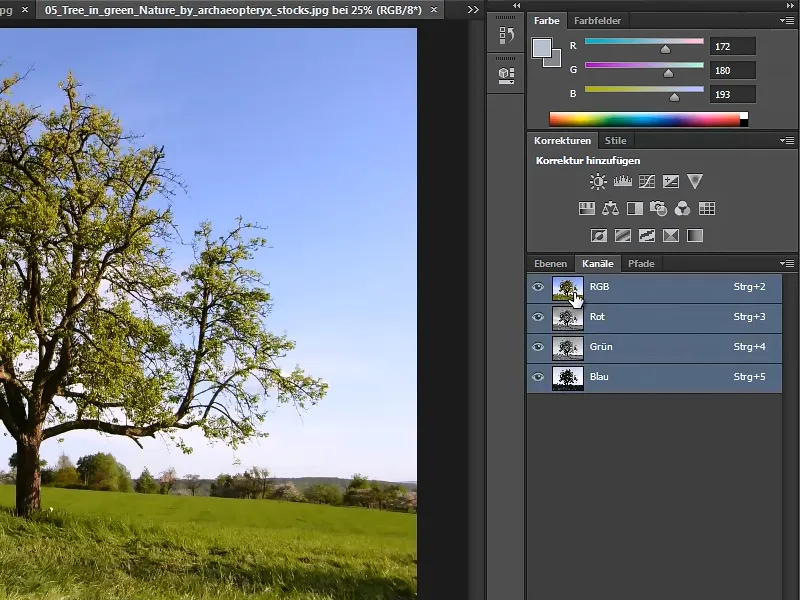
6.1 Determining a suitable channel
I can now select or show/hide each individual channel to see which one displays the tree best. This is usually the blue channel.
And the first thing I do now is duplicate it by dragging it onto the Create new channel icon.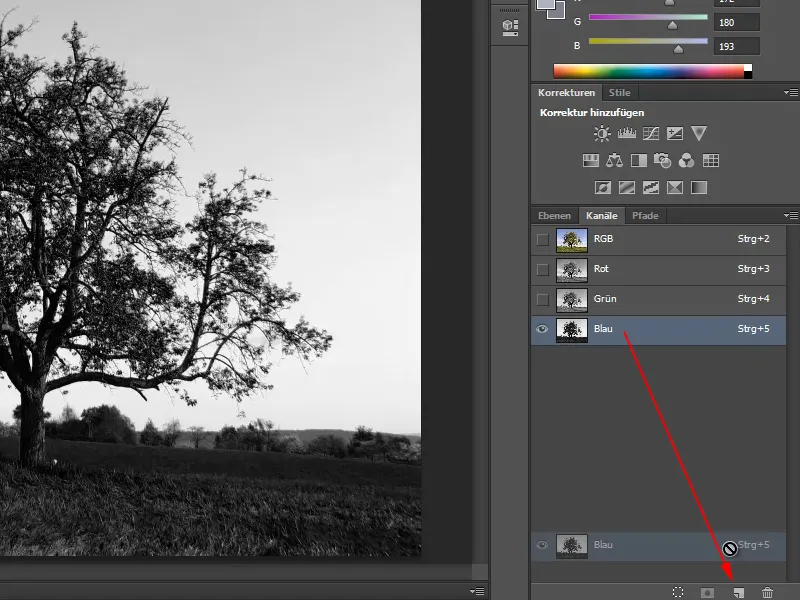
6.2 Enhance silhouette
Then I call up the tone value correction via Ctrl+L and move the sliders so that the tree becomes a silhouette. Then I confirm with OK.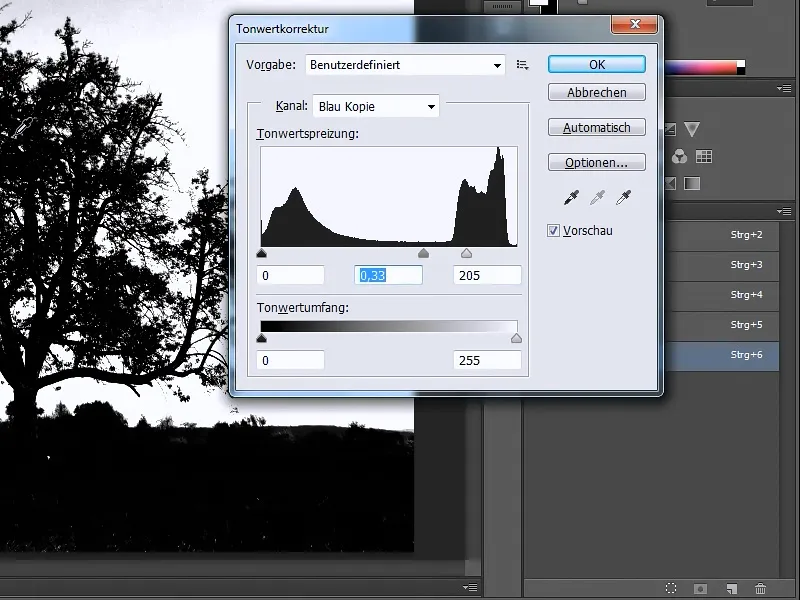
6.3 Select silhouette
I can now easily select this silhouette with the magic wand or - what I do now - via Selection>Color range. I use the pipette to pick up the colors of the grass and tree.
I remove the tick next to Localized colour groups and increase the tolerance to a maximum of 200. Then I confirm with OK.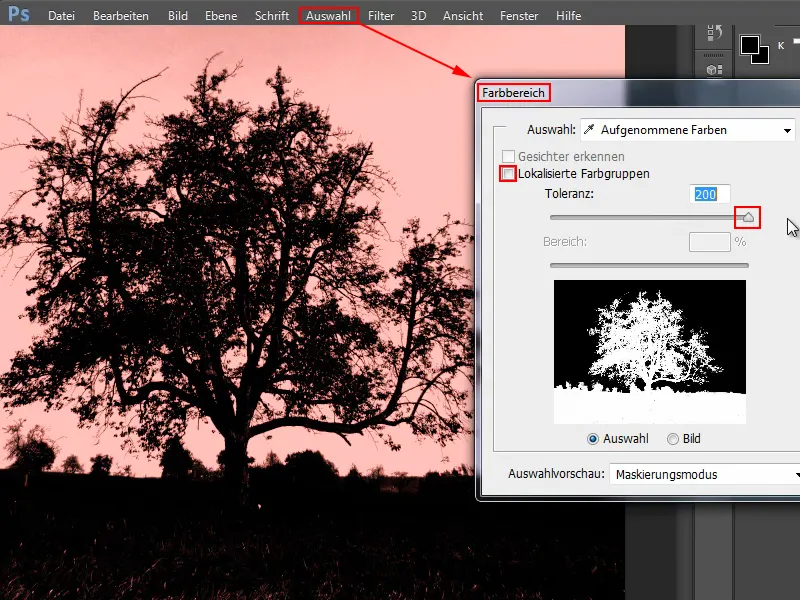
6.4 Crop and insert new background
I now have the selection and can show all channels again and hide the duplicated blue channel.
Back to the Layers tab: I click on Add layer mask at the bottom of the bar and the whole thing is clipped.
I add a new sky via File>Place, drag it to the right size, confirm with Enter and move the layers into the right order.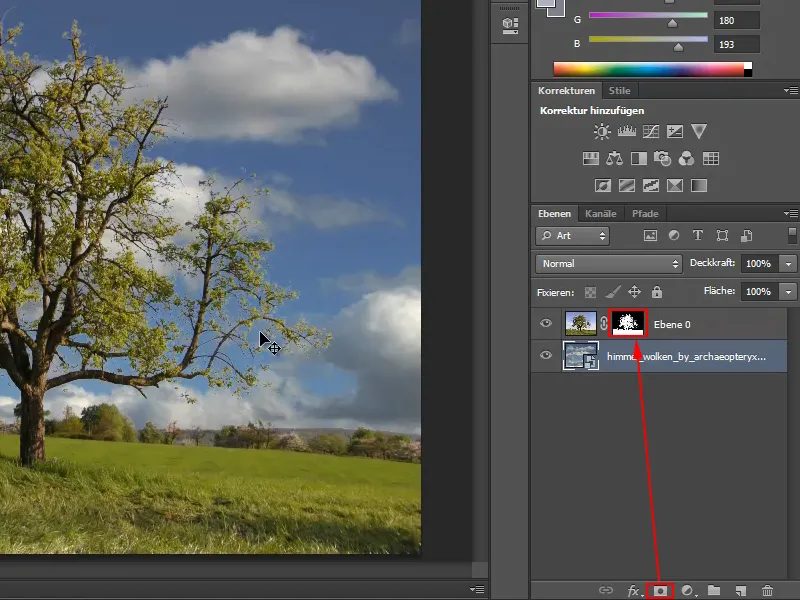
The result looks really good, there are no noticeable color fringes and the tree is really well cropped.
As you can see, there is no perfect method, but each image requires its own approach, be it the magic wand, the selection via the color range, the background eraser tool or the use of the channels. But these methods are not just for trees. Once you know how to combine the different cropping options in Photoshop, you can basically crop anything pretty well.
7. comparison: background eraser tool and channels
Let's take a look at the background eraser tool in direct comparison to clipping using channels.
7.1 Crop with the background eraser tool
To do this, we take the current image, rename the "Layer 0" to "Channels" and duplicate it with Ctrl+J.
As we have now also duplicated the layer mask, we select the Delete layer mask option in the "Channels copy" layer by right-clicking on the mask.
I then select the background eraser tool, set the size and tolerance and specify the foreground color to be protected using the eyedropper tool. Then I start erasing the sky.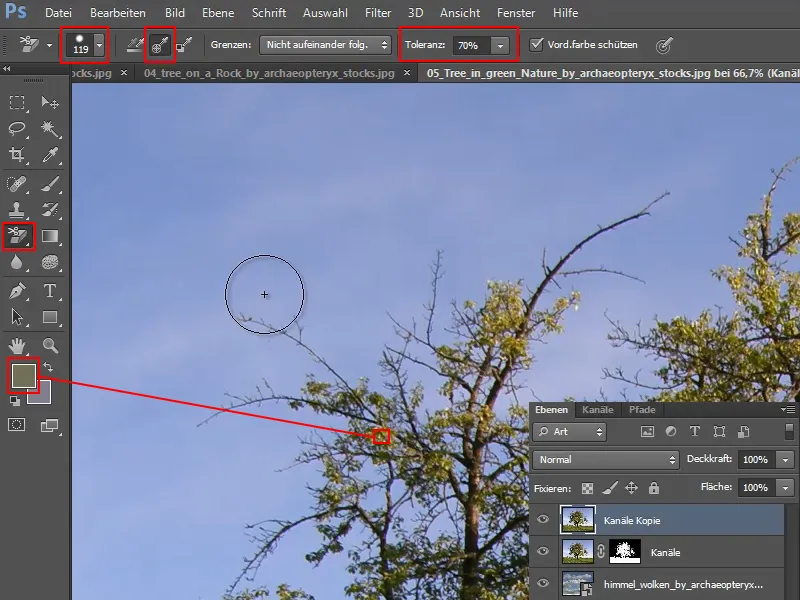
Working with the background eraser tool is really fun because it works almost like magic, without color fringing and without losing any branches. I don't have to be particularly careful when erasing, I just have to make sure that the crosshairs hit the sky when I click. There's almost nothing you can do wrong. Sometimes you might have to go over it several times or change the tolerance a little.
7.2 Comparison
If we now erase the sky, all the branches are retained. In comparison, you can see that parts of the branches have disappeared in the result of the clipping with channels: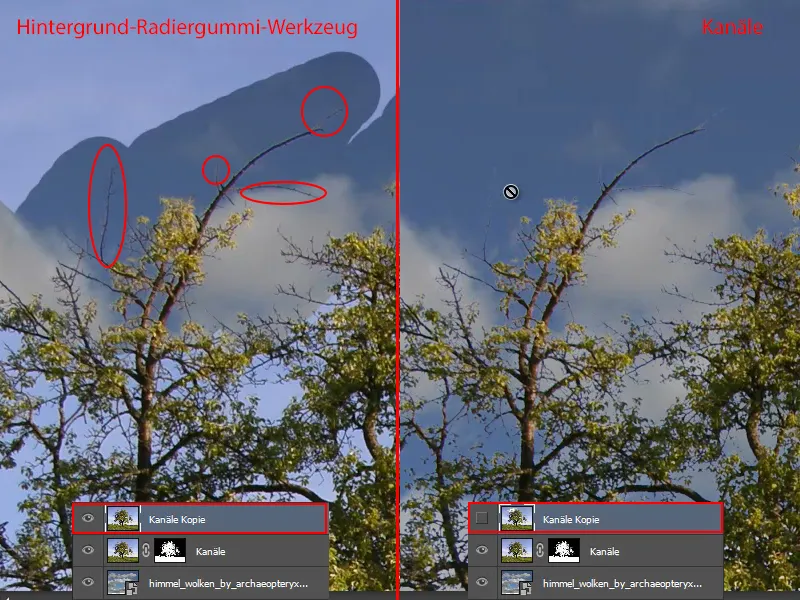
The branches have probably disappeared because I worked too generously with the tone correction, pushed the sliders too far and there was too much contrast.
You just have to try out which setting works best. The setting I used is not necessarily always the best. You always have to try it out for yourself, depending on the picture, to see how the branches are retained etc. As a result, I actually like cropping with the background eraser tool much better.
7.3 Correcting with the protocol brush
When cropping with the background eraser tool, I probably erased too much at this point. But I can still correct this.
I call up the protocol via Window>Protocol and select the protocol brush from the toolbar.
In the log, I select the point from which I started working with the background eraser tool.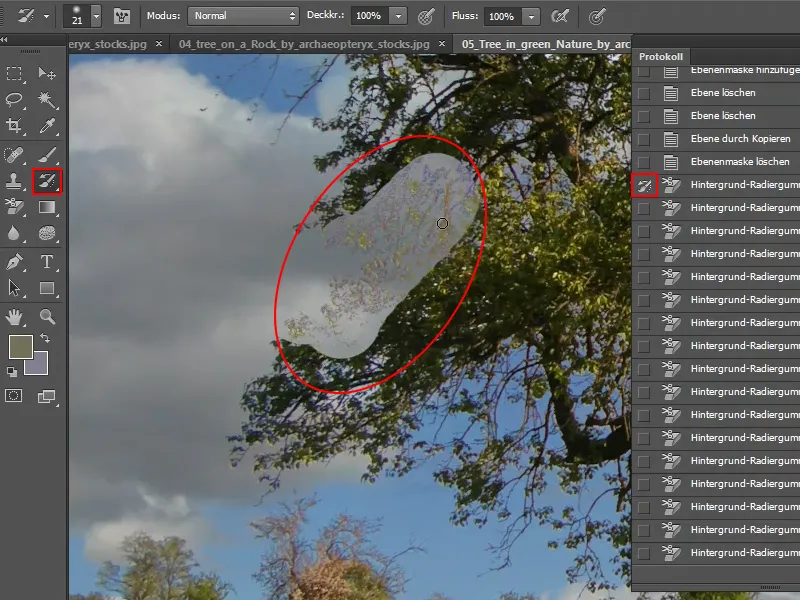
I paint generously over the area and then everything is back to how it was in the original. But also with the light color of the original sky.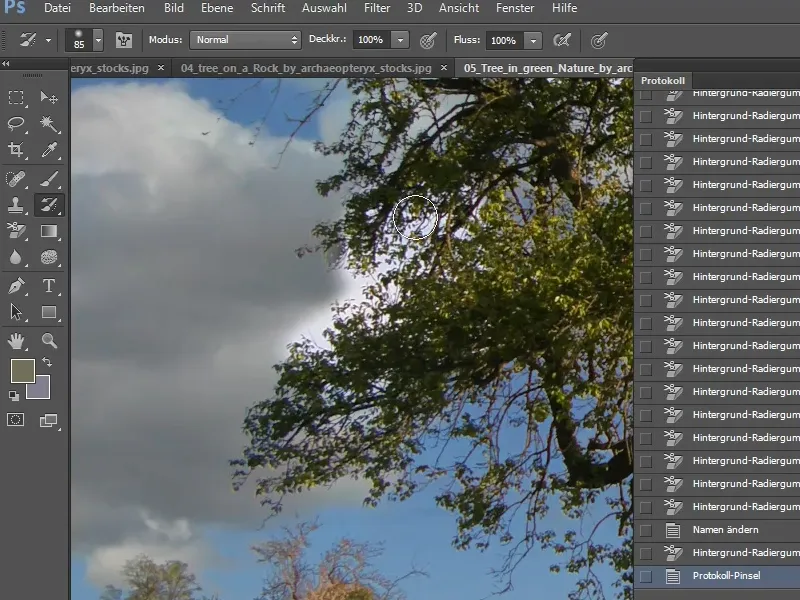
Then I simply select the background er aser tool again , place the crosshairs on the old sky and erase it properly. Then everything is Schick again.
7.4 Protocol settings
I also recommend working with the protocol from time to time.
When I reinstalled Photoshop, the default settings were set to save just 20 log objects. I then immediately increased this to 150. You can of course go even higher, to a maximum of 1000, but then the computer can really struggle. 200 is also a good compromise, I think.
Via Edit>Preferences>Performances ... I get to the settings field where I can enter the number of log objects.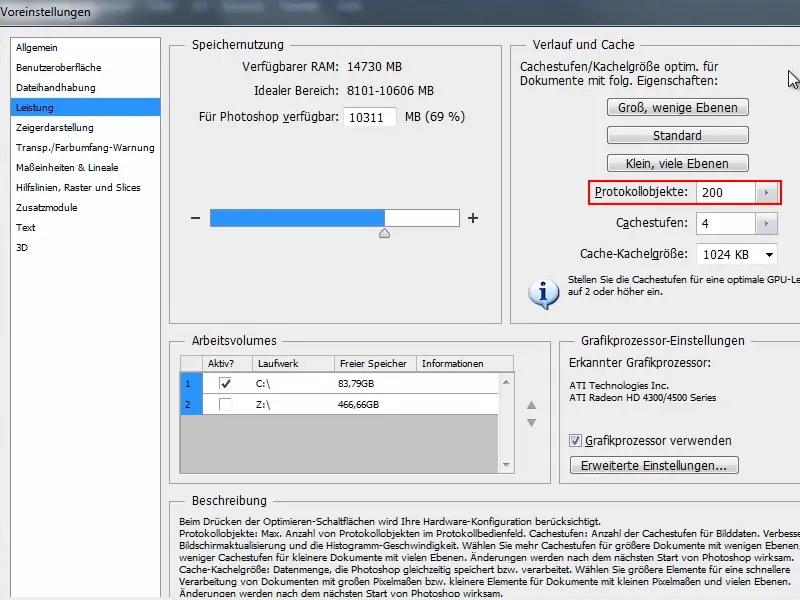
7.5 Inserting an alternative background image
I insert another background, for example this sunset. Then I can immediately see where there are still errors and where I need to make improvements.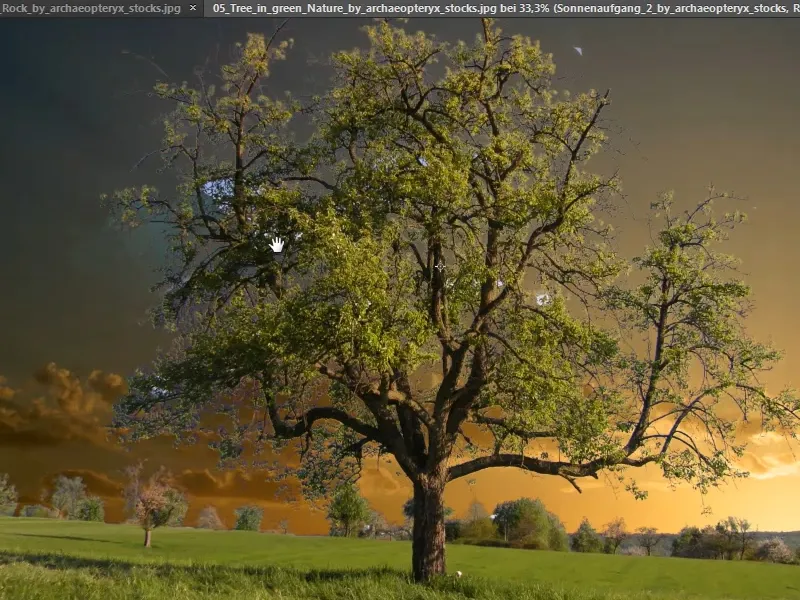
But no problem. I simply click on my layer again, select the background eraser tool and place the crosshairs directly on the areas that are still blue. This way I can quickly remove the annoying spots.
7.6 Non-destructive working method
I really like the result and if I now want to have the image as a non-destructive layer with a layer mask, I proceed as follows:
First I duplicate the "Channels" layer (left), then I delete the layer mask in the copy (center) and finally I drag the selection to the "Eraser" layer by clicking on it with the Ctrl key pressed.
Then I click on the image again ("Channels copy") and on the Create new layer mask icon (right).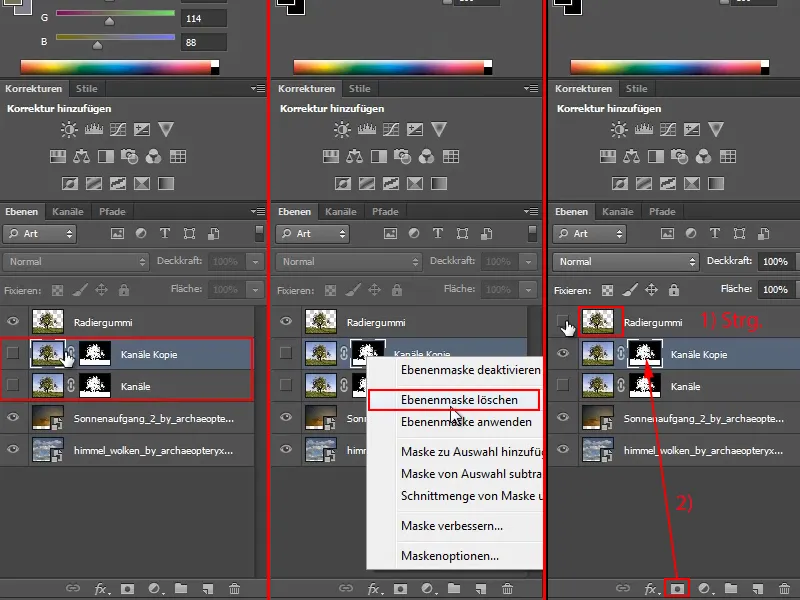
Then I can rename this layer "Channels Copy" to "Eraser + Mask".
7.7 Removing color fringes
Now you can see a little more color fringing. However, I can also correct a lot of this afterwards with Improve mask (right-click on the layer mask).
I drag the Move Edge slider to the left and see how the color fringing is corrected.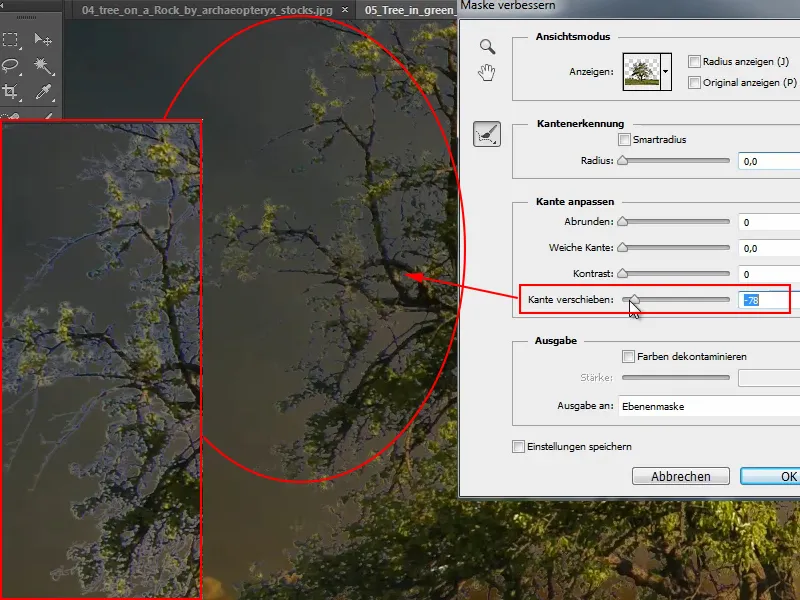
7.8 Fixing transparent pixels
Finally, a mini-trick on how to correct color fringing.
First, I hide the two layers "Channels" and "Eraser+Mask" and we look at the original image of the "Eraser" layer. In other words, the one that I destructively clipped at the beginning with the background eraser tool.
This has created a small color fringe that you might not necessarily like. And since I'm already working destructively anyway, I might as well do it properly ... with the Fix transparent pixels function, which I click on.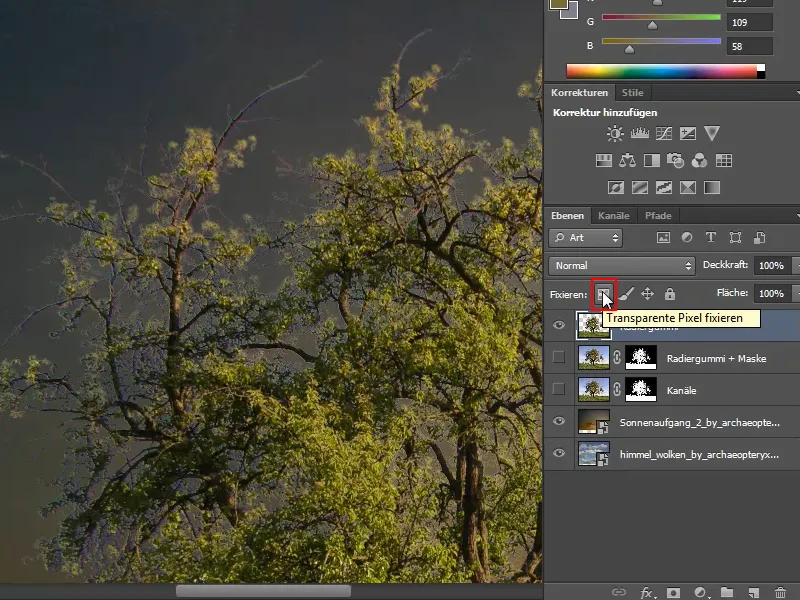
This means that everything that is already cropped and transparent is no longer changed. I'm only interested in the pixel mash that is displayed in the wrong color. For example, the green on the branches, which looks a bit like moss. But that's not real and I don't want it.
That's why I take the brush and select the color I actually want by holding down the Alt key. In this case, I want the branch to be brown, of course, so I apply color to one part of the branch.
If I then paint in an area of the sky, nothing happens. If, on the other hand, I paint over the tree, the pixels that are actually there are repainted..webp?tutkfid=68783)
Of course, I don't want it to be that blatant. That's why I now press Ctrl+Z and undo the last step.
I work better in color mode. It's a bit finer. Then I reduce the opacity a little so that it's not quite so strong.
And if I now paint over the discolored branches, they appear brown again.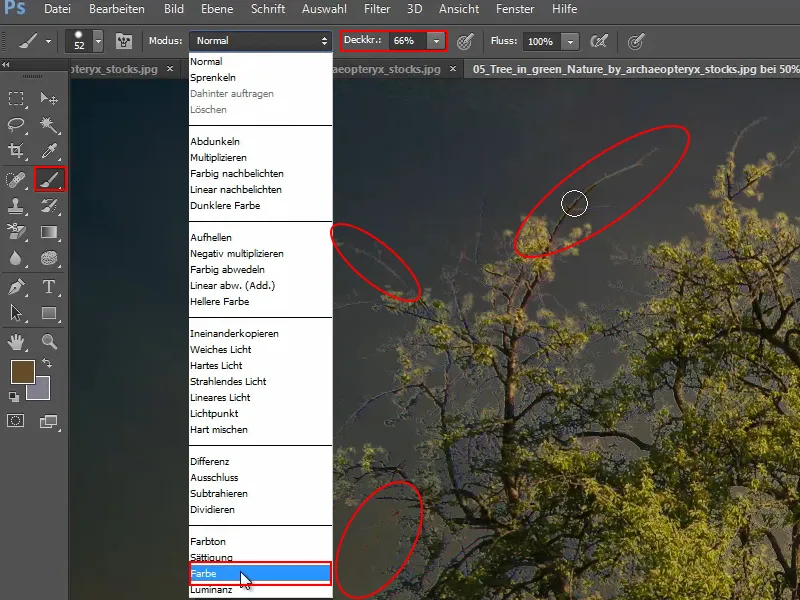
I can do exactly the same with the leaves that have turned blue a little further down.
I select a suitable shade of green by holding down the Alt keyand then run the brush over the blue leaves. This makes the disturbing blue tones disappear.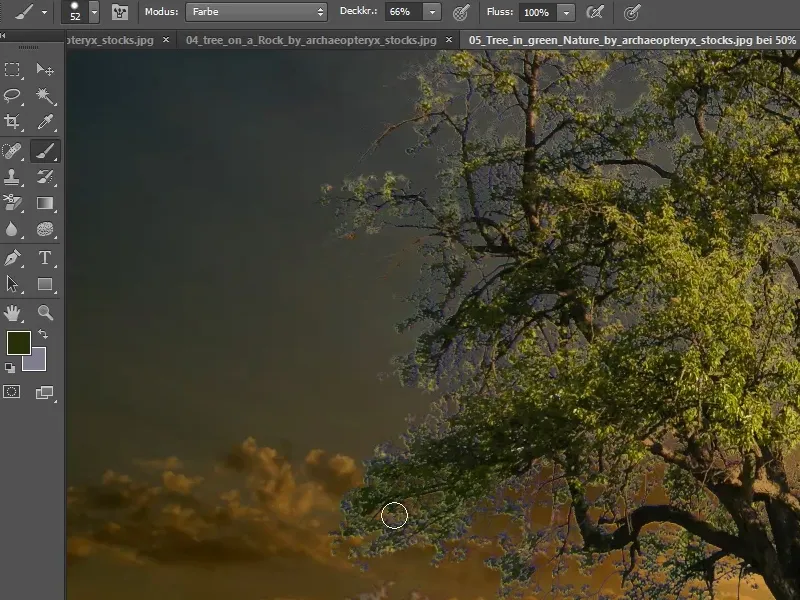
It's not a work of art, you just have to know which buttons to press. In this case, it is the Fix transparent pixels button.
And that's all there is to it. I hope I've been able to show you that it's not so bad to crop trees - and of course this doesn't just apply to trees, as the same tools are ultimately used to crop hair, etc.
And I hope you've also seen that certain methods can be combined with each other, because it doesn't work with just one click. But if you combine them correctly, you'll soon be saying "Crop olé!"
I wish you lots of fun!
Yours, Stefan
from PSD-Tutorials.de


