Part 12: Tracking control during a long exposure
Low-light celestial objects in the night sky require a long exposure time. Even if in the age of digital photography several shorter exposures are taken instead of a single, very long exposure, which are then added together by image processing software, the automatic tracking of an astronomical mount is not precise enough to produce reliably sharp photos when using long exposure focal lengths.
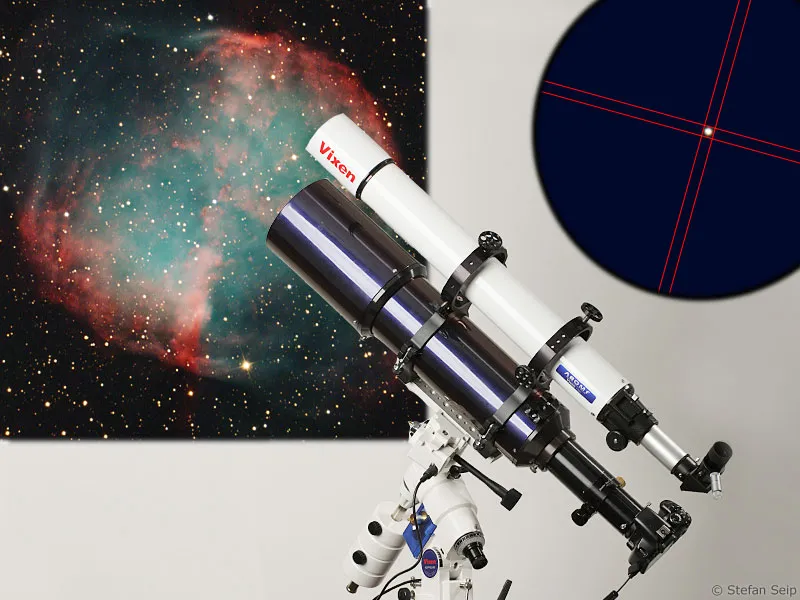
It is then necessary to check the movement of the mount during the exposures and - if necessary - take corrective action. This process is referred to as tracking control or "guiding", the activity as "guiding". If a special camera takes over this process, it is referred to as an "autoguider." A guiding check becomes necessary if, despite motorized tracking of the mount within the desired exposure time, the stars are not exactly point-shaped, but slightly line-shaped.
There can be many reasons for this inaccuracy:
- The mechanical design of the mount is not up to the requirements
- The mount has not been aligned well enough (see part 9 of the "Astrophotography and sky photography" tutorial series (handling an astronomical mount))
- The speed of the motorized tracking does not correspond exactly to the speed of the apparent rotation of the sky
- The prism effect of the Earth's atmosphere (atmospheric refraction) means that the stars are not exactly where they should be
- Movements in the system, such as the slight tilting of the focuser during exposure
- The periodic worm error that each drive worm produces in relation to the driven gear ring in the course of one revolution
- Non-uniformity of the ring gear driven by the worm
While many points can be influenced by careful design, at least the last two points mentioned remain problematic. Every mechanism, no matter how good and expensive, will have the slightest deviations from the ideal state, which will sooner or later have an effect on long-exposure photos. A simple calculation shows what tracking accuracy must theoretically be achieved.
As an example, let's take a telescope with a focal length of 1500mm to which a digital SLR camera is connected. The pixel size of the sensor is assumed to be 5.7 micrometers, i.e. 5.7 thousandths of a millimeter, a value that applies to the Canon EOS 400D or EOS 1000D, for example. Let us further assume that the air turbulence deflects the location of a star over a range of four arc seconds (1 degree = 60 arc minutes = 3600 arc seconds), which corresponds to good to average conditions in Germany.
This means that during the exposure time, each star forms a disk with a diameter of four arc seconds due to the air wobbling. We will therefore not be able to image the stars any sharper anyway.
Now we need to calculate the angle that a pixel of the image sensor represents. This is done using the following formula.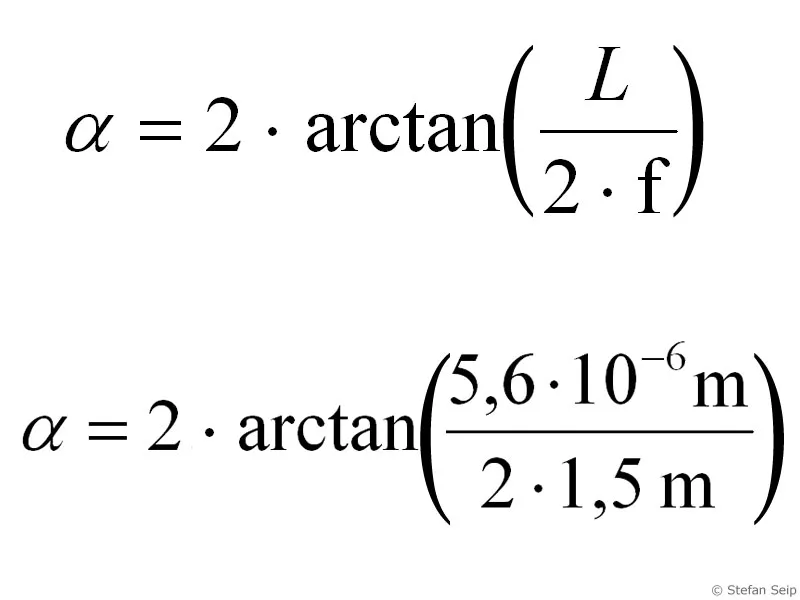
Formula for calculating an image angle alpha. In this case, "L" is the edge length of the pixels and "f" is the focal length. Both values must be given in the same unit (in this case meters).
The image scale is therefore 0.8 arc seconds per pixel. The star disk will therefore have a diameter of 5 pixels (corresponds to 4 arc seconds) on the sensor. Now we define the tolerance that we want to allow before we have to talk about a slightly line-shaped star image. I suggest that a deflection of 20 percent should still be acceptable. Anything above this 20% should be considered blurring. This tolerance is a rather generous concession.
On the left, a perfect star image with optimal tracking. On the right, a star that is slightly deformed and whose long axis exceeds the short axis by 20 percent.
For a star image with a diameter of five pixels, 20 percent corresponds to exactly one pixel tolerance. This means that the tracking may deviate from the ideal state by just 0.8 arc seconds during the exposure time. 0.8 arcseconds are 2.2 ten-thousandths of a degree (remember: the full moon has an apparent diameter of approx. 0.5 degrees). This calculation may illustrate the challenge of tracking with long focal lengths and emphasize the necessity of tracking control.
Tracking control in practice
As already mentioned, there are two basic methods of tracking control, manual and using an autoguider.
1. manual tracking control
During manual tracking control, a crosshair eyepiece is used, in the center of which a star is positioned. During the entire exposure time, the observer keeps an eye on the "guide star" and makes sure that it does not drift out of the center of the crosshairs. If a drift is detected, the star is immediately brought back to its target position by pressing the direction buttons on the mount control.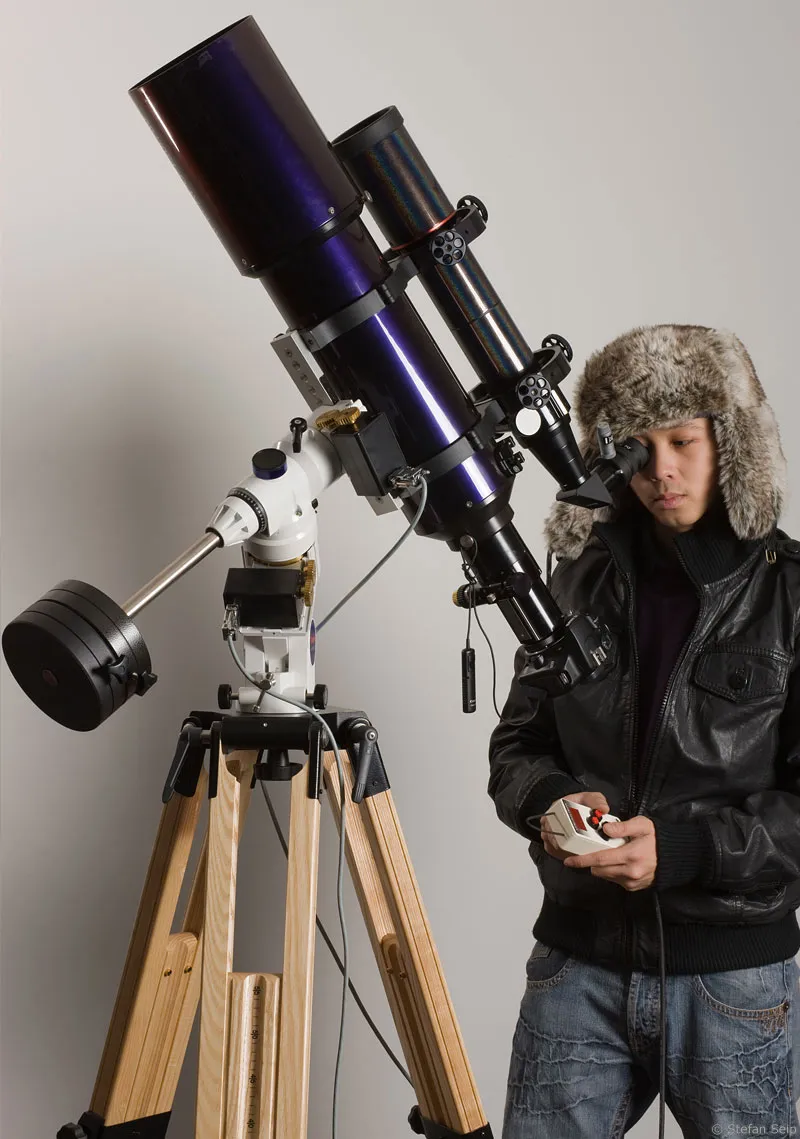
With manual tracking control, the photographer controls the movement of the mount by observing a star in the crosshair eyepiece while the camera carries out the exposure. Corrective action can be taken using the manual control box on the mount.
If the main telescope is used as the imaging optics, a second telescope must be used for tracking control, which is referred to as the "guide scope" or "guide scope" for short. The guide scope is mounted together with the main telescope on the same mount and aligned more or less parallel to it. Absolute parallelism is not necessary. On the contrary: many guide scopes are attached to the main telescope in so-called guide scope clamps, which clamp the guide scope in two clamps with three hand screws each. By adjusting the hand screws, the guide scope can then be moved in relation to the main scope within certain limits. The purpose of this arrangement is to always find a sufficiently bright guide star, because not every subject in the sky contains a bright star in the field of view.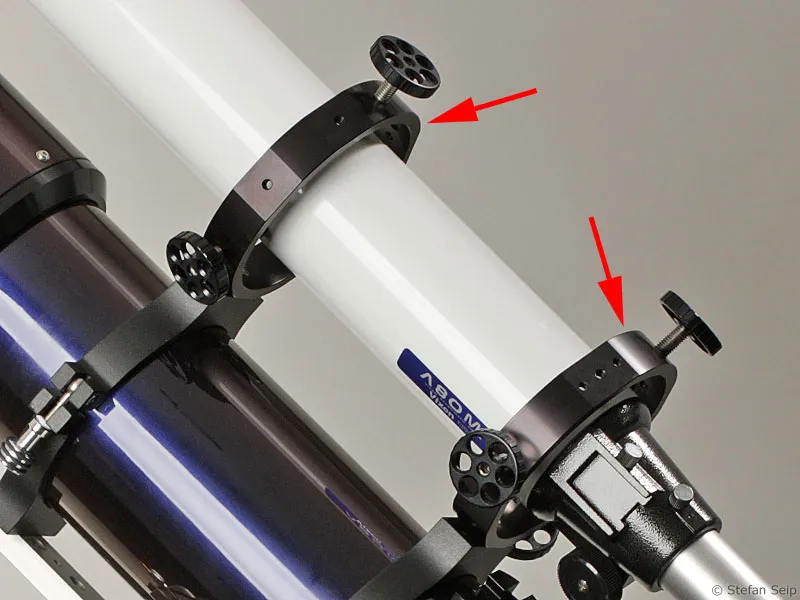
A pair of guide scope clamps (red arrows), screwed onto the main telescope, allow the guide scope freedom of movement so that it can be aligned with a brighter guide star. Each clamp has three hand screws that clamp the guide scope in all positions. If one of the hand screws is loosened, another must be tightened to secure the clamp.
You will therefore need the following items for manual tracking control:
- a) Guide scope
The image quality does not play a major role, so an inexpensive telescope can also be used as a guide scope. It is important that the focal length is not too short. Ideally, the focal length should be twice the focal length of the image. The effective focal length of the guide scope can be extended by using a Barlow lens (a lens system similar to a teleconverter). The focuser of the guide scope should be stable and not wobble, otherwise the required tracking accuracy cannot be achieved.
- b) Crosshair eyepiece
Simple models have two threads at an angle of 90 degrees; types with a double crosshair are particularly helpful for tracking control, where the guide star does not disappear behind the threads in its central position. In any case, make sure that it can be illuminated. This means that the reticle is illuminated by a red LED powered by batteries so that it can still be seen against a dark night sky. The illumination device is usually dimmable.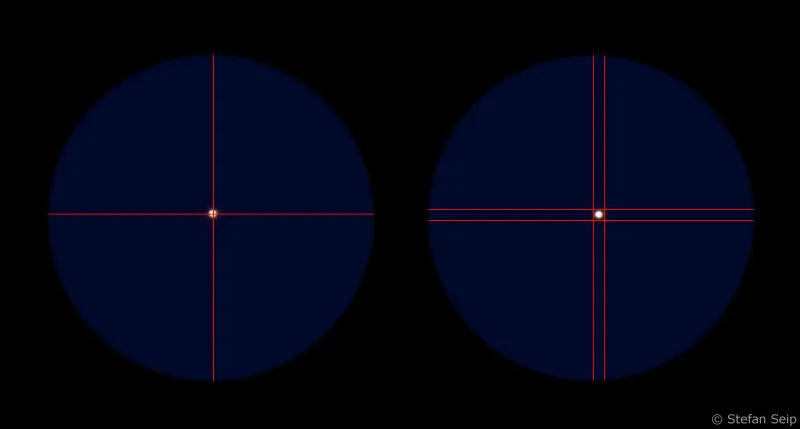
With a single crosshair eyepiece (left), the crosshair covers the guide star. An eyepiece with double crosshairs (right) avoids this situation.
A reticle eyepiece with dimmable illumination device (red arrow). Button cell batteries inside supply a red LED with the necessary voltage: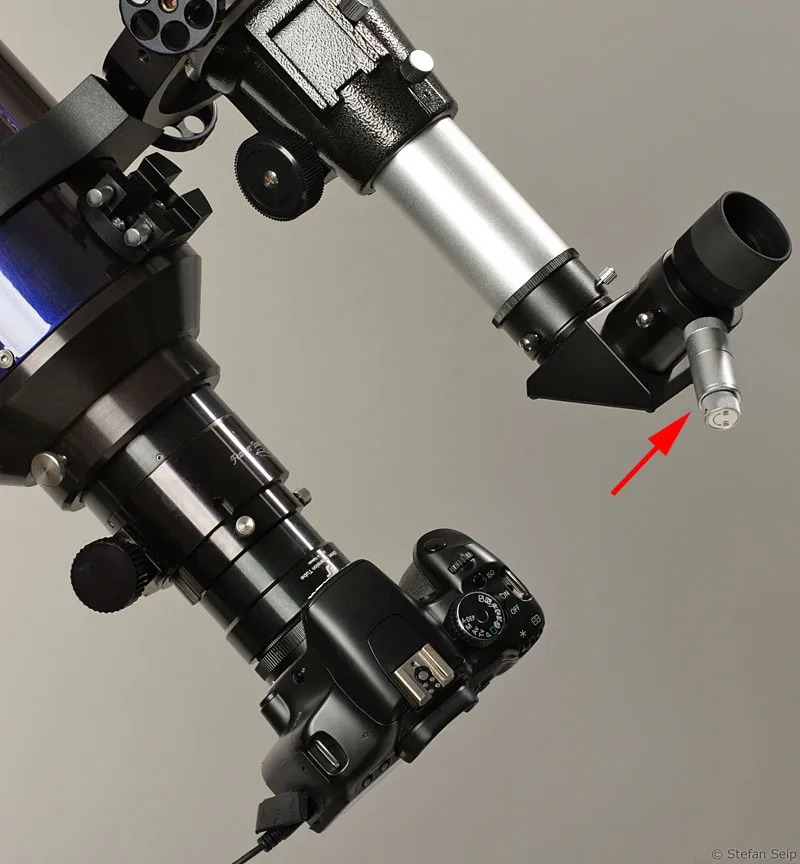
- c) Mounting option for the guide scope
The guide scope must be mounted as stably as possible on the main telescope. Distortions during the exposure time would lead the tracking control ad absurdum. The guide scope clamps mentioned above are an elegant solution. Procedure: First, the main telescope with the connected camera is aligned with the celestial subject. If necessary, the desired image section is optimized by rotating the camera in the focuser. Now all the necessary settings are made on the camera. The focus is then adjusted, if necessary by panning to a bright star not far from the selected section of the sky.
After focusing, the image section is checked again, which is made easier with faint objects by a test exposure with an exposure time of perhaps one minute, whereby no tracking control is carried out. Only then is the guide scope with the crosshair eyepiece moved in its guide scope clamps until a sufficiently bright star is in the center of the crosshair. The crosshair eyepiece is now rotated in its sleeve until the two threads correspond exactly to the direction of movement of the two mount axes (hour and declination axes). To do this, set the movement speed of the motors on the control unit to about 16 times the speed and move the mount back and forth around the hour axis. Rotate the eyepiece until the guide star moves along a thread in the crosshair eyepiece.
View through a reticle eyepiece with guide star (left). The direction of movement of the mount axes is indicated by light blue arrows. Rotating the eyepiece in the focuser ensures that the direction of movement corresponds to the crosshairs (right).
Now the guide star is brought into the center of the crosshairs by the motors of the mount and the speed of the motors is reduced again, preferably to single (1x) or half (0.5x) star speed. You should then memorize exactly which of the buttons on the controller to press in order to move the star to the left, right, up and down so that you can immediately and precisely compensate for any star drift from the center of the crosshairs. This state should be achieved after a short practice phase. Then the time has come: the exposure is started. After opening the camera shutter, the guide star must be constantly observed.
If it moves out of the center of the crosshairs, immediately press the correct button on the control unit to bring it back to the center. On mounts with good tracking properties, corrective movements may only rarely be necessary; on mounts with a relatively inaccurate drive, corrections at intervals of only a few seconds may be appropriate. Manual tracking control then degenerates into work that requires a high level of concentration in the long term.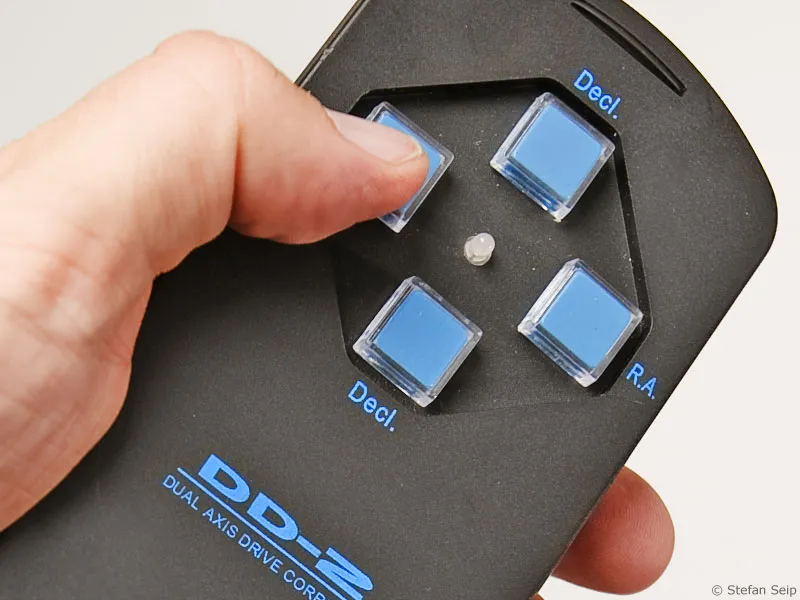
The four decisive buttons on the mount control for manual tracking control. They can be used to move the star in the eyepiece in any direction in order to compensate for detected deviations of the guide star.
Due to the high magnification of the reticle eyepiece and the long focal length of the guiding telescope, even the smallest deviations from the ideal state become visible before they lead to a line-shaped star image in the photograph. This means that not every small deviation of the guide star from its central position in the middle of the crosshairs immediately spoils the photo. Nevertheless, it is of course sensible to counteract any observed inaccuracy immediately with appropriate corrective movements. The tracking control may only be ended after the end of the exposure.
If several exposures are to be taken, a short break can be taken between each exposure to relax the eyes. With a little practice and experience, manual tracking control will make it possible to take long exposures while the camera is attached to a telescope with a long focal length. The practically unavoidable inaccuracy of the mounts during motorized tracking is compensated for by the technique of manual tracking control, so that ideally the stars on the photo are depicted exactly point-like. The maximum sensible exposure time when using digital SLR cameras is around 15 to 20 minutes, depending on the camera model. Manual tracking control over such a period can be a strenuous task. Therefore, make sure you have a comfortable viewing angle in the reticle eyepiece and a comfortable viewing height, if possible. For many celestial objects, a single image with the maximum exposure time mentioned is not sufficient. In this case, several photos must be taken, which are later added together (see episode number 16 of the series "Astrophotography and Sky Photography": "Getting to grips with electronic image noise").
Tip: Specialist retailers offer so-called off-axis guiders as a replacement for a guide scope. These devices are attached between the telescope and the camera and contain a small mirror that deflects the light of a star far off the optical axis, outside the camera's field of view, by 90 degrees. This makes it theoretically possible to use the main telescope as a guide scope during the exposure. Unfortunately, however, the image quality of most telescopes so far off-axis is quite poor, so that no clean image of a guide star can be seen. In addition, the search for a guide star with an off-axis guider turns into a laborious odyssey and usually ends with you having to involuntarily change your chosen image section so that a guide star can be found at all. Even then, the viewing position is often uncomfortable and can sometimes only be achieved by contortions. In such a posture, manual tracking control becomes a physical ordeal.
I therefore advise against the purchase and use of an off-axis guider.
2. automatic tracking control
On closer inspection, manual tracking control is a rather mindless task. You quickly become convinced that it should be possible to automate this task using technical instruments. The good news is that it does work, using special digital cameras known as "autoguiders". The bad news is that plug-and-play solutions do not exist in the field of autoguiding, i.e. plugging in and wiring is not nearly enough to get an autoguider to do what you expect it to do.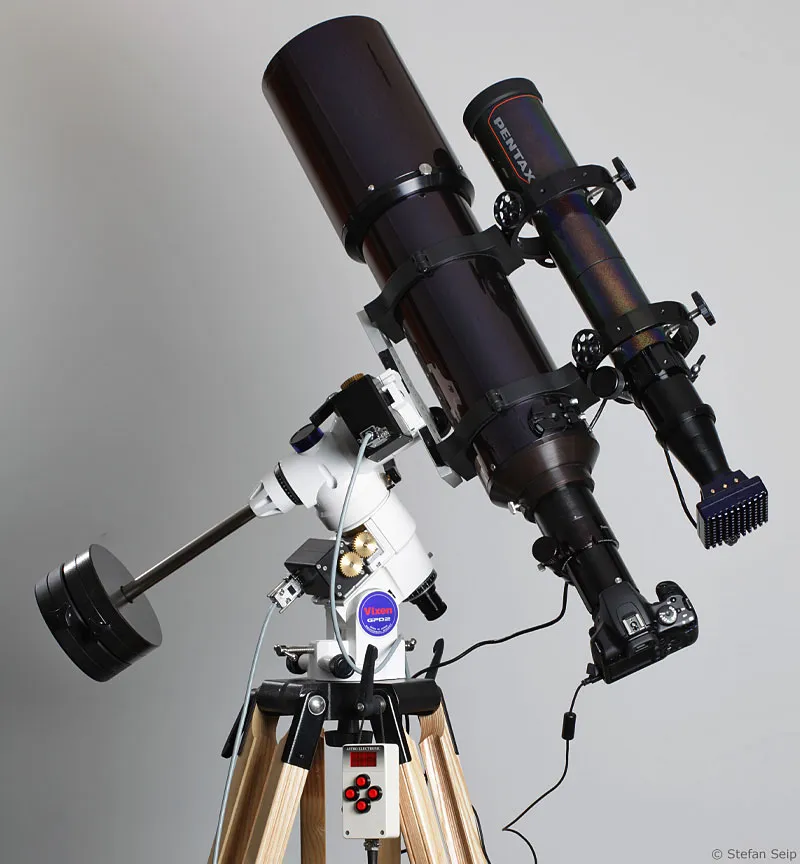
With autoguiding, the crosshair eyepiece of the guiding telescope is replaced by a tracking camera (autoguider).
There will be an initial phase in which no astrophotos are taken, but the autoguider has to be made to work with the mount used. Without experience, this may take several hours or even nights! Technically, autoguiding works as follows: A special digital camera or a video or web camera is used as an autoguider. The sensor of these cameras is usually very small, with a low pixel count. A star is projected onto the sensor of the autoguider and its position is determined by software. The autoguider's sensor is read out at short intervals and the star's position is measured again.
If the guide star deviates from its original position, the software is able to carry out a counter-movement by controlling the mount motors and thus bring the star back to its target position. To do this, it is necessary to connect the autoguider or the control computer to the mount controller via a cable. For its part, the mount controller must have an autoguider interface, i.e. a connection option.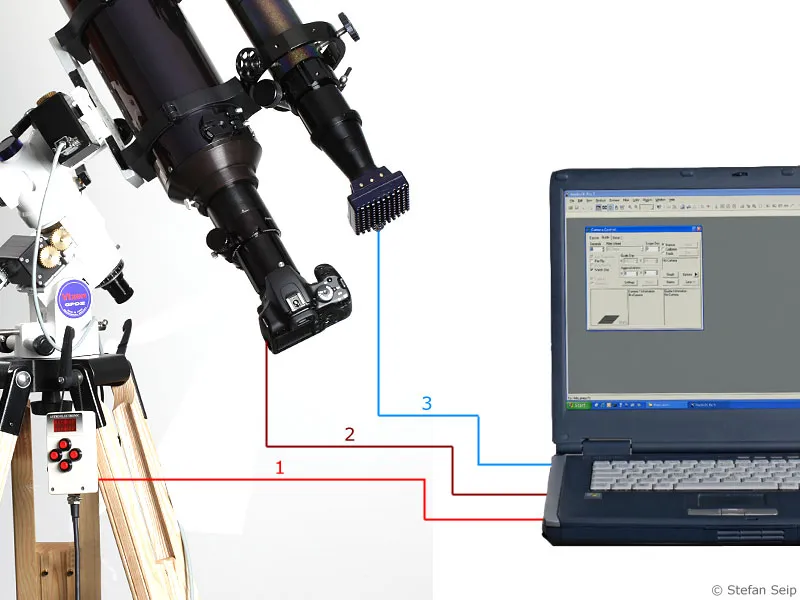
Wiring example (schematic). The DSLR is connected to the PC with a USB cable (dark red, 2). The autoguider uses another USB interface on the computer (blue, 3) to transfer images. A further cable (red, 1) is required so that the control software of the guider can carry out corrective movements of the mount, in this case a serial connection (COM1). As modern laptops often no longer have a serial interface, only a USB-to-serial adapter can help. Depending on the mount and autoguider used, the cabling may differ from this diagram.
What sounds quite trivial in theory turns out to be quite a challenging task in practice. It starts with the fact that autoguider interfaces are not standardized and care must first be taken to ensure that a suitable cable is available. The pin assignment is also not specified; a quasi-standard is compatibility with the "SBIG ST-4" autoguider, labeled for example as "ST-4-compatible autoguider interface".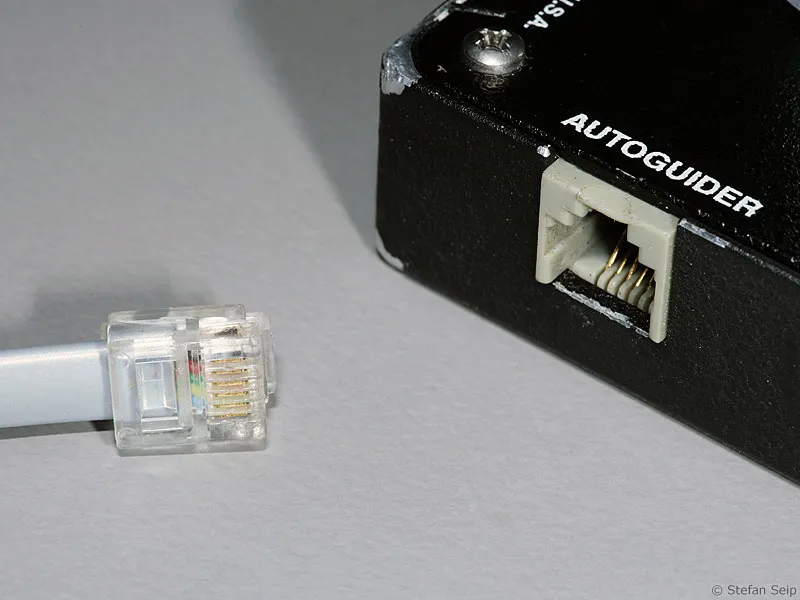
Autoguider interface of a mount controller (right) with matching autoguider cable (left).
This control unit (left) has a completely different plug for the autoguider connection and therefore also requires a different cable (right):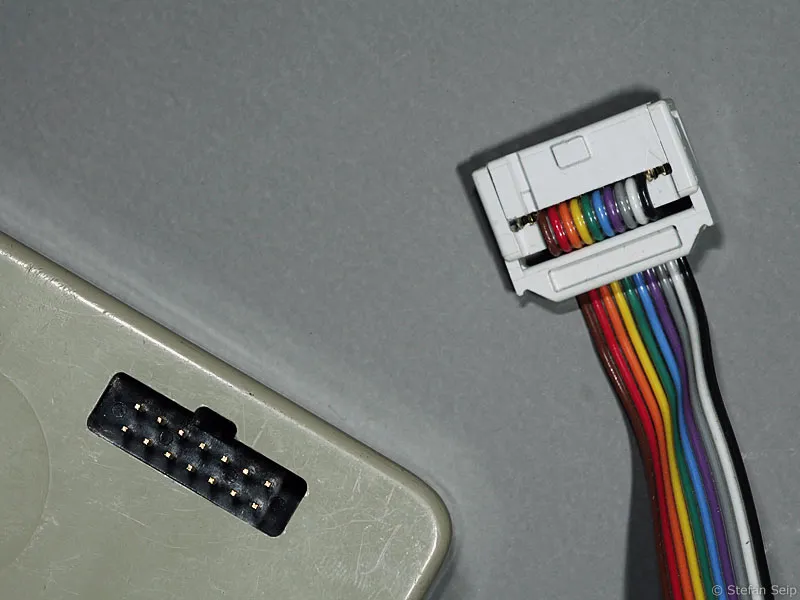
"Stand-alone autoguiders", i.e. devices that manage without a connected computer, are hardly available on the market anymore. In most cases, operation is only possible with a computer (i.e. a laptop for field use). Commissioning then involves the following steps:
(a) Locate the guide star in the guide scope and bring it to the center of the field of view using a crosshair eyepiece.
b) Insert the autoguider instead of the crosshair eyepiece.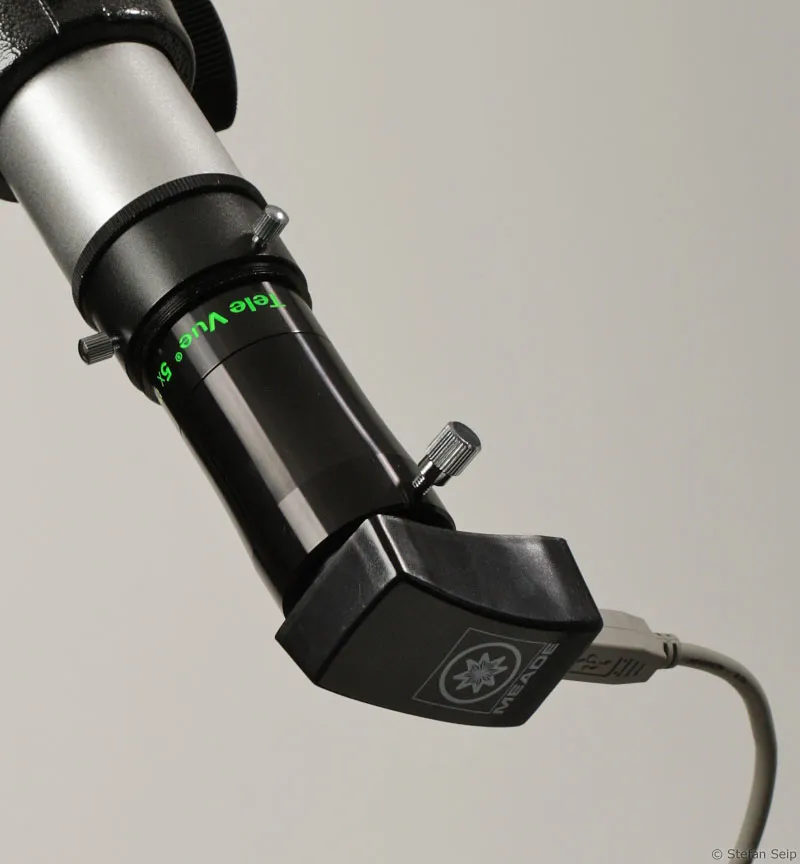
Here, the "Lunar Planetary Imager" from Meade is used as an autoguider. A Barlow lens with a fivefold extension factor is used to extend the focal length of the guide scope.
c) Focusing the guide star using the autoguider software on the laptop.
d) Selecting a low motor speed on the mount control (e.g. 1x star speed).
e) Position the guide star approximately in the center of the image field.
f) Start a "calibration routine" of the guiding software, which now moves the motors of the mount in all directions, determines the direction of movement of the guide star and in this way "learns" how it must control the mount in order to deflect the guide star in a desired direction.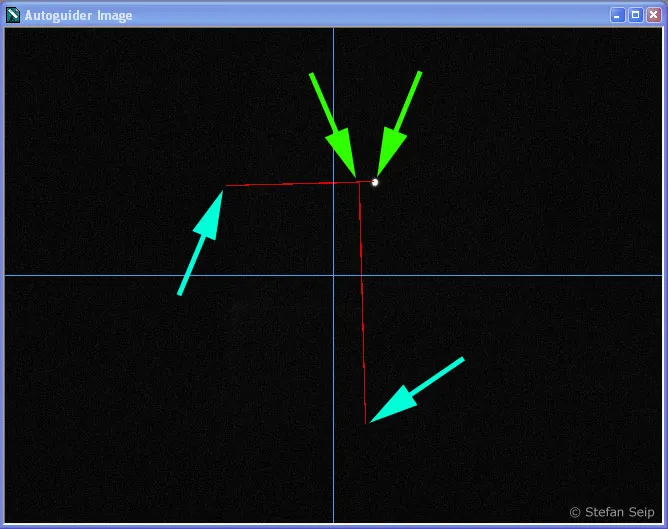
Screen display of the "MaxIm DSLR" software(http://www.cyanogen.com) during the calibration routine. Before the start, the star was at the position indicated by the green arrow on the left. During calibration, the two axes of the mount move one after the other in one direction (blue arrows) and then back again. Afterwards, the star is more or less back at its original position (right, green arrow). The fact that it does not return to its original position is due to the dead gear of the gears (gear backlash). After calibration, the software "knows" which movements it has to make in order to deflect the guide star in the desired direction.
g) Starting the autoguiding function: If all steps have been carried out correctly, the autoguider takes one image after the next in quick succession, depending on the selected exposure time. The optimum exposure time is between two and five seconds and depends primarily on the brightness of the guide star.
It must not be overexposed in order to prevent the sensor of the autoguider from running into full saturation at the location of the guide star. On the other hand, it must be imaged clearly enough so that the software can determine its exact position.
If the exposure time is too short, there is a risk that the guide star will be deflected by the air turbulence and the guider will try to follow this "fidgeting movement". If the exposure time is too long, the guider will not be able to react quickly enough to a suddenly occurring motion inaccuracy of the mount.
After each individual exposure, the software determines the position of the guide star with sub-pixel accuracy and can therefore react to the smallest deviations from the target position. A guide scope with a shorter focal length is therefore sufficient for autoguiding. If the guide scope has half the focal length of the main telescope, this is quite sufficient if the autoguider is working optimally.
If the software detects a drift of the guiding star, it steers in the opposite direction using the drive motors of the mount and thus compensates for the inaccuracy of the tracking. After starting the guiding function, you should give the system about one minute to reach a stable state.
During this time, observe the display, which shows the deviations of the guide star either as a series of numbers or graphically. If the deviations are within the expected range, the exposures can be started.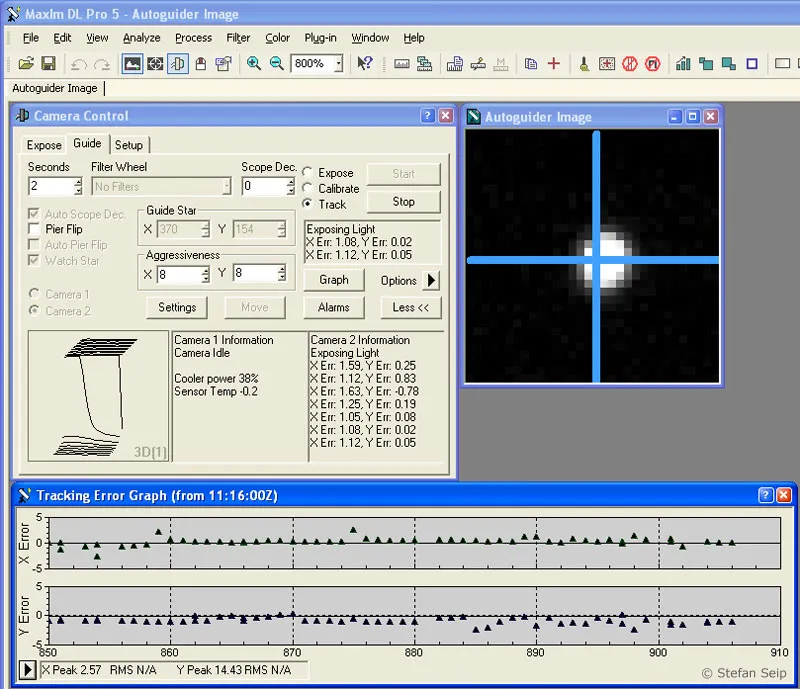
Screen display of the MaxIm software during guiding. At the top right, a current image of the recorded guide star including crosshairs is displayed. At the bottom, a graph shows the deviations of the guide star from its target position in both axes.
Unfortunately, it is not possible to provide more precise step-by-step instructions within the scope of a tutorial, as the procedure differs considerably in detail depending on the autoguider camera used. It is therefore necessary to refer to the operating instructions for the respective camera models.
Nevertheless, here are some general tips for successful autoguiding:
(a) Many autoguiders only work, or at least work better, if you mount them so that the direction of movement of the mount axes coincides with the pixel rows and columns.
b) The calibration point mentioned in the above list under f) should be repeated as soon as the telescope is swiveled to another region of the sky.
c) In many cases, it is necessary to define within the software how many seconds the autoguider should move the axes during the calibration run before the position of the guide star is determined again. This time period must be calculated in such a way that the star does not leave the sensor surface on the one hand, but on the other hand undergoes such a strong change in position that the software can clearly determine the direction and any play in the gearing of the mount does not have a major influence. Ideally, the guide star would be moved from the center of the sensor to near the edge of the sensor by the calibration routine.
The two "Calibration Tim" fields in MaxIm define how many seconds the software runs the motors of the mount during the calibration routine: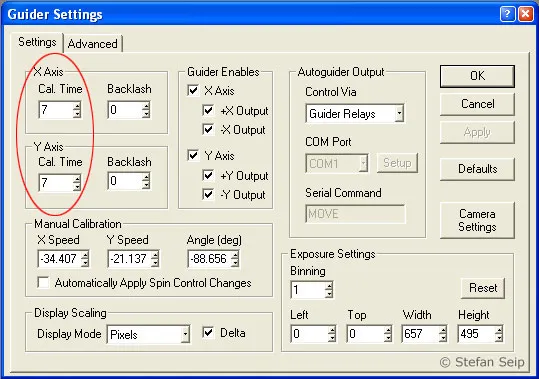
d) The control software of many autoguiders contains quite a few parameters to optimize guiding. One important point is the "aggressiveness". It determines whether an attempt is made in the next step to bring the guide star back to its original position if a drift of the guide star is detected or whether the software should attempt to approach the target value in smaller steps. If the aggressiveness is set too high, the system may build up and the guide star may constantly oscillate around the target value due to overreaction. If it is too low, a persistent drift in one direction can hardly be compensated for. This means that an average value must be found through practical experience, which depends on the characteristics of the mount used and the focal length of the guiding telescope.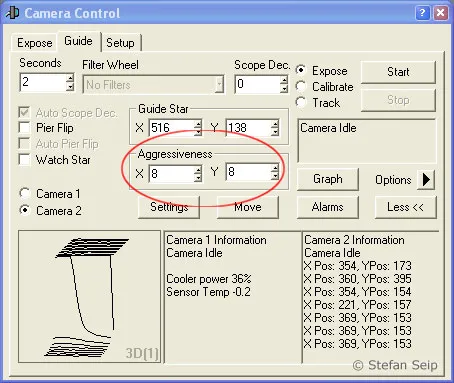
Setting the "aggressiveness" in the guiding module of MaxIm. The value "8" means that a detected deviation of the guide star from its target position is already corrected by 80 percent in the next step. A one hundred percent correction often leads to the system rocking.
Which cameras are suitable as autoguiders?
If you are looking for a stand-alone autoguider that does not require a connected computer, you really only have one choice for a new device: Baader LVI SmartGuider, http://www.baader-planetarium.de/sektion/s21/s21.htm.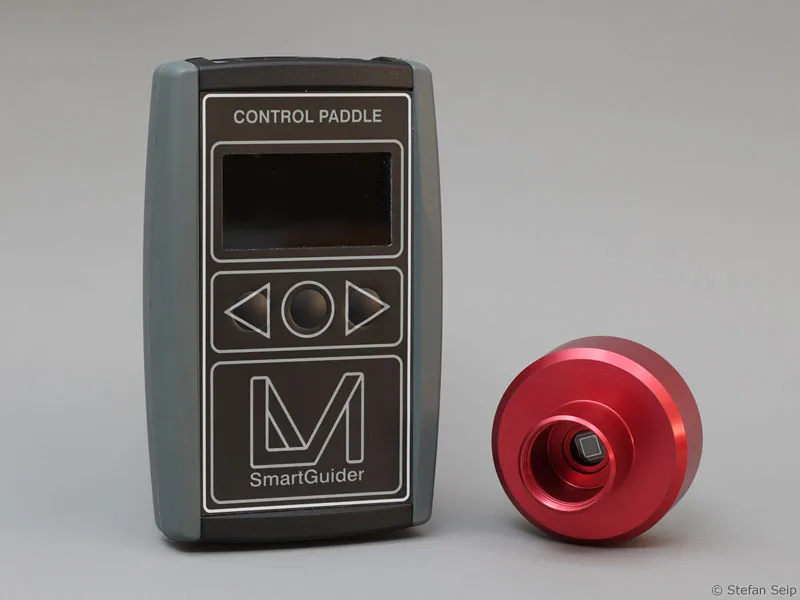
The "LVI SmartGuider" is a stand-alone guider that does not require a PC/laptop for operation.
It should not be concealed that this is a newly introduced product and that no sound practical experience is yet available. At this stage, I can neither recommend nor advise against this device.
The following autoguiders require a PC for operation:
Alccd ALccd 5 Autoguider http://www.astrolumina.de
Imaging Source: DMK 21AU04.AS and other models, video modules http://www.astronomycameras.com.
DMK video camera from ImagingSource. The packages for astrophotographers include a connection sleeve for the telescope (top right), but no software for using the camera as an autoguider.
SBIG ST-402ME: CCD camera http://www.sbig.de
Meade DSI 2 Deep Sky Camera,
CCD camera, various models http://www.meade.de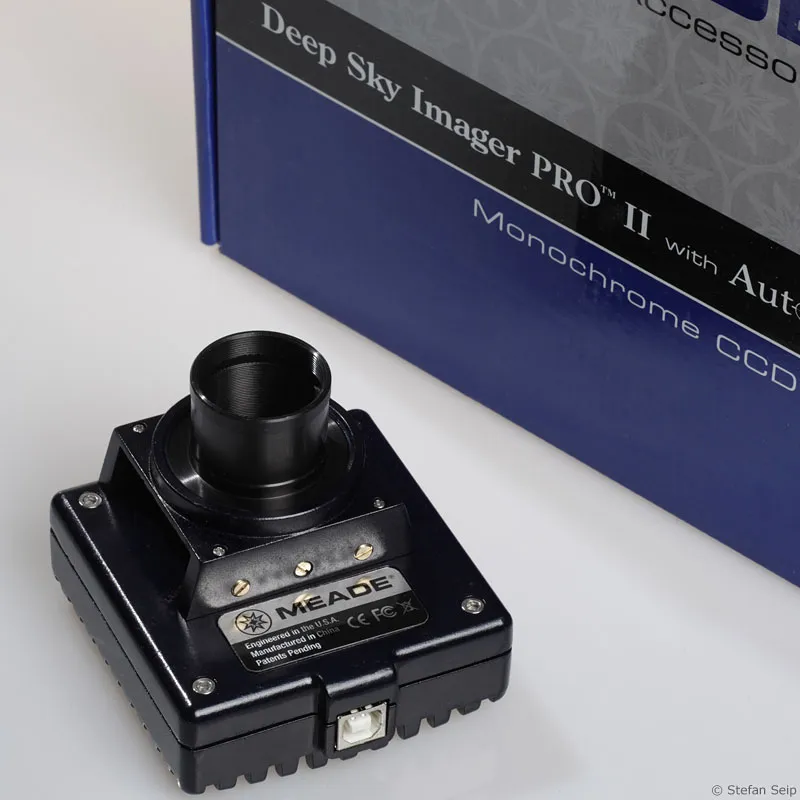
The "Deep Sky Imager PRO II" from Meade is a CCD camera for astrophotography, but its sensor is small compared to that of a DSLR. If you want to use it as an autoguider, you can rejoice, because the necessary software is included in the scope of delivery.
Before purchasing one of these camera models, it is important to clarify which cables and, above all, which software may also be required for use as an autoguider. One advantage of these cameras is that they can be used not only as autoguiders but also as cameras, preferably for planetary photography (see episode number 14 of the series "Astrophotography and Sky Photography": "Capturing Planets with the WebCam").
The classic stand-alone autoguiders are the SBIG ST-4 and SBIG ST-V models, which are unfortunately no longer in production. Both are worth an unreserved recommendation as a second-hand purchase!
Only available as a used device: the SBIG ST-4, an old but capable workhorse among the stand-alone autoguiders. The six-digit display is the sparse user interface, which takes some getting used to at first.
Sample shots
A focal length of six meters was required to capture the globular star cluster "Messier 13" in the constellation Hercules full frame on the sensor of a Canon EOS 450D. The exposure time was ten minutes at ISO 400 and the guiding was carried out using a guide scope and an SBIG ST-4 autoguider camera.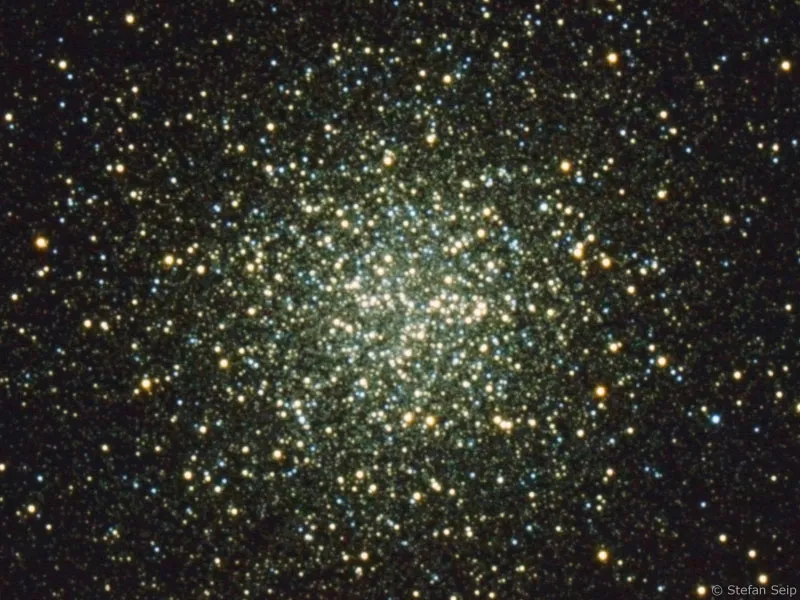
This photo of the Orion Nebula was taken with a Canon EOS 400D modified for astrophotography. The total exposure time was one and a half hours at ISO 800. The focal length was 600 millimetres at Blender 1:6.0. A 300-millimetre photo lens was used as a replacement for the guide scope, to which an SBIG ST-4 autoguider camera could be connected.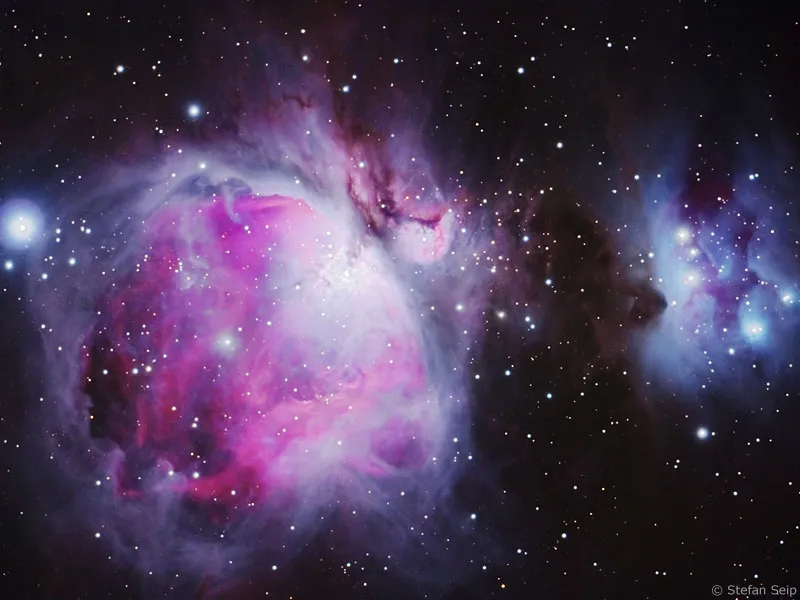
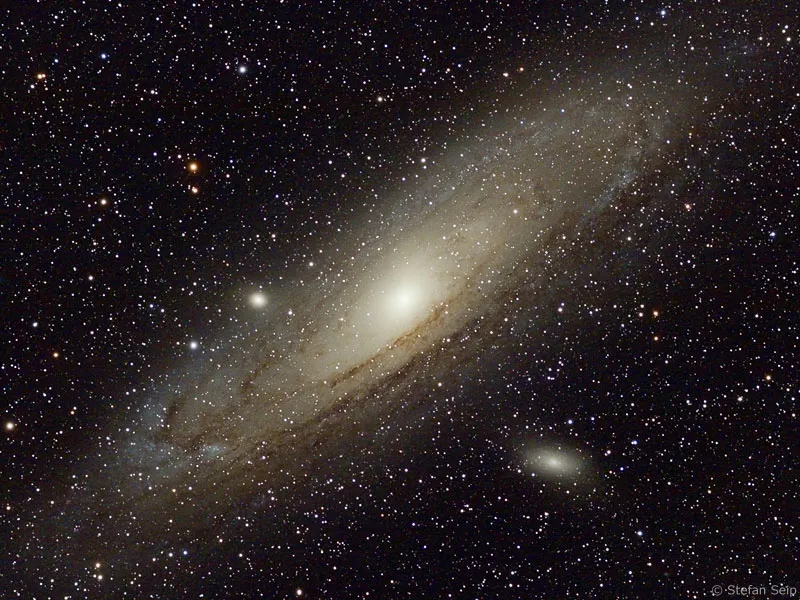
This image of the Andromeda galaxy was also taken with the modified EOS 400D. The optical system used was a refracting telescope with an aperture of only 60 millimetres and a focal length of 350 millimetres. The exposure time was one hour and 40 minutes at ISO 400. In the absence of an autoguider, manual tracking was carried out using a guide scope with crosshair eyepiece.