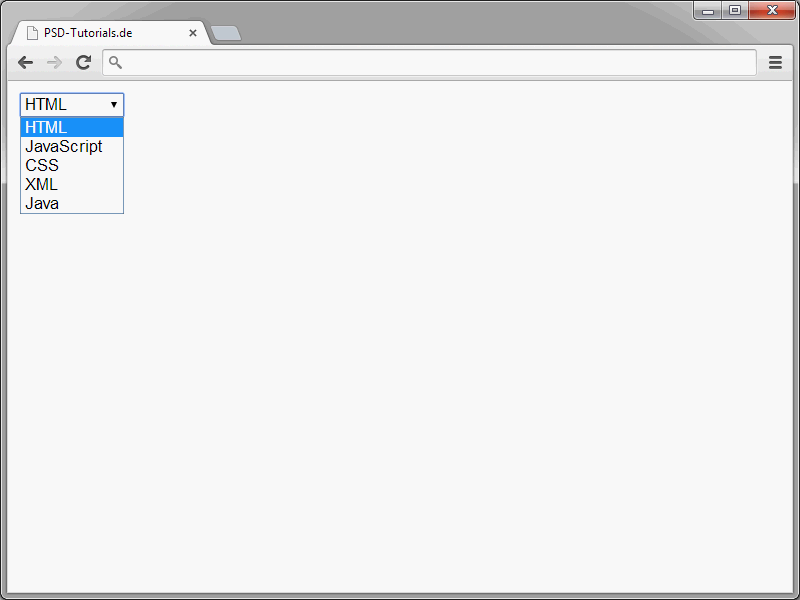
You can use selection lists to offer visitors a list of entries from which they can select an entry.
<select name="languages"> <option>HTML</option> <option>JavaScript</option> <option>CSS</option> <option>XML</option> <option>Java</option> </select>
Selection lists are defined using the select element. Again, each selection list should be uniquely identifiable in the document via an identifier(name). The individual entries in the list are each defined using an option element. The text of the list entry is placed between the opening and closing <option>.

By default, the text of the selected list entry is transmitted when the form is sent. Alternatively, you can also change the send value. This is done via the value attribute.
<select name="languages"> <option value="s1">HTML</option> <option value="s2">JavaScript</option> <option value="s3">CSS</option> <option value="s4">XML</option> <option value="s5">Java</option> </select>
You simply assign the desired send value to this value.
Normally, only one entry from a selection list is visible at a time. However, you can also display several entries at once if you wish.
To do this, assign the size attribute to the select element. This size determines the display size of the selection list.
<select name="languages" size="3"> <option>HTML</option> <option>JavaScript</option> <option>CSS</option> <option>XML</option> <option>Java</option> </select>
If the list contains more entries than can be displayed, the list can be scrolled.
By default, only one entry at a time can be selected from a selection list. However, a multiple selection can also be implemented if required.
<select name="languages" size="3" multiple> <option>HTML</option> <option>JavaScript</option> <option>CSS</option> <option>XML</option> <option>Java</option> </select>
Multiple selection is made possible by assigning the multiple attribute in the select element.
Initially, no entry is preselected in selection lists. However, this can also be changed by using a corresponding attribute.
<select name="languages" size="3" multiple> <option>HTML</option> <option>JavaScript</option> <option selected>CSS</option> <option>XML</option> <option>Java</option> </select>
To preselect an entry, assign the selected attribute to the relevant option element.
You can also preselect multiple entries. Simply use the selected attribute several times.
Radio buttons
You can define groups of buttons using the so-called radio buttons.
Users can then select one of the options offered from such a group.
Radio buttons are defined via input elements to which the attribute-value combination type="radio" is assigned.
<form action="form.php" method="post"> <p>Do you want to subscribe to the newsletter?:</p> <p> <input type="radio" name="newsletter" value="yes" /> Yes<br /> <input type="radio" name="newsletter" value="no" /> No </p> </form>
Again, use the name attribute to assign an identifier to the radio buttons. All buttons with the same name belong to a group. Exactly one of these buttons can then be selected.
The value attribute is used to determine the send value of the individual buttons.
To preselect a button, assign the checked attribute to it.
<form action="form.php" method="post"> <p>Do you want to subscribe to the newsletter?:</p> <p> <input type="radio" name="newsletter" value="yes" /> Yes<br /> <input type="radio" name="newsletter" value="no" checked /> No </p> </form>
Please note that a preselection can only be made for one button in a group.
Checkboxes
You are also familiar with checkboxes from countless forms.
These are a group of checkable rectangles from which users can select one, none or several.
<p>What other topics are you interested in?</p> <p> <input type="checkbox" name="theme" value="html" /> HTML<br /> <input type="checkbox" name="theme" value="css" /> CSS<br /> <input type="checkbox" name="theme" value="javascript" /> JavaScript </p>
Checkboxes are defined using input elements to which the attribute-value combination type="checkbox" is assigned. Each checkbox is given an identifier via the name attribute. All checkboxes that have the same name belong to a group. The value attribute is used to determine the sending value of the individual checkboxes.
Hidden input fields
You can define fields within forms that are invisible to visitors. When the form is sent, the values contained in the hidden fields are also transmitted. This is interesting, for example, if you use php to determine values and want to send them without the user noticing.
Hidden input fields can be defined using input elements to which the attribute-value combination type="hidden" is assigned.
<input type="hidden" name="id" value="">
The element is given a unique identifier via the name attribute. The value of the field is specified via value. This can be a static value. However, it can also be assigned dynamically using PHP or JavaScript, for example.
Upload fields
If you want to allow visitors to upload files, you can also provide a corresponding field. Here is an example of what a corresponding application could look like:
<form action="form.php" method="post" enctype="multipart/form-data"> <p>Your choice:<br> <input name="File" type="file" /></p> </form>
It looks like this in the browser:
Upload fields can be defined using input elements with the attribute-value combination type="file". For this field type, use the specification method="post" in the introductory <form>. In addition, the attribute-value combination enctype="multipart/form-data" should also appear there. Only then will the files actually be transferred. If this information is omitted, only the file name is transmitted.
Buttons for sending and canceling
In order for the form data to be sent at all, a corresponding button is of course required.
The following syntax is used to submit forms:
<input type="submit" value="Submit" />
The value of the value attribute determines what is displayed on the button.
The counterpart to these submit buttons are cancel buttons.
If such a button is clicked, all form content is deleted. The syntax for these buttons looks like this
<input type="reset" value="Cancel" />
The following also applies here: The label is determined by the value of the value attribute.
You can also define buttons using the button element.
The advantage of this variant is that you are very flexible. In fact, you can determine the appearance and functionality of these buttons yourself.
<button name="click" type="button" value="Surprise" onclick="alert('Are you sure?');">Click me</button>
In the current example, the onclick event handler is used to ensure that a JavaScript message window opens when the button is clicked. The appearance of the button is determined by the content between the introductory and closing <button> tag. Incidentally, this can be any content. So not only text is allowed. You can also specify an img element here to generate a graphic button.


