In fact, sensors with an edge length of a few millimeters are completely sufficient to fully capture a planet with reasonable focal lengths. The number of pixels does not matter either, a simple VGA resolution with 640x480 pixels is sufficient! What counts is the camera's ability to record 10, 20, 30 or even more images per second as a video file. The ideal recording devices for planetary photography are therefore web cameras (webcams) and digital video camera modules (not camcorders).
The planets in our solar system are comparatively small but bright objects in the sky. The imaging technique therefore differs fundamentally from long exposures for low-light deep-sky subjects. This lead image is a photomontage.
Part 14: Capturing planets with the webcam
In addition to the Earth, seven other planets orbit the sun. Starting close to the sun, the order is: Mercury, Venus, Earth, Mars, Jupiter, Saturn, Uranus and Neptune. Mercury and Venus are therefore inner planets whose orbital radius is smaller than that of the Earth. All the others are even further away from the sun than the Earth.
With the exception of Uranus and Neptune, the planets can already be seen in the sky with the naked eye, but they look like a star. Only attentive observers notice that a planet shows a calm light, while the stars "flicker" more or less strongly. In a telescope, planets appear as small discs at the appropriate magnification, while stars remain tiny dots of light even at maximum magnification in huge telescopes.
Due to their brightness, it is therefore no problem to find the planets Mercury to Saturn in the sky. However, you should know which constellation they are currently in. The term "planet" is derived from the ancient Greek word "planetes", which means "the wandering ones". The term "wandering stars" for the planets was also derived from this, because due to their movement around the sun, they are not always in the same constellation in the sky, but move through all the signs of the zodiac over the course of time.
Therefore, it is not possible to specify annually recurring visibility times, as the speed of their movement depends on the orbital period of the planets around the sun. And according to Kepler's third law, this depends on the distance from the sun: the closer a planet is to the sun, the shorter its orbital period. While Mercury only needs around 88 days to complete a "Mercury year", Saturn, which is far from the sun, needs around 29.5 years!
There are various ways to find out the current positions and visibility of the planets. One of these is an astronomical yearbook, such as the "Sky Year" published by Kosmos. It is published annually and describes the visibility of the planets for each month. Another is an online portal, such as www.calsky.de.
You can also use planetarium software such as "Guide"(www.projectpluto.com) or the freeware "Cartes du Ciel"(http://www.stargazing.net/astropc/).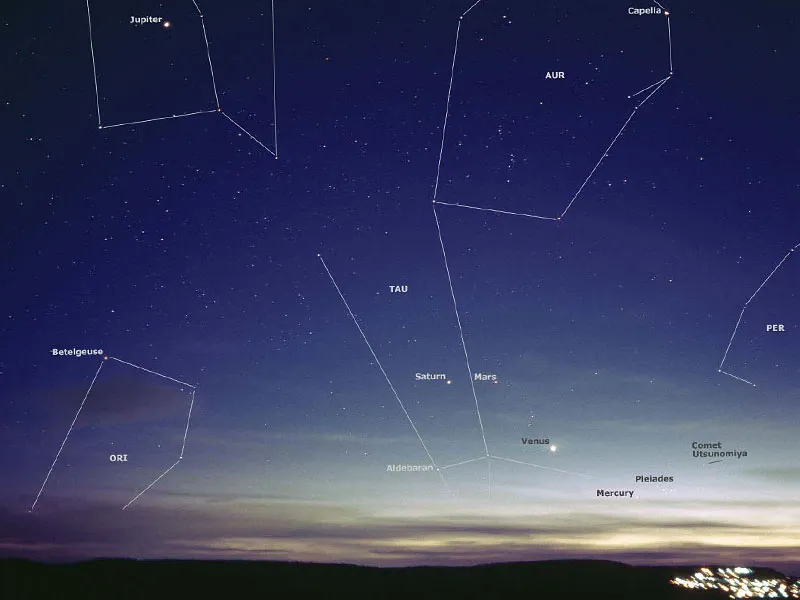
A very rare sight occurred on the evening of April 30, 2002, when all five planets visible to the naked eye were visible in the western sky at the same time.
The chances of visibility are fundamentally different for the inner and outer planets. The "inner" planets (Mercury and Venus) orbit the Sun within the Earth's orbit, i.e. we look at the orbit from the outside. As a result, these planets are always relatively close to the sun and only move away from it up to a maximum angular distance. This maximum distance is 28 degrees for Mercury and 48 degrees for Venus. The position at which this maximum angular distance is reached is called "elongation". In eastern elongation, the inner planets can be seen in the evening sky after sunset, in western elongation in the morning sky before sunrise. Due to the lighting conditions, the inner planets in the magnifying telescope show a phase similar to that of the moon. Other extreme positions occur when inner planets are behind the Sun ("upper conjunction") or between the Sun and Earth ("lower conjunction"). In the case of a inferior conjunction, Mercury or Venus can actually be seen as a dark disk in front of the Sun, but this is only very rarely the case due to their inclined orbital plane in relation to the Earth's orbit.
The situation is completely different with the outer planets. Their orbital radius is larger than that of the earth, so that they are opposite the sun at certain times when viewed from the earth. This makes them particularly easy to observe, as they rise at sunset and set at sunrise, so they can be seen in the sky all night long.
At the same time, they are particularly close to the Earth, i.e. their apparent size in the telescope and their brightness reach a maximum value. This optimum position is called "opposition". The opposite is "conjunction", when they are behind the sun, so to speak, and cannot be observed.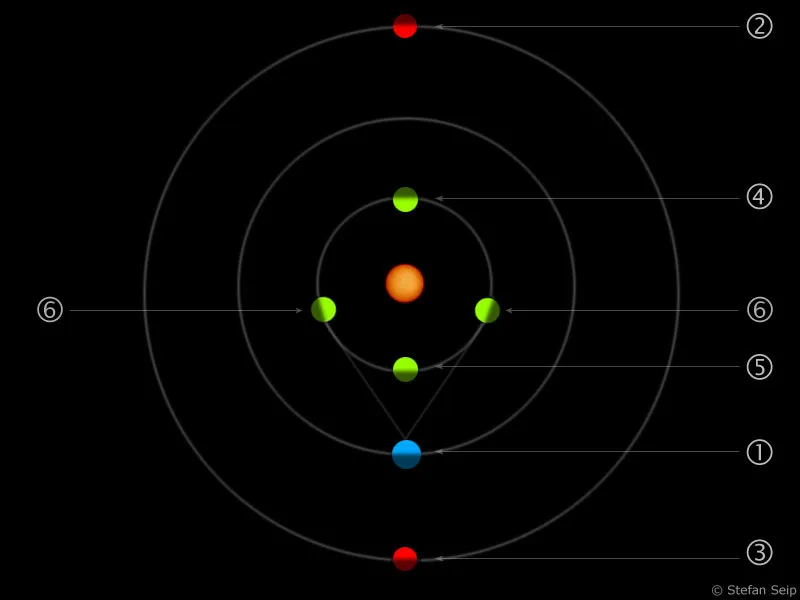
Schematic representation of important planetary constellations. The sun is in the center, the earth (1) is shown as a blue planet. For an outer planet (red), the opposition position (3) offers particularly favorable observation conditions, while it is unobservable in the conjunction position (2). An inner planet (green) is best seen when it is at maximum elongation (6), when its angular distance from the sun is particularly large. It cannot be observed at "superior conjunction" (4) and at "inferior conjunction" (5) only when it passes directly in front of the sun's disk, a so-called "transit".
Due to their great distance from Earth, the planets appear as tiny discs whose apparent diameter is given in seconds of arc ("abbreviation"). One degree is divided into 60 minutes of arc, and one minute of arc into 60 seconds of arc. The full moon appears to us at an angle of about half a degree, which corresponds to 30 arcminutes or 1800 arcseconds. No planet reaches more than 63 arc seconds. Another comparison: a one-euro coin at a distance of 240 meters appears to us at an angle of 20 arc seconds. This corresponds roughly to the value for the globe of the planet Saturn!
Capturing such small objects in sharp focus, possibly even with visible surface details, is a real photographic challenge. Not only very long focal lengths are required. The most difficult task is to compensate for the loss of sharpness caused by the turbulence in the Earth's atmosphere, which astronomers call "seeing" and which also causes the scintillation (the "flickering") of the stars.
Anyone who has ever looked at a planet in a telescope at high magnification will be familiar with the phenomenon: at times the image appears sharp, then blurred and washed out again. On nights with poor seeing, no usable image is produced at all and planetary photography is not worthwhile. But even with good seeing, the conditions are not stable and there are brief moments with a particularly detailed view.
For these reasons, a very successful strategy is to use a webcam or video camera to take hundreds or even thousands of individual images in a short space of time. Special software is then used to select the sharpest individual images from this flood of images and superimpose them precisely. An average value is calculated from the selected images, which are then sharpened. This results in a very detailed photo of a planet that ideally shows at least the details that an experienced observer can recognize when looking through an eyepiece.
Planetary photography is also worthwhile with relatively small telescopes. Here, a 30-year-old refractor with an aperture of only 75 millimetres and without motorized tracking was equipped with a DMK Firewire video camera: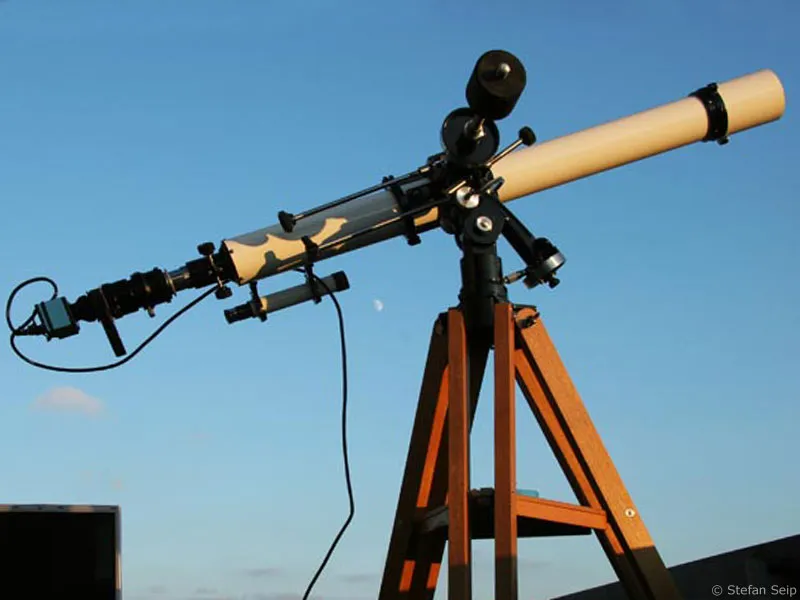
Images of the planets Saturn (left) and Venus, obtained with the equipment shown above.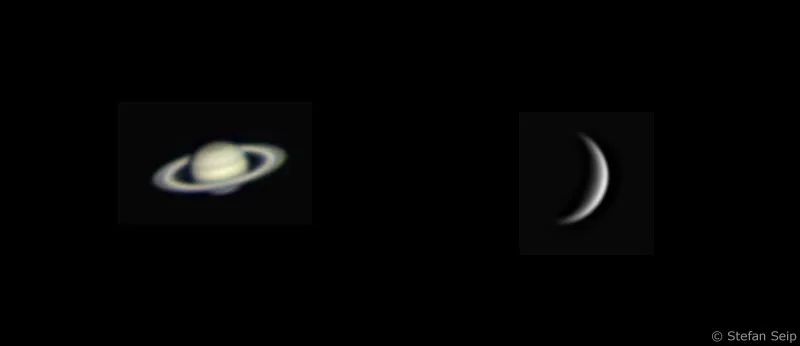
Before discussing the recording technique, all the planets should first be introduced individually.
Mercury is the closest planet to the sun and has no moons. Its apparent size in the sky is only just under 5 to a maximum of 12". Although Mercury has no atmosphere, so that we can see its surface, surface details are hardly visible, at most larger, darker regions. The aim of photographic images will therefore be to capture its changing phase.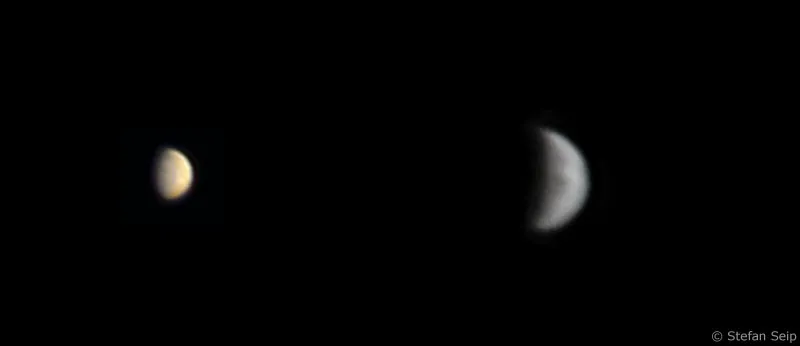
Two images of the planet Mercury taken on June 18, 2005 (left) and April 15, 2003, showing the planet's phase and faintly indicated surface structures. In both cases, a Philips ToUCam 740K webcam served as the camera, an 8-inch refractor on the left and a 10-inch Maksutov-Cassegrain telescope on the right as the imaging optics.
A transit of Mercury occurred on May 7, 2003: The planet closest to the sun passed in front of the sun as a tiny speck (arrow).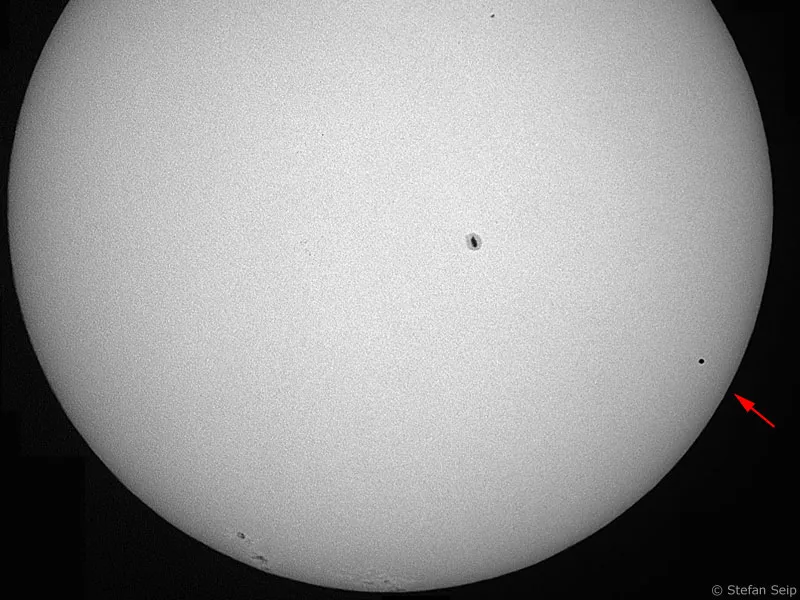
To make matters worse, Mercury is always relatively close to the sun and is no more than 28 degrees away from it. This means that it can only be seen about an hour after sunset or an hour before sunrise in a position close to the horizon. Alternatively, you can try to find it in the daytime sky, but extreme caution is required to avoid getting the sun in your field of vision.
During inferior conjunction, it occasionally happens that the planet can be seen as a dark dot in front of the solar disk. In this case, all the measures described in Part 6 of this tutorial series ("Caution when taking photos of the sun") must be taken. The next Mercury transits to be observed from Europe will take place on May 9, 2016, November 11, 2019 and November 13, 2032.
Mercury in numbers:
Diameter: 4878 km
Average distance from the sun: 57.9 million km
Orbital period around the sun: 88 days
Orbital inclination relative to the Earth's orbit: 7 degrees
Distance from the earth: 80 to 220 million km
Number of moons: 0
Average density: 5.4 g/cm³
Venus is also an inner planet and therefore shows phases. Its surface is never visible from Earth because Venus is enveloped in a dense, closed cloud cover. However, this reflects much of the sunlight that hits it, making Venus the third brightest star in the sky after the sun and moon and even casting a shadow in dark regions! Thanks to its brightness, it can sometimes be seen with the naked eye in broad daylight. Its apparent diameter varies between 10" ("full Venus") and 63" (inferior conjunction). Cloud cover structures are not to be expected unless you observe in ultraviolet light, which requires a reflecting telescope, a special filter and a UV-sensitive camera.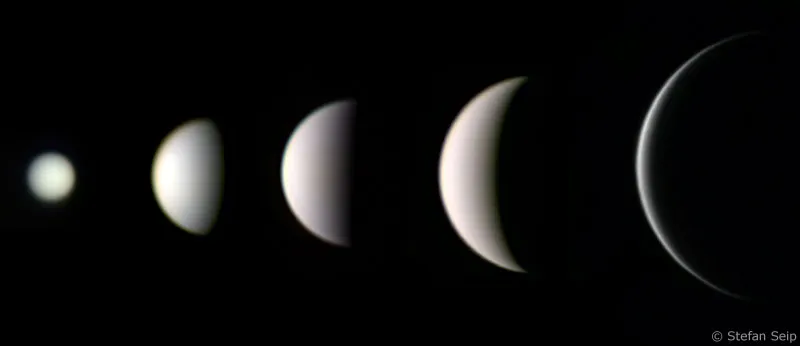
The phases of the planet Venus. On the far left "full Venus" near its upper conjunction, on the right a narrow Venus crescent near its lower conjunction.
After 1882, another Venus transit finally took place on June 8, 2004. During its inferior conjunction, it passed in front of the sun as a dark dot - an impressive sight! The transit lasted longer than six hours.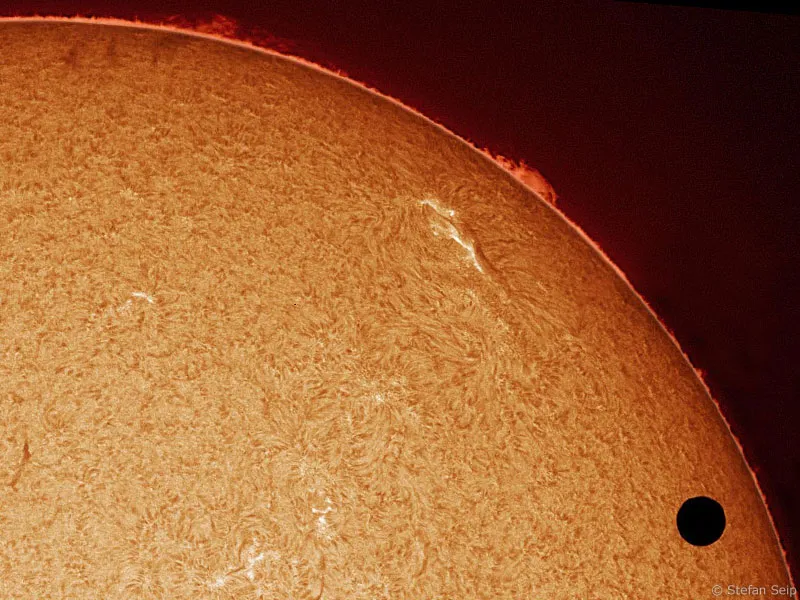
Observing Venus is much easier than observing Mercury because it is at a maximum distance of 48 degrees from the sun as seen from Earth. If it also occupies a position north of the sun in the zodiac, it is visible for up to 4.5 hours after sunset or before sunrise. Venus is commonly referred to as the "evening star" or "morning star".
Venus also occasionally passes in front of the sun as a black disk during its inferior conjunction, which is known as a "Venus transit". Venus transits are rarer than those of Mercury. They take place in a cycle of 243 years. A transit is followed by the next one after 8 years, then again after 121.5 and another 8 and 105.5 years. The last event of this kind after 121.5 years took place on June 8, 2004. The next transit of Venus will follow on June 6, 2012, of which only the end after sunrise can be followed in Central Europe. This will be followed by waiting periods until December 11, 2117 and December 8, 2125.
Venus in figures:
Diameter: 12104 km
Average distance from the sun: 108.2 million km
Orbital period around the sun: 224.7 days
Orbital inclination relative to the Earth's orbit: approx. 3.5 degrees
Distance from the earth: 38.8 to 260.9 million km
Number of moons: 0
Average density: 5.25 g/cm³
The Earth is only listed here in figures for comparison purposes:
Earth in figures:
Diameter: 12742 km
Average distance from the sun: 149.6 million km
Orbital period around the sun: 365.25 days
Orbital inclination relative to the Earth's orbit: 0 degrees
Number of moons: 1
Average density: 5.5 g/cm³
Mars orbits the sun outside the Earth on a relatively highly elliptical orbit. Although it has an atmosphere, it is very weak, so that details on its surface are recognizable. During favorable periods of visibility, even relatively small telescopes reveal the polar caps of frozen carbon dioxide and water ice, whose growth in the Martian winter and melting in the Martian summer can be observed. The surface of Mars appears reddish-orange, which is due to the presence of iron oxide and has earned Mars the name "Red Planet". At high magnification, dark regions become visible that are similar to the continents on Earth and have names. Thanks to these structures, the rotation of the Martian globe can be followed in the telescope.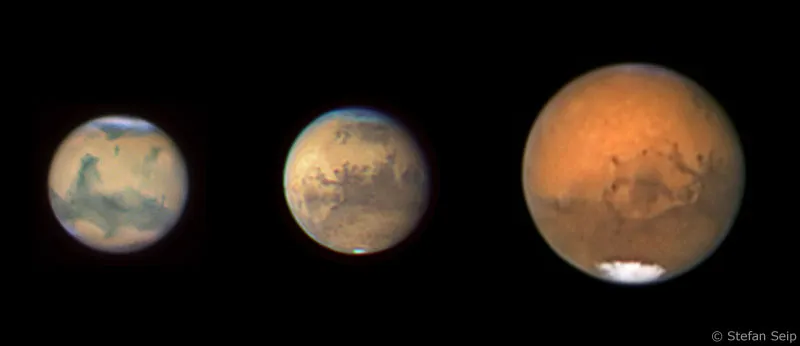
Three different perspectives of the planet Mars. The left image was taken on December 19, 2007, the middle one on October 14, 2005 and the right one on August 22, 2003. All three were taken with a 10-inch Maksutov-Cassegrain telescope, the two on the left with a DMK video camera and a color filter wheel, the one on the right with a Philips ToUCam 740K webcam.
The distance of Mars from Earth is subject to strong fluctuations, which is why its apparent diameter varies from a minimum of 4" to a maximum of 25". But even during its opposition position, which is reached every 780 days, it cannot always be observed optimally, as the elliptical orbit causes large differences. The minimum opposition distance is only 55.7 million kilometers, at which point it appears at an angle of 25". In "bad" oppositions, it is almost twice as far away from the Earth, i.e. only half as far in the telescope. Comparatively unfavorable oppositions lie ahead of us on 29 January 2010 (99.3 million km distance, 14.1" diameter) and on 3 March 2012 (100.8 million km, 13.9"). A particularly favorable one will follow on 27 July 2018 (57.6 million km, 24.3").
Observing the two Martian moons Phobos and Deimos is a challenge for amateurs with larger telescopes due to their small diameters (27 and 15 km respectively).
Mars in figures:
Diameter: 6794 km
Average distance from the sun: 227.9 million km
Orbital period around the sun: 687 days
Orbital inclination relative to the Earth's orbit: 1.85 degrees
Distance from Earth: 55.7 to 400 million km
Number of moons: 2
Average density: 3.9 g/cm³
Jupiter is the largest planet in our solar system - its diameter is around eleven times the diameter of the Earth. While Mercury, Venus, Earth and Mars are Earth-like planets, Jupiter is the first representative of the outer gas planets that do not have a solid, accessible surface. Instead of the surface, we look at its dense atmosphere, which shows a banding of cloud structures even in relatively small telescopes.
Some of these cloud bands are fairly constant, others appear and disappear. One conspicuous and constant detail is a huge whirlwind known as the "Great Red Spot".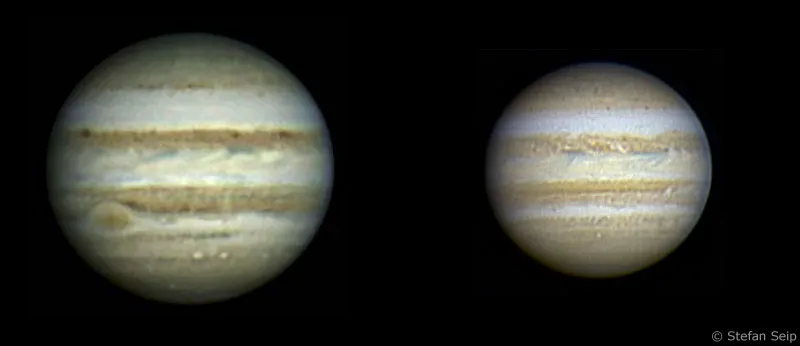
The giant planet Jupiter shines as a photo motif above all due to its high-contrast, highly structured cloud bands. The left-hand image shows the "Great Red Spot", which in reality is more orange in color. Both photos were taken with a 10-inch Maksutov-Cassegrain telescope and a Philips ToUCam 740K webcam, the left one on April 4, 2003, the right one on April 27, 2004.
Even with small telescopes and relatively short focal lengths, the four Galilean moons of Jupiter can be captured. If several images are taken at intervals of hours or days, their rotation around the planet can be observed.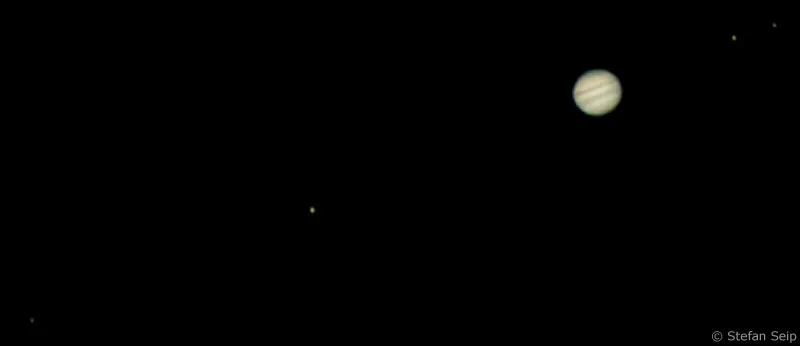
Jupiter is the fourth brightest star in the sky after the sun, moon and Venus. Only rarely does it surpass Mars in terms of brilliance. Its apparent diameter varies between 30" and 50". Its oblateness is clearly visible, which is due to the enormous rotation speed of less than ten hours: the diameter of the pole is significantly smaller than the diameter at the equator. The four largest of its moons, called the "Galilean moons" after their discoverer and named Ganymede, Callisto, Europa and Io, can be observed very well. Their movement around Jupiter can be followed over the course of hours and days. In medium-sized telescopes, you can even see when one of the moons casts its shadow on Jupiter's clouds or disappears into Jupiter's shadow.
As with all outer planets, the opposition position is the most favorable time to observe Jupiter. It is reached every 399 days, when the distance between Earth and Jupiter is minimal, the apparent diameter is at its greatest and the brightness is at its maximum. However, it is not necessary to use the night of opposition directly; visibility conditions are also very good several weeks before and after the opposition.
Jupiter in numbers:
Diameter: 139548 km
Average distance from the sun: 779 million km
Orbital period around the sun: 11.9 years
Orbital inclination relative to the Earth's orbit: 1.3 degrees
Distance from Earth: 558 to 967 million km
Number of moons: 63
Average density: 1.3 g/cm³
Saturn is best known for its magnificent ring system, which can be seen even in small telescopes. However, details only become visible in larger instruments, because even in the best case scenario, around 1.2 billion kilometers separate us from it - even light needs 1 hour and 24 minutes to travel this distance! Like Jupiter, Saturn is a gaseous planet without a solid surface. Its globe is also flattened due to its rapid rotation: It rotates around its own axis in just over ten hours, however, unlike Jupiter, Saturn's rotation cannot be observed directly, as the cloud structures on Saturn do not usually show any striking details, but merely consist of delicate, low-contrast bands of slightly different colors.
The ringed planet Saturn on January 2, 2004 (left), December 20, 2007 (center) and March 21, 2009. It can be clearly seen that the viewing angle of the ring system has become flatter over the years. The two arrows point to two gaps in the ring system, the relatively easy-to-observe "Cassini division" (right arrow) and the wafer-thin "Enke division" (left arrow), which only becomes visible in larger telescopes when the sky is clear. The two photos on the left were taken with a 10-inch Maksutov-Cassegrain telescope, the one on the right with a 90-centimeter Cassegrain reflector. A Philips ToUCam 740K webcam (left image) and a DMK video camera with color filter wheel (center and right) were used. For the image on the right, 2000 individual images were added together to produce the final result!
Saturn's globe appears at an angle between 14" and 20", the rings between 37" and 46", depending on the distance. It reaches opposition every 378 days. The ring system, which for many planetary observers makes Saturn the most beautiful of all planets, consists of countless individual chunks that can be as small as a speck of dust and as large as a detached house. Compared to the diameter of the ring system (272,000 km), the thickness is remarkably low at less than one kilometer.
The ring system is divided into many individual, concentric rings, some of which are separated from each other by gaps. Medium-sized telescopes already show the "Cassini division", while large telescopes also show the "Enke division". The plane of the ring is inclined by almost 27 degrees to the orbital plane, so that the ring can be seen twice exactly from the edge and twice at the maximum viewing angle when viewed from Earth during Saturn's full orbital period around the sun, which lasts 29.5 years. The edge-on position is reached in the years 2009, 2025 and 2038, with a particularly advantageous view of the northern or southern ring surface in between. When the edge-on position is reached, the rings cannot be seen at all for a few days.
Of the now numerous known moons of Saturn, around eight are suitable for observation with amateur equipment.
Saturn in figures:
Diameter: 116900 km
Average distance from the sun: 1432 million km
Orbital period around the sun: 29.5 years
Orbital inclination relative to the Earth's orbit: 2.5 degrees
Distance from the earth: 1191 to 1665 million km
Number of moons: 60
Average density: 0.7 g/cm³
Uranus is so far away from the Earth that it is practically invisible to the naked eye and was only discovered with a telescope in 1781. Like Jupiter and Saturn, it consists largely of gas.
Its apparent diameter is only 3" to 4", so it is not a particularly worthwhile target for amateur astronomical observations. It is in opposition to the sun every 370 days.
In the telescope, even at high magnification, it is only a tiny, greenish disk with no structures. The five largest moons of Uranus can already be captured photographically in medium-sized amateur instruments.
Uranus and four of its moons. To the left of the planet is the moon Umbriel, to the right Ariel, Titania and Oberon. The image was taken on August 28, 2003 with a 10-inch Maksutov-Cassegrain telescope.
Uranus in numbers:
Diameter: 51000 km
Average distance from the sun: 2884 million km
Orbital period around the sun: 84.7 years
Orbital inclination relative to the Earth's orbit: 0.75 degrees
Distance from the earth: 2582 to 3158 million km
Number of moons: 27
Average density: 1.3 g/cm³
Neptune is the last planet in the solar system to orbit the sun at an average distance of 4.5 billion kilometers. It therefore only appears faint and was only discovered in 1846 with the aid of a telescope. It takes 165.5 years to complete one orbit around the sun, meaning that it reaches its opposition position almost once a year, namely every 367.5 days.
But even then, the apparent diameter of the planetary disk is only a meagre 2.3" - too little to see details of its gaseous atmosphere. On the other hand, it is worth trying to photographically recreate its largest moon, Triton.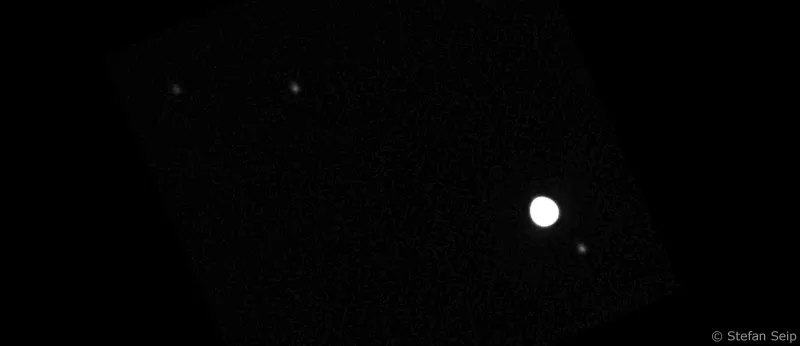
Neptune is the brightest lens in this image from September 17, 2003, and its brightest moon Triton can be seen to the right below the planet. Once again, a 10-inch Maksutov-Cassegrain telescope served as the imaging optics.
Neptune in numbers:
Diameter: 44730 km
Average distance from the sun: 4500 million km
Orbital period around the sun: 165.5 years
Orbital inclination relative to the Earth's orbit: approx. 1.75 degrees
Distance from the earth: 4300 to 4683 million km
Number of moons: 13
Average density: 1.7 g/cm³
Recording technique
As already indicated, the shooting technique for planetary photos differs fundamentally from that discussed in the previous tutorials in the "Astrophotography and Sky Photography" series. A camera system is required that is capable of taking as many images as possible in the shortest possible time, whereby the size of the image sensor plays an absolutely subordinate role. Large sensors are even a disadvantage because we are only dealing with a tiny slice of a planet and a large environment, which essentially consists of black sky, only unnecessarily increases the amount of data to be stored and makes it more difficult to process the images later.
In fact, sensors with an edge length of just a few millimeters are completely sufficient to fully capture a planet at reasonable focal lengths. The number of pixels does not matter either, a simple VGA resolution with 640x480 pixels is sufficient! What counts is the camera's ability to record 10, 20, 30 or even more images per second as a video file. The ideal recording devices for planetary photography are therefore web cameras (webcam) and digital video camera modules (not camcorders).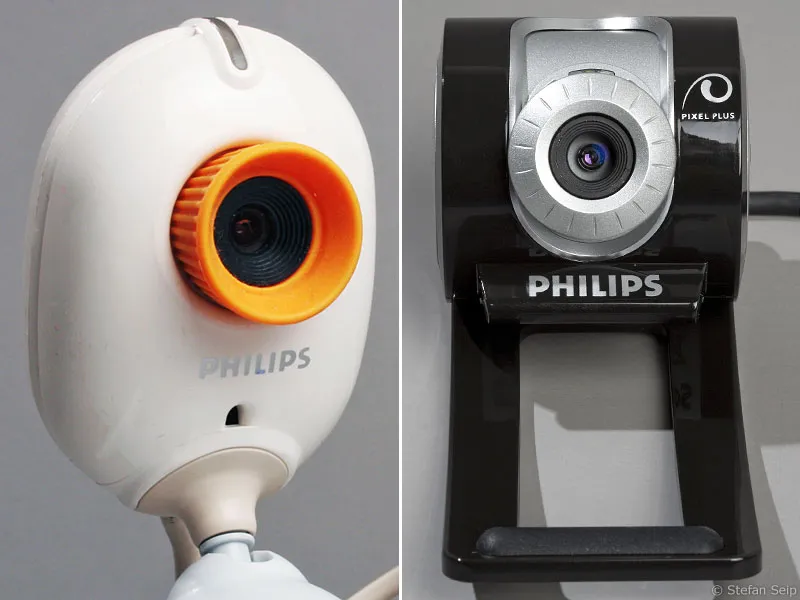
The webcam models Philips ToUCam 740K (left) and its successors up to the SPC 900 NC (right) are unfortunately only available second-hand. They have a real CCD sensor instead of the usual CMOS sensor, which is advantageous for planetary photography.
A webcam is the cheapest solution and can be purchased for just over 100 euros including the necessary accessories. Preference should be given to models with a real CCD sensor rather than a CMOS sensor. Unfortunately, Philips, which used to offer such a model, has discontinued production and now only offers devices with a CMOS sensor. If you have the opportunity to get hold of a used "Philips ToUCam Pro II PCVC 840 K" or "Philips ToUCam SPC 900 NC" webcam, this would be a good choice, as both models have a CCD sensor.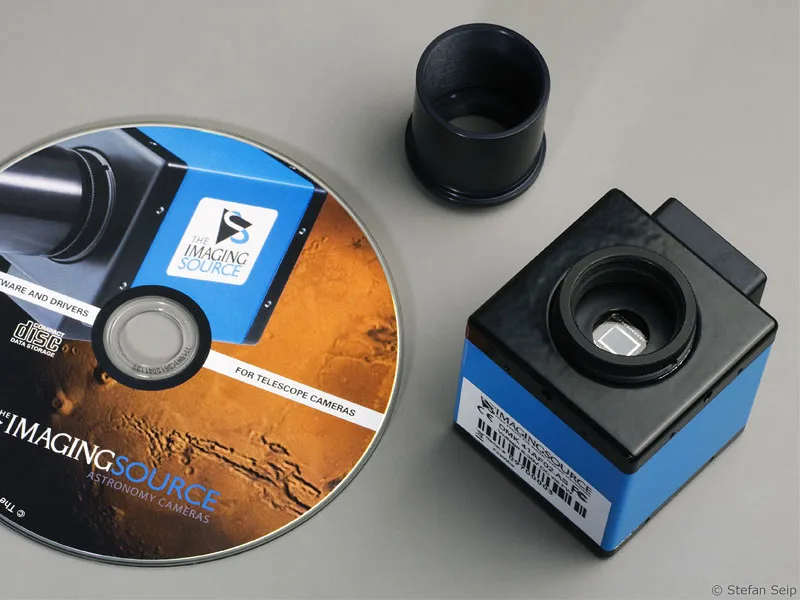
A DMK video module from the manufacturer ImagingSource delivers better image quality than a webcam, but also costs considerably more. The model shown here only provides black and white images and is also connected to a telescope via a 1.25-inch sleeve (top).
Ready-to-use DMK 21AF04 video camera, which transmits the images to the computer via a Firewire interface. A color filter wheel with a red, green and blue filter is also installed to obtain color planetary photos: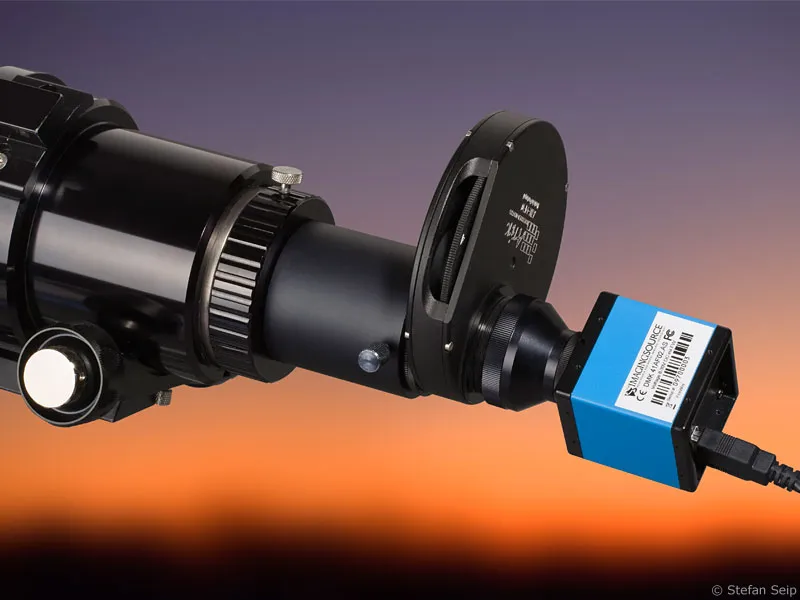
If you prefer a brand-new camera, the only remaining option is the "Celestron NexImage CCD camera"(link), whose inner workings correspond to those of a webcam, but which is supplied ready for connection to a telescope.
With the Philips products mentioned, the lens of the webcam must be removed and replaced by a telescope adapter with a diameter of 1.25 inches so that the camera can be inserted into the focuser instead of an eyepiece. If it is a refracting telescope, the use of an IR/UV filter may also be useful to prevent blurring.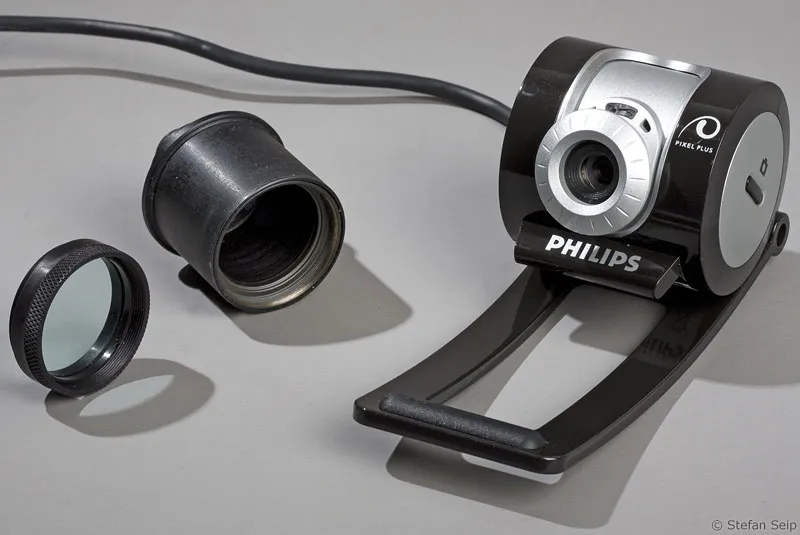
To make a webcam suitable for astrophotography, you will need a UV/IR blocking filter (far left, particularly important for refractors) and a webcam adapter (center).
The lens of the Philips SPC 900 NC is carefully removed with a box cutter, as it is not needed for planetary photography: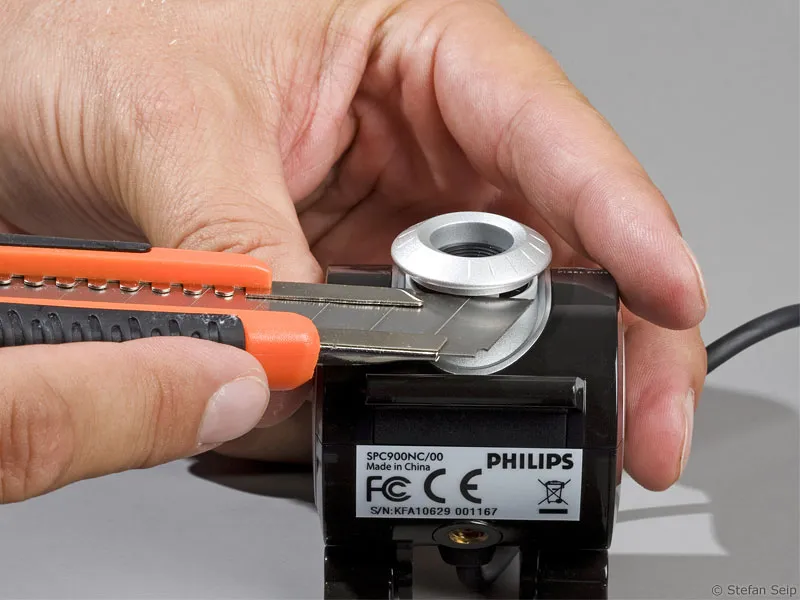
As a replacement for the removed lens, the webcam adapter is screwed into the lens thread so that the camera can be attached to the telescope's focuser.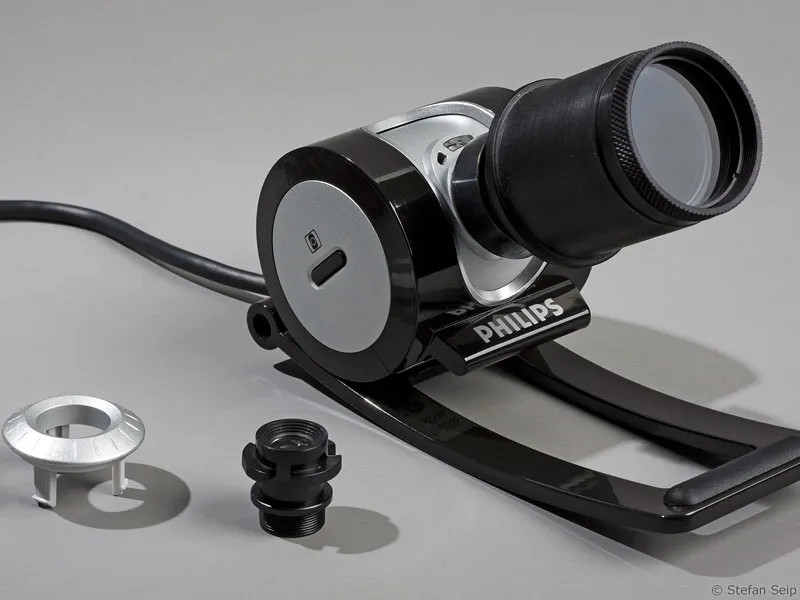
The 1.25 inch diameter webcam adapter is inserted into the focuser instead of an eyepiece.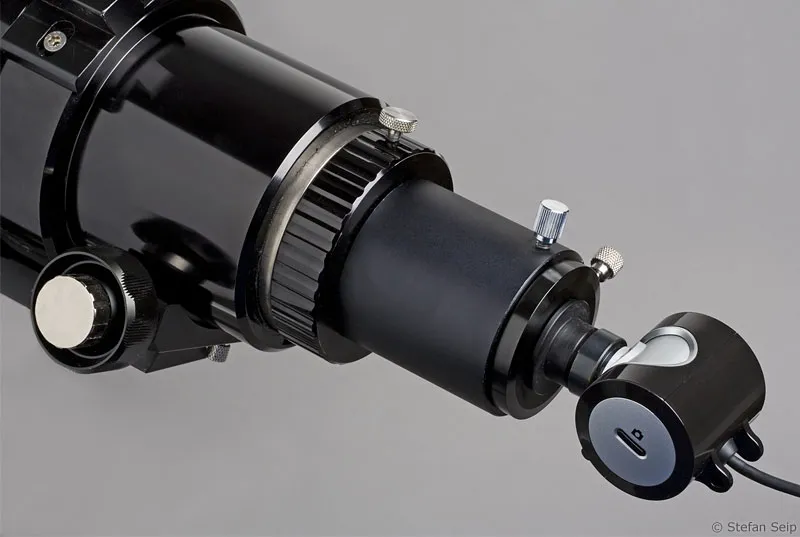
As webcams are not optimized for maximum quality of the individual images, but for the generation of a continuous video stream, the use of a digital video module is a good way to improve this. This makes it possible to obtain uncompressed individual images in the recorded videos, albeit at a much higher price. A recommended manufacturer of such video modules is ImagingSource(link).
Recording planetary videos
First of all, the optimum recording focal length should be determined, which depends on the resolution of the telescope (i.e. its aperture) and the pixel size of the camera. Typically, the sensors in webcams have pixels with an edge length of around five thousandths of a millimeter. The best focal length is achieved when the aperture ratio is around 1:20, although this may be generously rounded.
In other words, the focal length should be approximately 20 times the aperture. If it is shorter, the theoretical resolving power of the telescope cannot be used. If it is longer, the planetary disk will only become larger and fainter without more details becoming visible. What is particularly tragic in the latter case is that the exposure time for the individual images is unnecessarily extended and it becomes more difficult to use moments with low air turbulence for sharp individual images.
Example: If a telescope with an aperture of 150 millimeters is used, the optimum focal length would be 150mm * 20 = 3000mm, i.e. 3 meters. If the primary focal length is smaller, it is brought to the desired value using a Barlow lens, which is attached between the telescope and the camera.
The exact formula for the denominator of the best focal ratio is calculated by dividing the diameter of the pixels by the constant 0.00028. Example: The pixels of your camera have an edge length of 4 thousandths of a millimeter (= 0.004mm). 0.004 divided by 0.00028 gives the rounded number 14, i.e. the target focal ratio should be approximately 1:14.
The telescope is now aligned with the planet and viewed through an eyepiece. The motorized fine movement of the mount brings the planet exactly into the center of the image. Now remove the eyepiece and replace it with the webcam. A long exposure time and high image amplification (often referred to as "gain") should be set in the control software for the camera in order to recognize the planetary image on the computer screen, which is still very blurred at this point. The video recorded by the camera can be followed live on the screen, so focusing is not a major problem. The sharper the image becomes, the brighter it gets, so the exposure time and gain must be reduced in steps to avoid overexposure.
Before saving a planetary video, be sure to switch off the sound transmission of the camera so that the audio data does not waste valuable bandwidth.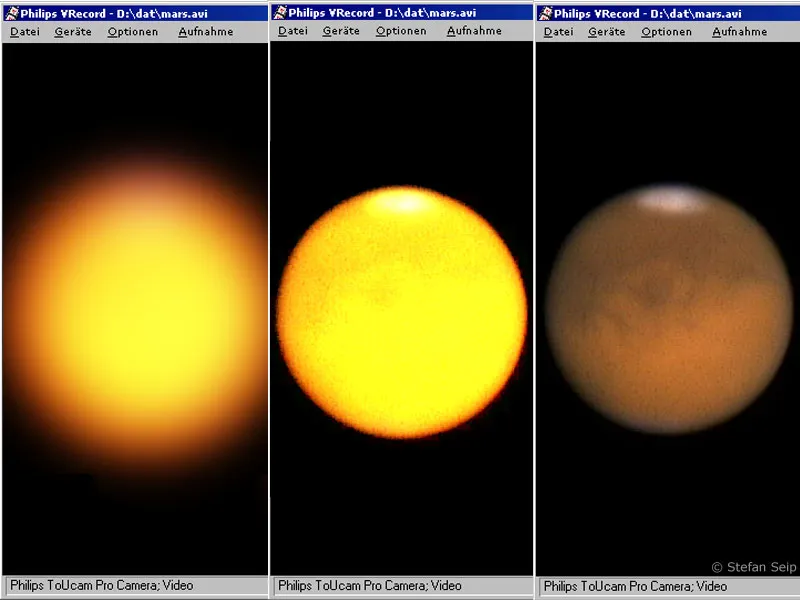
Screenshots of the "Philips VRecord" software supplied with the Philips ToUCam 740K. On the far left you can see the planet Mars after the eyepiece has been replaced by the webcam; the image is still completely blurred. In the center you can see the state after focusing, whereby the image is still heavily overexposed. On the far right, the exposure and white balance have been adjusted.
Once the planet is in focus on the screen, it's time to make the fine adjustments. It is important to find a good balance between the exposure time of the individual images on the one hand and the electronic image intensification on the other. Be sure to switch off the camera's automatic exposure function so that you can make all the settings yourself. Short exposure times make it easier to "freeze" moments with little air turbulence, while high image intensification leads to pronounced noise in the captured images. A compromise must be found depending on the brightness of the planet and the observation conditions with regard to air turbulence. Overexposure should be avoided in any case, as this saturates some pixels and image information is irretrievably lost. Strong underexposure is also not advisable, as this makes the signal-to-noise ratio less favorable.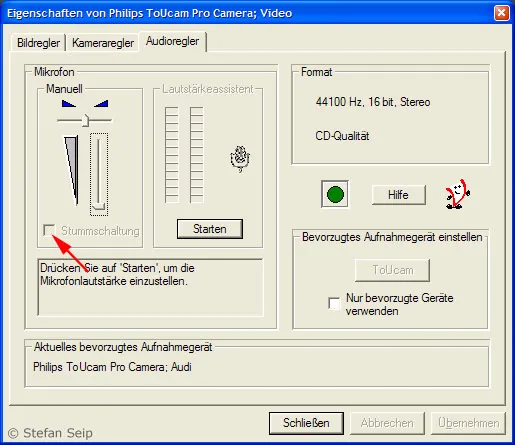
The sound recording should be switched off ("mute") in the webcam driver software. The appearance of the corresponding dialog box may vary depending on the camera model used.
Camera control of the Philips ToUCam 740K. It is important to switch off the automatic control of white balance and exposure. The color controls (top) and the controls for exposure time and gain (bottom) can then be set manually.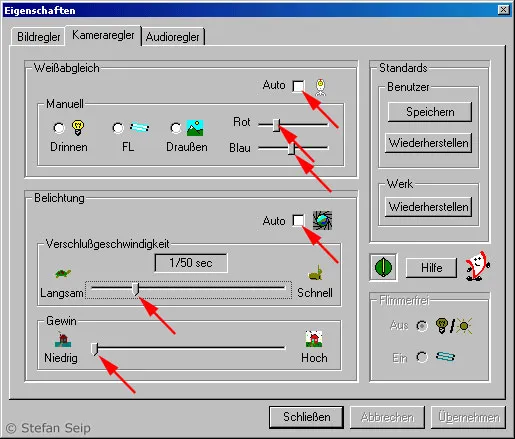
Image control of the Philips ToUCam 740K. The fully automatic setting must also be deactivated here. The frame rate, brightness and contrast are then adjusted manually until the visible image of the planet appears as natural as possible.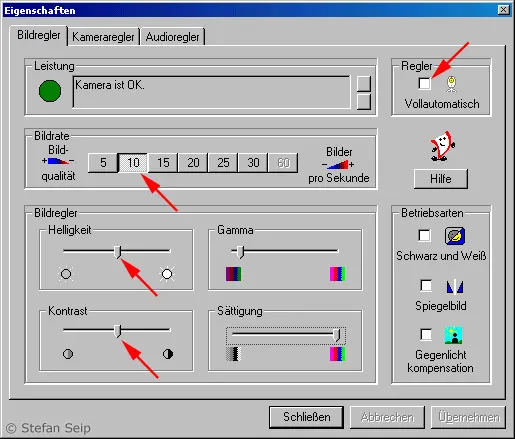
The next step is to adjust the white balance. There are one or two color controls for this, which you simply adjust until the color impression on the screen roughly corresponds to the visual impression at the eyepiece.
The last decision concerns the refresh rate. Do not set a value above 30 frames per second for webcams, because the image data must then be very heavily compressed in order to be able to transfer the amount of data to a computer, which in turn reduces the image quality. Ten or twenty images per second are sufficient.
Now record a video, preferably in AVI format. Limit the length of your video to a maximum of 4-5 minutes so that the resulting file is not too large, which makes further processing more difficult. It is better to record several shorter videos one after the other with different settings. For planets whose surface features are in motion due to planetary rotation, the length of the video should not exceed four minutes. This is the case with Mars and Jupiter.
Processing the videos
At the end of the recording, you will have a video file showing the planet. Due to the turbulence in the air, not all of the individual images contained in it are equally sharp. Therefore, in the following step, the sharp individual images must be selected and precisely aligned so that they can be combined into a sum image with an average value calculation. The summation is necessary to reduce the image noise, which in turn enables the planetary image to be sharpened.
Selecting the sharpest individual images is a tremendous amount of hard work when you consider that a 4-minute planetary video consists of 2400 individual images at ten frames per second! Fortunately, this step does not have to be carried out manually, but can be done with special programs that are available as freeware on the Internet. Two of these programs should be mentioned:
GIOTTO(http://www.videoastronomy.org/giotto.htm) and
Registax(http://www.astronomie.be/registax/).
The procedure with the "GIOTTO" software is described below. You can follow the steps if you download the software and install it as described on the website mentioned. In addition, download the exercise file "MarsDemo.zip" for this tutorial, which contains the unzipped video "MarsDemo.avi". For reasons of file size, the video consists of only 100 individual images of the planet Mars, taken on August 22, 2003 with a 10-inch telescope and a Philips webcam.
It is best to watch the video first with a media player. Then you will realize that the image quality fluctuates greatly due to air turbulence. Here are two individual shots from the video, showing a particularly blurred and a fairly sharp individual image: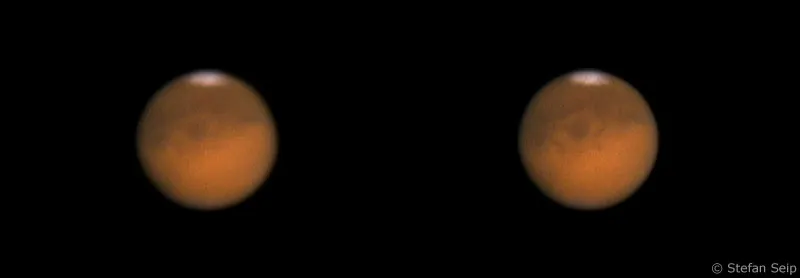
Two individual shots from the exercise video "MarsDemo.avi". On the left you can see a blurred individual image due to the air turbulence, on the right a much sharper one.
After starting GIOTTO (version 2.12), the following screen appears: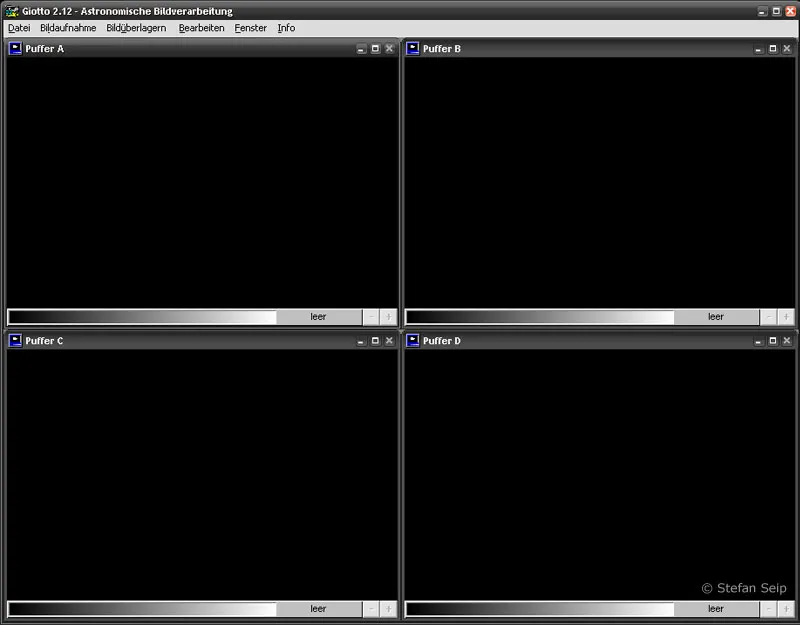
Start screen of the freeware "GIOTTO". Four image windows (buffers A - D) are available.
Select the command Overlay images/automatically overlay images... This dialog box then appears: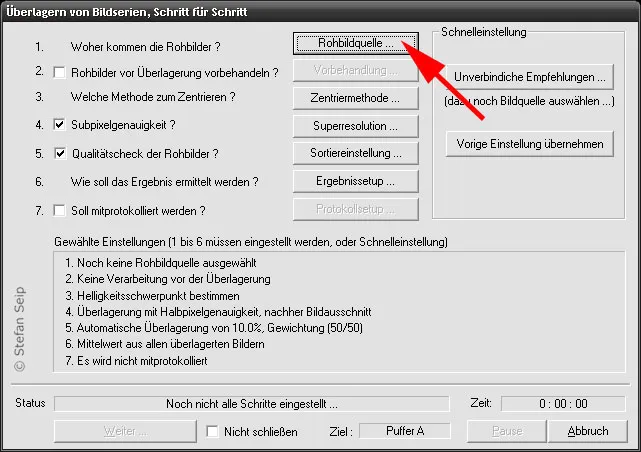
GIOTTO software: A planetary video is processed into a finished single image in seven steps.
Now proceed step by step and work through points 1 to 7. First of all, the software wants to know where the raw images come from. So click on the Raw image source... button. Select All single images in AVI file and Digicam/Webcam/Scanner/CCD camera (Non Interlace) and confirm with Apply: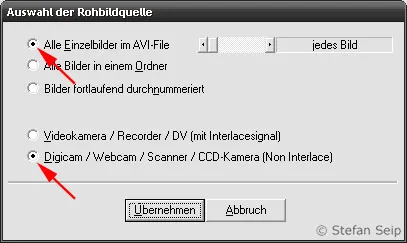
GIOTTO software: Select the raw image source.
We can skip point 2 (Pre-treat raw images before overlaying?) (remove the tick from the selection box if necessary) and move on to point 3 (Which method for centering?). This allows you to specify the method that GIOTTO should use to superimpose the planetary images precisely. Decide on Search for brightness focus (bright individual objects) after you have clicked on the Centering method... button: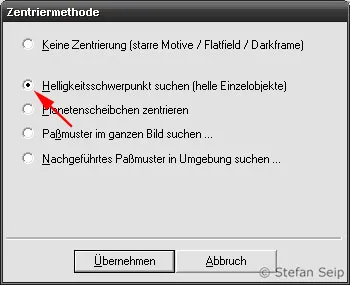
GIOTTO software: Selecting the centering method. The selection "Search for center of brightness" usually provides better results than "Center planet disk".
In step 4, "Subpixel accuracy", click on the Superresolution... button and decide in the corresponding dialog box to double the resolution (half pixels) and then to cut out the motif; the image size is retained. This setting causes GIOTTO to double the size of all individual images before overlaying, which increases the precision of the overlay.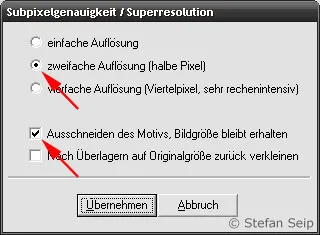
GIOTTO software: After selecting "double resolution", GIOTTO can work with sub-pixel accuracy.
Now we turn to point 5, the quality check of the raw images. Click on the Sort setting... button to specify what percentage of the images should be used and the rest discarded. As the exercise video only contains 100 individual images, we want to use 70 percent of the images, which can be set using theUsage rate slider. Also important is the weighting of sharpness and distortion, which is defined with the Sharpness/Distortion slider. Decide on 70% sharpness and 30% distortion.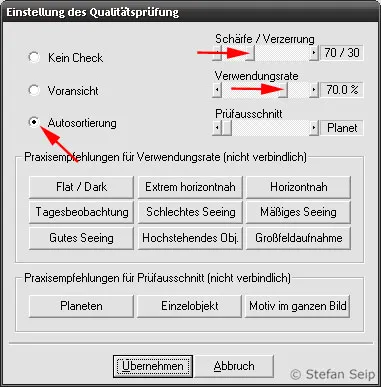
GIOTTO software: The weighting of sharpness and distortion as well as the usage rate must be adjusted depending on the nature of the planetary video. The buttons in the "Practical recommendations" box offer useful suggestions.
Depending on the nature of the video in question, it may be necessary to change these values. If videos recorded in turbulent air contain only a few sharp individual images, the usage rate should be drastically reduced. If the turbulent air also caused many distorted planetary images, give more priority to distortion and less to sharpness. The sliders are moved to defined, suggested positions when you click on the buttons below the given "Practical recommendations" in the dialog box.
Continue with point 6: How should the result be determined? Clicking the Result setup... button opens a corresponding dialog box in which you must select Means. Averaging stands for an arithmetic average calculation of the selected and centered frames: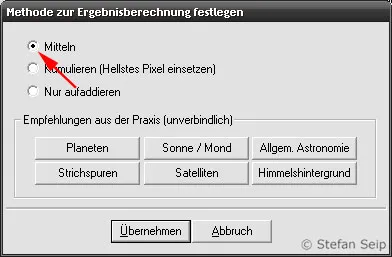
GIOTTO software: After selecting the sharpest individual images and aligning them, the planetary images should be averaged.
Point 7 can again be omitted, so that the Next... button must now be pressed. If it is not available, clicking the Accept previous setting button can solve the problem.
After starting the procedure, the program will first ask you to select the video file (in our case "MarsDemo.avi") and then spend some time calculating, with the progress displayed as a percentage.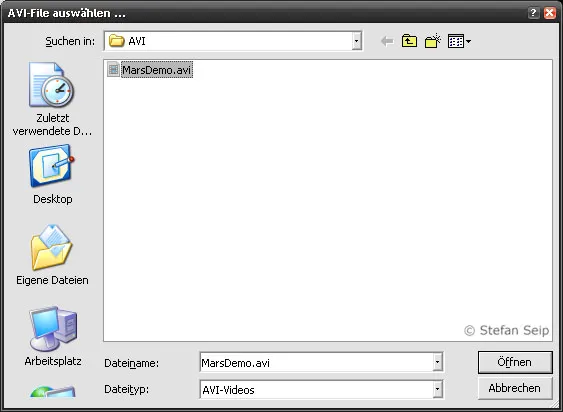
GIOTTO software: Selection of the planet video.
GIOTTO software: Depending on the number of individual images to be processed, video processing takes a certain amount of time. During this time, GIOTTO displays status messages (arrows).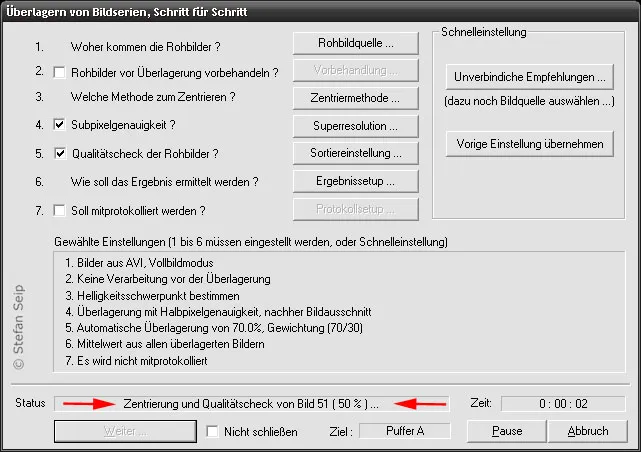
Once the work is complete, the result appears in the "Buffer A with sum image" window.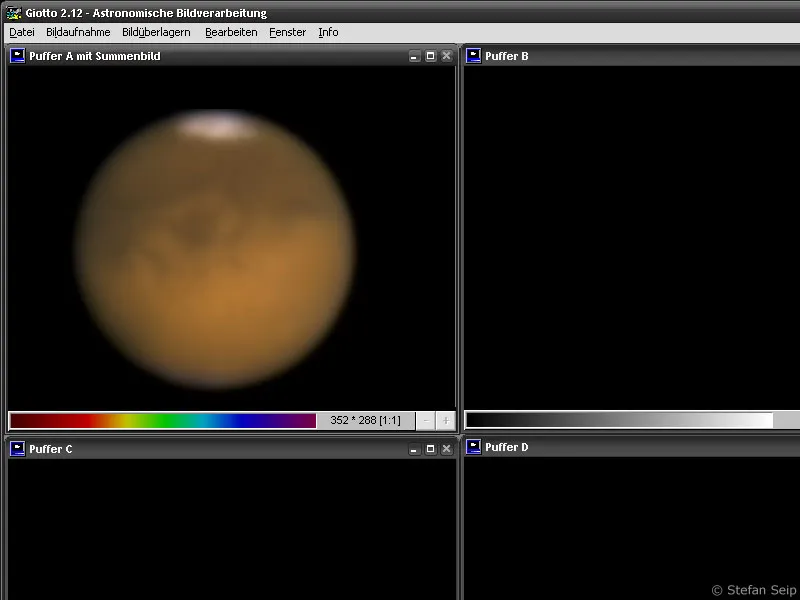
GIOTTO software: Display of the summary image.
At first, this image looks blurrier than a sharp individual image from the video, but the electronic image noise is considerably lower. This in turn enables us to apply sharpening filters. Let's try this and select the Edit/Sharpen and Filter... command in GIOTTO. In the dialog box that appears, select the Sharpen only tab, set the parameters shown in the following illustration and select Buffer B as the target. If you change a sharpening parameter, the preview window will only be updated after a relatively long waiting time, which is required to calculate the preview image.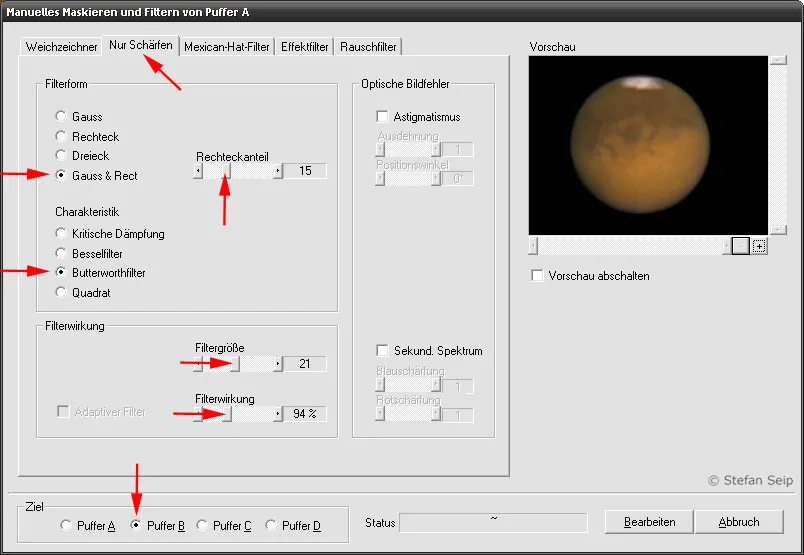
GIOTTO software: The sharpening of the sum image must be finely controlled with many parameters in order to avoid over-sharpening, which creates unwanted artifacts. The preview image makes this work much easier.
Use the Edit button to start the sharpening routine, the result of which is then displayed in the "Buffer B" window.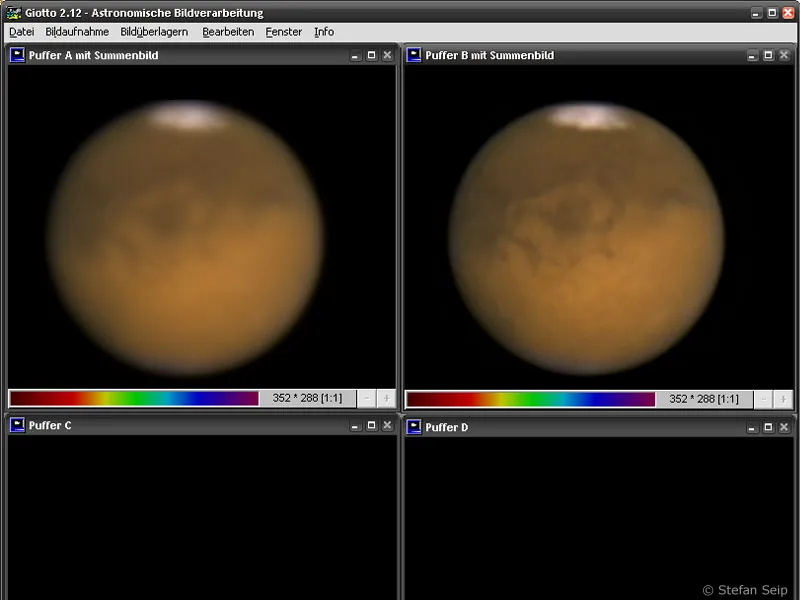
GIOTTO software: Display of the sharpened sum image in buffer B.
Before saving, make sure that the graphic format settings are correct. To do this, select the command File/Graphic formats... in GIOTTO and set the options Uncompressed and 16 bit in the TIFF section:
Software GIOTTO: Configuration of graphic formats. Only TIFF and FITS work without loss, which is important if the planetary photo is to be further processed with other software.
With the command File/Save image... you can save the contents of the four file windows separately, preferably in a lossless format (e.g. TIFF).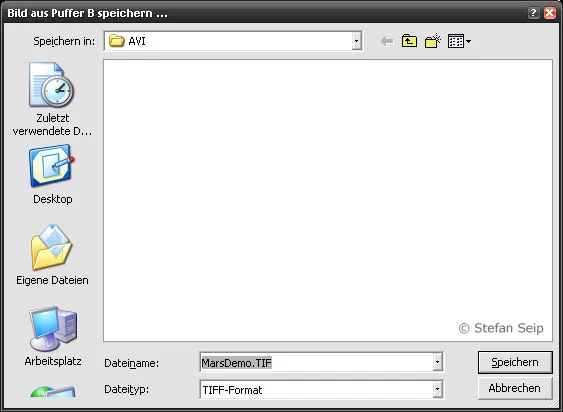
GIOTTO software: Saving the sharpened sum image in TIFF format.
If desired or required, you can then open such an image in TIFF format in another image editing program to carry out the final editing steps.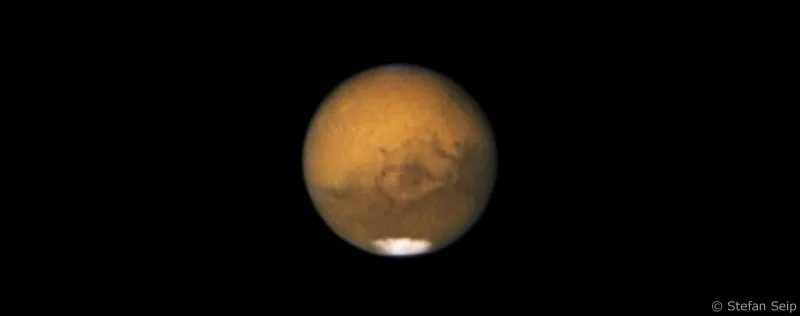
Finished Mars image from the exercise file "MarsDemo.avi" after minor adjustments to alignment, gradation and coloring have been made in Adobe Photoshop.
Tube of the 10-inch Maksutov-Cassegrain telescope used to take many of the planetary photos in this tutorial. A Canon EOS 1D is shown as a size comparison: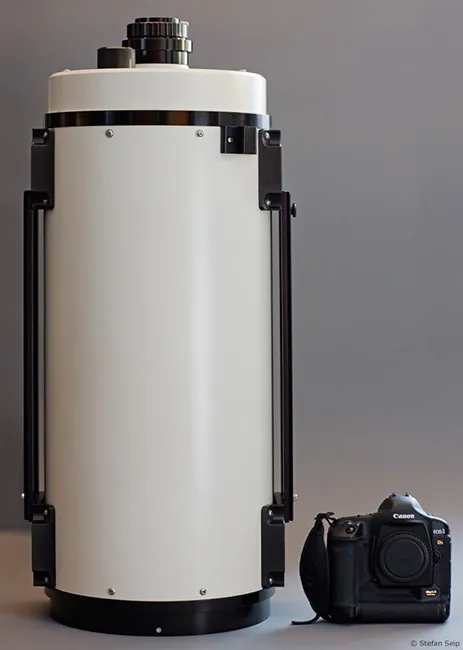
Note on our own behalf: All the image examples used were taken in the manner described in the tutorial.
The only exception: The title image is a photomontage of planetary images that you took yourself.
Continue with part 15: "Calibration: taking bright field and dark images"
