Schematic diagram of the calibration: The final result is obtained after a dark image has been subtracted from the raw image and divided by a bright field image.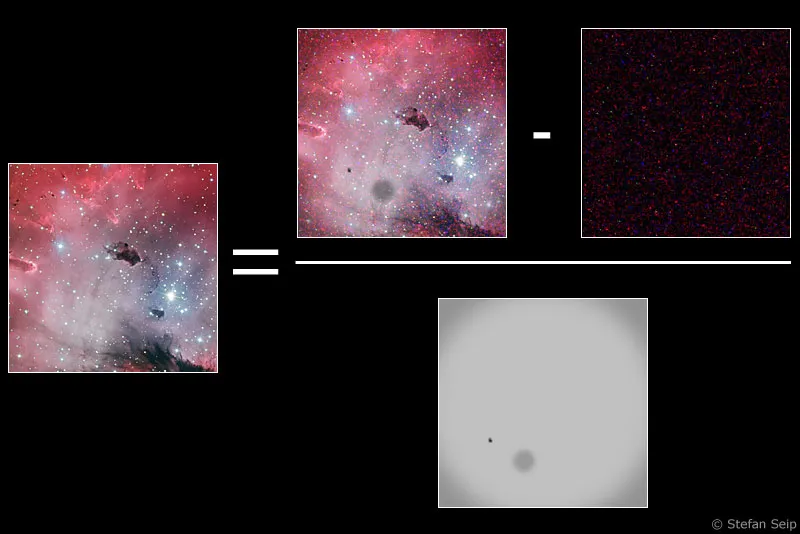
Part 15: Calibration: Taking bright field and dark images
Digitally captured astrophotos not only contain the unprocessed data provided by the photographed celestial object, but also a number of artifacts, i.e. unwanted phenomena. The term "calibration" refers to the process of removing these artifacts from the raw images.
Cause of the artifacts
Let us first look at which components are responsible for the formation of artifacts and what kind of unwanted information they generate:
1. the camera
The image sensors of digital cameras and their readout electronics lead to a more or less pronounced "image noise", which is particularly easily recognizable by a "grainy" structure of the images in uniformly bright or dark areas. A distinction is made between brightness or luminance noise, in which the pixels of equally bright subject areas randomly take on different brightness values, and color noise, in which pixels that actually show a subject of the same color have slightly different color reproduction. Electronic image noise has various causes. One of the main reasons is the so-called thermal noise, caused by processes on the sensor that depend on the temperature and spontaneously lead to the generation of "charge" in the pixels, which is later interpreted as brightness information. This noise component therefore also occurs if the sensor is not exposed at all, i.e. no light hits the sensor during the "exposure time". The term "dark current noise" was coined for this.
The amount of noise is largely dependent on the following factors:
a) Temperature (more noise at higher temperatures)
b) Exposure time (the longer the exposure time, the higher the noise)
c) ISO value (more noise with increasing ISO number)
The type of sensor used, the noise reduction software used in the camera and the readout noise caused by the electronics that measure the sensor data after the exposure should also be mentioned. However, as these factors depend on the camera and cannot be influenced by the photographer, we will not go into them in detail.
In addition to noise, individual pixels whose brightness values deviate greatly from those of their surroundings are noticeable in digital image sensors. For example, if a single pixel does not react at all to incident light, it always remains black and is referred to as a "dead pixel" or cold pixel. Other pixels, on the other hand, react much more sensitively to incident light than the others, so they quickly take on very high brightness values or even reach full saturation, in which case they appear white.
These abnormal pixels are called "hot pixels". Both "dead" and "hot" pixels are practically unavoidable in the manufacture of sensors, so a certain number of these faulty pixels must be accepted. As the sensor ages over the course of several years, the number of affected pixels may well increase.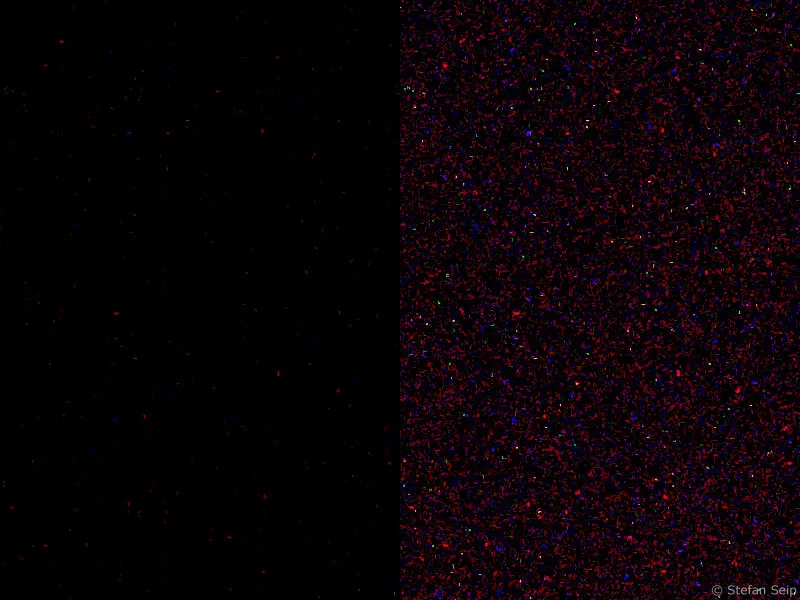
Detail of a dark image taken with a Canon EOS 450D at ISO 100 (left) and ISO 1600 (right). The exposure time was ten minutes. You can clearly see how the overall noise increases with a higher ISO value. Both image sections were brightened in the same way to make the noise clear.
2. the optical system
No telescope or lens provides a perfect image. The further you move away from the optical axis, the more visible aberrations become. The corners of the image are particularly affected. However, calibration cannot eliminate these aberrations. We therefore want to concentrate on those phenomena that can be combated by calibration.
The first is vignetting, i.e. the darkening of the image corners. Vignetting is particularly pronounced when using photo lenses with a full aperture. On the one hand, vignetting can be kept within limits by stopping down. On the other hand, stopping down also leads to an increase in the required exposure time, which is often undesirable for astrophotography. And since, for physical reasons, telescopic lenses also deliver a higher image brightness on the optical axis than in the image corners, vignetting is one of the practically unavoidable phenomena of astrophotography. The larger the image sensor of the camera used, the greater the risk of vignetting occurring.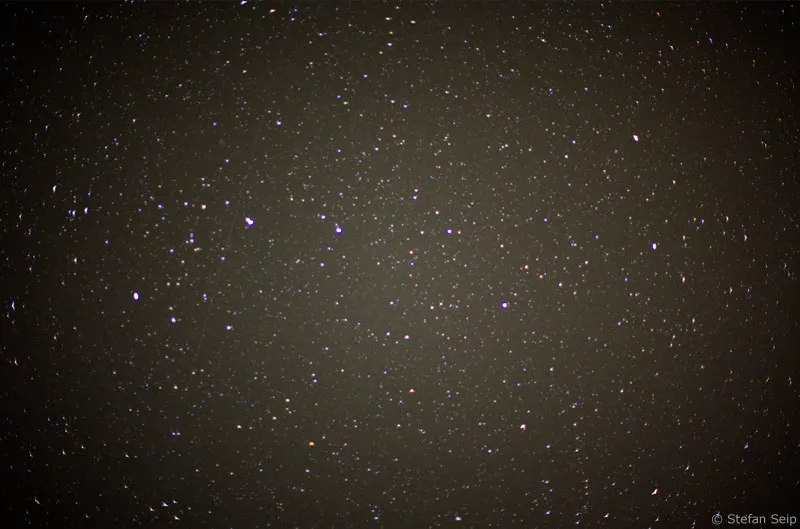
Image of the constellation "Big Dipper" with a fast 50-millimeter lens and open aperture. The vignetting in the form of darkened image corners is unmistakable.
In extreme cases, light can no longer reach the outermost corners of the sensor, for example if a component with too small an internal diameter is used in the optical path or the optical system simply illuminates too small a field of view. The image corners then remain black and can no longer be saved by calibration.
Secondly, dirt particles that have settled on the sensor or a lens or mirror of the optical system are imaged. Careful cleaning of the camera and optics can minimize the appearance of dark spots on the photo, but never completely prevent them. The smaller the distance between a particle of dirt and the sensor, the sharper it will appear in the photo. Particles that have settled directly on the protective glass in front of the sensor therefore appear almost razor-sharp.
Dust on the front lens, on the other hand, is not critical, whereas contamination of the rear lens of a lens can certainly leave visible traces on the photo. When using a reflecting telescope, dirt particles may appear on the image in the form of dark rings, as their blurred image takes on the shape of the entrance pupil, which is ring-shaped in reflecting telescopes due to the secondary mirror in the beam path.
Dirt in the beam path becomes visible in the form of dark spots. The three upper spots are particles lying on the sensor. The lower speck of dust is rather blurred and is located on a lens of the objective used: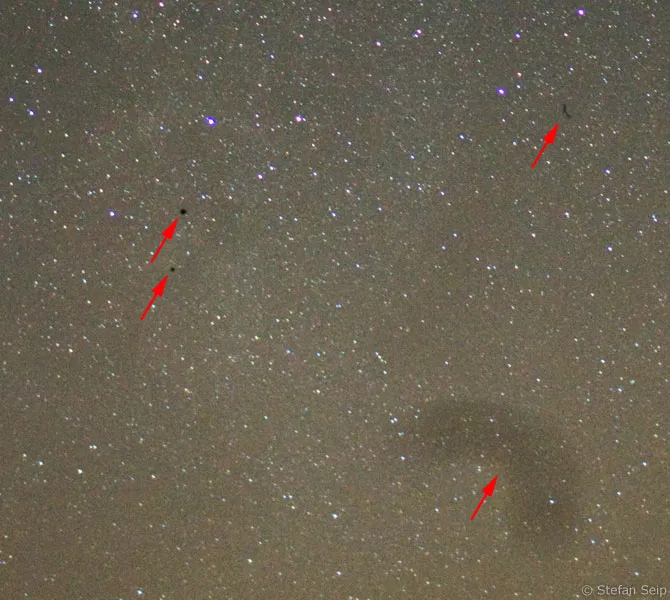
On the left image of the Milky Way, I discovered a thread of dust that was imaged quite sharply and had settled on the protective glass of the sensor. After using the sensor cleaning function in the camera menu, the troublemaker disappeared (right):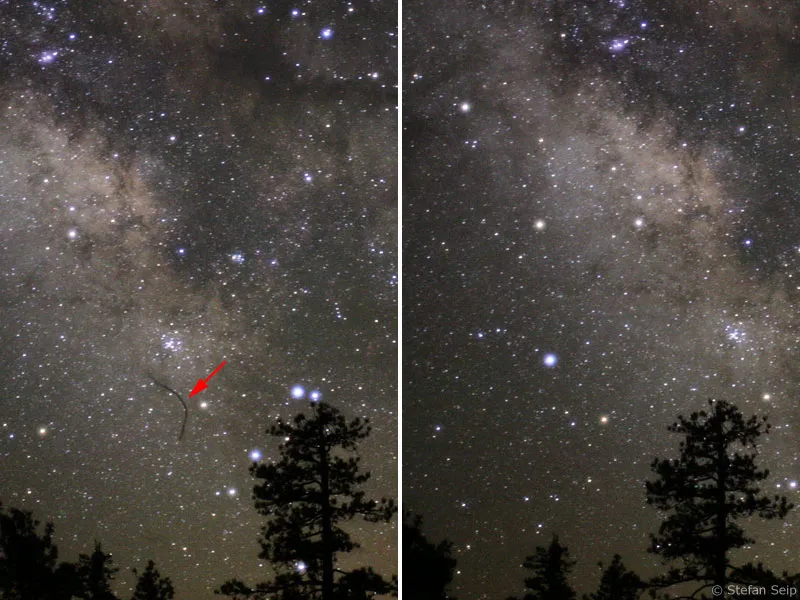
The sensor cleaning function built into many cameras attempts to "shake off" dirt particles lying on the protective glass in front of the sensor by means of high-frequency vibrations. This does not always work perfectly, but the usefulness of this function is beyond question (see the following image example).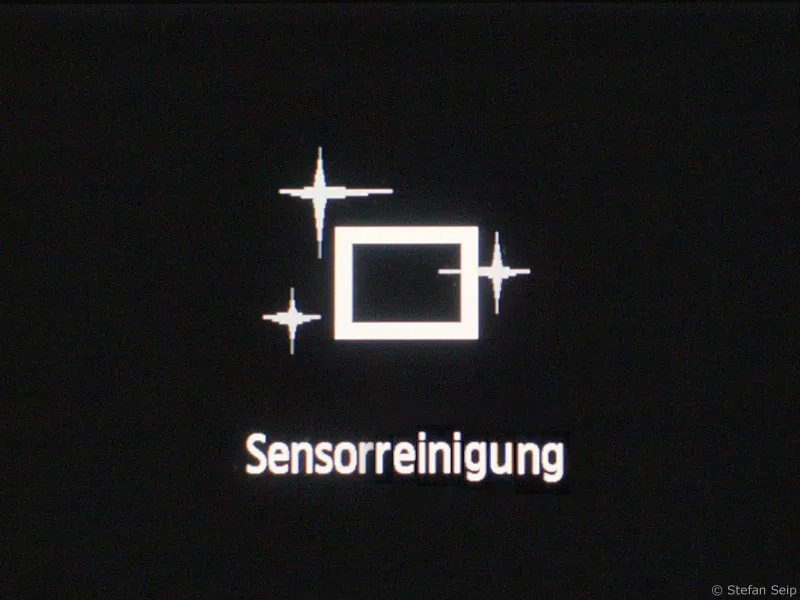
Taking pictures for calibration
The discussed artifacts can be eliminated or at least mitigated if an image calibration is performed. Two types of calibration images must be created for this purpose:
1. dark frames
Dark frames are "exposed" for exactly the same amount of time as the actual sky images. However, care is taken to ensure that no light reaches the sensor, for example by putting on the front lens cap!
The result is not a completely black image, as the dark image contains all the dark current noise. This is based on the assumption that this dark current noise is identical to that of the sky image. Such an assumption is risky, because the noise always contains a statistical, unpredictable component. Fortunately, however, this component is relatively small in amount, so that the above assumption is correct to a first approximation.
Section of a dark image taken with a Canon EOS 1000D at ISO 1600 with ten minutes of "exposure" time. On the left the unchanged image, on the right the result after increasing the tonal values with Photoshop (command Image>Adjustments>Gradation Curves...)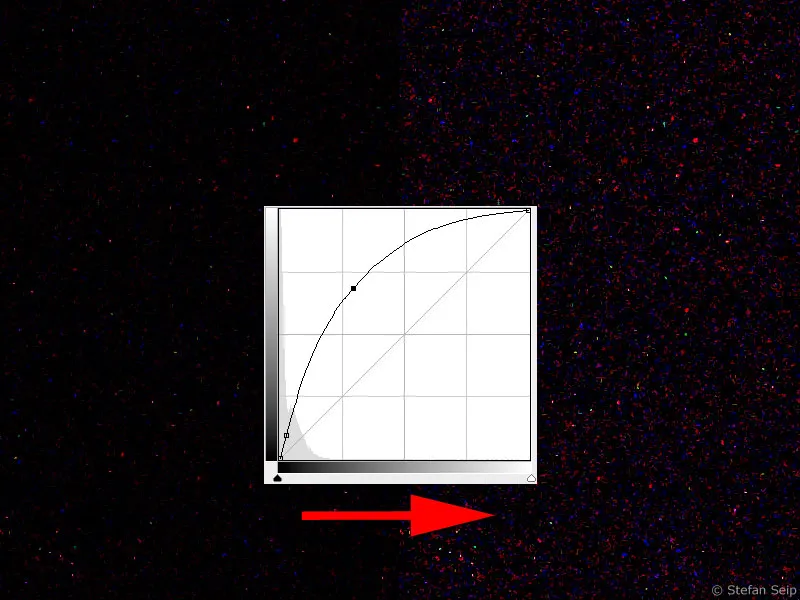
The idea now is to use the dark image to capture only the noise component and then subtract this from the later sky image. In this way, the noise should disappear or at least be reduced. At the same time, all hot pixels that still contain usable data, i.e. are not completely saturated, are repaired. Dead pixels and fully saturated pixels, on the other hand, cannot be "repaired" by a dark image.
In order to produce "suitable" dark images, all general conditions on which the dark noise depends must be as identical as possible to those of the sky images. This means that not only the exposure time, but also the ISO value must not be changed compared to the sky images. One problem is the temperature of the sensor, which cannot be regulated on most cameras (such as all digital SLR cameras). This means that the dark images must be taken as close in time as possible to the sky images, i.e. either shortly before or immediately after. As the sensor heats up during longer exposure times, several dark images taken at different times and averaged later will improve the result. For example, you could take a dark picture before and a second one after a series with several long exposures.
Practical example:
You want to take a picture of the Ring Nebula in the constellation Lyra with a digital SLR camera. To do this, you plan eight exposures of ten minutes each. Then first switch off all the noise reduction options offered in the camera menu! This explicitly applies to the item "Noise reduction for long exposures", because otherwise the camera would automatically create a dark image with the same "exposure time" after each exposure, which would cost valuable observation time. You would then have to invest half of the observation time for the automatically created dark pictures.
After switching off this function, you first take a dark image with all the settings that you also want to use for the sky image. This is followed by the series of eight ten-minute exposures, followed by another dark frame. To take the dark images, place the lens cap on the lens or telescope. The two dark images are then averaged later and subtracted from all sky images. Both the sky and the dark images must be taken in RAW format, otherwise the calibration will not work.
2. bright field images (flat frames)
Flat-field images are created when you photograph a uniformly bright surface. Of course, you must use the same lens that you use to take the sky images.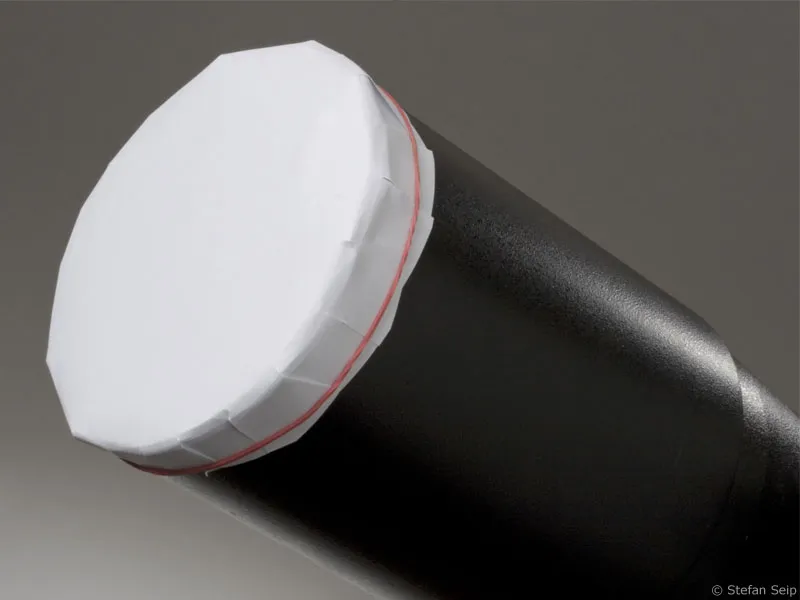
To obtain a bright field image, you can attach a piece of paper in front of the lens. This paper is then illuminated as evenly as possible, for example with a flashlight.
This produces an image that shows both the vignetting and the dirt particles in the light path. If the sky images are later divided by the bright field images, these artifacts can also be removed.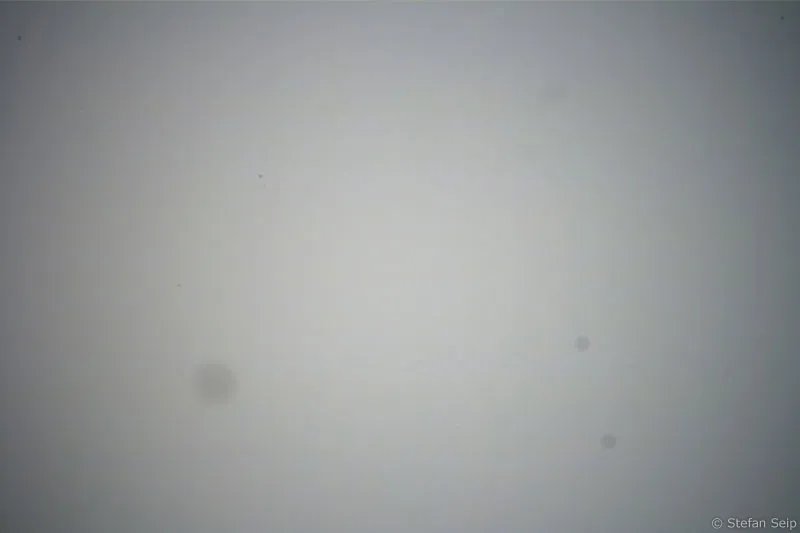
Typical bright field image. It contains the vignetting (dark image corners) and the dirt in the light path (spots).
Ideally, bright field images are taken at the lowest possible ISO value and short exposure time in order to avoid introducing additional dark current noise.
A practical example:
You already have the images of the ring nebula discussed in the "Dark images" chapter and the matching dark images "in the box". Now you would also like to create bright field images. First of all, it is very important that the arrangement of the camera and lens remains absolutely unchanged! So do not remove the lens from the camera or the camera from the telescope and do not change the focus under any circumstances! To ensure that the dirt particles are imaged on the same part of the sensor as in the sky images, it is even advisable not to even touch the camera. Controlling the camera via a connected laptop is definitely preferable if this option is available.
It is particularly critical if the connection of the camera to the telescope or its focuser is not particularly stable. Now the question is where you can find a uniformly brightly lit area at night. One possibility would be to place a semi-transparent material (e.g. a piece of paper) in front of the front lens of the objective or telescope, which is then illuminated on the front side by a lamp. You can even use a flash unit as an illumination source. In order to achieve the desired short exposure times, you need a bright light source. Nevertheless, it is important to expose the bright field image correctly. It should be well exposed, but without running into saturation.
To do this, check the histogram of the bright field image, whose "data mountain" should be arranged to the right of the center, but without reaching the right stop. In continuous light, you can simply set the camera to aperture priority ("Av" or "A") and the manual exposure compensation to the value "+1.5". The bright field images can then even be taken with the camera's automatic exposure. It is important that you set the same aperture for lenses that was used for the sky shots.
In summary, it should be mentioned that the creation of both dark and bright field images should be carried out with the greatest possible care. On the one hand, because they are no longer reproducible after removal, and on the other hand, because the use of "faulty" calibration images does not improve the result, but can even worsen it.
Performing calibration
Ultimately, calibration is a mathematical operation in which the dark image is subtracted from the raw image for each pixel and then divided by the bright field image. The formula is as follows:
Formula for image calibration.
But don't worry, you don't have to perform this arithmetic operation yourself for the many millions of pixels of your digital camera; this is done for you by suitable software.
The calibration of astro images using dark and bright field images cannot be carried out using conventional image processing programs such as Adobe Photoshop. This also applies in particular to photos taken with color cameras, such as a digital SLR camera. The reason for this is the color synthesis from the raw image: The individual pixels of the image sensor are provided with different color filters ("Bayer matrix"), whereby the RGB color values for each pixel are automatically interpolated when the image file is opened. However, calibration must take place before color synthesis is performed!
A fairly easy to use software to perform the calibration properly is "DeepSkyStacker", which can be downloaded for free (freeware) from the website http://deepskystacker.free.fr/german/index.html. I would like to use this program to explain the calibration process.
I first save my sky images ("light frames") together with the dark frames and bright field images ("flat frames") in a folder. In this specific case, there are seven light frames and one dark frame and one flat frame. The subject is "Messier 57", the ring nebula in the constellation Lyra, which I exposed seven times for two minutes at ISO 800 with a Canon EOS 450D. The best way to avoid confusion is to use file names that indicate whether the image is a light, dark or flat frame.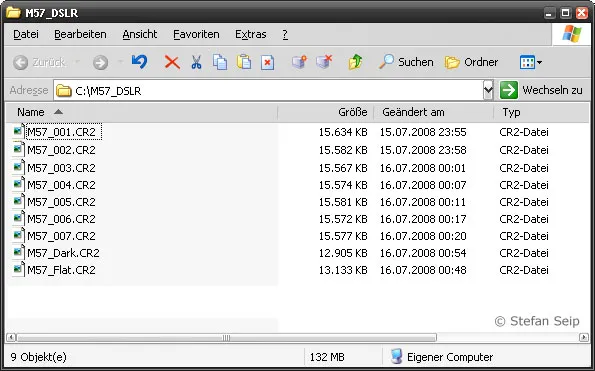
By using "speaking file names", a distinction can be made between the actual sky images, the dark frame and the flat frame, so that there is no confusion.
I then start the DeepSkyStacker program.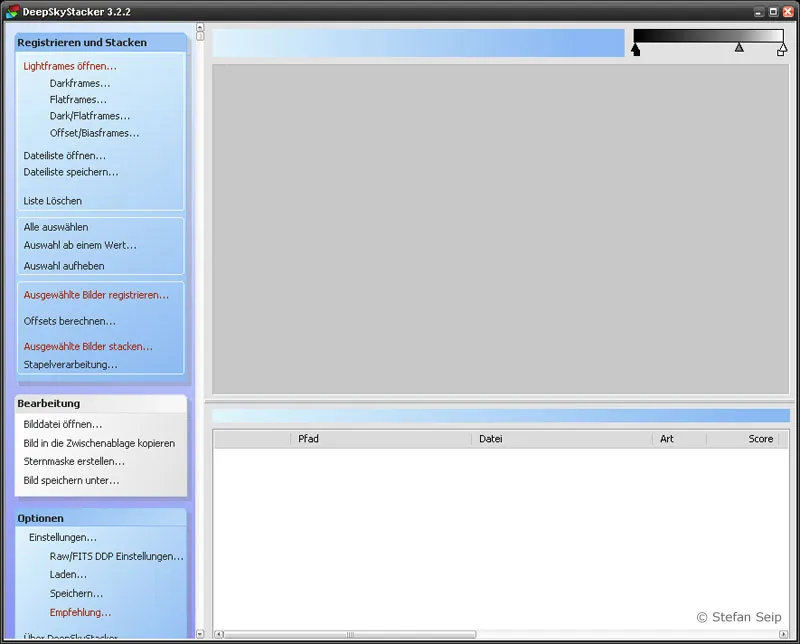
DeepSkyStacker software: Screen after starting the program.
I can open my images with the top three commands in the left bar, taking care not to confuse light, dark and flat frames.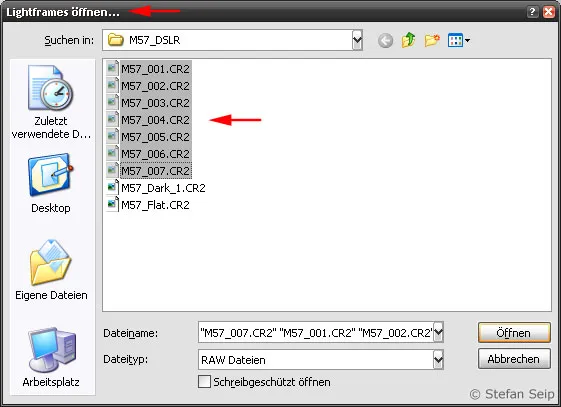
DeepSkyStacker software: Open the sky images ("Lightframes") by selecting the Open Lightframes command...
Alternatively, I can also drag and drop my files from Windows Explorer into DeepSkyStacker, but I have to do this in three steps because I always have to specify the type of file(s) involved.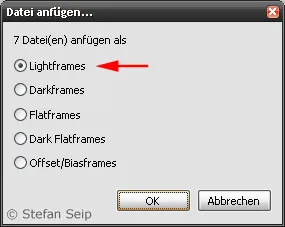
DeepSkyStacker software: If files are imported into DeepSkyStacker using "Drag&Drop", the program asks what type of files they are.
Once all files have been added (including the dark and flat frames), I can see an overview of which files have been imported in the file list. In the Type column, I check once again to make sure that the assignment "Light", "Dark" and "Flat" is correct.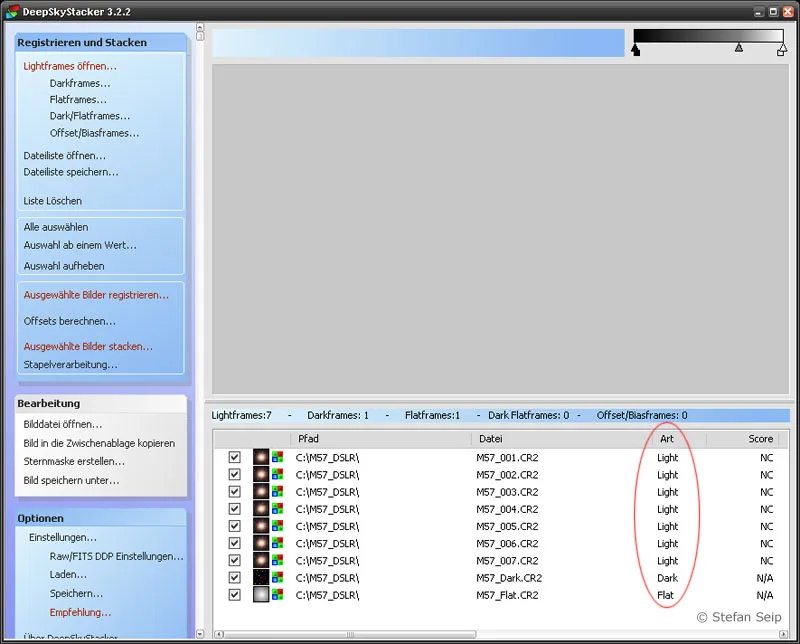
DeepSkyStacker software: All required files have been imported. You can check in a list whether the correct file type has been specified ("Type" column, red ellipsis).
By clicking on any file in the list, DeepSkyStacker loads the file into memory and displays it in the image window. I click once on a lightframe and have to wait a few seconds until the image is displayed. By moving the middle triangle at the top right to the left, I make the display brighter so that the dark corners of the image are clearly visible - a result of vignetting.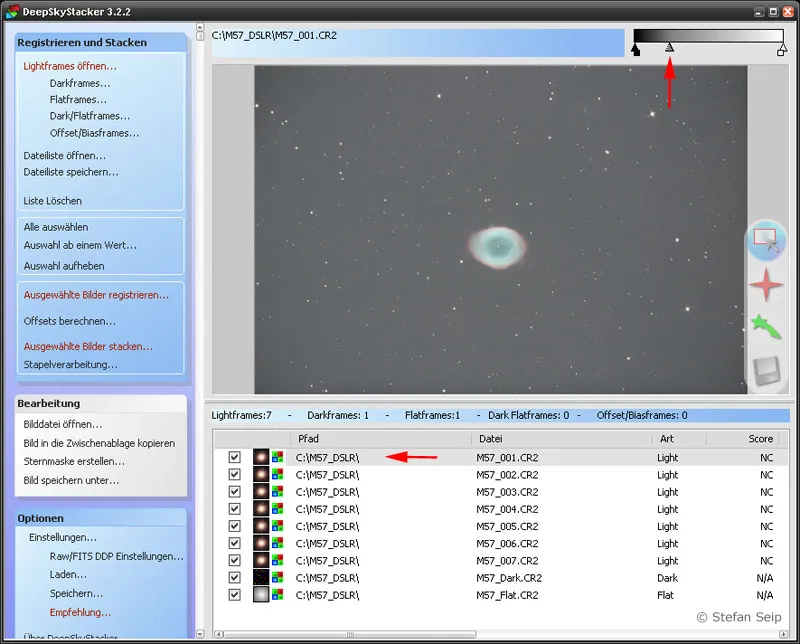
DeepSkyStacker software: Display of a single image from the list (lower red arrow). Moving the gray point (upper red arrow) to the left results in a brighter display.
Now I click on the flat frame, which is displayed after another short wait. The dark image corners are also clearly visible in the flat frame.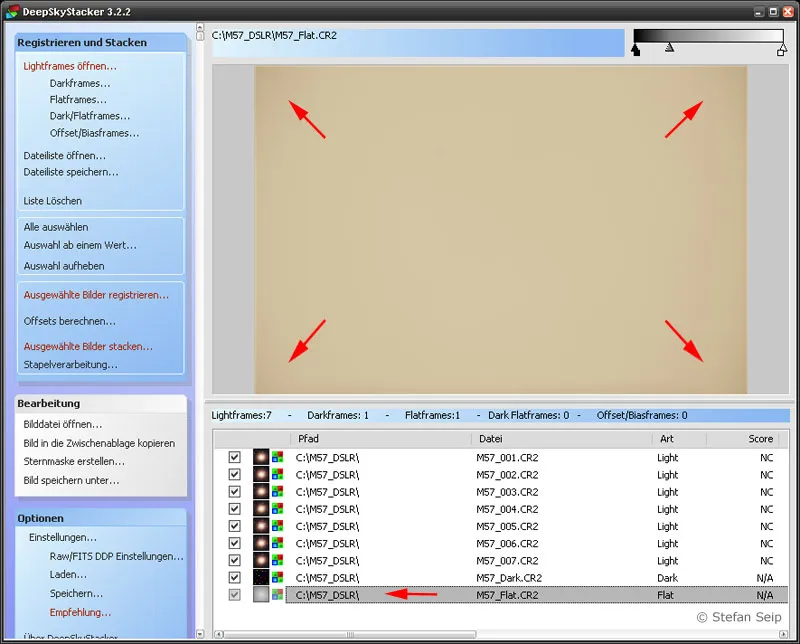
DeepSkyStacker software: Display of the bright field image (lower arrow). It contains the dark image corners caused by vignetting, as indicated by the four arrows above.
Before starting the calibration routine, I make sure that all files are selected by ticking the box to the left of the file name. If this is not the case, I click on the Select all command in the left-hand menu column.
DeepSkyStacker software: Select all imported files: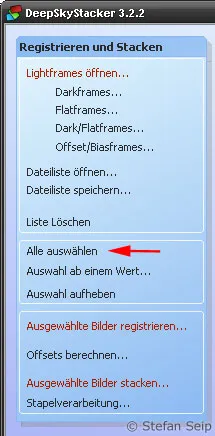
Then I start by selecting the Stack selected images command highlighted in red.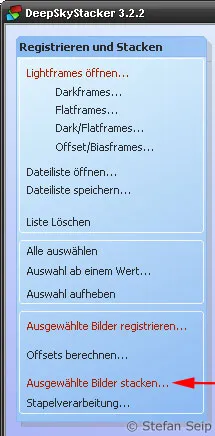
DeepSkyStacker software: Start the calibration routine by selecting the "Stack selected images..." command, whereby the term "stacking" stands for the overlaying of the individual images.
A dialog box appears with a summary of the upcoming, automatically performed processing steps.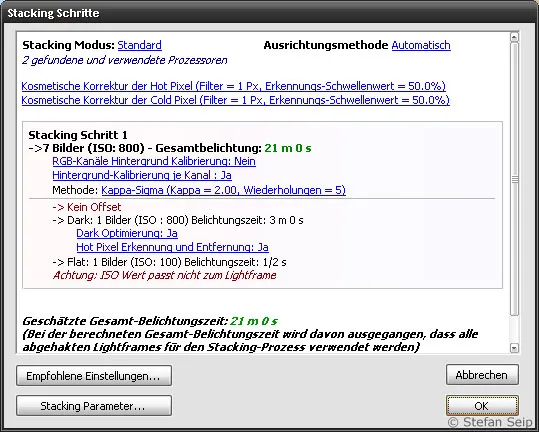
DeepSkyStacker software: Dialog box for starting the calibration and stacking procedure.
Since DeepSkyStacker also aligns the images automatically, i.e. aligns photos that are not congruent by moving and rotating them before overlaying them, some program parameters should be set and checked. To do this, I click on the Stacking Parameters... button ; another extensive dialog box with eight tabs appears. Without going into all the options, I will now show you all eight tabs with my settings, which largely correspond to the default settings: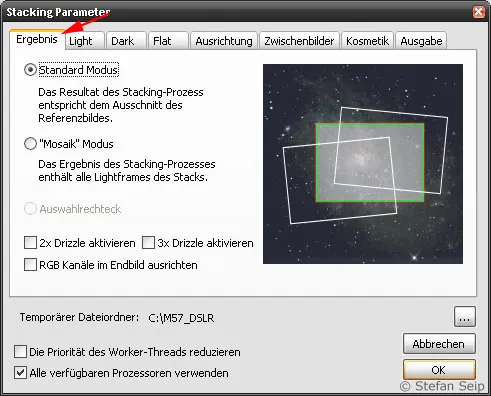
Stacking parameters of the DeepSkyStacker software, "Result" tab. Select the "Standard mode" here.
Stacking parameters of the DeepSkyStacker software, Light tab. The Kappa Sigma Clipping stacking mode, in which extreme values are not included in the mean value calculation, provides good results: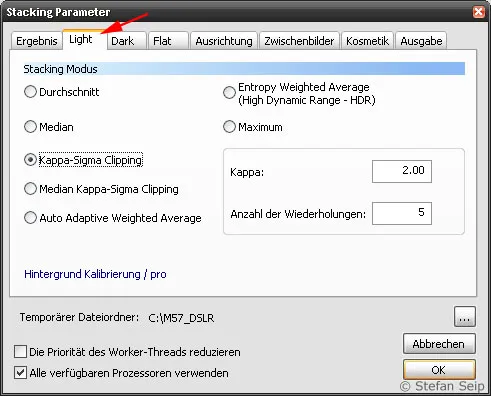
Stacking parameters of the DeepSkyStacker software, Dark tab. As there is only a single dark image, it is irrelevant which stacking mode is selected here.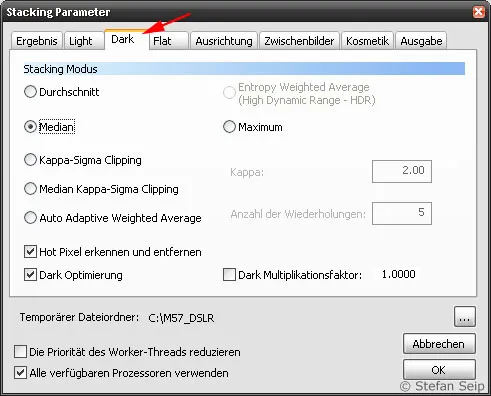
Stacking parameters of the DeepSkyStacker software, Flat tab. The stacking mode is also irrelevant here, as there is only a single bright field image.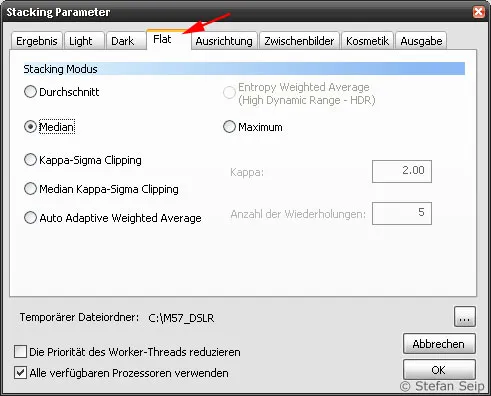
Stacking parameters of the DeepSkyStacker software, Alignment tab. The Automatic method ensures a precise overlay of the individual images, whereby stars are selected as reference points. Recognition of the reference points is also fully automatic.
Stacking parameters of the DeepSkyStacker software, Intermediate images tab. The program requires sufficient memory space to save intermediate results. It may therefore make sense to select a temporary file folder with sufficient free memory.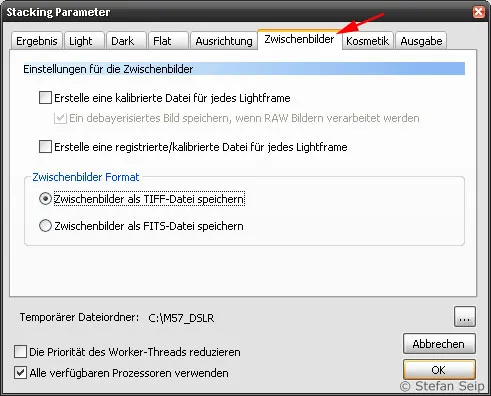
Stacking parameters of the DeepSkyStacker software, Cosmetics tab. Despite the calibration, individual defective pixels may remain. The software can recognize and remove these automatically.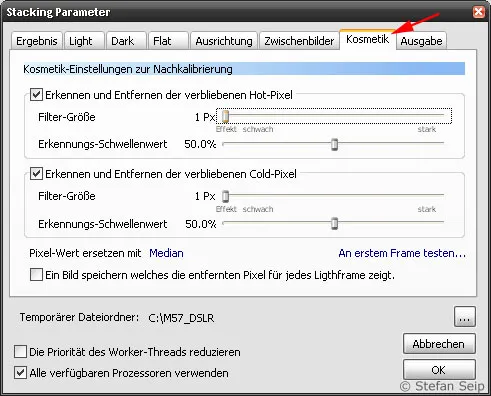
Stacking parameters of the DeepSkyStacker software, Output tab. Here you can specify what should happen with the result of the calculations.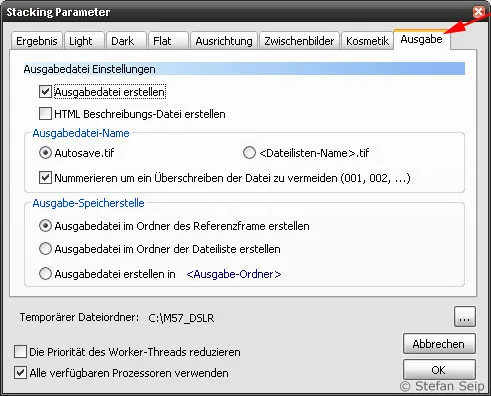
I end the extensive dialog with OK and start the calibration procedure with another click on OK in the Stacking steps dialog box shown above. This is followed by a very computationally intensive time, which took more than half an hour on my computer. During this time, DeepSkyStacker provided me with status messages about the status of the processing: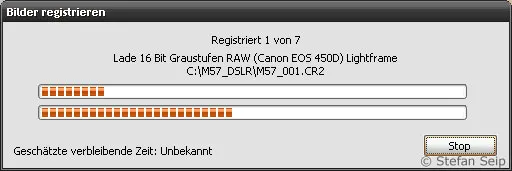
DeepSkyStacker software: calibration and stacking can take some time. A status message is displayed during this time.
After the program has finished its work, the result is displayed in the image window: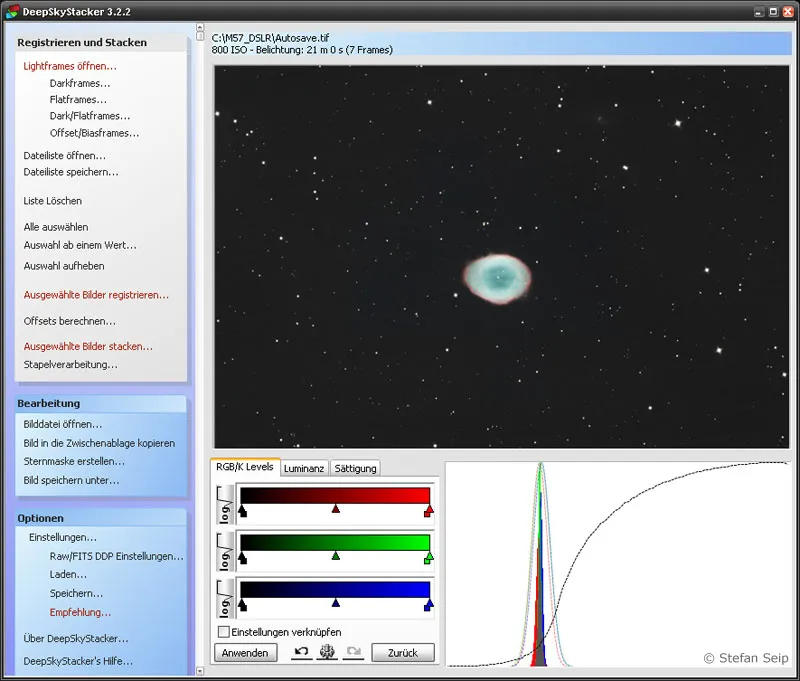
DeepSkyStacker software: display of the resulting image after calibration and stacking.
Unless you specify otherwise, the result was saved at the same time under the file name "Autosave.tif" in the same folder in which the processed files are located. This image in TIF format has a "color depth" of 32 bits per pixel and color channel. To process such an image in Adobe Photoshop, you need at least version CS2. If you are using an older version, you should click on the command Save image as... in DeepSkyStacker and select TIFF image (16 bit/K) as the file format.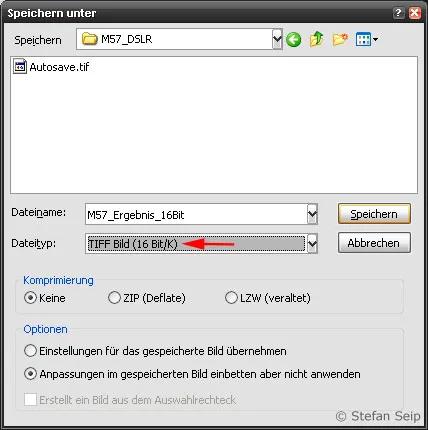
DeepSkyStacker software: The "Save as..." dialog box allows you to select the file format, in this case a TIF format with 16 bits per pixel and color channel (red arrow).
In the following, I use Adobe Photoshop CS3 to put the finishing touches to the "Autosafe.tif" created by DeepSkyStacker. It can be opened with Photoshop without any problems and a glance at the header of the file window shows that it is a 32-bit file: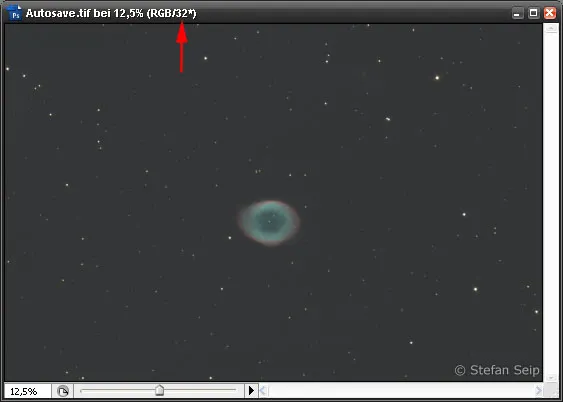
Opened 32-bit file in Adobe Photoshop CS3. The 32 bits per pixel and color channel are mentioned in the title bar of the image window (red arrow).
Even the first glance at this image clearly shows the success of the calibration: the dark image corners have disappeared!
However, the further processing of 32-bit photos in Photoshop is severely limited. I therefore first convert them into a 16-bit format. I select the command Image/Mode/16-bit channel... and the following dialog box appears:
Converting an image from 32 to 16 bit with Adobe Photoshop CS3.
I confirm - here for the sake of simplicity, without changing any settings in it - with OK and can now use the almost complete command set of Photoshop CS3 with a 16-bit image.
What happens next depends very much on the source material and cannot be generalized. In the image of the ring nebula, I first cropped the histogram on the left to make the sky appear darker (command Image>Adjustments>Tone correction....):
Shifting the black point (marked with a red arrow) from the zero position to the right.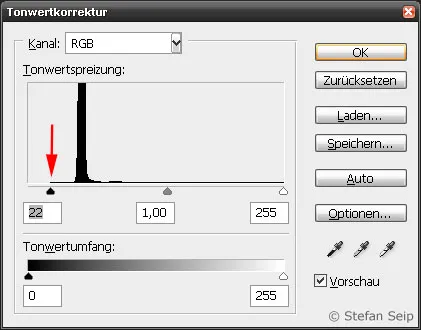
I then used the Image>Adjustments>Gradation Curves... command to further darken the sky by "bending" the curve and brighten the bright subject areas ("S-shape" of the gradation curve) in order to increase the image contrast: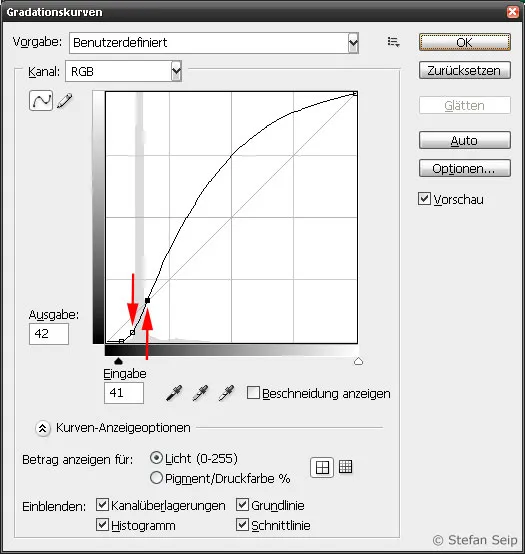
An s-shaped bending of the gradation curve in Photoshop causes an increase in contrast. The red arrow on the left shows the point at which the curve was bent downwards, the arrow on the right shows the point at which it was raised.
After a slight increase in color saturation (command Image>Adjustments>Hue/Saturation... I was satisfied with the final result for the time being:
Finished photo of the Ring Nebula. All artifacts have disappeared due to the calibration. Marked with the arrow is a galaxy in the background, namely IC 1296.
So why all the trouble?
The use of the DeepSkyStacker has brought the following advantages in terms of calibration:
Reduction of the dark noise of the individual images by subtracting a dark image
If we look at a small section of a single image at high magnification, both the noise reduction and the elimination of hot and dead pixels are clearly visible. I also used DeepSkyStacker to calibrate the dark image for this comparison: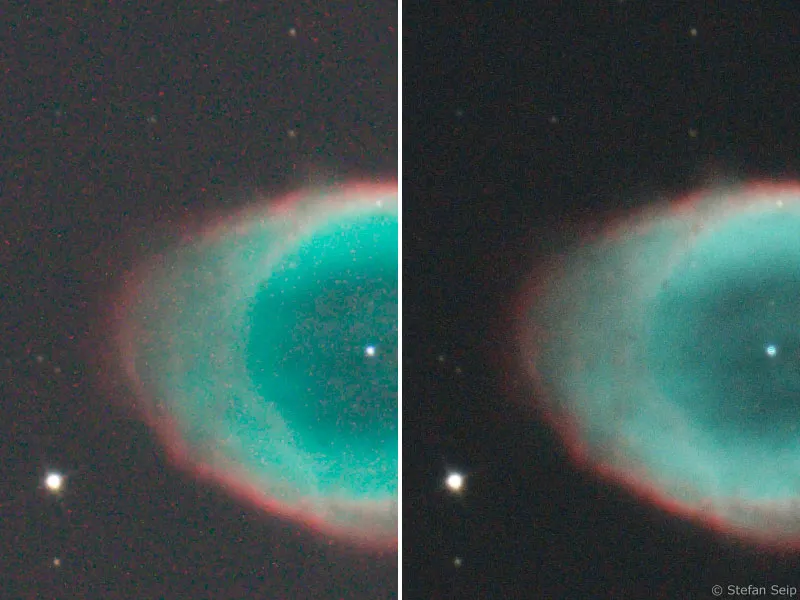
Calibration of a single exposure (left) through a dark frame. The result can be seen on the right: The noise component is reduced and the faulty pixels have disappeared. Only a small section of the overall image can be seen.
Removing the vignetting and the dirt particles in the beam path
First, let's take a look at the entire image to assess the dark image corners caused by vignetting. You can clearly see that the DeepSkyStacker was able to completely eliminate this defect by using a bright field image: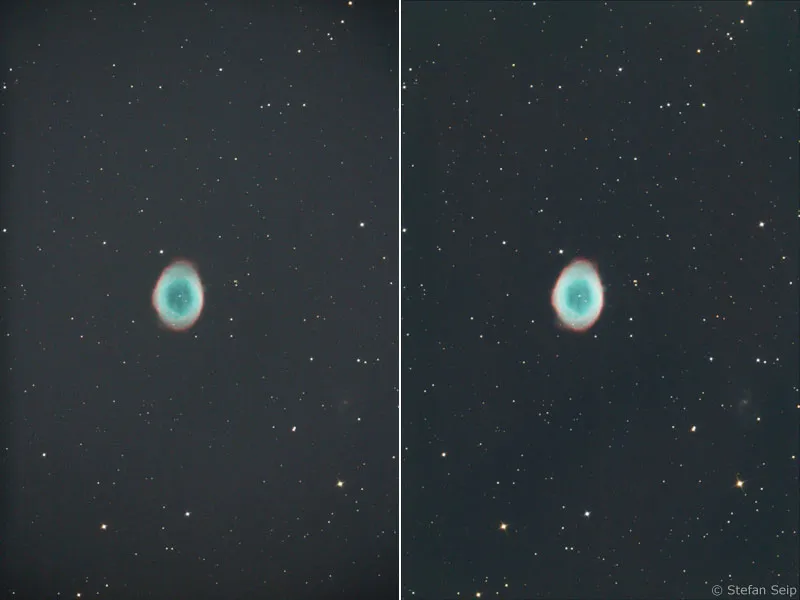
While the vignetting can be seen in the raw image (left) in the form of dark image corners, this artifact was eliminated by applying a bright field image (right).
Now let's take a closer look, again at a small section of the image where a spot of dirt was imaged, which presumably stuck to the sensor. This spot also disappeared completely when the bright field image was used: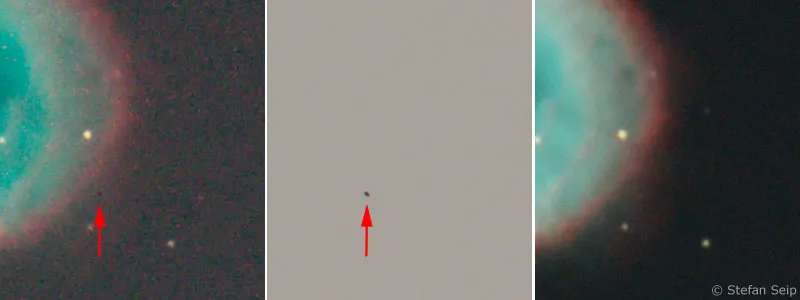
On closer inspection, small dark spots can be found on the individual images, caused by dust on the sensor (far left, section of a raw image). The same section of the bright field image (center) also shows this dust particle. Calibration makes it disappear (right).
There is something else that the image above gives us an idea of: When comparing the single raw image (left) with the result of the averaged seven images (right), it is noticeable that a further reduction in noise was achieved by offsetting several individual images. This method of combating image noise will be the subject of the following and final part of the "Astrophotography and Sky Photography" tutorial series.
