There are many different types of shadows. However, this article will only deal with the so-called cast shadow that an object casts on its surroundings. An element that casts no shadow or a completely wrong (cast) shadow under lighting, e.g. because it has been carelessly copied from one picture into another where different lighting conditions prevail, appears as a foreign body in its new surroundings. Due to the enormous complexity of the topics of shadow and perspective, only simple case studies can be dealt with here. Further reading can be found at the end of the article.
Excursus: Creating shadows
Before we get to the practical side of Photoshop, let's first take a brief excursion into the topic of "shadow formation" so that more realistic representations can be achieved. The following properties of a shadow should be mentioned:
Shape and orientation of the shadow
The shape of the shadow depends on the shape of the body that casts it and the surface onto which it is projected. Simple, flat objects such as a plate on a flat table cast a shadow in the shape of the body. More complex elements, such as a teapot whose shadow falls on another object, cast highly distorted shadows.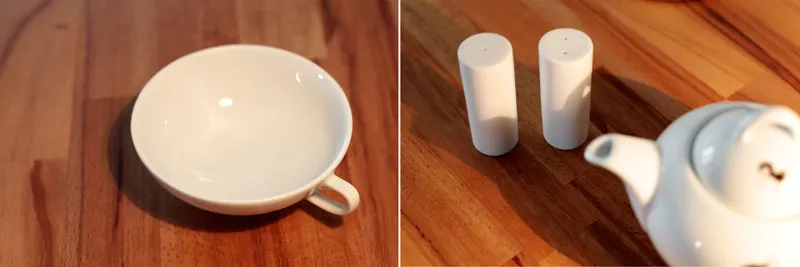
The direction in which a shadow falls depends on the position of the light source. With a point light (e.g. spotlights on the ceiling), it is always the opposite side of the light source. If there are several light sources (e.g. clamp lighting), multiple shadows are cast. This also creates core and half shadows, i.e. areas that appear denser or lighter. ( A simple and a complex version on the subject of core and penumbra).
Color
Contrary to popular belief, the color of the shadow is hardly influenced by the color of the light. This is basically logical, as the shadow is created where the light does not reach. Instead, the color of the shadow is determined by the color of the body, the general ambient light and, of course, the background.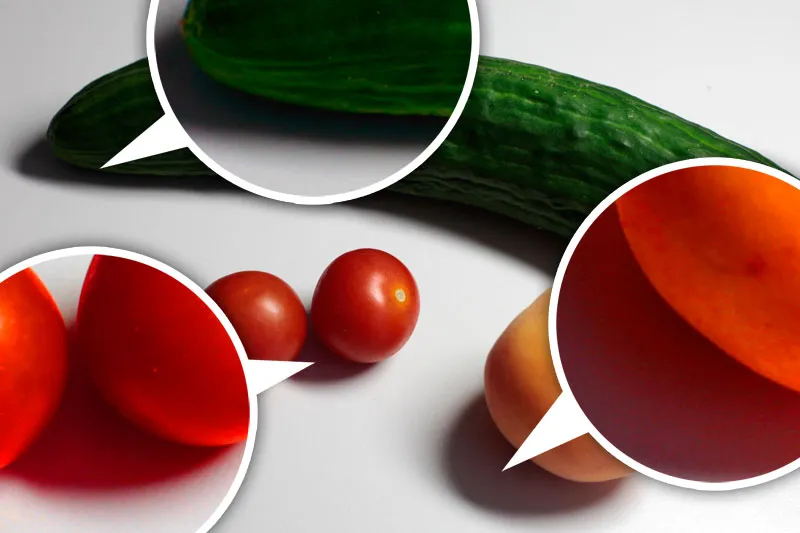
The color of the body is also reflected in the color of the shadow. The saturation of the detail sections was increased to show the effect more clearly.
Density and sharpness
The type of light source determines the appearance of the shadow. A strong, direct light source such as the sun or a flashlight at close range produces very hard edges and dark shadows. The more diffuse the light becomes (e.g. a cloudy sky or when using a softbox), the softer and lighter the shadow will be.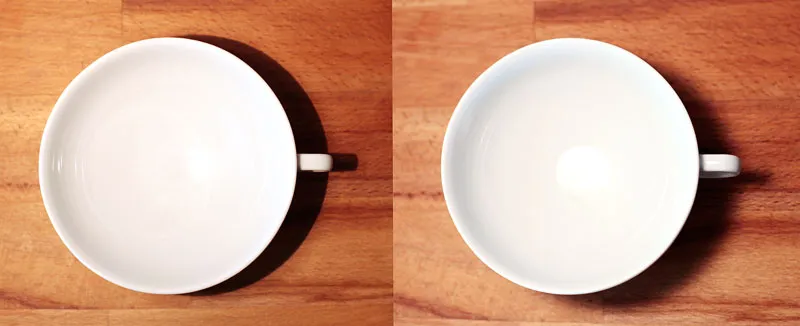
On the left, a hard, strong light source creates a sharp-edged, dark shadow. On the right, a semi-transparent reflector was held in front of the light. The shadow becomes lighter and more diffuse.
Distance and size
The distance between the shadow and the body ultimately determines its spatial position. If the shadow is close to the body, it is also close to the background. As the distance of the shadow increases, the impression of a floating body is created. In addition, the shadow becomes smaller than the body casting the shadow as the distance increases, with one exception: if the object comes very close to the light source, the shadow created becomes larger.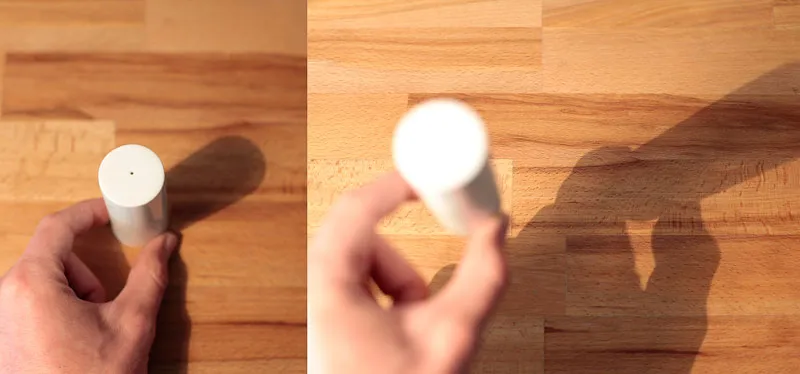
The distance of the shadow to the body illustrates its distance from the background.
Constructing shadows in perspective
If you want to create realistic shadows, you will have to familiarize yourself with the laws of physics and perspective drawing, including vanishing points. But this is not as bad as it sounds. On the contrary: once you have a basic understanding, new worlds will open up in no time at all and you will be amazed at how much a correctly placed shadow can contribute to a harmonious image effect.
Schematic illustration
Defining the light source Let's start with a fairly simple and easy-to-understand example. A pole is set vertically (90°) into the ground in front of us. The sun as a light source is exactly to our left and shines on the earth at an angle of 45°. This angle is shown on the right in the illustration.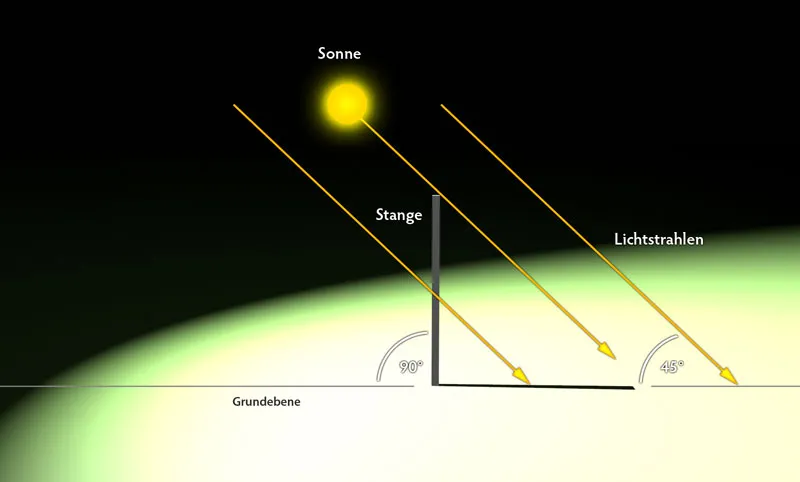
Frontal view of the object. The sun shines on the ground at 45° exactly to the side of the observer.
Constructing shadows
The aim of determining the correct shadow cast is quickly achieved. A straight line is drawn from the light source (the sun) over the upper edge (the right-hand corner, point A) of the rod down to the ground plane (point C). A connection is then created from the lower end of the rod B to the intersection of the light beam and the ground plane. This connection (B-C) represents the shadow in the correct direction and length.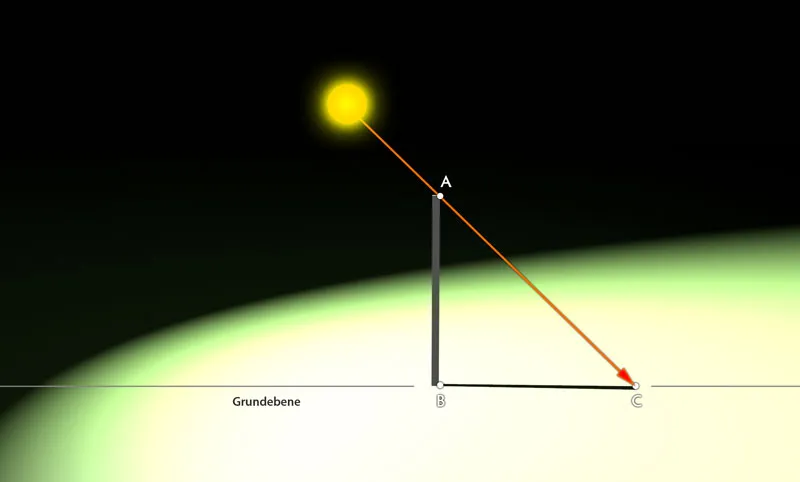
Knowing the angle of incidence of 45°, the correct shadow is quickly calculated. The perspective of the illustration has been tilted slightly to show the shadow more clearly.
Further examples:
If the pole were not straight, but tilted slightly to one side, the basic construct would be identical, as shown in the third illustration. The shadow would only lengthen or shorten depending on which side the pole is tilted to.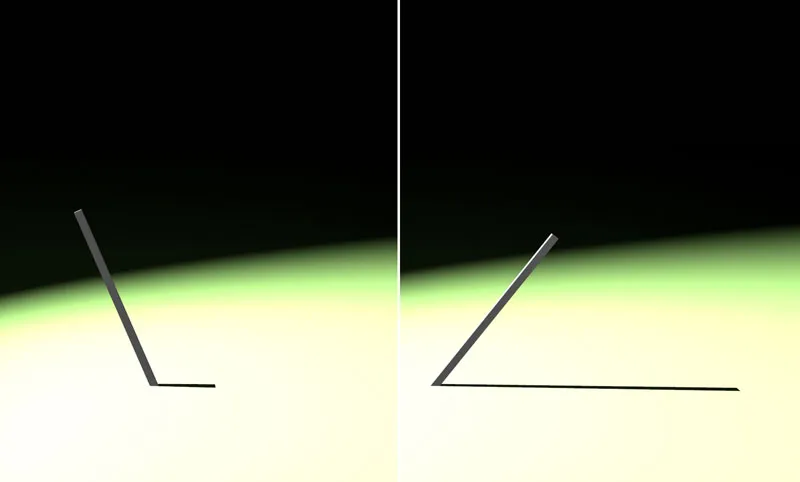
The length of the shadow cast also changes with the inclination of the pole.
Plan spatial depth
The direction and size of the shadow becomes more complex if the pole tilts not only horizontally but also vertically.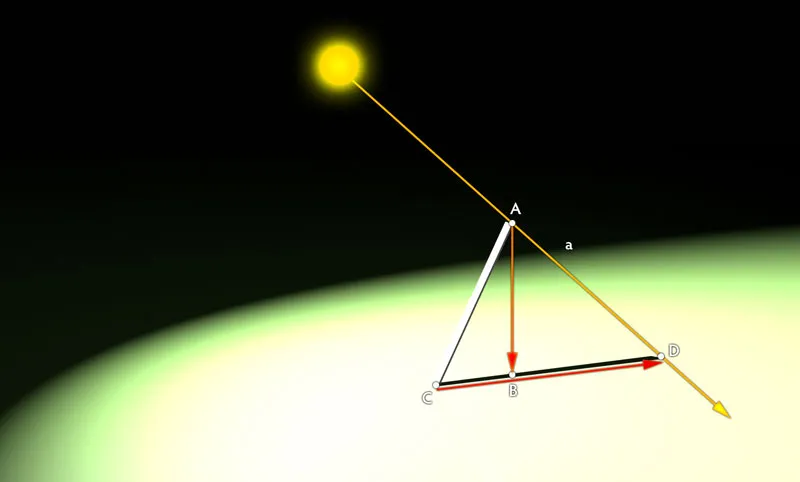
The length of the shadow cast changes with the inclination of the pole.
Here too, a straight line is first drawn from the light source over the edge of the object to the ground plane (distance AD). Then a perpendicular (line b) is dropped from point A to the base plane (point B). Finally, a straight line must be drawn from the lower end of the rod (point C) over the previously determined point B. The intersection point D with the straight line a of the light beam defines the end point of the shadow. This therefore runs from C to D.
Note: Determining the base plane for the perpendicular is not always easy, as it is not on the same level as the base point of the object (here point C of the rod), as was the case in the first examples. If the shadow falls backwards, the point to be determined lies above the base of the object. If it falls to the front, it is below it. A sense of perspective and practice are required here. Relevant literature on perspective drawing, such as the classic "Spatial Drawing" by Henk Rotgans, is helpful.
Designing in real use
Once the basic understanding has hopefully been established, it is time for a more practical application. An additional object is to be inserted into an existing photo so that its shadow blends seamlessly into the rest of the image composition.
Inserting image material
Open the file "berglandschaft.jpg" and add it to the file "buchstabe.png" via File>Place. Press Enter to confirm the insertion of the image, which is initially framed with a box. Now place the motif roughly as shown in the illustration. In any case, there should still be enough space to the right for the shadow.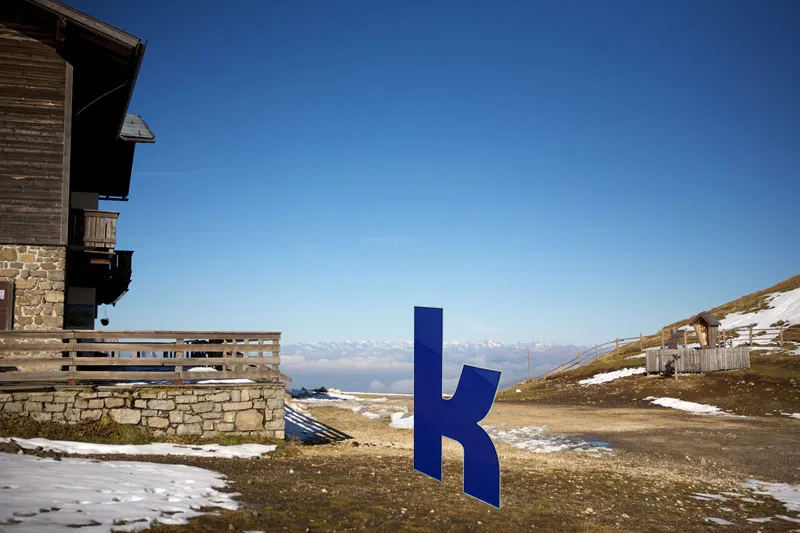
The new object is placed in the main subject.
Calculate the light angle
In order for the shadow to be consistent for the letter, the angle of the incident sunlight must first be calculated. To do this, we make use of the knowledge from the previous examples - only this time we saddle up the horse from behind.
Consider the right edge AB of the wall-fence construction as the pole from the previous example. The length and direction of the shadow, which had to be constructed previously, already exist. A triangle can now simply be drawn accordingly. The resulting angle at the bottom right is the angle of incidence of the light - here approx. 60°.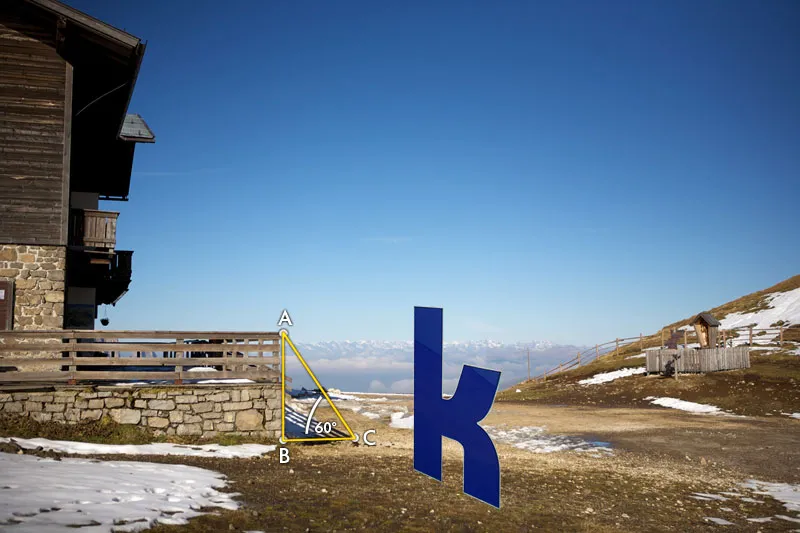
The angle of incidence of the sunlight is calculated using the existing shadow.
Preparatory measures
The projection point on the floor must now be determined for each corner point - and also for concise curve points. For a better overview, I name all affected points clearly with letters (D - O). This is not necessary in practice, but is helpful at the beginning, especially with more complex objects. To determine the projection points within Photoshop, proceed as follows: Using the Path tool in Shape Layers mode (1), draw the triangle ABC that was already discussed in the second step of the tutorial and set its opacity to approx. 50%.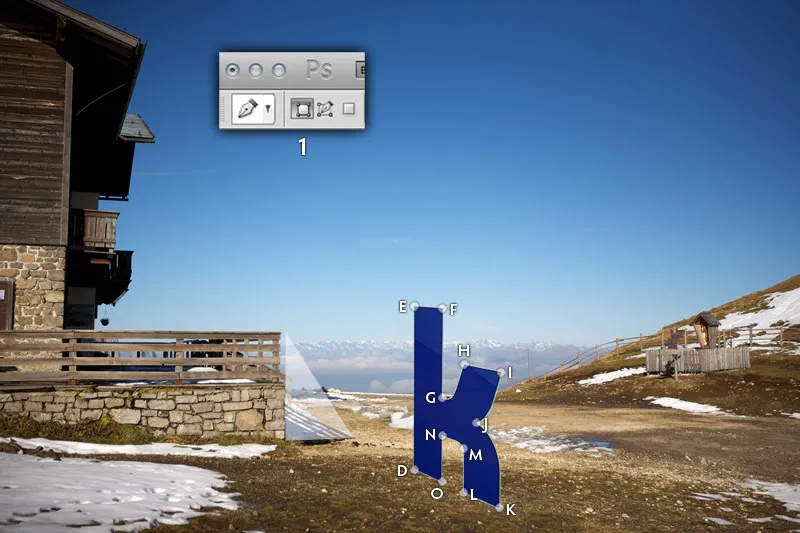
The calculated angle of incidence of 60° is transferred to the letter.
Determine the projection points
Now move the triangle and place the top corner at point E. Then scale the shape using Ctrl/Cmd+T so that the bottom left corner touches the ground. At point E, this would be the same position at which point D is drawn. The last corner of the triangle ultimately determines the projection point E' - shown in red in the illustration.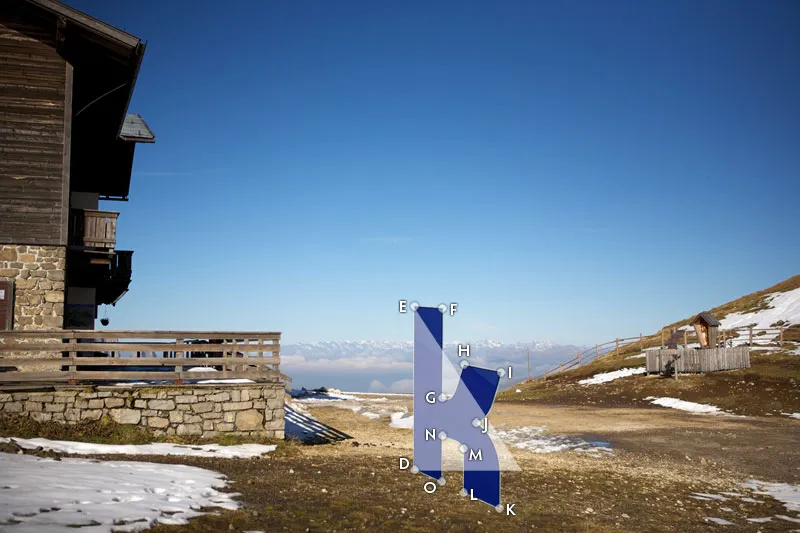
The calculated angle of incidence of 60° is transferred to the letter.
Follow the same principle for each additional point on the letter: Move the triangle, scale it and draw the projection point.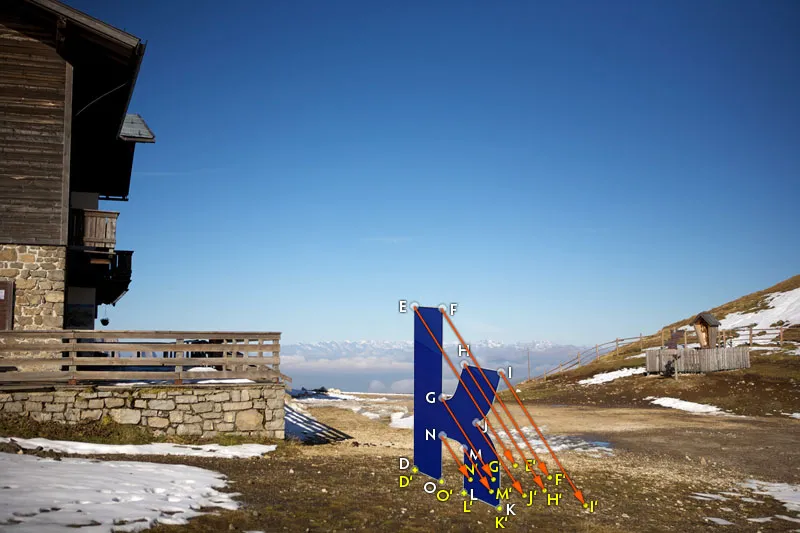
All constructed projection points in the overview, calculated using a light incidence of 60°.
Drawing shadows
The finish is now simple. In the style of painting by numbers, the letters are connected using the path tool in Paths mode (1). At curved points such as the LMN connection, a curve should also be indicated to make the shadow more realistic. Load the completed path as a selection withCtrl/Cmd+Enter and fill it with black on a new layer. Finally, use the opacity slider and the Gaussian blur (found under Filter>Blur filter) to set the desired properties. Standard values are 80% opacity and a filter thickness of 1.2 pixels.
The final drawing of the shadow is quite simple after the preliminary work.
Creating shadows from basic shapes
You've survived the worst. I promise. And the good news: in many cases, you don't have to construct a shadow in such a complicated way. As a rule, a less detailed image whose direction and extent roughly correspond to the surroundings is sufficient. Shadows are abstract, so minor inconsistencies will only catch the eye of a very attentive observer.
The aim of the tutorial is to place the cyclist from the file "wald.jpg" in the vineyard landscape of the file "weinberge.jpg". So that you can concentrate fully on creating the shadow, you will already find a clipping area in the file "fahrrad.png".
Shape and alignment
Open the file "weinberge.jpg" and load the file "fahrrad.png" into the vineyard environment via File>Place. Scale the graphic directly to a believable size and position the wheels and the woman on the asphalt path. The further back you position the bikes, the smaller you have to scale the graphic.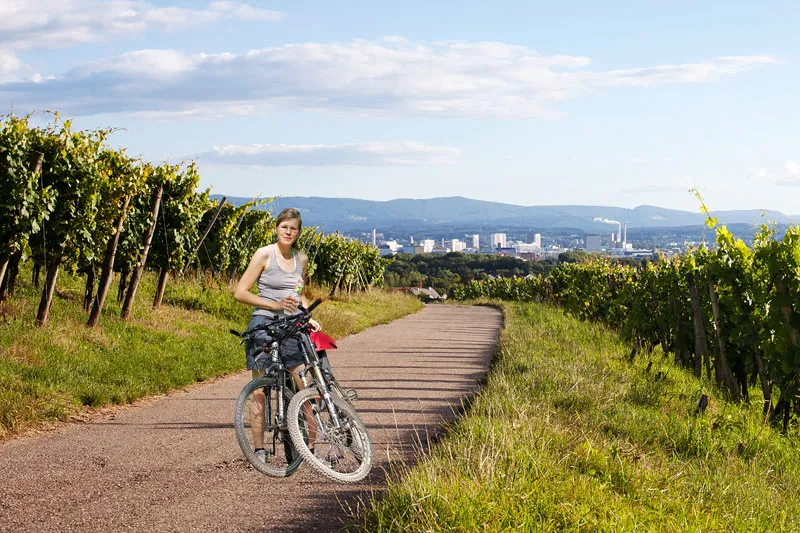
The individual motifs are merged.
Creating shadows
Select the "Bicycle" layer and duplicate it by pressing Ctrl/Cmd+J. Then select the lower of the two bicycle layers and rasterize it via Layer>Raster>Smart object in order to be able to work more flexibly with it in the subsequent steps. Open the Hue/Saturation dialog (Ctrl/Cmd+U) and move the brightness slider to -100 to color the rasterized bicycle layer black.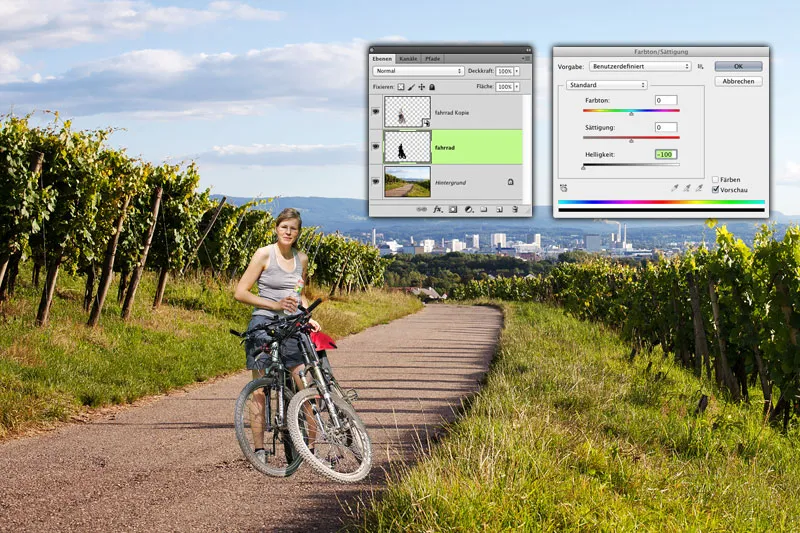
The basic shape of the shadow is created using a simple copy of the original motif.
Distort shadow
Select the Edit>Free Transform command and distort the shadow plane in several steps. First, grab the handle at the top center (A) and drag it to the bottom left, approximately to the edge of the grass (B), while holding down the Ctrl/Cmd key to create a basic shape. Then hold down the Ctrl/Cmd key and drag the corner handles into shape: You can align the two right-hand handles (C and D) to the front right and rear "corner" of the tires of the right-hand wheel by eye. Make sure that the handle itself is not positioned at the corner, but that the shadow cast starts there (E).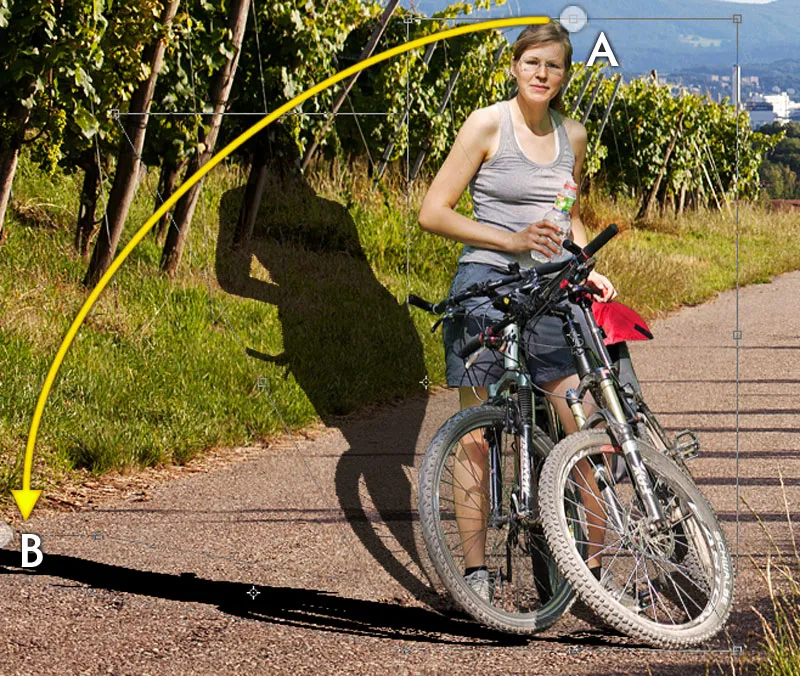
The individual motifs are brought together.
The sun is very low and therefore creates long shadows, as the vines clearly illustrate. Pull the two left-hand corner handles (F and G) far to the left of the work surface to take up this fact on the wheels.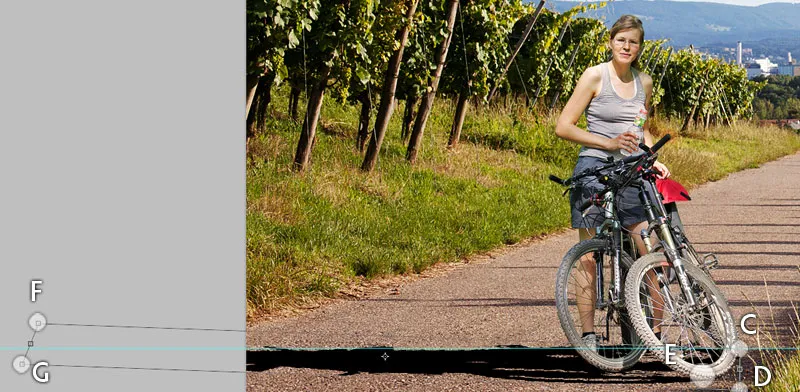
Adjust the shade to the position of the sun.
Fine adjustment
The shadow of the bicycle is still too dark, hard and intense compared to the other shadows. Move the bicycle shadow next to an existing shadow for better matching. Set the layer mode of the shadow layer to Multiply (A) so that the color of the background is taken into account. Also block all transparent pixels of the shadow layer from being changed by clicking on the corresponding icon in the layer palette (B),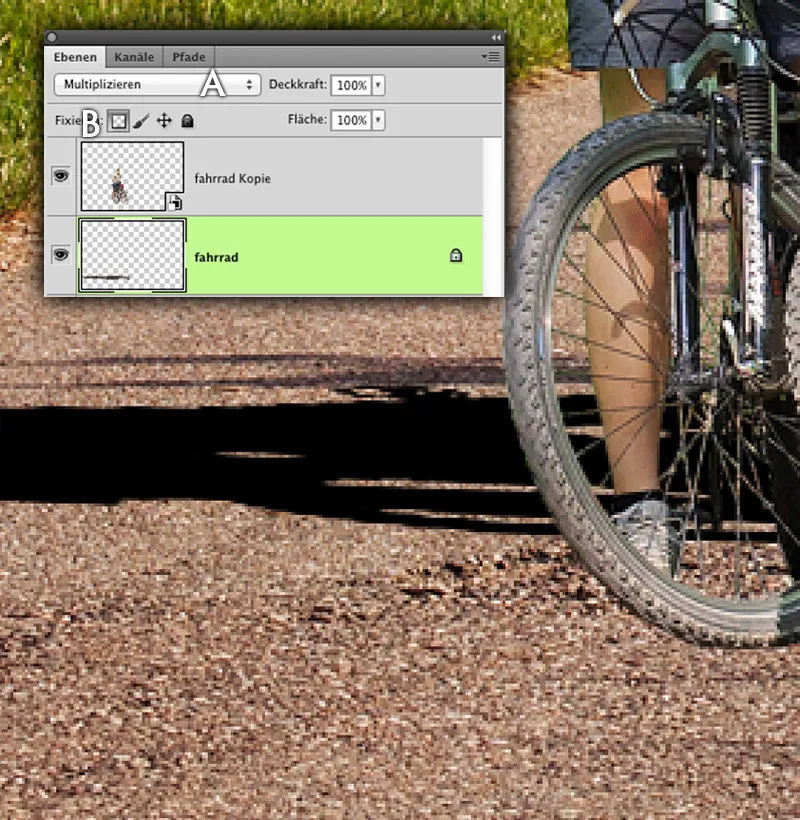
The shadow layer is prepared for the adjustment.
Click once with the eyedropper tool (I) in the shadow of the vine (A) to pick up its basic tone. Use Edit>Fill Area>Use: Foreground color to color the previously black shadow. This does not quite match the color tone. To adjust it, open the Hue/Saturation dialog (Ctrl/Cdm + U) and adjust the shadow using the sliders. You can find suitable values in the illustration.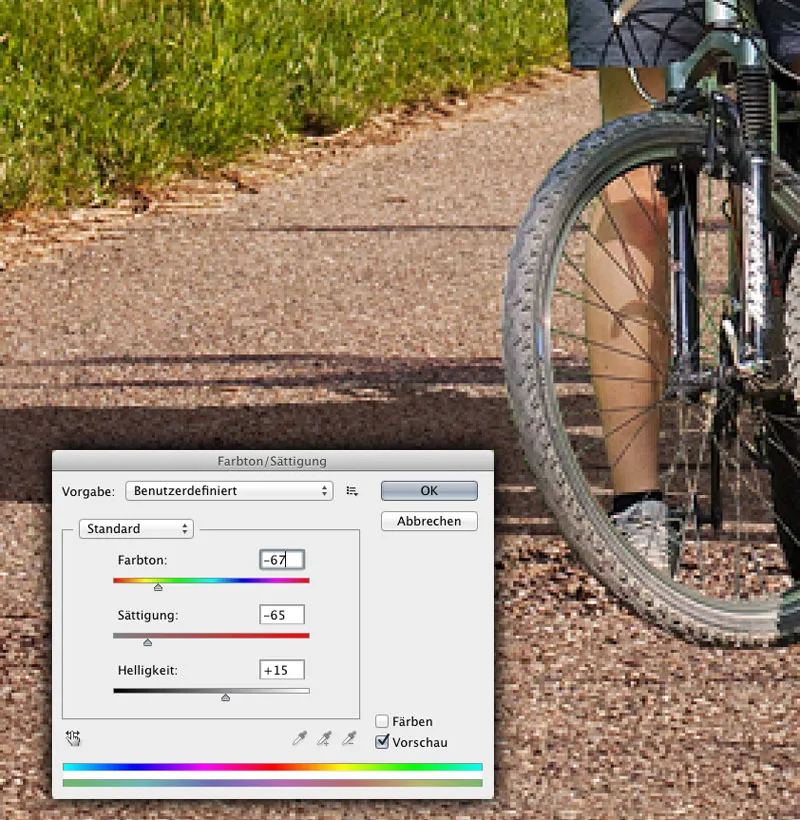
Coloring the shadow layer.
Final details
You can add the finishing touches in two simple steps. Reduce the opacity to approx. 95%. Remove the blocking of the transparent pixels of the shadow layer and apply the Gaussian blur filter with a value of just over 1 pixel. Finally, move the shadow back to the correct position.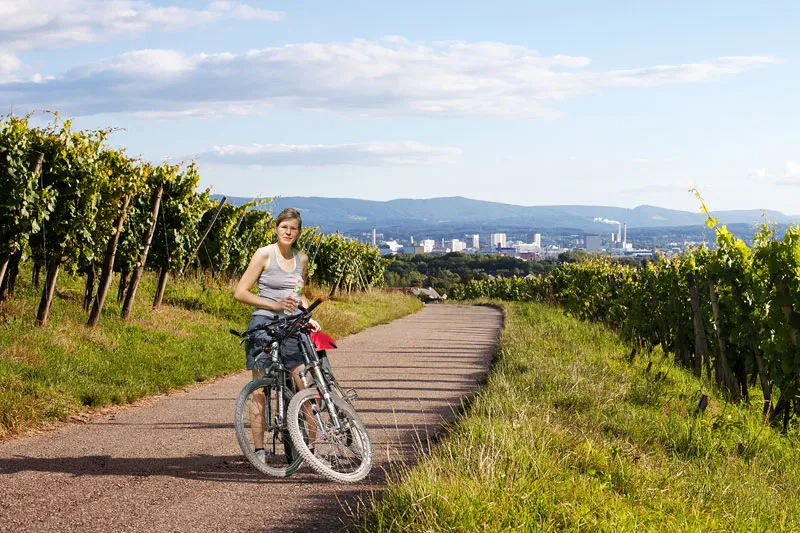
Adjust the opacity and edge sharpness.
The offset filter
A further step towards a sophisticated shadow is provided by the largely unknown Offset filter in Photoshop. Image information is shifted on the basis of a grayscale image, thus creating the impression of a shadow cast with a more consistent perspective.
View file
Open the file "sandhalde.psd." Here you can see a quickly placed shadow cast by a crane, which looks completely implausible as it falls over hilly sand mountains without, however, taking up their curvatures. Delete the layer with the crane from the document for the time being, but don't save it yet.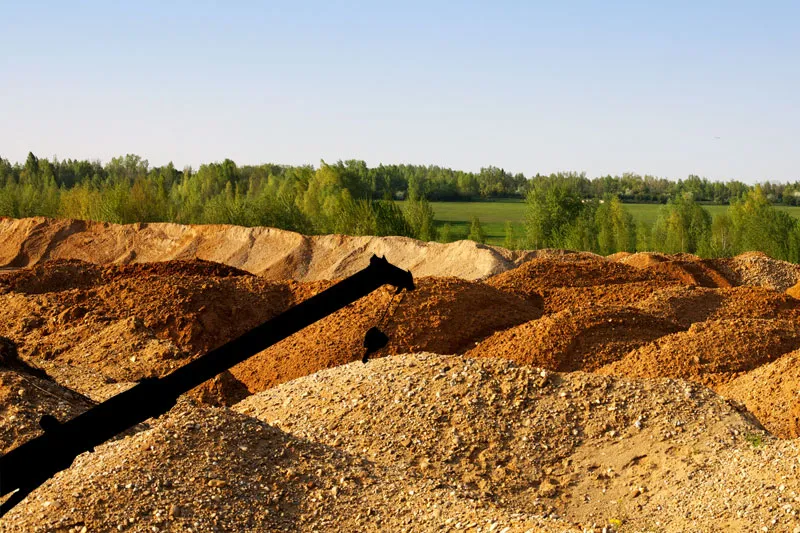
The shadow of the crane looks completely implausible.
Create displacement map
To apply the displacement filter, Photoshop needs a grayscale file as a template. Black pixels are shifted by the maximum amount (can be specified in the filter dialog ) in one direction, white pixels are shifted by the maximum amount in the opposite direction. An average gray value of 128 causes no change. The gradations in between are only partial values of the maximum amount.
Convert the image to a grayscale image via Image>Mode>Grayscale. You must also blur the result considerably, otherwise you will not get a pleasing result. Use a value where the shapes are still recognizable but no sharp contours can be seen. For example, a radius of 12 pixels for the Gaussianblur. You must save the result as a Photoshop document.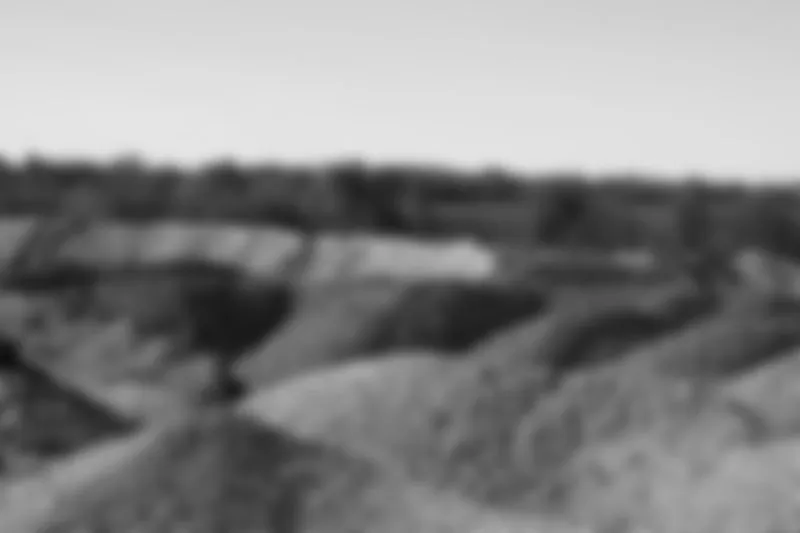
Create a template for the offset filter.
Apply filter
Select File>Back to last version to return to the original. Then select the layer with the crane shadow and apply the filter>Distortion filter>Offset. Enter 100 pixels for both directions as the value for the shift. Depending on how large your file is, you may need to adjust up or down here. Just try it out a little. The other settings are shown in the illustration.
A dialog will then open in which you select and confirm the previously created PSD file. After a short calculation, Photoshop distorts the shadow relatively credibly. Set the layer mode to Multiply and reduce the opacity to around 80%. Also apply the Gaussian blur to soften the shadow. A value of approx. 4.5 pixels should be suitable.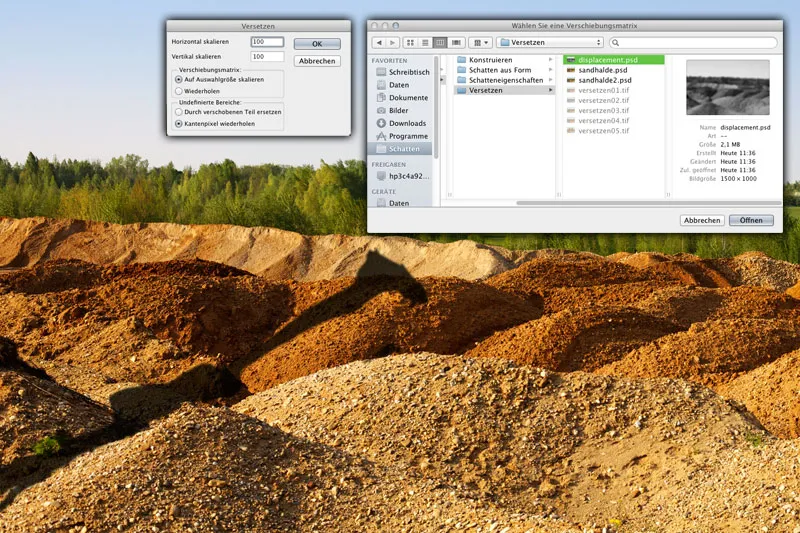
Apply the Offset filter.
Manual offset (optional)
If you want to be precise, you will need to do a little manual work. At the moment, the shadow after a hill continues over the hill behind it without any offset. In reality, however, it should be moved a little to the side. Use the lasso to create a selection whose lower edge corresponds exactly to the edge of a sand hill (A) and save the selection as an alpha channel.
Cut out the layer contents as a copy using the key combination Ctrl/Cmd+J and move the image snippet a little to the right and a little downwards. (B). Then load the previously saved alpha channel, invert the selection and delete the content. This removes the intersection of the two shadow pieces. (C).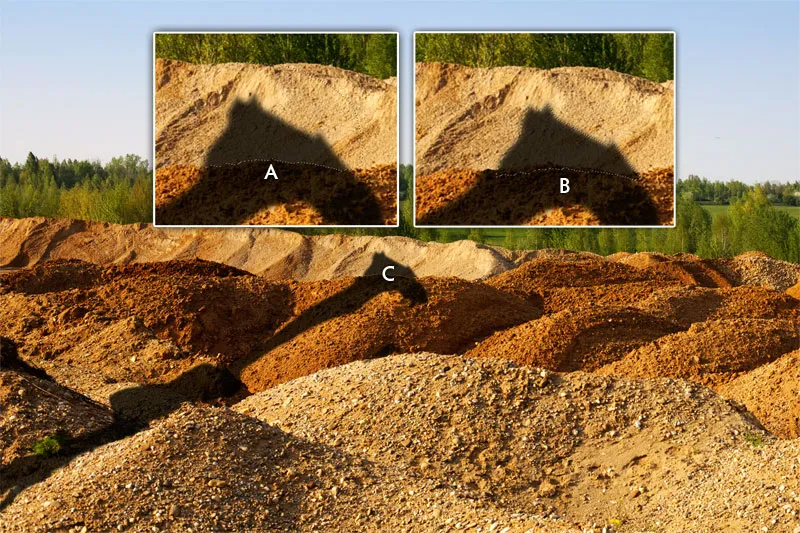
Adjust the properties of the shadow.

