We use the text object to generate basic spline objects, which can then be extruded into 3D objects word by word, paragraph by paragraph or even letter by letter. However, the typographic possibilities were previously very limited, so that more sophisticated text designs could only be realized with difficulty using individually positioned text objects.
In CINEMA 4D Release 15, we now finally have the option of setting letter spacing and scalingparametrically and interactively in the editor. In typographic terms, however, scaling should only be used to create text animations like the example shown. In this tutorial you will learn how this is possible with the help of XPresso.
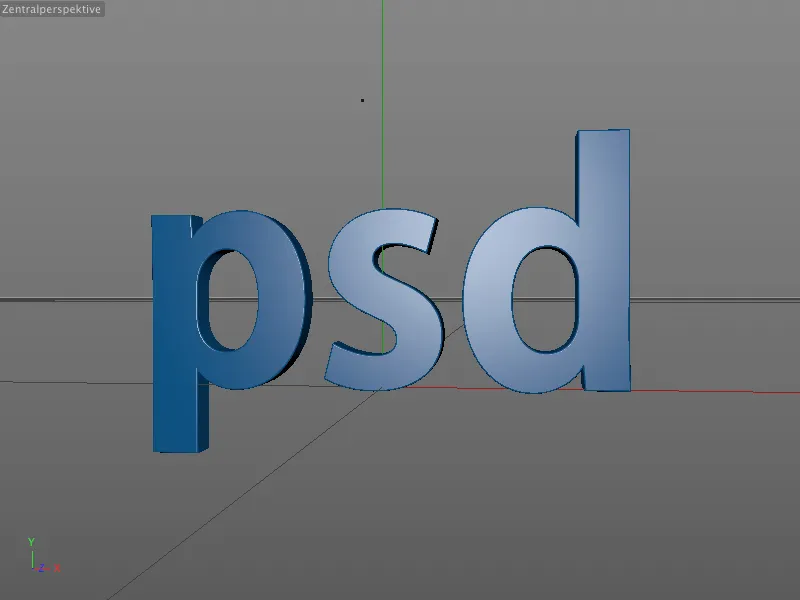
As already mentioned at the beginning, the extrude object (called "Extrude-NURBS" before R15) is probably the most frequently used generator for creating three-dimensional texts. This is no different in our example scene; the text object is already created as a sub-object of the Extrude generator.
The scene also contains a plane object as a back wall behind the text and a simple light source to illuminate the scene.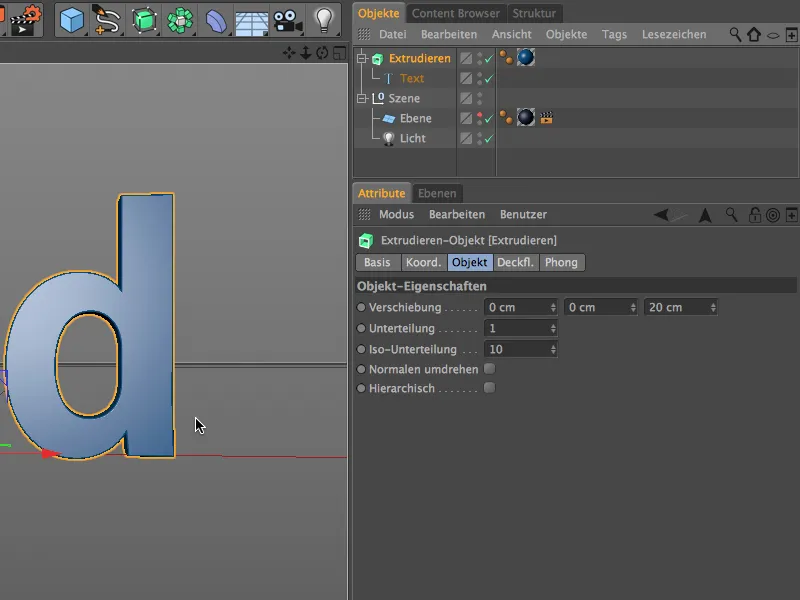
Creating the text
If we select the text object via the Object Manager, we have its settings dialog in the Attribute Manager in front of us. Of course, you can enter any other text in the Text field and also select a different font via the Font menu.
As the later animation of the text should use the center of the text as a reference point, I have selected the option Center for Text Alignment. All other parameters remained at the default settings.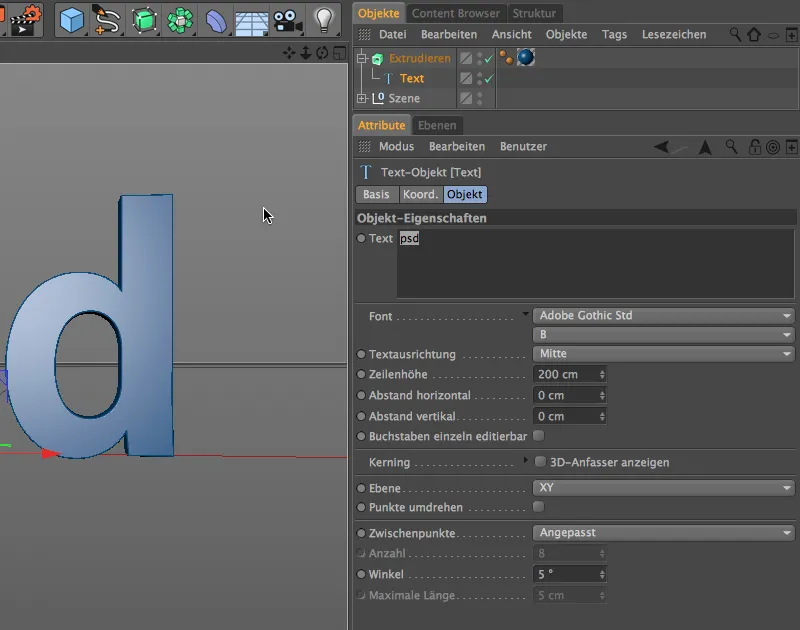
Typographic design of the text
If we expand the Kerning field using the small arrow, we find the new setting options for the typographic text design in front of us. So that editing can be done not only via the parameters, but also via the 3D view, we activate the option Show 3D handles.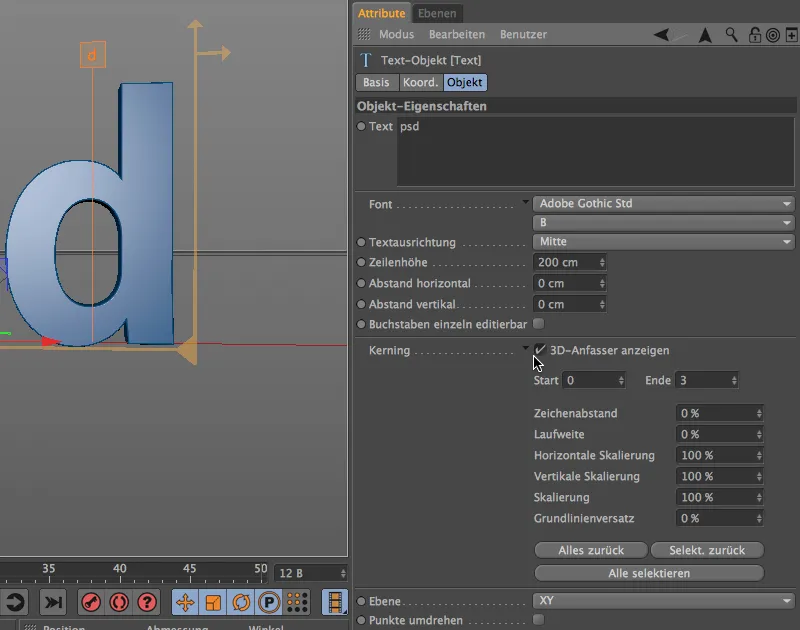
Now each letter has its own handle with which we can move it. The orange coloring of these handles tells us that all three letters are currently selected and can be edited simultaneously. The arrows at the top right allow the selection to be scaled horizontally and vertically, while a baseline offset can be set using the arrow handle on the baseline.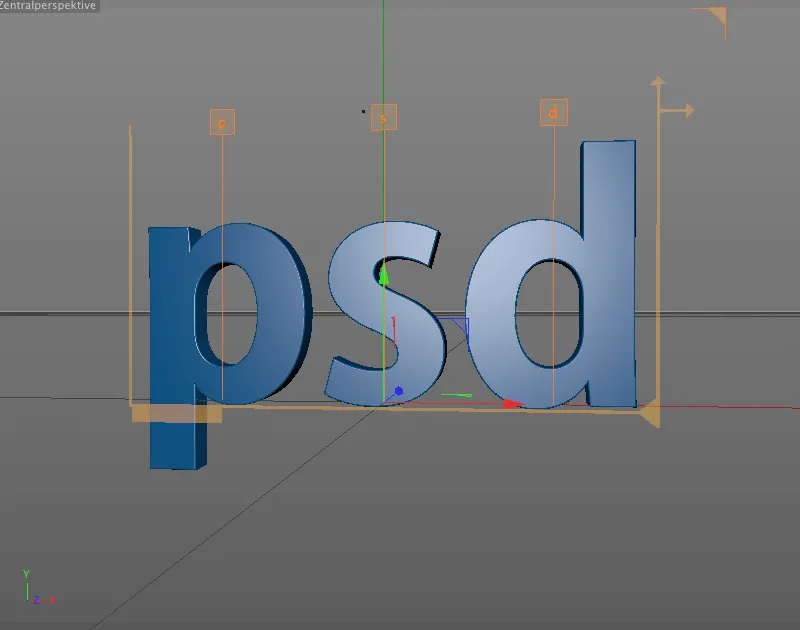
For the most precise typographic editing possible, it is best to switch to the view from the front (F4 key). To edit an individual letter, we select it by clicking on the handle. The unselected letters now show a purple-colored handle. Simply move the letter along the baseline by dragging it with the mouse. It makes sense for the following letter "d" to follow the shift so that we achieve an undercut of the letters.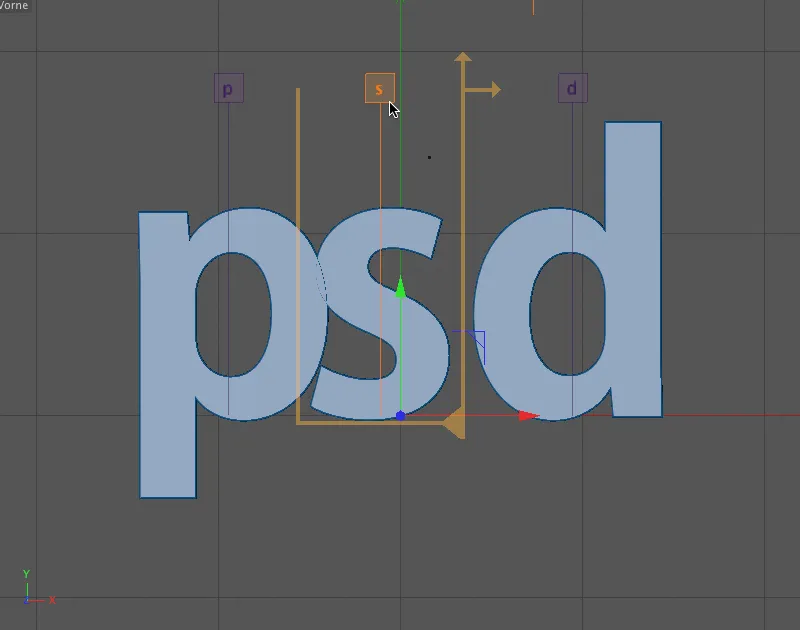
Incidentally, we can also see which letter is currently selected from the Start and End parameters. This may seem unimportant at the moment, but it will be very helpful for a later animation. You can see my kerning value for the letter "s" in the character spacing parameter.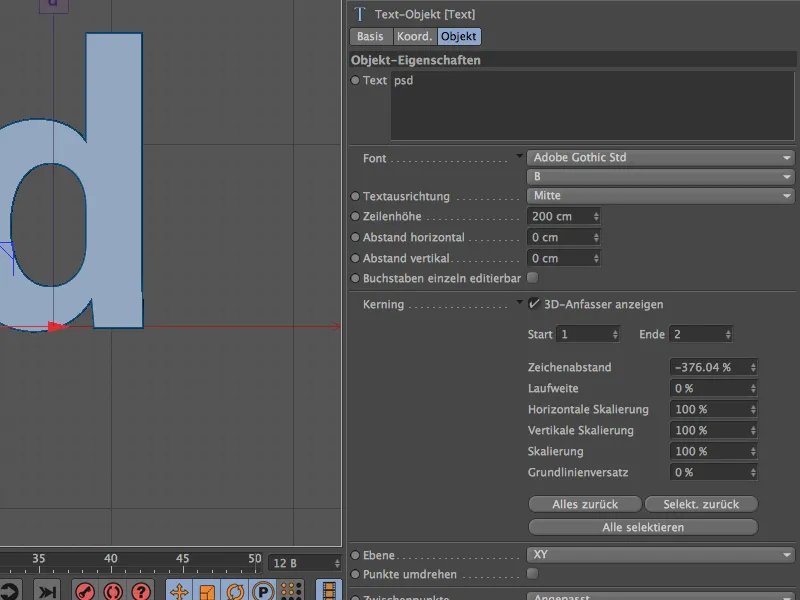
Now that "s" and "d" have been undercut far to the left, we move the " p " up a little using the baseline offset. To do this, we first select the " p " using the letter handle and then move it upwards using the arrow handle on the baseline.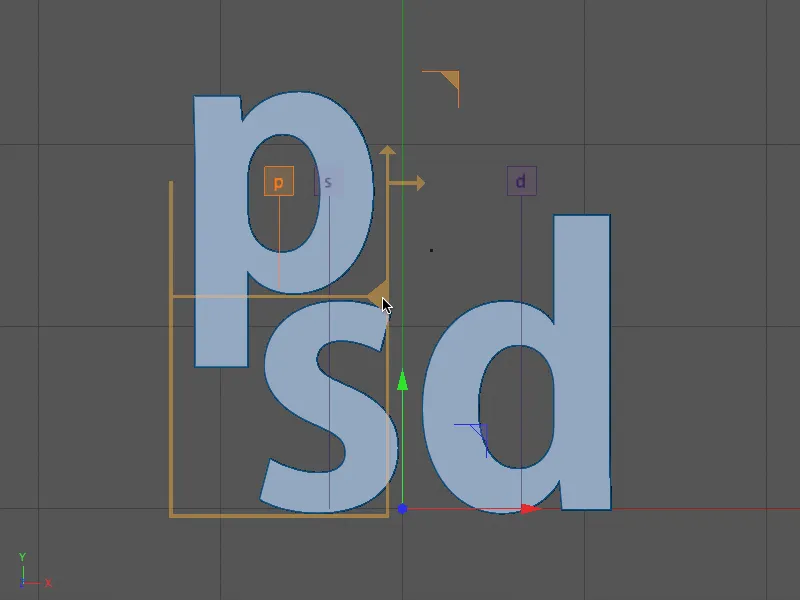
To check, here again are my settings for the letter "p" in the Attribute Manager. As the "p " seemed a little too dominant to me, I made it slightly smaller using the scaling parameter.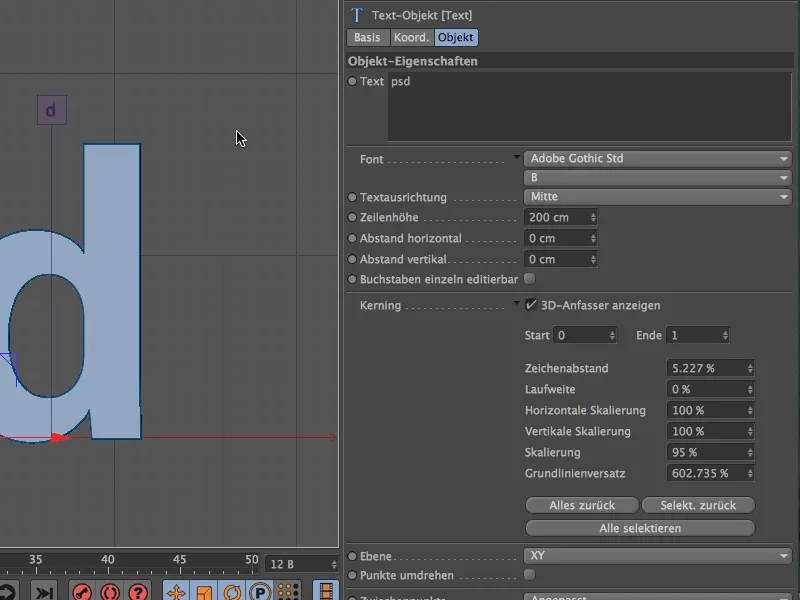
Last but not least, it's the turn of the "d". In the first step, we move it by undercutting it using the letter handle, then we move it upwards using the baseline offset until it visually merges seamlessly with the base of the "s".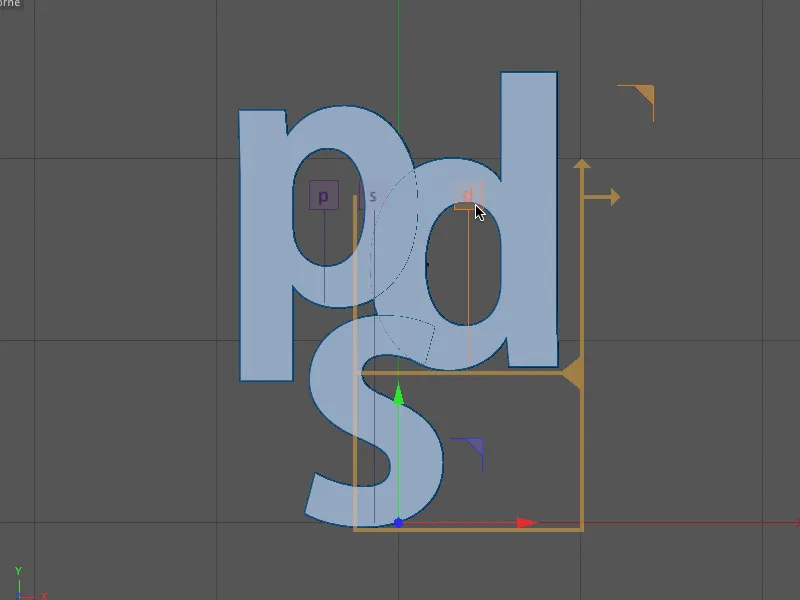
To check, here are my settings for the letter "d" in the Attribute Manager. These parameters naturally relate to my example with the font I used and are primarily intended to provide a starting point for your own creations.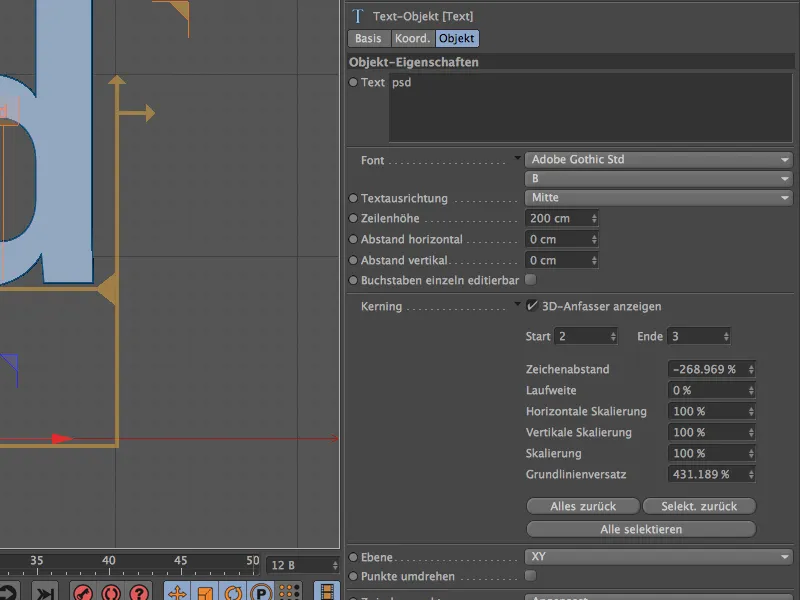
Controlling the kerning parameters with XPresso
You have probably already noticed that there is no parameter circle available for animation in the kerning parameters. This does not necessarily make text animation any easier, but thanks to XPresso it is not impossible either.
With a small text animation of two kerning parameters, let's take a look at what we can achieve with a single text object and the help of an XPresso expression without much effort. First, we assign an XPresso expression to an object, in my case the Extrude object, via the context menu with the right mouse button or via the Tags>CINEMA 4D Tags menu.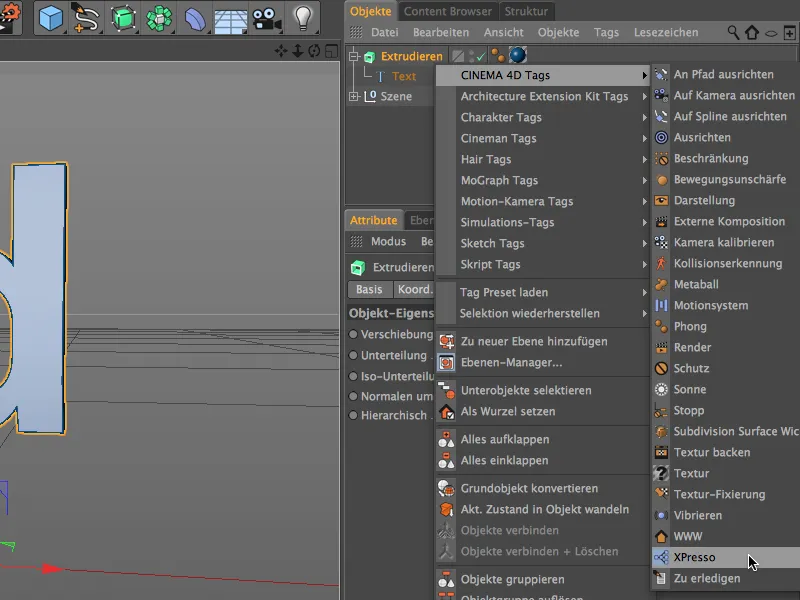
Double-click on the expression tag in the Object Manager to open the XPresso editor. Since we want to control the parameters of the text object, we drag it from the Object Manager directly into the XPresso Editor to create a node for the text object.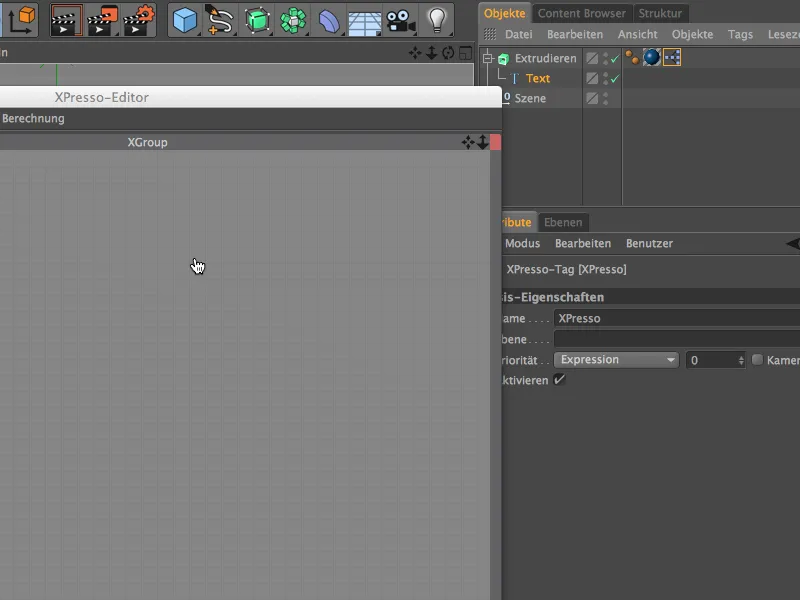
As we want to control the text object, only the blue input port is of interest to us. By clicking on the blue port button, we create a total of four ports from the Object Properties>Kerning menu : Start, End, Vertical Scaling and Run Distance. We need these four entries for our animation.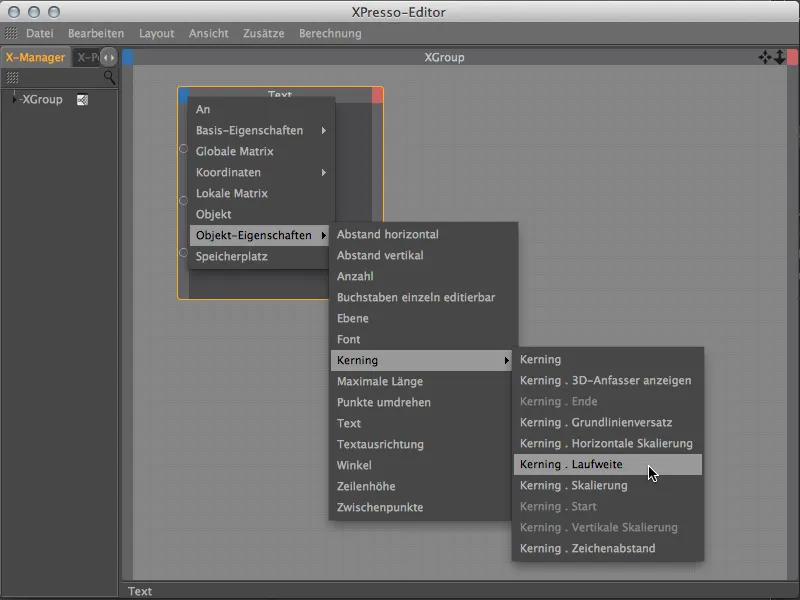
To supply the four ports of the text object node with data or values, we need additional nodes. Numerical values can be easily realized via the constant node, which we create via the context menu with the right mouse button in the menu New Node>XPresso>General.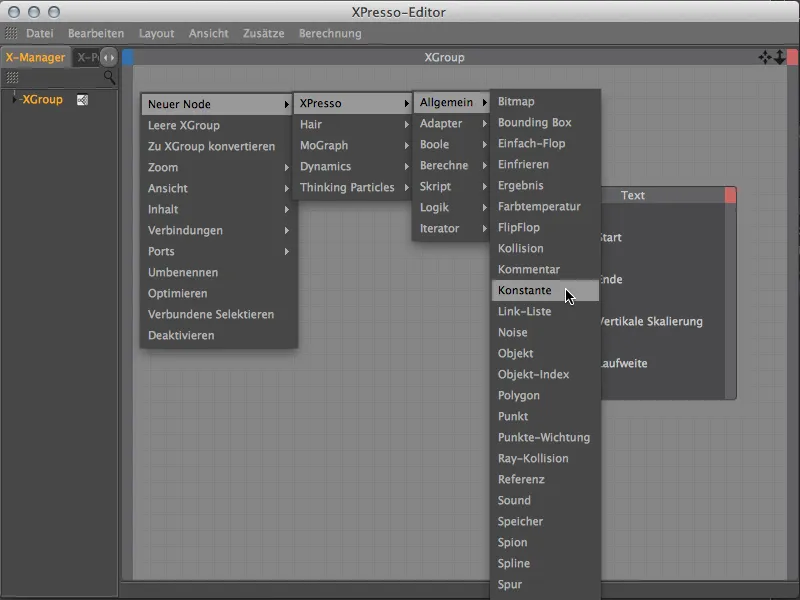
You can easily create copies of the constant node by moving the node in the XPresso editor while holding down the Ctrl key. We need a total of three copies to supply all four input ports of the text object.
Now I'll come back to the Start and End parameters of the kerning function mentioned earlier. If we do not specify in our XPresso expression which letters of the text object are to be addressed, the expression simply always uses the currently active selection, which cannot be in our interest. For this reason, we save the start and end here using two constant nodes with fixed values. We can connect the first constant node to the Kerning . Start, as the start value 0 is correct for the first letter.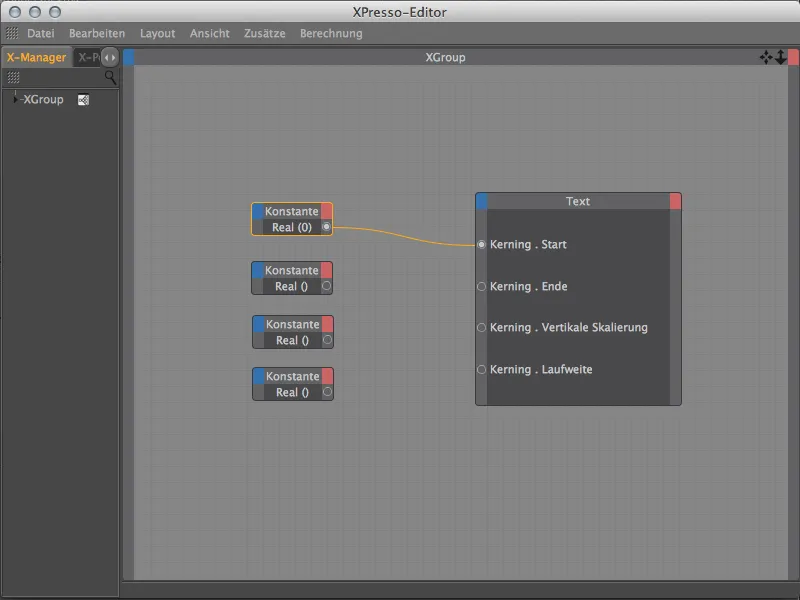
We select the second constant node in the editor so that we can enter a value in its settings dialog via the attribute manager. As we saw at the beginning in the text object, the kerning ends at letter 3. Now we can connect the two ports of constant and kerning . End with each other.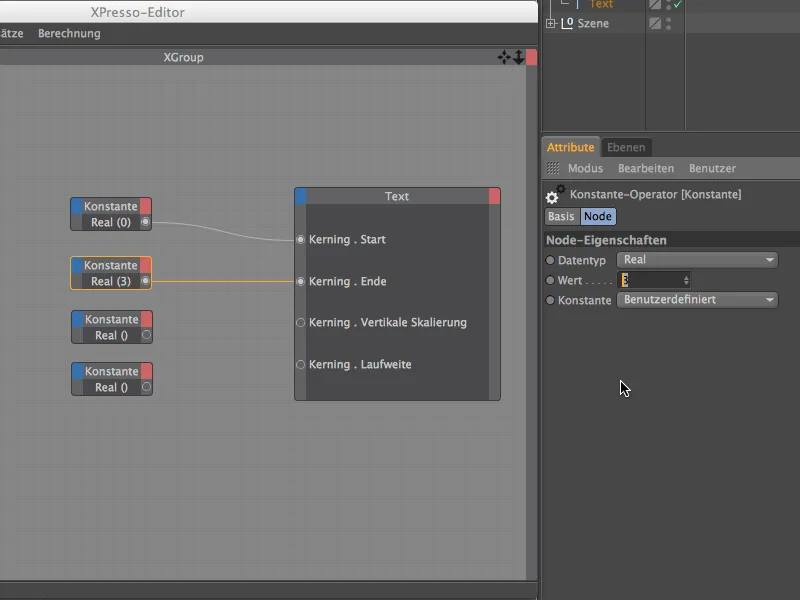
We continue with the control of the parameters responsible for the actual animation. To specify the current state of 100% vertical scaling, the value 1 must be present at the port. Accordingly, we enter the value 1 in the settings dialog of the third constant node and connect it to the port Kerning . Vertical scaling.
In contrast, the default value for the running distance is 0, which is why we can connect the port of the fourth constant node directly to the Kerning . Run distance without making any changes.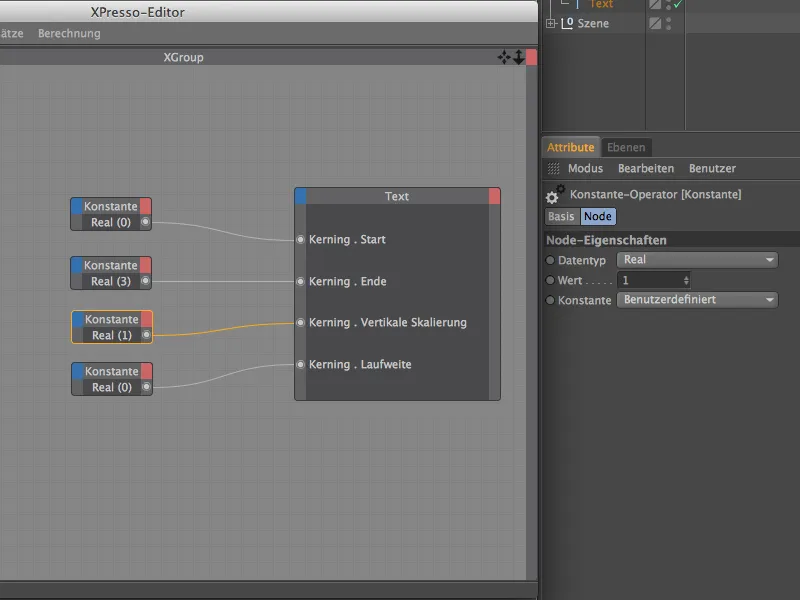
These last two constant nodes are the important contact points for the animation. It therefore makes sense to assign them a unique name. We can easily do this using the Rename command in the context menu by clicking with the right mouse button. I have simply named the two constant nodes after the port of the text object addressed in each case.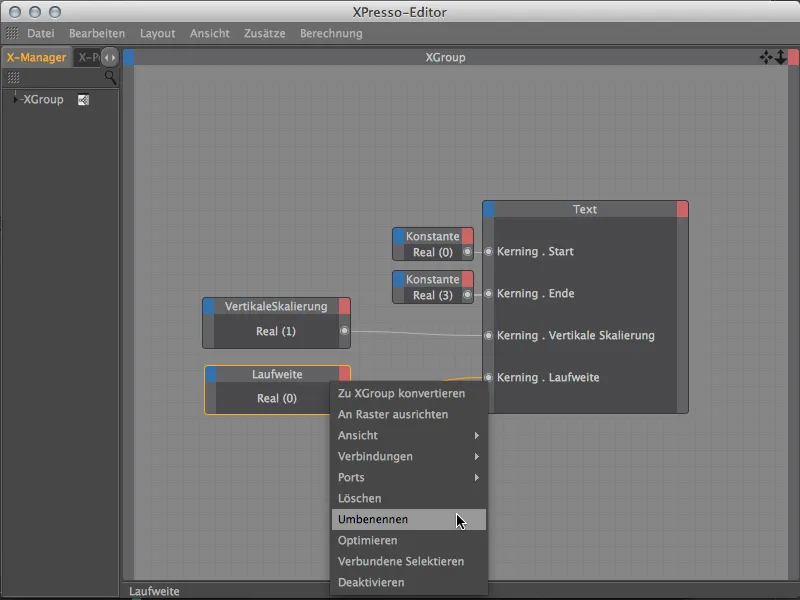
To make the animation of the two parameters really convenient, we now click on the Value parameter of the two constant nodes in the Attribute Manager and add both value parameters to the Head Up Display (HUD ) of our 3D view via the Add to HUD command in the context menu by clicking with the right mouse button.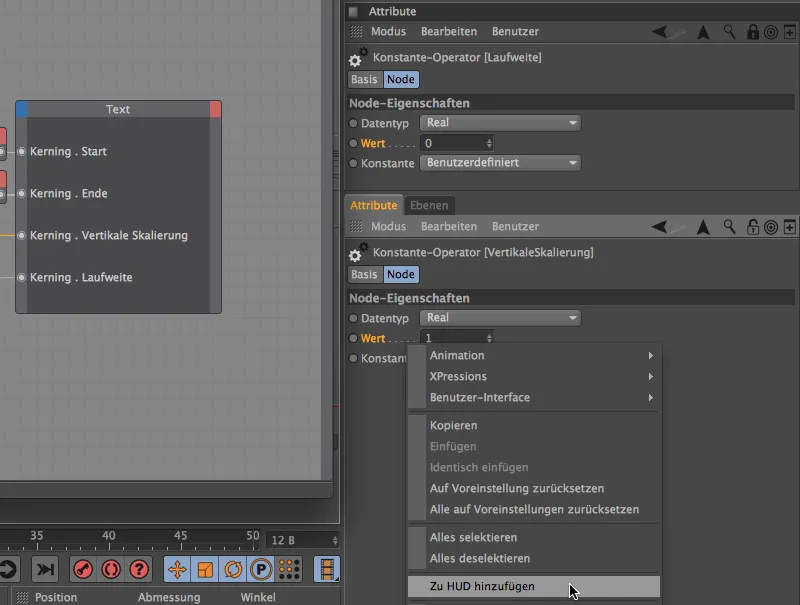
Animation of the text object kerning
Now we can close the XPresso editor and switch to the central perspective (F1 key) in our 3D view. To move the two new entries in the head-up display to a suitable position in the view, simply hold down the Ctrl key at the same time.
The combination of letters we created using kerning should be the final state of our animation. We should therefore record these parameters in a keyframe. For a very short and crisp animation sequence, we move the green time slider to frame 30 and create the first keyframes directly via the head-up display by clicking in the parameter circles while holding down the Ctrl key.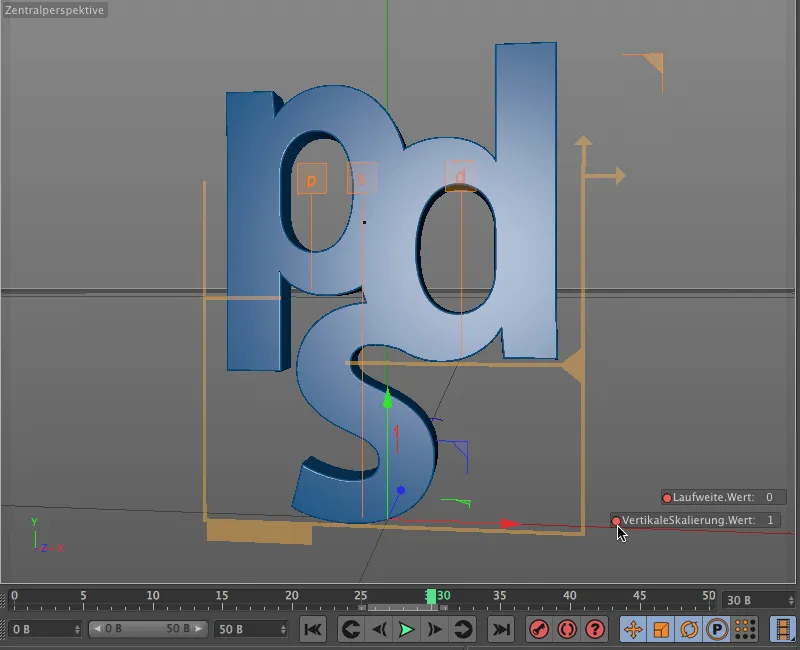
As the start of the animation should begin at frame 5, we move the green time slider there. We reach the final state captured in a keyframe after the letters move into the scene from the left, right and bottom. We have the best means at hand for this with the tracking distance. In addition, the letters should still be squashed at the beginning and unfold to their full size during the animation. For this, we have the vertical scaling as a parameter in the HUD.
In my example, you can see my two values for the two parameters, which are captured in a keyframe in Figure 5 by clicking in the parameter circle while holding down the Ctrl key.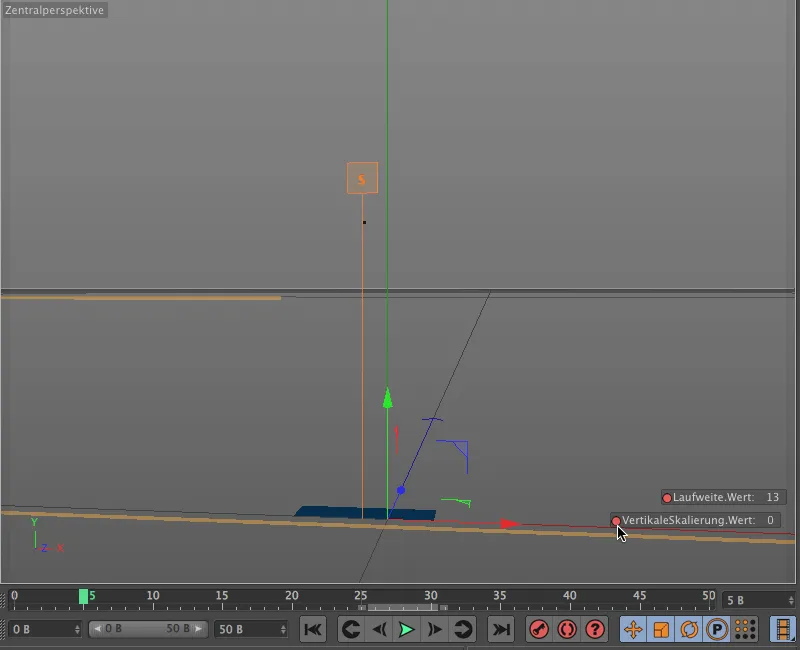
In order not to simply move the letters to the end position, but to allow them to overshoot a little and overlap, we make an intermediate stop at image 15 and record a value of approx. -4 for the run width in a keyframe.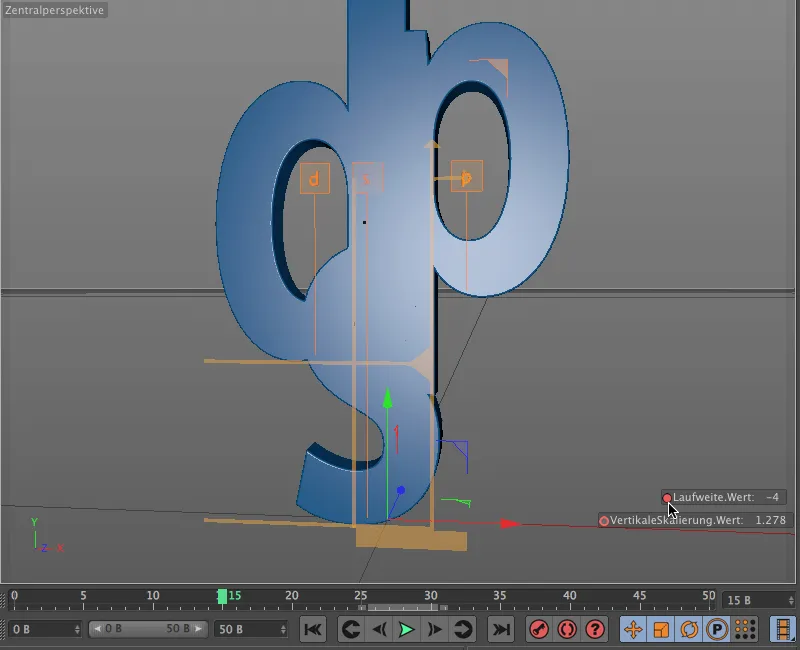
We can also apply a similar short exaggeration for the vertical scaling. So that the animation does not appear too uniform, we set this keyframe a little later, for example at image 21.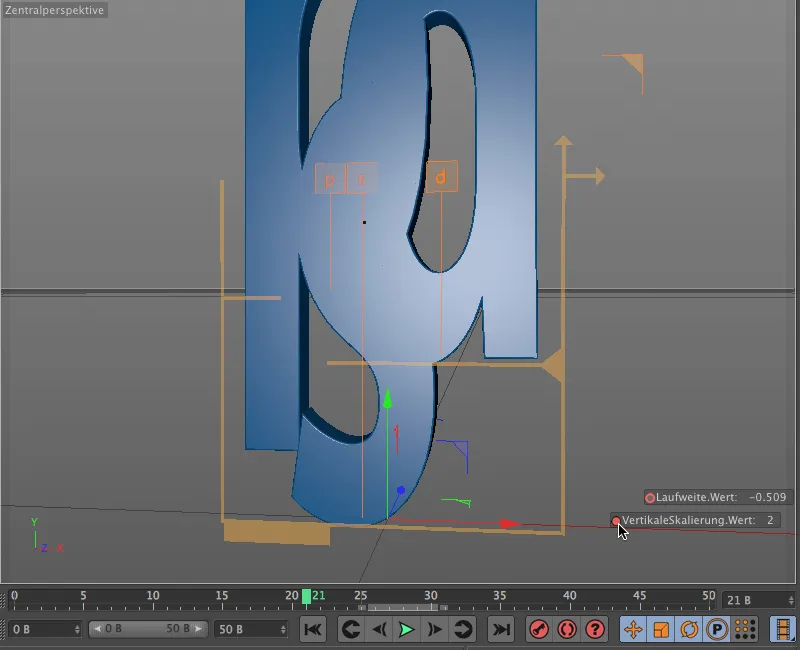
We get the next swing at image 25, where we let the letters drift apart a little again, for example with a run width of 2, which we record in a keyframe.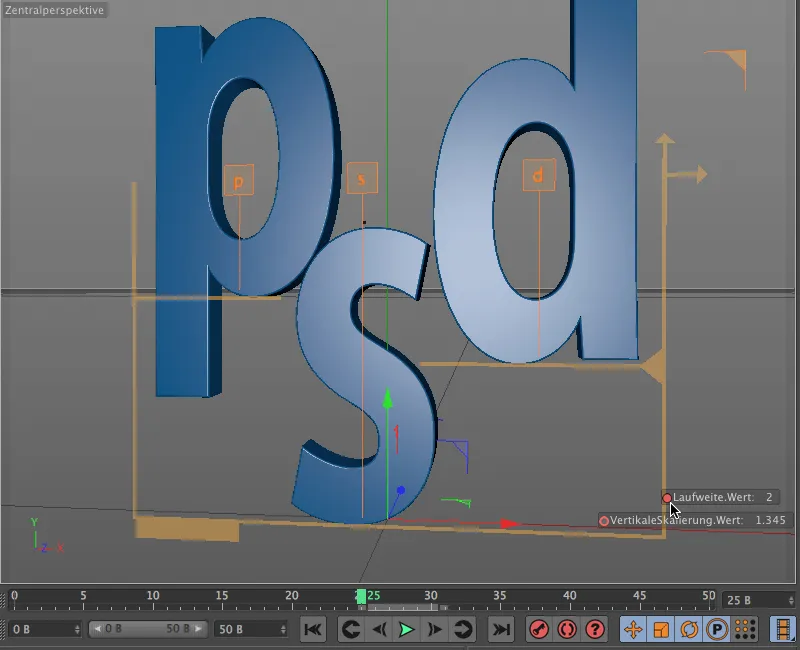
The vertical scaling is also given one last swing before the final state. The best way to do this is to go to the timeline ( Window menu ). In key mode, we open the vertical scaling track completely and insert a new keyframe slightly below the final state value in image 27 by clicking while holding down the Ctrl key. The adjacent curve of the parameter track shows very clearly how the scaling changes again shortly before the final state.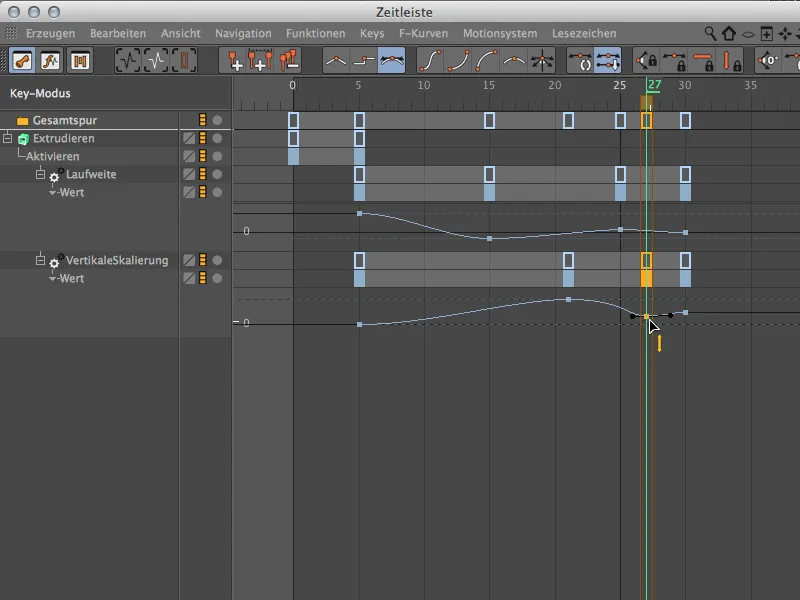
Finalizing the animation
We still have to take care of a small blemish. In the initial state, a small strip can be seen from the "s" despite scaling to the minimum. We can quickly eliminate this by simply activating the extrude generator at the start of the animation.
To do this, we set the green time slider back to image 5 and add a keyframe for the activated state via the settings dialog of the extrude object on its base page.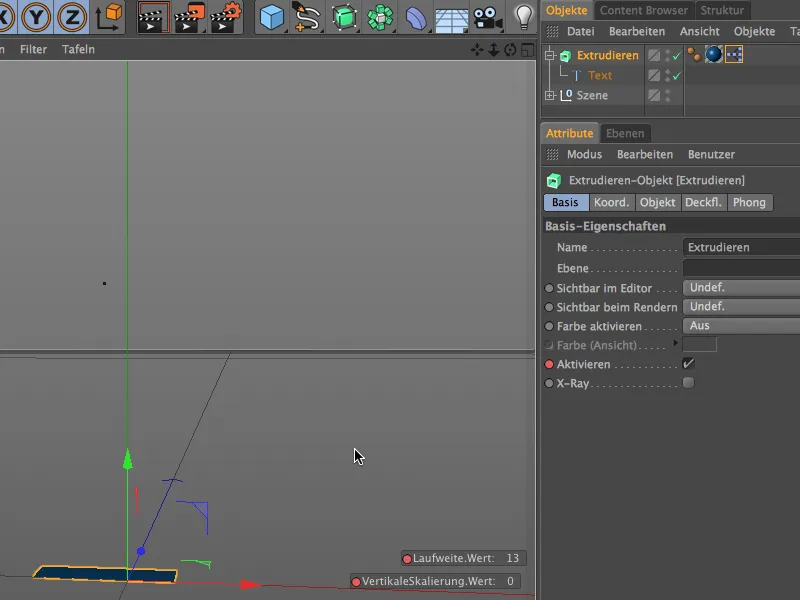
To ensure that the extrude generator is inactive before screen 5, we switch it off from screen 0. To do this, we move the green time slider to screen 0, remove the tick behind the Activate parameter and create a key for the inactive state by holding down the Ctrl key and the parameter circle.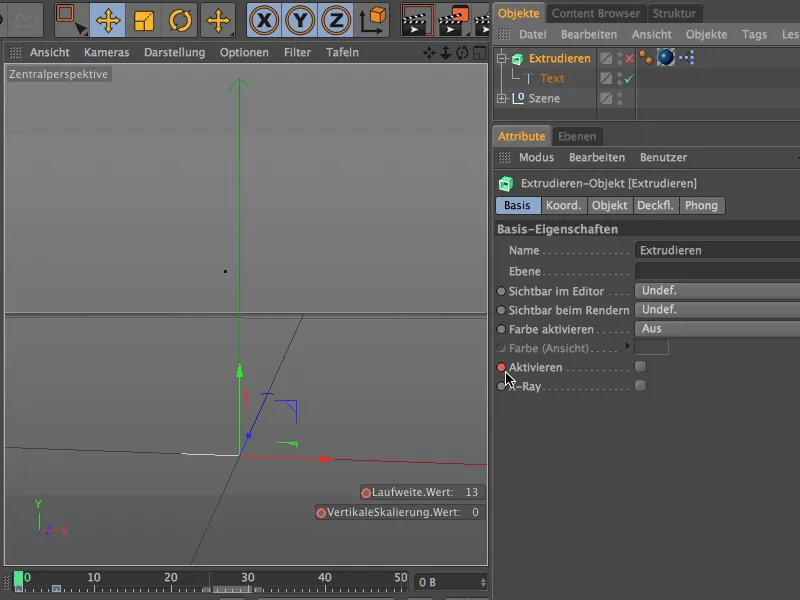
Our small example animation for the new kerning functions of CINEMA 4D Release 15 is now complete. As you have seen, the text object offers a few more parameters that you can experiment with ...


