Step 1: Placing the sky
For my advertising poster, I chose a wide format with the following settings:
- Width: 5000 px
- Height: 2857 px
- Resolution: 300 dpi
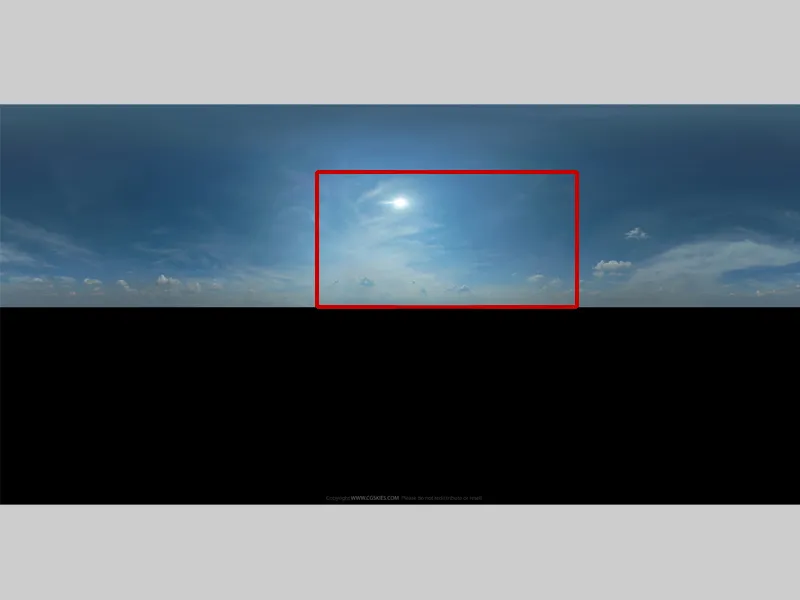
I chose a sky at www.cgtextures.com, selected a suitable section for my installation and inserted it into my workspace.
I divide my workspace as described in the first part:
- upper part 2/3
- lower part 1/3
I place my sky in the upper part of the picture. In the lower part I will create water using a plug-in for Photoshop: Flaming Pearl Flood. http://www.flamingpear.com/flood.html.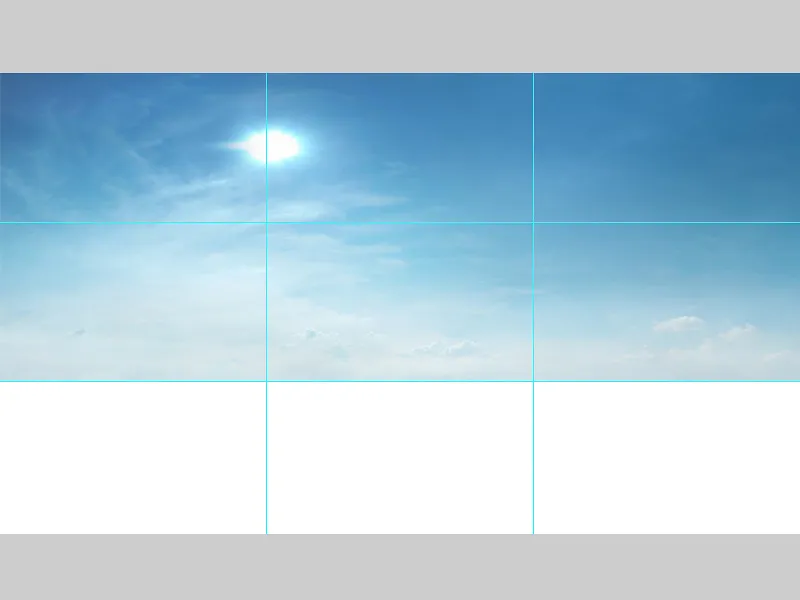
Step 2: Create water
I name the layer with the sky "Background", select the layer and go to Filter>Flaming Pearl Flood. A window opens where I have various setting options. I can adjust everything in the plug-in, such as horizon, perspective, wave strength, etc. When I am satisfied with the result, I confirm it with OK.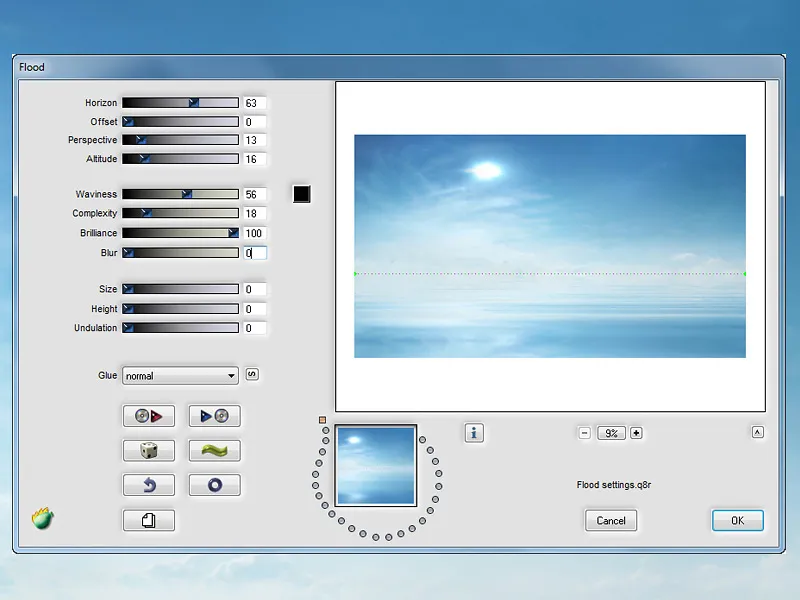
Step 3: Adjust the background color to the Kuler palette
Now I'm going to adjust the background to my created Kuler palette. I select a point in the image with a medium color tone and I will use this point as a guide for the correction. To give me a better overview, I paint my color palette in small boxes. Take a color pickup tool and click once on my box with the blue color and once on a spot in the sky. Open the Info window, here I can see the RGB numbers and adjust the color perfectly.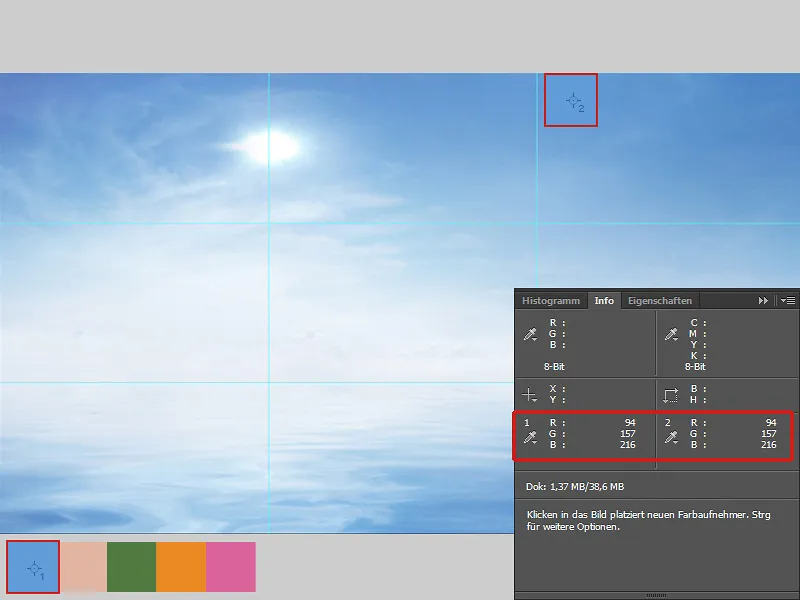
For the background, I will use gradation curves to lighten the image a little in the mid tones. In Hue/Saturation I will reduce the saturation slightly. In Color Balance, I will give the image more blue tones. I combine all the layers in one folder and name it "Background".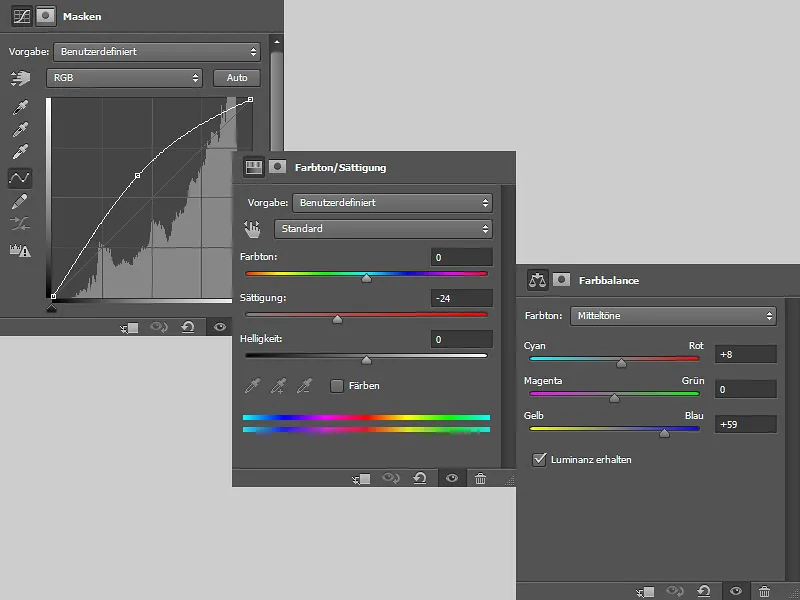
Step 4: Inserting the stone
I place the stone in the lower left area of the image. As a first step, I will correct some color in Color Balance. I merge the two layers into one layer and name it "Stone". I duplicate the layer and select the Soft light mode with 55% opacity. I put the two layers in a folder and name it "Stone".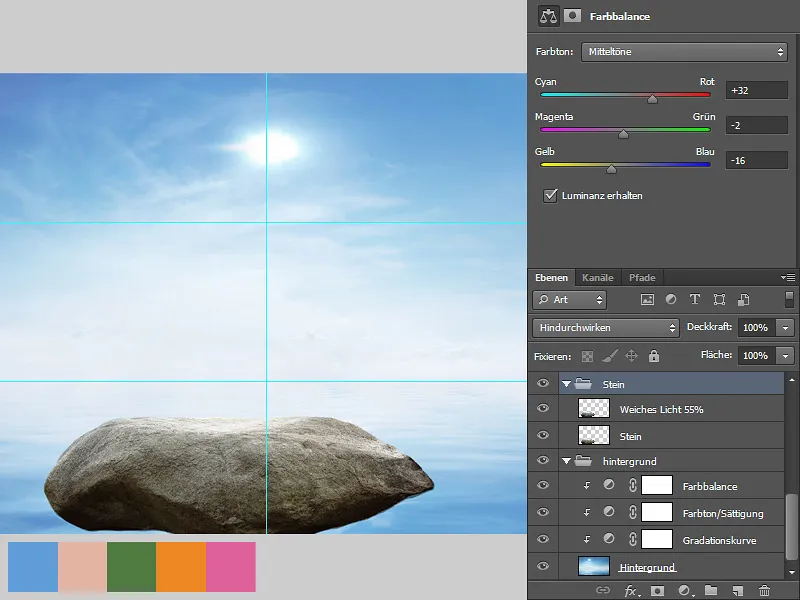
Step 5: Adding the woman
I have already cropped the woman and now I insert her into my picture and place her on the stone. I will remove the sun in the background. The hair also needs to be adjusted, as the white fringe disturbs me. And to make sure the woman really sits on the stone, shadows need to be painted.
Sun: I select the "Background" folder, create a new layer and call it "Sky". Pick up the color of the sky with the eyedropper tool and paint over the sun with a soft brush.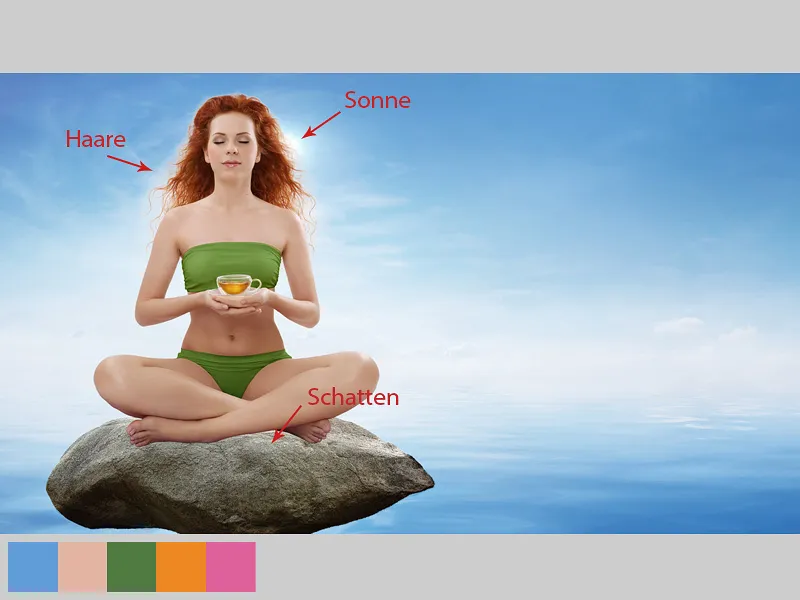
Hairline
I create a new layer and call it "Hairline". To ensure that the layer only affects the hair, I create a clipping mask and select Multiply mode for the layer. Using a soft brush and an opacity and flow of approx. 10-15%, I carefully paint over the hairline; I keep picking up the color from the sky.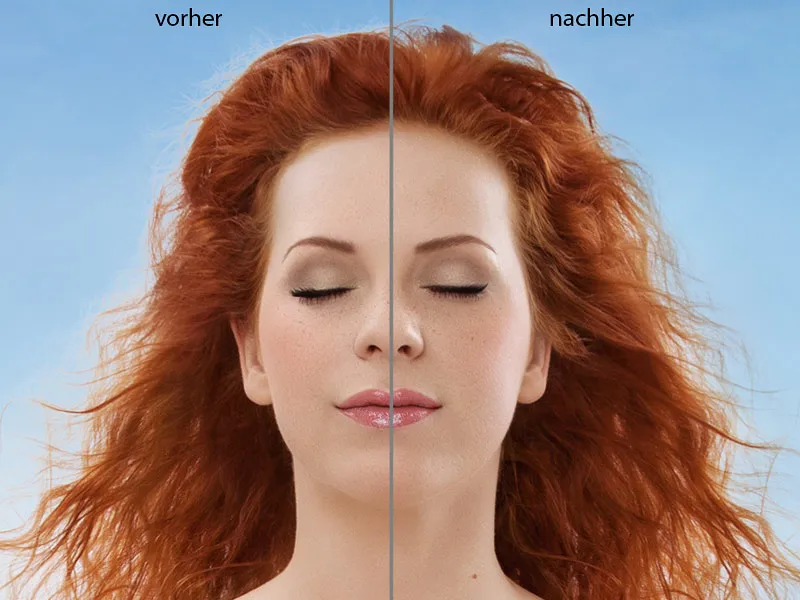
Adjusting the skin color
The skin color is a little too warm and doesn't fit in with the rather cool surroundings. I go to Photo filter, select dark blue, move the slider to 18% and click on the clipping mask icon. On the mask, I paint over the hair and clothing with black paint. I only want the skin color to change.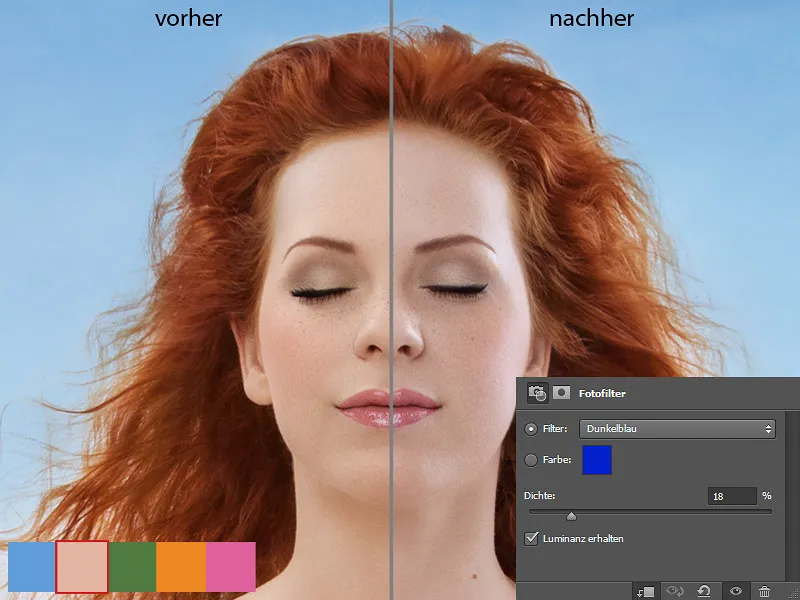
Painting hair
I create a new layer and call it "Paint hair." Then I choose a brush tip for the hair and paint with a medium opacity and carefully flow hair in the places where it is missing. The clipping left hair missing or unsightly gaps.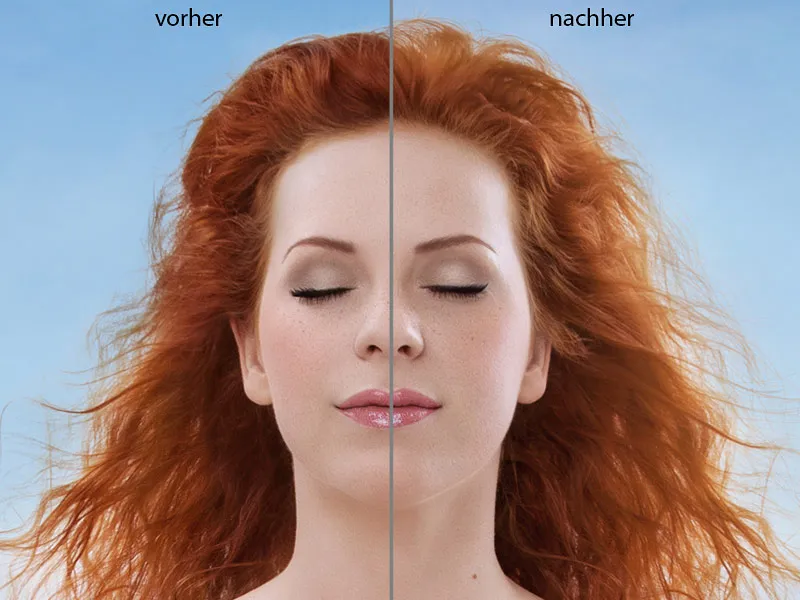
Now I want the hair to have a slight glow, i.e. to shine a little. And I do this on a new layer in negative multiply mode. I choose a large, soft brush tip with a low opacity and a flow of approx. 10-20% and paint over the hair. I take the color from the hair. I combine all the layers into one folder and call it "Woman."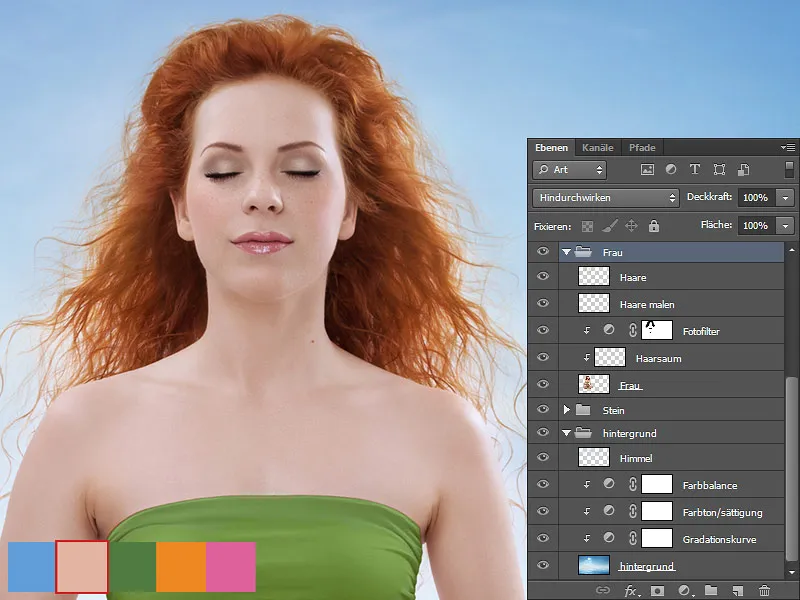
Painting shadows
I create a new layer between the "Stone" and "Woman" folders. I call the layer "Shadow" and put it in a new folder, which I call "Shadow/Stone". Later, I will create more layers for shadows in this folder. On the "Shadows" layer in Multiply mode, I paint the shadows under the woman's legs with a soft brush. I take the color from the stone.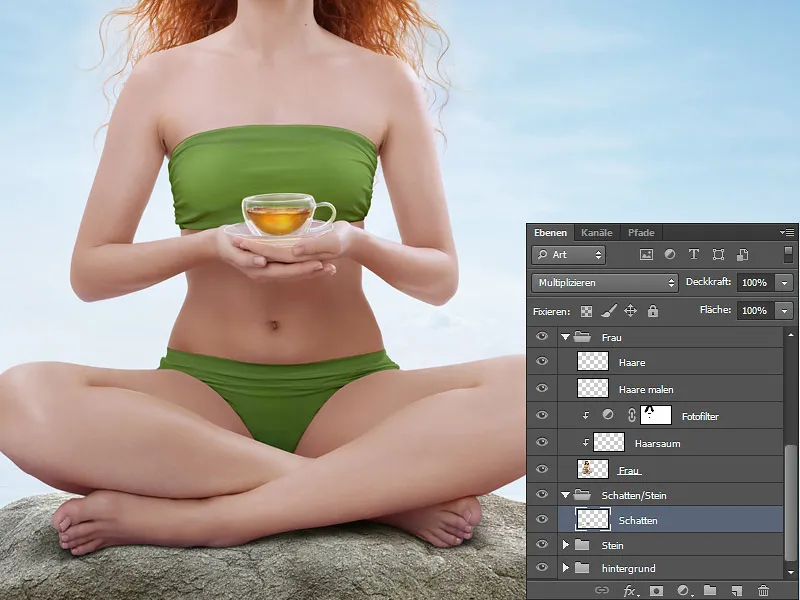
Coloring the legs
The color of the legs and feet also need to be adjusted. I create a new layer in the "Woman" folder with a clipping mask over the "Photo filter" layer. I call the layer "Color legs" and select the Color mode. Using a soft brush with an opacity and a flow of approx. 10-15%, I paint over the legs and feet. I take the color from the stone.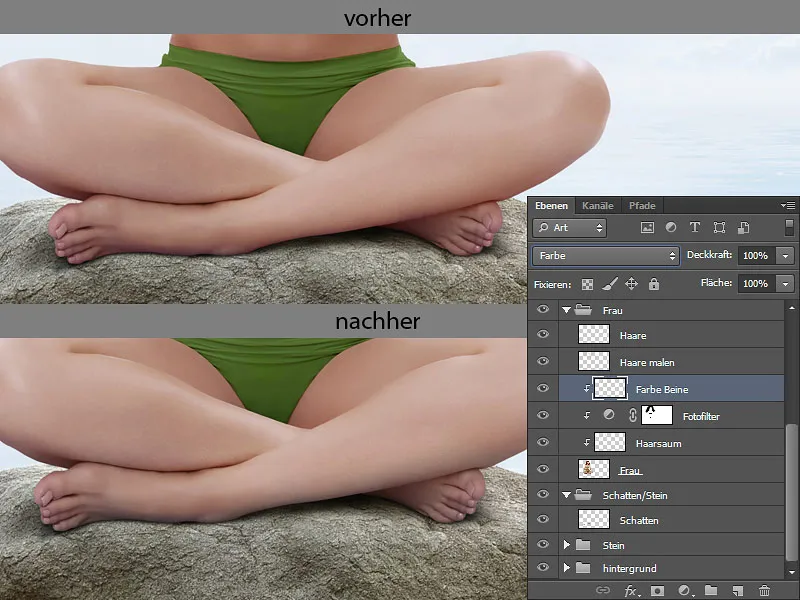
Step 6: Water reflection / stone
The "Woman" and "Stone" folders are duplicated. The folder copies are combined into one layer. I name the layer "Stone" and place it between the "Stone" folder and the "Shadow" folder. I also put this layer in a folder that I name "Water reflection". I will make the reflection of the stone from this layer. To do this, I select the layer and go to Filter>Flaming Pearl Flood. When I have finished making the correction, I confirm my changes with OK.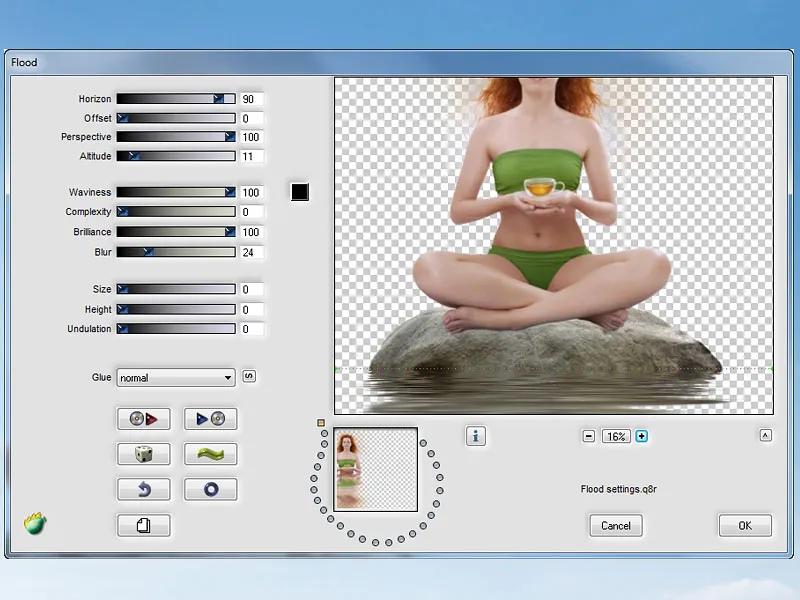
Using an eraser tool, I erase everything except the reflection, adjust the reflection to the stone; I select the smudge finger tool with the smudge finger brush tip at a strength of 50% and smudge horizontally in the direction of movement, thus blurring unsightly areas and gaps. Now I have to add blue tones to the reflection. I do this via color balance and, importantly, click on the clipping mask icon so that the changes are only applied to the reflection.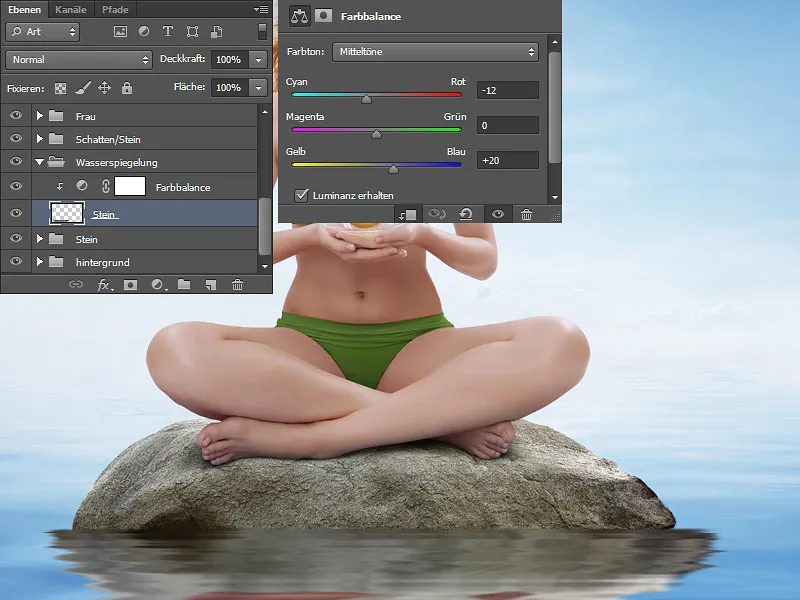
Step 7: Adding lotus flowers and leaves
Now I place all my prepared Blums and leaves and distribute them on the water as I like. I name the layers and put them in a folder above the folder with the woman and call it "Blum".
I create new layers for the layers with the Blums in Multiply with clipping mask mode. I will paint shadows on the layers for each individual Blum. I have marked the areas with the red arrow. I choose a soft brush with an opacity and a flow of approx. 10-15%. I take the color from the places where I want to paint.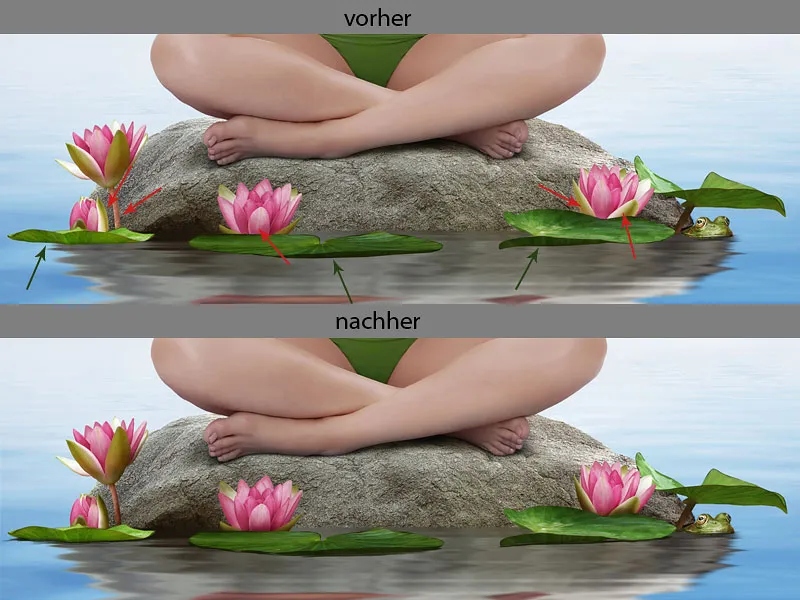
Now I create a new layer for the shadows under the leaves; I have marked the areas with a green arrow. I move the layer to the bottom, the layer must be below the layers with the leaves. I call the layer "Shadows". I select the brush tip with the name "Details" and paint shadows under the leaves. I take the color from the darkest parts of the leaves. I can correct my strokes a little with the smudge finger tool by smudging the strokes slightly in the direction of travel.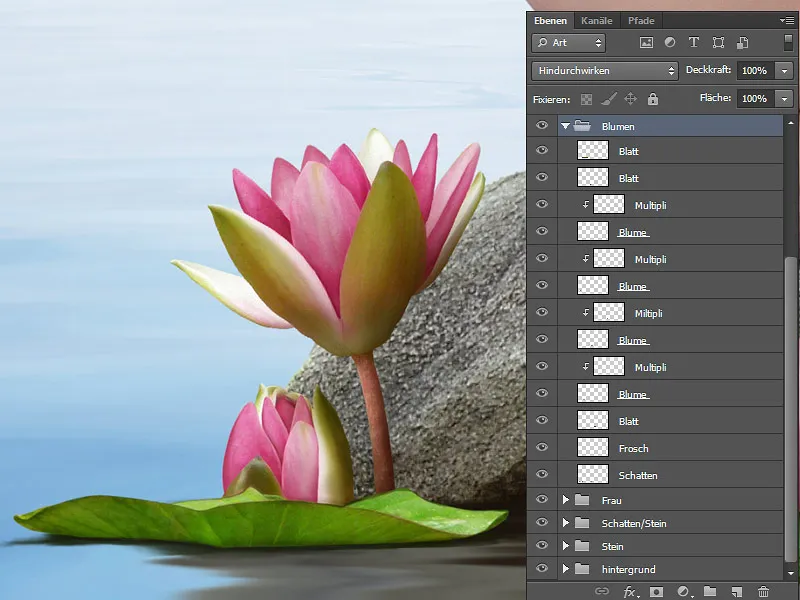
Water reflection lotus flowers and leaves
I copy the layers with the Blums and leaves and put the copies in the "Water reflection" folder.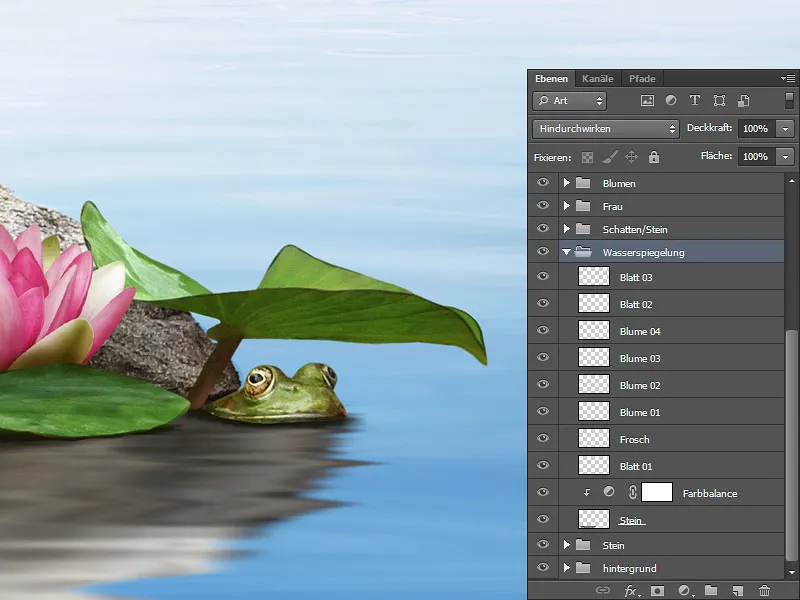
Now I select the layer with the leaf and go to Filter>Flaming Pearl Flood. Different settings are made for each individual Blum and each leaf. You just have to look and experiment. When I'm happy with the result, I confirm it with OK. I did the same with each layer.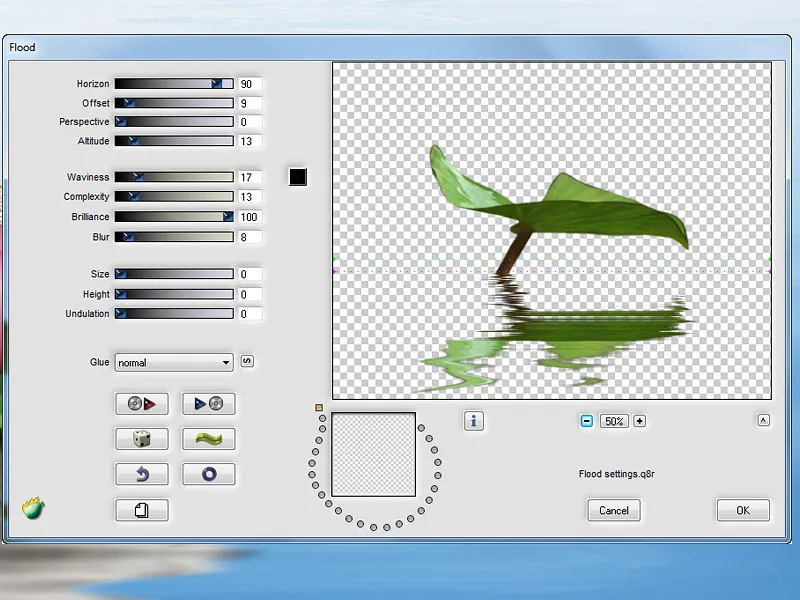
I erase the leaf with an eraser tool and leave only the reflection. Now I place the reflection under my leaf and under the frog.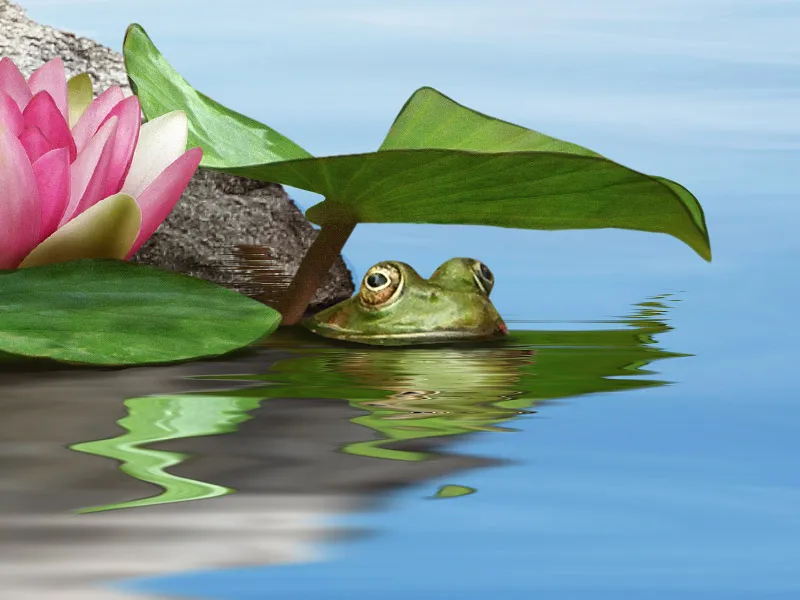
You can't leave the reflection as it is because it doesn't fit. I erase some areas with the eraser tool and use the smudge finger tool to give the reflection the right shape. For the wiping finger, I choose a standard brush with a hardness of 80% and wipe in the direction of travel.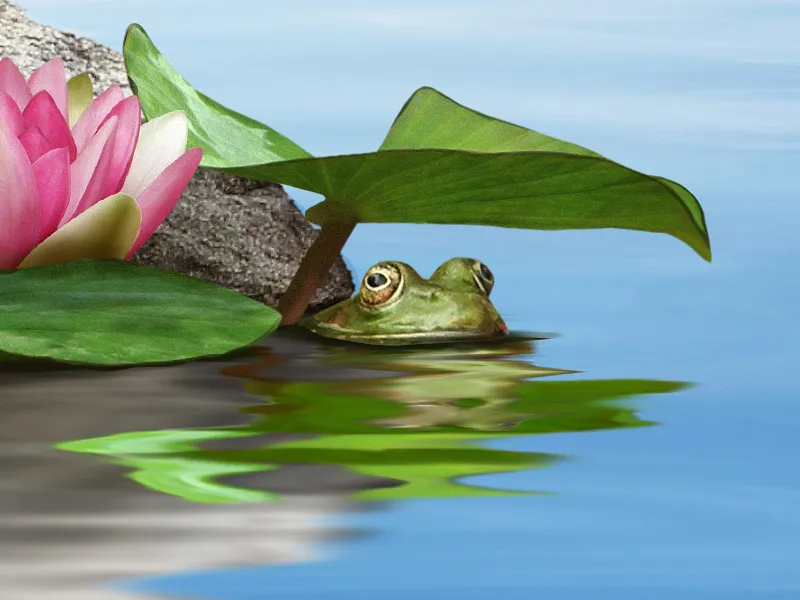
This is what my result looks like: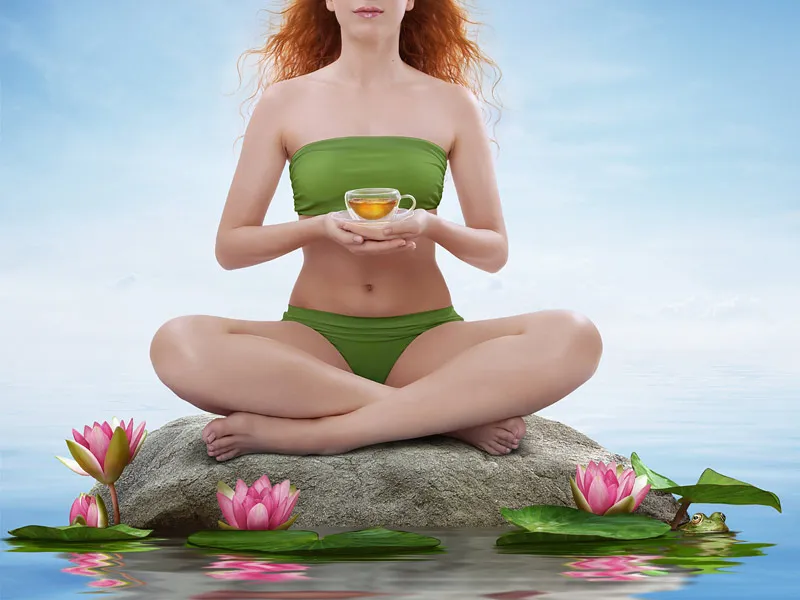
Color correction of the reflection of Blums and leaves
I like the reflection on the Blums and leaves, but the color needs to be adjusted a little. The Blums and leaves are a little too bright, so I change that in the gradation curves by pulling the curve in the mid tones down a little.
I do this for each leaf and Blum and create clipping masks by clicking on the clipping mask icon at the bottom. The saturation of each leaf and Blum also needs to be reduced, which I do via Hue/Saturation. I set the Saturation slider to -31% and activate the clipping mask. I will correct the color of the Blums a little, because they seem a little too reddish to me. I'll do this via Color Balance and activate the clipping mask again.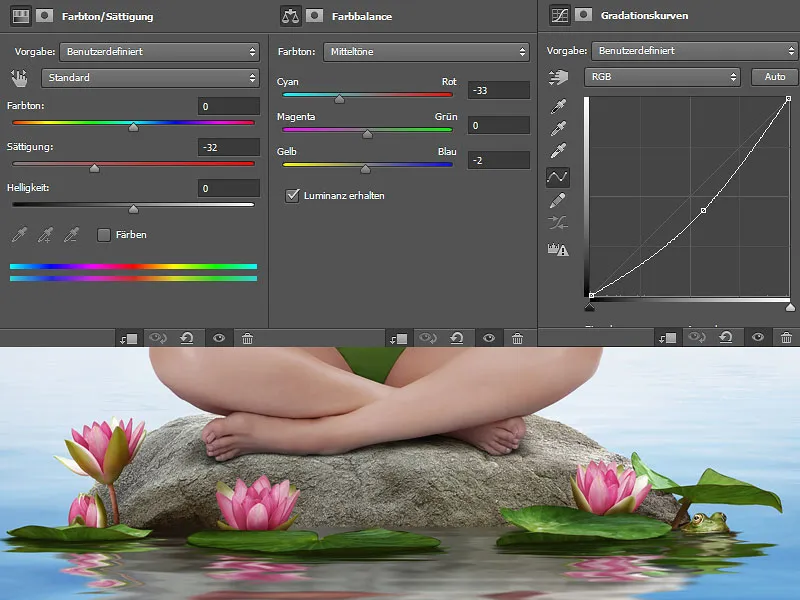
This is what my layer palette looks like: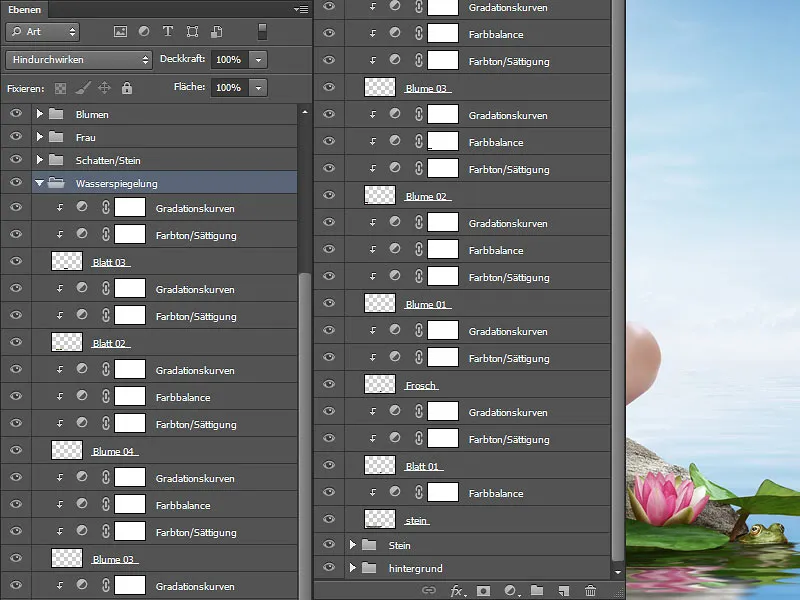
Shadow on the stone
In the "Shadows" folder, I create a new layer in Multiply mode. On the layer, I paint shadows of the Blums on the stone, because they shouldn't be missing either. I choose a soft brush with low opacity and flow (approx. 10-15%). I take the color from the stone and carefully paint in the shadows. The closer the object is to the stone, the darker and more expressive the shadows become. The further away, the softer.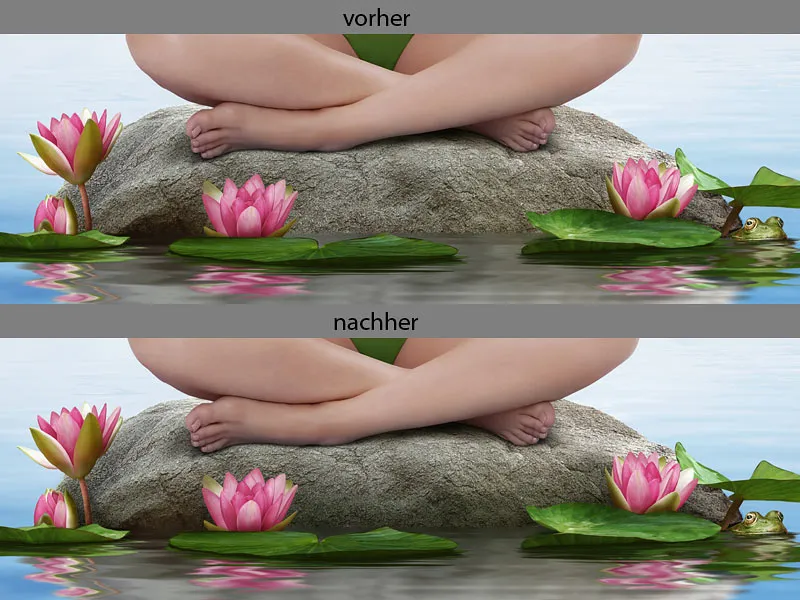
Step 8: Painting water droplets
I create two new layers "Water droplet 01" and "Water droplet 02". I will paint the water drops on the layers.
First, I paint an outline so that I can see the shape of what my water droplets should look like. I paint the outline with the brush tool for "Details". The second step is to paint over the water droplets with a base color. Then I determine where the shadow side is and paint it with a dark color. It's very difficult to visualize where the light and shadow are off the top of your head, so it makes sense to look for reference pictures. Which is what I did! I blur the color gradients between light and dark with the smudge finger tool. And as a final step, I paint light reflections. I also do this with the brush tool for "details" and carefully blur them with the smudge finger tool. I put the layers in a folder and call it "Paint details".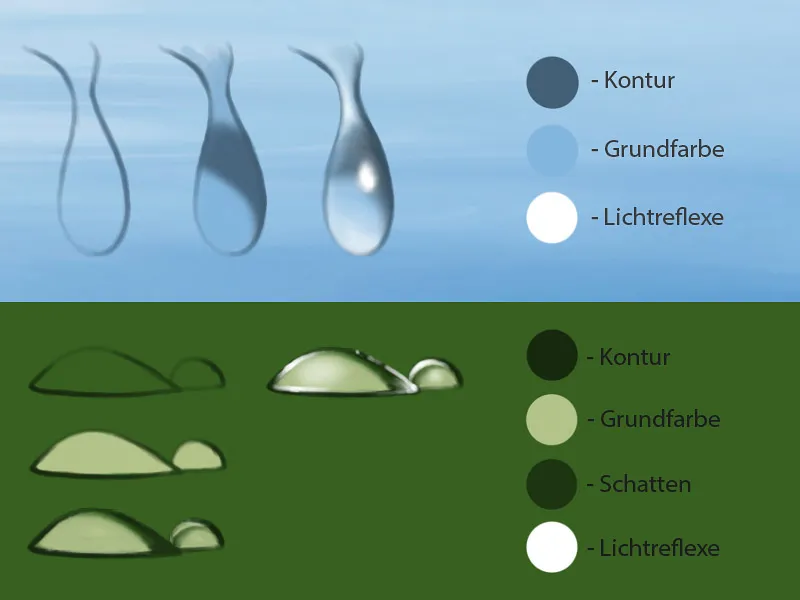
Step 9: Painting water reflections
I create a new layer in the "Paint details" folder and name it "Water reflections". I will paint the water reflections on this layer. Using the brush tool for "Details" with a medium opacity and a flow of approx. 50%, I paint light strokes with dots on the edge of the stone and on the leaves using white paint.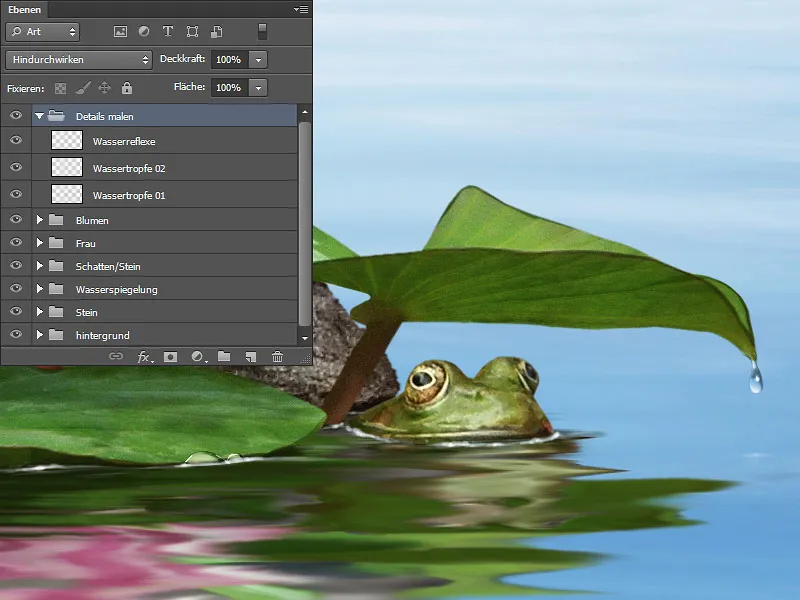
The best thing to do here is to look for reference images that you can use as a guide.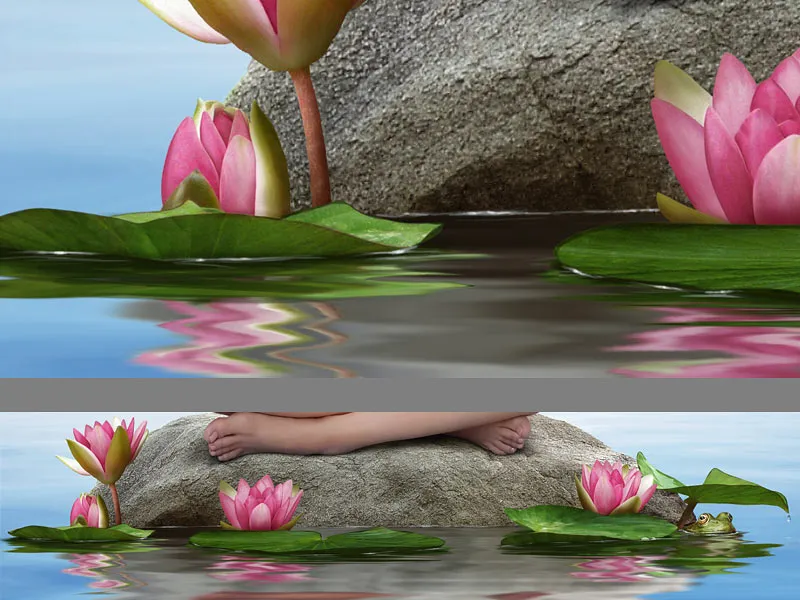
Step 10: Add noise
The last step is to add some noise to my water reflection. Editing and the smudge finger tool have also blurred the image pixels. I create a new layer in Soft Light mode and fill it with 50% gray. I put the layer between the "Shadow/Stone" folder and the "Water Reflection" folder and go to Filter>Noise Filter>Add Noise.
The strength always depends on the rest of the image. I orientate myself on the leaf and move the slider until the noise on the leaf and the noise in the water have the same strength. In my case it is 4%. I select Gaussian normal distribution and Monochromatic and confirm with OK.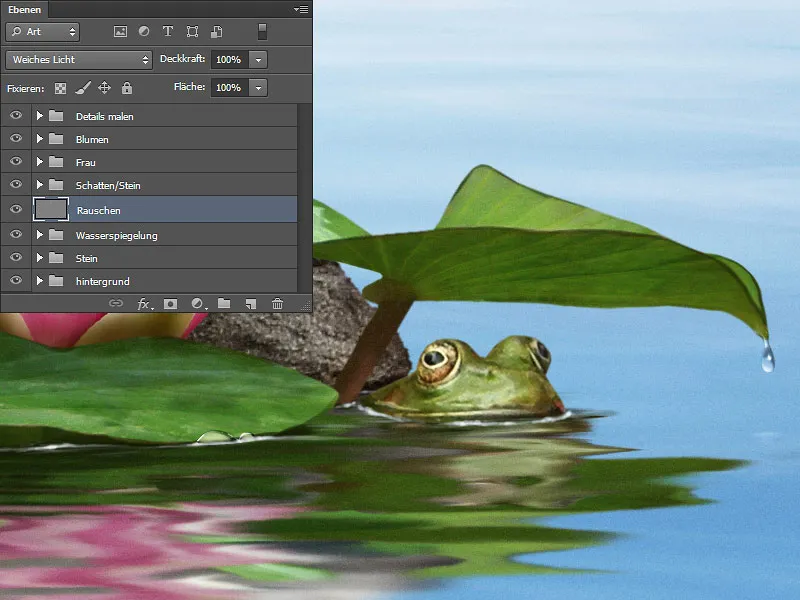
Step 11: Kuler
And a few more words about the Kuler. In step 3 ("Adjust background color to Kuler palette") I showed you how I work with the Info window. It is important to check the numbers, otherwise it will be too much and you will quickly lose track. Of course, this procedure only makes sense if you have a prescribed color palette or are working with Kuler and want the colors to be identical. If this is a free work and you design freely according to your taste, then you can save yourself the time.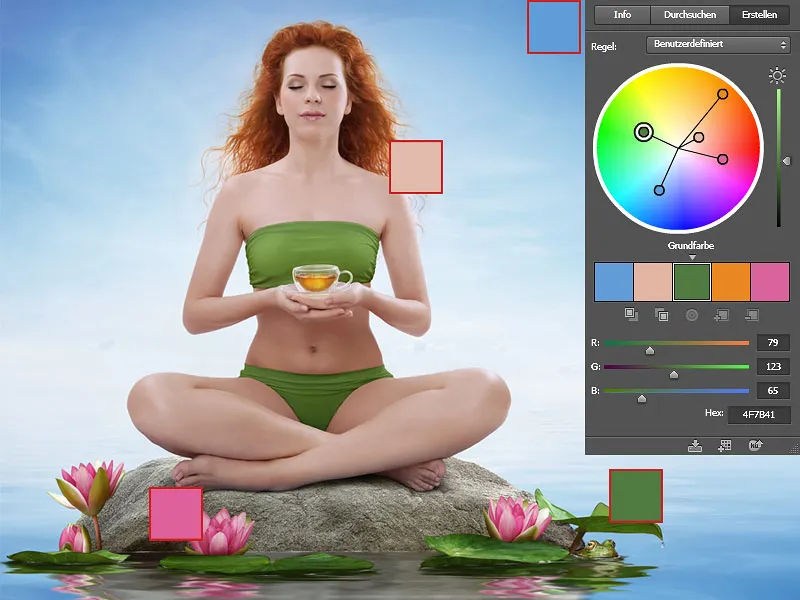
And this is how it will look!.webp?tutkfid=78752)


