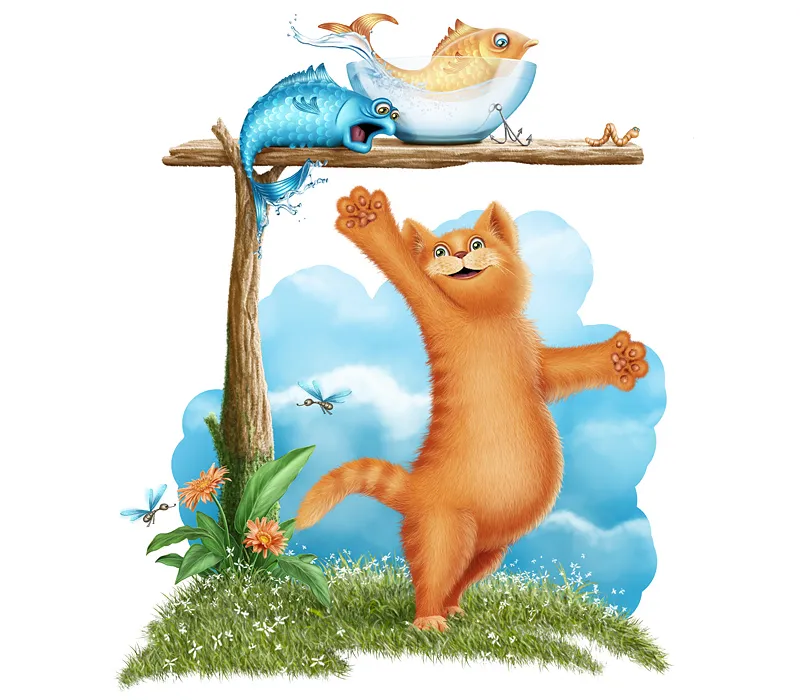
Step 1 - Meadow
Insert photo / painterly effect
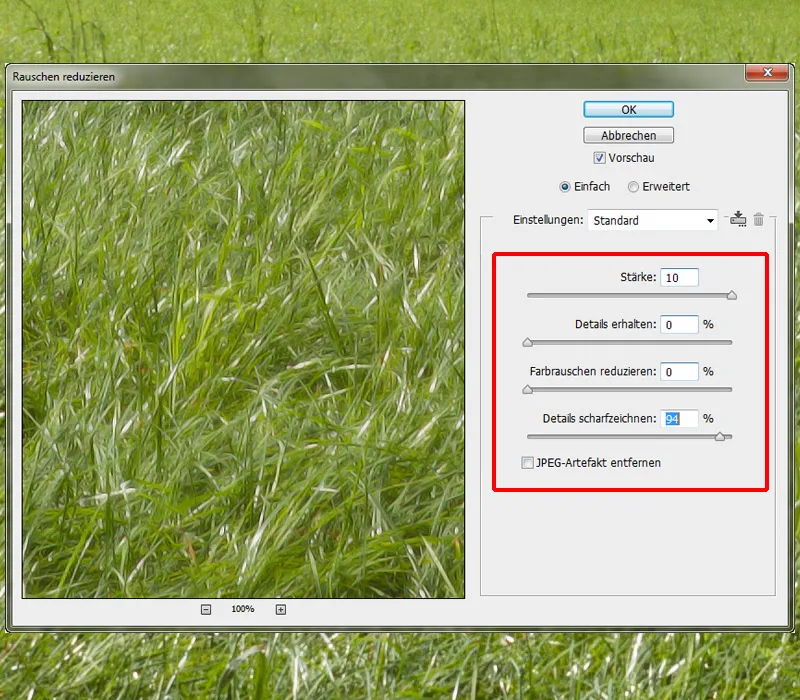
The first step is to insert the photo with the meadow into my picture. So that it doesn't look like a photo, I'll correct it a little with a filter: Filter>Noise Filter>Reduce Noise. The settings are different for each photo, it depends on the size of the image and the desired result. If necessary, you can repeat the process several times. In my case, once was enough.
Painting meadow / grass
I put the photo with the meadow in the "Meadow" folder and call it "Meadow photo". Below this layer is the painted layer that I created at the beginning when assigning the colors. I turn the photo layer into a clipping mask. I will paint grass on the painted layer and this will be displayed on the layer with the grass photo. I use the grass brushes from Nathies; in the brushes settings, only the middle part is important, where you can change the size, axis, angle and distance.
In this case, you have to experiment a bit and see which settings work best. I set the opacity and flow to 100%, paint along the edge and change the size , angle and axis! Now I'm going to paint some higher grass in the background; for this I'll use Brushes Hard Round, set Opacity and Flow to 100% and paint individual blades of grass. The meadow is a little too light compared to the cat; I'll change that using the gradation curve by pulling the curve down a little in the mid tones. And then I click on the Create clipping mask icon.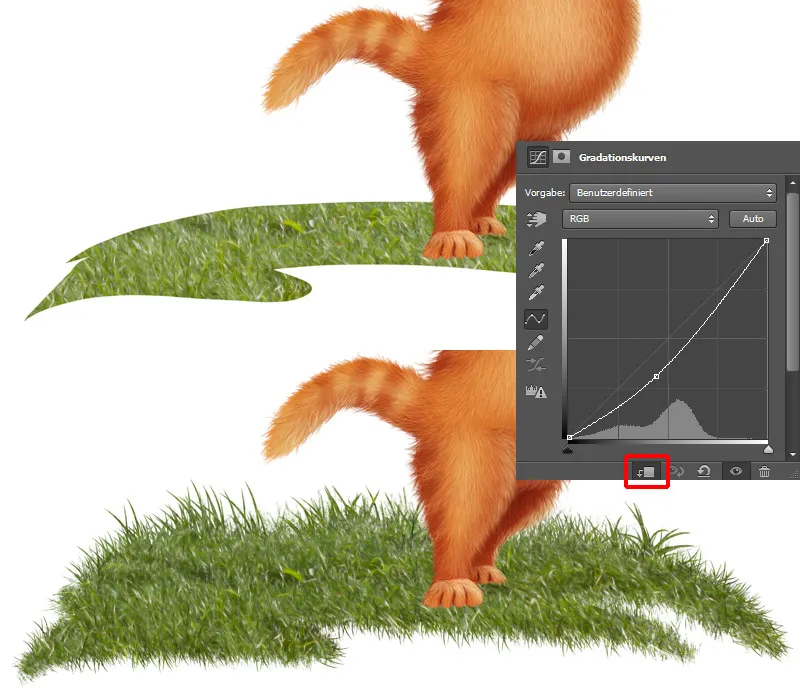
Step 2 - Painting the sky
In the "Background" folder, I create a new, empty layer on which I will paint a blue sky. I take Brushes Hard 1 in a medium size, set Opacity and Flow to 100% and paint the sky. It makes sense to show the layer with the sketch so that you can see better how it looks in the overall composition.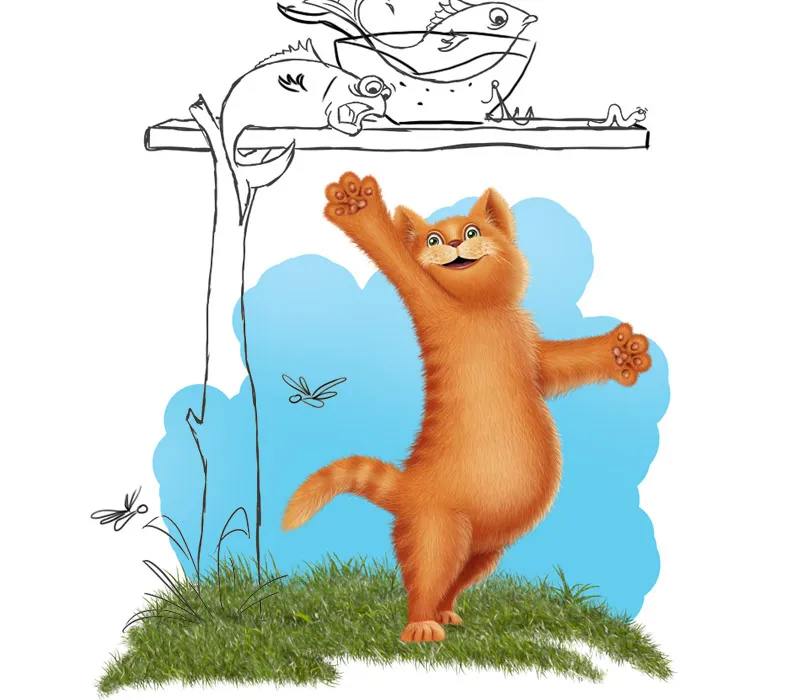
I will paint clouds on a new layer with a clipping mask; for this I choose the Clouds brushes from DanLuVisiArt. I take white color and paint again from back to front.
Step 1: I take a slightly larger brush tip, set opacity and flow to 40% and paint clouds where I want them.
Step 2: I reduce the size of the brush tip slightly and paint in the upper part of the clouds.
Step 3: I set the opacity and flow to approx. 65-70%, reduce the size of the brush tip and paint in more detail in the upper area.
Step 4: I set the opacity and flow to approx. 80-90%, make the brush tip even smaller and paint carefully around the edge of the clouds.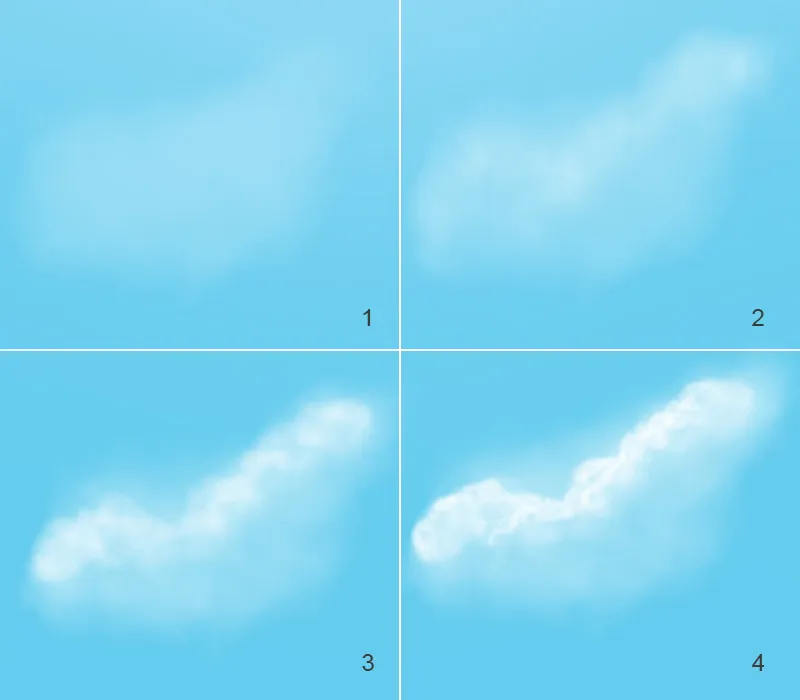
Adjusting the color in the sky
In the second picture you can see my finished result, but I don't quite like it yet. I want to give the sky more expression! I will darken the lower part of the sky a little. I'll create a new layer under the clouds and call it "Sky Color". Then I take a slightly darker shade of blue and paint with a soft brush tip in the lower part of the sky, setting opacity and flow to 50% (image 3). I want to darken the sky with the clouds even more in the lower area. I do this using the gradation curve by dragging the curve in the middle slightly downwards, and then I click on the Create clipping mask icon so that the changes are only applied to the sky and not to the whole image. I take a soft brush tip and paint with black foreground color in the upper part of the sky. I only want the sky to be darker in the lower area.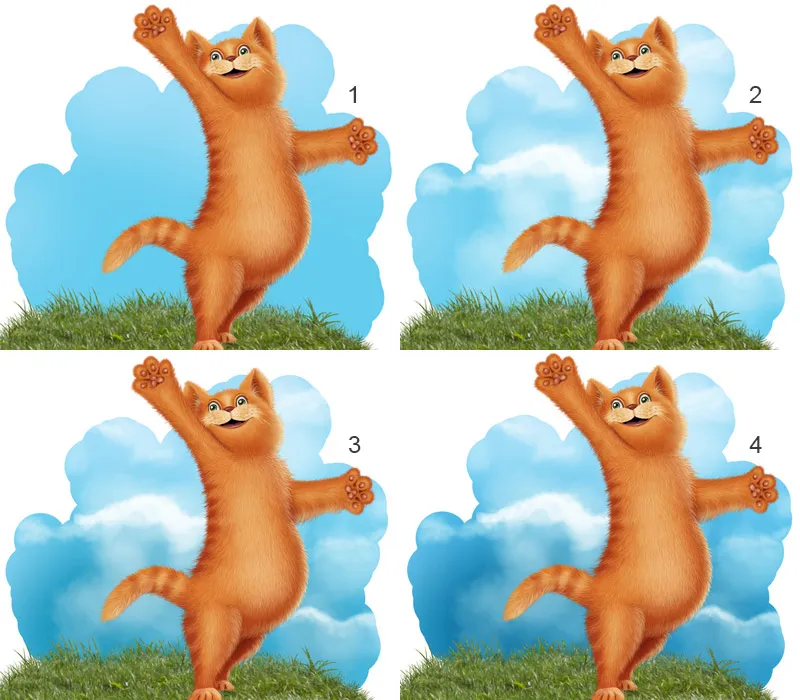
The layer overview: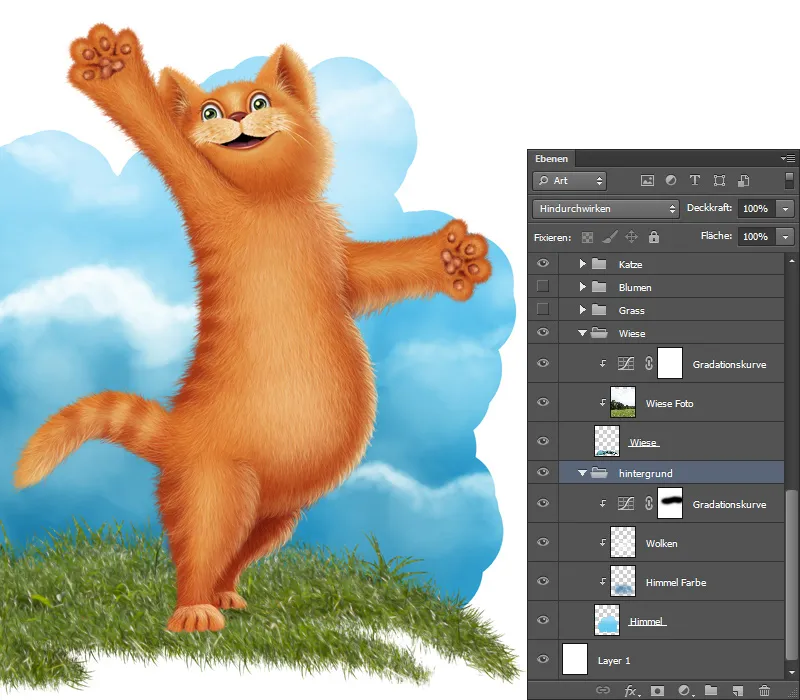
Step 3 - Painting the wooden table
I have already made the folder for the table at the beginning and I move it between the "Background" and "Meadow" folders. I already have two layers for the table in the folder, one for the table top and one for the table base. I want to give the edges more structure, so I use the eraser tool, select the tree bark brushes and carefully erase the edges.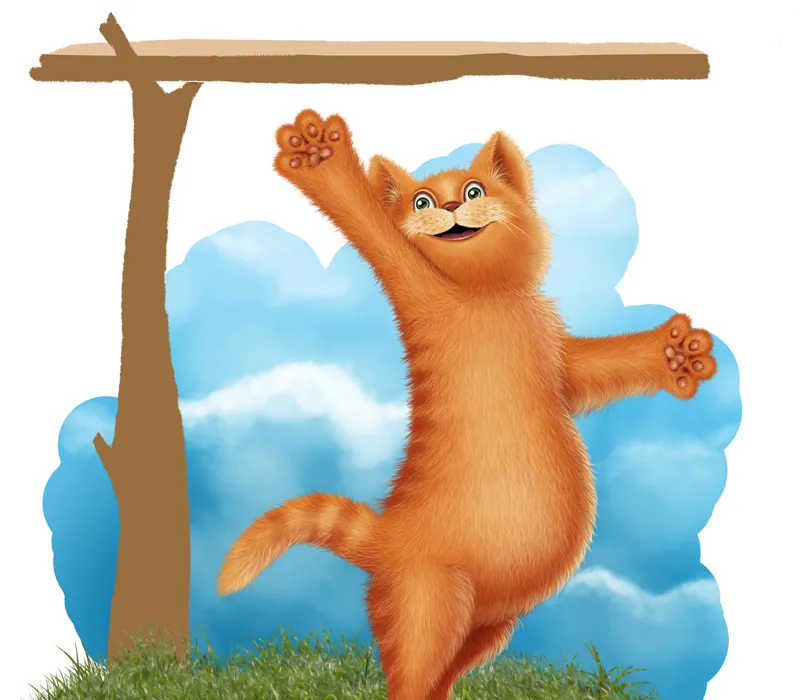
Wooden table / texture brushes
The next step is to paint a texture on the table. I create a new layer with a clipping mask for the table top and a new layer with a clipping mask for the table base layer, I call both layers "tree bark". I select the tree texture brushes from Nathies, in the brush settings I go to the texture settings and scale them to approx. 20-25%. The settings always depend on how big the object is and how big or small the structure should be. When I am happy with the size of the texture, I paint it onto the layers.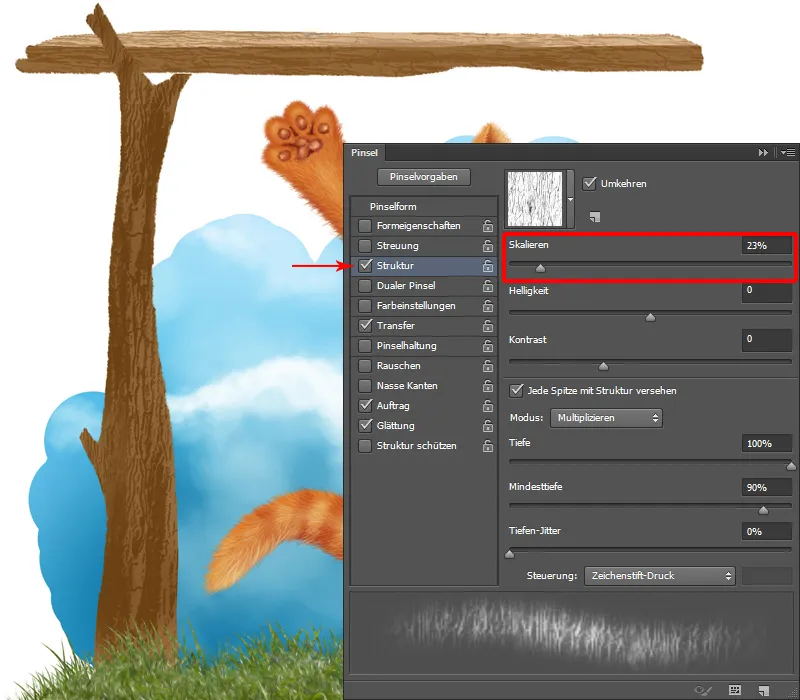
Wooden table / structure
To paint the structure, I create an empty layer with a clipping mask for the table base and a new layer with a clipping mask for the tabletop layer.
Step 1: You can now see the tree bark on the wood and to make it stand out nicely, I'll paint in more texture. And again, I'll do this step by step from the back to the front!
Step 2: I choose the tree bark brushes with low opacity and flow (approx. 20%). In the color selector, I take a beige tone and first roughly paint the shapes.
Step 3: In the color selector, I take a slightly lighter color, set the opacity and flow to 30-35% and paint over the areas to make them stand out even more.
Step 4: In the color selector, I take a dark shade for the shadow side and paint in the dark areas with the same opacity and flow.
Step 5: As a final step, I will paint more details with a very light color, opacity and flow at 70-80%. I make the tip of the brush very small and paint carefully on the edges of the tree bark.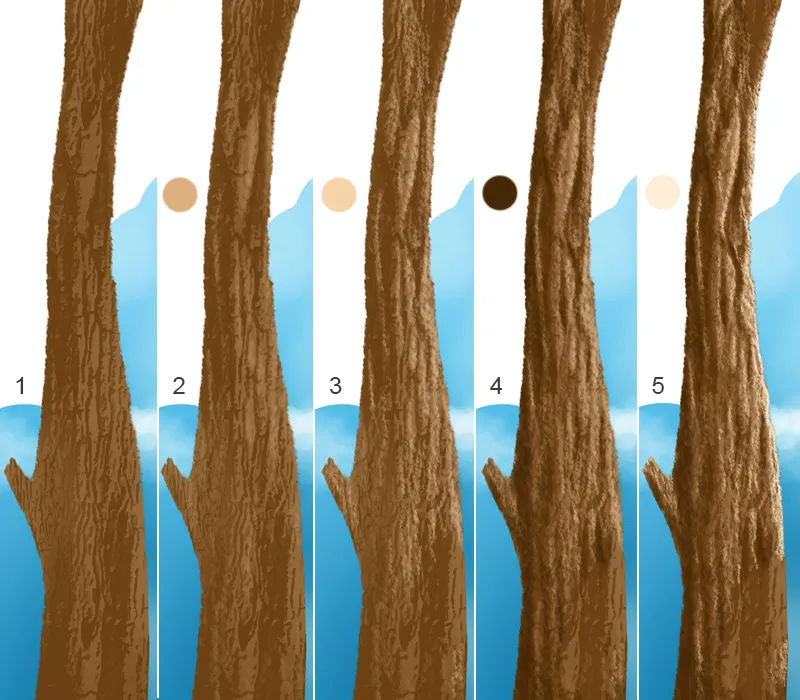
The same procedure for the table top!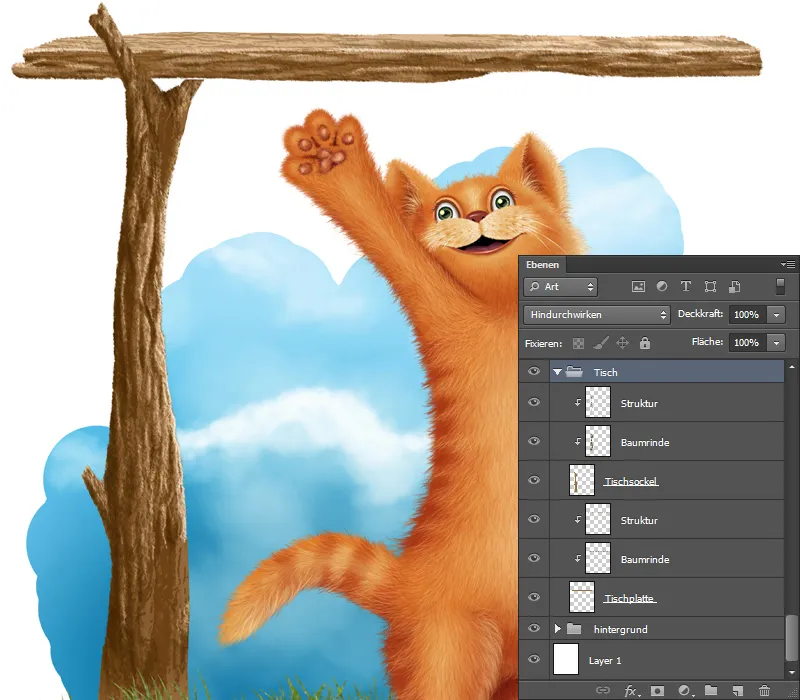
Step 4 - Painting the bush
I have a "Grass" folder above the "Meadow" folder; I will paint the bush on several layers in this folder. In my case, there are six layers that go from back to front, which means that the back leaves are on "Layer 1" and the front leaves on "Layer 6". I fix each layer with Fix transparent pixels. I select Brushes Painting 3 with opacity and flow at approx. 40% and paint rough shapes with the colors. I then blur them with the smudge finger tool and the brush (Brushes Smudge Finger). I use the same brush to paint in more texture by setting the opacity and flow to 60-70% and painting in more details.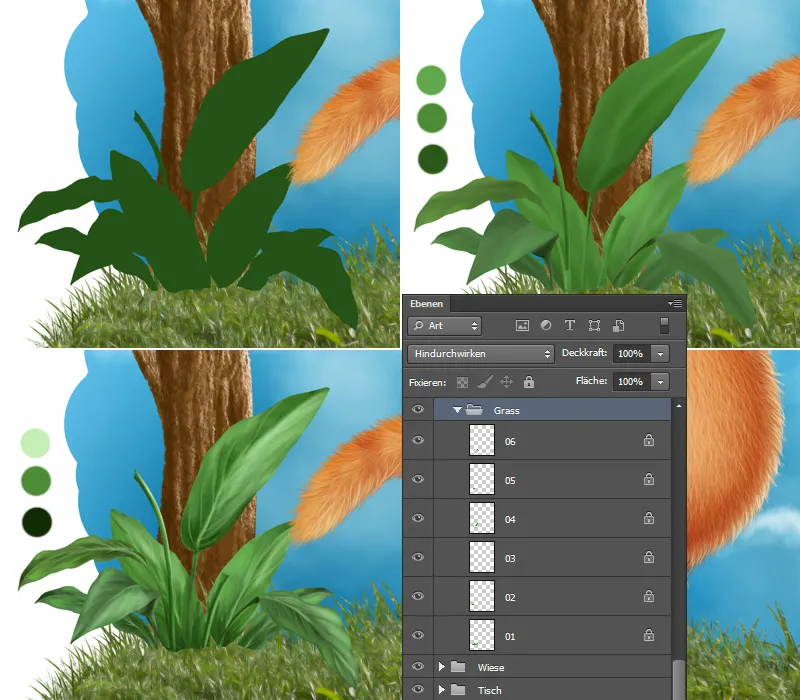
Painting the bush / structure
So the leaves look pretty flat, like very thin paper, so I'm going to paint the thickness of the leaves. I take Brushes Painting 3, set opacity and flow to about 30-40% and paint carefully around the edge of the leaves with a small brush tip. The middle and side ribs should not be missing here either, I paint these with the same brush and the same colors!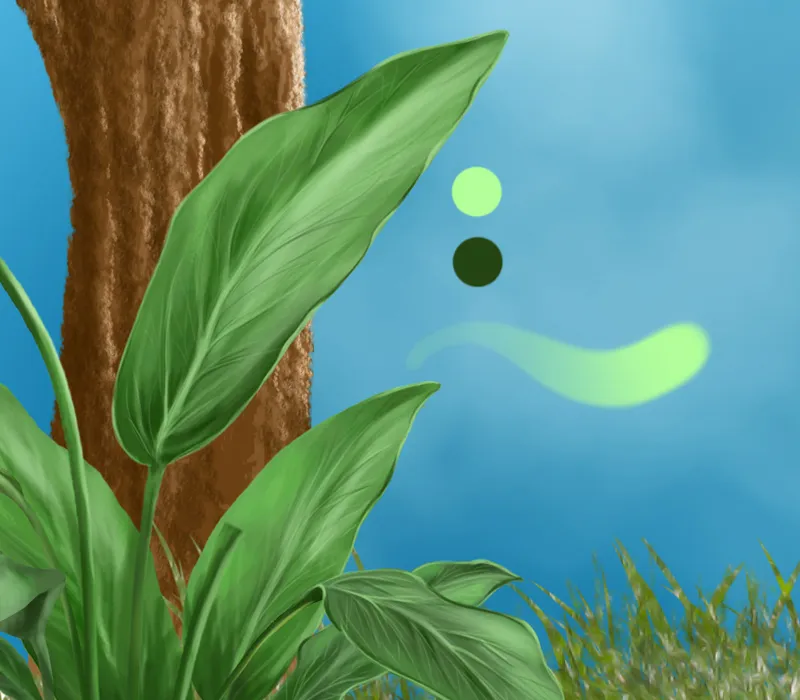
The last step is to add some texture to the leaves. I choose Brushes Texture and paint with light color on the light areas of the leaf and with dark color in the dark areas.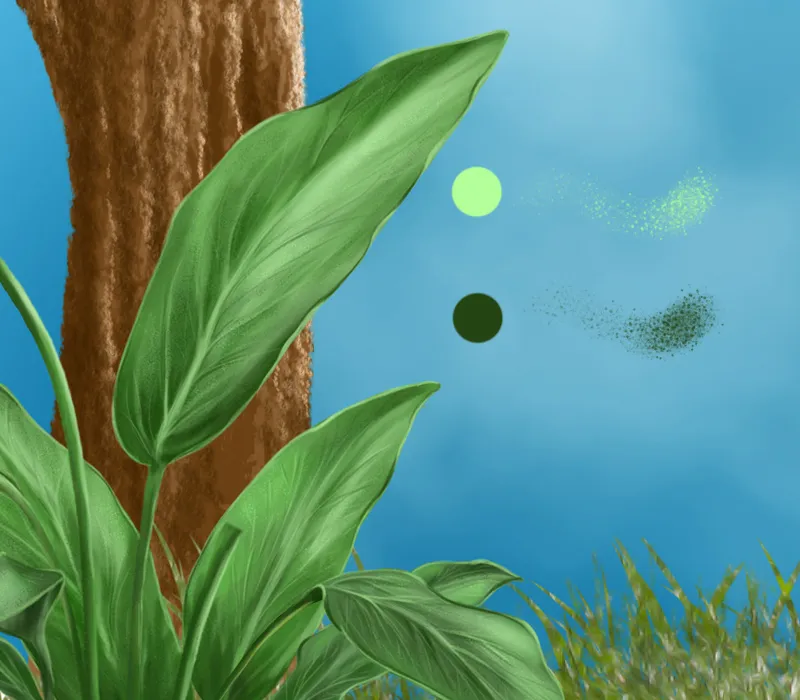
Step 5 - Adding and editing the Blums
Now I place the Blums where I want them. I'll adjust the color right at the beginning and I'll do this using color balance. Then I want the Blums to have a painterly effect! I go to Filter>Noise Filter>Reduce Noise and adjust the settings.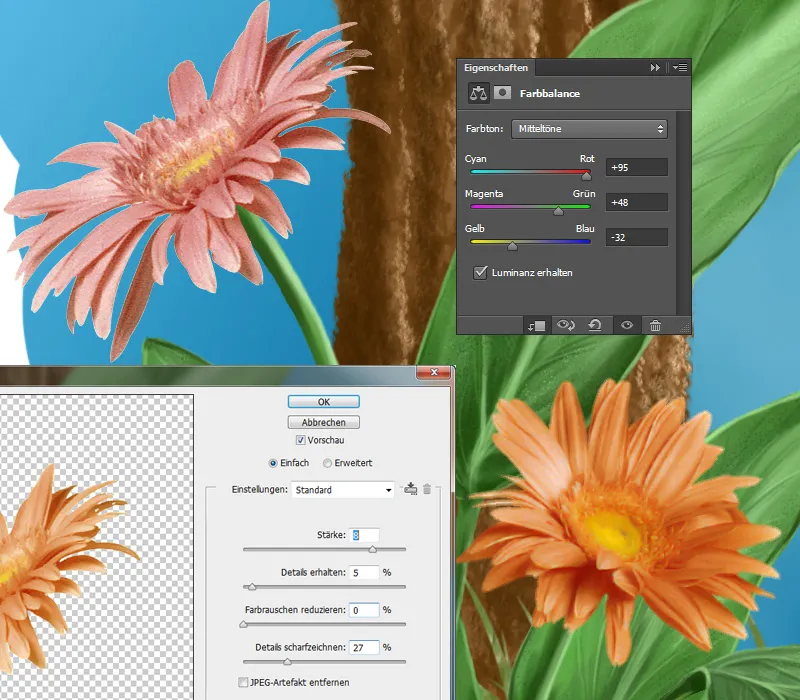
Painting Blums / Details
I create a new layer on which I will paint! Then I select the Brushes Painting 3 brush , set Opacity and Flow to about 20-30%, pick up the color from the Blum with the eyedropper tool and paint along the leaves, so I paint more light reflections and shadows. Now I reduce the size of the brush tip, set the opacity and flow to approx. 80% and paint along the edges of the individual leaves and in the center of the Blum, stylus, stamen, etc. I will paint some texture on a new layer. I choose the brush Brushes Texture and paint with light color on the light areas and with dark color in the dark areas, as I did with the leaves.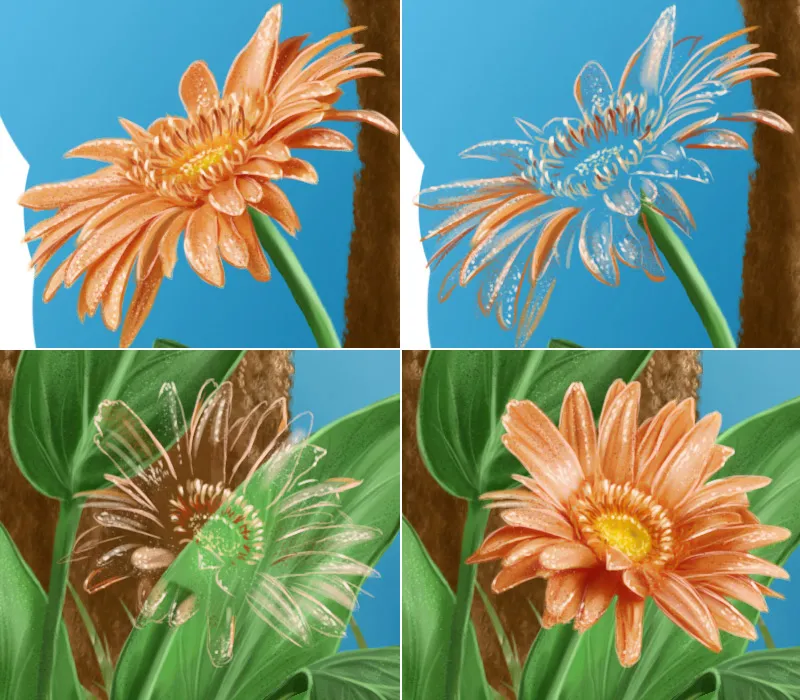
The layer overview again: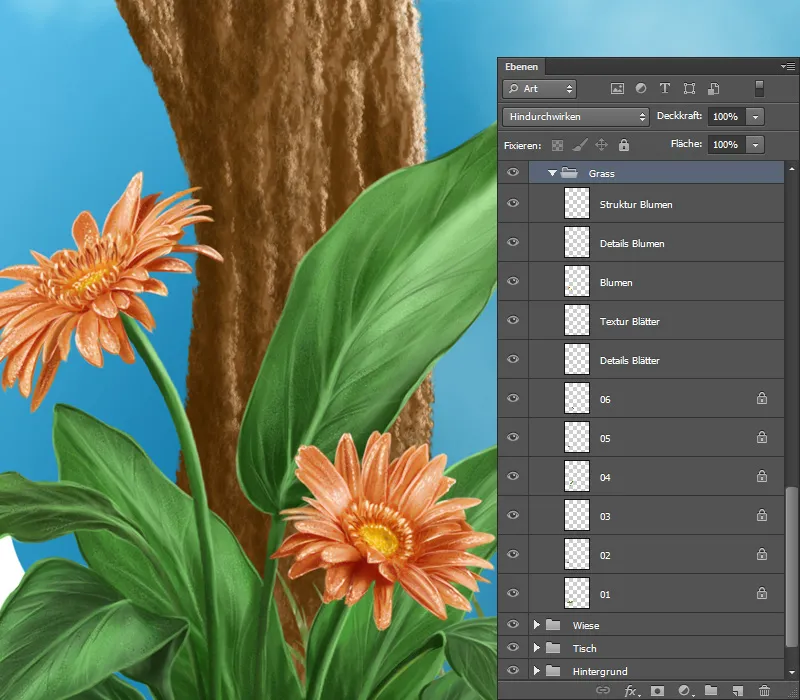
Step 6 - Painting the grass
Next, I will paint grass in the foreground. In the "Meadow" folder, I have the "Meadow photo" layer, which I duplicate on a new layer and then move it to the top. I hide the layer with a black mask and paint individual blades of grass with a white foreground color using the Brushes Hard Round brush at 100% opacity and flow.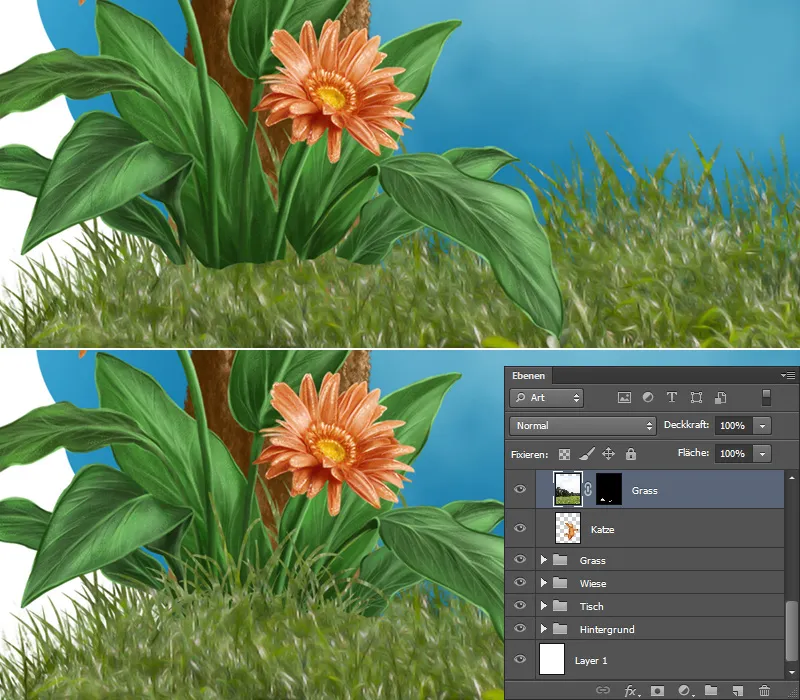
I do the same with the cat's paws!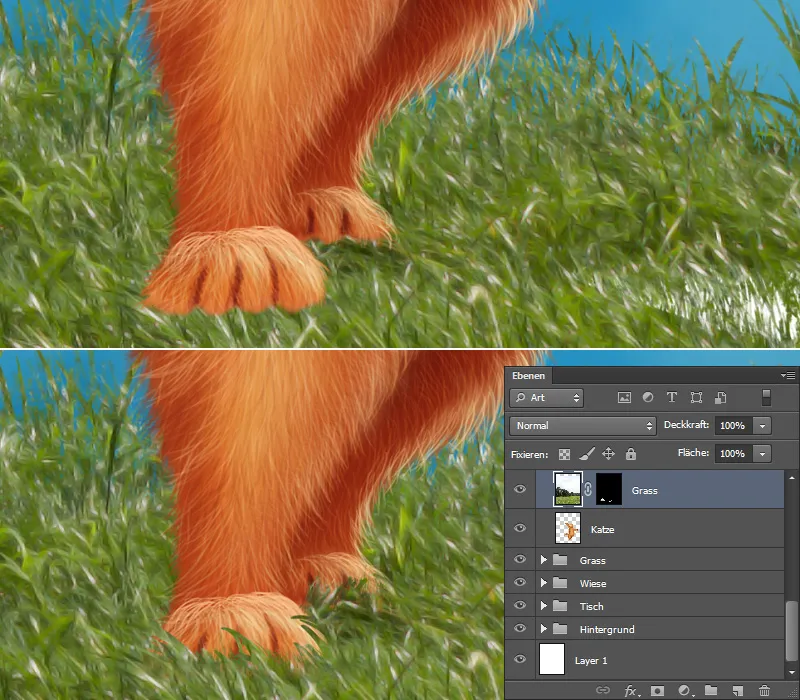
Grass / Details
Now I want to add more detail to the meadow by painting individual blades of grass. To do this, I create two new layers in the "Meadow" folder with a clipping mask. I assign the Multiply negative blend mode to one layer to lighten it and call it "Grass light". And the other layer in the Multiply blend mode, which I call "Shadows", is for the shadows behind the cat and under the bush. I select Brushes Hard Round, set Opacity and Flow to 100% and paint with light strokes at the back of the meadow, on the "Light Grass" layer. On the "Shadows" layer, I paint with a soft brush Brushes Soft 1 with low opacity and flow (approx. 20%) behind the cat and under the bush leaves. The front area should also have more detail! I also create two layers for this, one layer to lighten in the Multiply Negative blend mode, which I call "Grass Light". And one for darkening in the Multiply blend mode, which I call "Grass dark". I use the same brush tip to paint light and dark blades of grass with light strokes.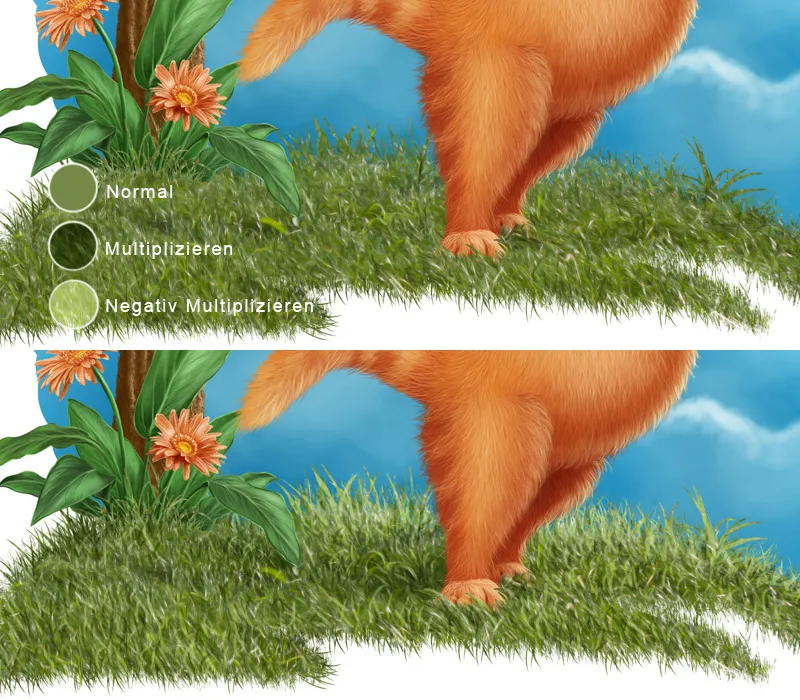
Painting meadow flowers
I create a new layer for the meadow flowers and select the Blum brushes from Nathies; only the distance and size are important for the brush settings! I set the distance to approx. 300% and paint small flowers in the back, enlarge the tip of the brush and paint slightly larger Blums in the foreground! I can use the eraser tool to erase individual Blums if I don't want them in certain places.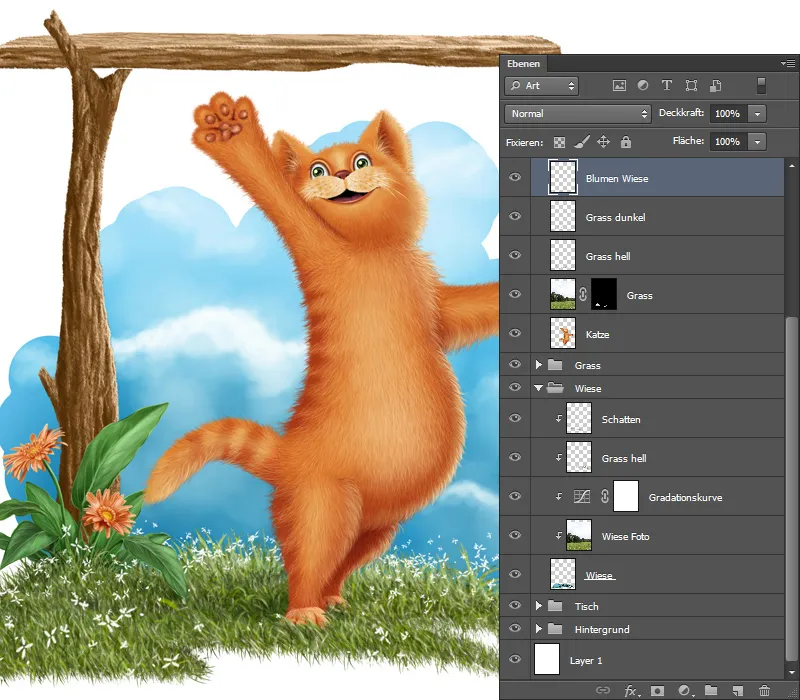
Painting moss
I select the "Table" folder and create a new layer, which I call "Moss". I paint from back to front again, i.e. from dark to light.
- With the Moss brush, opacity and flow at 100%, I paint the basic shape first. I paint more in the lower area with the darker color and more on top with the lighter color.
- I continue with the same brush tip, choosing a slightly lighter color.
- Then I reduce the size of the brush tip and paint in more details.
- I duplicate the layer and assign it the blending mode Soft Light and an opacity of 60%. This gives the moss more contrast.
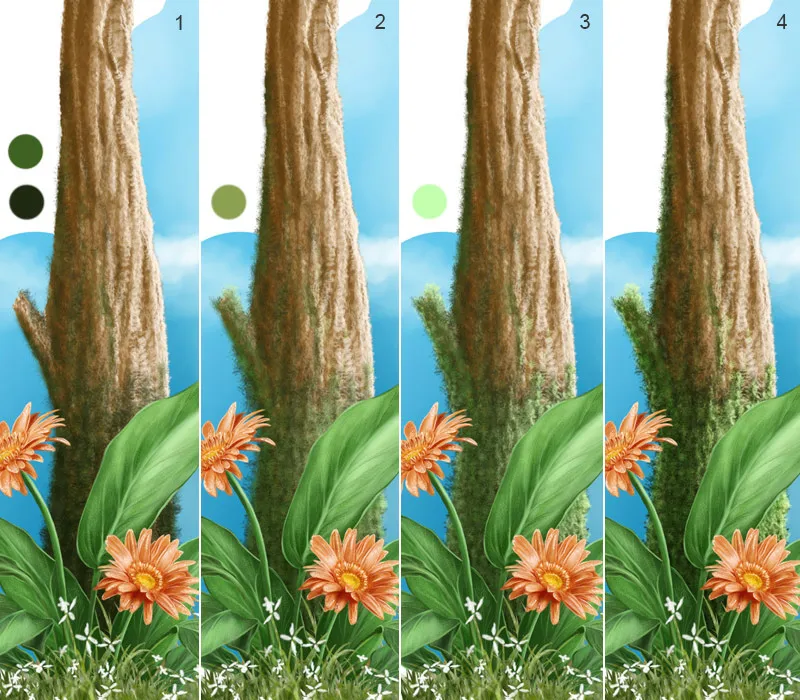
The layer overview again: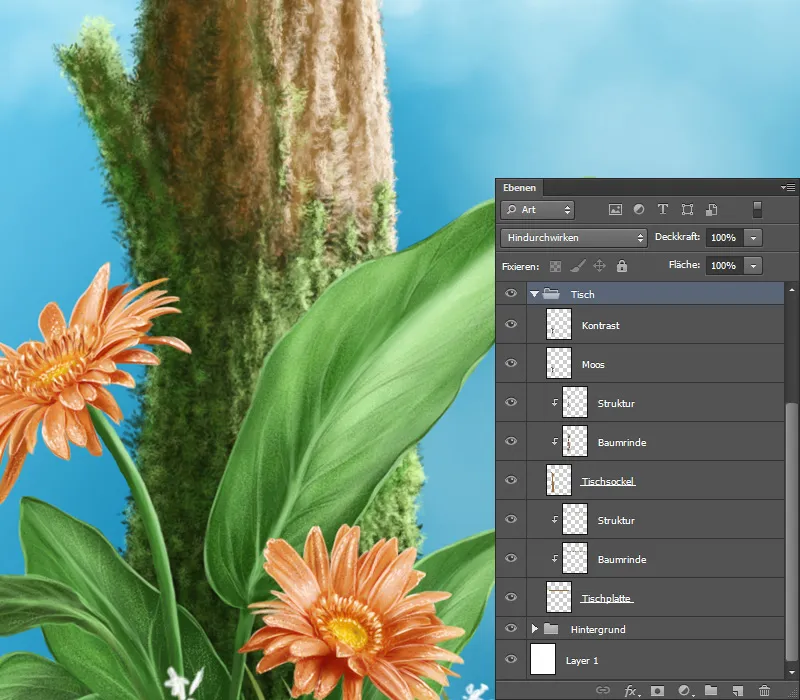
Step 7 - Painting insects
I have already created a folder for insects at the beginning of my illustration.
- I create a new layer in the folder and paint the basic shape of the insect with a hard brush Brushes Hard Round with an opacity and a flow of 100%.
- I create a new layer with a clipping mask and call it "Details". To give the insect a rounded shape, I paint in the middle of the head and body with the same brush and then smudge the painting with the Smudge Finger tool (with the Brushes Smudge Finger at a strength of 50%).
- I select Brushes Painting 3, set opacity and flow to 100% and paint something on the edge of the body and smudge it with the smudge finger tool (again with the Brushes sm udge finger at a strength of 50%). I paint the stripes with the same brush.
- To give the body more expression, I paint light areas on the head and body and smudge them with the smudge finger tool (again with the Brushes smudge finger at a strength of 50%)
- I paint the eye with the Brushes Hard Round brush with an opacity and a flow of 100%. I paint the light reflections with the Brushes Painting 3.
- For the texture, I create a new layer with a clipping mask and select the pore brushes from Nathies. I reduce the opacity and flow to approx. 50% and paint the texture.
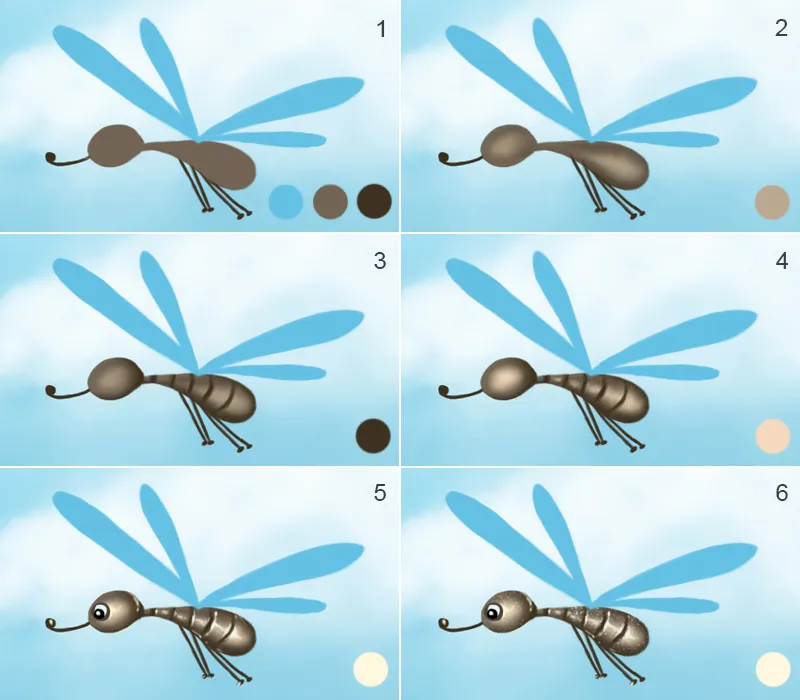
Insects / wings
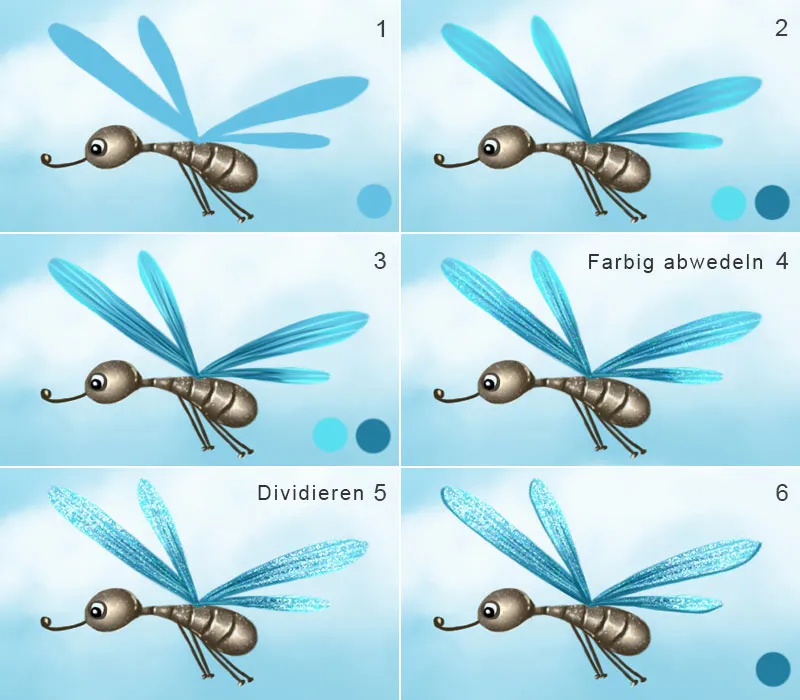
- I have painted the wings on a new layer with the Brushes Hard Round, with opacity and flow at 100%; I call the layer "Wings".
- I create a new layer with a clipping mask and call it "Details". I select Brushes Painting 3, set Opacity and Flow to 100% and paint around the edge of the wings and the stripes in the middle. To make the transitions soft, I smudge them with the smudge finger tool (Brushes Smudge Finger, strength 50%)
- Using the same brush (opacity and flow at 50%) and a small brush tip, I paint thin stripes.
4 - 5 The wings should have a nice, shiny texture. I duplicate the texture twice and create a clipping mask for each layer. I assign the Color Dodge blend mode to one layer and the Divide blend mode to the other and mask them out with a black mask. I select Brushes Painting 3, opacity and flow at 70%, white foreground color and paint with light strokes over the entire surface of the wings on the "Color Dodge" layer. On the "Divide" layer, I paint the texture only on the tips of the wings, using the same brush tip.
- To show the thickness of the wings, I paint something on the edge of the wings; I do this on a new layer, which I call "Edge". I use the same brush tip for this (Brushes Painting 3).
Insects / motion blur
The insects are in motion and I want to show this by blurring the wings. I copy the layers with the wings onto a new layer and duplicate it. I call one "Movement right" and the other "Movement left". I select the "Movement left" layer and go to Filter>Soft focus filter>Motion blur. A dialog box opens in which I click on Preview. I can change the angle and distance in the settings, then I confirm the entry with OK. I hide the layer with a black mask and paint the motion blur more in the upper area of the wings using a soft brush tip, opacity and flow at 80% and a white foreground color. I now select the "Motion right" layer and go to Filter>Blur filter>Motion blur. I only change the angle in the settings , the distance should be the same as on the left-hand side. I hide the layer with a black mask and paint in the motion blur more in the upper area of the wings with a soft brush tip, opacity and flow at 80% and a white foreground color. I move the two layers below the layer with the wings.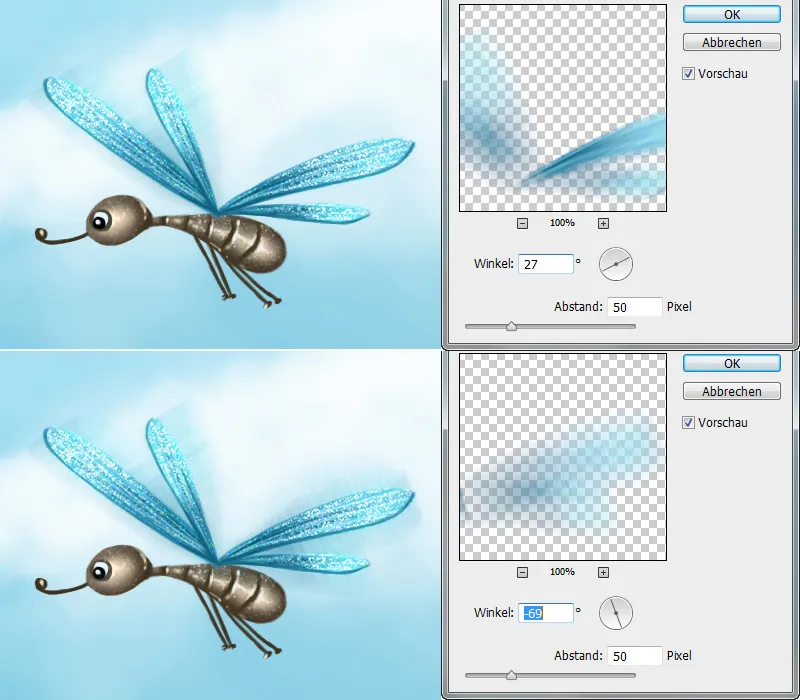
I duplicate all the layers with the insect on a new layer and place the second insect in the desired position.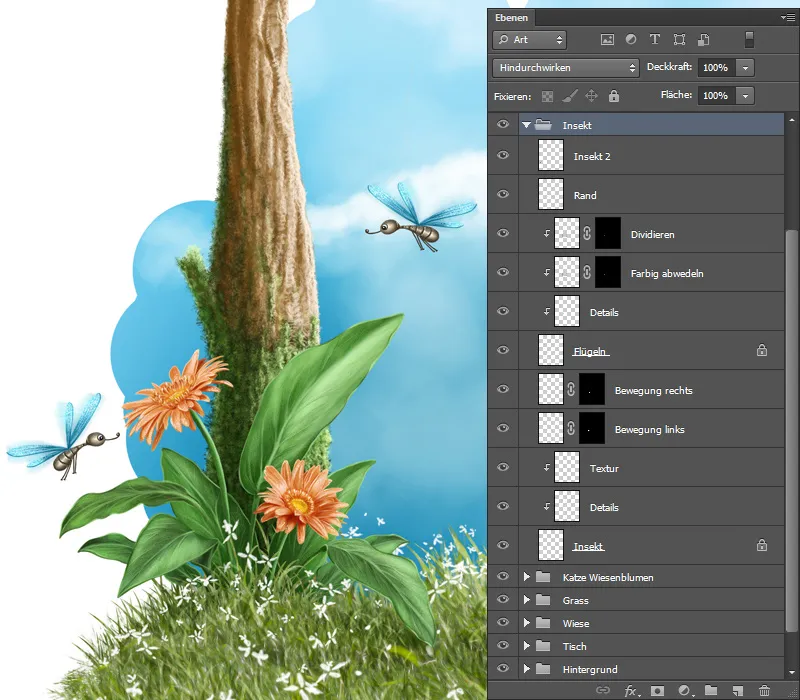
Step 8 - Painting the worm
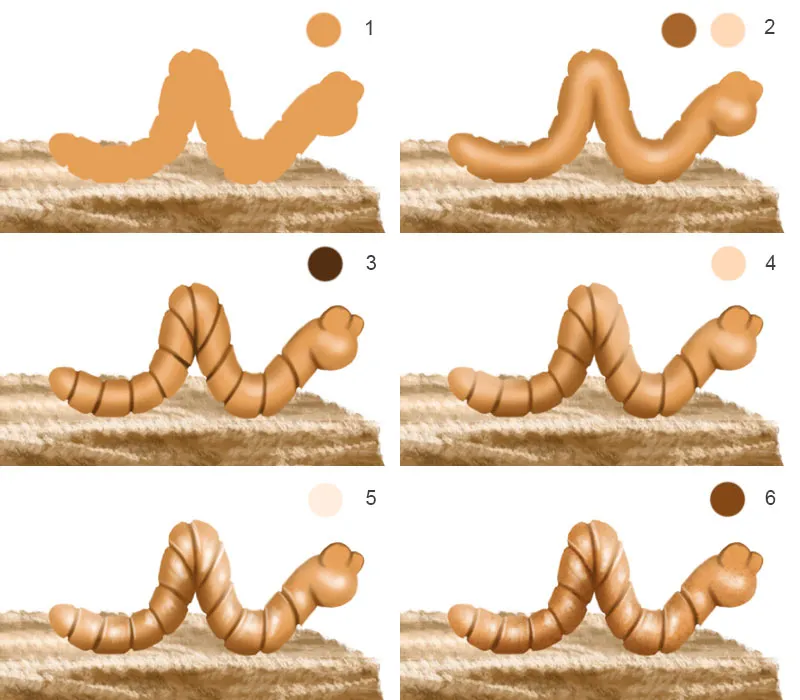
- I already have a layer in the "Worm" folder on which I have painted the worm.
- I create a new layer with a clipping mask and name it "Details". I select Brushes Painting 3, set opacity and flow to 100% and paint rough shapes, which I then blur with the smudge finger tool (Brushes Smudge Finger at a strength of 50%).
- I use the same brush to paint the stripes around the eyes, setting opacity and flow to 80%.
- I choose a soft brush tip, Brushes Soft 1 with low opacity and flow (approx. 20%) and lighten the areas on which the light falls.
- I paint the light reflections with Brushes Painting 3, op acity and flow at 80%
- I create a new layer with a clipping mask in Linear Burn mode, which I call "Texture". I choose the brush tip Skin Pores from Nathies, set opacity and flow to 30% and paint some texture.
Customize worm / eyes
In the next step, I will place eyes on the worm. I paint eyes on a new layer with white paint. I go to the layer with the cat, select the lasso tool, cut out the eyes and click on Layer>New>Copy Layer. Now I have the eyes on a new layer. I move this layer to the "Worm" folder and click on Create clipping mask. With the key combination Ctrl+T I get to the Transform mode ; here I adjust the size of the eye. I do the same for the second eye. I adjust the color using the Sel. Color Correction and activate the clipping mask symbol at the bottom. I select the layers with the eyes and click Reduce to one layer. That way I don't have so many layers! With the brush tip Painting 3, opacity and flow at 80%, I paint some more shadows around the eyes.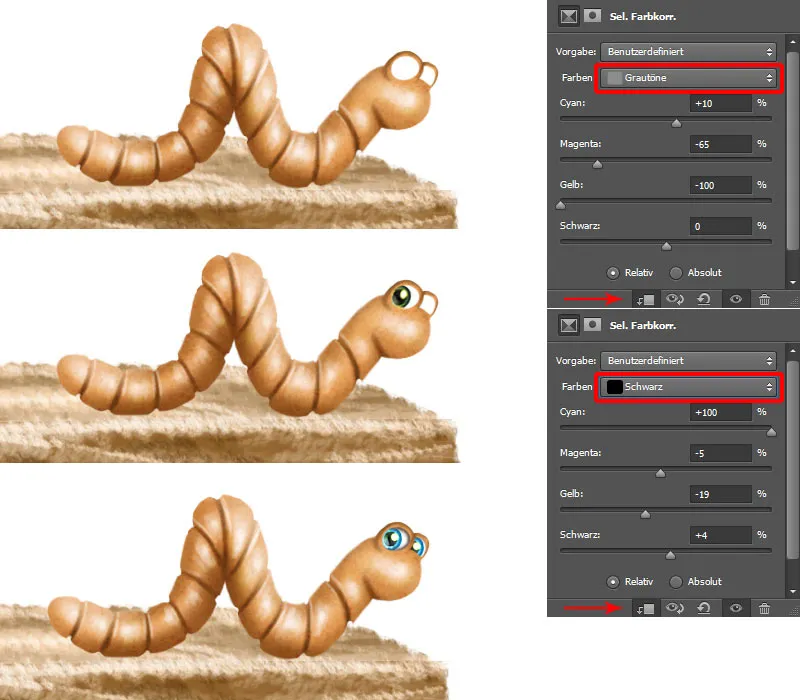
Painting the worm / slime and shadows
The worm also needs some slime. I create a new layer for this, which I call "Slime". I select Brushes Painting 2, set Opacity and Flow to 100% and paint dots and strokes with white paint in the lower part of the worm and on the wood. I create a new layer in Multiply mode for "Shadows", which I move to the bottom of the folder. I select a soft brush tip (Brushes Soft Round) with low opacity and flow (approx. 30%) and paint the shadows under the worm.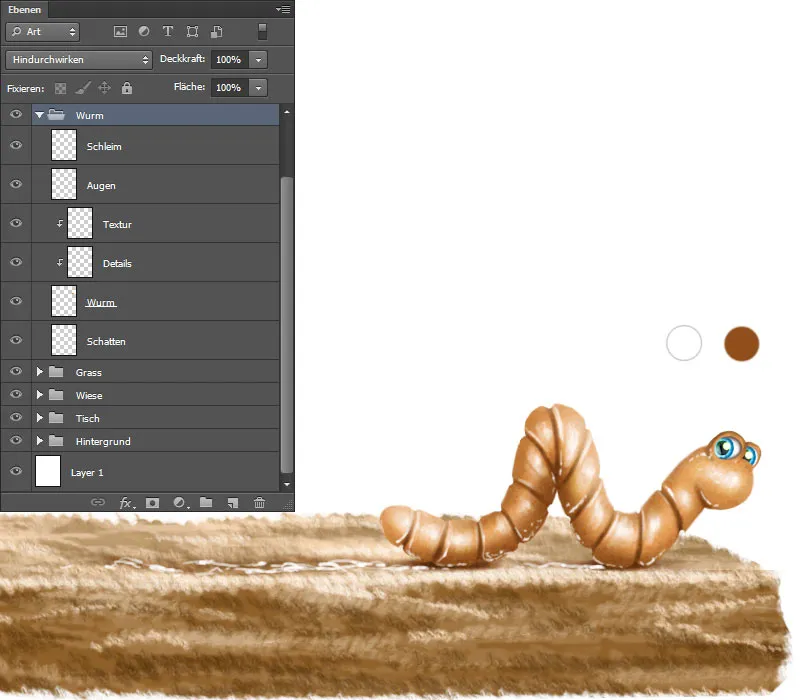
Once again the layer overview.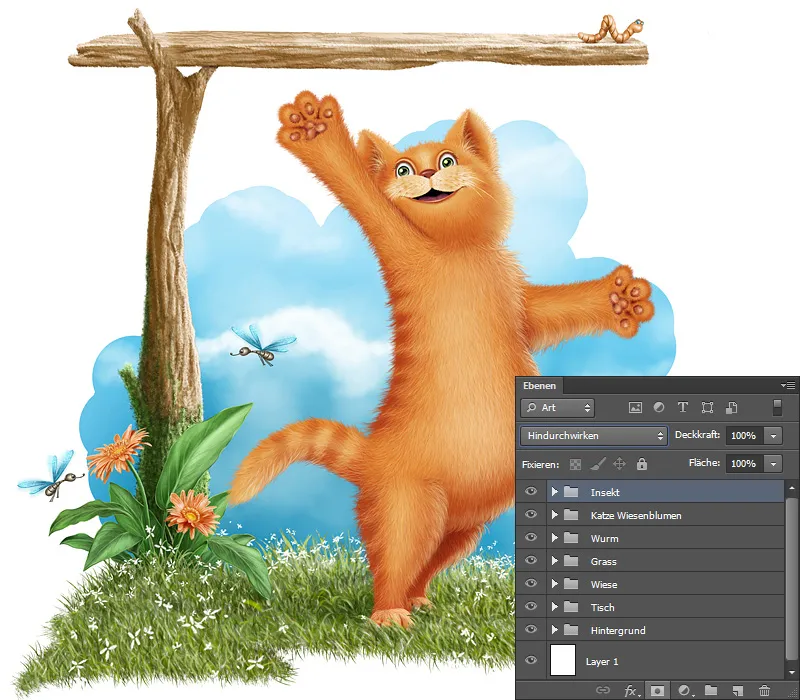
In the last part of this tutorial series, I will show you how I painted fish, how the textures were used and how to achieve the desired results with the right brush tips!