Fundamental innovations in the filters of Photoshop CS6
When you first skim through the new features in the filter gallery, you will notice that Photoshop now allows filter adjustments to be made on a much more image-based basis. This means that you can apply your desired changes directly to the image. In addition - which is nicely consistent with the tools - the context-related transformation values have also been displayed for the control options on the image.
And thirdly, the changes for some filters are no longer confined to a rigid dialog. With the Lighting effects filter, for example, your image is displayed on the entire program interface and you can use the filter changes with a good overview. It is a pity that this innovation has not been implemented consistently for all filters - if you compare it directly with the Gaussian blur.

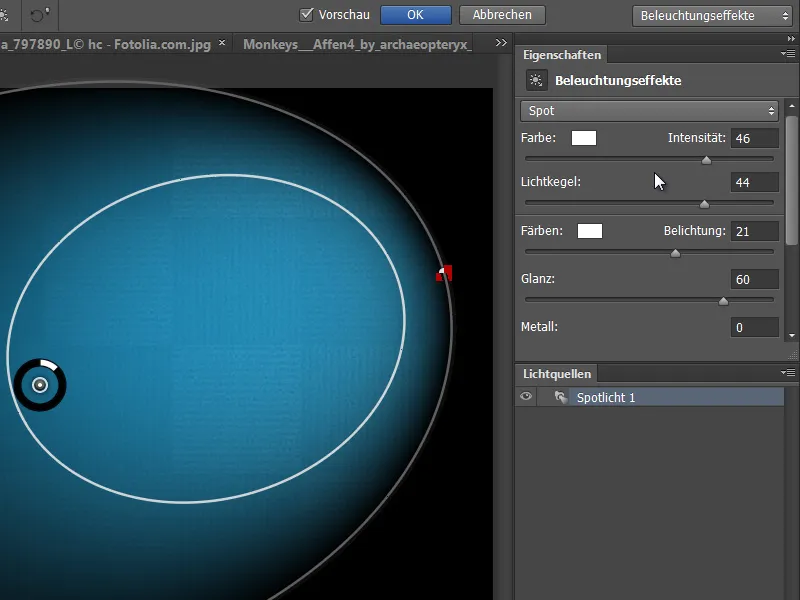
Render filter lighting effects
The Lighting Effects render filter has been completely revised for Photoshop CS6. Editing in this filter now takes place across the entire screen and is no longer confined to a small window.
The menu bar now contains the presets and there are control panels on the right with which the properties can be precisely set.
You can also make direct settings in the preview and then immediately see what the later result will look like with the setting parameters you have chosen.
The liquefy filter is much tidier and divides the functions into simple and advanced mode. Another new feature is that the brush size has been increased from 1500 px in PS CS5 to 15000 px. This allows you to use the brush with images with very large resolutions so that you can make changes according to your needs.
New filter: Adaptive wide-angle correction
The filter for correcting even severe wide-angle and fisheye distortions is new. The filter works by marking the straight line in the image (e.g. horizontal line) with the Contraint tool, which is represented as a curve by the distortion in the image. Photoshop will rectify the image using this manual instruction.
Several presets are available for the rectification: Automatic, Fisheye, Spherical Panorama and Panorama. You can hold down the Shift key for multiple lines in the image! You can use the sliders to scale the image to remove any areas of transparency and also manually adjust the crop factor and focal length.
Image source: maxoido - Fotolia.com
New filter: Oil color
In the Pixel Bender plug-in, OilPaint was an effective way to give photographs a painterly oil paint look very intuitively using various slider settings. This filter function has now been incorporated into the Oil Paint filter.
Here is the before image - Image source: auremar - Fotolia.com
As with the Pixel Bender plug-in Oilpaint, the Oil Paint filter examines the image for contrasts and edges, which are then converted into swirling structures. In this example image, this results in tracing along the edges of the trailer, which creates a realistic painting effect.
This creates the impression that there are brushstrokes painted directly with oil in the picture. Bristle details, purity, paint application etc. can be adjusted using the controls. The good thing is that the filter is also available as a smart filter.
New action for painterly looks
There is a new action template in the Actions panel that helps you to create painterly looks yourself with the brush. Three groups are created: one for the background details, one for the medium details and one for the fine details.
Image source: Light Impression - Fotolia.com
Important: Before executing the action, the All layers checkbox must be deactivated in the blending brush in the menu bar. A cloner brush must then be used for tracing in the tool settings.
The All layers checkbox can then be activated again. There are numerous tool templates in the tool settings. Additional ones, such as the artist brushes, can be added to the existing ones under the options.
So here we go: First carry out the action, then make the correct tool setting. In this case, point - round long cloner. And the structures are traced.
In the Underpainting layer, the coarse painterly colors are then applied with a larger brush tip. In the Intermediate Strokes layer, more details are brought into the picture by tracing the edges of the motif.
The Detail Strokes layer brings the fine details into the picture - preferably with a small brush tip.
When the reference layer is faded out, the structures take on a painterly look.
The effect is really cool if, for example, the painterly structures are combined with the oil filter. In this example, the original image was also processed once with the oil filter and only the hair area was blended in with a layer mask. The combination of both techniques - i.e. tracing in the layers generated via the action and the oil filter layer with the hair - results in a special painterly charm in the image.
More effective actions thanks to tool recording
Previously, it was only possible to record the work steps from the menu commands in actions. The option Allow tool recording in the Actions panel menu is new.
This means you can now also directly record the steps you take with the brush and paint tools or other tools in your image and play them back for other documents.
In this example, a black and white adjustment layer was added to the monkey image, colored black and a frame was created with a white brush. The frame creation was recorded as an action.
The action is now simply played on the tiger image and you can see how the adjustment layer is created and the brush movements are made in the image. Cool thing!


