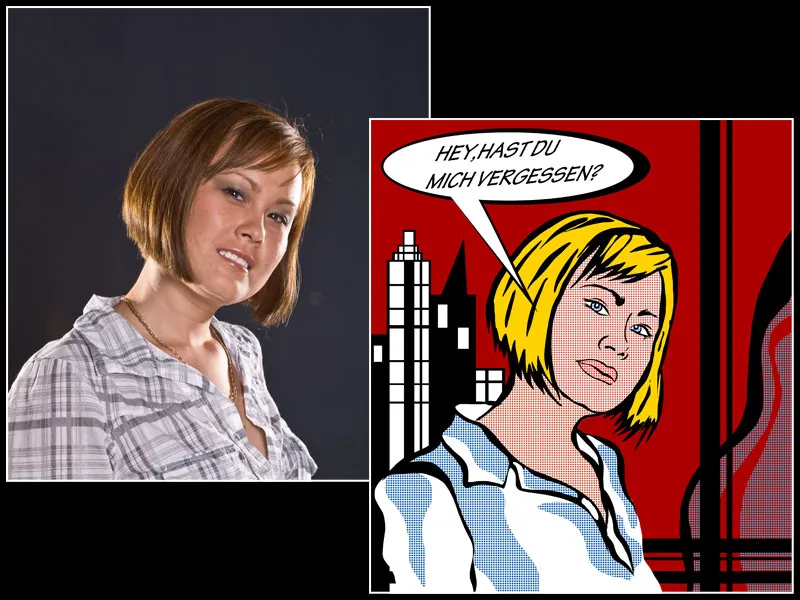
Roy Lichtenstein, known for his iconic works in the Pop Art style, has shaped an art movement with his comic-like dots, bold colors, and clear lines. A portrait in this style is a real eye-catcher and gives your designs a creative retro touch. In this tutorial, I will show you step by step how to create a portrait in the style of Roy Lichtenstein using Photoshop – from the halftone dot structure to the characteristic color accents and outline lines. Let's get started and turn your photo into a piece of art!
Step 1
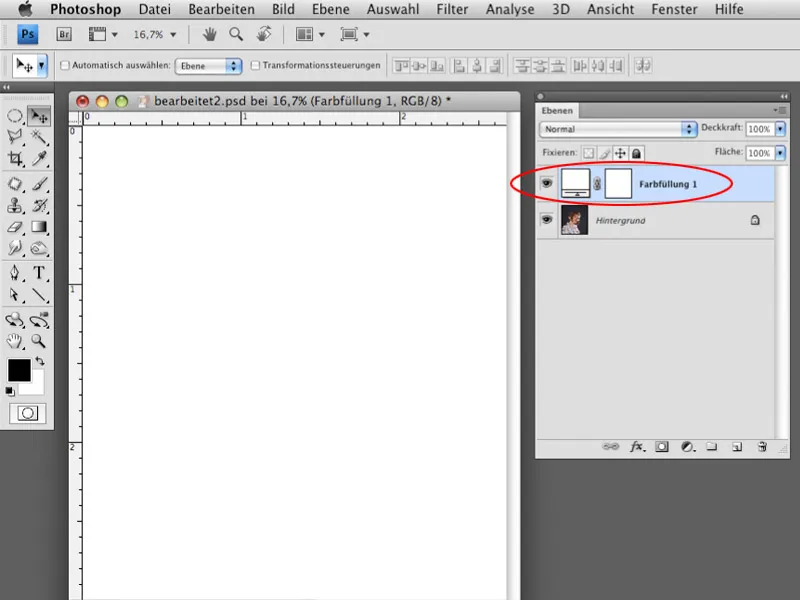
Open the image in Photoshop and create a solid fill layer in the Layers palette, which you can equip with white color. This will serve as a contrasting agent so that you can paint the shapes not on the original photo but on a slightly faded version of the image.
Step 2
Reduce the Opacity of the solid fill layer to about 30-40% so that the photo remains recognizable.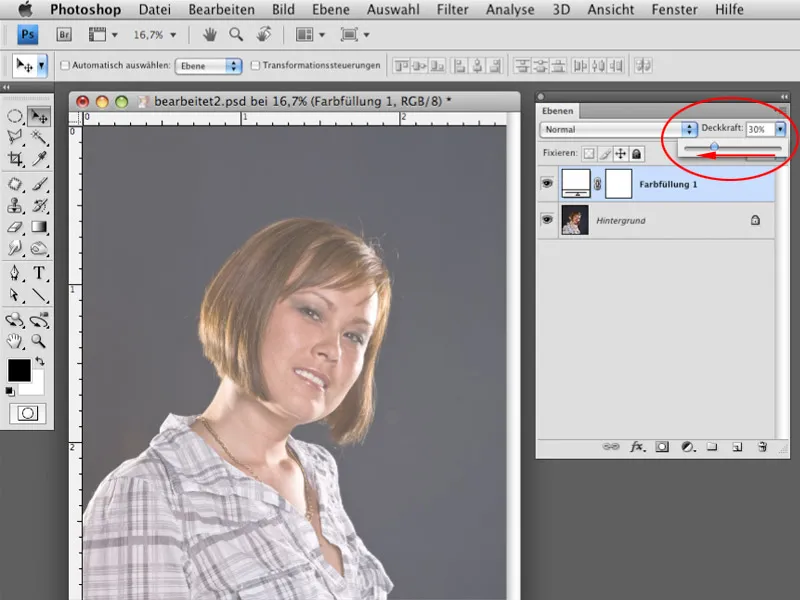
Step 3
Select the Lasso tool with the option Add to selection. It is also very important to set the option Feather to 0 so that the outlines of the shapes you will create appear clear and not blurred. Start by painting the outlines of the hair.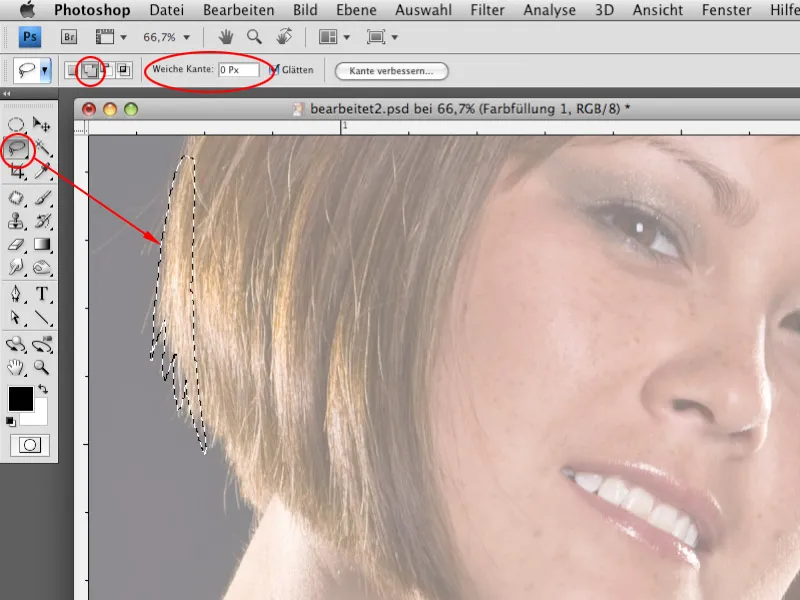
Step 4
Thanks to the option Add to selection, you can paint the outlines in multiple passes. This allows you to focus more on the details. It is advisable to create smaller areas so that the paths remain shorter.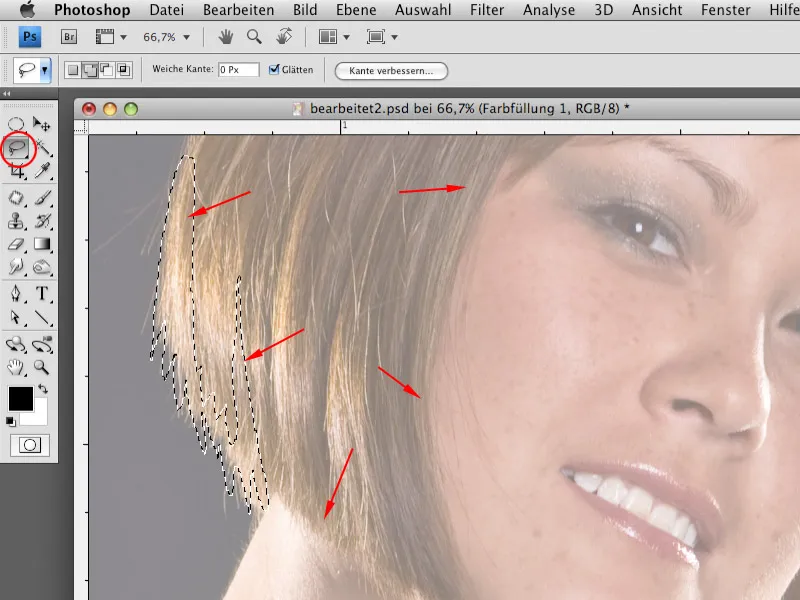
Step 5
Create a new empty layer in the Layers palette and choose the background color as black. After creating the outlines with the Lasso tool, you can fill the selected areas with black color using the keyboard command Ctrl+Delete.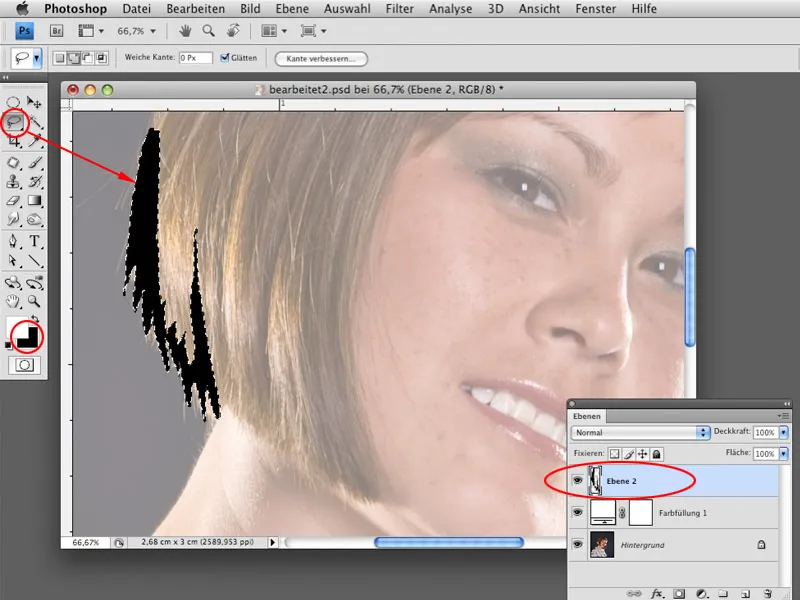
Step 6
Now select all relevant areas where the contours are to be created and fill the selection with black color. You can create all outlines on one or multiple layers (e.g., different layers for head, neck, clothing, etc.).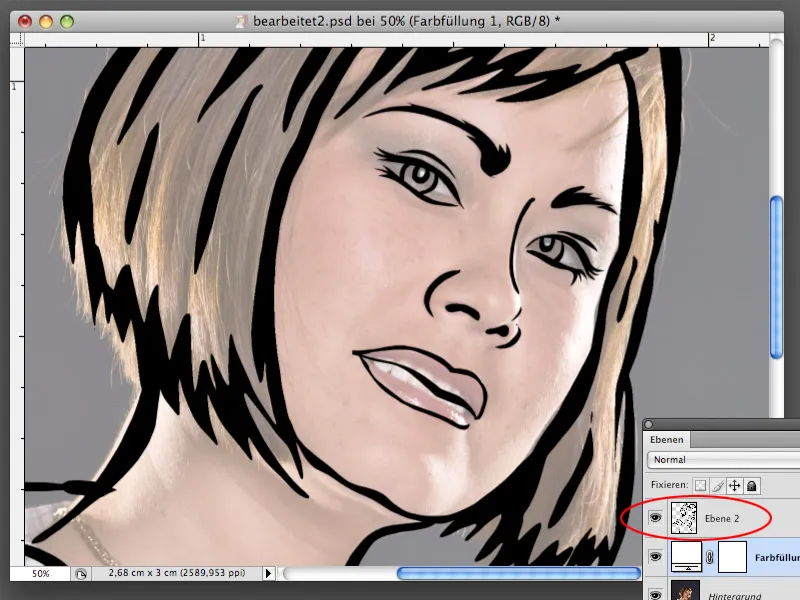
Step 7
When working with the Lasso tool, it often happens that the outlines of the selected areas are not completely straight. This is not a problem. You can subsequently correct the area with the black outlines so that the lines run smoother. Load the selection of the layer with the outlines by holding the Ctrl key and clicking on the layer thumbnail. Once the selection is displayed, select the option Refine Edge. In the Refine Edge dialog, you can increase the value of the Feather option to about 30. This will make the lines smoother. Confirm with OK, invert the selection with Ctrl+Shift+I, and cut off the excess pixels from the layer with the outlines using Ctrl+X.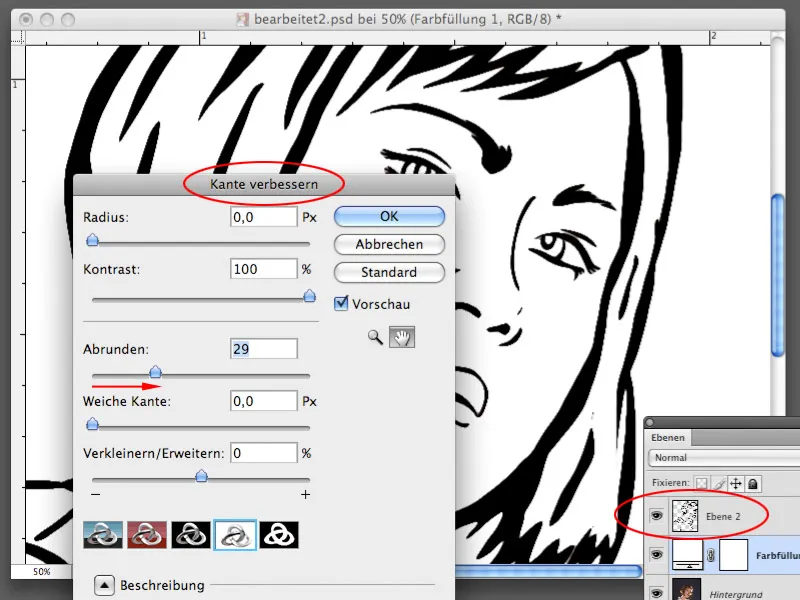
Step 8
For filling some areas, you need a pattern with dots, which you will generate now. You surely remember that some areas in Lichtenstein's paintings were filled with dots and not with solid color. Create a new working document with a size of 30x30 pixels at a resolution of 300 pixels/inch. The background should be transparent.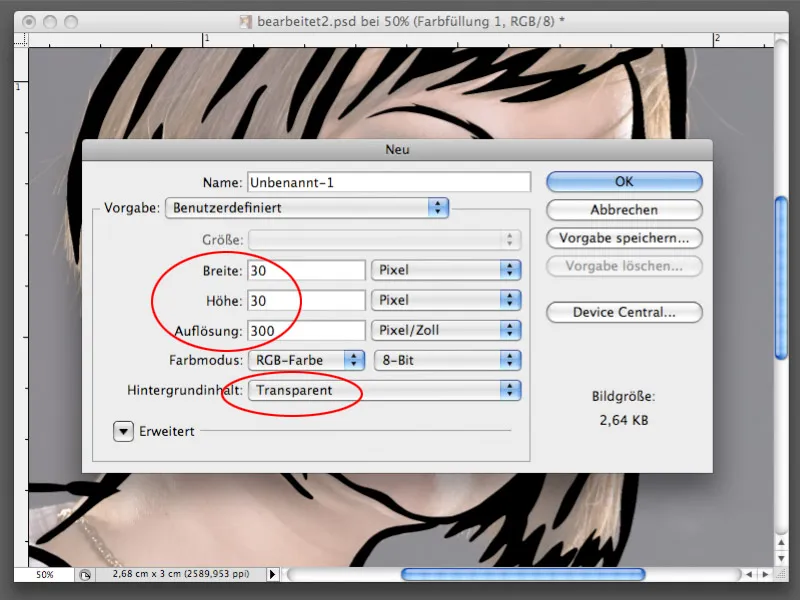
Step 9
On the new working document, create a circle using the Elliptical Marquee tool. Then choose Edit>Fill>50% Gray. Confirm with OK.
Step 10
Now select the entire area of the file with the circle using Ctrl+A and then choose the option Edit>Define Pattern. Confirm with OK in the Define Pattern dialog. The pattern will be saved in your Photoshop library and can be used immediately. You no longer need the newly created file, so you can close it without saving.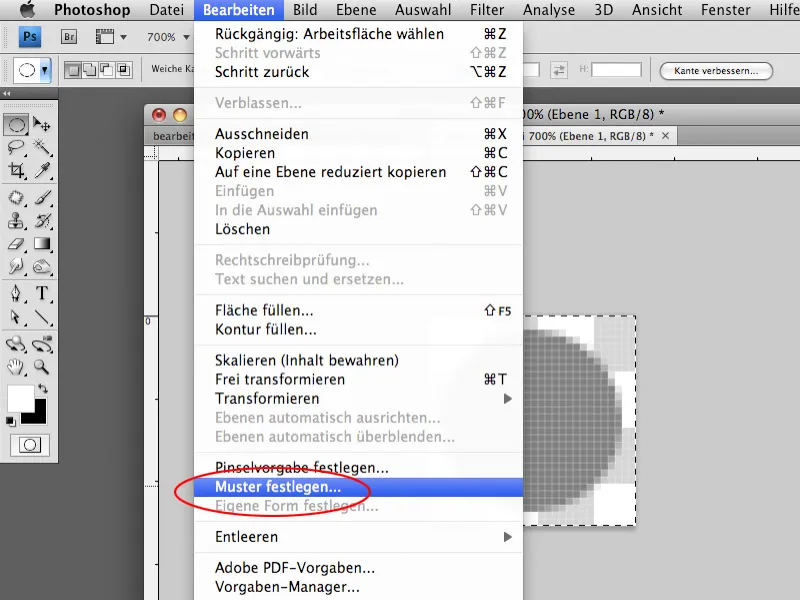
Step 11
Before filling in some areas with the pattern, you can fill the area with the hair with a solid color. Create a selection of the area with the hair inside the black outline. Use the Lasso tool.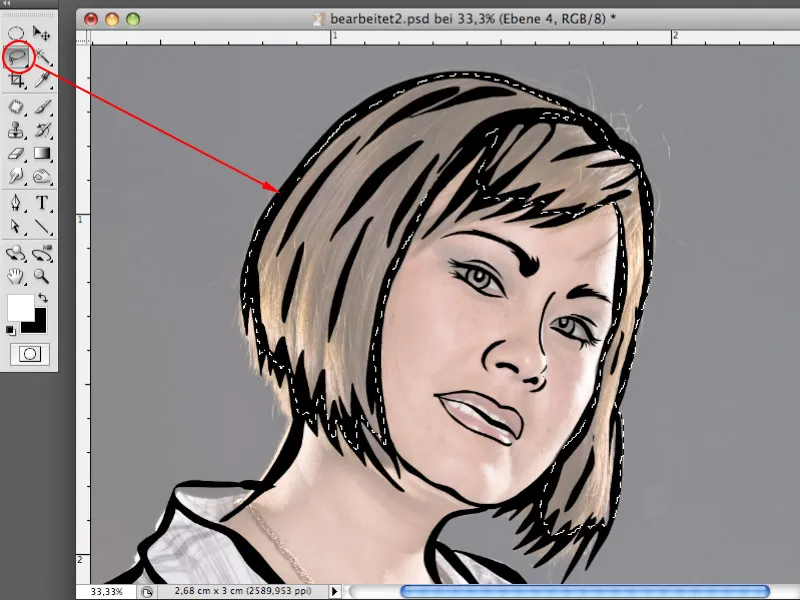
Step 12
Below the layer with the black outlines, create a new empty layer and fill the selected area on this layer with yellow color (or any other color of your choice).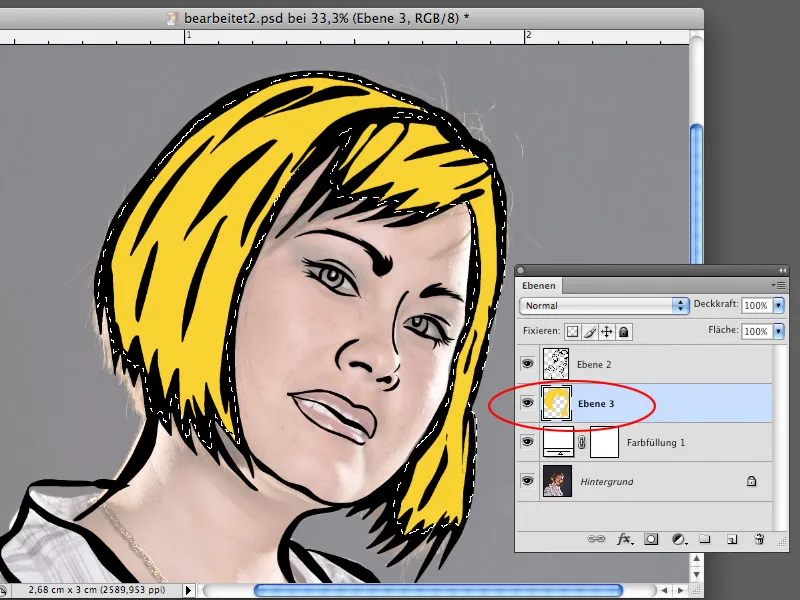
Step 13
Now select the model's face and again create a new layer below the layer with the black outline. Choose Edit>Fill area>Custom pattern. Fill the area with the previously created pattern with the gray circles. Although this is not the color that can be used as skin color, it won't stay like this. The gray color was intentionally chosen because it can be converted to any color.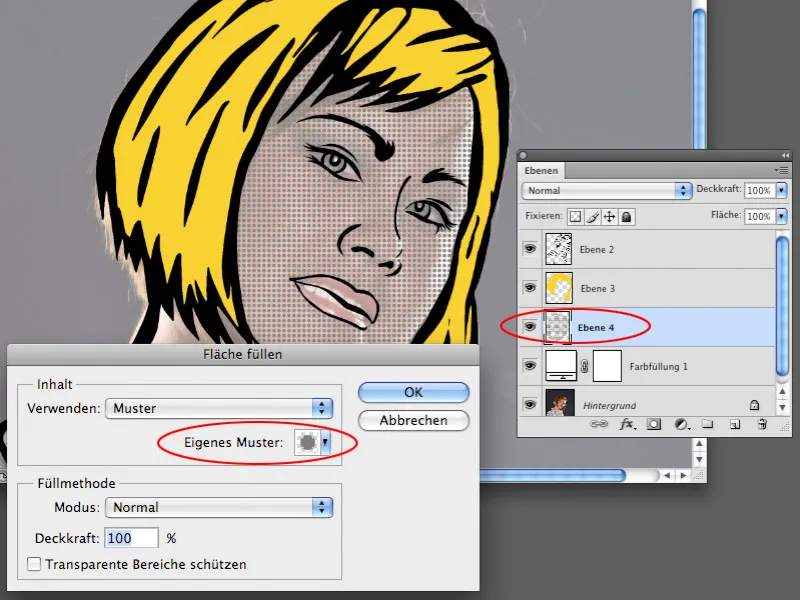
Step 14
For the layer with the pattern fill, choose Image>Adjustments>Color Balance. In the Midtones section, enhance the colors red, yellow, and magenta, which will transform the gray color into a more reddish one.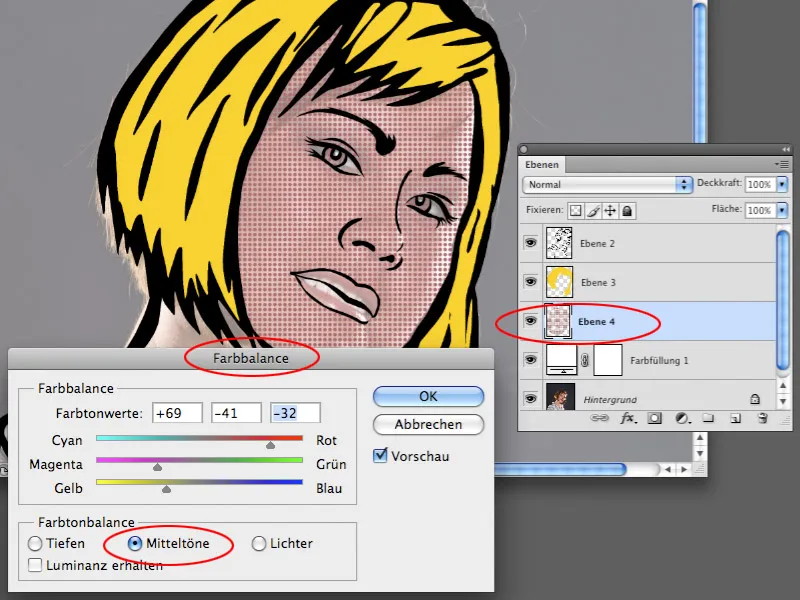
Step 15
In the Color Balance dialog, switch to the Highlights section. Make the necessary corrections here as well, so that the skin color really resembles the original skin color. If the color is too dark, you can adjust the brightness with the Levels or Curves settings.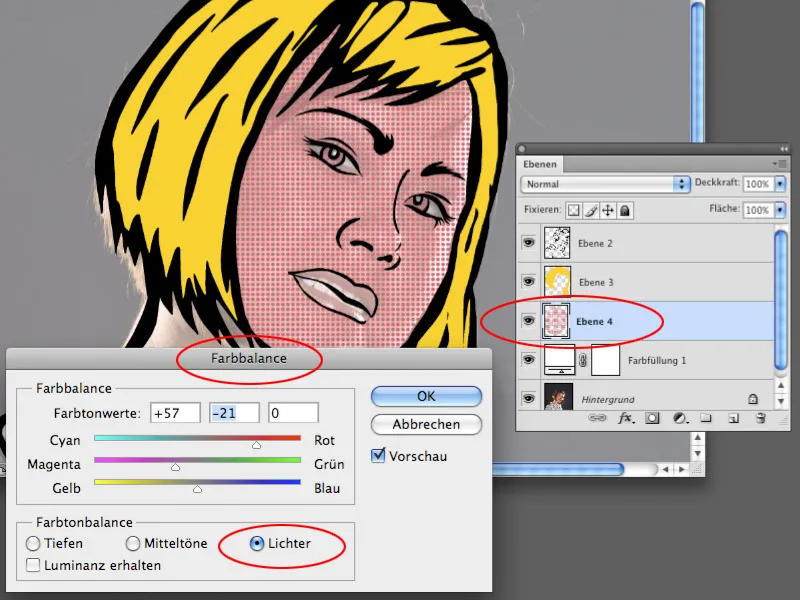
Step 16
You can fill all areas with the pattern fill and equip the colors of the filled areas with desired colors using the method described in steps 13-15.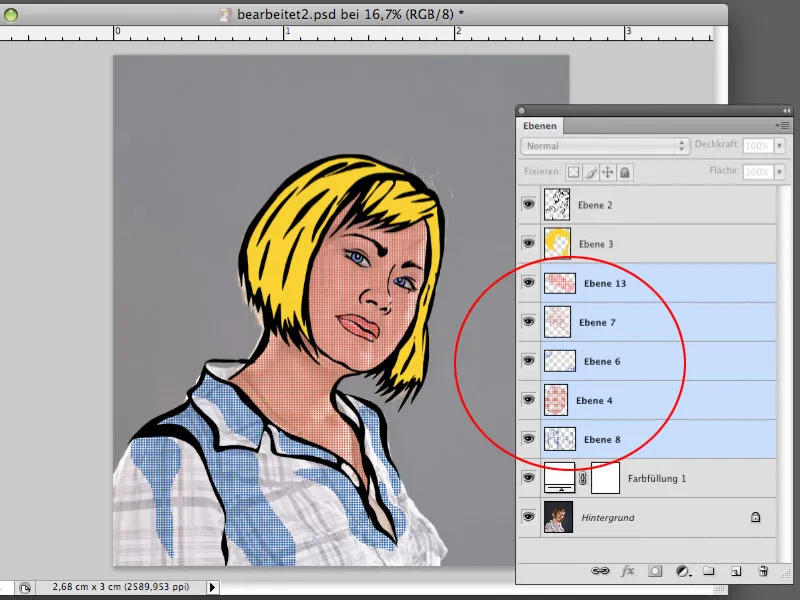
Step 17
Hide the layer with the original photo and the solid color fill layer for now. Create a new empty layer above the hidden layers. Use the Lasso tool to create a shape that encloses the figure of the woman but does not exceed the boundaries of the black outline. Fill this selection on the newly created layer with white color.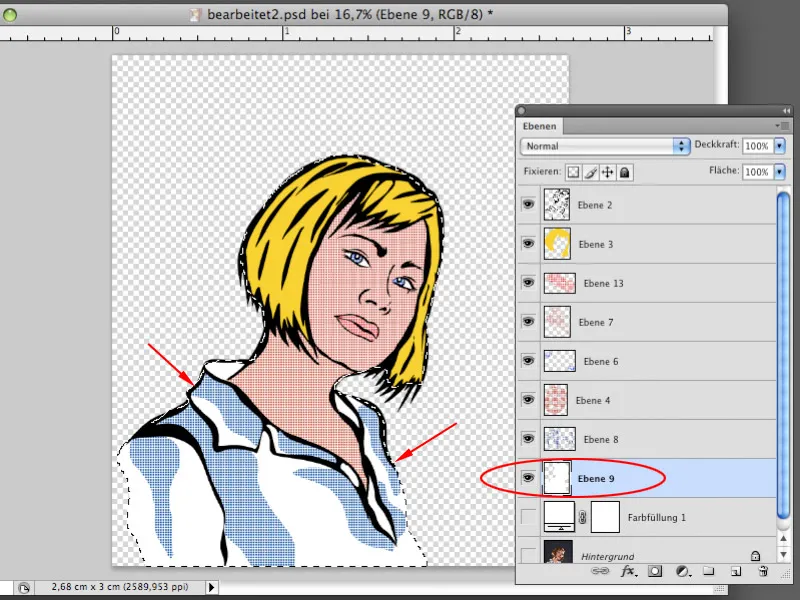
Step 18
You can now show the layer with the original photo and the Solid Color fill layer. Instead of white, you can now equip the Solid Color fill layer with another color, for example, dark red. Double-click on the layer thumbnail of the fill layer and define the desired hue in the Color Picker. You can set the opacity of the fill layer to 100%. The original photo is now hidden behind the fill layer and is no longer visible.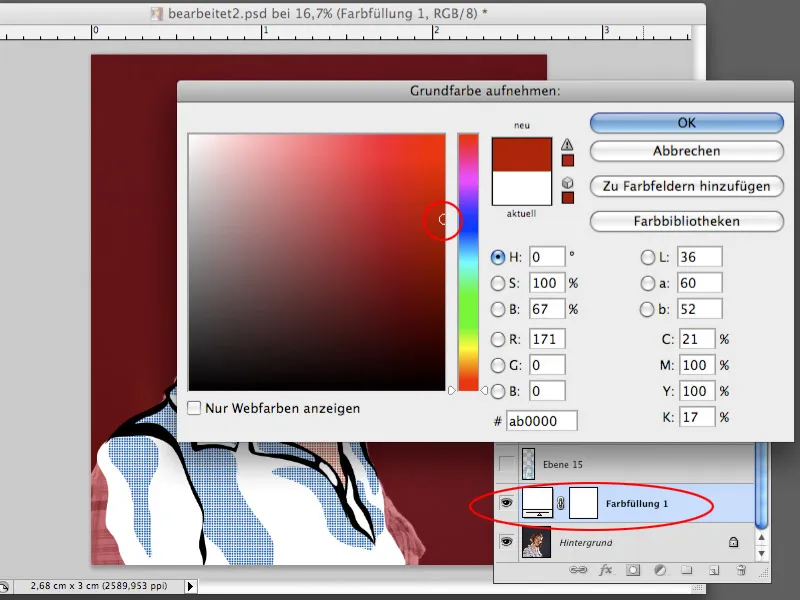
Step 19
Now start designing your own background. Roy Lichtenstein's paintings mostly have urban backgrounds where you can see skyscrapers, window frames, or other urban elements. You can select some rectangles using the Rectangular Marquee tool that will later act as window frames. After creating the selection, you can create a new layer and fill it with the color of your choice, for example, black.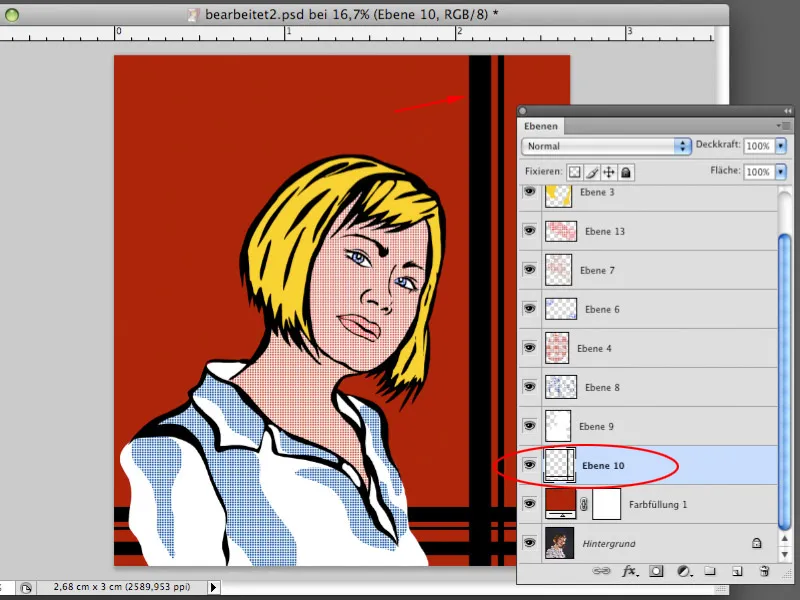
Step 20
Create another empty layer. In the same way, you can now create shapes that resemble skyscrapers. You can use the Rectangular Marquee tool and Polygon Lasso tool for this purpose. Both create straight lines that are well suited for architectural elements. Fill the selection with color.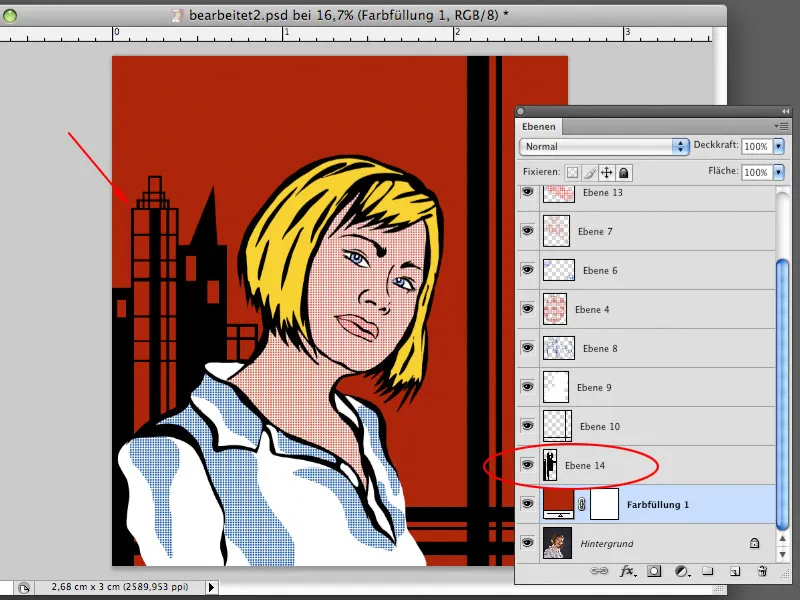
Step 21
Using the techniques you are already familiar with, you can create all the necessary shapes needed to design the background. Fill some of the shapes with solid colors and others with the created pattern. You are free to define the colors of the pattern fills.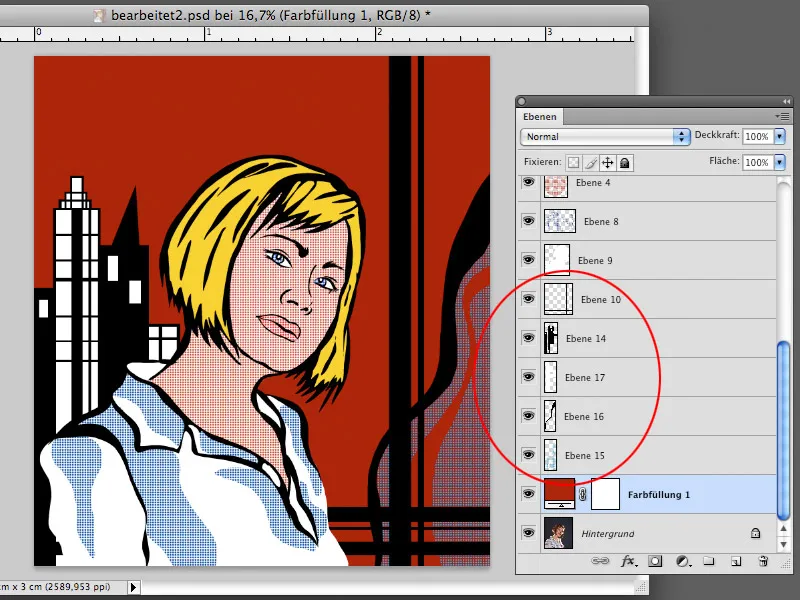
Step 22
Roy Lichtenstein's works are often equipped with speech bubbles that lend an expanded statement to the image. A speech bubble with text should also not be missing in our image. Create a selection with the Elliptical Marquee Tool and with the Polygonal Lasso Tool as shown in the screenshot. Generate another new layer and fill the selection on this layer with black color. This layer should serve as the outline of the speech bubble.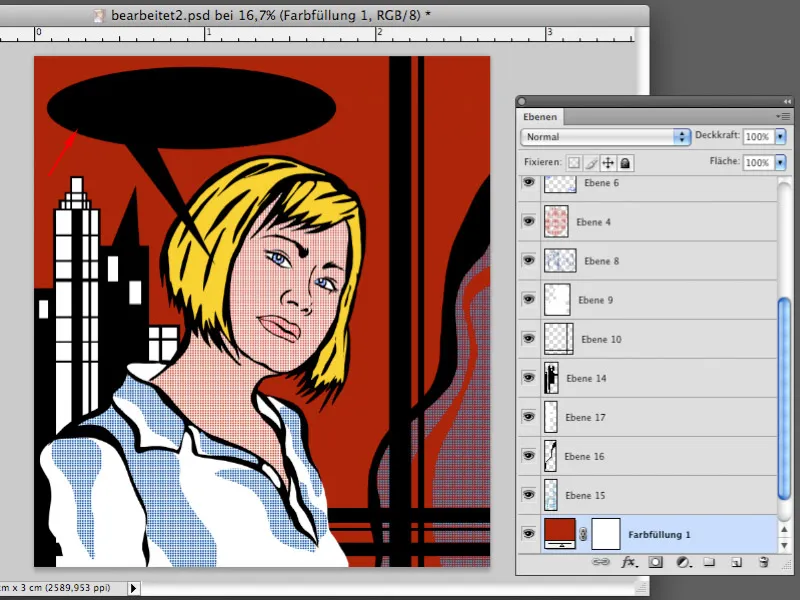
Step 23
Create another selection, which has a similar shape to the one created before, but smaller. Create a new empty layer above the layer with the black speech bubble and fill the selection on this layer with white color. The speech bubble now looks as you know it from comics.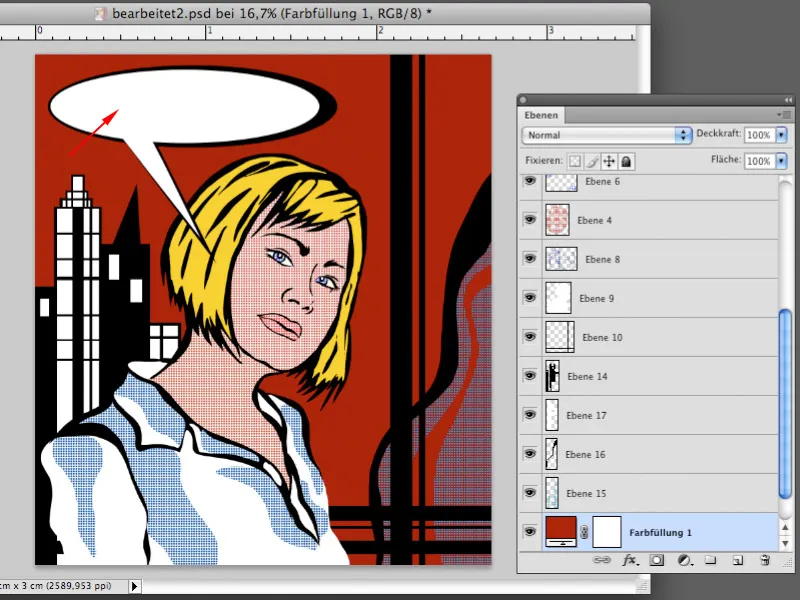
Step 24
Now you can create a phrase inside the speech bubble using the Type Tool. For this, you will need a font suitable for comics, like Tekton Pro, for example. Type the text, adjust the size and angle of the phrase using Edit>Free Transform as shown in the screenshot. Your artwork is now complete.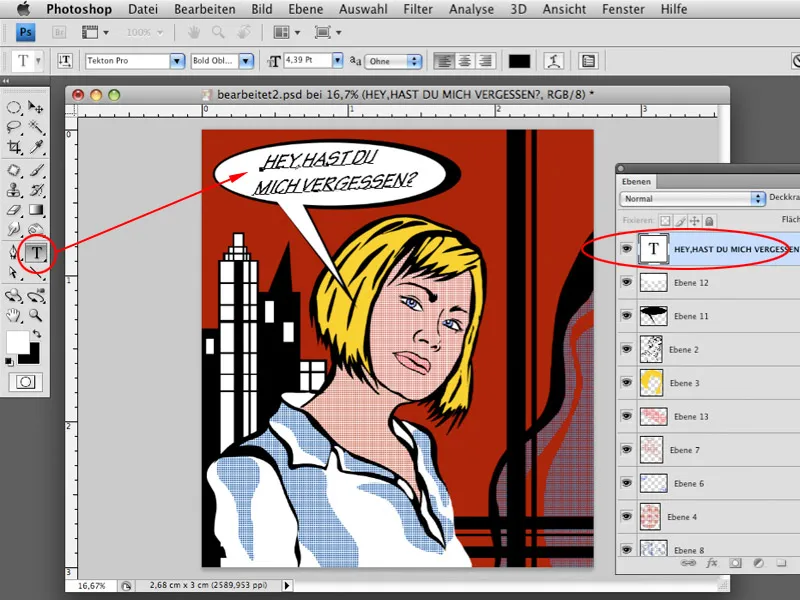
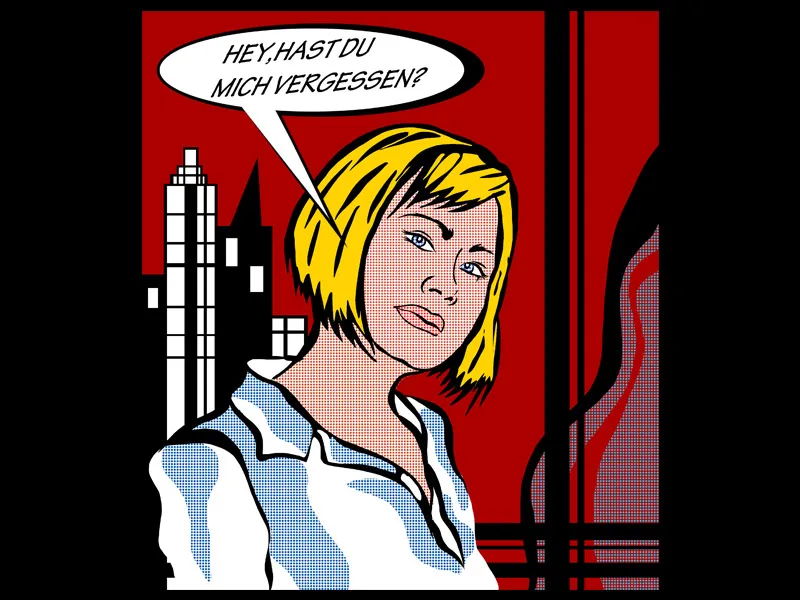
And this is what the finished image looks like: