A ball gown that glows in the moonlight and sparks the imagination is the centerpiece of a magical midsummer night's dream. With Photoshop, you can design this fairytale dress step by step by combining textures, gradients, and light effects. In this tutorial, I will show you how to create an elegant ball gown with flowing fabrics, sparkling details, and magical light effects - perfect for your creative projects that require a special, dreamy atmosphere. Let's start and bring the magic of a midsummer night's dream to life in your design!
Step 1: Quick Selection
Open the file Sculpture.jpg. It represents the main motif and needs to be masked. The mask is created with two different tools: the Quick Selection Tool and the Pen Tool. Start by quickly selecting the sky, and then create a new pixel mask via the Mask Panel.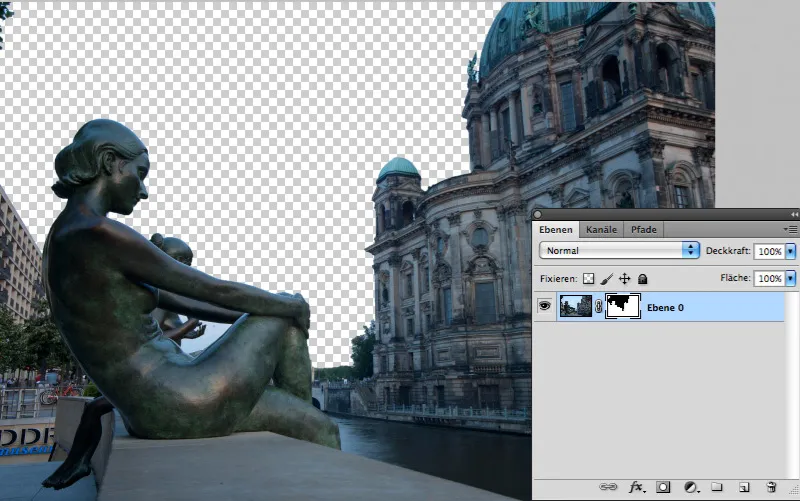
Step 2: Refining the Mask
The selection in the fuzzy leaves of the tree next to the building poses a problem. Clicking on Refine Edge... opens the familiar dialog, but it has been completely revamped: Simply check the box for Smart Radius, and the tree will be perfectly masked. Ingenious, isn't it?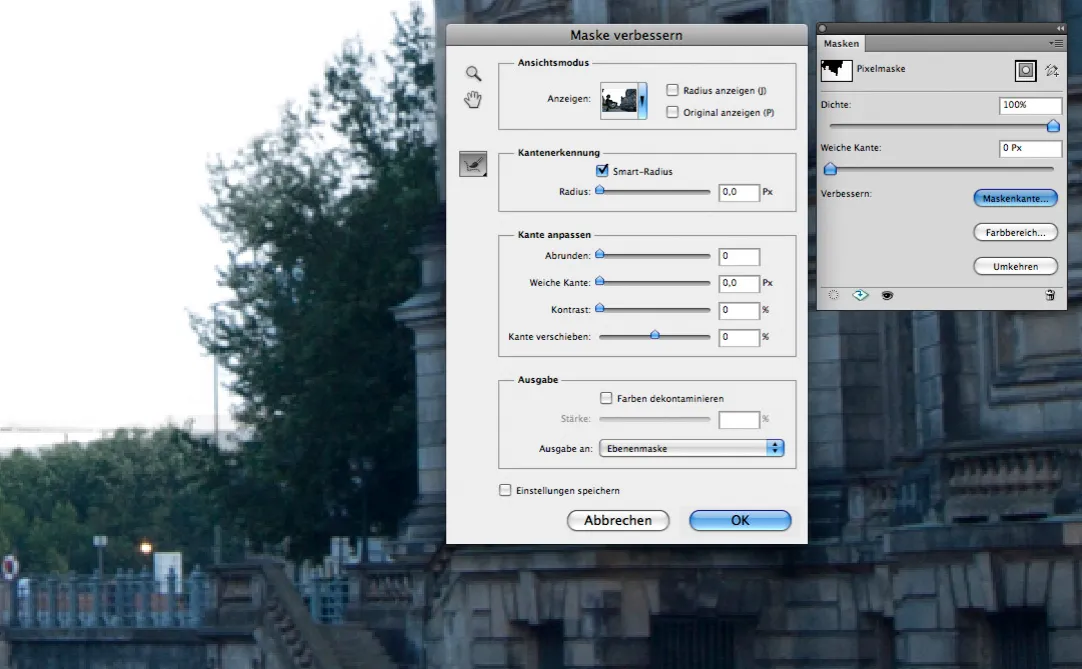
Step 3: Completing Layer Mask
The rest of the environment is best separated from the sculpture using a path. The enclosed area and the head of the rear bronze lady should not be forgotten. Create a selection from the path and fill it with black on the active layer mask.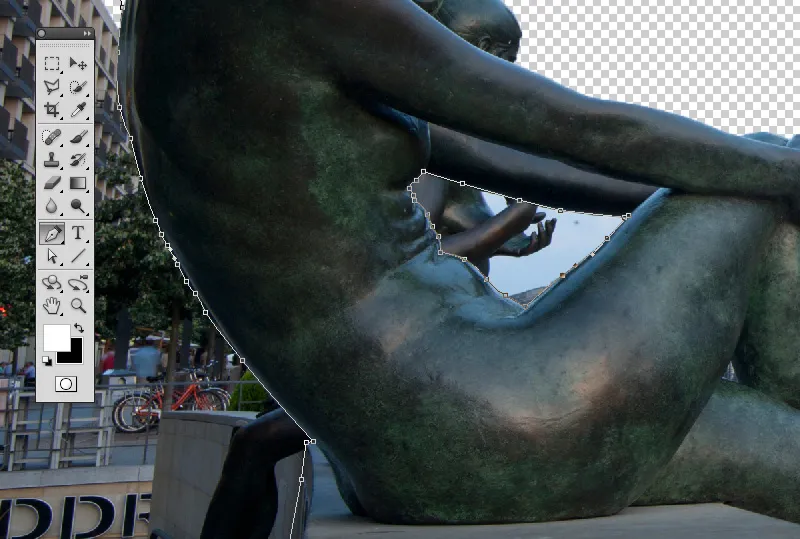
Step 4: Enlarging Workspace
A park-like landscape should extend behind the sculpture. To make room for it, enlarge the workspace. Click on the middle right square in the anchor matrix to expand the workspace to the left to the new width value. Then open the file Park.jpg and drag it into the image.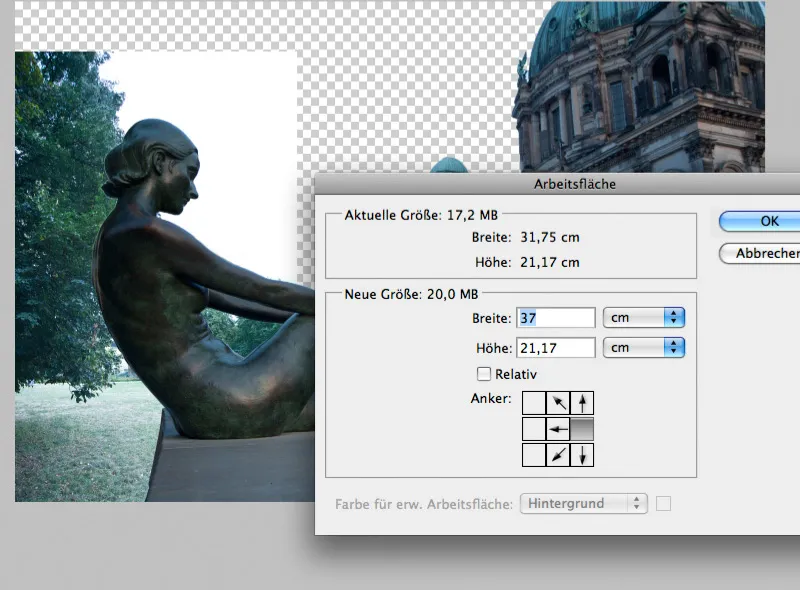
Step 5: Knitting Tree Tops
The cropped tree top is replaced by a branch: Draw a rectangular selection around the branch, copy it to a new layer, rotate it 90°, then mirror it horizontally, place it in the correct position, merge it with the tree, before reducing both layers into one.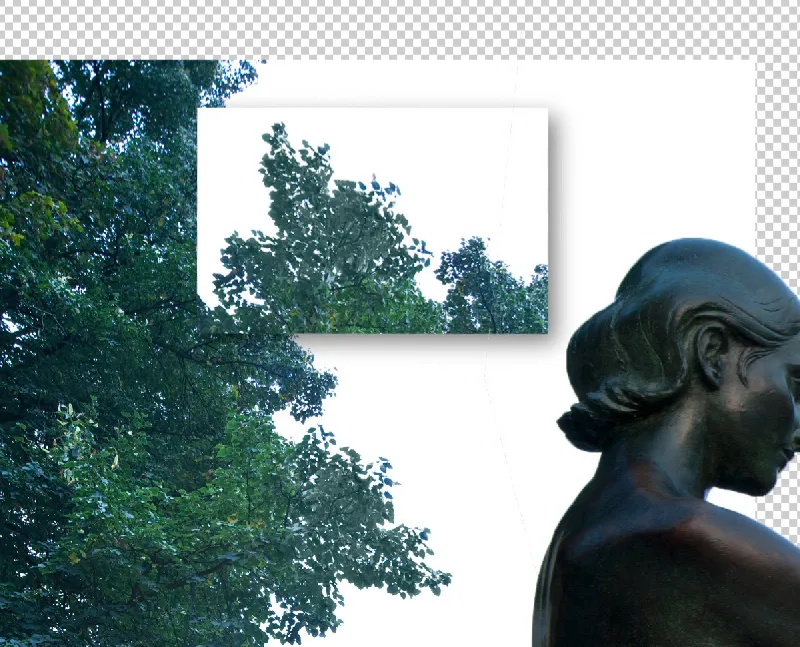
Step 6: Inserting Sky
Open the file Sky.jpg and drag the sky into the image. You can scale it down slightly. Its horizon and the horizon of the sculpture shot should roughly align to ensure the sky fits well into the motif perspective.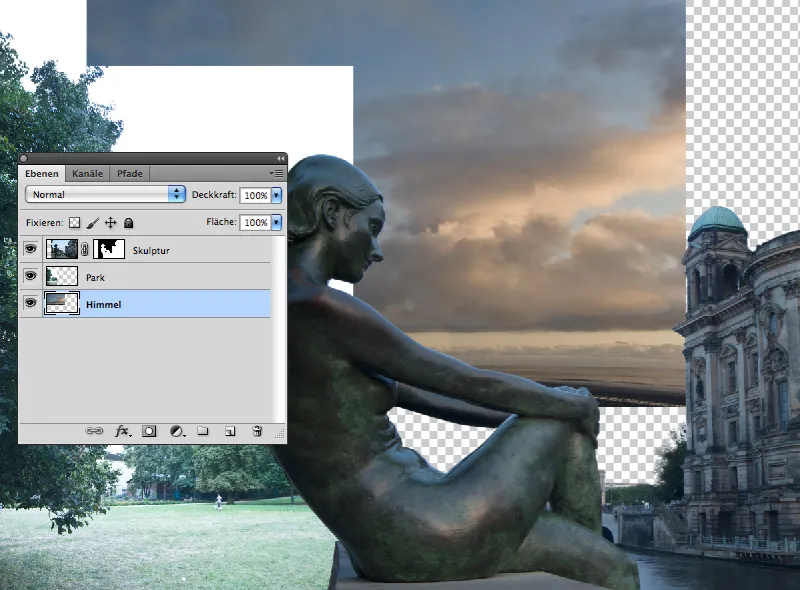
Step 7: Masking Park Landscape
As the sky is pure white, it is quite easy to mask: Create a new layer mask and then click on Color Range... Select the white tone and reduce the Tolerance to a value just under 30. Too small a Tolerance would result in harsh edges.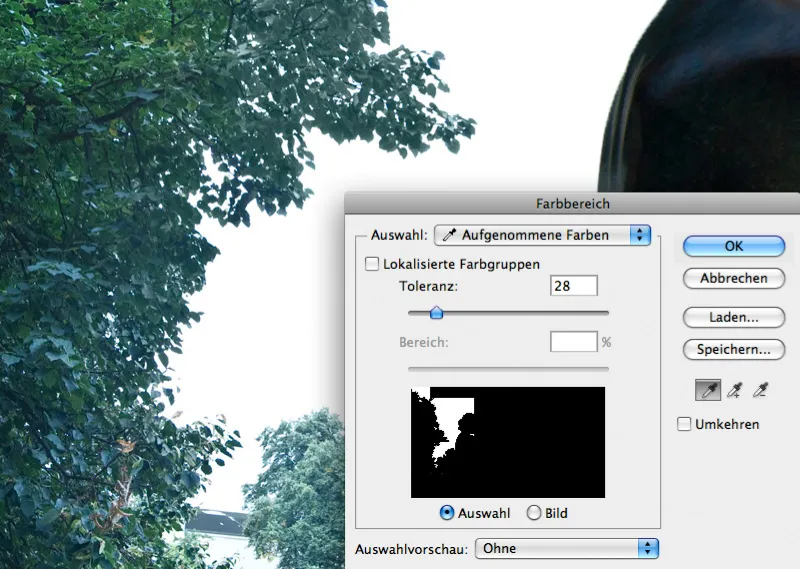
Step 8: Further Mask Refinement
After confirming the Color Range command, as before, click on Refine Edge... This time, however, using the Smart Radius doesn't really help; the white edges around the leaves are much easier to remove by reducing the selection by almost 50% and feathering the edge by 0.5 pixels.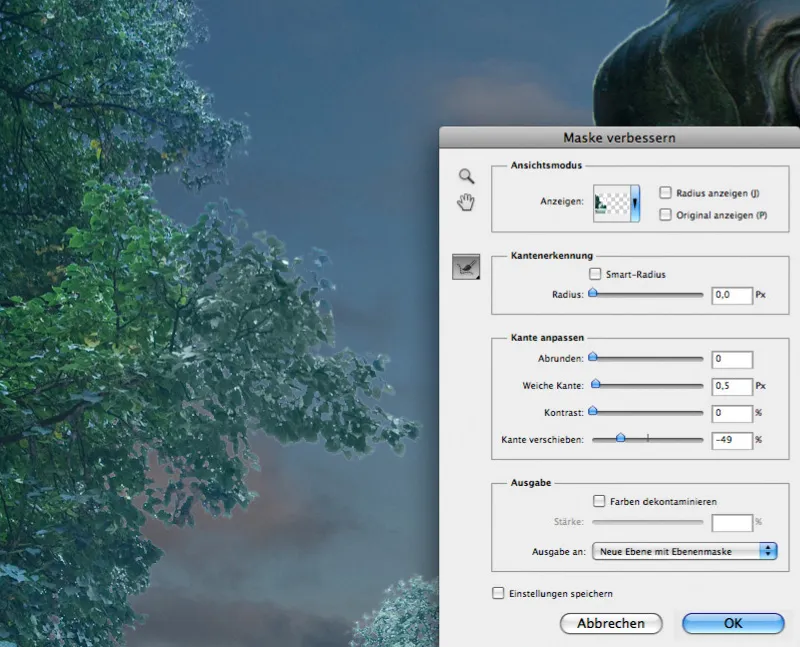
Step 9: Introducing Mountains
Between the sky and park layers, introduce the mountains. Open the file of the same name and use the Quick Selection tool to select the mountains. Invert the selection and mask the sky onto the mountain layer. Scale the mountains slightly longer than wider.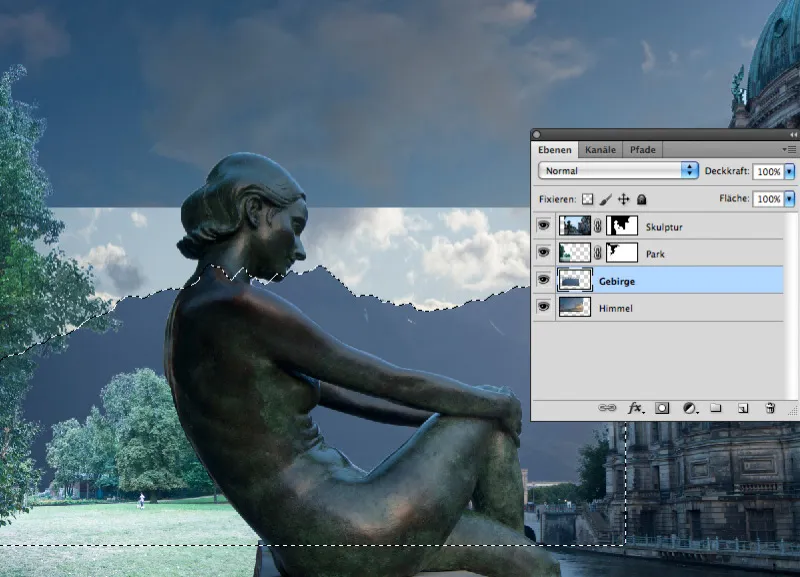
Step 10: Color Adjustment
Essentially, the most important components are now in the picture. They fit perspective-wise, but not yet in terms of lighting. To give it a twilight look, add a Color Balance adjustment layer on top and shift the Shadows to 15% Cyan and 20% Blue.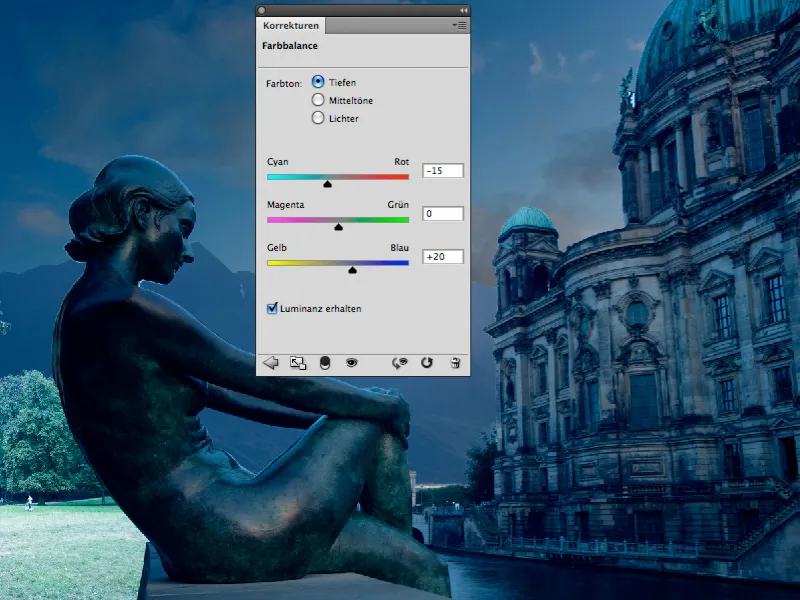
Step 11: Gradation Correction
A new gradation curve adjustment layer should be placed above the park level, and the left end of the curve, representing the highlights, should be brought down by one third. Then, add two more curve points to give the curve a smoother transition: this prevents overly darkening the deep shadows.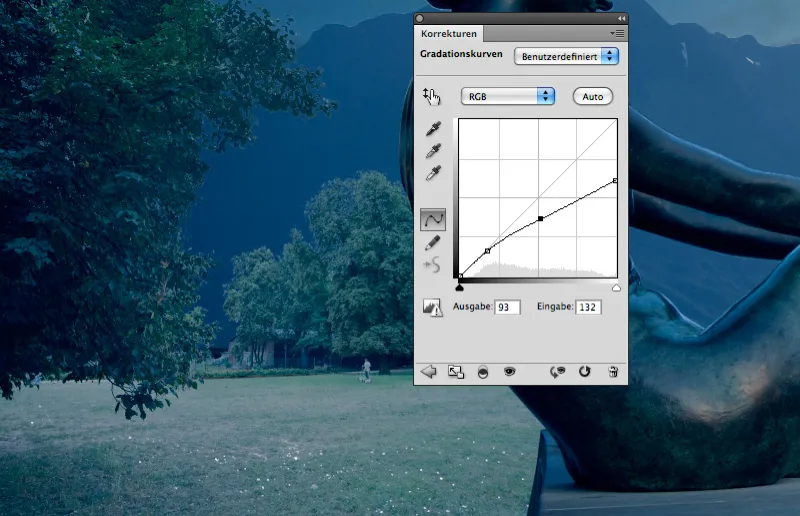
Step 12: Brighten the Sky
The sky is brightened: create a new layer above the sky layer and fill it with medium gray. It will be blended in Linear Light mode. Now paint a bright spot representing the setting sun over the cathedral and mountains using a large, soft brush with 10% Opacity.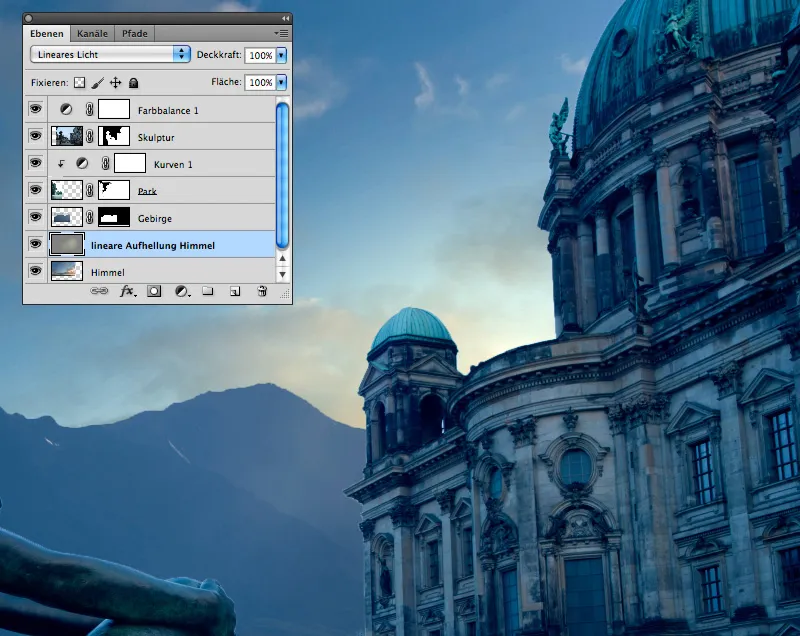
Step 13: Increase Mountain Contrast
The light coming from the sun must have an effect on the mountains. Create a new gray layer above the mountain layer and blend it in Glowing Light mode. Then, use a warm color tone (R 255/G 240/B 220) to add contrast-enhancing highlights to the base of the mountains.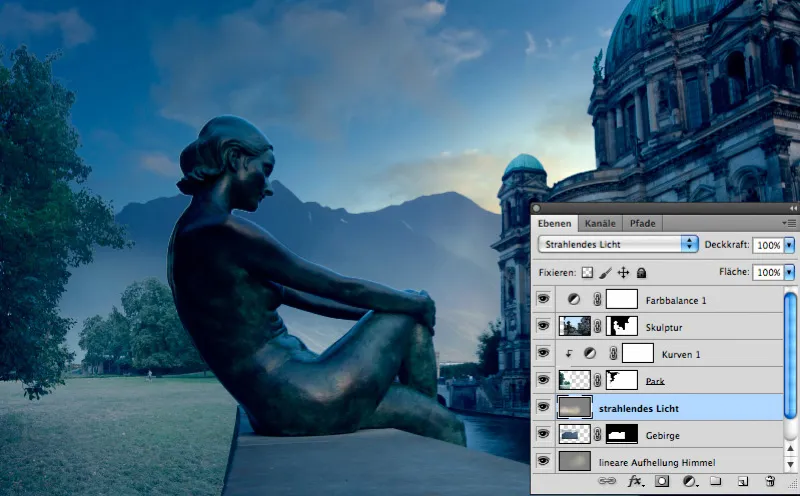
Step 14: Insert Fireflies
The first fireflies are hovering in the foreground: Open the files "Jetfly_01.psd" and "Jetfly_02.psd" and drag both onto the workspace. Copy Jetfly_01 once or choose another firefly file to place it in a suitable spot in the image.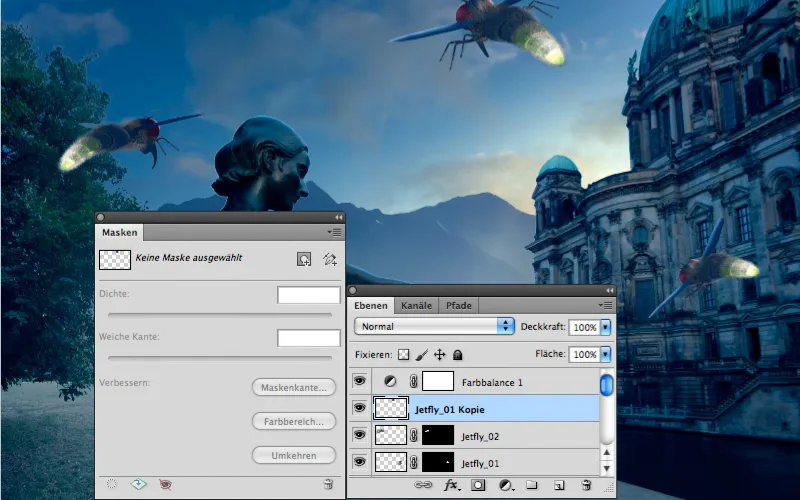
Step 15: Out of Focus
The largest of the fireflies is also the one closest to the viewer. It is processed with the Soften Depth of Field filter to account for the limited depth of field. A Radius of 20 is sufficient; Brightness and Specular Highlights should be kept near 0 and above 200, respectively.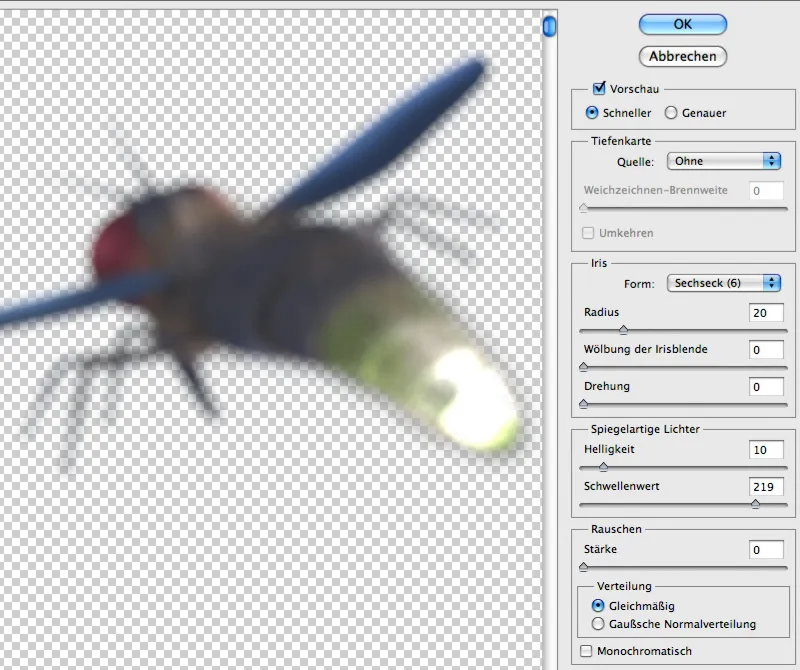
Step 16: Spot On!
The overpowering light is simply painted into a new layer: using white and a soft, round brush. Use a Diameter of 500 pixels and an Opacity of 5%. Then click multiple times on the glowing rears of the three fireflies until the light truly shines!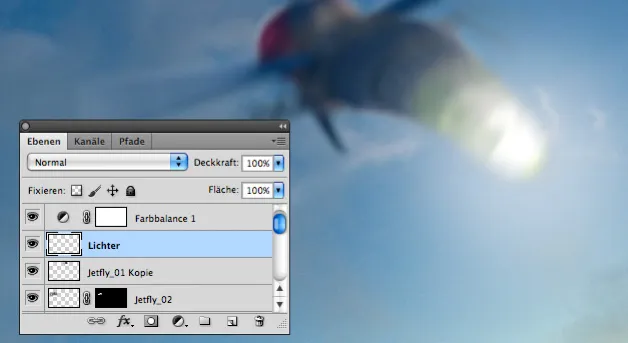
Step 17: Designing Brush Tips
Since we need numerous of these critters, duplicating them as brush tips seems sensible. Open Jetfly 06 and under Edit>Define Brush Preset, set the fly layer as a new brush tip shape. Give it a distinctive name to easily find it later. To use it as a brush tip and quickly paint a whole swarm, set the following Shape Dynamics for the brush: a Size Jitter between 60 and 90% and a Minimum Diameter just below 50. These settings, along with a Angle Jitter of 26%, create a well-mixed swarm.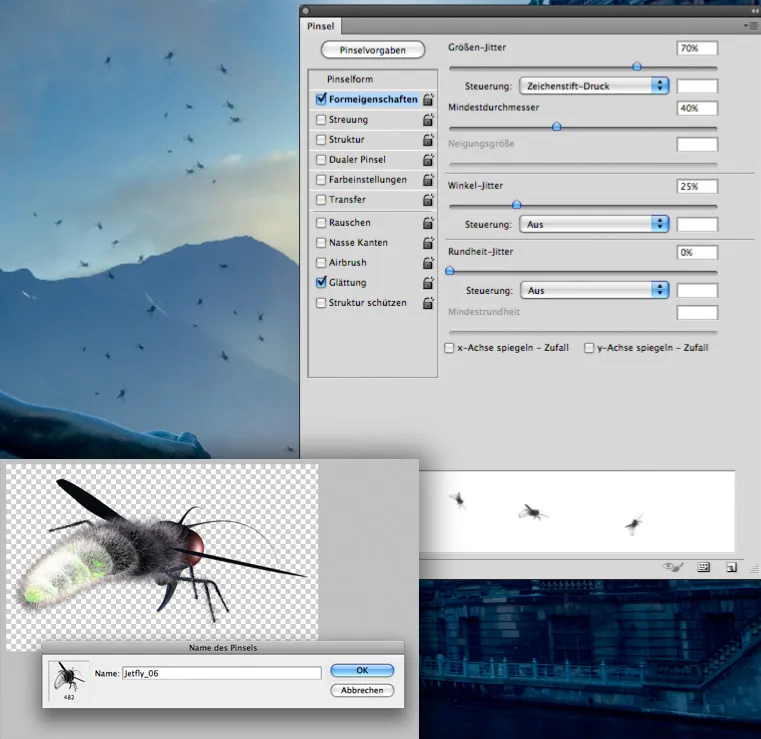
Step 18: Handwork: Painting Light Points
After creating more brush tips from the remaining Jetflies, proceed with creating the brush tip for illuminating the fireflies. It consists of a dark center and a large but faint glow. Save the brush and paint bright points on the fireflies with full Opacity.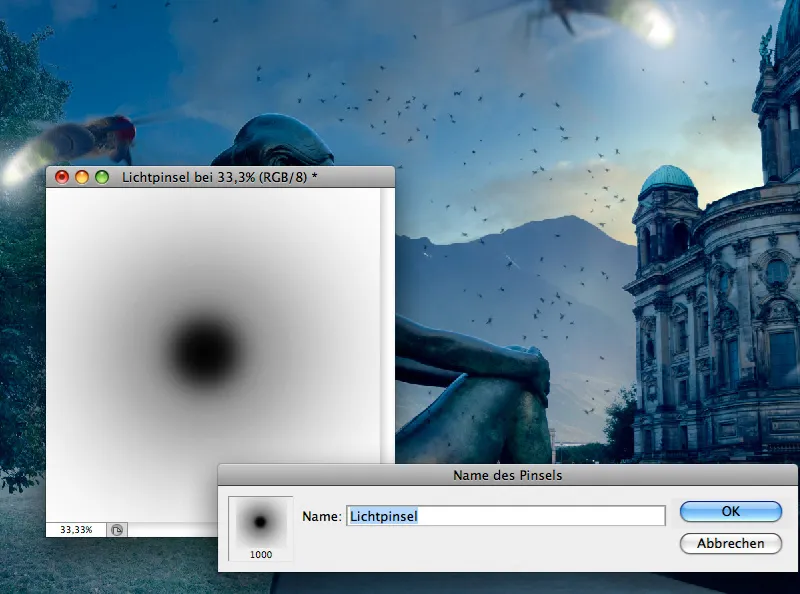
Step 19: Tailoring the Dress
As the dress should consist only of fireflies, you need to paint them along the lines of a dress. Therefore, create a temporary layer where you paint the rough contours and folds of a simple dress. Then use the various firefly tips to paint fireflies on the contours.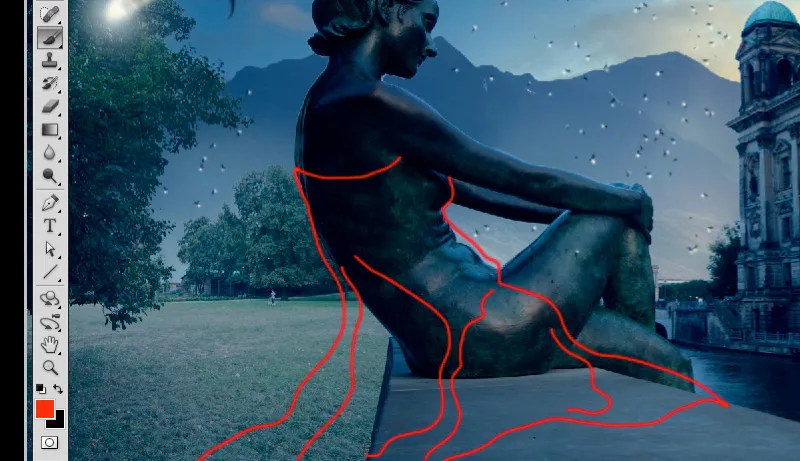
Step 20: Point Illumination
Wherever the fireflies touch the sculpture, they also illuminate it. So, create a new layer in Color Dodge mode and draw light points at the touch points with a very light yellow and an Opacity of 20%. The blending mode makes the color appear as light.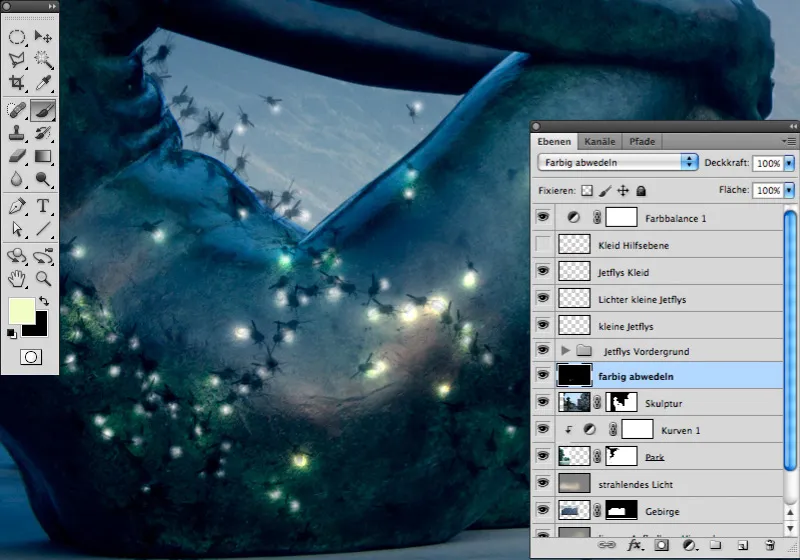
Step 21: Never too many
Whenever you think you have enough fireflies, you will realize a few more look even better. So, let the dress consist of several hundred fireflies. Everywhere these touch the sculpture or the seat, draw light traces in the Color Dodge layer.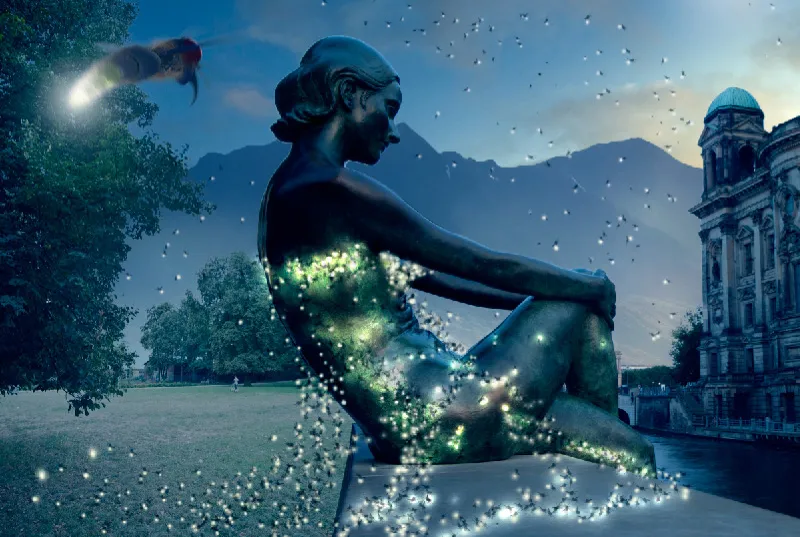
Step 22: In Bright Glory
The dress is not shining yet. This changes when you retrace the contours of the dress in a new layer above the sculpture with low opacity and very bright yellow again. Draw the lines more frequently in areas with more fireflies than in areas with fewer fireflies.
Draw the lines with one stroke without lifting the pen, and don't worry if they don't align perfectly everywhere. Then convert the layer into a smart object and apply the Gaussian Blur.
The suitable value ranges between 20 and 50 pixels, depending mainly on the thickness of your lines.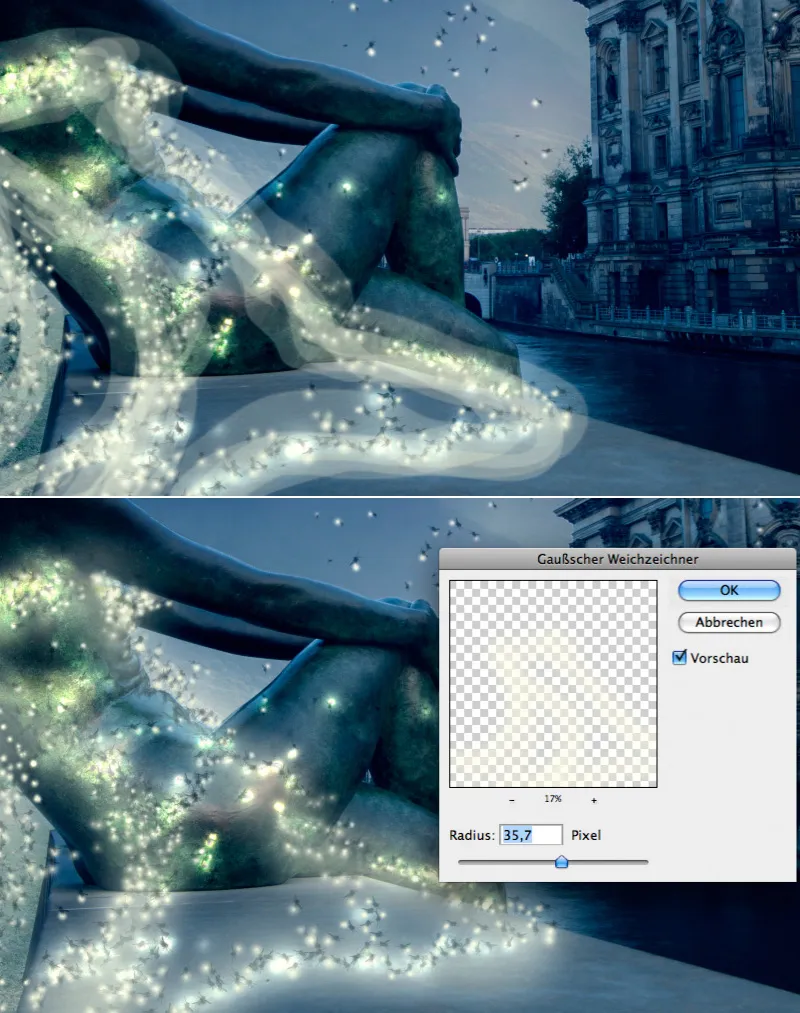
Step 23: Final Corrections
The final corrections are simple yet effective. By using a gradation curve, placed at the top of the layers palette, the overall brightness is further reduced. Lastly, a color balance is applied to enhance the blue tones in the mid-tones and emphasize the nocturnal impression.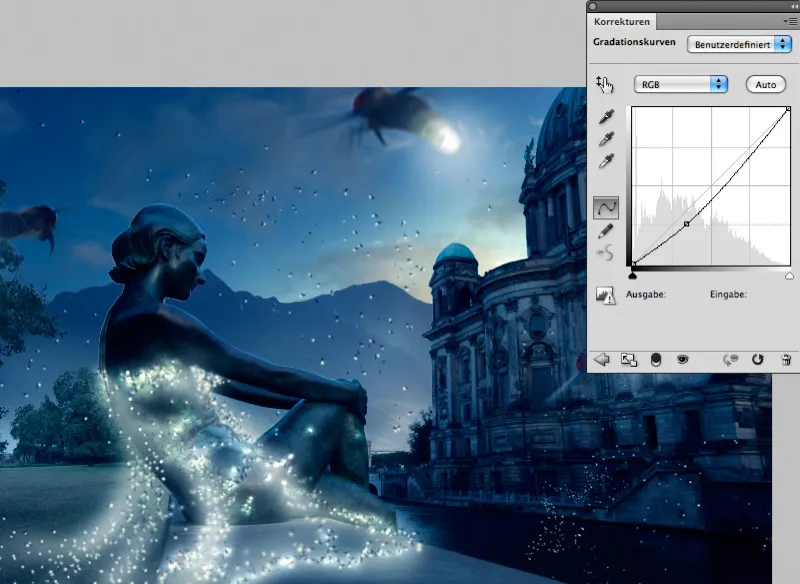
And this is what the finished artwork looks like:.webp)

