Creating optical illusions with Adobe Illustrator
Introduction:
Hello dear PSD community. I am pleased to welcome you once again to one of my tutorials. In today's tutorial, we will be looking at the topic of optical illusions. I have prepared four optical illusions for you and we will now create them step by step together in Adobe Illustrator.
Optical illusion 01:
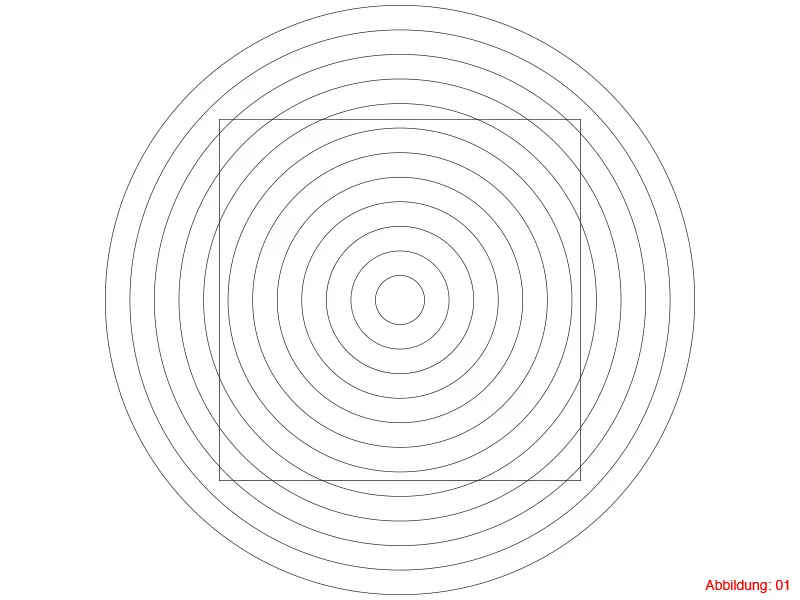
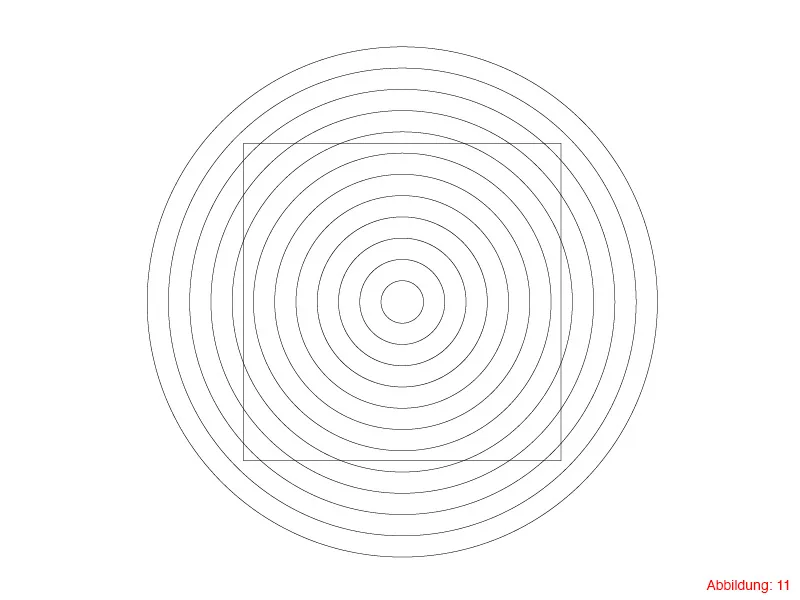
In this graphic you can see several circles and in the middle is a square with the sides curved inwards.
What if I told you that the square in the middle has absolutely straight sides? You don't believe me? Well, just hold a ruler to the sides. You'll see that I was telling the truth. :-).
Units of measurement:
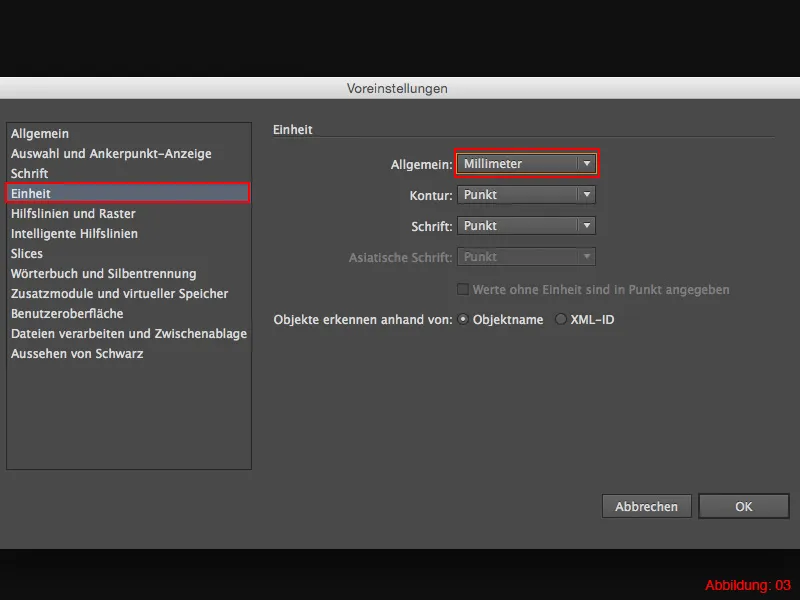
Before we finally start with the actual tutorial, I would like to ask you to check your settings for the units of measurement. We will only be working with millimeters in this tutorial. If this is already the case for you, you can go straight to step 1.
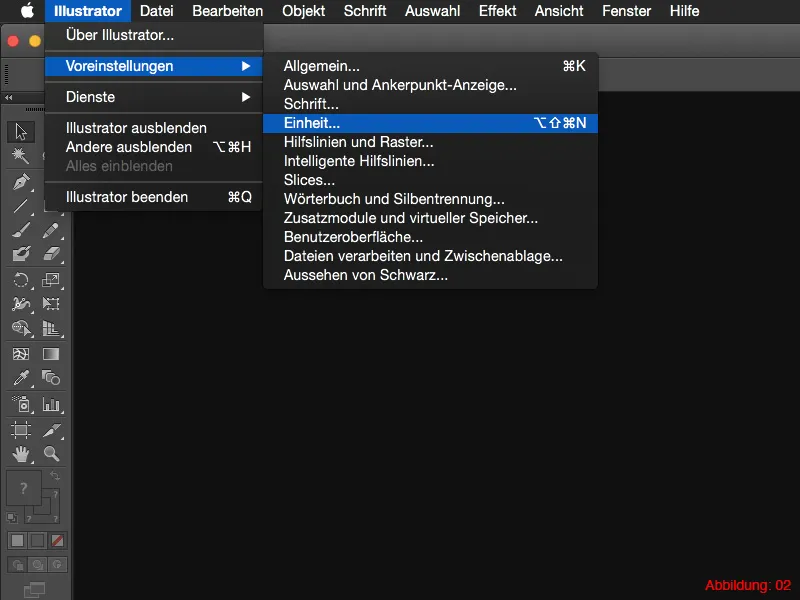
To change the unit of measurement on the Mac, click Illustrator>Preferences>Unit... in the top menu bar. (Figure 02).
On the PC, go to Edit>Preferences and then to the Unit... tab.
In the following window you can now change the unit of measurement to millimeters. (Figure 03).
Step 1: Create a circle
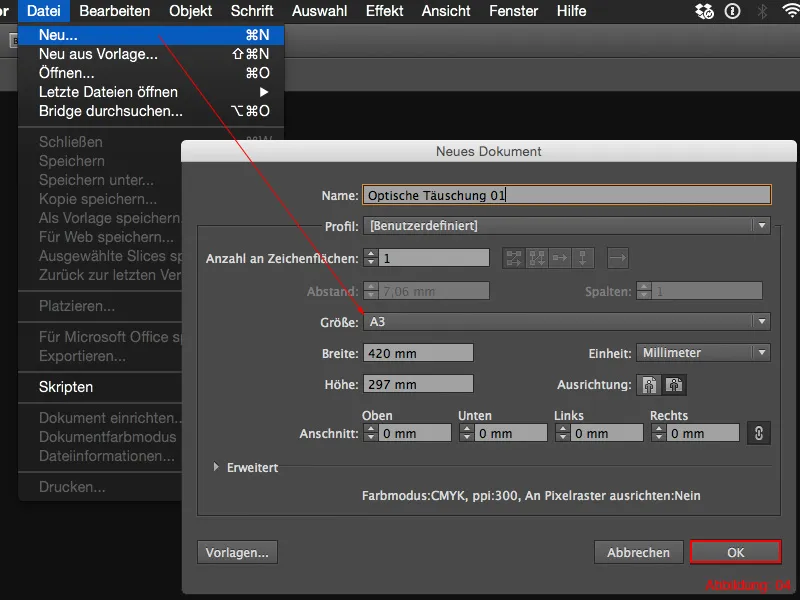
Once in Illustrator, the very first thing to do is to go to File>New. In the following dialog box, create a landscape format in DIN A3 (but you can also choose any other format).
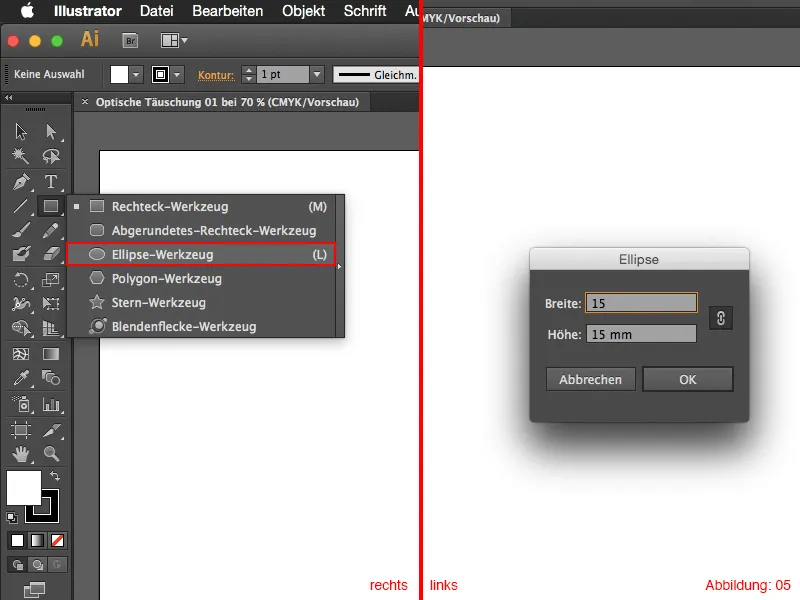
As we need some circle paths for this optical illusion, first grab the Ellipse tool from the tool palette. This is located under the rectangle tool and can be called up by clicking and holding on it. Alternatively, you can also simply press the shortcut L on the keyboard.
Now click anywhere on the workspace with the ellipse tool. This click opens a dialog box in which you can enter the size of the ellipse. For the width, you need a value of 150mm. As you need a circle, you also need to enter this value for the height. Enter 0.5pt for the outline thickness.
Step 2: Duplicate and scale circles
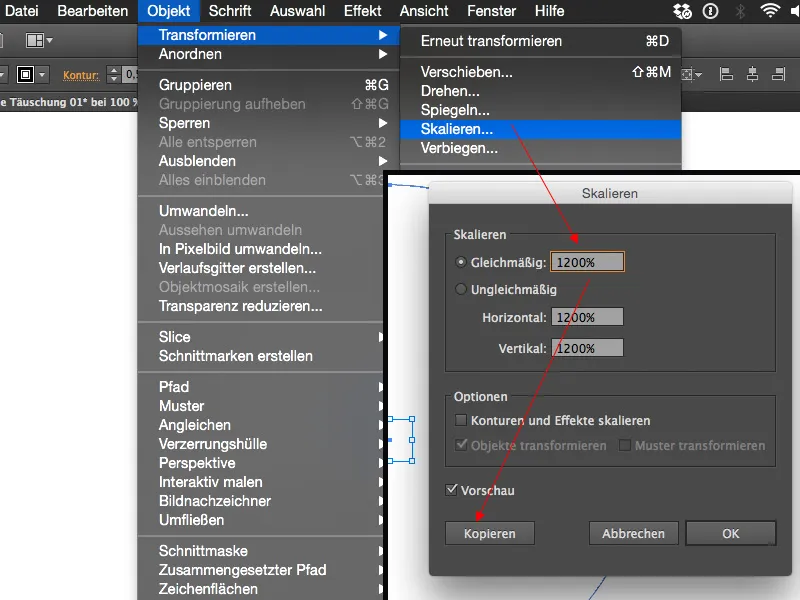
Next, this circle must be duplicated several times and enlarged evenly. The best way to do this is to click on Object>Transform>Scale in the menu bar.
Enter a value of 1200% in the following window.
As this scaling is to be applied to a copy of the circle, we confirm this dialog box by clicking on Copy. If you click on OK, the circle will not be copied, but the existing circle will be enlarged and the small one will disappear. You should therefore always click on Copy.
To create the remaining circles, you will need the Adjust tool. You will find it in the tool palette next to the eyedropper. Double-click on the Adjust tool and set Fixed levels and a value of 10 in the following window.
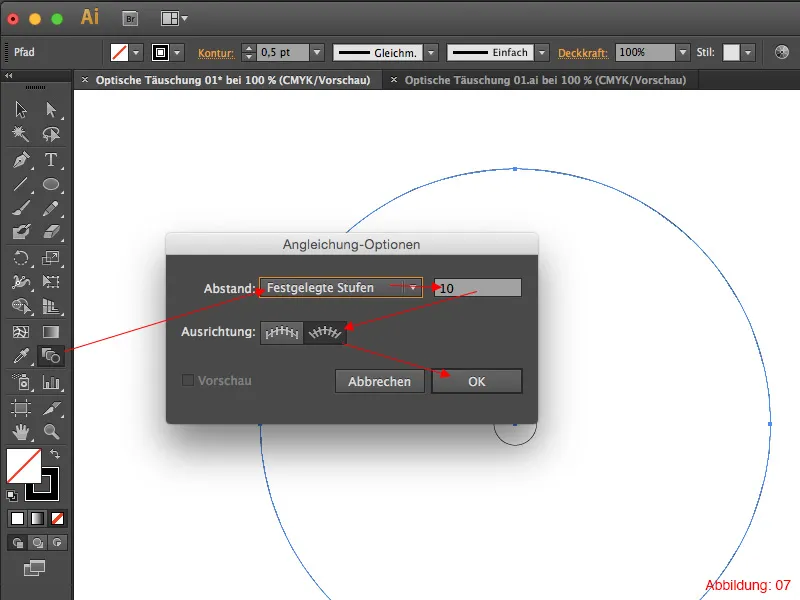
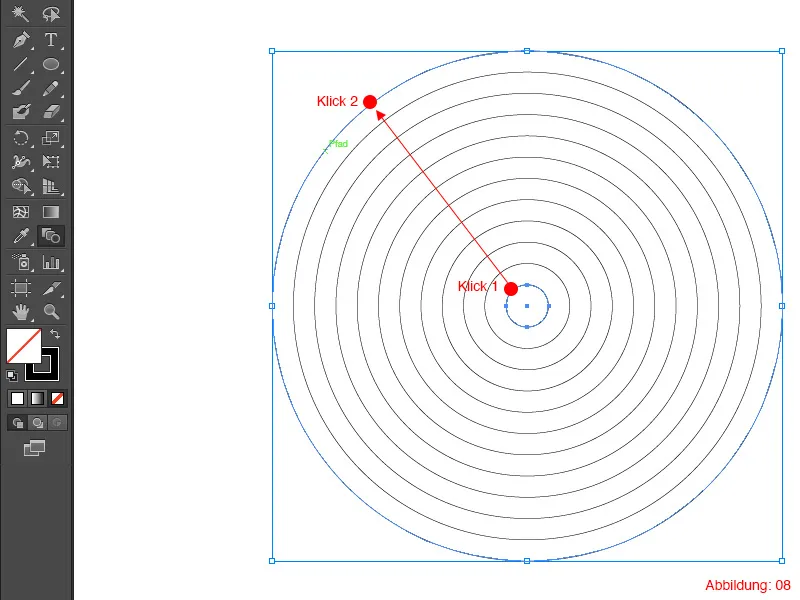
After confirming with OK, first click on the small circle (click 1) and then on the large circle (click 2). The Adjust tool then automatically creates the 10 inner circles that were missing (see Figure 08).
Step 3: Creating the square
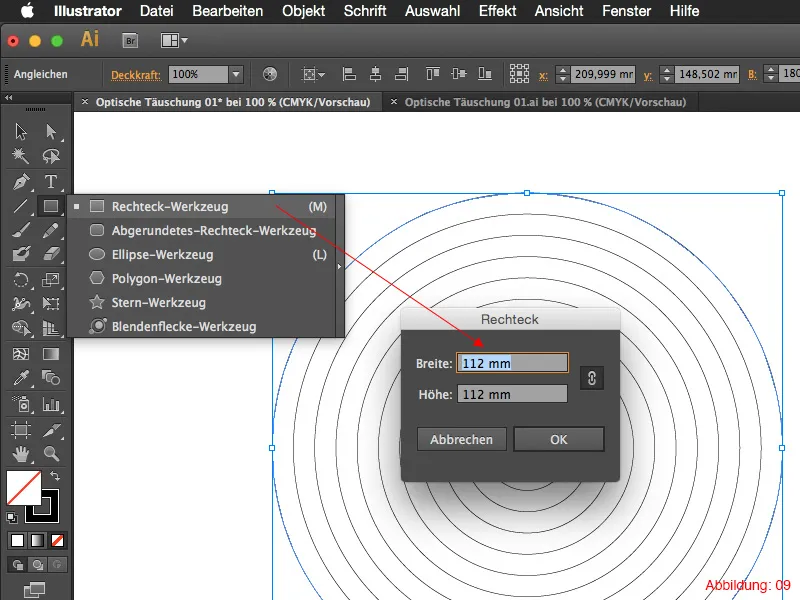
The only thing missing now is the square. We create this with the rectangle tool. Pressing the shortcut M immediately calls up the rectangle tool. Just as before with the ellipse, simply click anywhere on the workspace. The window in which you can set the size will then appear again. Here you set a size of 112mm for the width and height. As before, select 0.5pt for the outline thickness.
Step 4: Finish the optical illusion
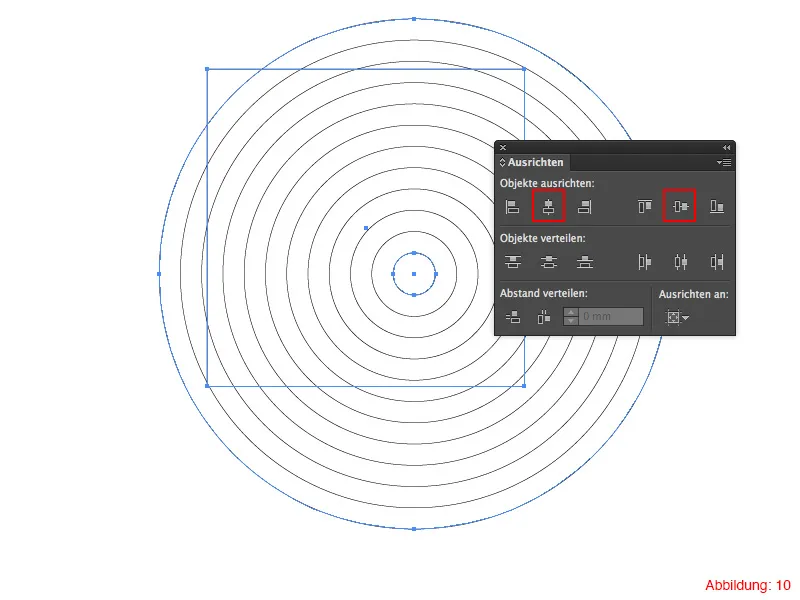
In the last step, select the circles and the square. To select several objects at the same time, hold down the Shift key while clicking on the two objects.
Now you need the Align palette. You can find this under Window>Align.
Here you only need to click once on Horizontal Align and once on Vertical Align (see Figure 10).
After aligning, your first optical illusion is ready and should look something like this (see Figure 11). You can of course embellish the whole thing afterwards by using different colors.
Optical illusion 02:
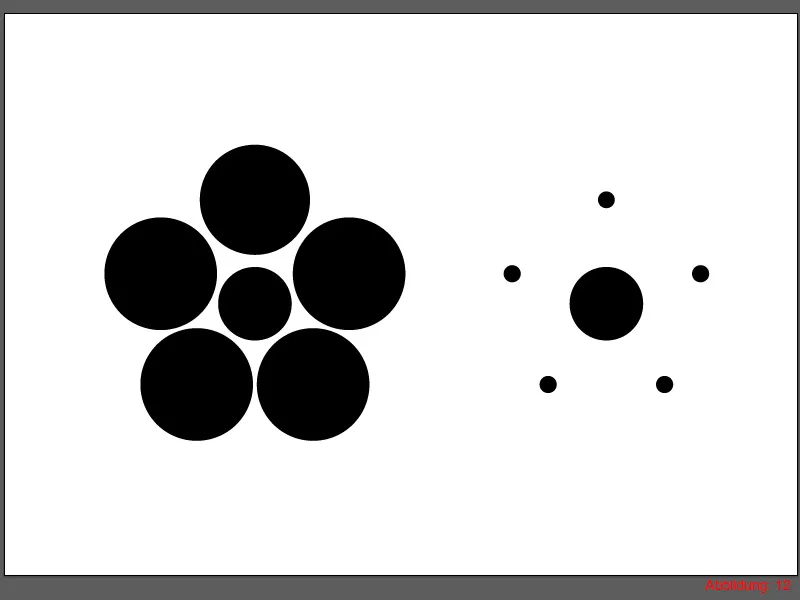
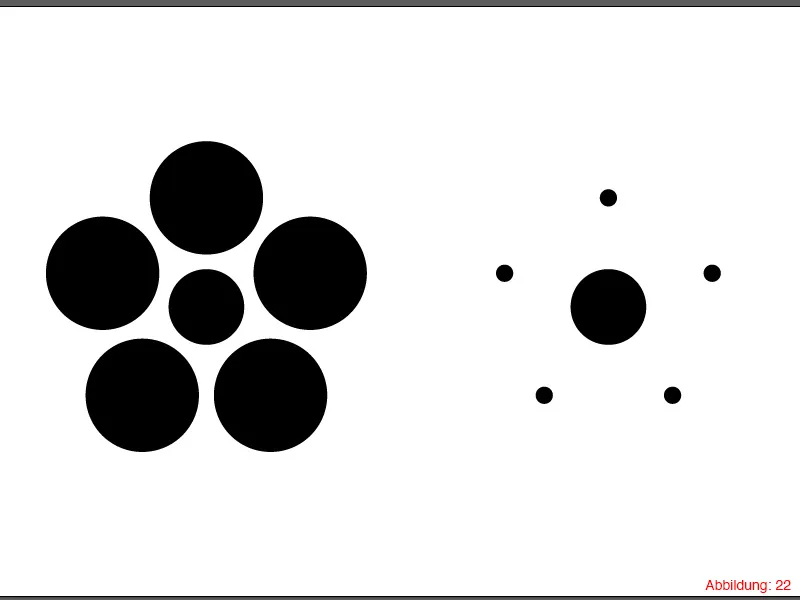
The second optical illusion is about the relationship between large and small. On the left-hand side, the middle dot looks a lot smaller than on the right-hand side. In reality, however, these two dots are exactly the same size. When constructing this optical illusion, you will learn how to use the Move dialog and the Rotate tool.
Step 1: Creating the workspace
Before you can start with the construction, you need a new workspace. You can create this again via File>New. In the following window, select a format of DIN A3 (you can also use a format of your choice this time if you wish).
After you have created the workspace, you must first create a center point as the center for the first circle in the middle. Use the shortcut Command+R or Ctrl+R to display the rulers.
By holding down the left mouse button, you can now drag guides out of the rulers. You will need one horizontal guideline and one vertical guideline (approximately in the middle). (Figure 13).
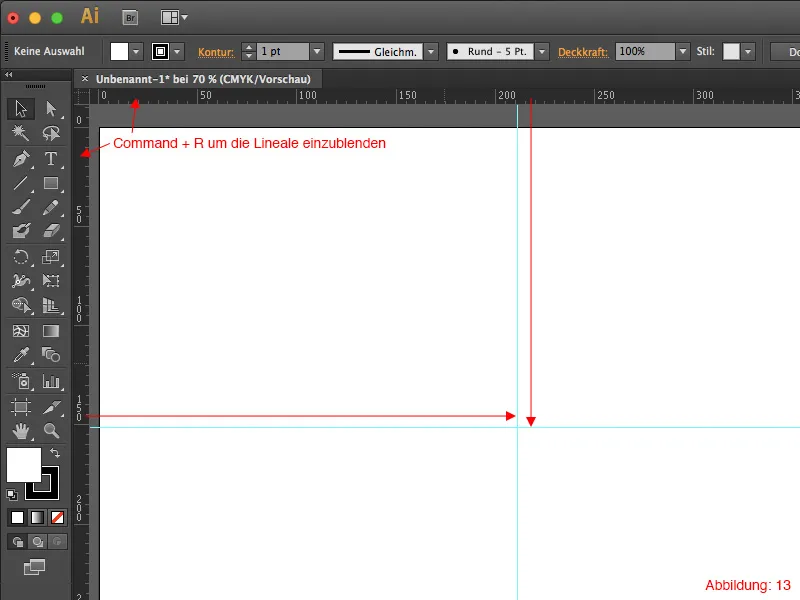
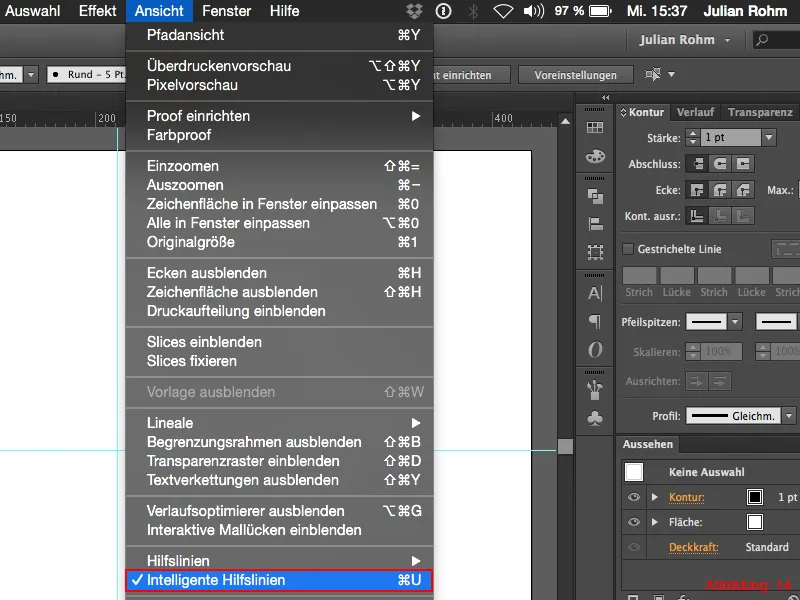
Now is the time to check whether the intelligent guides are activated. You can easily check this by going to View>Intelligent Guides in the top menu bar. If this option is not yet checked, click on it once to activate this function.
Step 2: Create the left half of the optical illusion
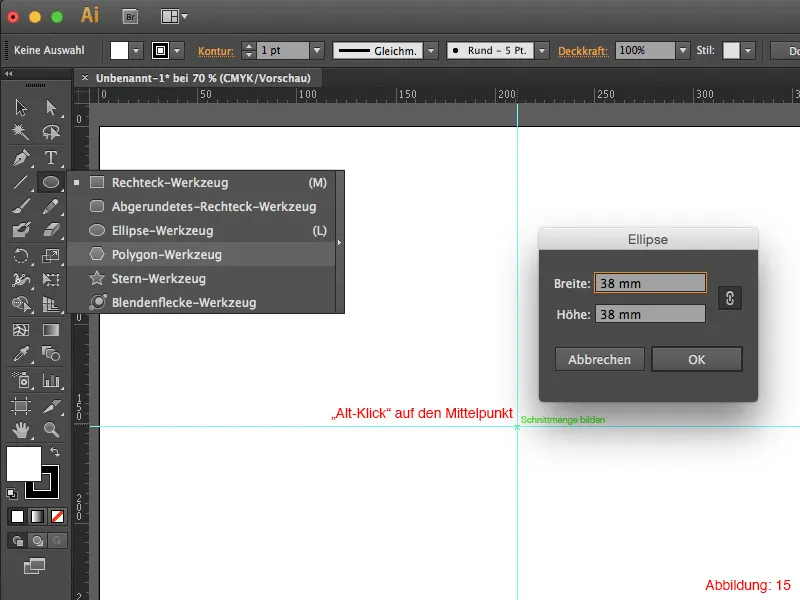
In the next step, grab the ellipse tool and, holding down the Alt key, click on the center point of the guides you created previously.
In the following dialog box, enter a size of 38x38mm. By holding down the Alt key beforehand, the circle created will be generated directly from the center of your center point.
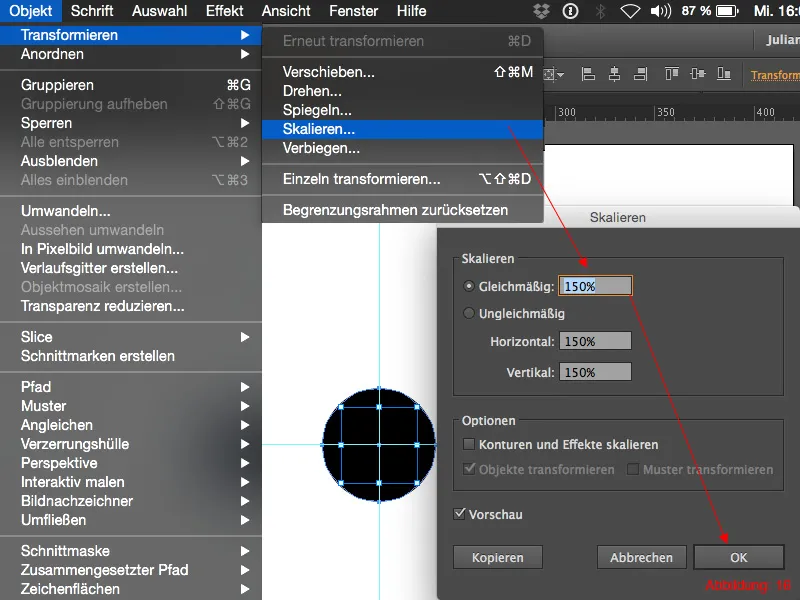
Use Command+C and Command+F (on PC: Ctrl+C and Ctrl+F) to copy this circle and paste it in the same place. Now go to Object>Transform>Scale in the top menu bar. Enter a value of 150% for Uniform and confirm with OK.
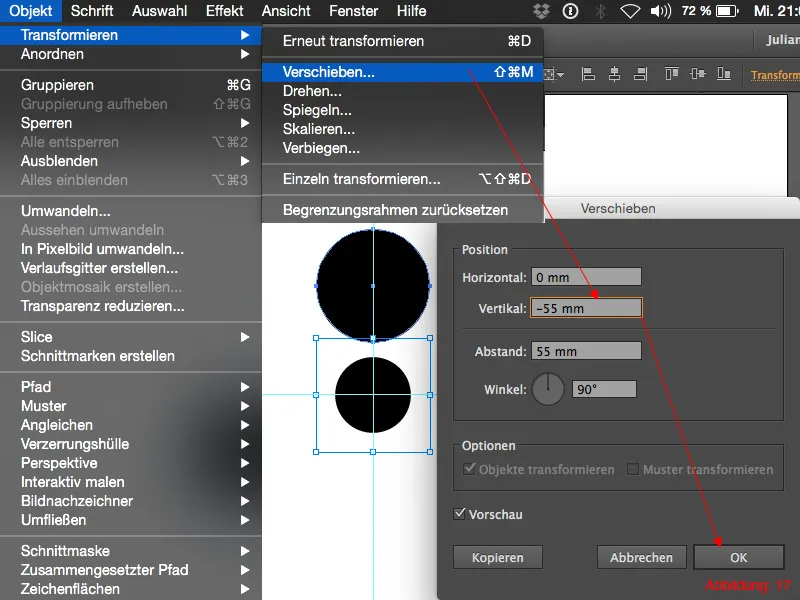
Now you have to move this circle upwards by 55mm. You can easily do this by clicking on Object>Transform>Move again. Leave the value 0mm for Horizontal and enter a value of -55mm for Vertical. (Minus, because you want to move upwards and not downwards).
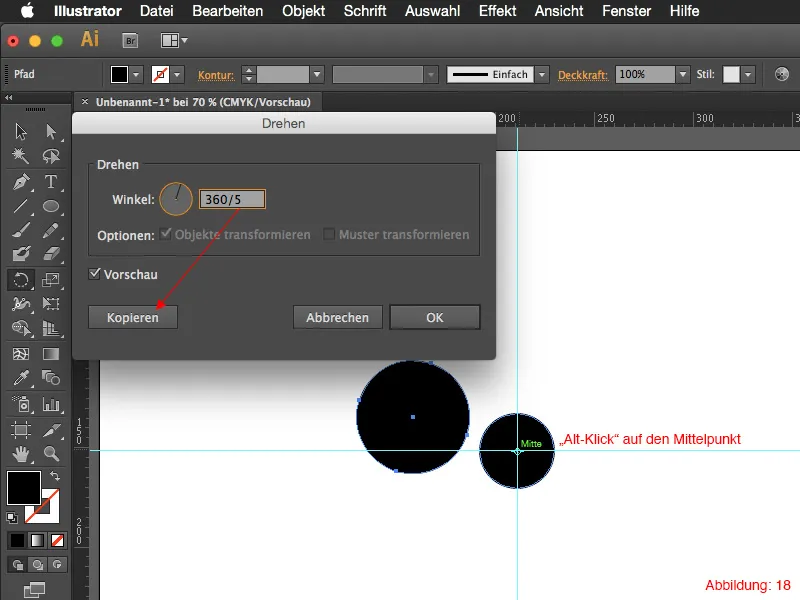
This larger circle must now be evenly distributed around the smaller circle. In the tool palette you will find the rotate tool. If you now hold down the Alt key again and click on your center point, you can rotate the circle directly around this axis.
As you may have already seen in the preview image for this optical illusion, you need exactly five circles distributed around the center. Since a circle is known to have 360°, simply enter 360/5 in the rotate dialog box. Illustrator is so clever in this case that it understands this calculation and immediately shows you the result. (This saves you having to do the mental arithmetic). Now it is important that you do not confirm with OK, but click on Copy. This will keep the original circle and make a copy of it.
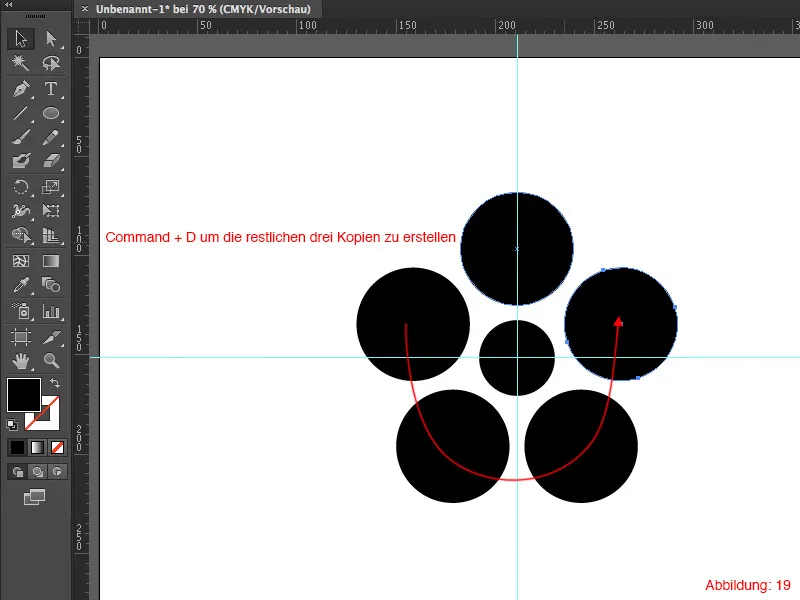
You can repeat this process three more times with the shortcut Command+D (on PC: Ctrl+D).
Step 2: Create the left side of the optical illusion
This completes the largest part of the optical illusion. To create the right part with the smaller circles, select everything with Command+A (on PC: Ctrl+A) and create a copy to the right of it by holding down the Alt key.
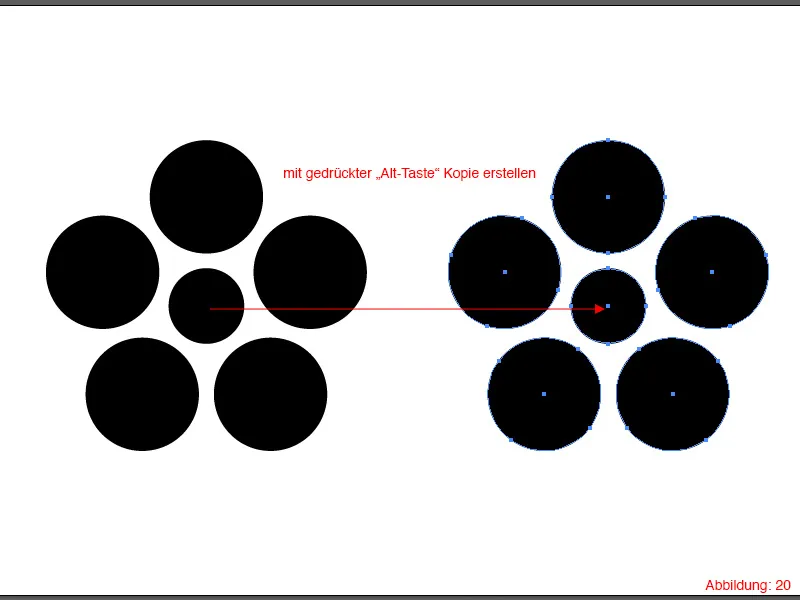
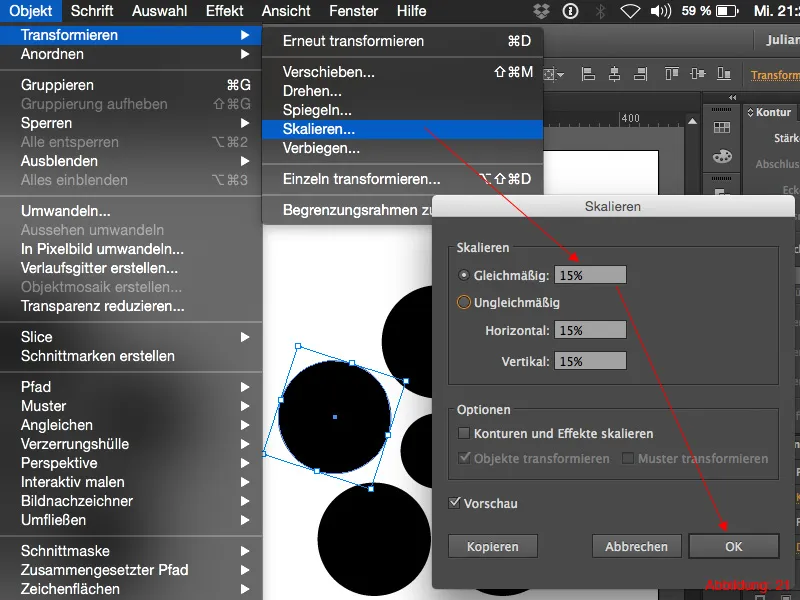
The rest is just a little bit of hard work. You now have to grab each of the five circles once and always scale them down to 15% using Object>Transform>Scale.
The second optical illusion is finished:
Optical illusion 03:
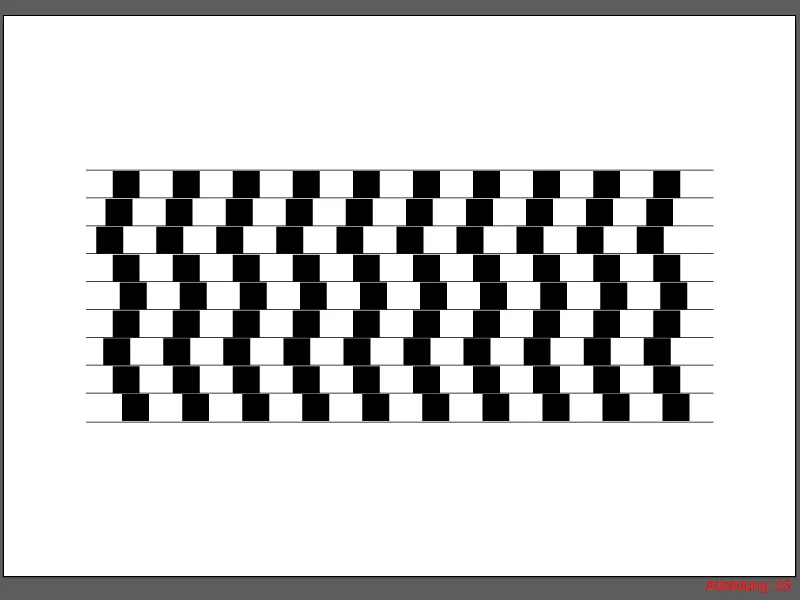
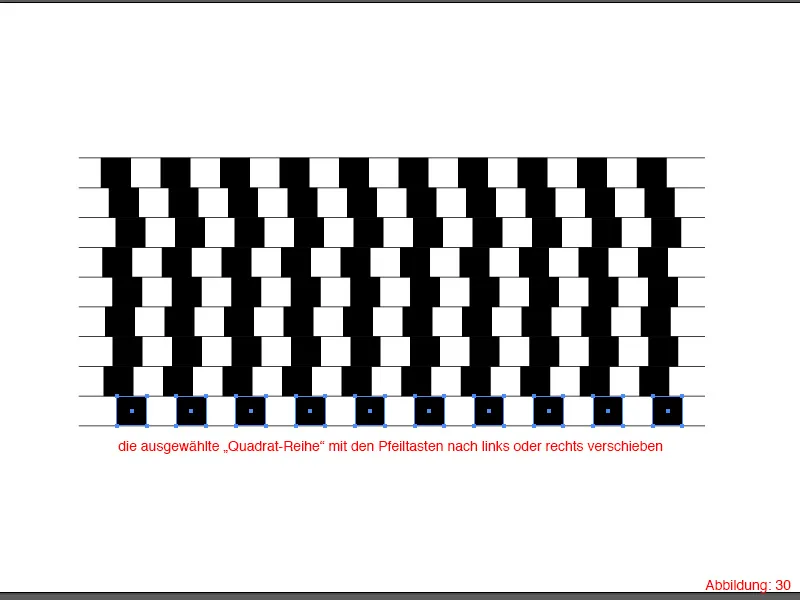
Now we start directly with the third optical illusion. In this illusion, our eyes are tricked into believing that the lines and squares (especially in the middle area) slope steeply to the left and right. In reality, however, the lines and squares are aligned exactly horizontally.
Step 1: Let's get started!
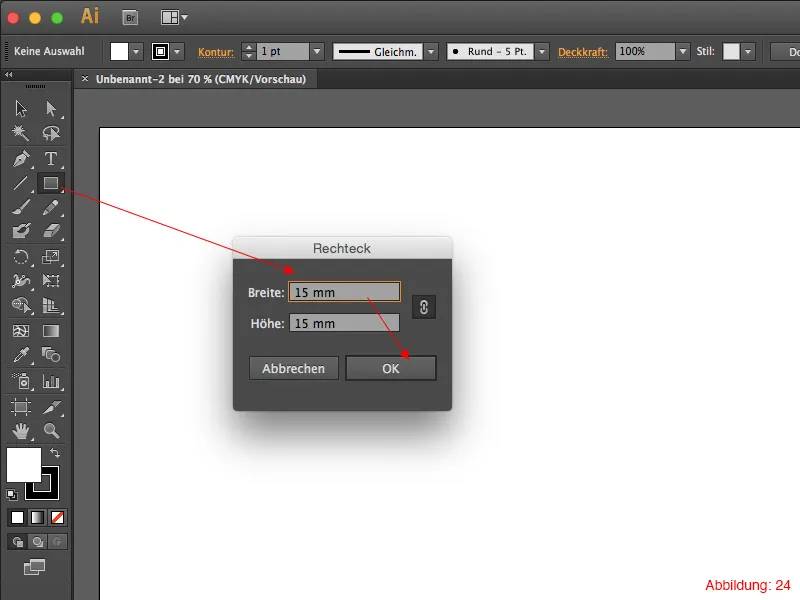
To create this optical illusion, the first step is to use the rectangle tool to create a square measuring 15x15mm.
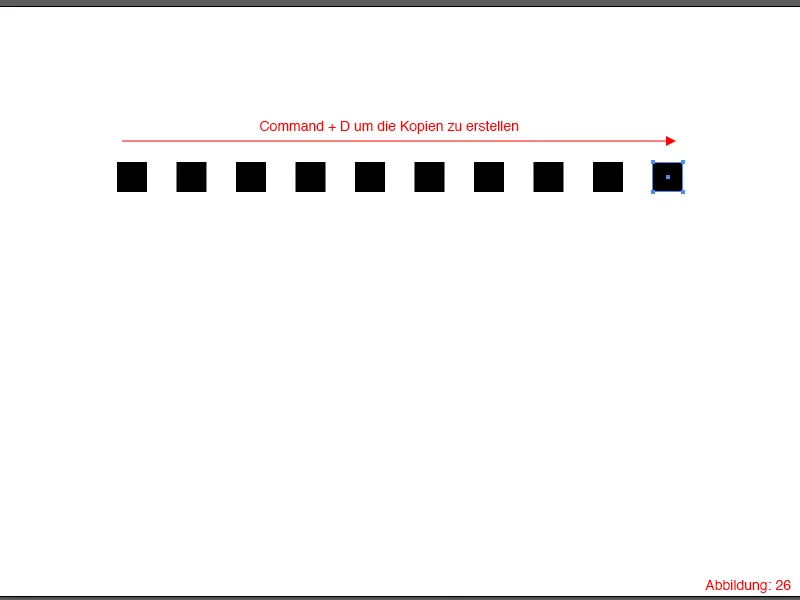
We need 9 copies of this square, each with a distance of 15mm between them in the horizontal direction.
To do this, go back to Object>Transform>Move. In the following window, enter a value of 30mm so that you have a gap of exactly 15mm between the next square. Confirm this dialog by clicking on Copy.
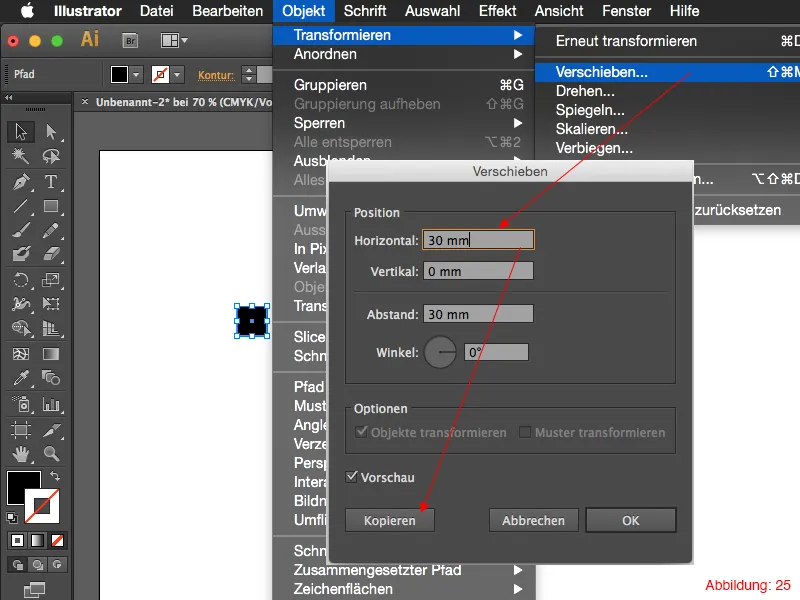
Use the shortcut Command+D (on PC: Ctrl+D) to create eight more copies so that you end up with 10 squares in a row, each with a 15mm gap.
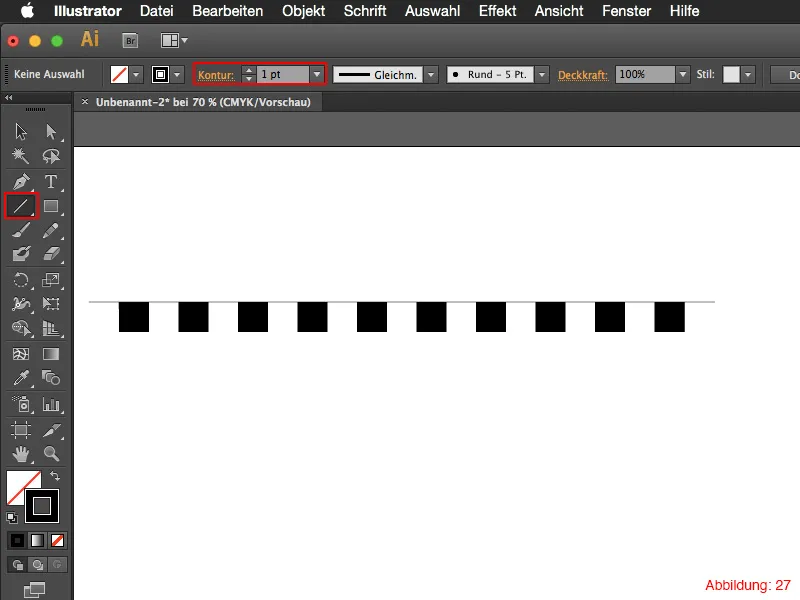
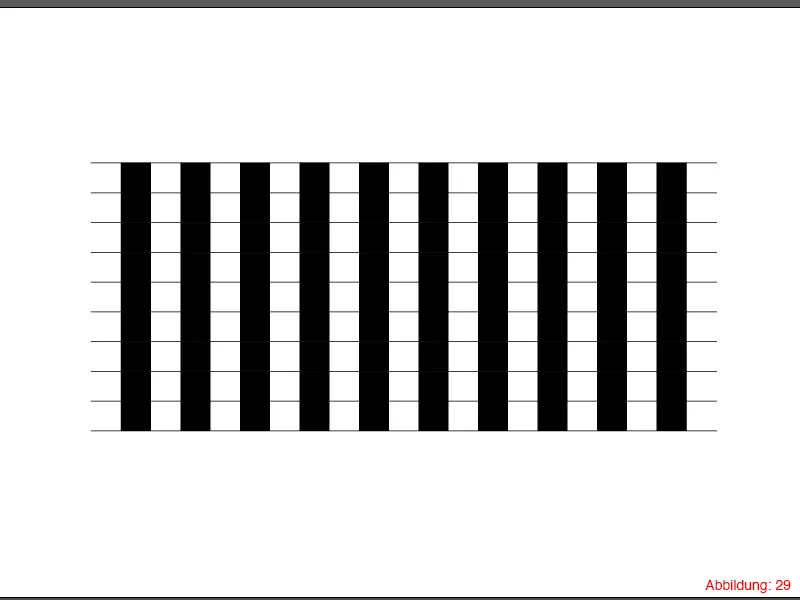
In the next step, grab the line tool from the tool palette and draw a horizontal line directly at the top edge of the squares. Make sure that the line protrudes slightly to the left and right as shown in the illustration. (Line thickness: 1pt).
Now mark all the squares including the line you have just drawn and call up the Move dialog again via Object>Transform>Move. Enter 0mm for Horizontal and 15mm for Vertical. Confirm this dialog box again with Copy.
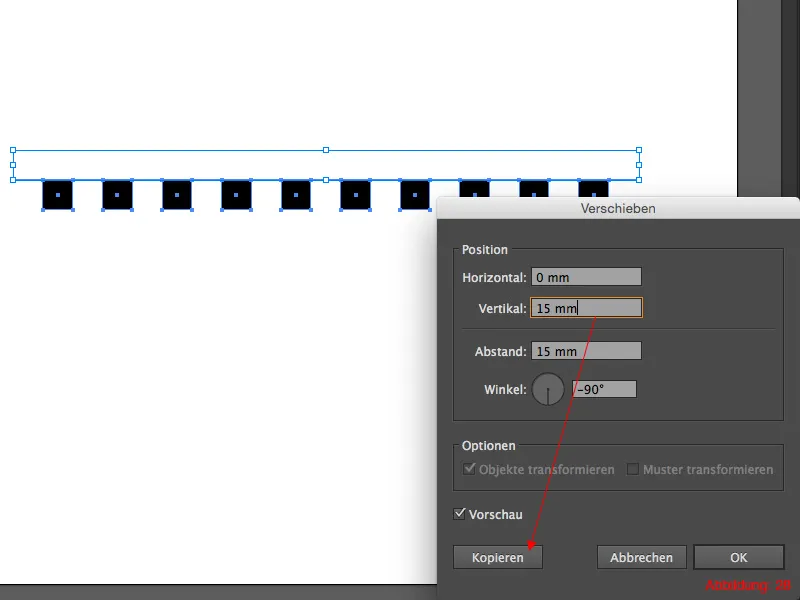
Use Command+D (on PC: Ctrl+D) to create seven more copies.
For the last copy, create another line at the bottom edge of the squares to finish the whole thing off cleanly. It should then look like Figure 29.
Step 2: Finishing the optical illusion
To complete this optical illusion, use the selection tool to select one row of squares at a time and move them in different directions using the arrow keys. When you have done this with each row, it will look as if the lines and squares are sloping diagonally in both directions.
Optical illusion 04
We have now reached the last optical illusion in this tutorial.
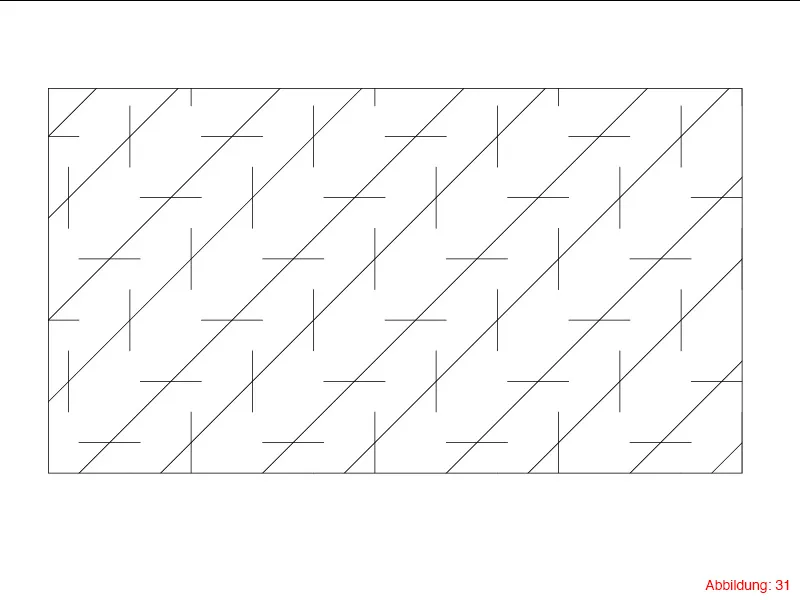
In this illusion, it looks as if the long lines are at different angles to each other. In reality, however, they are at exactly a 45° angle to each other. This illusion is created by the fact that the short lines are always arranged alternately horizontally and vertically on the 45° lines. (Was that just too much input at once? Never mind! You'll understand what I mean as soon as you create this illusion. :-) ).
Step 1: Creating the lines
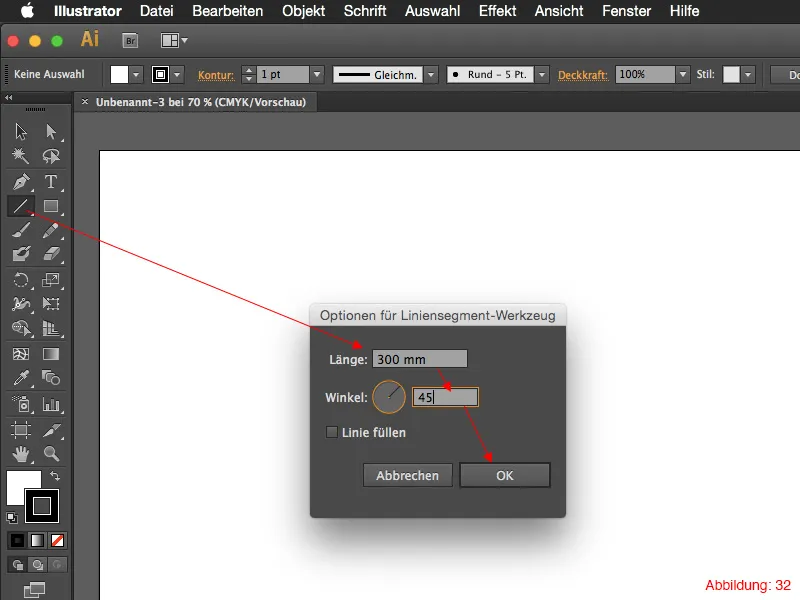
First create a new workspace in A3 format. Then take the line tool and click once on your workspace. A window will now appear in which you can set the length of the line and the angle. Enter a length of 300mm and an angle of 45° and confirm with OK.
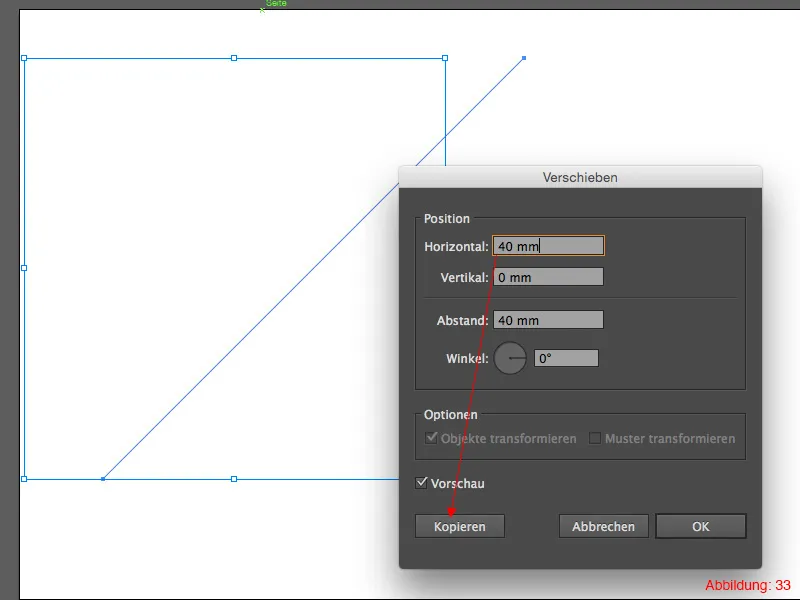
Use Object>Transform>Move to move the line 40mm to the right and confirm with Copy.
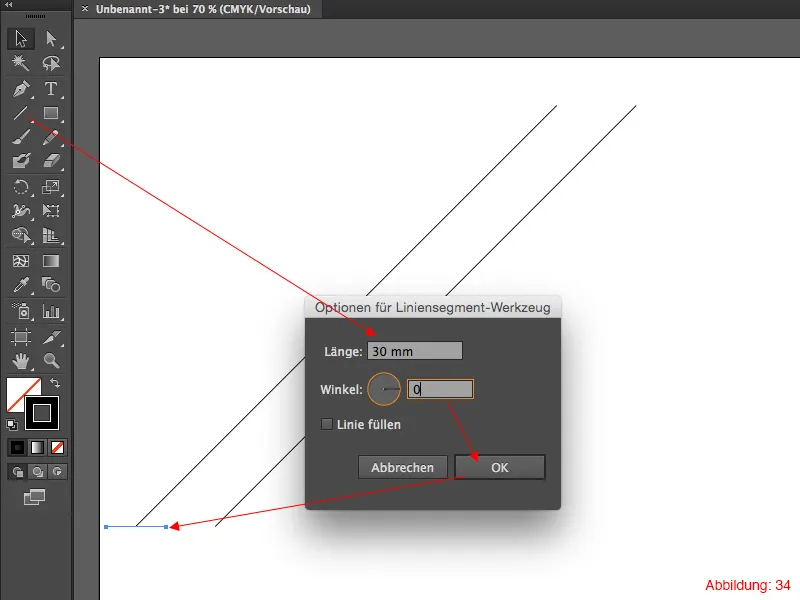
Now you need the line tool again. This time create a line with a length of 30mm and an angle of 0°. Now place this line in the middle at the lower end of the first line as shown in the illustration.
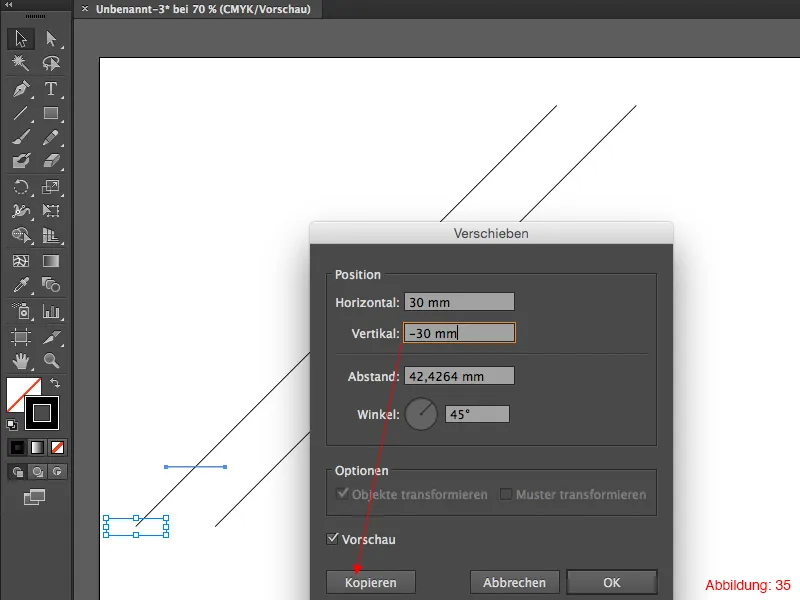
In the next step, call up the Move dialog again. Object>Transform>Move.
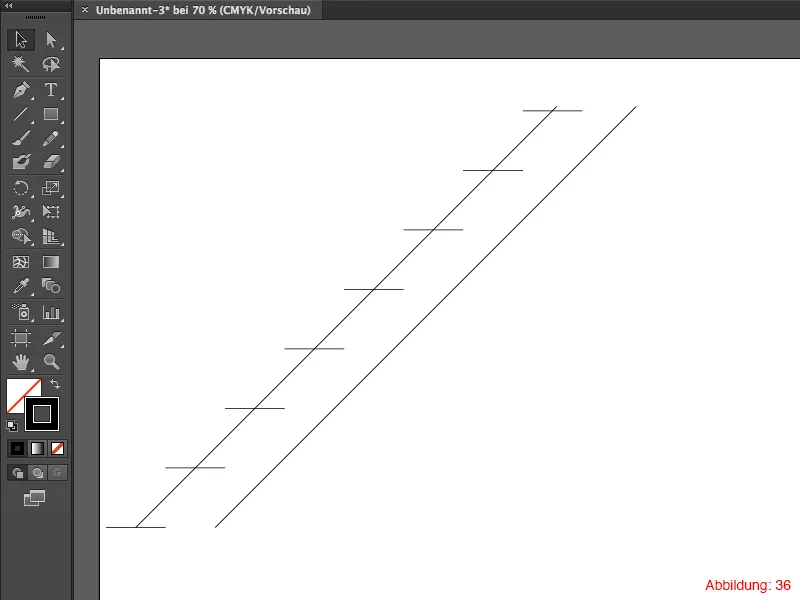
This time you have to move in both directions at the same time. Enter 30mm for Horizontal and -30mm for Vertical. Confirm by clicking on Copy and duplicate the whole thing again with the shortcut Command+D (on PC: Ctrl+D).
The whole thing should then look something like this. (Figure 36).
Now create a new line with the line tool. Select a length of 30mm again, but this time with an angle of 90°. Place this line in the middle at the lower end of the second line and call up the Move dialog again. Object>Transform>Move. Again, set Horizontal to 30mm and Vertical to -30mm and confirm with Copy. Duplicate the whole thing with Command+D (on PC: Ctrl+D).
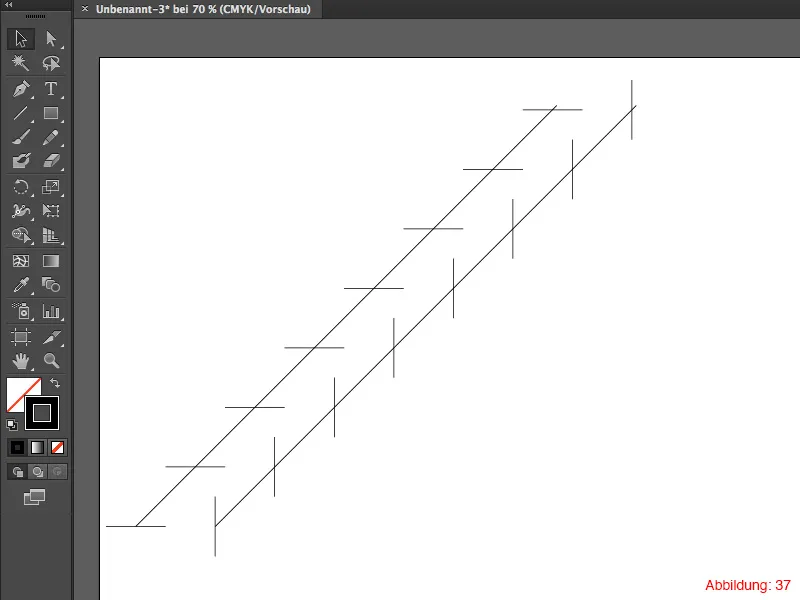
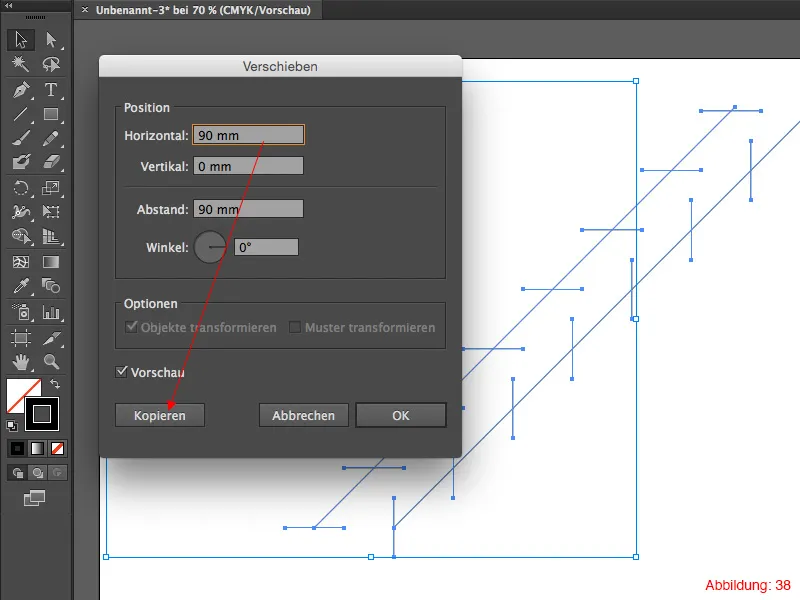
Now select everything and call up the Move dialog again. (You will have noticed by now that this dialog is used very often :-) ).
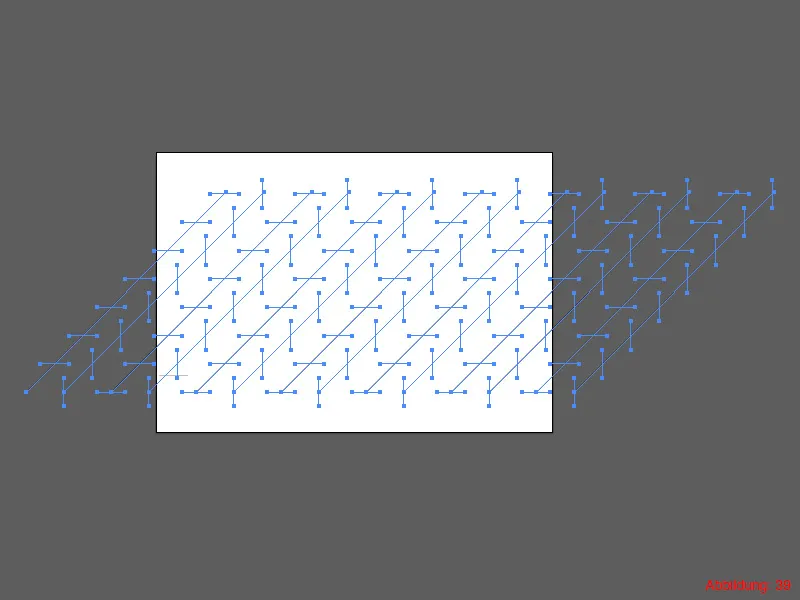
This time you move everything by 90mm horizontally and confirm again with Copy. Now duplicate the whole thing 5-6 times with Command+D (on PC: Ctrl+D).
The whole thing should then look something like this:
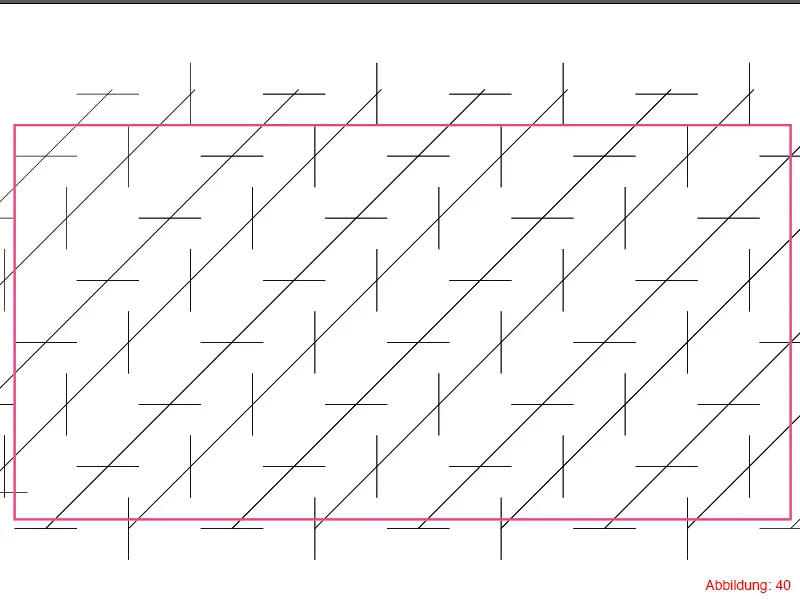
Now we have almost reached the end. In the last step, grab the rectangle tool again and draw a rectangle directly over all your lines (see Figure 40).
Step 2: Creating the frame
Then select everything. The best way to do this is with Command+A (on PC: Ctrl+A). Right-click in the middle of your rectangle and select Create clipping mask. This will hide all elements that should not be visible.
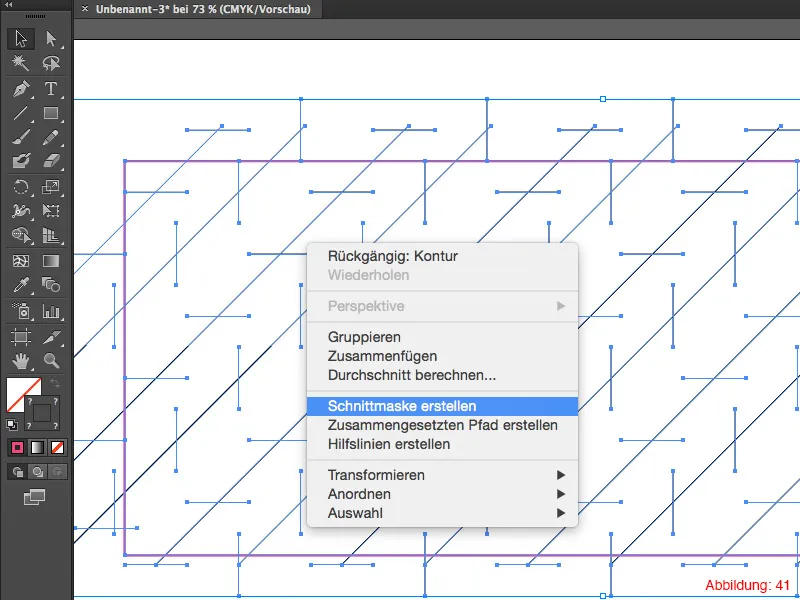
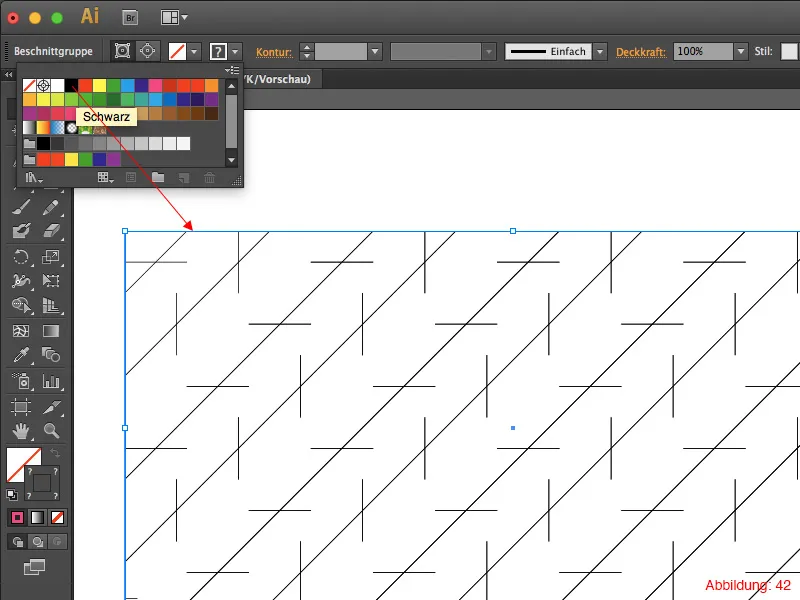
Now you just need to apply an outline to the clipping mask to create a nice frame. And the final optical illusion is complete.
Final words:
I hope you enjoyed the tutorial and that you can now create some nice optical illusions. As you may have noticed, some commands in Illustrator are quite repetitive, and I'm pretty sure that once you've worked through this tutorial completely, you'll never forget what the Move dialog and the shortcut Command+D (on PC: Ctrl+D) can be useful for.
If you have any further questions on this topic, please write them in the comments. I will do my best to answer them as soon as possible.
Best regards
Yours, Julian


