Gold effect on lettering
Introduction:
Hello dear PSD community. Nice to have you with me again for one of my tutorials. Today you will learn how to create a beautiful gold effect like the one in Figure 01. I will also show you how to create your own color libraries so that you can use the gold colors that we will create later at any time. Finally, as a little extra, we'll take a look at how you can turn a 2D text into a 3D realization.
So, enough talk now. Let's get straight to it ...

Part 1:
Step 1: Create gold colors
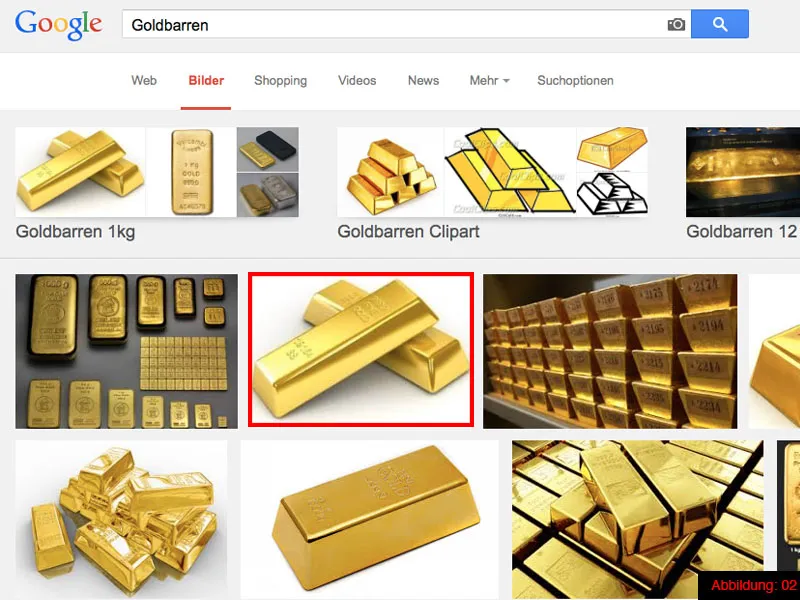
Before you can start creating a gold effect, you will of course need different gold colors. In this tutorial, we need four different CMYK color values. But where is the best place to get these values? My recommendation in this case is quite simple. Since we need gold colors, enter the word "gold, gold bars, gold colors" or similar in a search engine of your choice (in my case "Google"). Then go to the "image search" and take a look at various images in which gold colors appear. As you can see in Figure 02, I have chosen a picture with two gold bars. Save this image or the image of your choice to your computer and then switch to Illustrator.
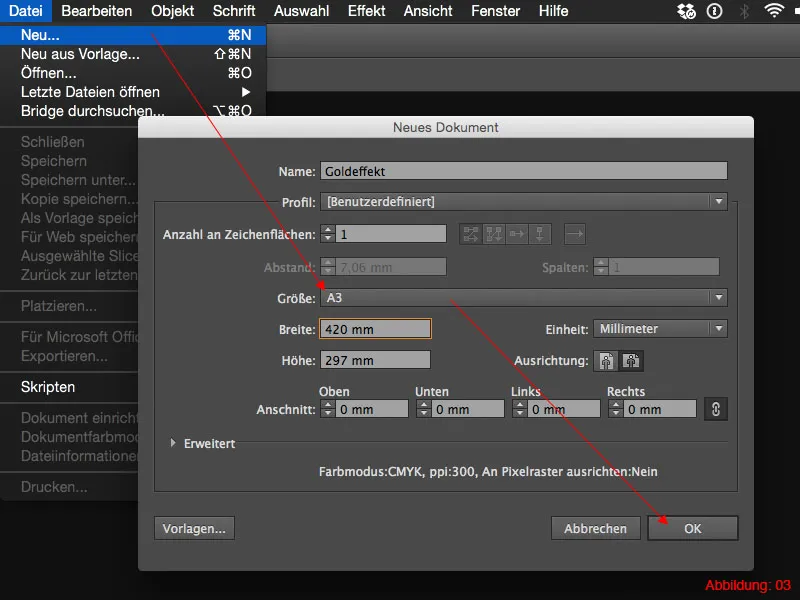
Once in Illustrator, the very first thing you need to do is create a new workspace in A3 format. You do this via File>New.
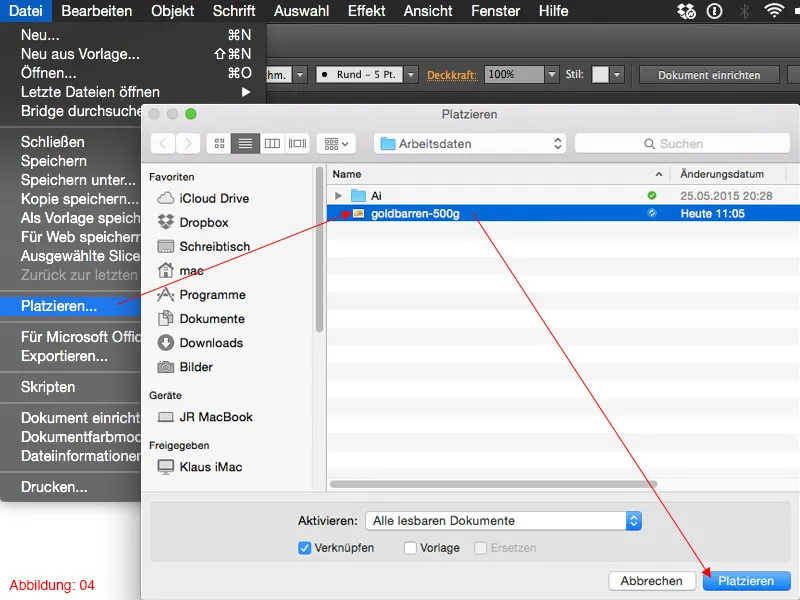
Now go to File>Place and select the image you saved previously in the following dialog box. Confirm this window with OK.
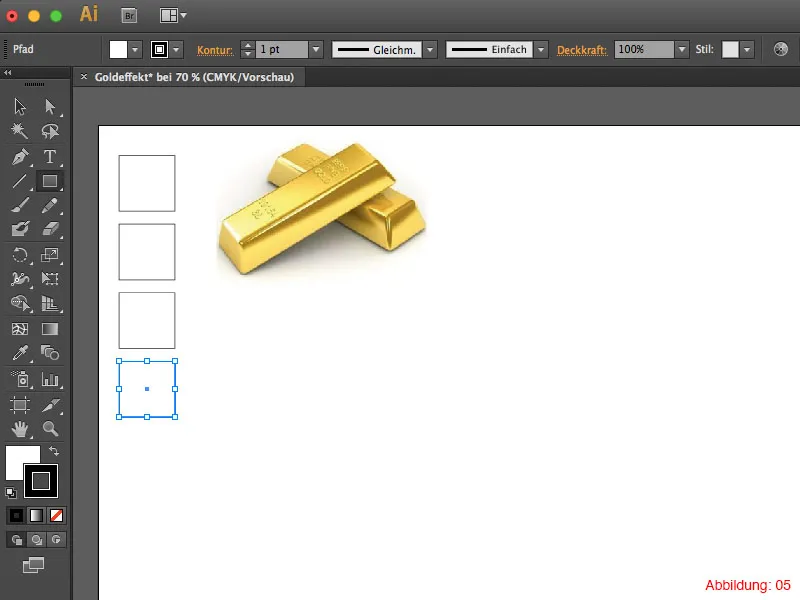
We will now use this image as a reference for the gold colors. Grab the rectangle tool, create four small squares and place them somewhere on the edge of your workspace. The size doesn't matter. In my case, the squares are all 28 x 28mm.
Now we have reached the point where you have to read out the color values of your image. To do this, first select a square and then grab the eyedropper tool from the tool palette. Now select different shades of gold from the image. Do this once for each square. In Figure 06 you can see the areas from which I took the color values with the eyedropper.
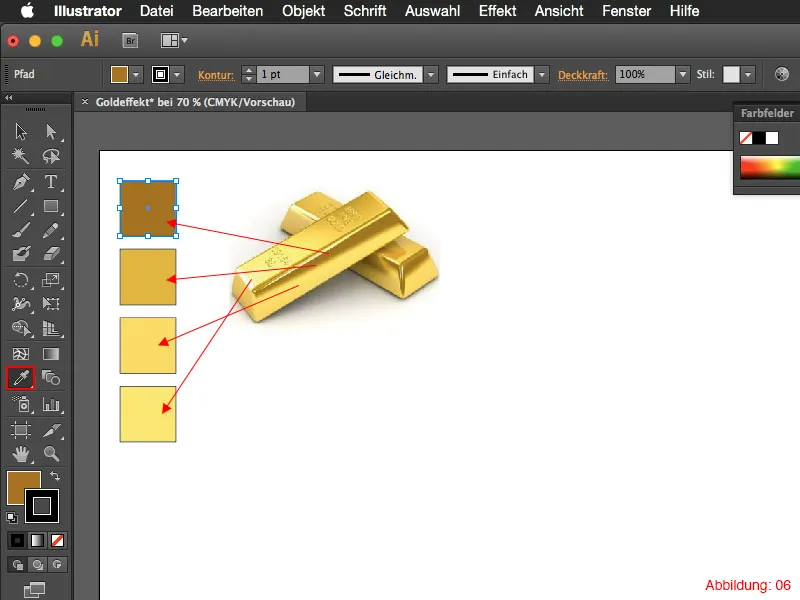
For all those who are not completely satisfied with their own color values, here are the CMYK values of my four colors (see also Figure 07).
- CMYK - 9/43/96/37
- CMYK - 6/24/80/9
- CMYK - 2/13/67/0
- CMYK - 3/6/65/0

Step 2: Create gradient
Once you have created the four different color values, it's time to create a gradient with these colors. To do this, grab the rectangle tool again and create another square. The size doesn't matter much in this case either.
Before you can start creating a gradient with the gold colors, you need to add these colors to your swatches palette. You can also call up this palette again via Window>Color sw atches if you have not yet shown it.
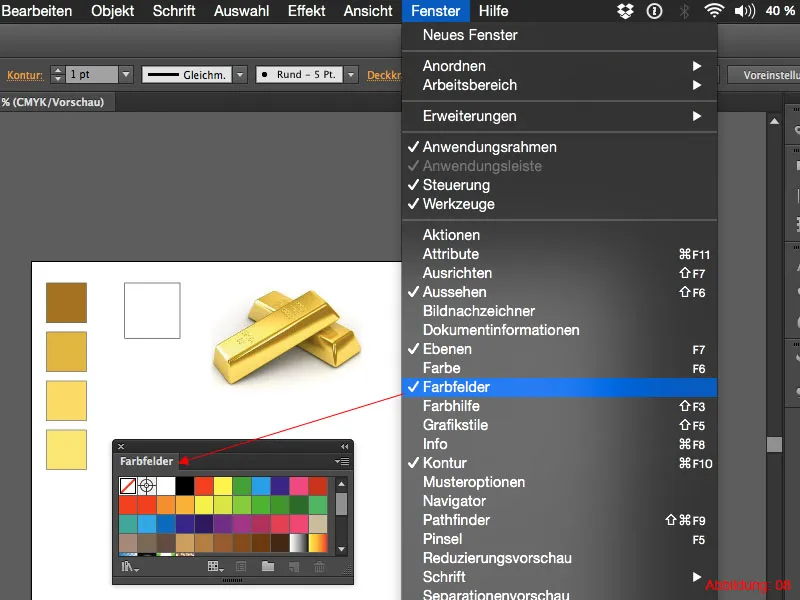
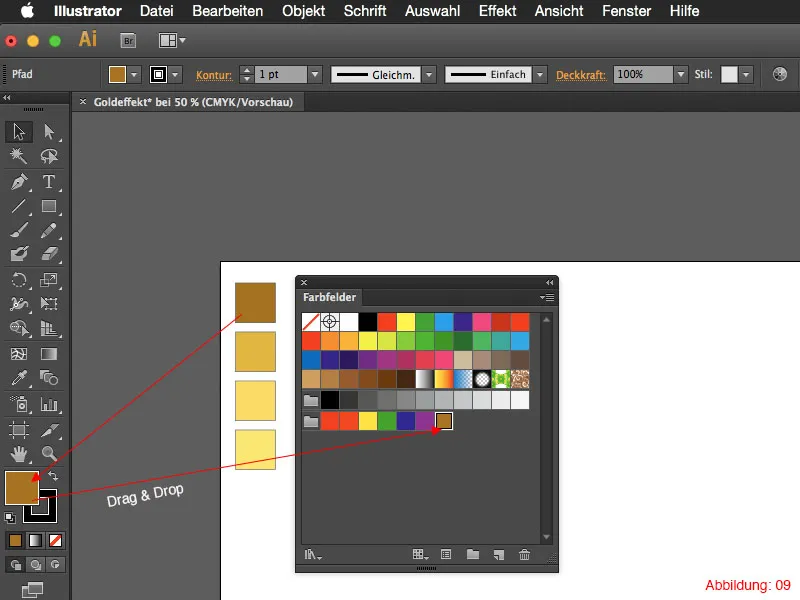
If you now click on a square with a gold color, this color will also appear in the lower area of the tool palette on the left-hand side. By holding down the left mouse button, you can now drag and drop this color into the color fields palette. Do this with all four colors.
Next, you will need the gradient palette. If you haven't opened it yet, go to Window>History (or on the Mac - Command+F9) to show it.
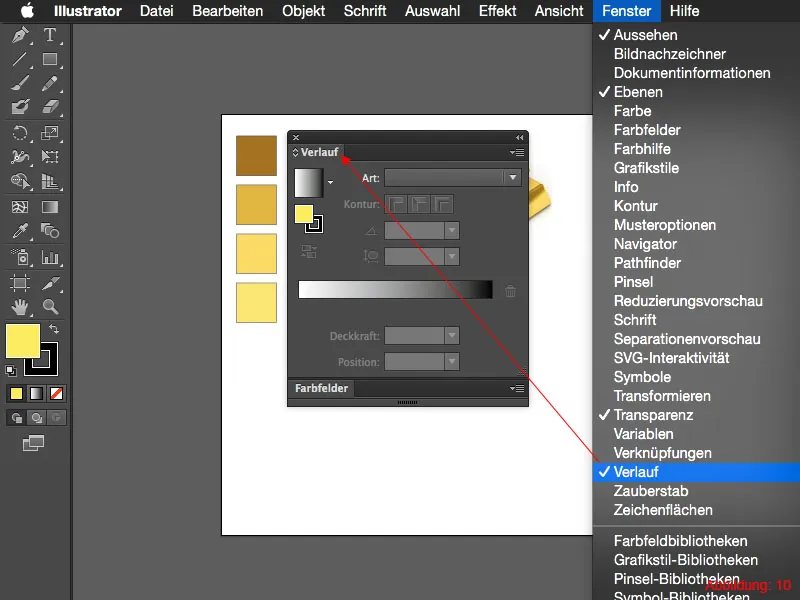
In the next step, select the square that you created at the very beginning of step 2. Click once in the gradient field in the gradient palette to create a preset black and white gradient. We now need to modify this gradient for our purposes.
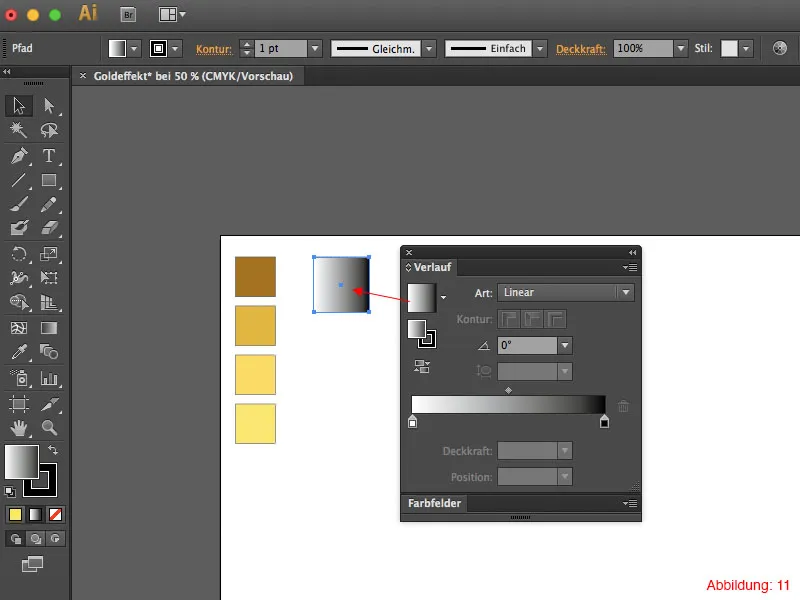
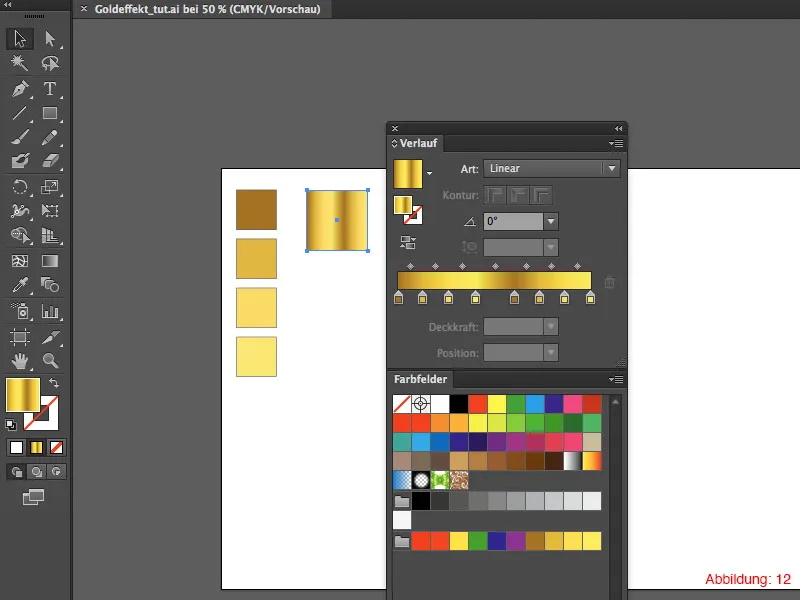
Using the color swatches palette, you can now drag and drop the gold colors you have just created into the gradient field. You can easily remove the black and white color fields in this gradient by holding down the left mouse button and dragging them out of the gradient palette.
Now drag as many color fields into the gradient as shown in Figure 12.
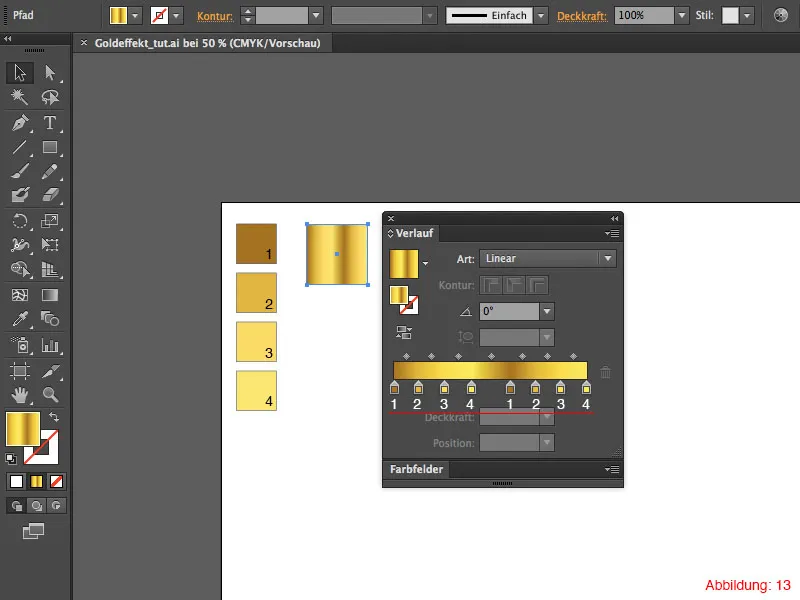
From left to right, you will then have the following sequence of color fields (see Figure 13).
Step 3: Create text and prepare it for the gold gradient
Once you have finished creating the gold gradient, you can use the text tool to write a word or even a sentence. In my case, I write the word "Gold". To ensure that the gold effect really comes into its own later on, I recommend that you choose a font that is relatively thick. With fine, filigree fonts, the gold effect won't stand out as much and will look out of place. In my case, I chose the font Myriad Pro in Bold. I set the font size to 300pt.
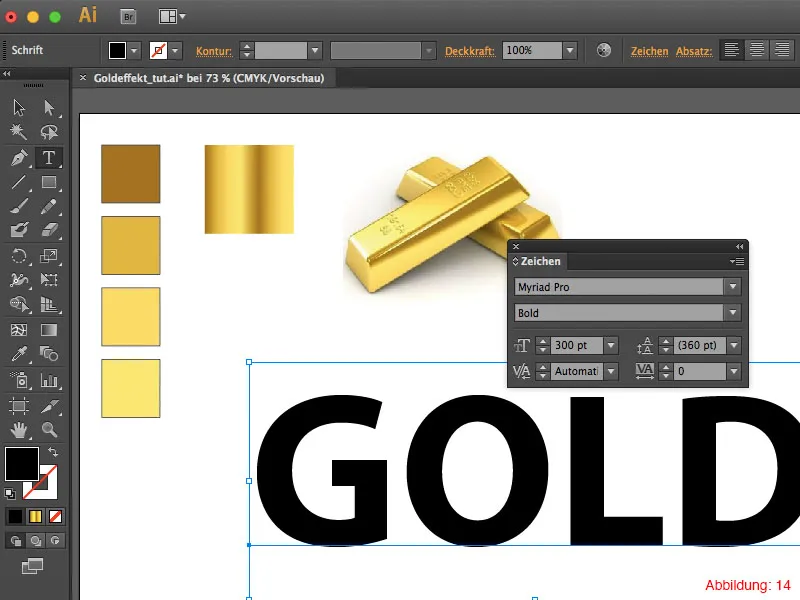
When you are happy with your font and word choice, go to Font>Convert to Paths in the top menu bar.
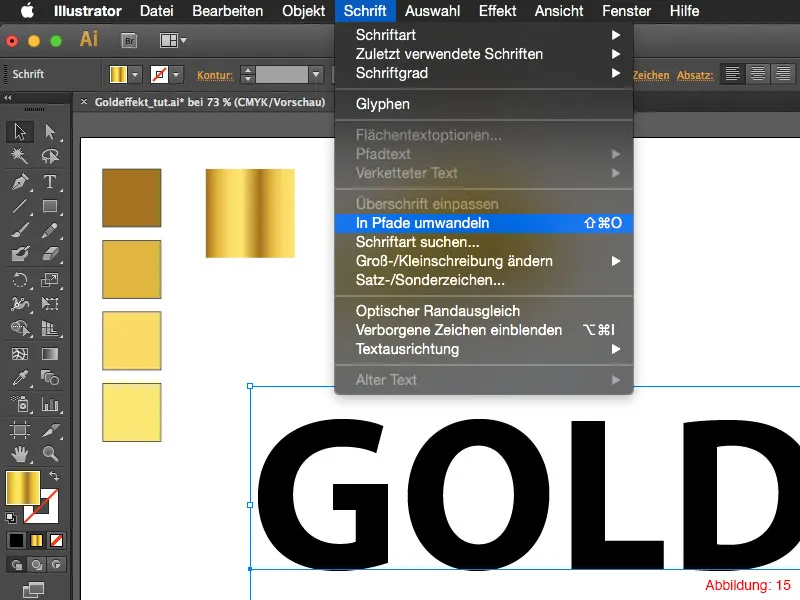
Now you can use the eyedropper tool to click on the square with the gradient you have previously created. Unlike in Photoshop, for example, the eyedropper tool in Illustrator recognizes the difference between a single color and a gradient. This will apply the entire gradient to your lettering. The whole thing should then look something like Figure 16.

As the gradient now runs from left to right and not from top to bottom as desired, you can either simply set an angle of 90° in the gradient palette...
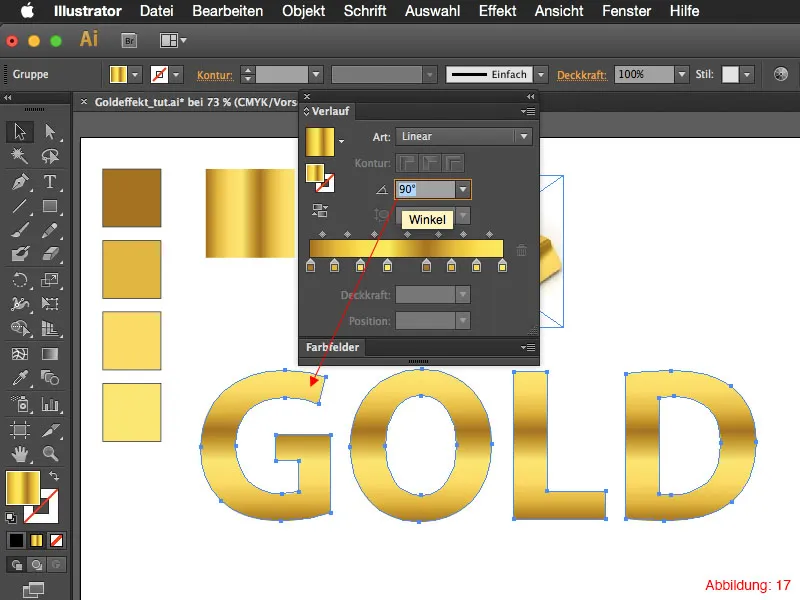
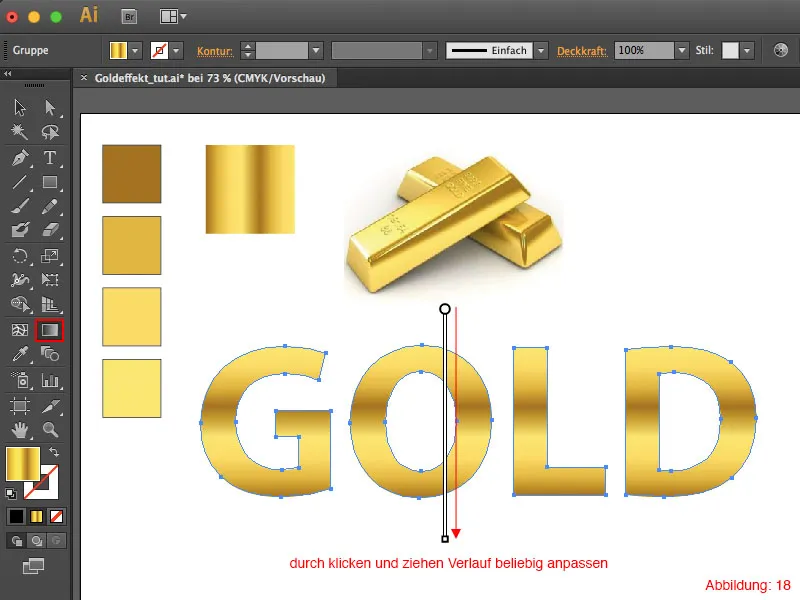
... or you can grab the gradient tool from the tool palette. This tool allows you to freely adjust the gradient by clicking and dragging. This allows you to freely define the angle, position and length of the gradient.
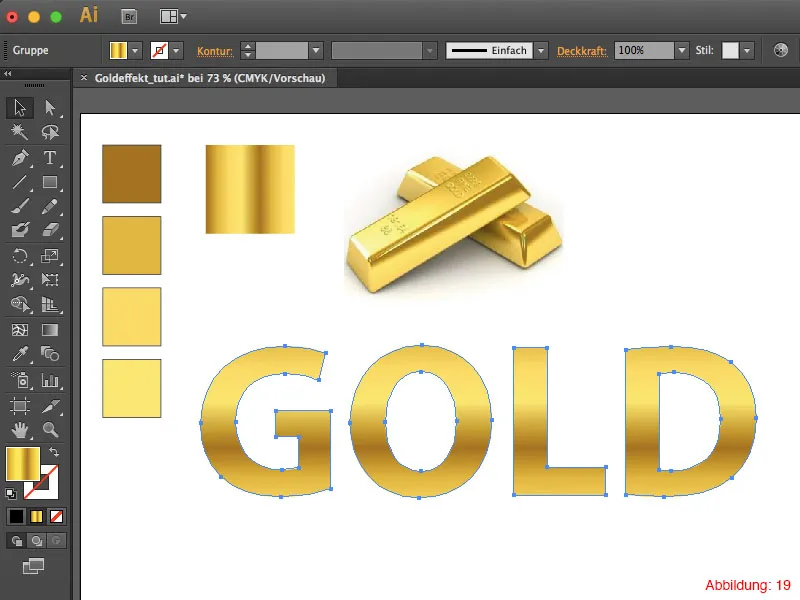
Once you have adjusted the gradient, it should look something like this (see Figure 19).
Step 4: Make gold shine
In the next step, you need to make sure that your gold shines beautifully.
To achieve this, create a black outline with a thickness of 5pt.
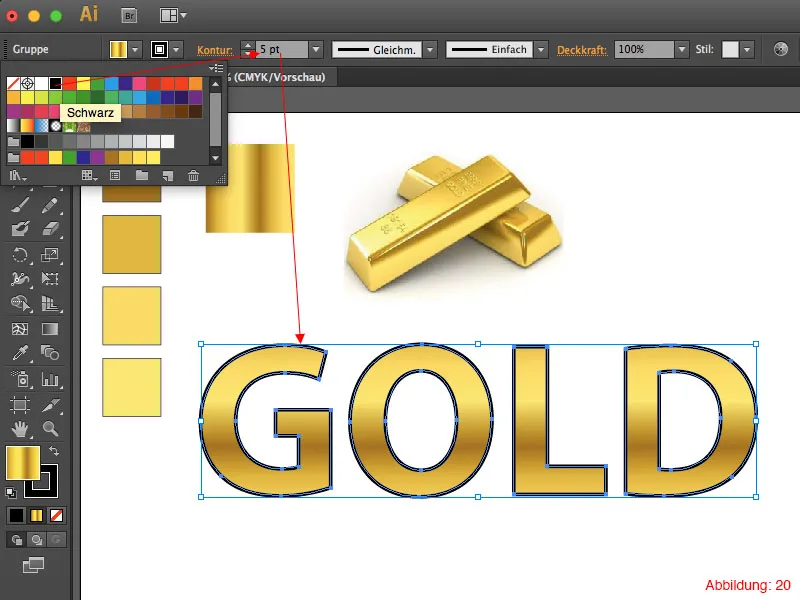
As older Illustrator versions do not yet allow gradients on outlines, you need to convert this outline so that you can turn it into a separate object. This can be done via Object>Convert. In the following window, remove the checkmark for Surface and set one for Contour. Confirm the whole thing with OK.
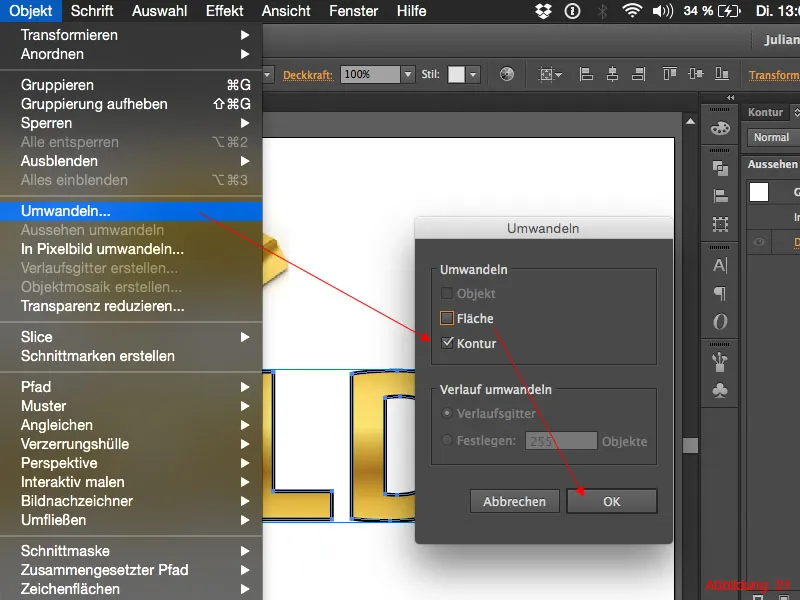
With the shortcut Command+Shift+G (on the PC - Ctrl+Shift+G) you can ungroup the whole thing (press this shortcut twice). As a result, you can now select the contour separately. (Illustration 22)

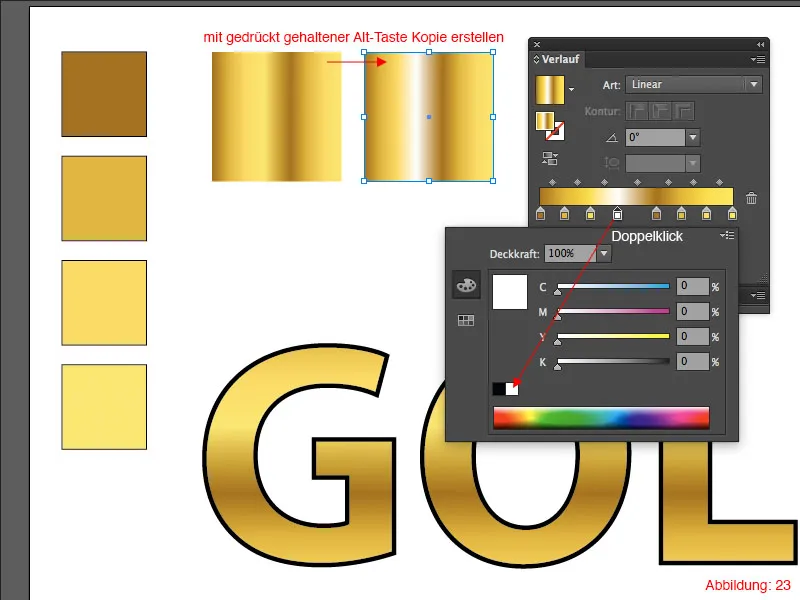
Now click on the square with the gradient and create a copy directly next to it by holding down the Alt key. Now go back to the gradient palette and change the selected gold value to white as shown in Figure 23. This white value will later be responsible for the highlights on the edges.
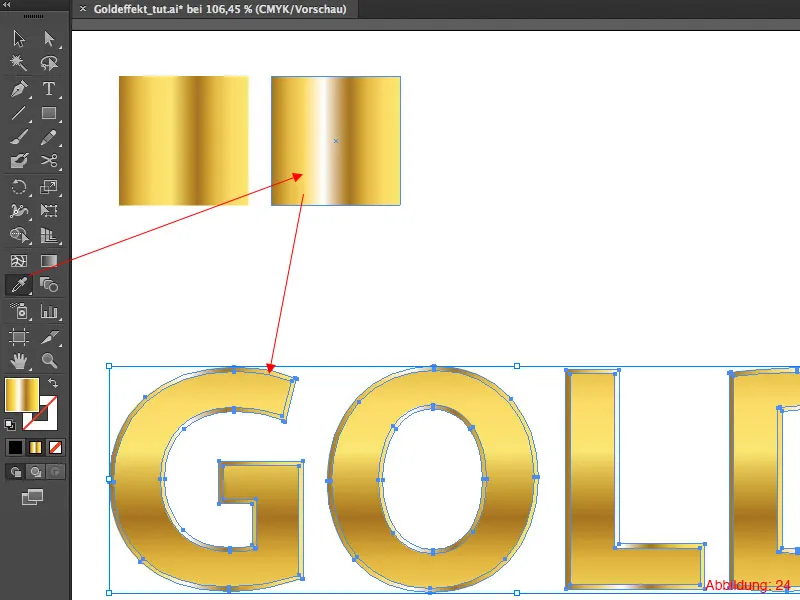
Now select the outline of your font and fill it with the gradient you have just changed. The easiest way to do this is to use the eyedropper tool again by clicking on the square with the appropriate gradient (Figure 24).
To adjust this gradient slightly, grab the gradient tool from the tool palette again and drag the gradient from the top left to the bottom right. (You have to do this for each letter individually). The whole thing should then look something like Figure 25.

If you now place this font in front of a dark background, the shiny edges will stand out even better. And the gold effect is finished.

Part 2:
Creating color libraries
Especially with effects like the gold font, it would be very practical if you could somehow save these colors and gradients separately. Of course, you can write down the appropriate color values in a notebook and look them up whenever you need them. However, Illustrator offers a much better, faster and, above all, simpler option.
Here you have the option of creating your own color libraries, which are stored directly in Adobe Illustrator.
Now go back to the color palette. You previously dragged and dropped all the gold tones into it. You can now do the same with the two gradients that you have created.
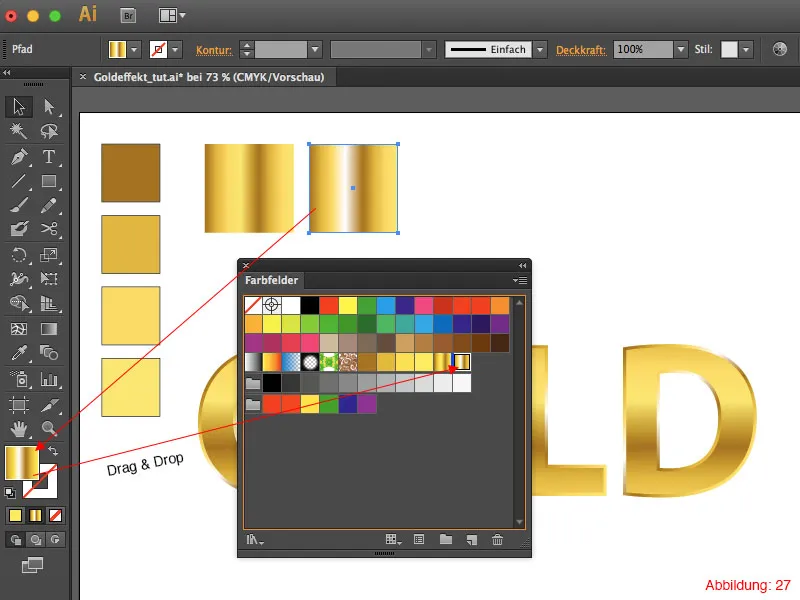
Now click on the small folder icon at the bottom right of the color swatches palette. In the following window, you can assign a name to this new color group. Simply call this group "Gold colors" and confirm the window with OK. This creates a new group.
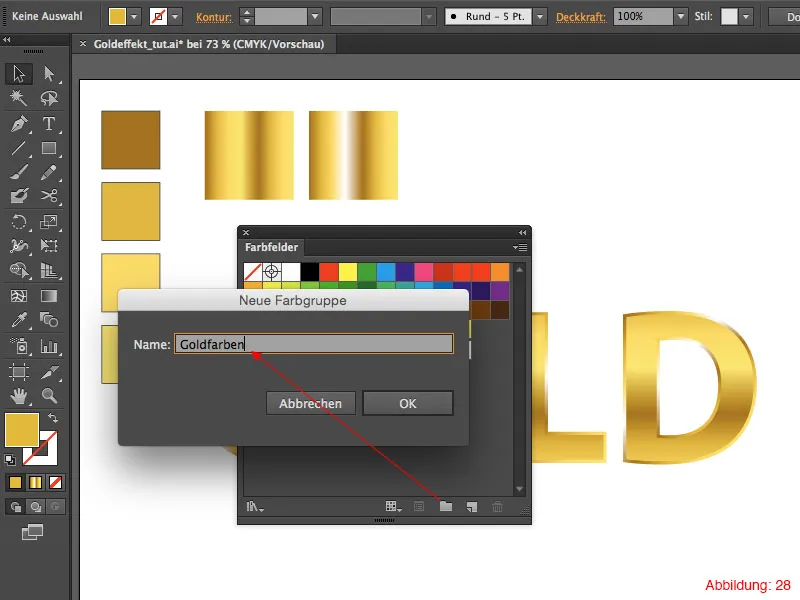
You can now drag and drop your gold colors into this group. Unfortunately, you cannot put the gradients in this folder as Illustrator will not accept them.
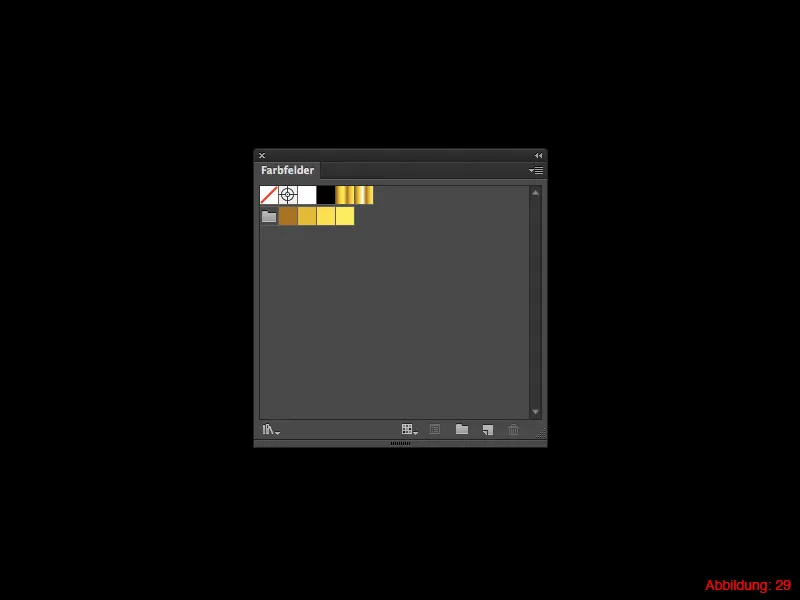
As you only want to save the gold colors in your gold color library, you still need to delete the standard colors. The best way to do this is to select the colors you want to delete by holding down the Shift key and then clicking on the small trash can in the bottom right-hand corner.
I don't usually delete the black and white colors, as these are often useful. Once you have done all this, the whole thing should look something like this (Figure 29).
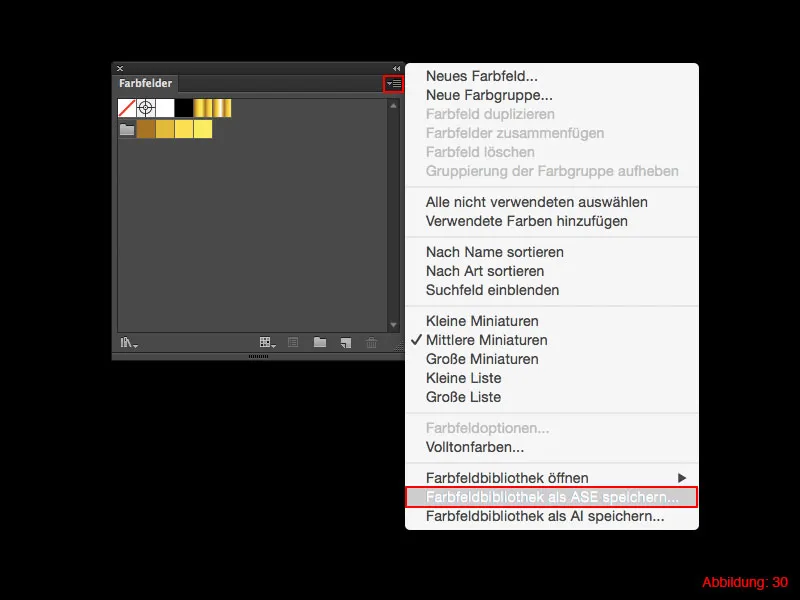
Now click on the small arrow in the top right-hand corner to open a drop-down menu. Go almost all the way down and click on Save color field library as ASE. Assign a name in the following window (in this case "Gold colors" again).
Your first own color library is ready.
Now create a new document via File>New.
Once you have created the document, you will notice that the gold colors have disappeared and the standard colors are visible again.
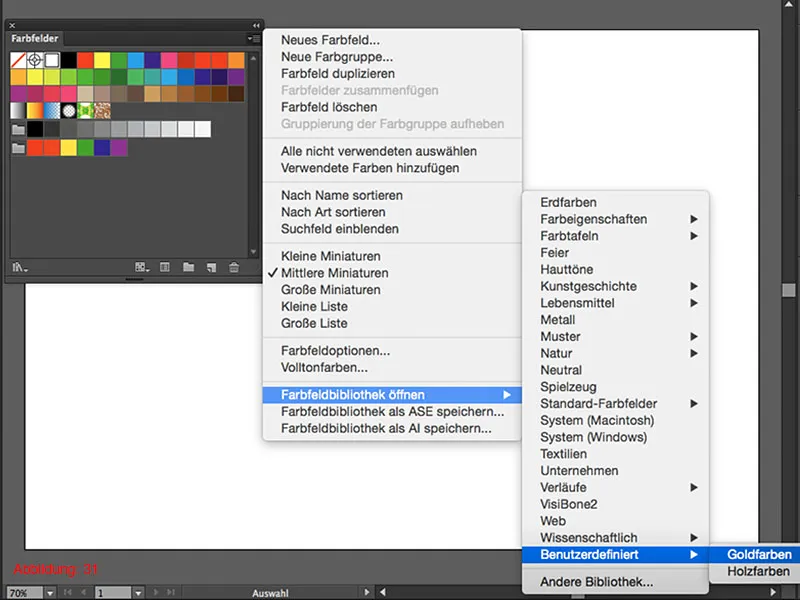
To call up the gold colors again, click on the small arrow at the top left of the color fields palette to call up the drop-down menu. This time, however, click on Open color field library and then on User-defined. The swatch libraries you have saved yourself will now appear there. If you now click on Gold colors, a new swatches palette will open with the gold colors and gradients that you have previously saved.
Extra content
Gold lettering as a 3D implementation
As already announced at the beginning of the tutorial, I have prepared a little extra content for you here. I would like to quickly show you how you can turn your 2D font into a 3D font. So let's get straight to it ...
Select your golden lettering and then click on Effects>3D>Extrude and flattened edge in the top menu bar.
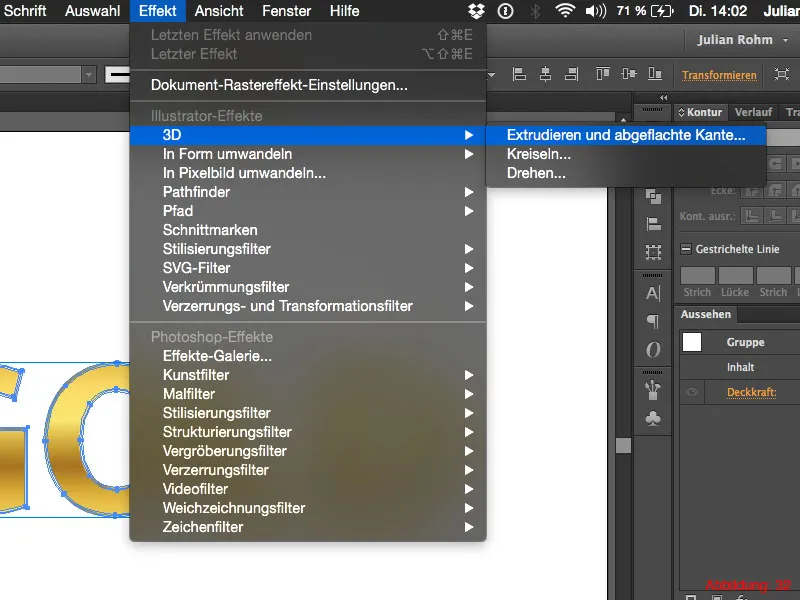
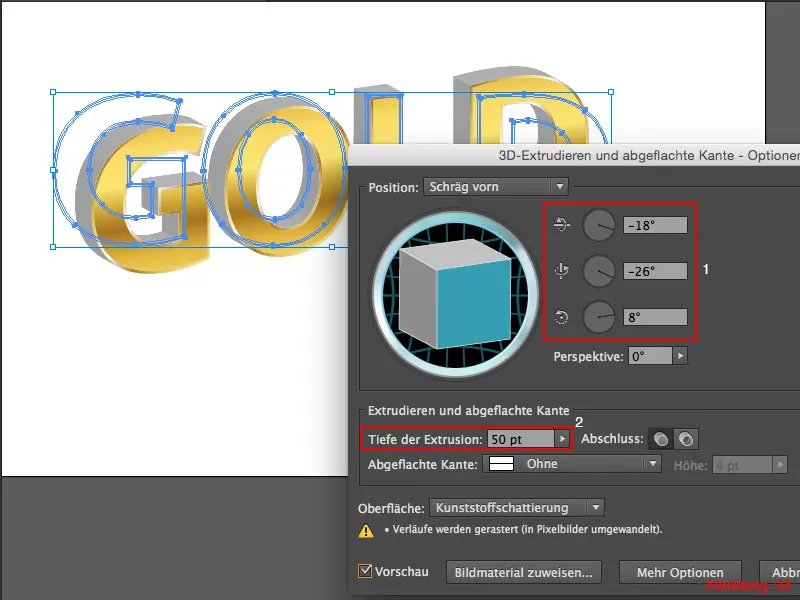
A slightly larger dialog box will appear in which you can now make all the settings for a 3D text. If you click on Preview at the bottom left, you can always see what changes when you change a value.
Two settings are now very important for our 3D font.
- In the upper area, you can freely rotate the 3D font and position it as you wish (1).
- Under Extrusion depth, you can set how far back your font should be extended (2).
At the moment, the whole thing doesn't look particularly great (Figure 33), as the part of the font that is extruded to the back is gray and not yet golden.
However, you can easily fix this problem by clicking on More options and going to Custom under Shading color. You can enter #D2B023 as the color value here. You can see all the settings I have made in Figure 34.
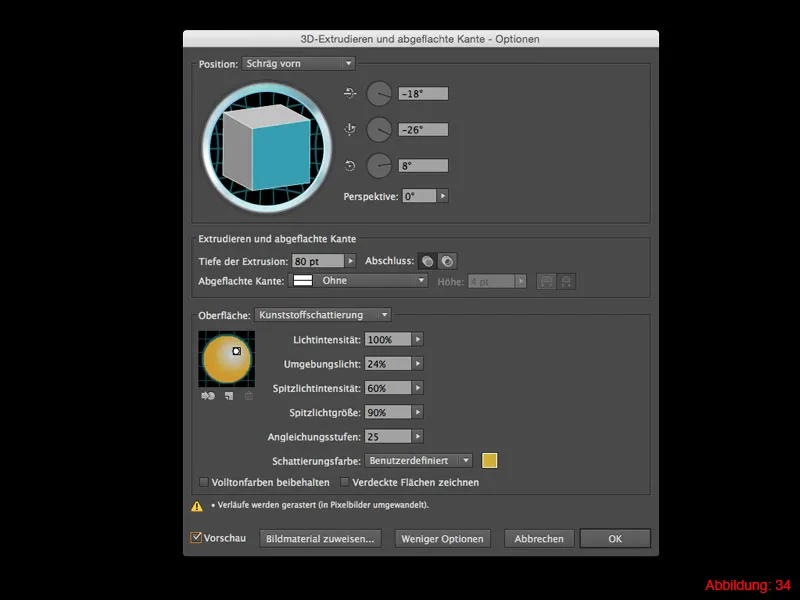
Your golden 3D font is ready.

Final words
I hope you enjoyed this tutorial and that you now know how to create a golden font with relatively simple means. If you have any further questions, please write them in the comments below this tutorial. I will do my best to answer them as soon as possible.
Yours
Julian


